Sondigo sirocco User manual

user manual
Wireless Audio Bridge
Powered by C-Media's
TM
Wi-Sonic Network
Audio Technology

FCC Certifications
This equipment has been tested and found to comply with the limits for a Class B digital device, pursuant to Part 15 of the FCC
Rules. These limits are designed to provide reasonable protection against harmful interference in a residential installation. This
equipment generates, uses, and can radiate radio frequency energy and, if not installed and used in accordance with the
instructions, may cause harmful interference to radio communications. However, there is no guarantee that interference will not
occur in a particular installation. If this equipment does cause harmful interference to radio or television reception, which can be
determined by turning the equipment off and on, the user is encouraged to try to correct the interference by one or more of the
following measures:
Reorient or relocate the receiving antenna.
Increase the separation between the equipment and receiver.
Connect the equipment into an outlet on a circuit different from that to which the receiver is connected.
Consult the dealer or an experienced radio/TV technician for help.
CAUTION:
Any changes or modifications not expressly approved by the grantee of this device could void the user's authority to operate the
equipment.
This device complies with Part 15 of the FCC rules. Operation is subject to the following two conditions: (1) This device may not
cause harmful interference, and (2) This device must accept any interference received, including interference that may cause
undesired operation.
FCC RF Radiation Exposure Statement
This equipment complies with FCC RF radiation exposure limits set forth for an uncontrolled environment. This equipment should
be installed and operated with a minimum distance of 20cm between the radiator and your body.
CE Mark Warning
This is a Class B product. In a domestic environment, this product may cause radio interference, in which case the user may be
required to take adequate measures.
Specifications are subject to change without notice.
Sondigo and Sondigo Sirocco are trademarks of Layton Electronics and Networking Limited, all rights reserved. Copyright 2006
Layton Electronics and Networking Limited.
C-Media and C-Media Wi-Sonic are trademarks of C-Media Electronics, Inc. All rights reserved. Patents pending.
Microsoft and Microsoft Windows are trademarks of Microsoft Corporation
Manufactured under license from Dolby Laboratories. “Dolby” and the double-D symbol are trademarks of Dolby Laboratories.
Confidential Unpublished Works.1992-2004. Dolby Laboratories, Inc; all rights reserved. Note that: No Dolby technology is being
used in association with the analog output of the product.
All other trademarks are property of their respective owners
Wireless Audio Bridge
Table of Contents
Introduction 1
1.1 Features 1
1.2 Get To Know Sirocco 1
1.3 Factory Default Settings 2
Setup Instructions 3
2.1Equipment Required 3
2.2 Quick Start Guide 3
Using the Sirocco Control Panel 6
3.1 Audio Link 6
3.2 Audio Setting 7
3.3 Mixer 8
3.4 Effect 8
3.5 Information 9
Support and Updates 10
4.1 Product Registration 10
4.2 Sondigo User Forums 10
4.3 Firmware Upgrades 10
Troubleshooting Guide 11
2
1
3
4
5

1
Introduction
Sirocco is a network audio device that allows you to stream all of your audio content from
your PC to speakers in your living room or bedroom, in the glory of 5.1 surround sound.
As an audio device, Sirocco is essentially a “wireless sound card”, which plays back all of
your computer’s audio. This means that, unlike other wireless media players on the market,
Sirocco can play your copyright-protected music, and audio from any program.
As a part of your wireless network, Sirocco provides a simple setup procedure with the
Sirocco Setup Wizard. Also, WPA, WPA-2, and 64/128bit WEP encryption are supported,
allowing Sirocco to work on almost any network, and giving you a high level of security.
Features
Audio
Stream all of your audio from your PC to speakers in your house.
Outputs audio to 5.1 channel speaker systems, headphones, or digital (S/PDIF) receivers.
Use Dolby Digital Live to connect 5.1 audio to your receiver with a single cable.
Keep track of your settings with the Sirocco Control Panel.
Networking
Supports WPA, WPA-2, and WEP encryption.
Can act as a DHCP client on automatically configured networks.
Easy configuration of network settings through the Sirocco Setup Wizard
Front Panel: (LED Indicators)
LED Status
Indicator Color Solid Flashing
1 Wireless Green Turns solid green when Receiving/Sending data
linked to a local network.
2 LAN Green Turns solid green when Receiving/Sending data
linked to a local network.
3 Audio Blue N/A Receiving/Sending data
4 5.1 Surround Blue Turns solid blue when playing N/A
5.1-channel surround sound
5 Dolby Digital Live Blue Turns solid blue when you N/A
use Dolby Digital Live encoding
6 Reset Green Turns on when you reset N/A
the device
7 Power Green Turns solid green when N/A.
power is applied
Get To Know Sirocco
1
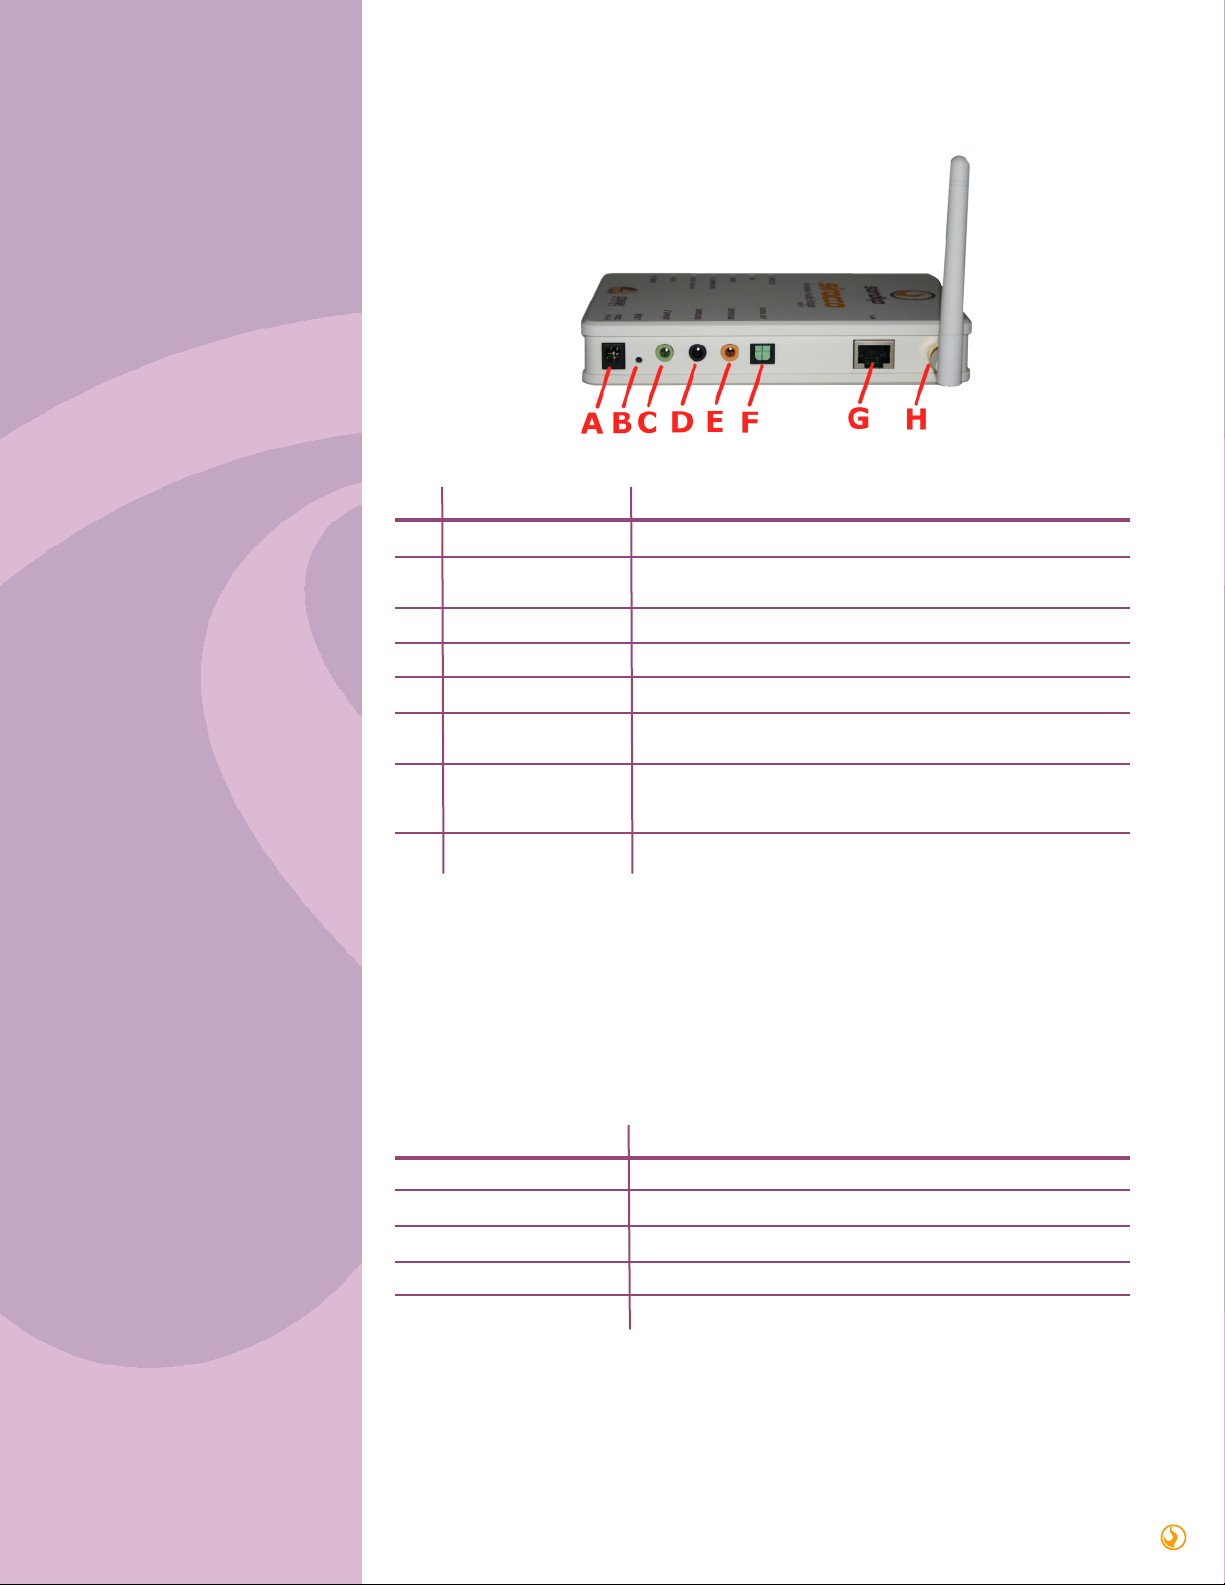
Rear Panel: Connection Ports
Factory Default Settings
Port/button Functions
A Power adapter Plug in the included 9VDC power adapter.
B Reset Press and hold for 3 seconds to reboot the device.
Press and hold for 10 seconds to restore factory settings.
C Front/HP Plug in stereo speakers or headphones.
D Surround Plug in your surround speakers.
E Center/Sub Plug in your center/sub speakers.
F S/PDIF Out Optical digital output to connect the device to a receiver
with the included TOSLINK cable.
G LAN Connects via Ethernet cable to either your computer
(in wired audio mode) or modem (when used as a wireless
access point)
H Antenna Connects to the included antenna
Setting Wireless Access Point
Device Name Sondigo- xxxxxxxxxxxx (12 digit MAC address)
SSID default
Channel Number 11
Encryption Disabled
IP Address 192.168.1.254
2

Equipment Required
Quick Start Guide
Sirocco Receiver and AC adapter
Sirocco software CD.
A PC running Microsoft Windows XP Service Pack 2 operating system
Ethernet cable
Powered speakers, headphones, or your home theater system
Optical S/PDIF cable (optional)
1) Connect Sirocco to your PC’s Ethernet port
a. Hook up your Sirocco Wireless Audio Bridge to wall power with the included AC adapter
b. Connect Sirocco to your computer[LCL1] with the included blue Ethernet cable
2) Install the software
a. Insert the included CD into your computer and follow the on-screen instructions to install
Sirocco’s Network Audio Driver.
b. When the Sirocco Setup Wizard appears, select “Device Configuration” and continue.
2
Setup Instructions
3
c. You will be presented with a list of Sirocco devices on your network. If there is only one
device present, select it and click OK. If there is more than one device in the list and you’re not
sure which to pick, check the sticker on the back of your device, and select the list entry that
has the corresponding Hardware ID.
d. The next step will give you the option of renaming your Sirocco. This gives you a chance to
personalize it, and identify it if you have more than one Sirocco on your network.
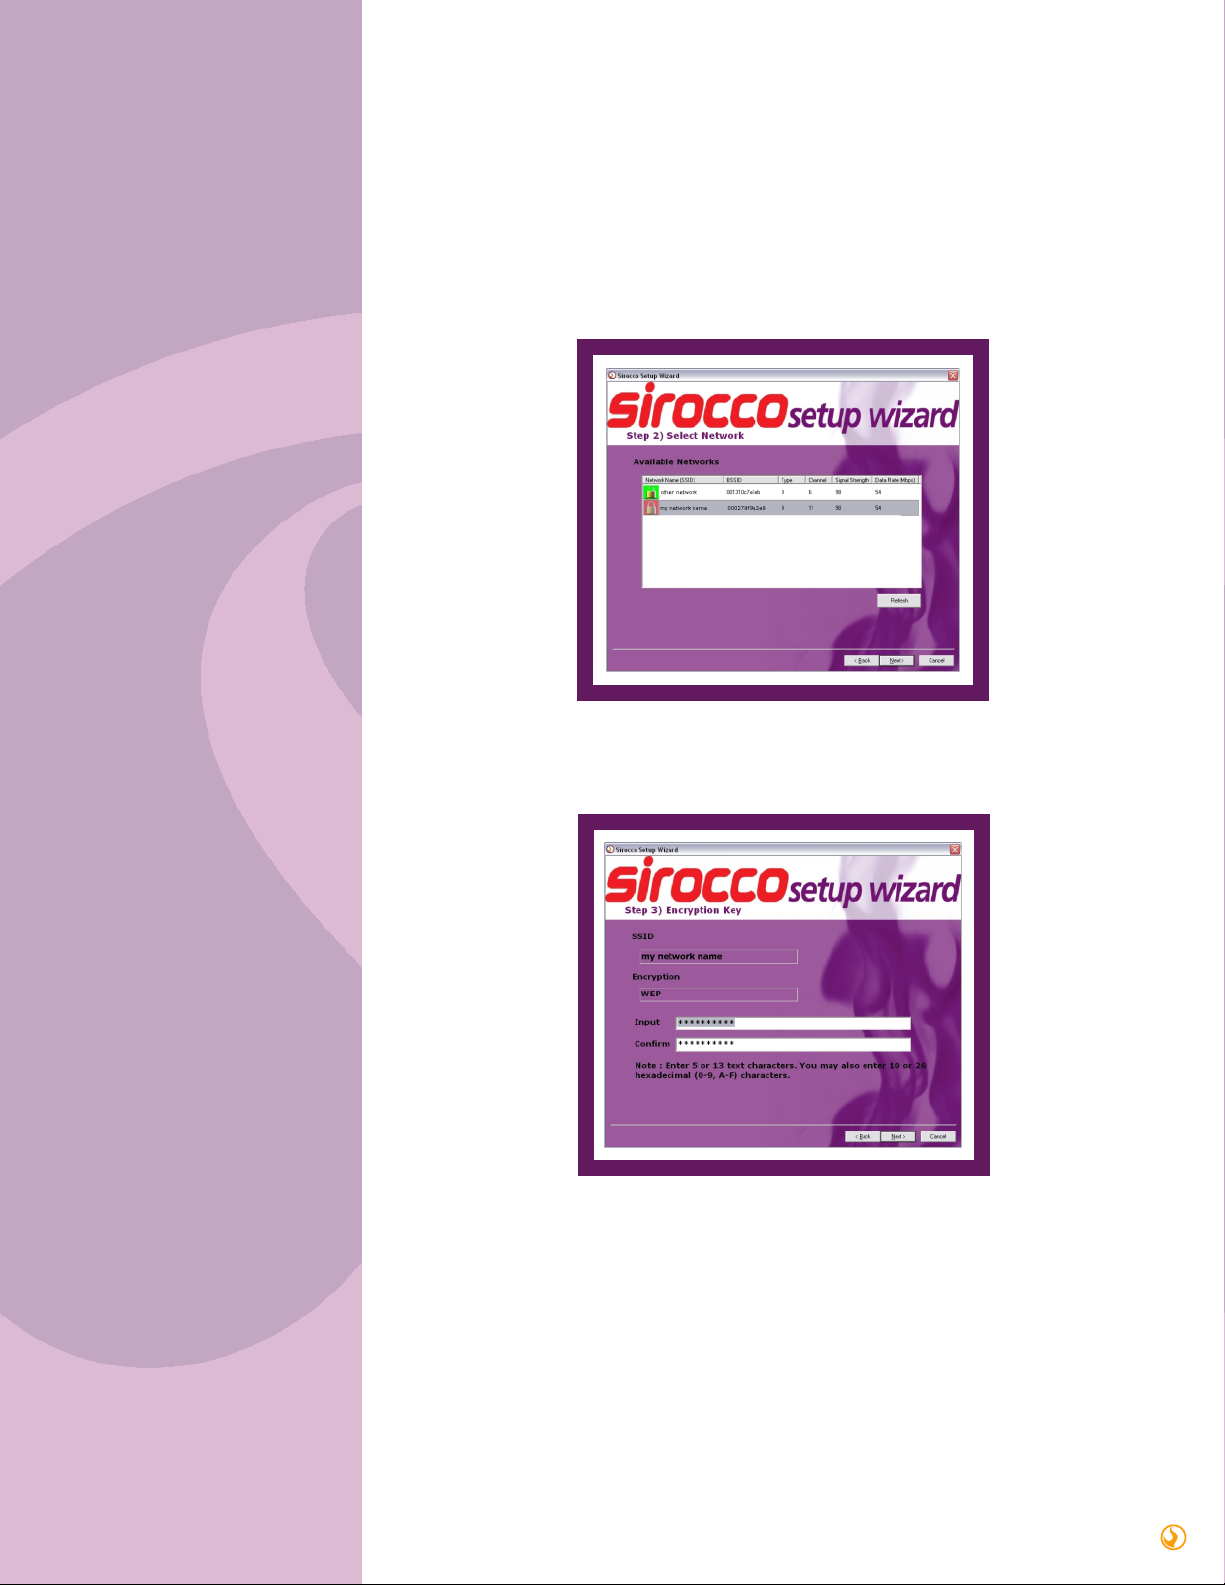
e. After scanning for wireless networks, the wizard will present you with a list of available
networks. Select your network and click Next. If your network doesn’t appear, try clicking the
Refresh button.
f. If your network uses a security key, you will be prompted for it in Step 3. Enter your key and
confirm it, then click Next.
4

5
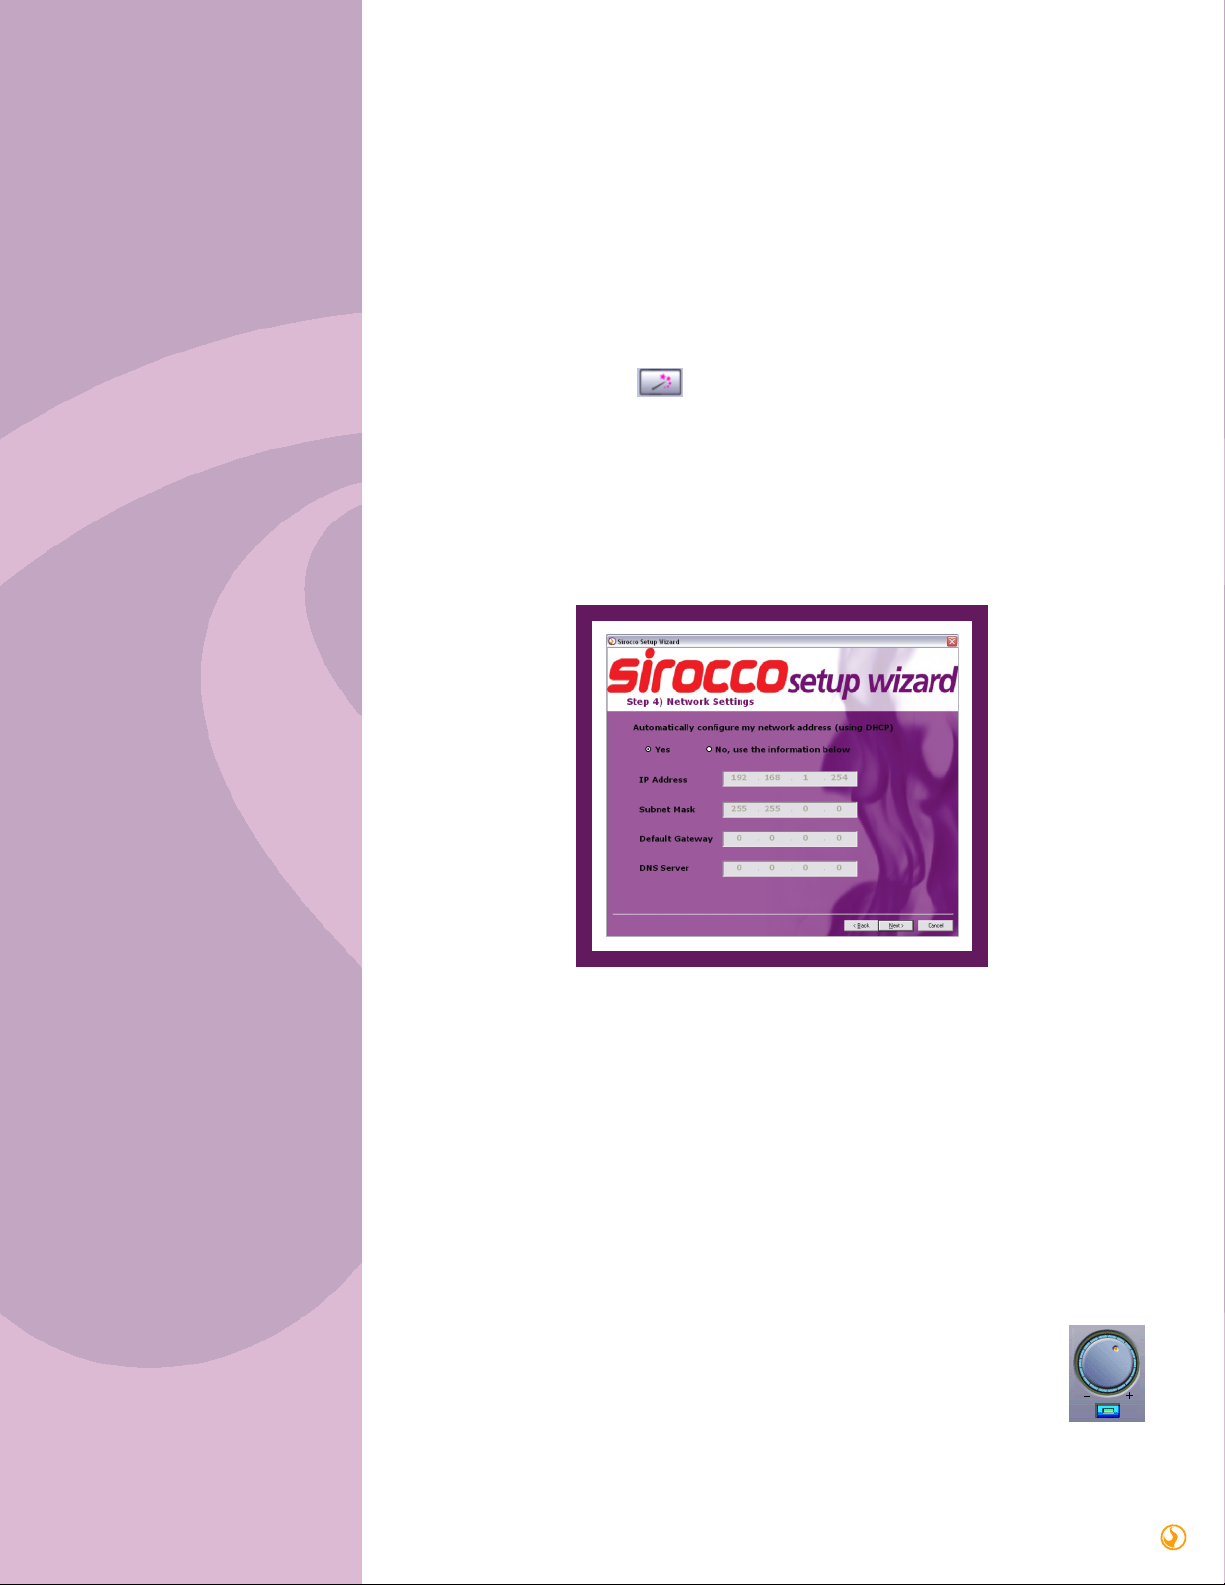
g. If your network configures itself automatically (using DHCP), or you’re not sure how your
network is set up, choose Yes in the Network Settings step, and click Next.
Otherwise, choose No and enter the required information in the four network setting fields.
h. Click Finish to end the Setup Wizard. It will take a few seconds to save your changes back to
your Sirocco device.
i. The Sirocco Control Panel will appear when you are finished the Setup Wizard. Select your
Sirocco device and click Connect.
3) Connect your speakers and go wireless!
a. You can now unplug the Ethernet cable if you’re on a wireless network, and stream your
audio wirelessly around your home!
b. Connect your Sirocco receiver to your headphones or speakers with the green
Headphone/Front jack, or to your AV receiver through the Digital Out jack.
If you had problems with this setup process, or need some help with troubleshooting, check
out Section 5 of this manual.
6
3
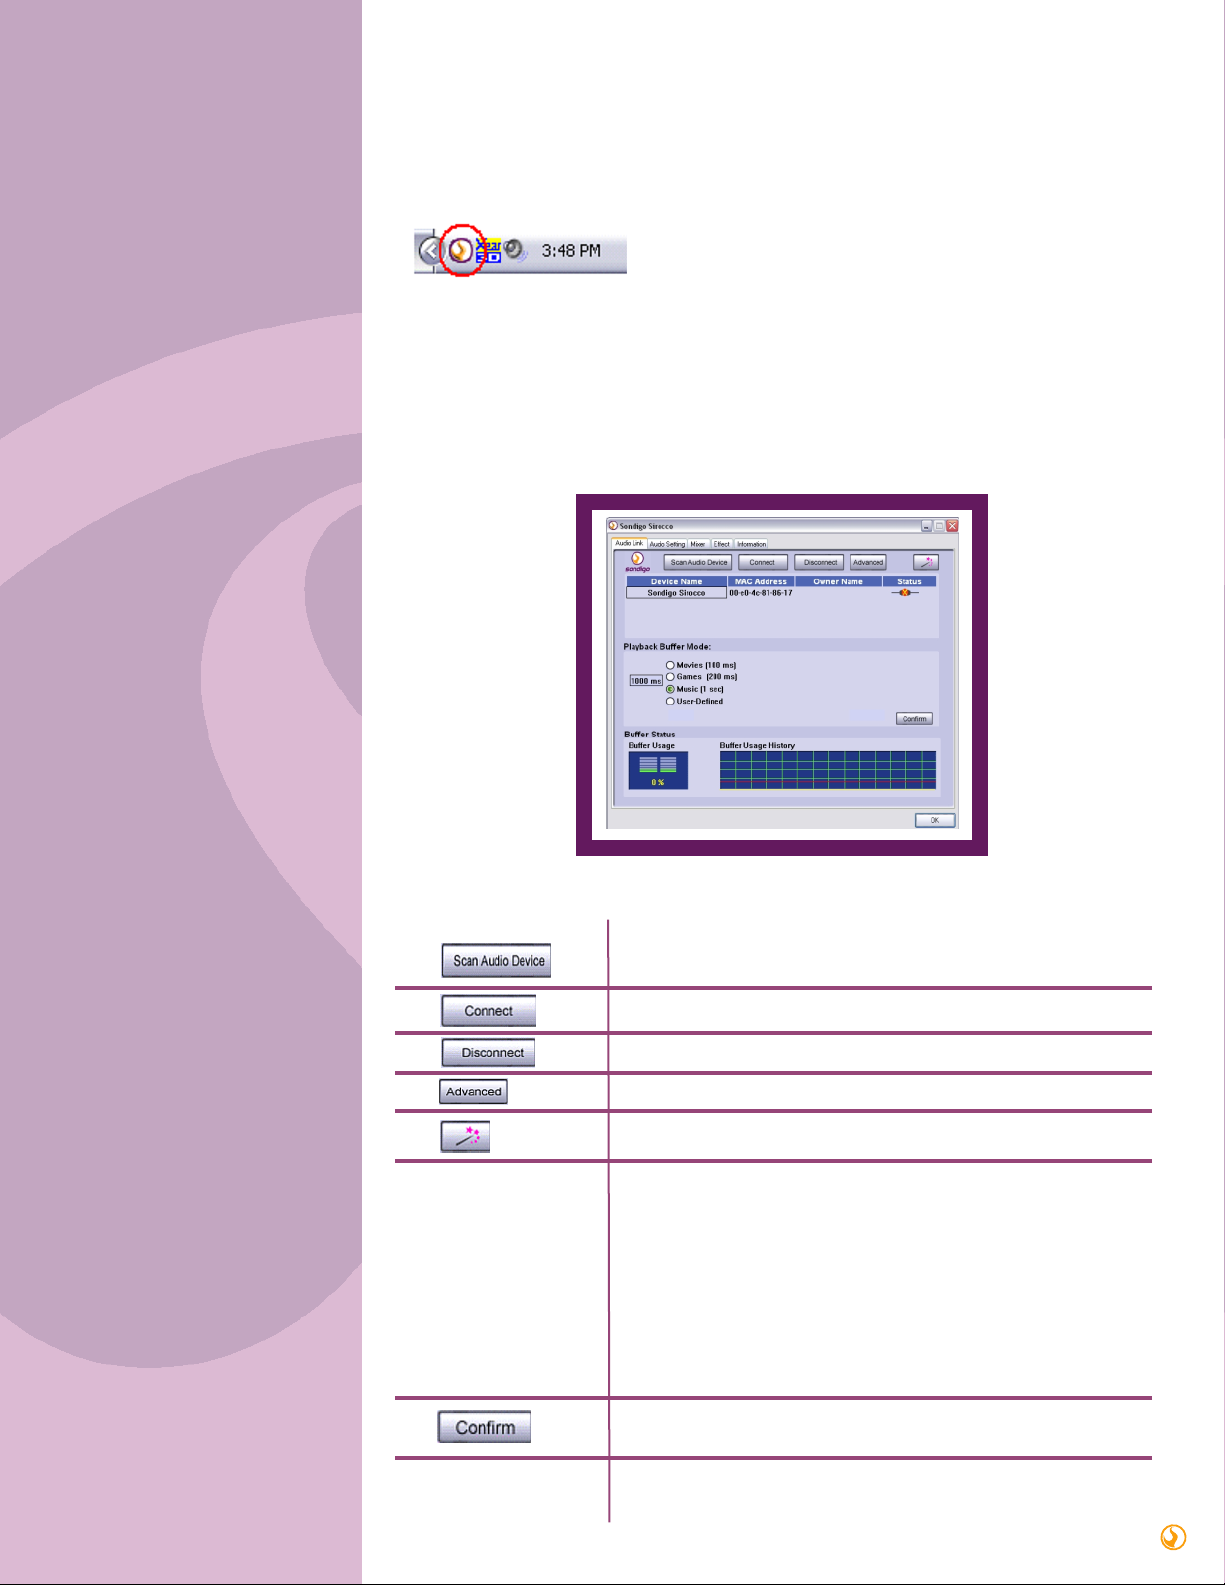
Using the Sirocco control panel
Double-click on the system tray icon on the bottom-right hand corner of your screen (see
below). The Sirocco Control Panel will appear.
The Audio Link tab is where you go to connect to your Sirocco device, and customize your audio
buffer settings (see Playback Buffer Mode below for an explanation). You can also access the
Setup Wizard to easily make networking changes.
Scans the network for Sirocco Wireless Audio Bridges, and refreshes
your list of available devices.
Connect to the selected device.
Break the audio connection with the selected Sirocco device.
Opens a menu of advanced settings
Click to open the Sirocco Setup Wizard.
Playback Buffer Mode This section allows you to select the length of your audio buffer. A
larger audio buffer prevents your signal from “dropping out” when
there is lots of traffic on your network. However, it also adds delay
between when you perform an action (like pausing a song) and
when you hear the corresponding sound.
Choose a small buffer setting if you don’t want a long delay, and a
large buffer if you want to ensure that your audio doesn’t drop out.
You can select your own custom buffer length by clicking on the
User Defined option and choosing your buffer size with the slider.
Don’t forget to press the Confirm button to finalize your selection.
Saves your current buffer setting. You must click this button for a
new buffer size to take effect.
Buffer Status Shows the current buffer usage percentage and history. A large
percentage means that you have
Audio Link
7
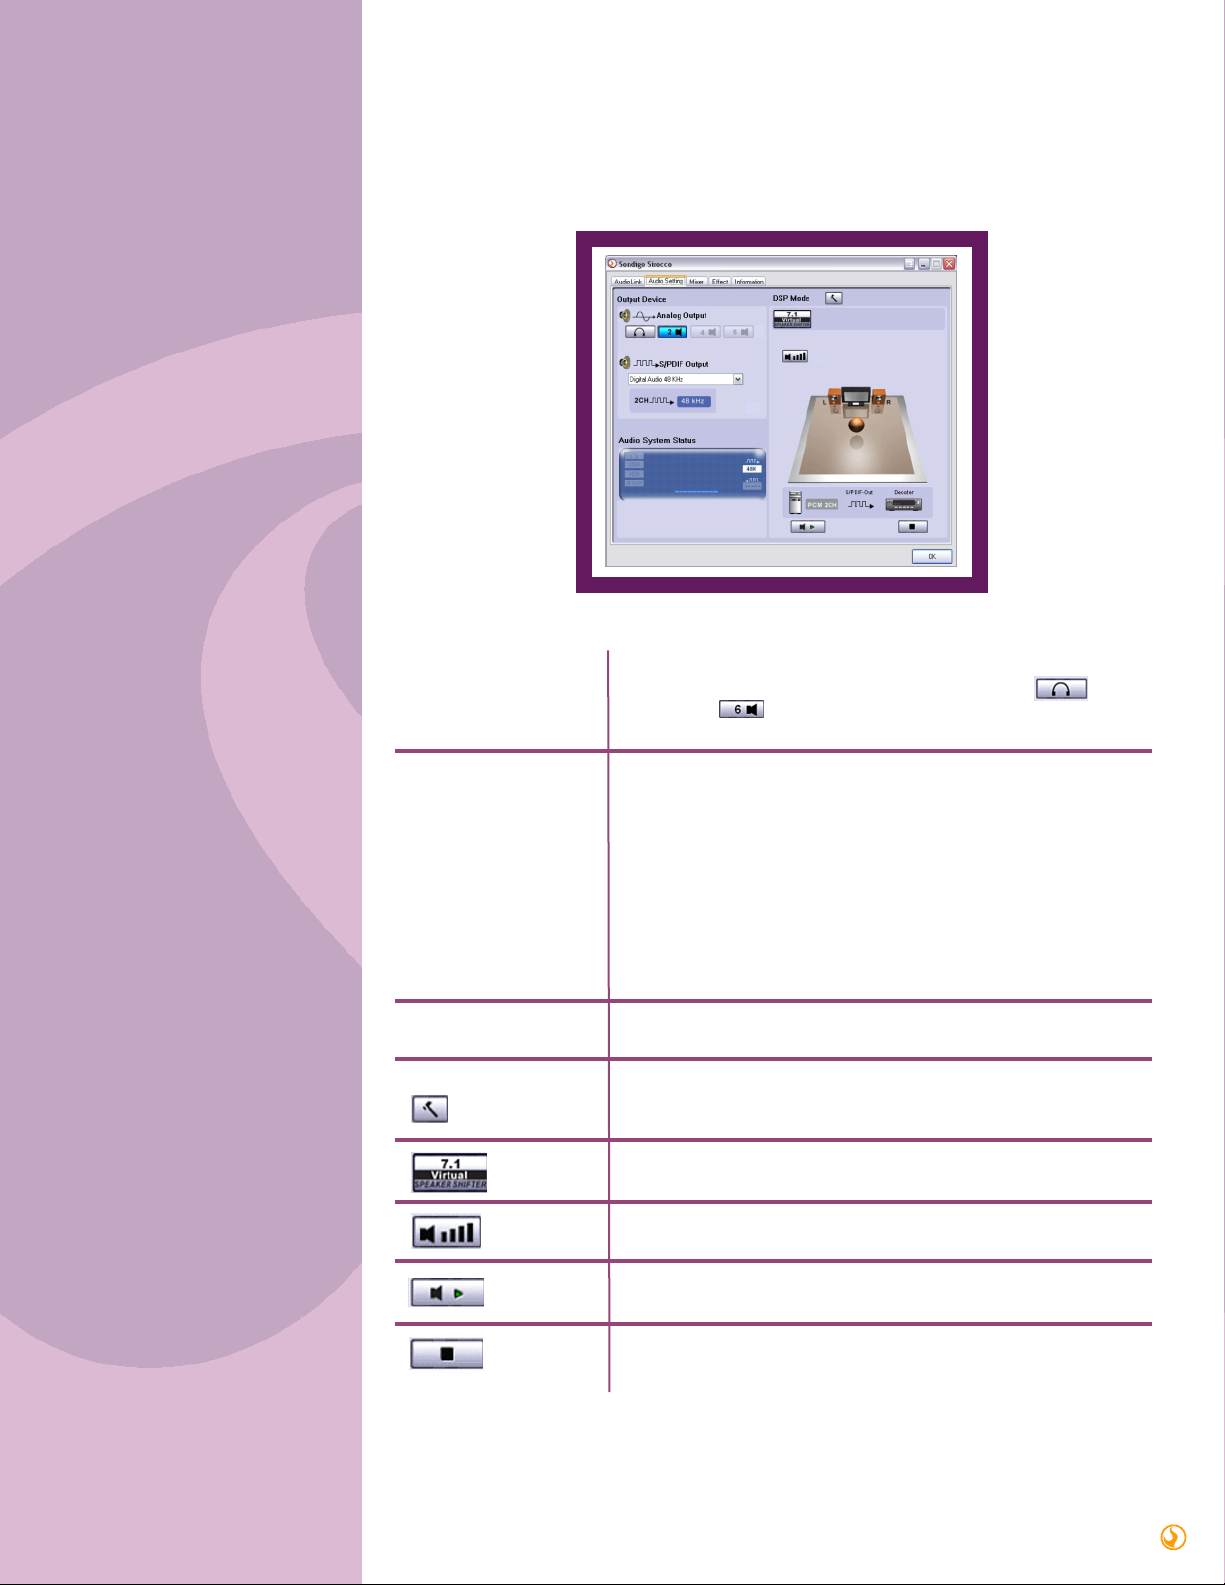
Audio Setting
This page enables you to configure your audio output and verify that your speakers are
connected properly.
Analog Output Here you select what type of system you have hooked up to Sirocco.
For example, if you’re using headphones, click on the icon.
Click on the icon if you’re using a 6-channel (or 5.1) speaker
system.
S/PDIF Output You can choose either Dolby Digital Live or Digital Audio 48kHz to
be output from the digital out jack.
Dolby Digital Live: This mode allows you to send 5.1 channel
audio data over a single wire. You will need to have a Dolby Digital
decoder at the other end of this connection, as found in most A/V
receivers. Note that in this mode, you will not be able to also play
audio out of Sirocco’s analog speaker jacks.
Digital Audio 48KHz: Choose this mode to play 2-channel audio
from the digital output jack.
Audio System Status Shows which output modes are currently enabled.
DSP Mode Click to toggle between the Speaker Shifter and Speaker Test
control panels.
Enables/disables Virtual Speaker Shifter processing.
Click to adjust the individual volumes for each channel
Click to do a sound check of each output channel.
Stops a sound check when one is in progress.
8
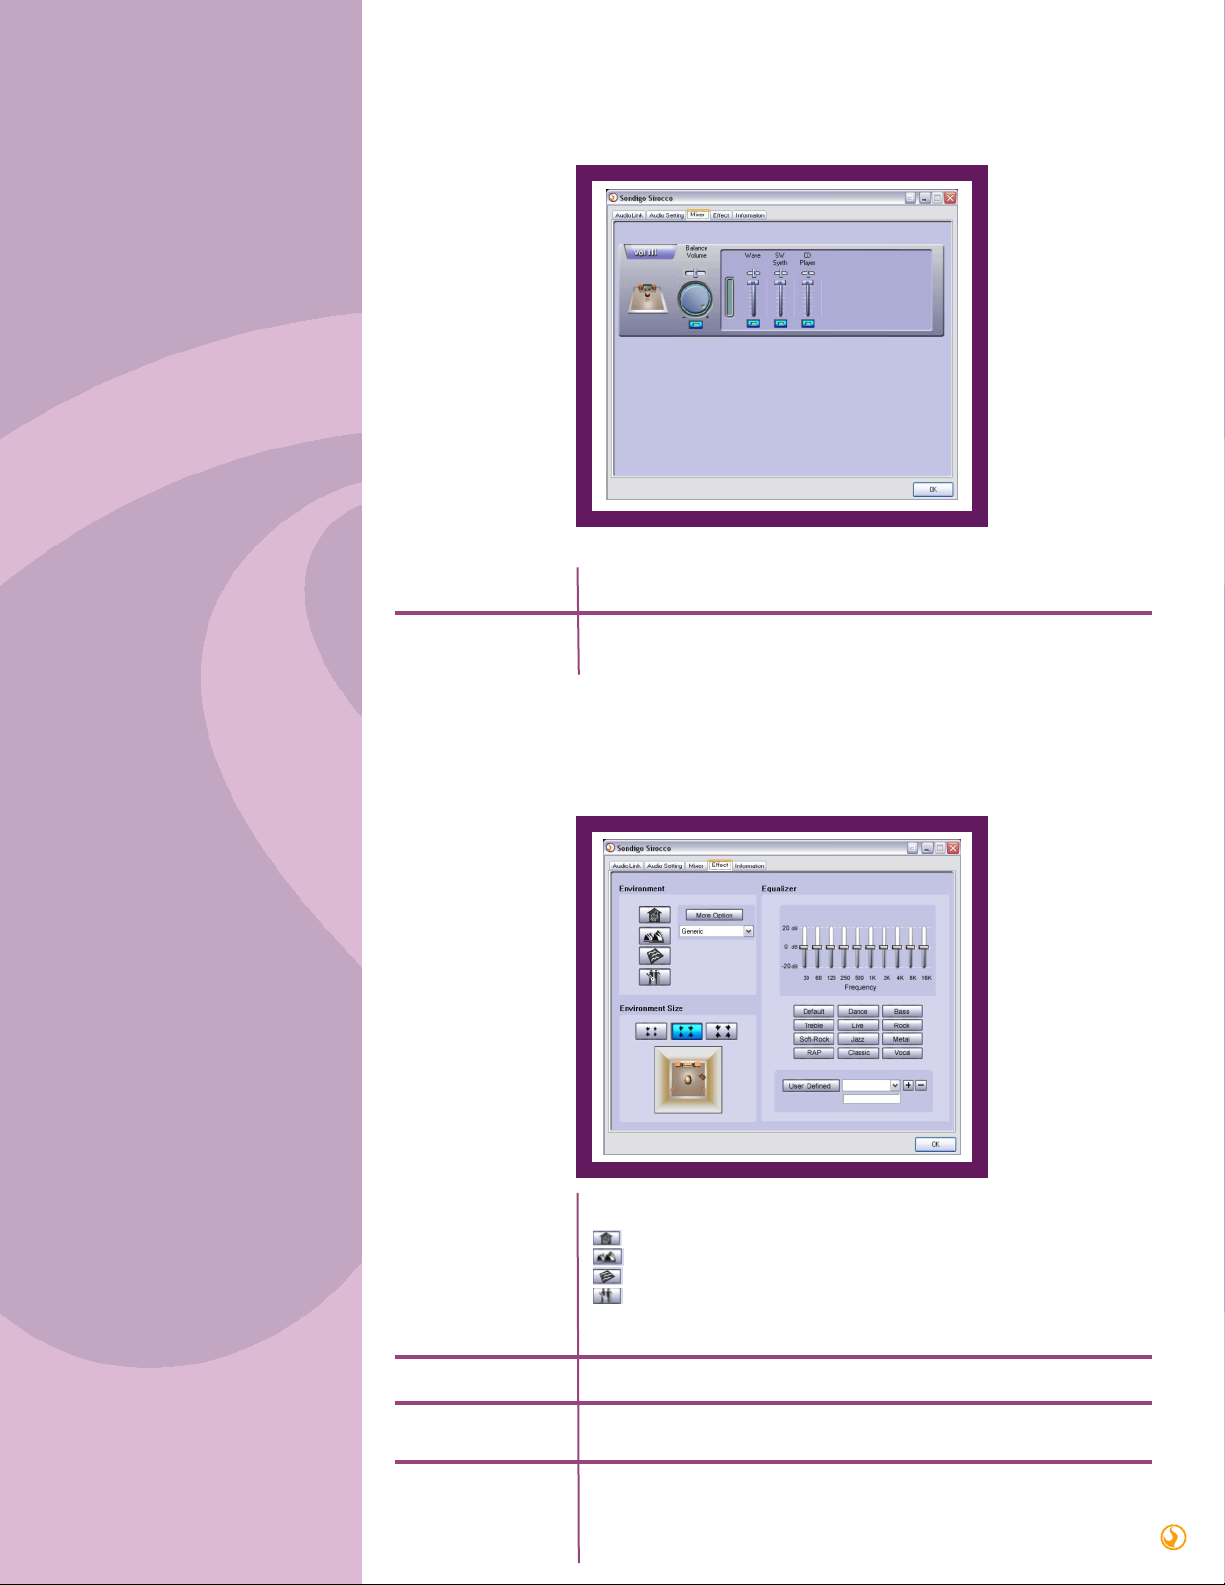
Mixer
Effect
The Mixer allows you to control your volume levels.
Volume Control Adjust this knob using your mouse to change the overall volume level.
Wave, SW Synth, If you want to change the volume for a specific audio source, you can
CD player make separate adjustments to each of these sliders.
The Effects page lets you spice up your audio by providing a 10-band EQ and environment
(reverb) processing.
Environment Select the environment you wish to emulate:
Bathroom
Concert Hall
Underwater
Music Pub
For additional choices, click the More Options button and choose one
from the pull-down menu.
Environment Size Adjust the size of the virtual environment.
Equalizer There are 12 equalizer presets to choose from. Many are optimized for
different styles of music, such as Rock, Jazz, Rap, etc…
User Defined You can change the gain settings for each frequency band and save it as
your own EQ preset. To do this, tweak the sliders to your liking and enter
a name in the empty text field. Click “+” to add your personal setting into
the “User Defined” list. Click “-” to delete the current user preset.

9
Information
This tab displays information about your current 3D audio engine, sound chip, Network audio
driver, and DirectX version. You can also decide if the audio configuration icon should be
shown in the system tray.

10
Product Registration
Sondigo User Forums
Firmware Upgrades
At the bottom of the Information tab is a link that allows you to register your Sirocco Wireless
Audio Bridge. Registering keeps you in the loop for product upgrades and information, and
helps the Sondigo team provide you with better support.
Sondigo has user forums where you can get support, learn more about Sirocco, and meet other
Sirocco users.
To check them out, head on down to www.sondigo.com/forums
From time to time, new features and upgrades to your Sirocco may become available. To access
them, you will need to download a new firmware file and install it. Installing new firmware is a
very simple procedure, outlined in the steps below:
1) Download the new firmware file (its name will probably end with “.bin”) from
www.sondigo.com and save it on your computer. Save it somewhere that’s easy to find,
like on the Desktop.
2) Connect Sirocco to your computer with an Ethernet cable.
3) Open the Sirocco Control Panel and click on the Setup Wizard button
4) From the first page of the wizard, select “Upgrade Firmware” and press “Next”.
5) Choose the device that you want to receive the firmware upgrade, and click “OK”
6) Click the “Browse…” button in the next screen (shown below). You will be prompted to
find the location of the firmware file. Find it, click “Open”, and then click “Finish”.
7) It will take a minute for the new firmware to load. When it’s finished, the Sirocco Control
Panel will open and your Sirocco will appear in a few seconds.
4
Support and Updates
11
This section provides some solutions to problems that you might encounter while using your
Sirocco Wireless Audio Bridge.
Q. I went through the Setup Wizard successfully, but after unplugging the Ethernet
cable, my device doesn’t appear in the Sirocco Control Panel’s Device List.
A. The problem is most likely that the networking information you entered in the Setup Wizard
wasn’t compatible with your wireless network. Re-connect your Sirocco receiver to your
computer with the included Ethernet cable. Open the Sirocco Control Panel and click on the
Sirocco Setup Wizard button.
- When you reach Step 2 of the Wizard, make sure that you select the same network that your
computer is connected to. If you’re connecting to an encrypted network, your network key
must exactly match the one used on your computer, or else Sirocco won’t be able to join the
network.
- If you’re sure that you connected to the right network and entered the correct network key,
there may be a problem with your networking settings. These settings were entered in Step 4
of the Setup Wizard (see image).
For most networks, simply entering “Yes” to have your network setup automatically (with
DHCP) will do the trick. If this doesn’t work, and you’re not sure what to enter, select “No”
and ask the person that set up your wireless network to provide you with information for the
four networking fields.
Q. I’ve connected to my Sirocco device in the Control Panel, and I’ve got a healthy
buffer percentage, but I still can’t hear any audio from my Sirocco device.
A. Try the following:
- If your Sirocco’s blue Audio light is blinking, your Wireless Audio Bridge is receiving data from
your computer. If you’re connecting to a set of powered speakers or an A/V
receiver, make sure that their volume control is set to an audible level.
- Next, check the volume levels on your computer. If your audio program has a
volume control, make sure that it’s at its usual level. Also, enter the Sirocco
Control Panel, go to the Mixer tab, and make sure that the master volume is on
and above 50% (as shown at right).
5
Troubleshooting guide
12
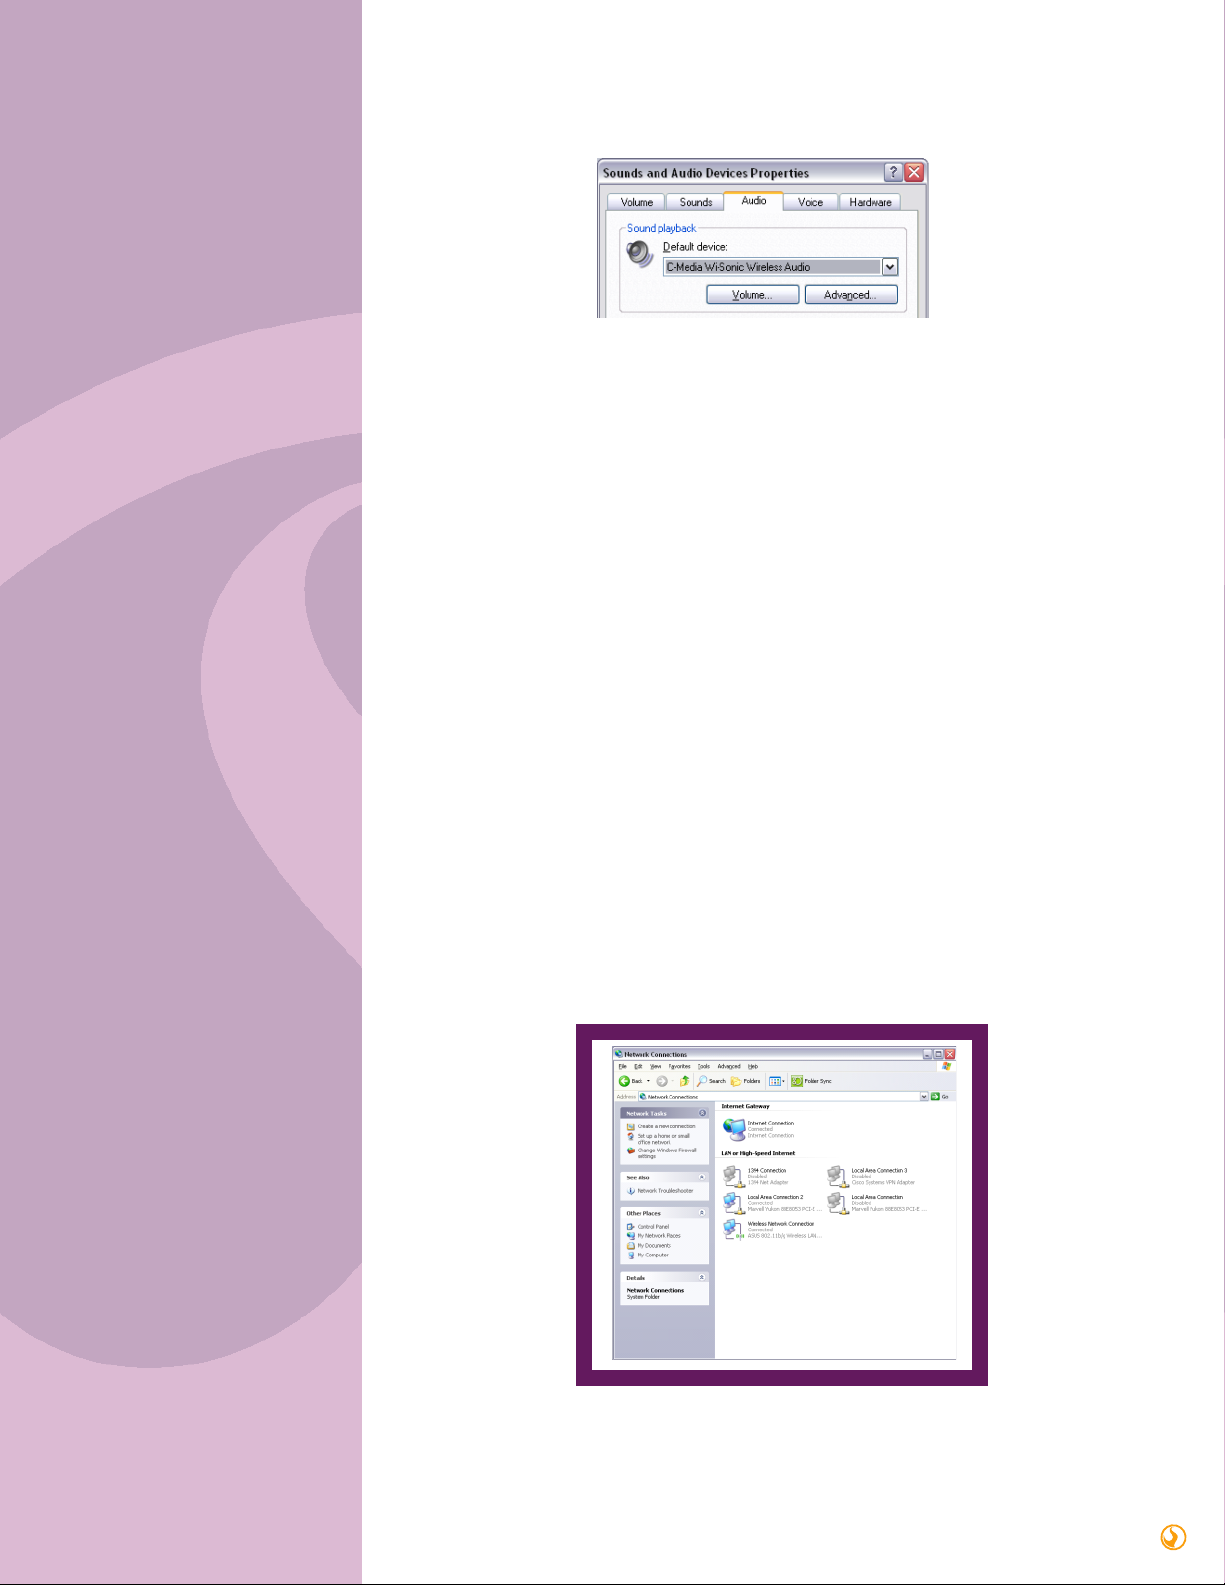
- In Start>Control Panel>Sounds and Audio Devices, click on the “Audio” tab and ensure that
“C-Media Wi-Sonic Wireless Audio” is set as the default device for audio playback (see image).
- Try closing and re-opening your audio program. If you changed your default audio playback
device (as above), this will ensure that your program will send its audio to your Sirocco driver,
and not to a different audio device on your computer
Q. I’ve got my Sirocco connected properly, and I can hear audio coming out, but it’s
dropping out a lot and the buffer level is unstable. How can I correct this?
A. On a congested wireless network, the odd drop out will occur. However, there are a few
steps that you can take to minimize the effects of network traffic on your audio connection.
- In the Sirocco Control Panel, go to the Audio Link tab and increase the length of your buffer.
For information on how to do this, see section 3.1 of this manual. If you’re listening to your
music connection wirelessly, a 1 second buffer is suggested for good protection against drop
outs.
- If drop outs persist with a longer buffer, try disconnecting and then reconnecting to your
Sirocco in the Audio Link tab.
Q. I’m not sure if my computer is connected to the right wireless network for use with
Sirocco. How do I set this up?
A. Follow this numbered guide to get your computer onto your wireless network, and then run
through the Quick Setup Guide in Section 2.
1) First, ensure that your wireless adapter is enabled. You can find this information in
Start>Control Panel>Network Connections. In this window you should see an icon called
“Wireless Network Connection”. If a red X appears on your wireless device, right-click and
select “Enable”.
13
2) Right-click on the Wireless Network Connection icon , and select “View Available
Wireless Networks”. The following window will appear:
3) Make sure that your computer is connected to the same wireless network that you joined
Sirocco to in the Quick Setup Guide.
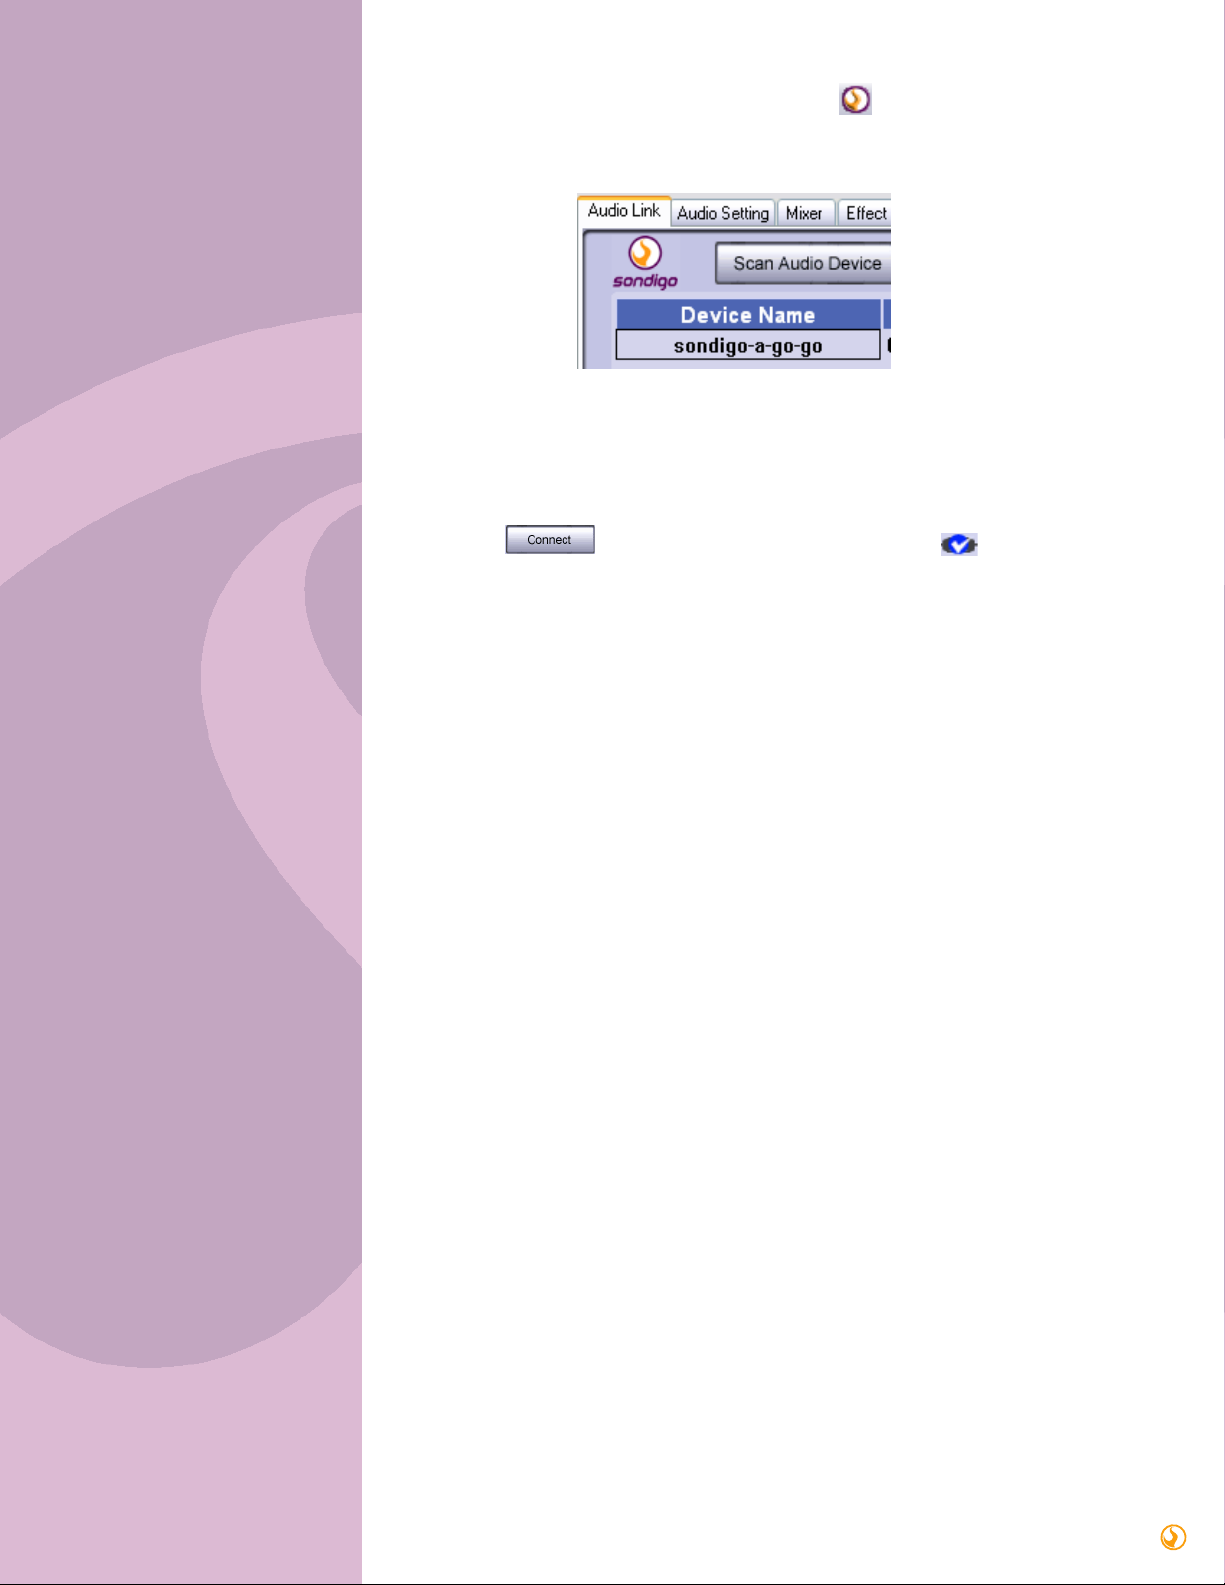
4) Open the Sirocco Control Panel by clicking on the icon in the bottom-right hand corner of
your screen. Within a few seconds, your Sirocco device should appear under “Device
Name”, as seen at right.
5) Click the button to establish the audio connection. A icon should appear
under “Status”, and the audio buffer should ramp up.
US Repair Center
Company name: Layton Electronics & Networking Ltd.
Tel: 1 800 465-8137
Address: 12851 16th Ave., PMB# 45039, Surrey, BC,
Canada V4A 9L1


