Soniclear Gov Video Recorder 9 User manual

Video Recording
OPERATION GUIDE
for
Gov Video Recorder 9
Court Video Recorder 9
Interview Video Recorder 9

About This Manual
This manual covers the installation procedures for the video recording using SoniClear
software and systems, including the following products:
•SoniClear Gov Video Recorder 9
•SoniClear Court Video Recorder 9
•SoniClear Interview Video Recorder 9
•Axis Video Camera Kits
•Axis Video Encoder Kit
Printed in the United States.
Copyright 1998 - 2017 Trio Systems LLC
Updated 7/12/17
All rights reserved. No part of this publication may be reproduced, stored in a retrieval
system, or transmitted, in any form or by any means, electronic, mechanical,
photocopying, recording, or otherwise, without the prior written permission of the
publisher.
SoniClear and Trio Systems are registered trademarks of Trio Systems LLC.
Portable Recorder, SoniClear Gov, Gov Video Recorder 9, Court Video Recorder 9,
Interview Video Recorder 9, and VoiceBoost are exclusive trademarks of
Trio Systems LLC.

Table of Contents
SoniClear Video Recording................................................................................................ 5
Overview......................................................................................................................... 5
SoniClear Video Kits...................................................................................................... 5
Axis M1065 Video Camera Kit.................................................................................. 6
Axis P1365 Video Camera Kit ................................................................................... 6
Axis V59 Video Camera Kit....................................................................................... 7
Axis F44 Video Camera Kit ....................................................................................... 7
Axis Q7401 Video Encoder Kit.................................................................................. 8
Recommended Optional Equipment:.......................................................................... 9
Recording with the Video Recording Kit ..................................................................... 11
Using the M1065Video Camera Kit ......................................................................... 11
Using the P1365 Video Camera Kit.......................................................................... 11
Using the V59 Video Camera Kit............................................................................. 12
Using the F44 Video Camera Kit.............................................................................. 13
Using the Video Encoder Kit.................................................................................... 14
Setting Up the SoniClear System.................................................................................. 15
Hardware Requirements............................................................................................ 15
Network Address Configuration............................................................................... 15
Network Device Power Settings............................................................................... 18
Disable WiFi............................................................................................................. 18
NOD32 Antivirus Setup............................................................................................ 19
Configure Windows Firewall.................................................................................... 21
Install Axis Video and Audio Software.................................................................... 22
Install SoniClear 9 Software..................................................................................... 23
Configure SoniClear 9 Software Preferences ........................................................... 23
Transcriber Live Configuration ................................................................................ 24
SoniClear Player Configuration................................................................................ 25
Configure Camera Audio Playback.......................................................................... 25
Custom Video Configuration........................................................................................ 26
Connecting the Axis Camera.................................................................................... 26
Connecting the Axis Encoder ................................................................................... 26
Configure the Axis Device........................................................................................ 27
Hardware Warranty and Repair .................................................................................... 33
Hardware Information:.................................................................................................. 33

SoniClear Video Recording Operation Guide Pg 4

SoniClear Video Recording Operation Guide Pg 5
SoniClear Video Recording
Overview
SoniClear video recording products are designed to make it easy to capture digital video
along with digital audio. The software works with compatible Axis video cameras and
encoders, and keeps the audio and video synchronized during playback. The user can
select audio from any microphone or the microphone in the camera while viewing
synchronized video of the event. The current release supports a single Axis camera or
encoder that is connected via Ethernet.
SoniClear Video Kits
SoniClear Video Camera Kits are available for use with Gov Video Recorder 9, Court
Video Recorder 9, and Interview Video Recorder 9. The kits include either an Axis
camera, or an Axis video encoder for connection to an existing video camera or video
switcher. The kits also include all of the required parts to start video recording quickly
and easily.

SoniClear Video Recording Operation Guide Pg 6
Axis M1065 Video Camera Kit
The Axis M1065 Video Camera Kit includes the following hardware:
-Axis M1065 video camera
http://www.axis.com/us/en/products/axis-m1065-l
-A desktop tripod with an adapter for mounting the M1054 camera.
-Axis POE Power Injector for remotely powering the camera.
-Flexible 25’ Ethernet cable for connecting camera to the Power Injector.
-Standard 6’ Ethernet cable for connecting the Power Injector to the computer.
Axis P1365 Video Camera Kit
The Axis P1365 Video Camera Kit includes the following hardware:
-Axis P1365 video camera
http://www.axis.com/us/en/products/axis-p1365
-Axis Q7401 video encoder (optional)
www.axis.com/products/cam_q7401
-Netgear GS105PE Network Switch (or similar)
http://www.netgear.com/business/products/switches/unmanaged-
plus/GS105PE.aspx
or
Axis T8120 POE Power Injector
http://www.axis.com/us/en/products/midspans/axis-t8120-midspan-15-w-1-port
-Flexible 25’ Ethernet cable for connecting camera to the Power Injector.
-Standard 6’ Ethernet cable for connecting the Power Injector to the computer.

SoniClear Video Recording Operation Guide Pg 7
Axis V59 Video Camera Kit
The Axis V59 Video Camera Kit includes the following hardware:
-Axis V59 video camera
https://www.axis.com/us/en/products/axis-v59-series
-Flexible 25’ Ethernet cable for connecting camera to the Power Injector.
Axis F44 Video Camera Kit
The Axis F44 Video Camera Kit includes the following hardware:
-Axis F44 video camera encoder
www.axis.com/products/f_series/index.htm
-Axis F1015 Varifocal camera head with 39 Foot Cable (4 heads)
www.axis.com/us/en/products/axis-f1015
-Axis F8203 Tripod Mounting Bracket (4 mounts)
http://classic.www.axis.com/files/manuals/ig_axisf8203_57321_en_1406.pdf
-Axis POE Power Injector for remotely powering the camera.
-Flexible 25’ Ethernet cable for connecting camera to the Power Injector.
-Standard 6’ Ethernet cable for connecting the Power Injector to the computer.

SoniClear Video Recording Operation Guide Pg 8
Axis Q7401 Video Encoder Kit
The Axis Video Encoder Kit includes the following hardware:
-Axis Q7401 video encoder
www.axis.com/products/cam_q7401
-BNC to RCA composite video adapter. (Note: User must provide a cable for
connection to a standard composite video source, such as a professional
camcorder or video switcher.)
-Axis POE Power Injector for remotely powering the encoder.
-Flexible 25’ Ethernet cable for connecting camera to the Power Injector.
-Standard 6’ Ethernet cable for connecting the Power Injector to the computer.

SoniClear Video Recording Operation Guide Pg 9
Recommended Optional Equipment:
The follow equipment can be used with the Axis Camera Kit and the Axis Encoder Kit to
optimize the configuration for various requirements:
-SoniClear Tablet Recorder System. This is a Microsoft Surface Pro 4 business-
class laptop with an i5 processor.
http://www.soniclear.com/Tablet_Recorder.html
-Ethernet POE switch.Used for connecting both the camera device and a
network connection to a single Ethernet jack on the computer. The POE power
output from the switch eliminates the need to power the camera using a power
brick or POE Injector. Recommend switches:
oNetgear GS105PE, which supports up to 4 video cameras
http://www.bhphotovideo.com/c/product/1116815-REG
oD-Link DES1005P, which is smaller, less expensive, and supports one
camera
www.bhphotovideo.com/c/product/859848-REG
-Microphones for recording audio. Various SoniClear microphones will work
with video, including multichannel recording interfaces, such as the Motu 4Pre
and Motu 8PreUSB. Consult with SoniClear for recommended audio additions to
the video kit:
http://www.soniclear.com/Products.html#Computer_Microphone_Products
-Ethernet Crossover Adapter. Please note that some computers will need to
connect to the camera using an Ethernet Crossover Adapter. However, in testing
we have found the computer usually does not need this adapter. If you are
connecting the camera and computer into an Ethernet switch, no Ethernet
Crossover Adapter is required, as this functionality is provided by the switch.
StarTech Ethernet crossover adapter:
https://www.startech.com/Cables/Network/Network-Adapters/Cat-6-Gigabit-
Crossover-Adapter~C6CROSSOVER

SoniClear Video Recording Operation Guide Pg 10

SoniClear Video Recording Operation Guide Pg 11
Recording with the Video Recording Kit
Using the M1065Video Camera Kit
The Video Recording Kit with the Axis M1065 Camera is supplied ready to use. Once
the SoniClear software has been installed and the computer has been configured for
video, you can start recording using these setup steps:
1. Set up the computer and microphones as required for the recording.
2. Set up the Axis camera on the supplied desktop tripod, or other user-supplied
tripod.
3. Plug the 25’ Ethernet cable into the Axis camera.
4. Plug the other end of the 25’ Ethernet cable into the Power Injector (such as the
Axis T9120). Be sure to use the jack labeled “Data & Power Out”.
5. Plug the 6’ Ethernet cable into the jack labeled “Data In” and plug the other end
of the cable into the laptop or desktop computer.
6. Run SoniClear and record as directed in the SoniClear Users Guide.
Using the P1365 Video Camera Kit
The Video Recording Kit with the Axis P1365 Camera is supplied ready to use. Once the
SoniClear software has been installed and the computer has been configured for video,
you can start recording using these setup steps:
1. Set up the computer and microphones as required for the recording.
2. Set up the Axis camera on a user-supplied tripod.
3. Plug the 25’ Ethernet cable into the Axis camera.
4. For kits that do not include a Q7401 encoder:
a. Plug the other end of the 25’ Ethernet cable into the Power Injector (such
as the Axis T9120). Be sure to use the jack labeled “Data & Power Out”.
b. Plug the 6’ Ethernet cable into the jack labeled “Data In” and plug the
other end of the cable into the Ethernet Crossover Adapter.
c. Plug the Ethernet Crossover Adapter into the Ethernet jack in the laptop or
desktop computer.

SoniClear Video Recording Operation Guide Pg 12
d. Plug the audio feed from the microphone or sound system into the
microphone input jack on the back of the camera. The kit of parts to make
this connection will vary, depending on the sound system. Contact
SoniClear for assistance with this connection.
5. For kits that do include a Q7401 encoder:
a. Plug the camera and encoder into the Netgear switch. Note that the camera
and encoder can be located anywhere, they do not need to be next to each
other or the computer.
b. Plug the Netgear switch into the computer.
c. Plug the audio feed from the microphone or sound system into the
microphone input jack on the Q7401.
d. Note: For systems using the Netgear switch (or equivalent).
6. Run SoniClear and record as directed in the SoniClear Users Guide.
7. Loosen the focus and zoom adjustments on the camera. View the SoniClear
Liveview video preview window while adjusting the focus and zoom to the
appropriate coverage of the room. After adjustment is complete, tighten the focus
and zoom adjustments to prevent shifting.
8. After general adjustments have been made on the camera lens, it may be
necessary to perform additional fine focus adjustment using the computer focus
assist feature. Connect to the camera using a web browser (entering the user name
and password for the camera). In the Settings section, select video settings and
focus, following the steps outlined on that display.
Using the V59 Video Camera Kit
The Video Recording Kit with the Axis V59 Camera is supplied ready to use. Once the
SoniClear software has been installed and the computer has been configured for video,
you can start recording using these setup steps:
1. Set up the computer and microphones as required for the recording.
2. Set up the Axis camera on a user-supplied tripod.
3. Plug the 25’ Ethernet cable into the Axis camera.
4. Plug the other end of the 25’ Ethernet cable into the Ethernet jack in the laptop or
desktop computer.

SoniClear Video Recording Operation Guide Pg 13
5. Plug the audio feed from the microphone or sound system into the Left XLR
microphone input jack on the back of the camera. For systems using the Motu
4Pre, the supplied cable connects from the camera XLR jack to the 4Pre Output
#3 (1/4” phone plug).
6. Run SoniClear and record as directed in the SoniClear Users Guide.
7. Adjust the camera settings using the web control panel for the V59 camera. To do
this, enter the address of the camera in the Microsoft Internet Explorer browser
(such as 192.168.0.90). When prompted, enter the user name and password. After
authentication, make the following adjustments:
a. Adjust Pan, Tilt, Zoom, and Focus manually in the main Live View
window.
b. If needed, enter Preset locations for Pan, Tilt, Zoom in the Setup panel,
under the PTZ section.
c. If needed, adjust White Balance in the Setup panel, under Video and
Audio/Camera Settings section.
Using the F44 Video Camera Kit
The Video Recording Kit with the Axis F44 Camera is supplied ready to use. Once the
SoniClear software has been installed and the computer has been configured for video,
you can start recording using these setup steps:
1. Set up the computer and microphones as required for the recording.
2. Set up each of the four the Axis camera heads on a user-supplied tripod. An
optional 4-head mounting bracket is available to hold all four camera head units
on a single tripod.
3. Plug the 25’ Ethernet cable into the Axis F44 camera base unit.
4. Plug the other end of the 25’ Ethernet cable into the Power Injector (such as the
Axis T9120). Be sure to use the jack labeled “Data & Power Out”.
5. Plug the 6’ Ethernet cable into the jack labeled “Data In” and plug the other end
of the cable into the Ethernet Crossover Adapter.
6. Plug the Ethernet Crossover Adapter into the Ethernet jack in the laptop or
desktop computer.
7. Please note that some computers will connect to the camera without the need for
the Ethernet Crossover Adapter. However, in testing we have found the camera
may not always connect to the computer without the adapter. If you are

SoniClear Video Recording Operation Guide Pg 14
connecting directly to the camera as described in this section, using the adapter is
necessary for reliable operation.
8. Plug the audio feed from the microphone or sound system into the microphone
input jack on the F44 camera base unit.
9. Run SoniClear and record as directed in the SoniClear Users Guide.
10. Using a screw driver, loosen the focus and zoom adjustments on the camera.
View the SoniClear Liveview video preview window while adjusting the focus
and zoom to the appropriate coverage of the room. After adjustment is complete,
tighten the focus and zoom adjustment screws to prevent shifting.
Using the Video Encoder Kit
The Video Recording Kit with the Axis Q7401 Encoder is supplied ready to use. Once
the SoniClear software has been installed and the computer has been configured for
video, you can start recording using these setup steps:
1. Set up the computer and microphones as required for the recording.
2. Connect the Axis Q7401 encoder to the composite video output of the existing
camera or video switching unit.
3. Connect the Axis encoder to the supplied Axis T9120 Power Injector. Be sure to
use the jack labeled “Data & Power Out”.
4. Plug the 6’ Ethernet cable into the jack labeled “Data In” and plug the other end
of the cable into the Ethernet Crossover Adapter.
5. Plug the Ethernet Crossover Adapter into the Ethernet jack in the laptop or
desktop computer.
6. Alternatively, connect the Q7401 directly to the computer and power it using the
included encoder power supply.
7. Run SoniClear and record as directed in the SoniClear Users Guide.
Please note that some computers will connect to the camera without the need for the
Ethernet Crossover Adapter. However, in testing we have found the camera may not
always connect to the computer without the adapter. If you are connecting directly to the
camera as described in this section, using the adapter is necessary for reliable operation.
If you are connecting the encoder and computer into an Ethernet switch, no Ethernet
Crossover Adapter is required.

SoniClear Video Recording Operation Guide Pg 15
Setting Up the SoniClear System
The SoniClear Tablet Recorder system is ready to use for video recording without the
need for additional configuration steps. If you are using SoniClear software with your
own computer, you will need to perform the configuration and installation steps listed in
this section.
Hardware Requirements
The SoniClear video recording requires a computer that has the following minimum
hardware specifications:
-Intel-based desktop or laptop computer with i5 or i7 processor.
-Windows 7 Operating System (64-bit recommended).
-System has been tested and passes the DPC Latency requirements listed in the
SoniClear Installation Guide or the Court Recorder Installation Guide.
-SoniClear-compatible microphones.
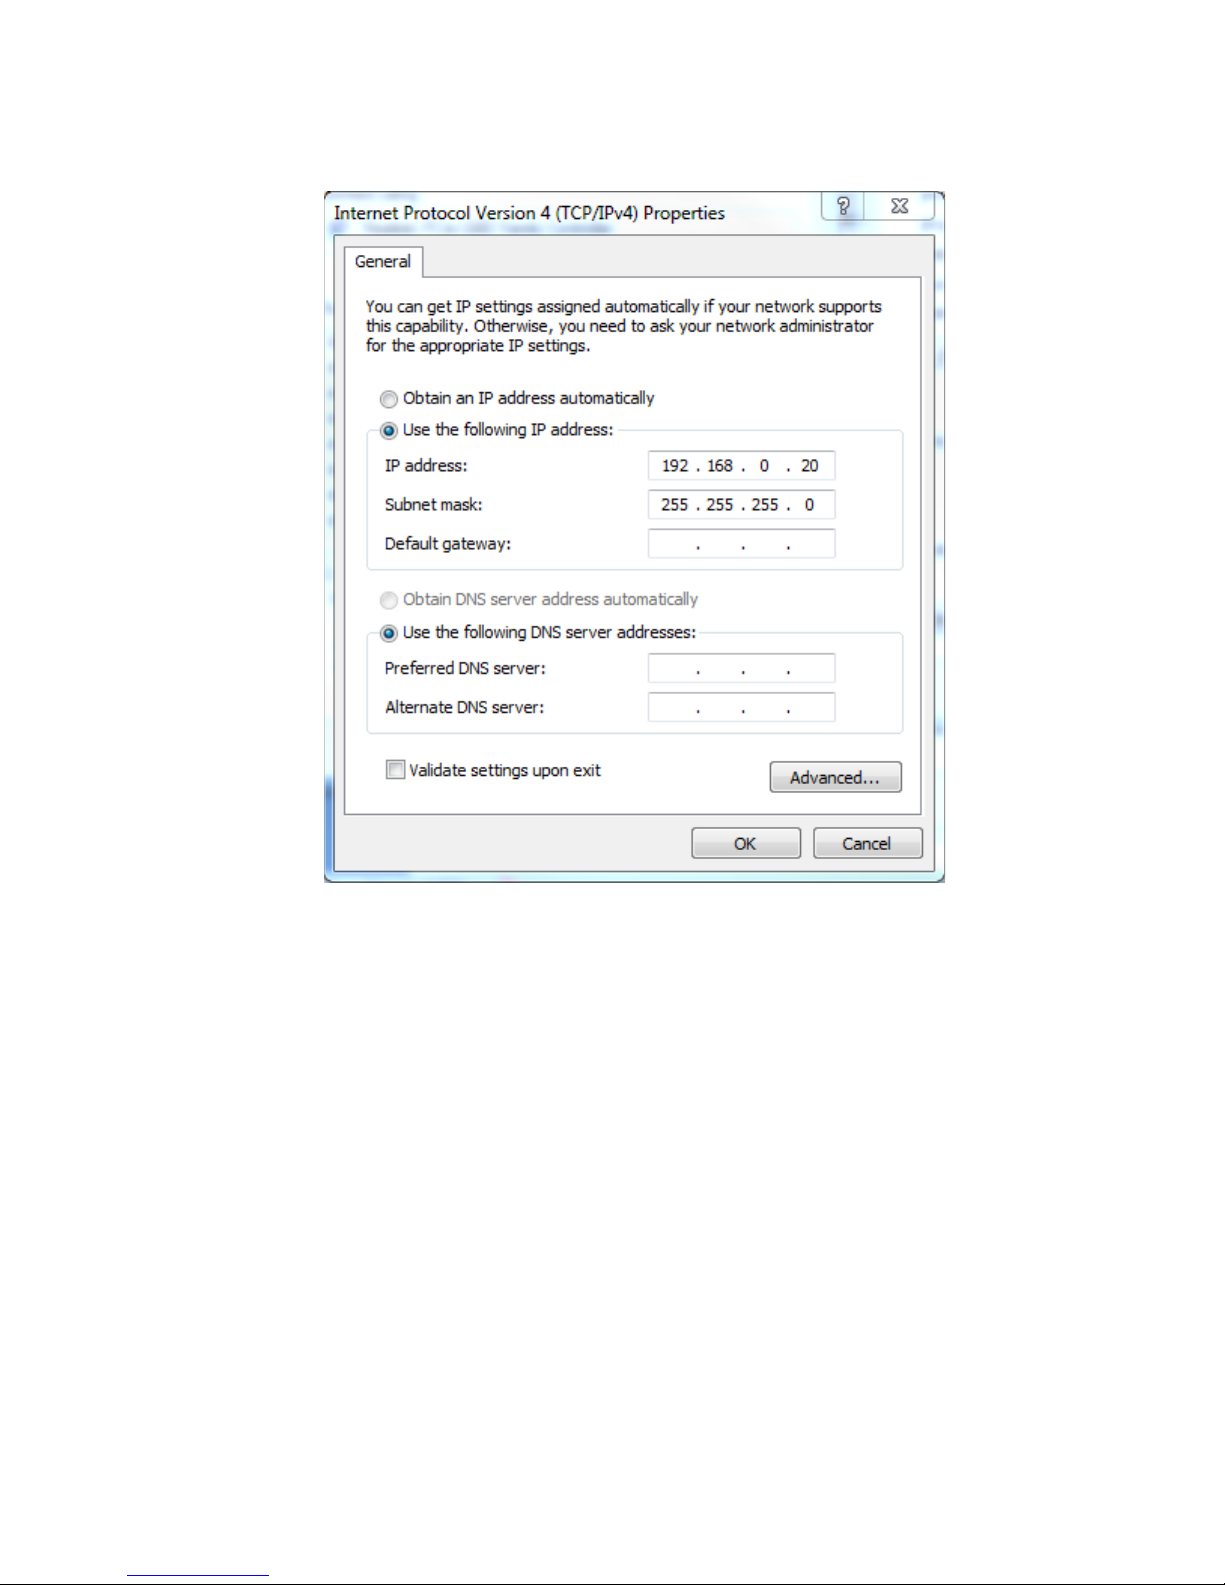
Network Address Configuration
If the camera is connected to the laptop (either directly using a crossover cable, or
indirectly through an Ethernet switch), the laptop will need to be configured to connect to
the camera without the use of an Ethernet router to assign an IP address. This is
accomplished by setting a fixed IP address in the laptop network settings (Windows 7
instructions):
1. Open the Network and Sharing Center: select Start/Control Panel/Network and
Sharing Center.
2. Click Change Adapter Settings link in left column.
3. Double click on Ethernet adapter entry to open the Connection Status dialog for
that adapter.
4. Click the Properties button.
5. Double click on the Internet Protocol Version 4 entry to open the Local Area
Connection Properties dialog.
6. Select the option “Use the following IP address”.
7. Set the IP address to 192.168.0.20 (or similar address on the same “subnet”).
8. Uncheck the option “Validate settings upon exit”.
SoniClear Video Recording Operation Guide Pg 16
9. Make sure the Subnet mask is set to 255.255.255.0 and click OK.
10. Make sure the “Default gateway” field is blank (since there is no gateway used in
this connection).
11. Make sure the DNS fields are also blank.
12. Click OK to close the Local Area Connection Properties dialog. This may display
a diagnostic error dialog because this setting does not support connection to the
Internet. Dismiss these dialogs.
13. Disconnect any Ethernet cable if it is not connected to the Axis camera.
14. Reboot the computer.
15. The computer will reset the Ethernet port to the new static address set in the
Alternate Configuration dialog when you connect to the camera.

SoniClear Video Recording Operation Guide Pg 17
16. To confirm the port setting, make sure the camera is connected, and wait for the
alternate IP address to be set (done when the little circle on the Ethernet
connection turns to a warning triangle). Then click Start and enter cmd.exe into
the search field. Run the cmd.exe program displayed, which will bring up a
command line dialog.
17. On the command line enter the command: ipconfig. This will display the current
computer IP address.
18. If the displayed IP address is not the one specified, enter the following additional
commands:
ipconfig /release
ipconfig /renew
ipconfig
The release and renew steps should force the IP address to the new setting, which
will be confirmed by the last ipconfig command.
19. If the IP address does not set correctly, contact SoniClear Support for assistance.
IMPORTANT NOTE: after making these setting changes, the Ethernet port can only be
used for connection to the camera. Use the WiFi connection for Internet access.

SoniClear Video Recording Operation Guide Pg 18
Network Device Power Settings
By default the Ethernet network hardware in the computer will have power settings
enabled. This will interfere with recording of video information sent through the Ethernet
connection. The power saving settings must be disabled following these steps:
1. Open the Network and Sharing Center: select Start/Control Panel/Device
Manager.
2. Open the Network Adapters section of the device list.
3. Double click on the Ethernet network device. (If there is more than one Ethernet
device, configure the device that will be connected to the Axis camera).
4. In the device properties dialog select the Power Management tab.
5. The options displayed for power management will vary, depending on the type of
network device. The generic option is “Allow the computer to turn off this device
to save power”. This should be unchecked. For Intel network devices the dialog
will display is a set of options under the section “Power Saver Options”. Uncheck
all of these options to fully disable power saving.
6. Click OK .
7. Close all programs and reboot the computer.
Disable WiFi
To ensure proper access to the camera via the Ethernet port, it is necessary to disable the
WiFi transmitter while using the computer with the camera. Otherwise the computer will
try to connect to the camera via WiFi and fail to connect. The most reliable way to
accomplish this is to disable the WiFi driver in the Device control panel. Alternatively, it
is possible on many laptop computers to manually disable the WiFi from a button.
However, this requires that the system user be properly training on this detail and that
they exercise care to make sure the WiFi is turned off before starting SoniClear.

SoniClear Video Recording Operation Guide Pg 19
NOD32 Antivirus Setup
SoniClear has been tested for compatibility with the Eset NOD32 antivirus product.
SoniClear video recording has not been tested with any other antivirus product and only
NOD32 is recommended and supported.
By default the NOD32 antivirus scanning product tries to monitor the recording files
being written by SoniClear. With audio this generally does not interfere. However, with
the high data volume produced by video recording the antivirus product can introduce
processor overhead and disk drive delays that will cause problems.
To prevent this type of interference, add exclusions in the antivirus software setup for the
following file types:
*.video
*.index
*.state
*.mp3
*.wav
*.bkc
*.bkm
*.txt
Adjust the settings for NOD32 Real Time Scan following these steps:
1. Open the Eset NOD32 control panel: Click the Start button, click All Programs,
scroll down and click Eset folder and the Eset NOD32 folder, then click the Eset
NOD32 program icon.
2. In the NOD32 window click the Setup link in the left panel.
3. Click the link “Enter advanced setup…” in the right panel.
4. Double click on the Computer link to open that section.
5. Double click on the “Antivirus and antispyware” link to open that sub-section.
6. Click on the Exclusions link to open the Exclusion editing panel.
7. Click the Add button and enter an exclusion item listed above (such as *.video).
8. Repeat the Add operation to add all of the file exclusions.
9. Click OK to close the setup window.
10. Click the link “Enter advanced setup…” in the right panel.
11. Double click on the Computer link to open that section.

SoniClear Video Recording Operation Guide Pg 20
12. Double click on the “Antivirus and antispyware” link to open that sub-section.
13. Click on the Real-time file system protection link to open those options.
14. Click on the Setup button for ThreatSense engine parameter setup.
15. Click on Extensions option.
16. Enter an exclusion item listed above, without the “*.” characters (such as VIDEO)
17. Click the Add button.
18. Repeat the Add operation to add all of the file exclusions.
19. Click OK twice to close the editing dialogs and close the main NOD32 window.
Adjust the NOD32 web scanning feature to prevent the camera video from being scanned
while recording:
1. Open Eset control panel (click on NOD32 icon in System Tray icon).
2. Click on Setup button on left.
3. Click on "Enter advanced setup" link.
4. Expand "Web and Email" settings tree.
5. Expand "Web access protection" settings tree.
6. Click on "URL address management" link.
7. Click the Add button and enter the IP address of the camera (such as
192.168.0.90).
8. Click OK to save the new IP address exclusion. Click Yes to accept security
warning, if you get one.
This manual suits for next models
2
Table of contents


