manuals.online logo
Brands
  1. Home
  2. •
  3. Brands
  4. •
  5. SonicWALL
  6. •
  7. Power Supply
  8. •
  9. SonicWALL NSa 3650 User manual

SonicWALL NSa 3650 User manual

SonicWall® NSa2650/3650 Power Supply
Installation and Replacement
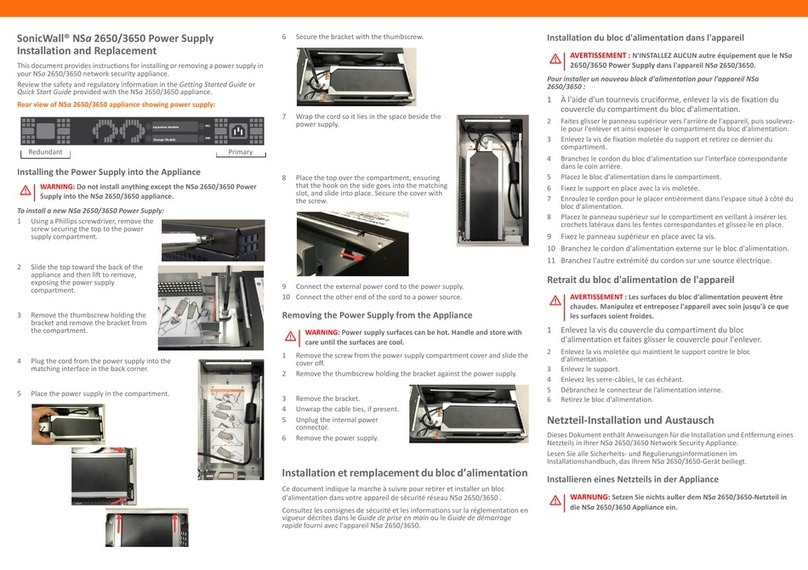
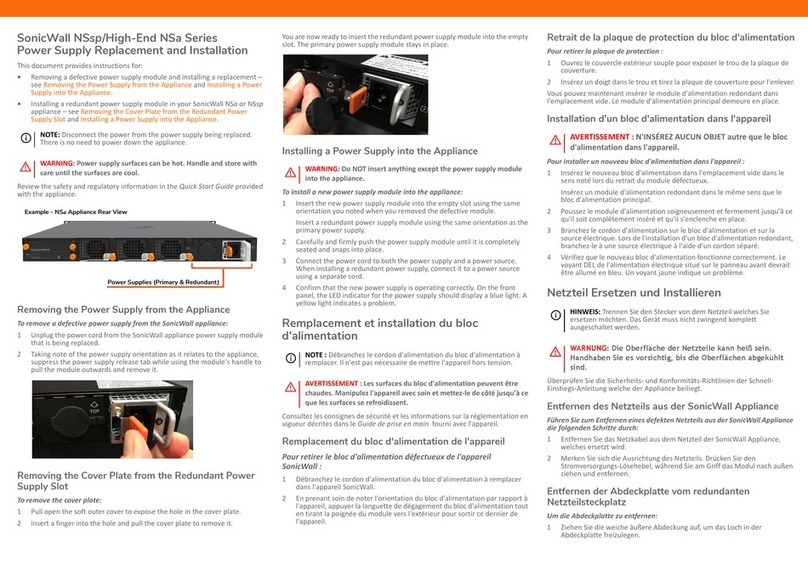
This document provides instructions for installing or removing a power supply in
your NSa2650/3650 network security appliance.
Review the safety and regulatory information in the Getting Started Guide or
Quick Start Guide provided with the NSa2650/3650 appliance.
Rear view of NSa2650/3650 appliance showing power supply:
Installing the Power Supply into the Appliance
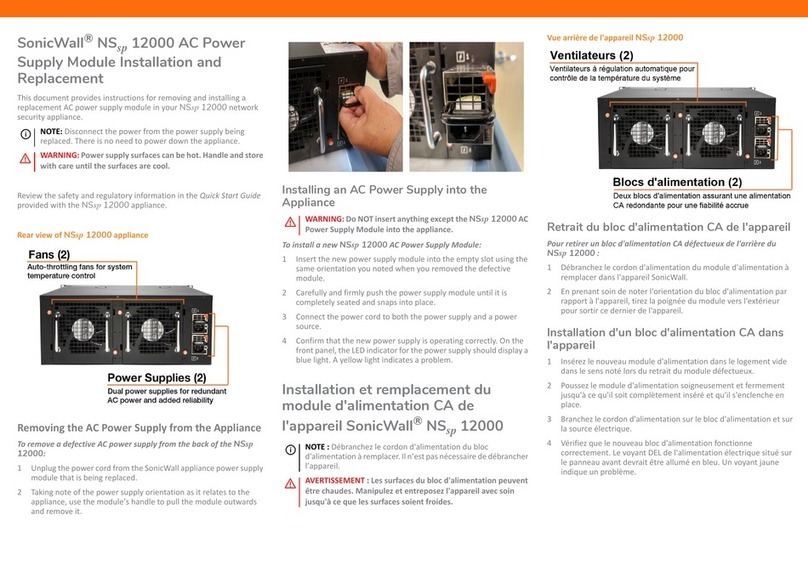
To install a new NSa 2650/3650 Power Supply:
1 Using a Phillips screwdriver, remove the
screw securing the top to the power
supply compartment.
2 Slide the top toward the back of the
appliance and then lift to remove,
exposing the power supply
compartment.
3 Remove the thumbscrew holding the
bracket and remove the bracket from
the compartment.
4 Plug the cord from the power supply into the
matching interface in the back corner.
5 Place the power supply in the compartment.
6 Secure the bracket with the thumbscrew.
7 Wrap the cord so it lies in the space beside the
power supply.
8 Place the top over the compartment, ensuring
that the hook on the side goes into the matching
slot, and slide into place. Secure the cover with
the screw.
9 Connect the external power cord to the power supply.
10 Connect the other end of the cord to a power source.
Removing the Power Supply from the Appliance
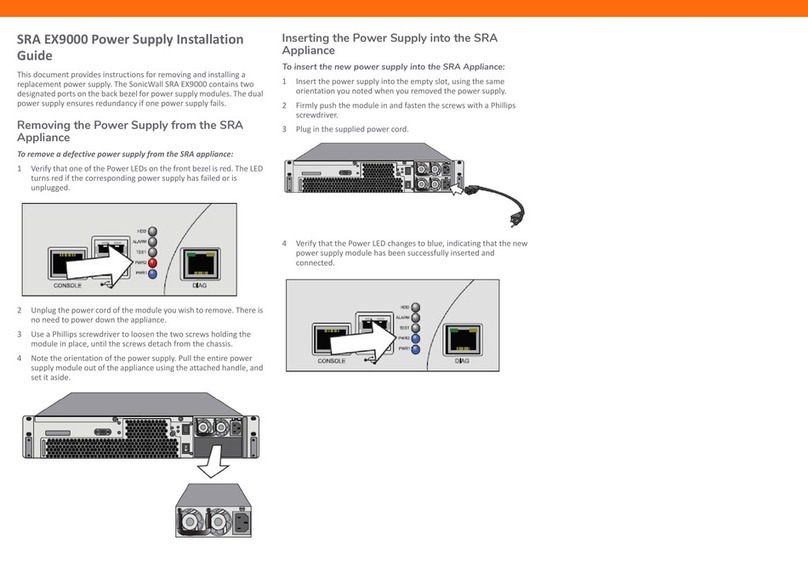
1 Remove the screw from the power supply compartment cover and slide the
cover off.
2 Remove the thumbscrew holding the bracket against the power supply.
3 Remove the bracket.
4 Unwrap the cable ties, if present.
5 Unplug the internal power
connector.
6 Remove the power supply.
Installation et remplacement du bloc d’alimentation
Ce document indique la marche à suivre pour retirer et installer un bloc
d'alimentation dans votre appareil de sécurité réseau NSa2650/3650 .
Consultez les consignes de sécurité et les informations sur la réglementation en
vigueur décrites dans le Guide de prise en main ou le Guide de démarrage
rapide fourni avec l'appareil NSa2650/3650.
Installation du bloc d'alimentation dans l'appareil
Pour installer un nouveau block d’alimentation pour l’appareil NSa
2650/3650 :
1 À l'aide d'un tournevis cruciforme, enlevez la vis de fixation du
couvercle du compartiment du bloc d'alimentation.
2 Faites glisser le panneau supérieur vers l'arrière de l'appareil, puis soulevez-
le pour l'enlever et ainsi exposer le compartiment du bloc d'alimentation.
3 Enlevez la vis de fixation moletée du support et retirez ce dernier du
compartiment.
4 Branchez le cordon du bloc d'alimentation sur l'interface correspondante
dans le coin arrière.
5 Placez le bloc d'alimentation dans le compartiment.
6 Fixez le support en place avec la vis moletée.
7 Enroulez le cordon pour le placer entièrement dans l'espace situé à côté du
bloc d'alimentation.
8 Placez le panneau supérieur sur le compartiment en veillant à insérer les
crochets latéraux dans les fentes correspondantes et glissez-le en place.
9 Fixez le panneau supérieur en place avec la vis.
10 Branchez le cordon d'alimentation externe sur le bloc d'alimentation.
11 Branchez l'autre extrémité du cordon sur une source électrique.
Retrait du bloc d'alimentation de l'appareil
1 Enlevez la vis du couvercle du compartiment du bloc
d'alimentation et faites glisser le couvercle pour l'enlever.
2 Enlevez la vis moletée qui maintient le support contre le bloc
d'alimentation.
3 Enlevez le support.
4 Enlevez les serre-câbles, le cas échéant.
5 Débranchez le connecteur de l'alimentation interne.
6 Retirez le bloc d'alimentation.
Netzteil-Installation und Austausch
Dieses Dokument enthält Anweisungen für die Installation und Entfernung eines
Netzteils in Ihrer NSa2650/3650 Network Security Appliance.
Lesen Sie alle Sicherheits- und Regulierungsinformationen im
Installationshandbuch, das Ihrem NSa 2650/3650-Gerät beiliegt.
Installieren eines Netzteils in der Appliance
WARNING: Do not install anything except the NSa2650/3650 Power
Supply into the NSa 2650/3650 appliance.
PrimaryRedundant
WARNING: Power supply surfaces can be hot. Handle and store with
care until the surfaces are cool.
AVERTISSEMENT : N'INSTALLEZ AUCUN autre équipement que le NSa
2650/3650 Power Supply dans l'appareil NSa2650/3650.
AVERTISSEMENT : Les surfaces du bloc d'alimentation peuvent être
chaudes. Manipulez et entreposez l'appareil avec soin jusqu'à ce que
les surfaces soient froides.
WARNUNG: Setzen Sie nichts außer dem NSa2650/3650-Netzteil in
die NSa 2650/3650 Appliance ein.
Questo manuale d’istruzione è fornito da trovaprezzi.it. Scopri tutte le offerte per SonicWALL NSA 2650
01-SSC-1936 o cerca il tuo prodotto tra le migliori offerte di Firewall
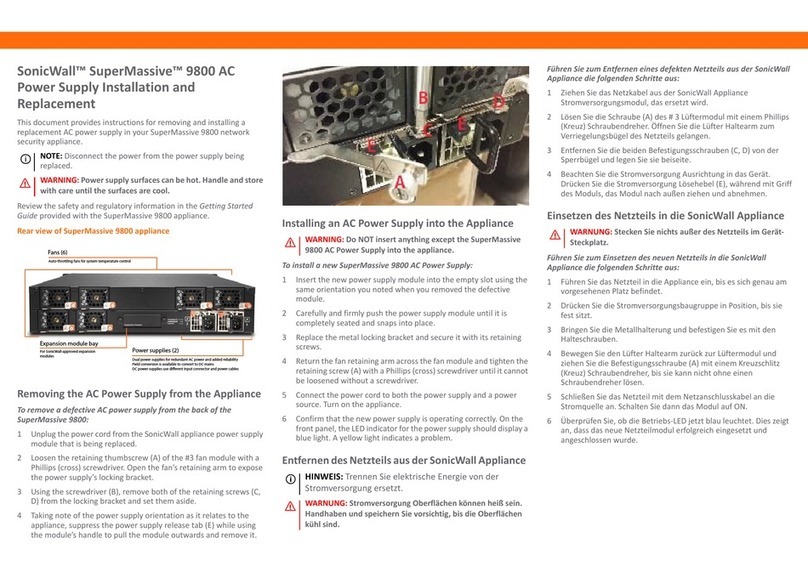
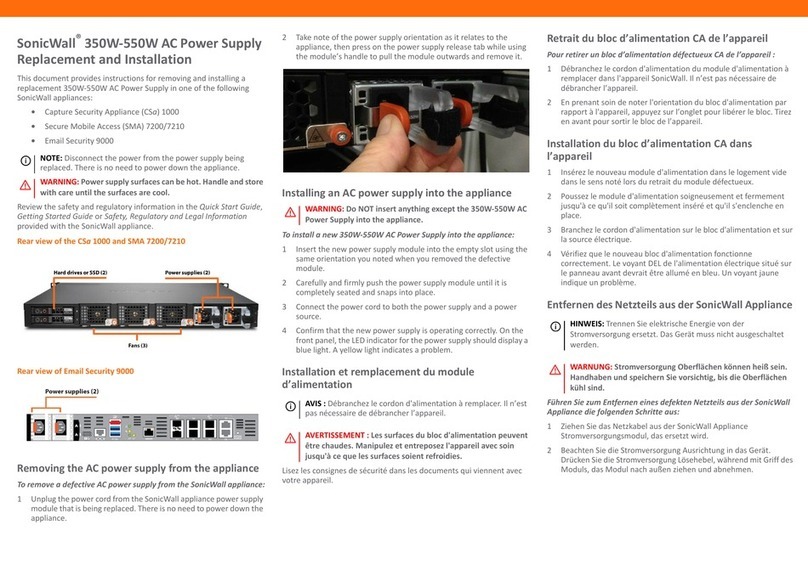
So installieren Sie ein neues NSa 2650/3650-Netzteil:
1 Verwenden Sie einen Kreuzschlitzschraubendreher, um die
Schraube zu entfernen, die die Abdeckung des Netzteilfachs
sichert.
2 Schieben Sie die Abdeckung in Richtung der Geräterückseite und heben Sie
sie an, um sie zu entfernen. Dadurch wird das Netzteilfach geöffnet.
3 Entfernen Sie die Rändelschraube der Halterung. Entfernen Sie
anschließend die Halterung aus dem Fach.
4 Stecken Sie das Kabel des Netzteils in die entsprechende Schnittstelle an
der hinteren Ecke.
5 Platzieren Sie das Netzteil im Fach.
6 Sichern Sie die Halterung mit der Rändelschraube.
7 Wickeln Sie das Kabel so, dass es in das Fach neben dem Netzteil gelegt
werden kann.
8 Platzieren Sie die Abdeckung auf dem Fach. Stellen Sie dabei sicher, dass
der seitliche Haken im entsprechenden Schlitz sitzt. Schieben Sie die
Abdeckung an ihren Platz.
9 Sichern Sie die Abdeckung mit der Schraube.
10 Verbinden Sie das externe Stromkabel mit dem Netzteil.
11 Verbinden Sie das andere Ende des Kabels mit einer Stromquelle.
Entfernen des Netzteils aus der Appliance
1 Entfernen Sie die Schraube von der Abdeckung des Netzteilfachs,
und schieben Sie die Abdeckung auf.
2 Entfernen Sie die Rändelschraube der Halterung, die das Netzteil sichert.
3 Entfernen Sie die Halterung.
4 Entfernen Sie ggf. die Kabelbinder.
5 Trennen Sie den internen Stromstecker.
6EntfernenSiedasNetzteil.
電源供應器安裝和更換
本文件提供有關在您的 NSa2650/3650 網路安全裝置中安裝或拆卸電源供
應器的相關說明。
檢閱隨 NSa 2650/3650 設備提供的快速入門指南中的安全須知與規範資
訊。
將電源供應器安裝到設備中
若要安裝新的
NSa 2650/3650
電源供應器
:
1使用十字頭螺絲起子,將用於將頂蓋固定到電源供應器隔室的螺絲拆
卸下來。
2將頂蓋滑向設備的背面,抬起後卸下,暴露出電源供應器隔間。
3拆下用於固定支架的指旋螺絲,再將支架從供電隔間拆開。
4將電源供應器的電源線插入背面的相符介面。
5將電源供應器放置在隔室。
6用指旋螺絲鎖定。
7將纜繩捲起,整齊地放在電源供應器旁的空間。
8將頂蓋放在隔室上方,確保側邊的卡榫滑入相符插槽,並勾入定位。
9用螺絲鎖緊外蓋。
10 將外接電源線接到電源供應器。
11 將電源線另一端連接到電源。
從設備拆卸電源供應器
1將螺釘從電源供應器隔室外蓋卸下,將蓋子滑開。
2拆下用於將支架固定到電源供應器的指旋螺絲。
3拆卸支架。
4如果有纜線,將纜線捆紮好。
5拔掉內部電源接頭。
6拆卸電源供應器。
This power supply module is for use only with SonicWall appliances indicated below. Use of
this module with a SonicWall appliance that is not approved will void the warranty for that
appliance. This module is provided as a replacement power supply, and is provided on an “as
is” basis without warranty of any kind.
This power supply, SONICWALL NSA 2650/3650 FRU POWER SUPPLY, is approved for use
with:
01-SSC-1936 SONICWALL NSA 2650 APPLIANCE
01-SSC-1937 SONICWALL NSA 3650 APPLIANCE
For information and related documents, see the following web site:
https://www.sonicwall.com/support
Copyright © 2020 SonicWall Inc. All rights reserved.
SonicWall is a trademark or registered trademark of SonicWall Inc. and/or its affiliates in the
U.S.A. and/or other countries. All other trademarks are property of their respective owners.
The information in this document is provided in connection with SonicWall Inc. and/or its
affiliates' products. No license, express or implied, by estoppel or otherwise, to any
intellectual property right is granted by this document. SonicWall Inc. and/or its affiliates do
not make any commitment to update the information contained in this document. For more
information, visit http://www.sonicwall.com/legal.
NSa2650/3650 Power Supply Installation Guide
Updated - November 2020
232-005528-50 Rev A
WARNUNG: Die Oberflächen von Netzteilen können heiß sein. Gehen
Sie vorsichtig vor, bis die Oberflächen abgekühlt sind.
警告 : 請勿安裝除 NSa 2650/3650 電源供應器以外的任何物件至 NSa
2650/3650 設備中。
警告 : 電源供應器表面會變熱。小心地處理及存放,直到表面冷卻
下來。
Legend
WARNING: A WARNING icon indicates a potential for property damage,
personal injury, or death.
IMPORTANT, NOTE, TIP, MOBILE, or VIDEO: An information icon indicates
supporting information.
SonicWall® NSa
2650/3650 Power Supply
Installation Guide

This manual suits for next models

2

Other SonicWALL Power Supply manuals

SonicWALL 01-SSC-0202 Use and care manual

SonicWALL

SonicWALL 01-SSC-0202 Use and care manual

SonicWALL TZ400 User manual

SonicWALL

SonicWALL TZ400 User manual

SonicWALL NSA 2650 User manual

SonicWALL

SonicWALL NSA 2650 User manual

SonicWALL NSa 2700 Use and care manual

SonicWALL

SonicWALL NSa 2700 Use and care manual

SonicWALL SRA EX9000 User manual

SonicWALL

SonicWALL SRA EX9000 User manual

SonicWALL CSa 1000 Use and care manual

SonicWALL

SonicWALL CSa 1000 Use and care manual

SonicWALL NSA 2650 Use and care manual

SonicWALL

SonicWALL NSA 2650 Use and care manual

SonicWALL NSsp 12000 User manual

SonicWALL

SonicWALL NSsp 12000 User manual

SonicWALL High-End NSa Series User manual

SonicWALL

SonicWALL High-End NSa Series User manual

Popular Power Supply manuals by other brands

INIM Electronics SmartLevel Series Installation and programming manual

INIM Electronics

INIM Electronics SmartLevel Series Installation and programming manual

Leviton 47605-PSA installation instructions

Leviton

Leviton 47605-PSA installation instructions

Bogen PRSLSI Specifications

Bogen

Bogen PRSLSI Specifications

TDK-Lambda ALV60 Series instruction manual

TDK-Lambda

TDK-Lambda ALV60 Series instruction manual

Videx 521B installation instructions

Videx

Videx 521B installation instructions

Unitek UNIBOND II Operation, maintenance and service manual

Unitek

Unitek UNIBOND II Operation, maintenance and service manual

GE SERIES B 480 user manual

GE

GE SERIES B 480 user manual

Siemens FP1801-A2 product manual

Siemens

Siemens FP1801-A2 product manual

Allied Telesis AT-BRPS8000 installation guide

Allied Telesis

Allied Telesis AT-BRPS8000 installation guide

Monster POWERCENTER PRO2000 owner's manual

Monster

Monster POWERCENTER PRO2000 owner's manual

Antec Trupower Gold TP-650G user manual

Antec

Antec Trupower Gold TP-650G user manual

Altronix R2432220 Series installation guide

Altronix

Altronix R2432220 Series installation guide

Consort EV1450 manual

Consort

Consort EV1450 manual

LenelS2 LNL-400XA quick reference

LenelS2

LenelS2 LNL-400XA quick reference

Thermal Arc Fabricator 250C III Operation manual

Thermal Arc

Thermal Arc Fabricator 250C III Operation manual

Fluke Calibration E-DWT 3622351 instruction sheet

Fluke Calibration

Fluke Calibration E-DWT 3622351 instruction sheet

3B SCIENTIFIC PHYSICS 1003311 instruction sheet

3B SCIENTIFIC PHYSICS

3B SCIENTIFIC PHYSICS 1003311 instruction sheet

Allied Telesis AT-PWR10 installation guide

Allied Telesis

Allied Telesis AT-PWR10 installation guide

manuals.online logo
manuals.online logoBrands
  • About & Mission
  • Contact us
  • Privacy Policy
  • Terms and Conditions

Copyright 2025 Manuals.Online. All Rights Reserved.