SONIQ L60U11A-AU User manual
60" FullHD LCDTV
with Touch Screen
L60U11A-AU
MD110 8 0 2 - 0 1

Connecting
CHANNEL
PICTURE
SOUND
TIME
OPTION
LOCK
Media play Function
PVR Function
9-10
11-16
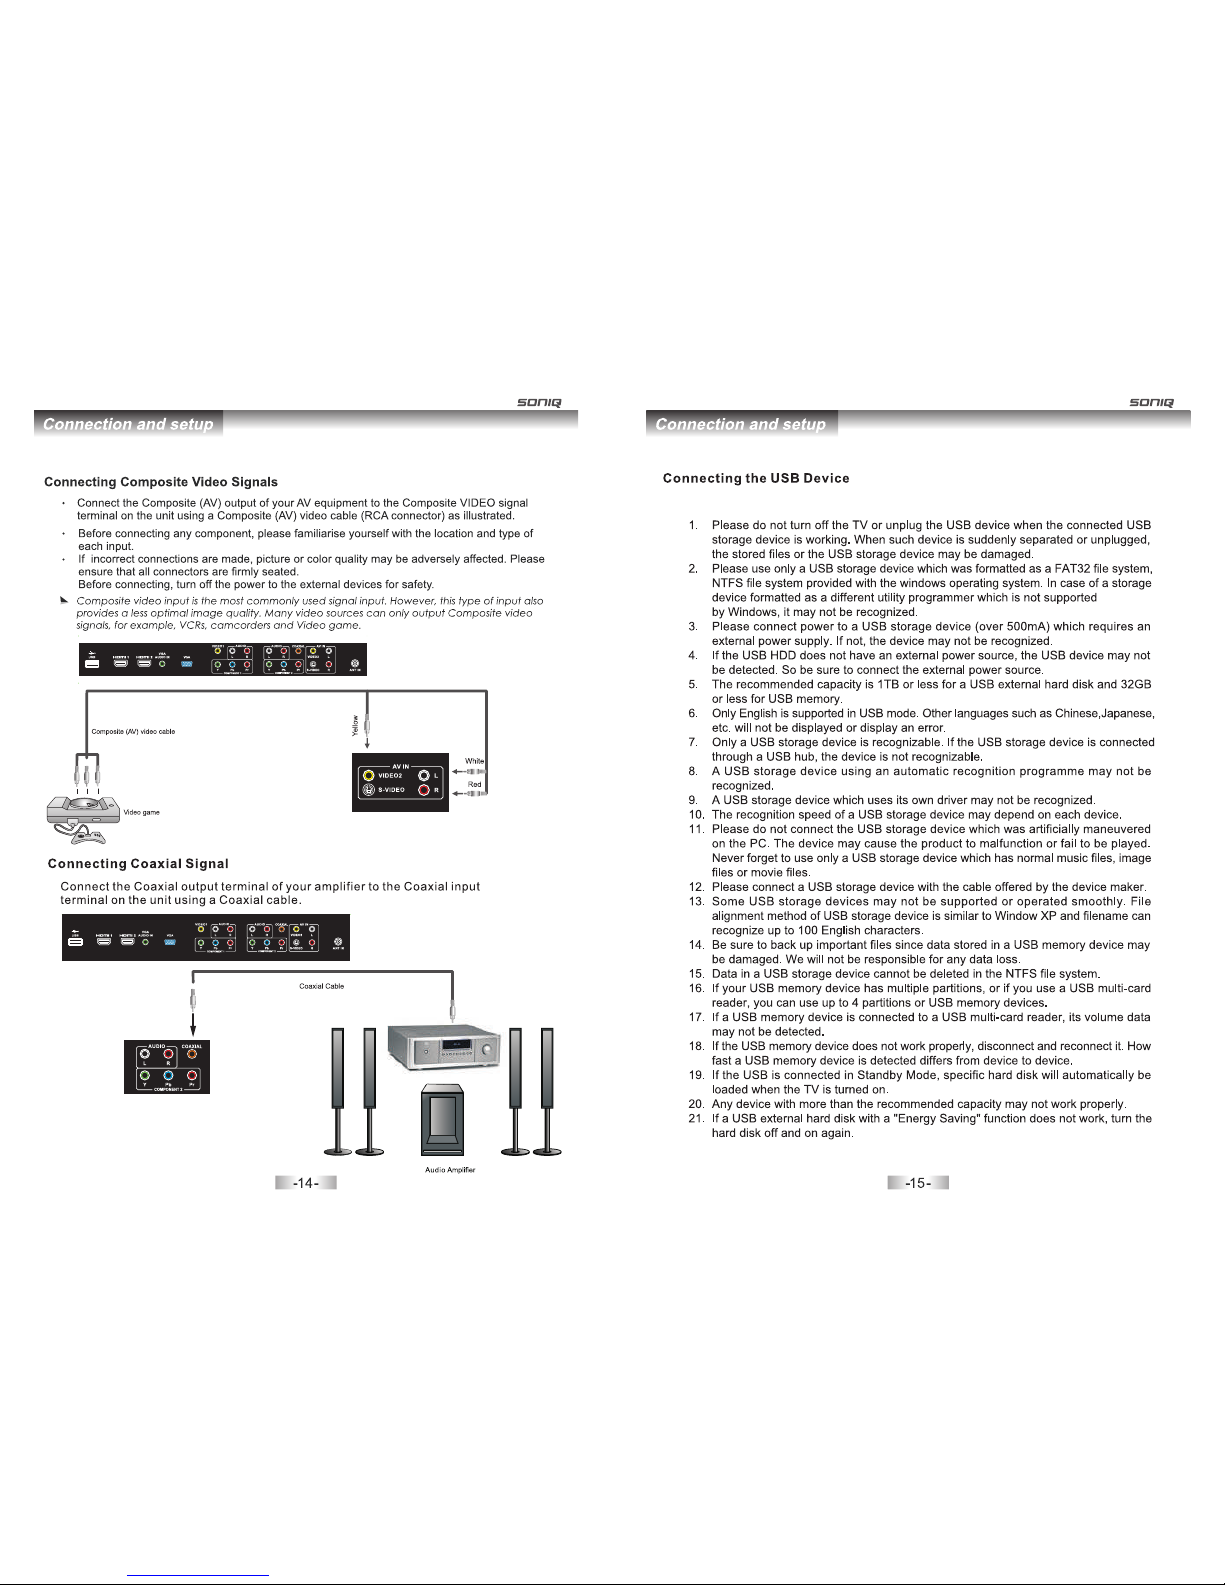
Connecting COAXIAL signals
Menu Operation Guide 17-18
Source Selection
Vol+/Vol-(Volume control)
Menu operation
19-23
19-20
26-30
24-25
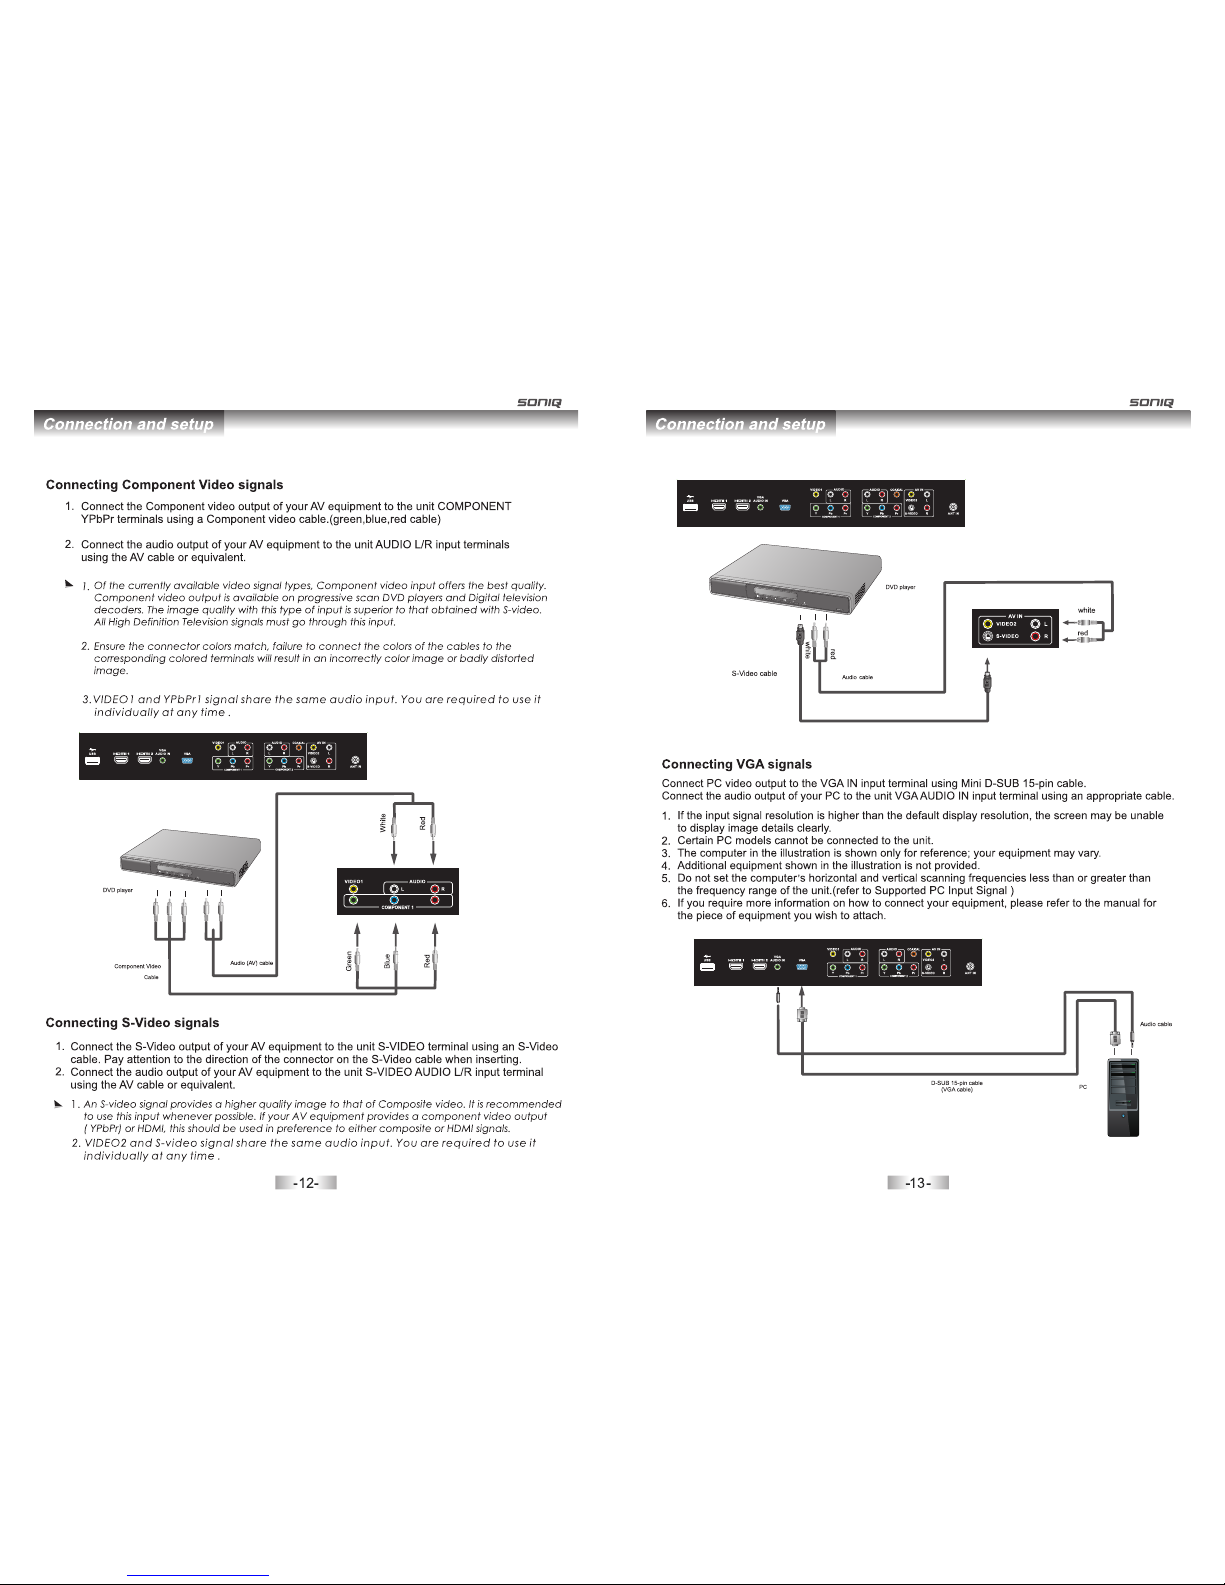
Connecting S-Video signals
1. Software Introduction
2. Software Installation
3. Software Unload
4. Software Application
4.1. Running
4.2. Main Menu
4.3. Calibration
4.3.1. Basic Mode Calibrating
4.3.2. Custom Mode Calibrating
4.3.3. Senior Mode Calibrating
4.3.4. Electronic Key
4.4. Option
4.4.1. Info
4.4.2. Configuration
4.4.3. Control
4.5. Operation Function
5. FAQ
6. Application of Checktool
Troubleshooting
Specifications
Supported PC Input Signal
Specification
..........................................................................31
.......................................................................31-32
...................................................................................33
.......................................................................34-40
........................................................................................34
....................................................................................34
...............................................................................34-36
..........................................................35
.......................................................35
........................................................36
.......................................................................36
.....................................................................................36-40
.................................................................................37-38
.......................................................................39
............................................................................39-40
........................................................................40
.................................................................................................40-43
......................................................................44
.....................................................................................45
....................................................................................46-47
.....................................................................46
........................................................................................47
Connecting HDMI signals
Connecting Composite Video signals


Instruction ManualMain Unit
VGA
VGA
AUDIO
USB
Touch Pen
Installation Disc

and program recording.
Coaxial Digital Audio output for Digital Amplifier.
12 POWER Press to power on or off the unit.
USB
A-B
Press to se lect A-set, AB-se t, None for
repeat fu nction.
None.
GOTO
Press to se lect all under Media mode.
Naviga tion keys
your pref erence. In DTV mode, press OK
to displa y Channel List.
12 13
13 TOUCH SCREEN
USB-A
COMPONENT1/
COMPONENT2
Connect to PC with USB line.

Pb1 Pr1Y1
Connect USB Device directly to the unit.
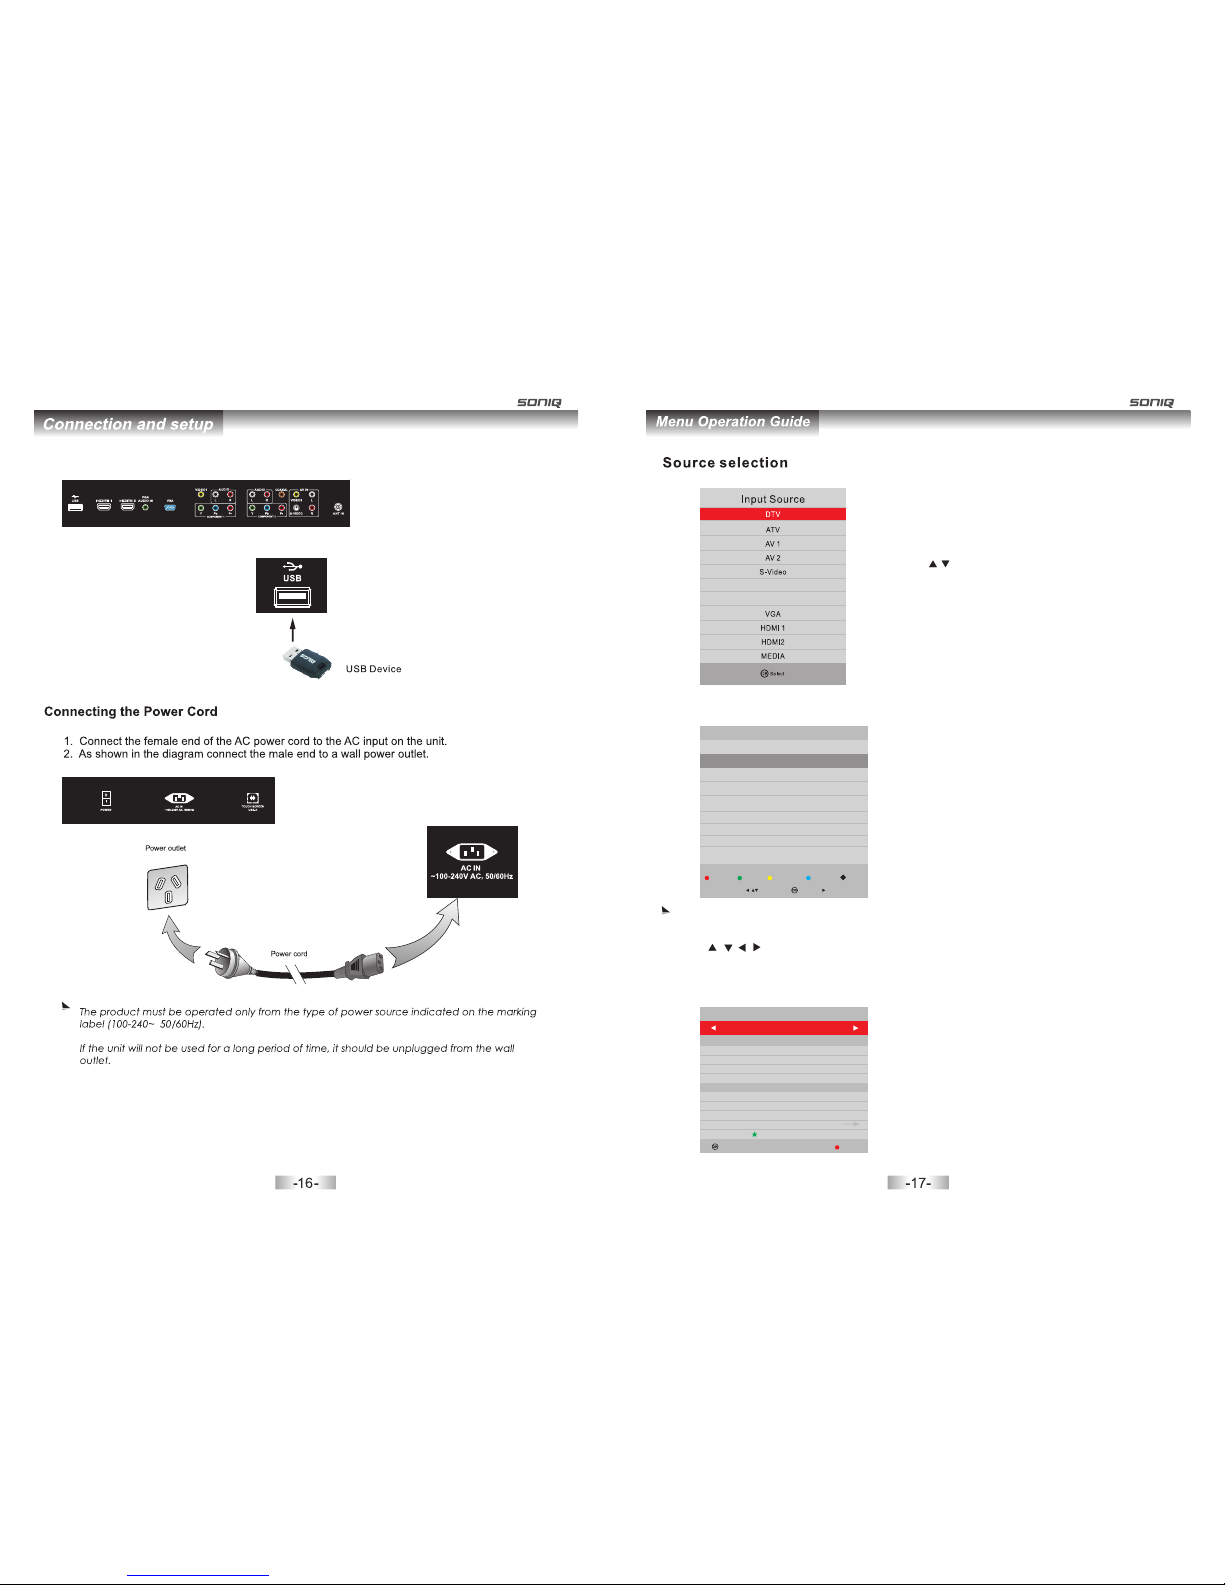
1.Press SOURCE button to display the input source list.
2.Press / or SOURCE button to select the input
source you want to.
3.Press “OK” button to enter the input source.
4.Press “EXIT” to quit.
EPG: It is only available in DTV mode.
PROGRAMME GUIDE
31 Mav 2 011 14:34
800 SZTVM01 No Information
801
802 SZTVM03 No Information
803 SZTVM04 No Information
SZTVM02 No Information
Reco rd INFO Sche dul e Re mind Inde x
Up/D own Select
This function can be used only when the EPG information is broadcasted by digital broadcasting
companies.The EPG displays the programme details for next 8 days.
Press / / / button to move the cursor,press OK button to switch to current channel.
Back
Sele ct
RECORDER
800 SZTVM01
- +
Start Time
42 Minut
14 Hour
May Month
31 Date
End Time
12 Minute
15 Hour
May Month
31 Date
Mode AUTO
Record: Press red key to display a Recorder window, from which you can set the time you want for
recording.(refer to the below picture)
YPbPr 1
YPbPr 2
TIME

UHF CH 52
0--.--- Mhz
DTV Manual Tuning
Press OK to search
Bad Norm al Good
CHANNEL MENU
Press MENU button to enter the CHANNEL page as follows:
A. Auto Tuning
1. Auto Tuning will be highlighted once being turned to this page. Press “OK” button to enter.
2. Press / to select country, press “OK” button to enter into the next step.
3. Press / to select the living area you are located in( Only available in Australia),then press
“OK” button to enter, and then use / to choose the tuning type.
4. Press “OK” to start auto search.
Time Z one
Time Zone S electio n Chann el Tuning
Ple ase cho ose you r chann el tuni ng mode
Sca n Chann el
DTV +ATV
DTV
ATV
DTV AT V
B. DTV Manual
C. ATV Manual Tuning
Storage To 1
System BG
Current CH 1
Search
Fine-Tune
ATV Manual Tuning
+
Menu
Frequency 861.80 MHz
Save
-
1.Press / to highlight DTV Manual Tuning, press“OK”
button to enter sub-menu.
2.Users can select channel number by pressing / , and
set frequency number by pressing numeric buttons.
3.Press “OK” to start.
1.Press / to highlight ATV Manual Tuning, then press
“OK” button to enter sub-menu.
2.All the items in this displayed menu can be adjusted,
after all the settings being done, press / to highlight
“Search”,then press / to start.
CHANNEL
Auto Tuning
DTV Manual Tuning
Programme Edit
Signal Information
ATV Manual Tuning
Back Select
CHANNEL
CHANNEL
Back Select
CHANNEL
ATV Manual Tuning
Software Update
Programme Edit
Signal Information
Allow Update
Count ry Select ion
Ple ase sel ect you r count ry
Cou nt ry
Aust ral ia
NewZ eal and
Back Sele ct Back Sele ct Back Sele ct
INFO:Press green key to view the details of the focused channel.
Schedule: Press yellow key to browse the program information saved in the schedule list, and press
yellow key or exit to return.
Remind: Press blue key to add a program needs to be reminded, and it will be switched on time.
Index: Press index key on the remote control to view the program list in 7 days.
Back
Sele ct
Reminder setting
800 SZTVM01
- +
44 Minute
14 Hour
May Month
31 Date
Once Mode
25 Dec 2005 09:00-10:00
A religiou s program. WS
Schedule List 09:33 25th Dec Delete
Time Date Programme Title Channel Name
10:00 Sun, 25 Dec SP-THE SINGING CHRISTMAS TREE 7 7 Digital
Note: Volume adjusting will exit the “MUTE”status
You can operate all function by remote control and maybe partial function by the key on panel.
The main menu can be operated by “MENU”, “OK”and “EXIT” button.
“MENU” button can open the menu or exit to the upper level menu. There are six main menu
pages in the system:PICTURE,SOUND,CHANNEL,TIME,LOCK,OPTION.
Press / / / button to select any item or adjust some settings.
Press “OK” button to confirm a selection.
Press”EXIT” button to exit the main menu.
- +
MEN U EXI T
SKIP

1. Press MENU button to bring up the main menu.
2. Then press / to enter PICTURE page, it will highlight the first option, press OK button to enter.
3. Picture Mode: Press / to adjust the mode by Standard, Dynamic, Mild, User. Contrast,
Brightness, Color, Sharpness can be adjusted only under user mode, Press “Menu” to return to
the main menu.
4. Color Temperature: Press / button to select Cool, Standard, Warm and User. You can adjust
the Red, Green and Blue in User mode.
5. Aspect Ratio will be available under DTV, and you can choose Full, 4:3,Auto Just Scan.
6. Screen can be available under PC mode.
7. Energy Saving: You can choose Middle, High, Off, Low, Standard in this section
8. Noise Reduction: Can be adjusted among Middle, high, Off, Low.
PICTURE MENU
SOUND MENU
1. Press MENU button to display the main menu.
2. Press / to enter SOUND page, it will highlight the first option, then press OK button to enter
sub-menu.Press / to adjust Sound Mode. You can change the value of Treble and Bass under
user mode.
3. Press / to select Balance, then press OK button to enter sub-menu. Press / to adjust
4. Press / to select Auto Volume, then press OK button to select On or Off.
5. Press / to select SPDIF Mode, then press OK button to enter sub-menu, press / to select
PCM,Auto and Off.
6. Press / to select Power On Music, then Press OK button to select On or Off.
PICTURE
PICTURE
Back Sele ct
SOUND
SOUND
Back Sele ct
Sound Mode
Balance
Auto Volume
SPDIF Mode
Power On Music On
Programme Edit
Press / to select Program Edit, then press OK button to enter sub-menu.
1. Press red button to delete the selected program.
2. Press yellow button to change program order. Selected
channel can be moved by using / , then press“OK”
for confirm.
3. Press blue button to skip the selected channel.
4. Press FAV on your remote control to add a channel to
the favorite list.
5. Press green button to rename the current channel.
(Only available in ATV mode)
7 7 Digital
Programme Edit
Menu
Del et e
DTV
70 7 HD Digita l DTV
71 7 Digital 1 DTV
72 7 Digital 2 DTV
Mov e
Ski p
Fav or it e
FAV
OK Select
73 7 Digital 3
77 7 Guide
2 C-04
3 S-04
4 C-08
1 C-02
DTV
DTV
ATV
ATV
ATV
ATV
Ren am e
Signal Information
Press / to select Signal Information, then press OK button to display signal details, including
channel number, network name,modulation model,signal quality and signal strength.
Signal Information
Channel 30
Network Seven Network
Modulation 64QAM
Quality 99
Strength 54
Software Update
If there is new software with broadcasting signal in DTV mode, the TV set will update software.
Allow Update
Set the time of software updatation, you can select On or Off.
PICTURE
PICTURE
Back Sele ct
Picture Mode Standard
Color Temperature
Aspect Ratio
Energy saving
Screen
Aspect Ratio
Energy Saving
Screen
Noise Reduction
Colo r Temp eratu re
OPTION MENU
Press MENU to display the main menu.
Press / to enter OPTION page, it will highlight the first option.
OSD Language: Only English can be selected in the function.
PVR File System: Press OK button to enter the PVR File System, Users can check the information
of the USB device, or format the USB device.
OSD Time Out: Set OSD time out.
OSD Transparency: Adjust the transparency from Off to 100%.
Restore Factory Default: Operate this item to resume all the initial setting.
Version Info: Highlight this item,and then press “OK” button to check out the version information of
the system.
Blue Screen: Press OK to select On or Off.
LOCK MENU
Press MENU to bring up the OSD menu.
Use / to turn to LOCK page, it will highlight the first option ,then press OK button to enter the submenu.
You are required to input
the password (default as 0000)
Back
LOCK
LOCK
Lock System
Set Password
Block Program
Parental Guidance
Back Sele ct
Please enter password
CancelClear
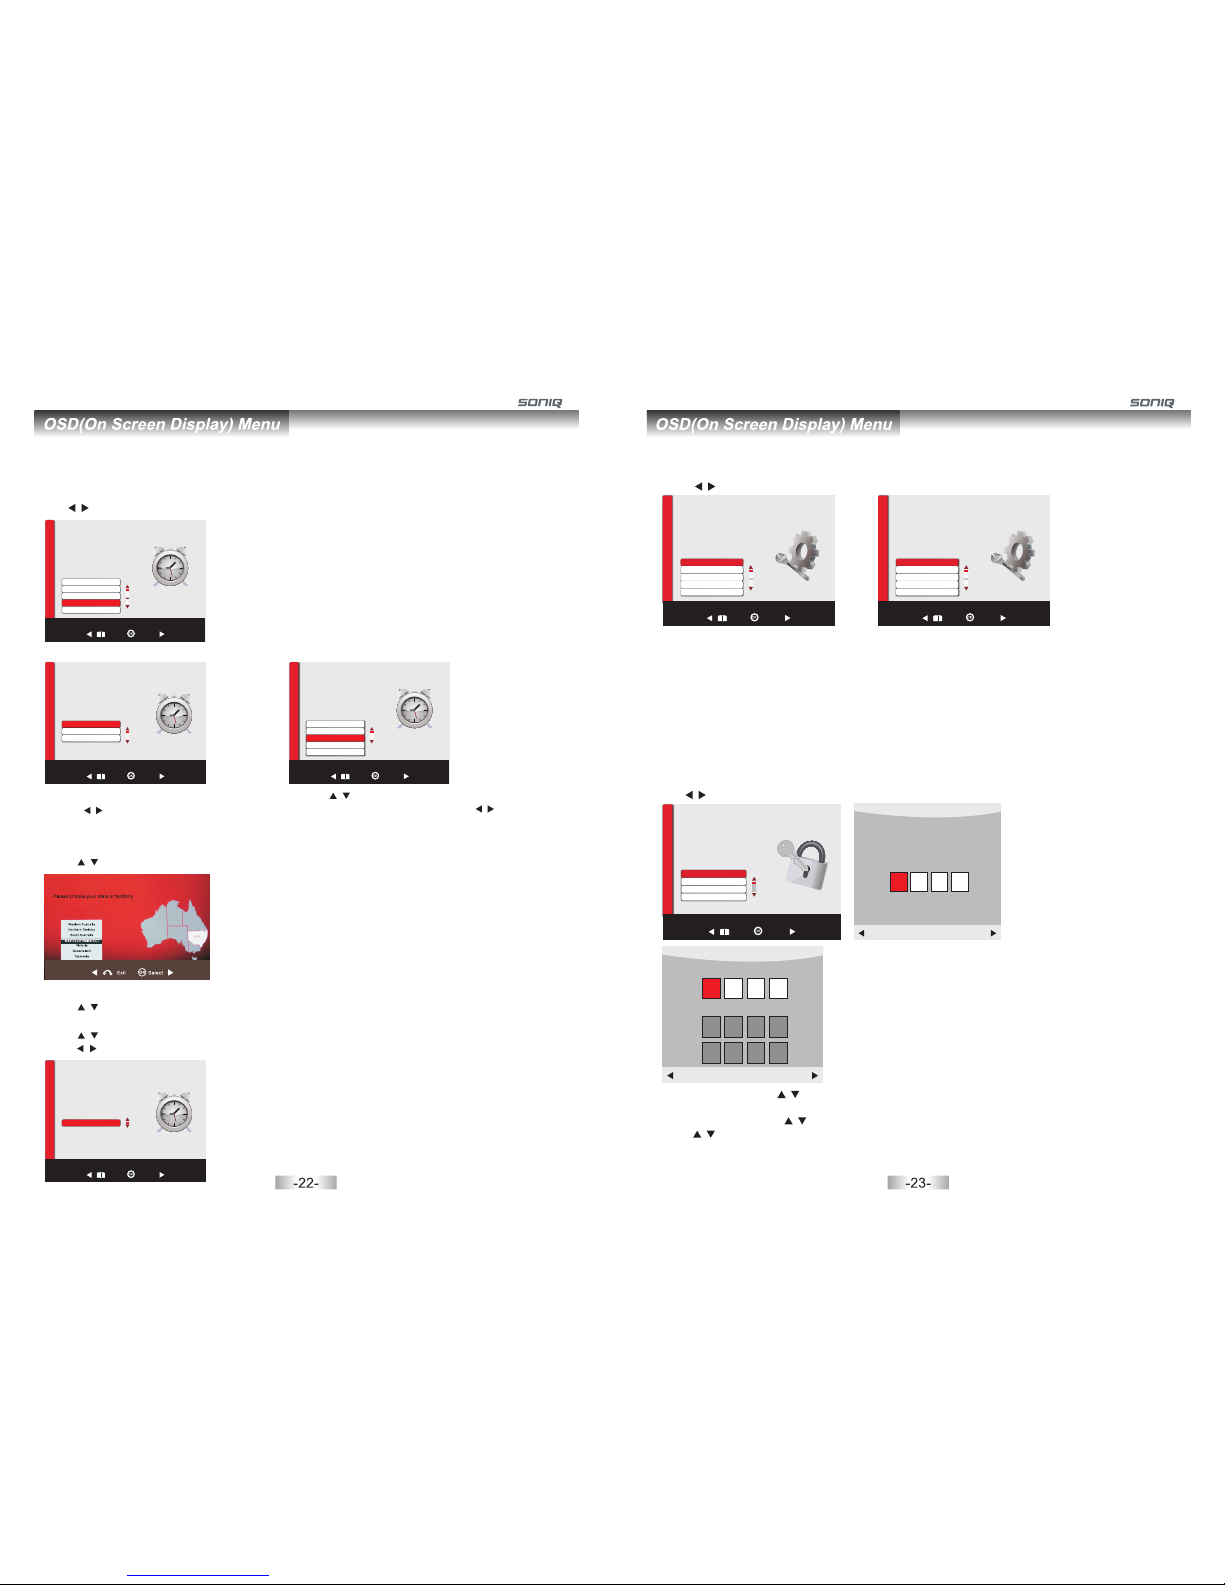
Press MENU to display the main menu.
Use / to enter TIME page, it will highlight the first option.
TIME MENU
Off Time
- Press OK button to enter submenu.
Press / to adjust.
On Time
- Press / to select On Time, then press OK
button to enter the sub-menu. Use / to adjust.
- Clock: Display the current system time .It's not
available.
Time Zone
Press / button to select Time Zone, then press OK button to enter sub-menu.
Auto Sleep
Press / button to select Auto Sleep, then press OK button to select On or Off.
Sleep Timer
Press / button to select Sleep Timer, then press OK button to enter sub-menu, and then
press / button to adjust.
TIME
TIME
Back Select
Off Time
On Time
Auto Sleep
Clock 02/Jun 15:55
Time Zone New South Wales/ACT
TIME
Back Select
Off Time Every Day
Hour 0
Minute 0
TIME
Back Select
Mode Select Once
Hour 12
Source AV 2
Volume 30
Minute 1
Tim e Zone
Time Zone Selection
Bac k Sel ect
TIME
Back Select
Sleep Timer Off
Back
OPTION
OPTION
OSD Language English
PVR File System
OSD Time Out
OSD Transparency
Restore Factory Default
Back Sele ct
Set Password: Press / to select Set Password, then press OK button to enter sub-menu to set
new password.
Block Program: Press / to select Block Program, then press OK button to enter sub-menu,
press / to select the program you want to lock ,then press green button on your remote.(To
unlock the program, input the password you set.)
Parent Guidance: Parent can set age limit level by this function.
Please enter old password
CancelClear
Back
OPTION
OPTION
Back Sele ct
OSD Time Out Off
OSD Transparency
Restore Factory Default
Version Info
Blue Screen

USB Disk
If not inserting USB equipment, it shows No Device; If USB equipment is inserted, it shows USB2.0
or USB1.1.
Format: Select to format the disk.
Time Shift Size
Can't be chosen.
Can be used at Timeshift space, the size is chosen by clients when doing format.
Speed
Can't be chosen. After Check PVR File System, it shows the available speed of USB.
If inspection failed, it shows FAIL, but if it is normal, it shows SUCCESS
Then Press OK button to start format the disk, then a warning with “All data will be lost” will be
displayed to remind the user to choose Start or EXIT.
Press button to start, button to exit.
USB Dis k Pass
Time Shif t Size All
Pass
Speed 9429 KB/s
Free Re cord Limi t 6 Hr.
Forma t
Check P VR File Sys tem SUCCE SS
Menu
Select Disk C:
Press format to display File System Size
PVR Fil e System Si ze All
HD 3726 M ins
SD 1304 1 Min
PVR Fil e System Type Hi Sp eed FS
Menu
File System Size
In Time Record Operation
Press REC button on the remote control to start recording the current programm, the recording
window will be disappeared after few seconds and a red transparent icon with REC characters will
be displayed at the right side of the screen. Press HOLD button for stop.
It is available for recording when the unit is in Standby mode.
Format disk
Warning! All data will be lost.
EXIT
Start
PVR File System
PVR function is only available for DTV, includes Record, Timeshift and Playback functions. Record
includes in time record and preserve record. In time record can be worked through REC key
immediately, and preserve record needs to preserve beforehand.
Record and Playback can be done at the same time. Timeshift is another function for both recording
and playing.
The following will explain in details.
Enter PVR from OPTION menu, as follows:
Select Disk
Choose the disk to store whatever content recording, normally default as C:
Press / button to select Start, then Press OK button to enter the submenu.
Back
OPTION
OPTION
Back Sele ct Menu
Select Disk C:
Check PVR File System Start
USB Disk
Time Shift Size
Speed
Free Record Limit 6 Hr.
Format
Menu
Select Disk C:
Check PVR File System Checking
USB Disk Pass
Time Shift Size All
Pass
Speed Checking
Free Record Limit 6 Hr.
Format
PVR Function PVR Function
PVR.L Operation
Press PVR.L button to display the recorded program list, select any of the items for watching.
Delete: Press red button to delete focused program.
INFO: Press green button to pop out programme information.
Index: Press to switch recording program orders.
OK: Play focused program.
Up/Down: Press / button to select program.
Preserve Record Operation
Press EPG directly to display the PROGRAMME GUIDE window, focus on your favorite channel
that you want to record then press REC button at the remote control to enter into the RECORDER
menu, and then you are required to set the recording time there.Press OK for confirm.
Men u
Del ete
OK Se le ct
INF O
Ind ex
Reco rde d Lis t Progr am
DISN EY ADVEN TUR ES
DISN EY ADVEN TUR ES
DISN EY ADVEN TUR ES
GOOD C HEF B AO CH FF
GOOD C HEF B AO CH FF
GOOD C HEF B AO CH FF
GOOD C HEF B AO CH FF
GOOD C HEF B AO CH FF
Geor ge And M art ha
DISN EY ADVEN TUR ES
Timeshift
Press to delay the process of program broadcasting in DTV mode.
Time Shift
[00:00:03/00 :00:00]
A B
20:13
OSD Language English
OSD Time Out
OSD Transparency
Restore Factory Default
PVR File System
OK Select
OK Select
Sele ct
OK Sel ect
OK

MEDIA Ph ot o BM P 1/2
Ret urn Up Fo lder 10 24x76 8_bmp .bmp 14 40x90 0.bmp
160 0x120 0.bmp 213 12.bm p DTVLO GO_NE SX.bm p GRAY1. bmp
GRAY 2.bmp u ntitl ed.bm p untit led1. bmp unti tled1 23.bm p
Delet e co py p as te
Ret urn Up Fo lder QX Q music
000 111 .jpg 06 .mp3 10 02461 6c.mp 3
Sub Me nu S elect /Unse lect All
052 1hang mu09. jpg 052 1hang mul3. jpg 052 1hang mu15. jpg 08_ gC1WI vNHu1 UZ_0. .
Reso lutio n: 1280 x800
Size : 199 KBy tes
Date : ---- / -- / - -
Time: - - : -- : --
1/1
Return Up F ol de r mo vi e mu si c
Photo Text
Sub Me nu Sele ct/Un selec t All
C:\MEDIA
1/11MED IA \P hot o\ JPE G
Ret urn Up Fo lder 10 24x76 8_bmp .bmp 14 40x90 0.bmp
160 0x120 0b.mp 2 1312. bmp DTV LOGO_ NESX. bmp GRAY 1.bmp
GRAY 2.bmp u ntitl ed.bm p untit led1. bmp unt itled 123.b mp
Sub Me nu S elect /Unse lect All
C:\ME DI A\ Ph ot o\ BM P 1/2

1/2
Ret urn
Sub Me nu S elect /Unse lect All
C:\ ME DI A\M ov ie\ mk v
Para norma l_Act ivity _[- Sam sung .Demo .Ocea ni_ Shu tter_ Islan d_[Di vx_-[ MV].H otcha -.Par tyGi -
Resol ution : 1920 x 10 80
Audio Tr ack: 1/ 2
Subti tle: OF F
Progr am: -/0
Size: 5 19585 K Bytes
Big Buck Bun ny_ 108 -[D ivx7 ]_A AC5 .1_ A_
720p _chd- mr&mr s-smi _
1/15
Ret urn Up Fo lder QX Q music
03. mp3 06. mp3 100 24616 c.mp3
1139 15394 0.mp3 117 42706 62.mp 3 117751 52828 05.mp 3 136er qiany y.mp3
Sub Me nu S elect /Unse lect All
Albu m:
Titl e:
Blt Ra te: 128 K
Arti st:
Samp ling: 4 4K
Year:
Slze : 3924 KB ytes
C: ME DIA Musi c MP3

1/1
MED IA \Tex t
Return
Sub Me nu Select /Unse lect All
chinese txt.txt
This b ook by th e www.wm txt.c om(un kno
wn txt n ovel do wnloa d site) f or you to o r
gani ze prod uctio n
Down load fr ee nove ls more e xciti ng,mo re
comp lete ve rsion o f the nov er e-bo ok dow
nloa d pleas e visit w ww.wmt xt.co m
chap ter
Eng lish tx t.txt
Size : 35KBy tes
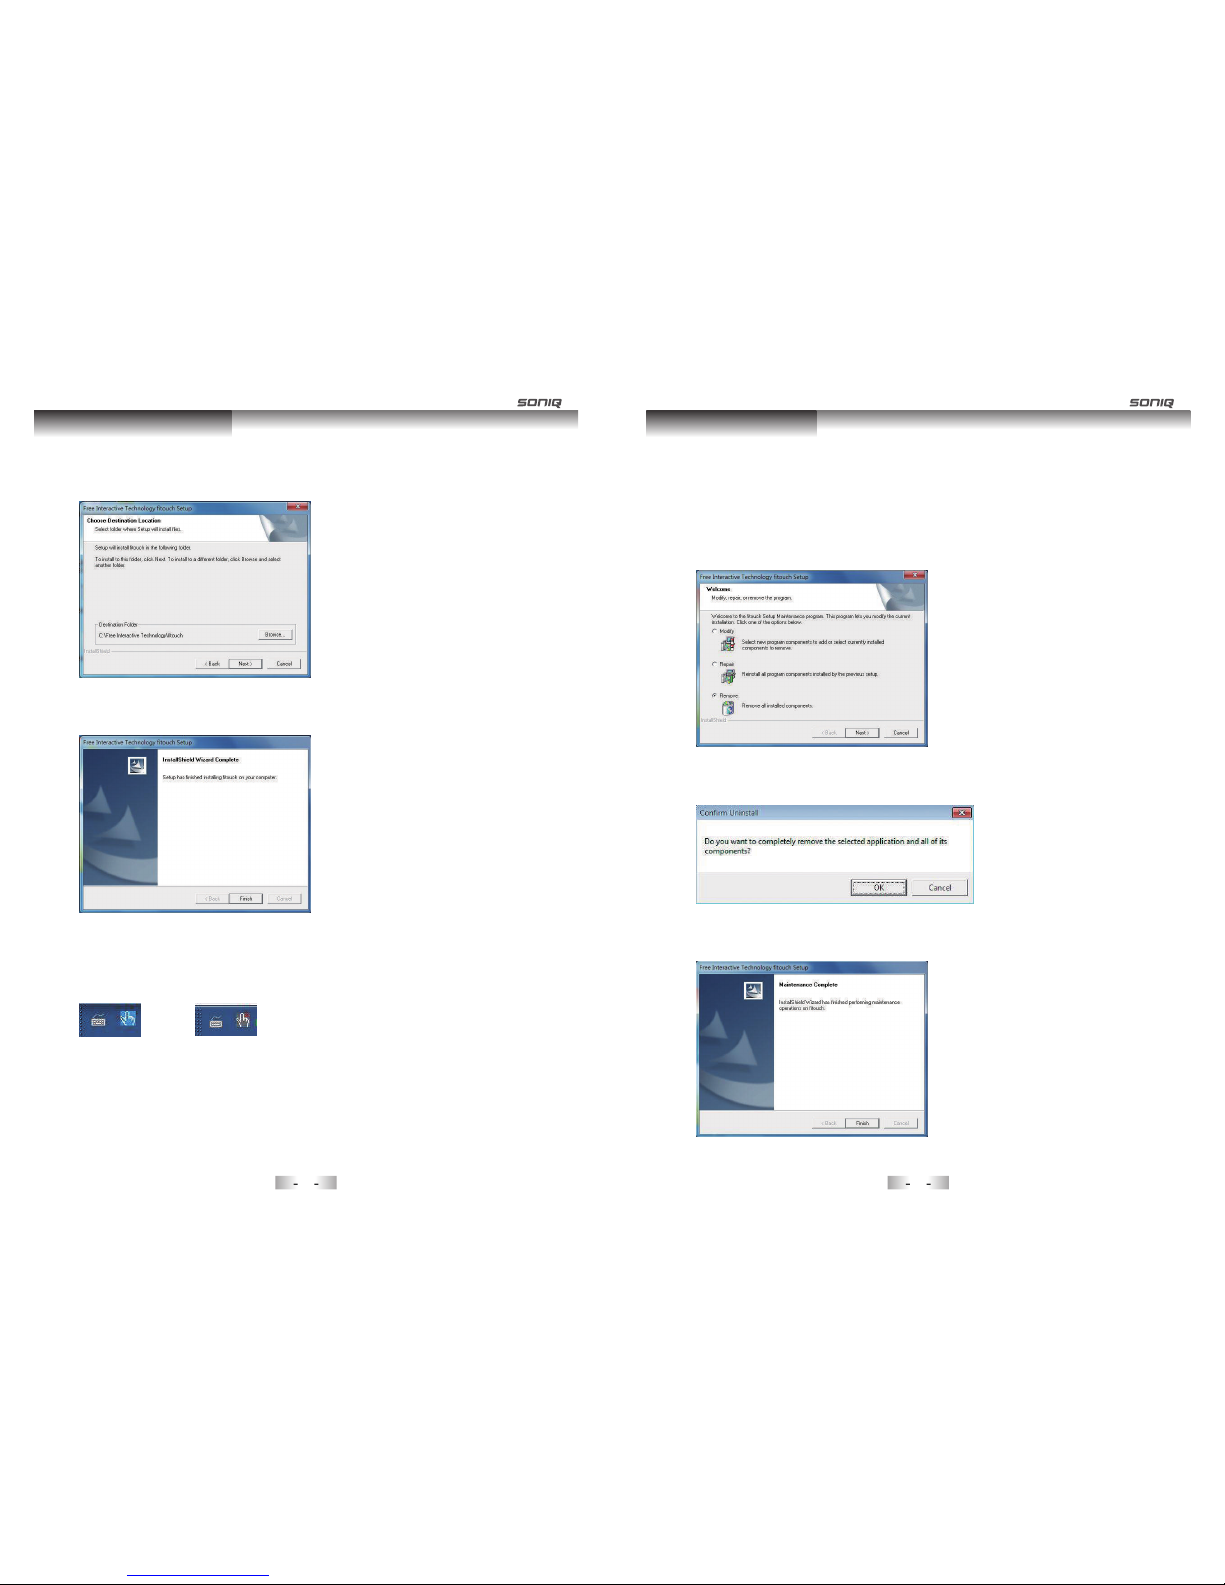
(3) Select destination folder. You can change it based on your own requirement. Then click “Next”:
(4) Click “Next” all the way down until a dialog box as below appears, and click “Finish”:
(5) After the installation, watch if there is an icon in tray style appearing on the bottom right of
the desktop: if so, that means installation succeeds. ( note: blue one means the device has
been connected, gray one means the device has not been connected.)
If Fitouch program is running, please exit it first.
Open the "Control Panel" of Windows operating system, click "Add or Remove Programs", find
Fitouch, and then click to uninstall it, refer to the following steps:
3. Software Unload
(1) Select “Remove” and click “Next”:
(2) Click “Yes” in the dialog below:
(3) Click “Finish” and Fitouch is uninstalled..
Software Installation Software Unload
3332
Software Application Software Application
(1) The software will run automatically on boot-up under the default mode, you can find the
tray-liked icon on the bottom right of the desktop.
4. Software Application
4.1. Running
(2) If you closed this software by accident, you can find "Free Interactive Technology"
through entering"Start"->"All prgrams", and then select" Fitouch" to run the program.
Default mode: You can find the shortcut of Fitouch" on the Desktop, directly double
clicking it will also run the program.
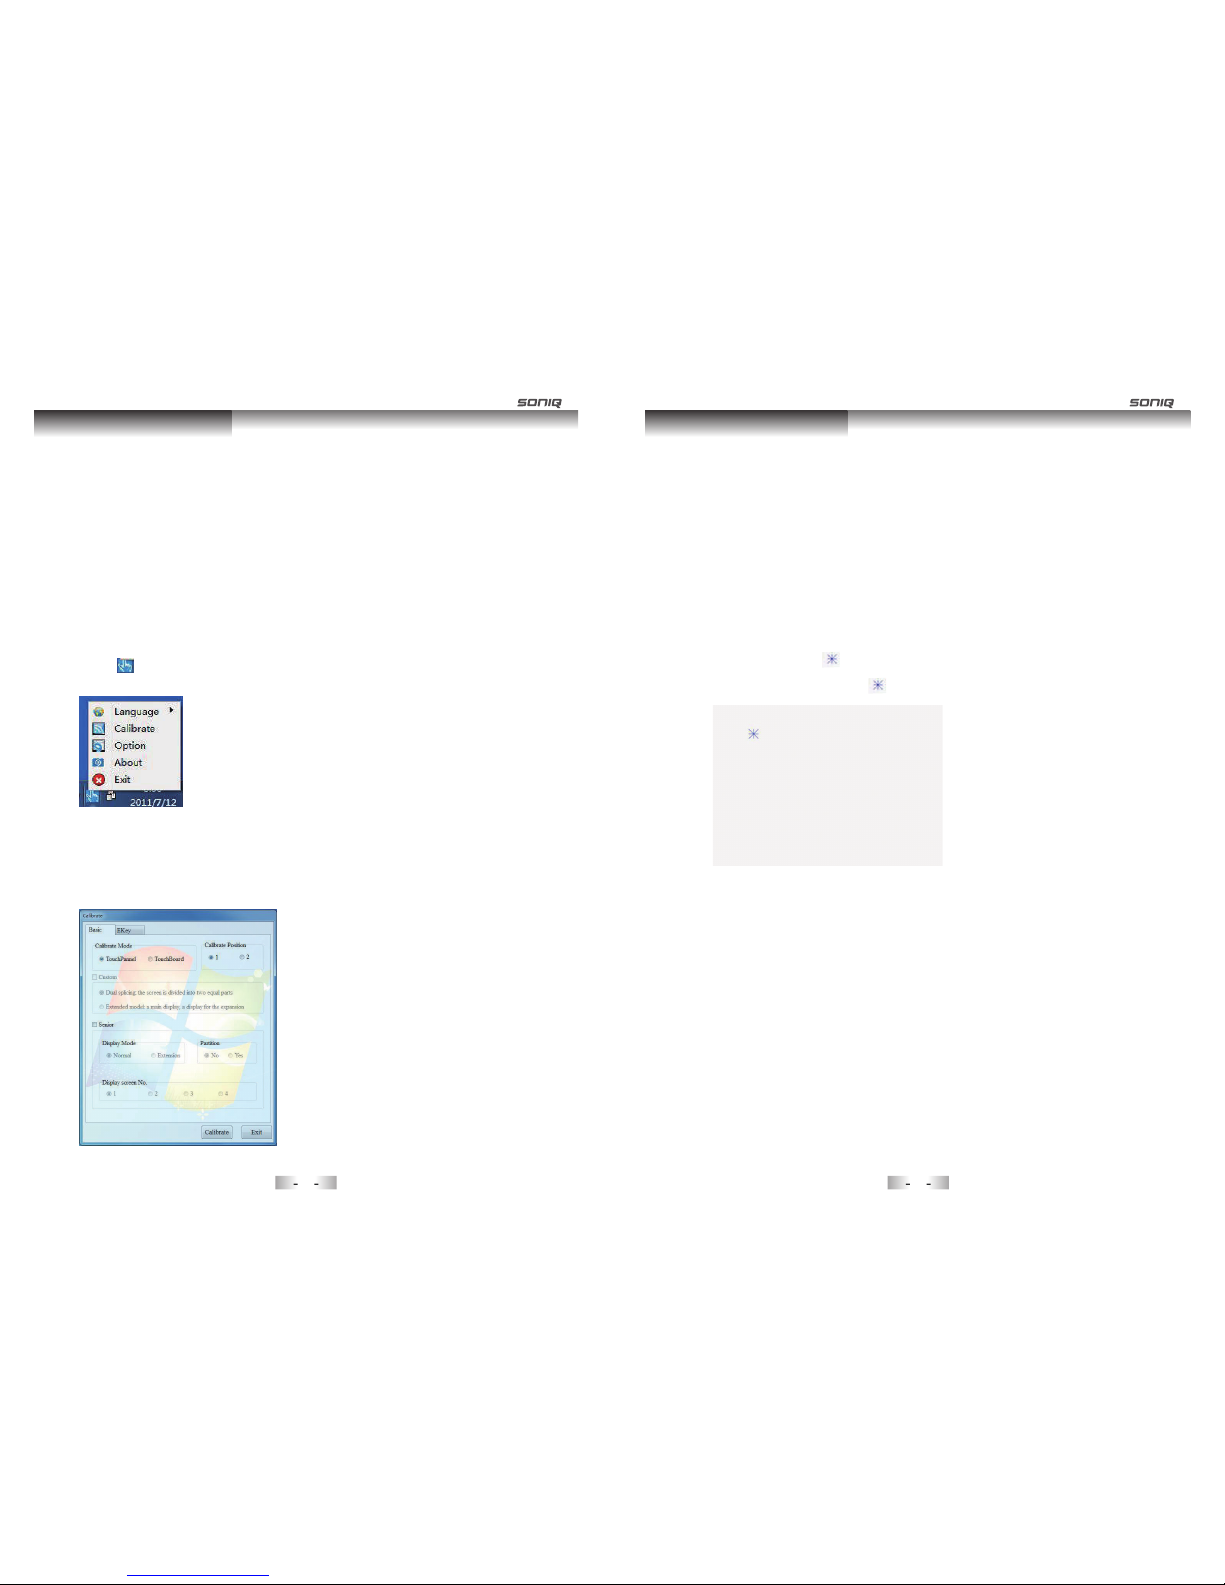
Click “ ” tray icon to display the main menu as shown below:
4.2. Main Menu
Functions are as follows:
(1) Language: Select user interface language.
(2) Calibrate: Calibrate the screen to ensure the touch position
coincide with the actual position on the screen.
(3) Option: Display the basic information of touch screen. User can
configure corresponding parameters to achieve better effect
according to actual demands. Meanwhile, user can control and
check the device through Option.
(4) About: Display information of Fitouch software.
(5) Exit: Close Fitouch software.
Click “Calibrate” and a dialog as below pops up:
4.3. Calibration
There are Custom and Senior two options in the dialog above. If no option is selected,
then the default will be basic mode calibration.
The mode is only applicable to the situation that one touch screen is connected.
“Calibrate Mode” includes “TouchPanel” and “TouchBoard”. The difference between
them is that “TouchBoard” supports positioning of non-rectangular display screen,
“TouchPanel” only supports positioning of rectangular display screen. For rectangular
screen of television, please select “TouchPanel”.
“Calibrate Location” includes “1” and “2”. “1” represents positioning icon will move in
four corners of the screen; “2” represents positioning icon will move near the central area
of the screen. (Note: “1” is recommended in regular situation.)
After done with selecting, click “Calibrate” and pop up the following interface. Please
touch the center of “ ” with touch pen or your finger. (In the process of positioning,
the touch pen should be hold vertical to touch surface and the pen head should be
coincided with the center of “ ”.
4.3.1. Basic Mode Calibrating
The positioning icon will move to the four corners of the screen, please touch them respectively.
4.3.2. Custom Mode Calibrating
It is custom mode calibration when “Custom” is selected. It supports following two
positioning ways. Two touch screens are required for positioning in custom mode. It not
supports positioning if there is only one screen.
(1) Double Screen Splicing
Double screen splicing refers to dividing the screen into two parts. The screen
displays in two monitors respectively, while the two monitors need to be equipped
with touch screen. In this way, it needs doing positioning respectively, one is on the
left side of the screen, and the other is on the right side of the screen.
(2) Extended Mode
Extended mode refers to extending the screen into two parts: main screen and
expansion screen, which correspond to two pieces of monitors. Similarly, both two
monitors need to be equipped with touch screen. In this way, it does also positioning
twice separately, the first time on the main screen, the second time on the expansion
screen.
3534
It is Senior Calibrating when “Senior” is selected.
In this mode, user can calibrate the screen flexibly based on your own demands.
Should you have any problem when calibrating the screen in this mode, please contact
our company for technical support.
4.3.3. Senior Mode Calibrating
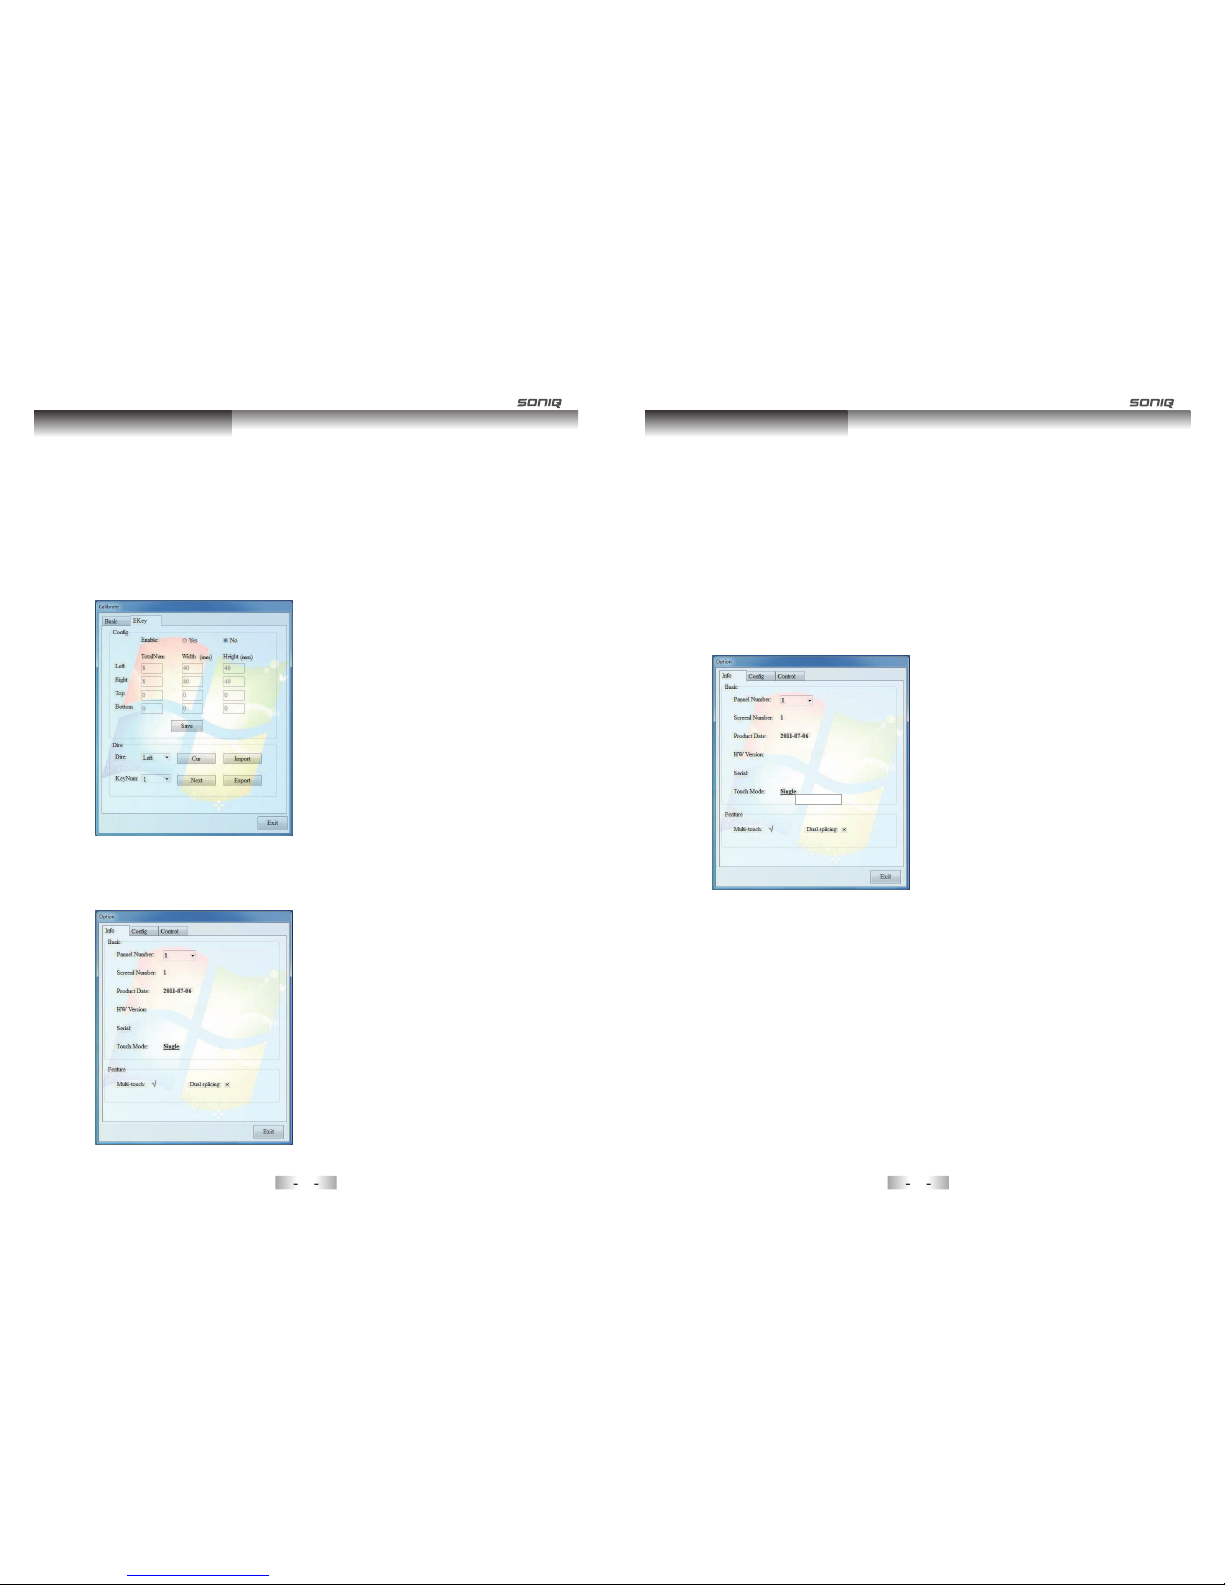
4.3.4. Electronic Key
Electronic key can be calibrated in the
specified area on the screen. Designated
area must be shown on the dialog box to
configure, save and calibrate.
Click “Option” to display the dialog as follow:
4.4. Option
“Basic” shows information of the connected touch screen. Different touch screen
numbers can be chosen when several touch screens are connected, in order to show the
corresponding information of touch screen. In “Basic” dialog box, user can switch touch
mode in “Basic” as following:
1.Single point to Multi-points: Click “Single Point” and pop up a menu, then click “Multi-
Points” to switch to “Multi-Points” touch mode.(Note: When the “Multi-Points in “Feature”
shows “√”, the “multi-Points touch mode can be available.)
2. Multi-Points to Single Point: Click “Multi-Points” to pop up a menu. Then click “Single
Point” to switch to single point touch mode.
4.4.1. Info
For Window 7 OS, if touch screen supports Multi-Points, user can set it to Multi-points
mode to experience the effect of Multi-points touching.
Single Point Mode: Fully substitute the function of mouse. There is no need to run
Fitouch in this mode.
Multi-Points Mode: Enable user to realize Multi-points or multi-user interaction on the
same screen.
“Feature” displays update information of touch monitor. “√ ” means supporting, “×”
means not supporting.
Multi-touch upgrade: (Must have appropriate authority before upgrade.) Click “×” after
the multi-touch in “Feature”, the dialog box shown as below:
Software Application Software Application
3736
TS02R02B021B
00003513
TS02R02B021B
00003513
Multi
Table of contents
Other SONIQ LCD TV manuals

SONIQ
SONIQ E23Z15A-AU User manual

SONIQ
SONIQ QSL423XT User manual

SONIQ
SONIQ G32HW60A User manual

SONIQ
SONIQ G43FW60A User manual

SONIQ
SONIQ E40W13A-AU User manual

SONIQ
SONIQ L55S11A-au User manual

SONIQ
SONIQ G75UW40A User manual

SONIQ
SONIQ Qvision QV192LCT User manual

SONIQ
SONIQ QSL322T User manual

SONIQ
SONIQ qv220lti User manual

SONIQ
SONIQ E32S12A User manual

SONIQ
SONIQ L32V11D-NZ User manual

SONIQ
SONIQ G75UW62A User manual

SONIQ
SONIQ iV220T Qvision User manual

SONIQ
SONIQ E40W13C-AU User manual

SONIQ
SONIQ Qvision QV325L User manual

SONIQ
SONIQ E42FV40A User manual

SONIQ
SONIQ QASA QSL470XT User manual

SONIQ
SONIQ E65UV40A User manual

SONIQ
SONIQ U58V14A-AU User manual


