SONLUX LightmaXX User manual
INSTRUCTION
663-0404
22-2022
1 / 12
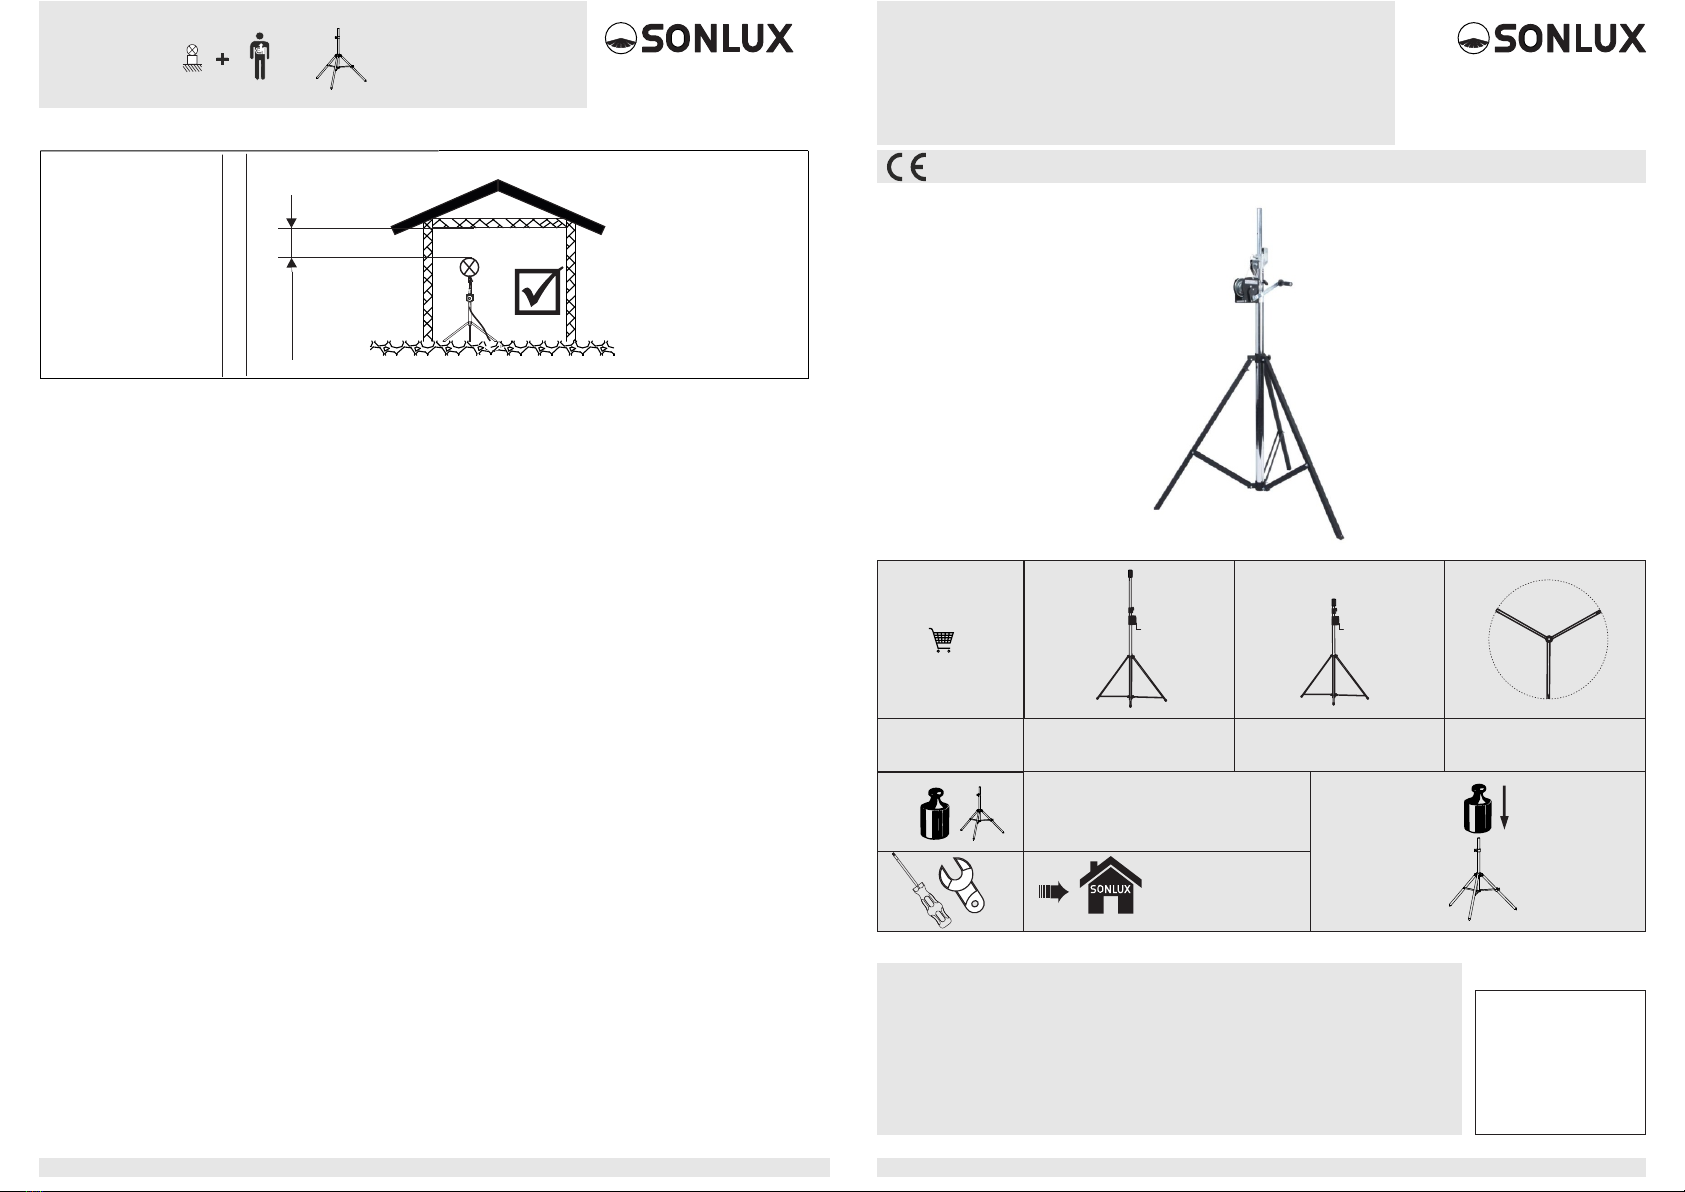
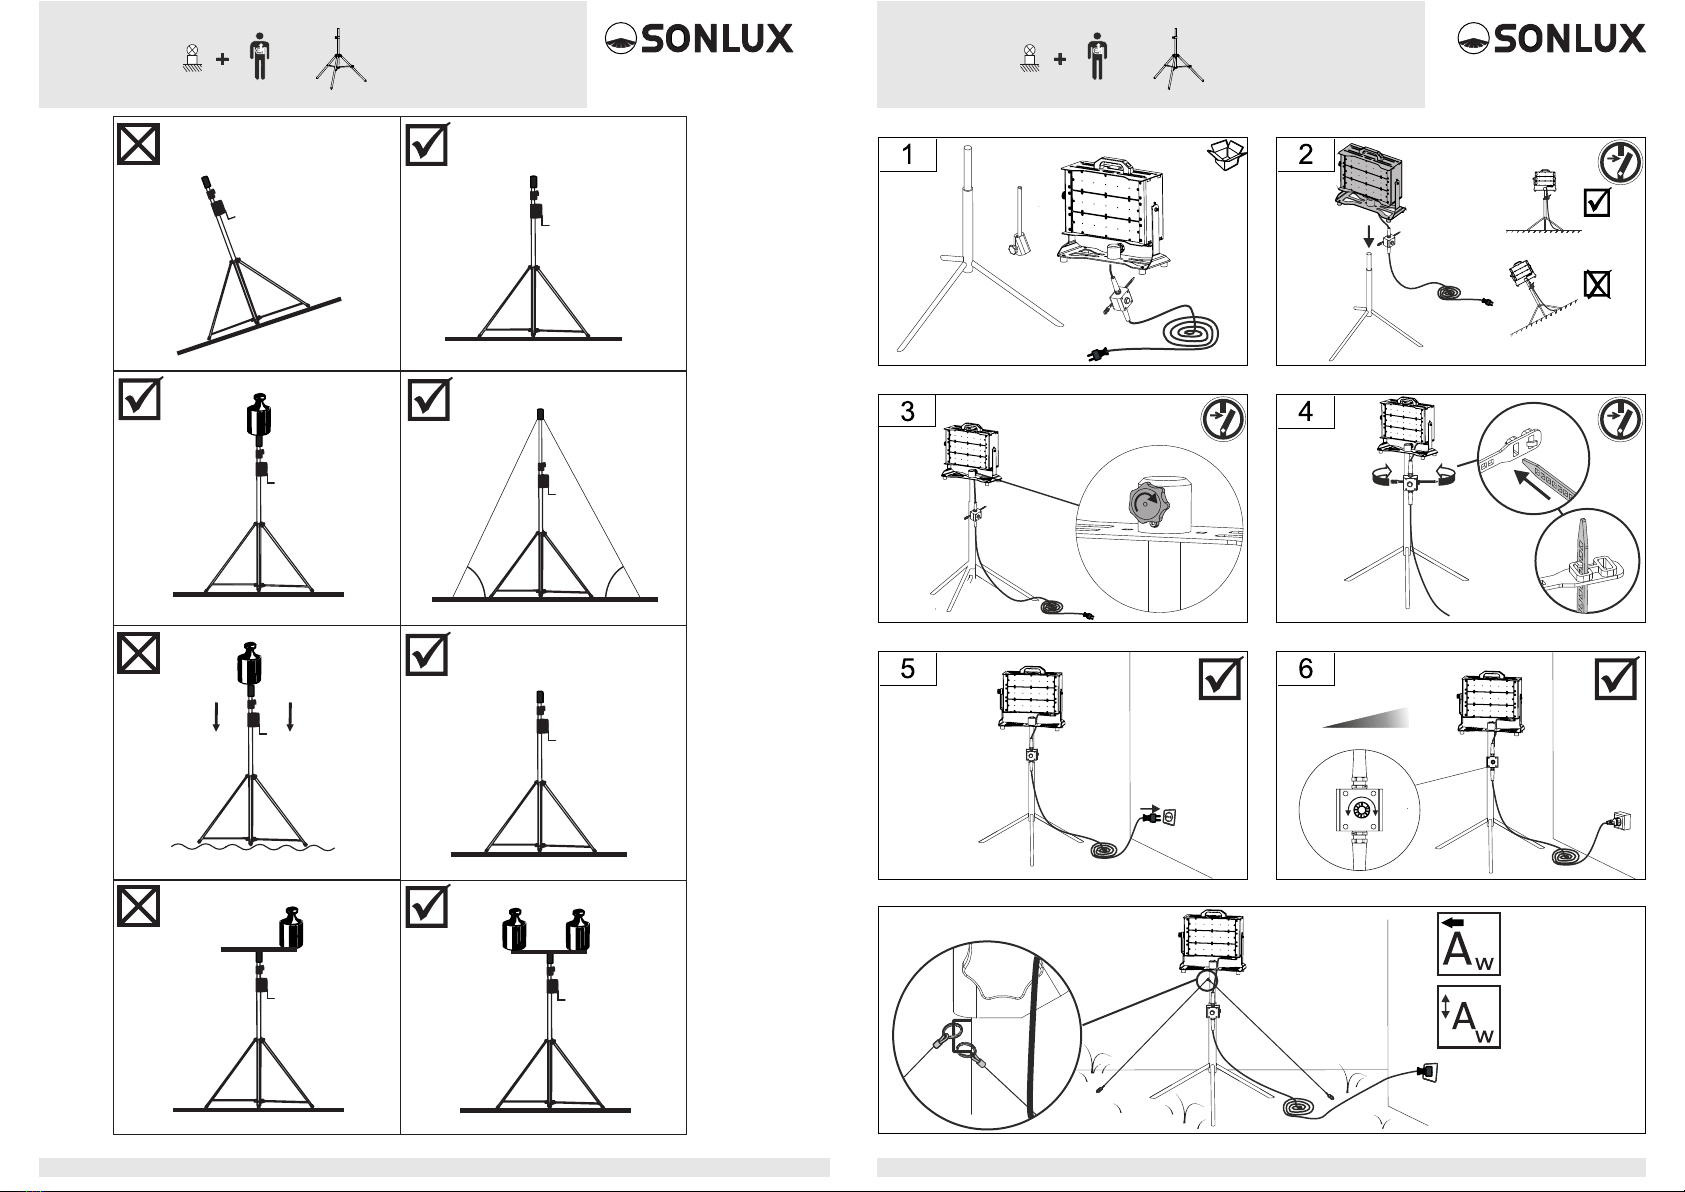
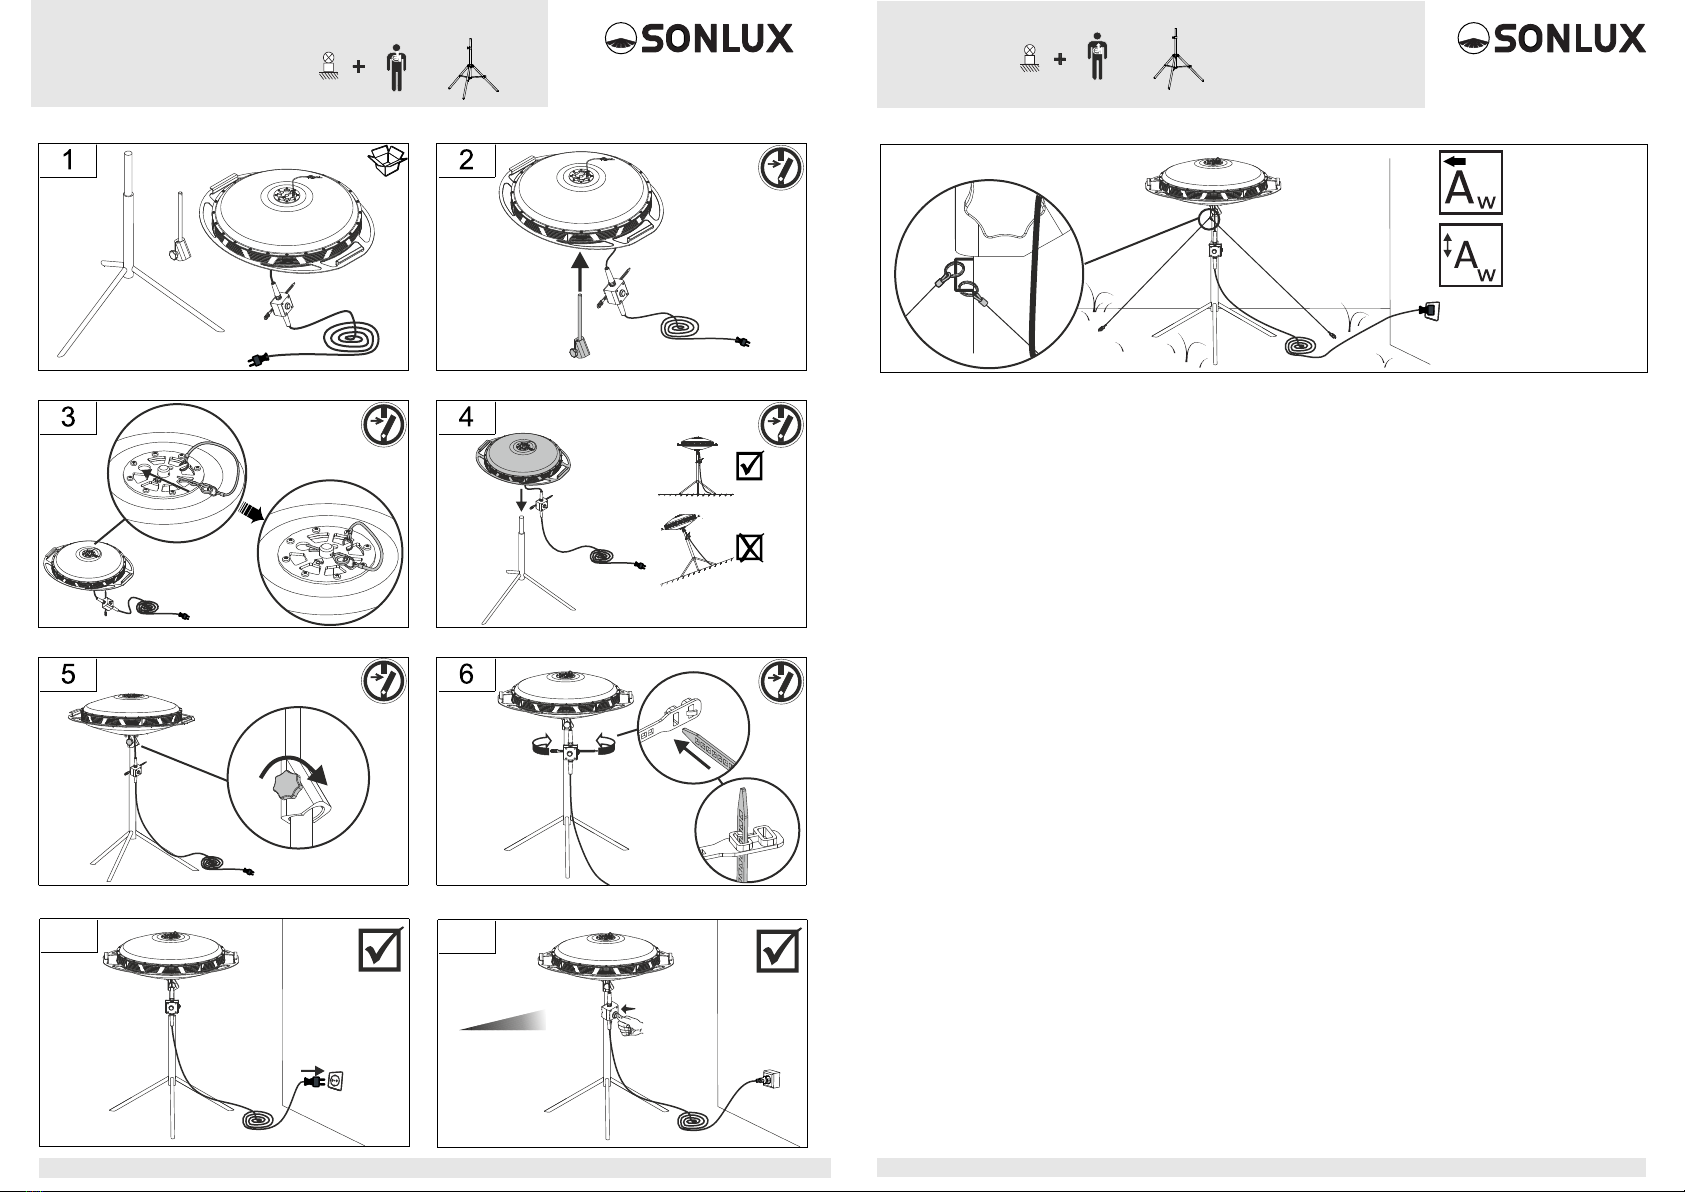
H max = 4,13 m D max = 1,73 m
D min = 1,19 m
www.sonlux.de
12 / 12
max. 85 kg
Our products are subject to a strict Quality control! Should their tripod anyway work
perfectly, we regret this very much. Please contact the following address:
Unsere Produkte unterliegen einer strengen Qualitätskontrolle! Sollte ihr Stativ trotzdem
nicht einwandfrei funktionieren, bedauern wir dies sehr und bitten Sie, sich an die folgende
Adresse zu wenden:
Nos produits sont soumis à de strictes contrôles de qualité. Si vous n'arrivez pas à
l'installer correctement, nous le regrettons et veuillez contacter l'adresse suivante:
www.sonlux.de
SONLUX
Lighting GmbH
Frankenhäuser Str. 66
D-99706 Sondershausen
Deutschland
Telefon +49 36 32/65 22-0
Telefax +49 36 32/65 22-822
www.sonlux.de
Kurbelstativ Lightmaxx
Crank tripod, Trépied à manivelle
95-0294-0014
25 kg
H min = 1,75 m
!
not less than 400 mm
nicht kleiner als 400 mm
le minimum est 400 mm
Instruction: +
2 / 12
max 85kg
www.sonlux.de 11 / 12
www.sonlux.de
60°
60°
1.
2.
3.
Außenbereich /Outdoor/Extérieur
= 0.03m²
= 0.10m²
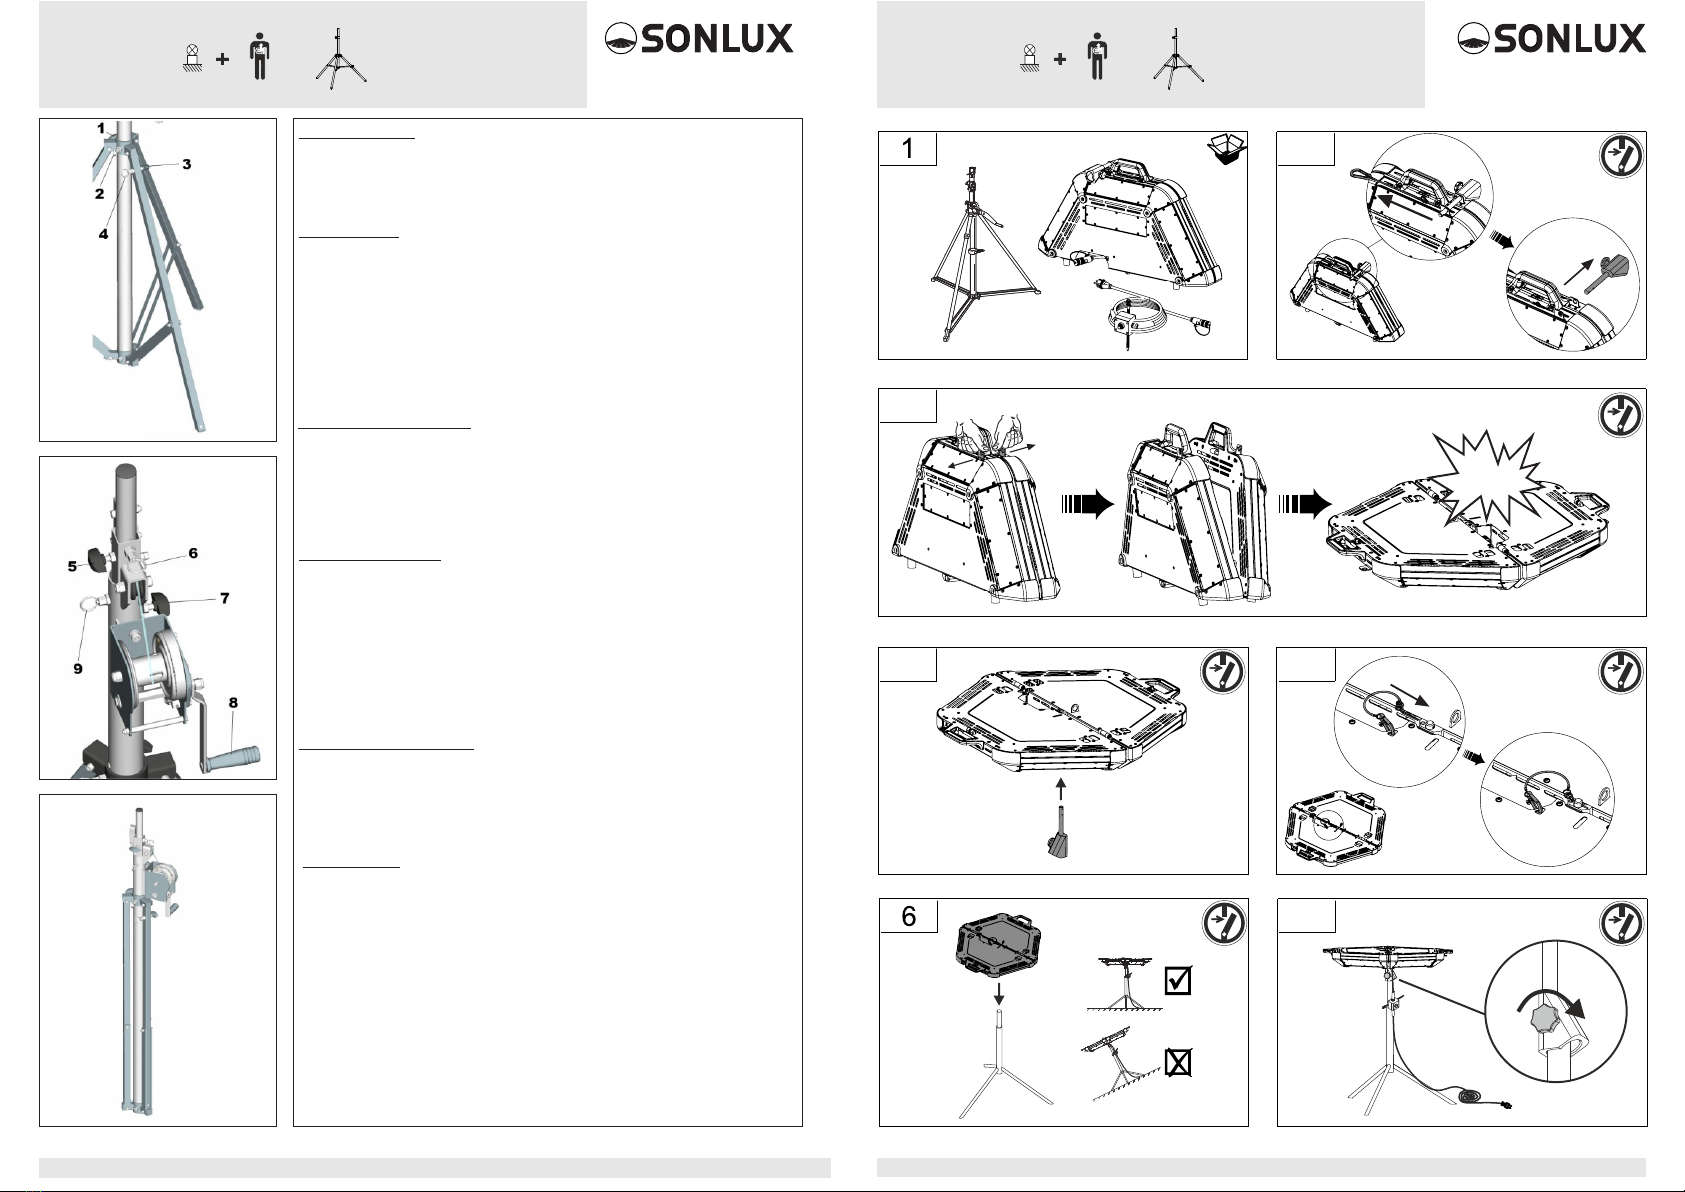
Schraube festziehen /
tighten a screw /
serrer la vis
0% 100%
I + O
Instruction: +Instruction: +
3 / 12
www.sonlux.de
www.sonlux.de
10 / 12
Sicherheitsüberprüfung
Überprüfen Sie das Gerät vor der Verwendung unbedingt auf Schäden. Sollten Schäden
festgestellt werden, Benutzung sofort stoppen und zurück an den Händler zur Reparatur
schicken.
Benutzen Sie die Originalverpackung oder eine geeignete Transport- oder Lagerverpackung,
um das Produkt bei Nichtbenutzung optimal vor Einflüssen wie Staub, Feuchtigkeit etc.
zu schützen.
Aufbau des Stativs
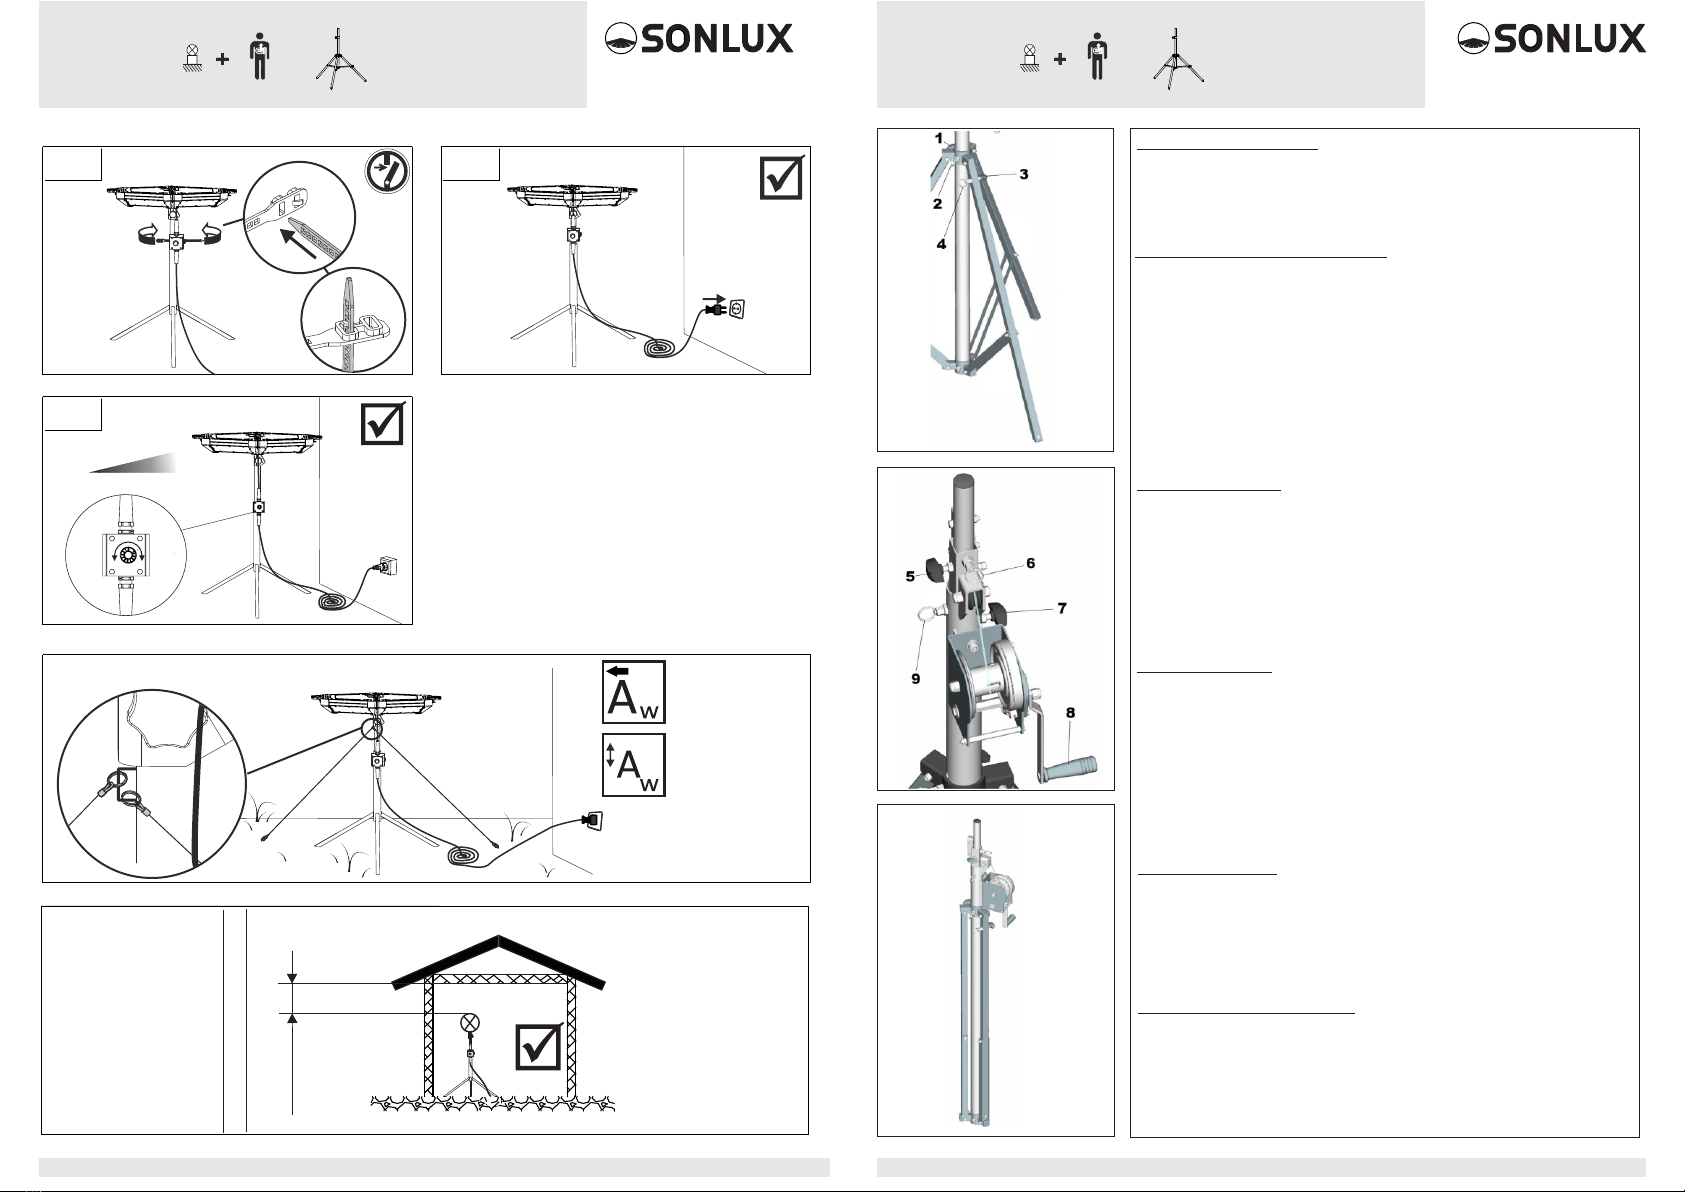
Zum Ausbreiten der Stativbeine, lösen Sie zunächst jeweils die Feststellschraube (1) und
ziehen die Fixierbolzen (2) heraus.
Setzen Sie die Fixierbolzen in der gewünschten Höhe in die Bohrung der Stativstange ein und
ziehen Sie die Feststellschraube wieder fest.
Überprüfen Sie vor der Benutzung des Stativs den festen Sitz aller Feststellschrauben und
Fixierbolzen.
Sofern das Stativ auf einer Treppe oder einer anderen unebenen Fläche aufgestellt
werden soll, lösen Sie zunächst den Feststellknopf (3) und ziehen den Fixierbolzen (4) heraus.
Ziehen Sie das Stativbein heraus, bis die gewünschte Position erreicht ist.
Setzen Sie nun den Fixierbolzen in die Bohrung des Stativbeins wieder ein und ziehen Sie
den Feststellknopf wieder fest.
Höhenverstellung
Benutzen Sie zur Höhenverstellung die Handkurbel mit Seilzug.
Lösen Sie zunächst die Feststellschraube des oberen Teleskopmastes (5) und ziehen Sie
den Fixierbolzen (6) heraus.
Ziehen Sie die andere Feststellschraube (7) fest, um eine korrekte Hubfolge zu gewährleisten:
Der obere kleine Mast muss zuerst angehoben werden, gefolgt vom größeren Mast!
Drehen Sie nun die Handkurbel (8) im Uhrzeigersinn, um den oberen Mast anzuheben.
Sobald die gewünschte Höhe erreicht ist, setzen Sie den Fixierbolzen in die Bohrung der
Stange ein und ziehen Sie die Feststellschraube wieder fest.
Wiederholen Sie die Schritte mit dem anderen Mast: Lösen Sie zunächst die Feststellschraube
des Teleskopmastes (7) und ziehen Sie den Fixierbolzen (9) heraus. Drehen Sie die Kurbel
ein wenig gegen den Uhrzeigersinn, um zu vermeiden, dass das Seil irgendeine Last trägt.
Instandhaltung und Wartung
Befreien Sie das Stativ nach jeder Benutzung von Dreck und Schmutz. Setzen Sie
das Stativ keiner permantenten Feuchtigkeit aus!
Instandhaltung und Service sind nur von zugelassen Personal
durchzuführen.
Der Service von nicht zugelassenen Personal oder Verwendung von
nicht zugelassenen Ersatzteilen ist nicht gestattet. Bei Verstoß erlischt die Garantie!
Bestimmungsgemäßer Gebrauch
Das Kurbel-Stativ „LightmaXX“ dient der Aufnahme von SONLUX Arbeits- und
Großflächenleuchten. Das Stativ darf ausschließlich zu diesem Zwecke und im Sinne der
Bedienungsanleitung betrieben werden. Eine Verwendung des Stativs mit nicht
zugelassenen Zubehör ist ausdrücklich untersagt! Die Befestigung der Leuchten muss gemäß
den Angaben in dieser Anleitung erfolgen. Stellen Sie ggf. eine zweite, unabhängige Sicherung
der Leuchte, z.B. durch ein Sicherungsseil her.
Andere Verwendungszwecke, sowie der Betrieb unter anderen Betriebsbedingungen sind
ausdrücklich nicht bestimmungsgemäß und können zu Sach- oder Personenschäden führen!
Für Schäden, die aus einer nicht bestimmungsgemäßen Verwendung resultieren wird keine
Haftung übernommen.
Es muss sichergestellt werden, dass das Gerät ausschließlich von geschulten und
fachkundigen Nutzern betrieben wird, die im Vollbesitz ihrer geistigen, physischen und
sensorischen Fähigkeiten sind. Eine Nutzung anderer Personen ist ausdrücklich nur auf
Aufforderung einer für ihre Sicherheit zuständigen Person zulässig, welche die Nutzung
anleitet oder beaufsichtigt.
1.
2.
3.
Außenbereich /Outdoor/Extérieur
= 0.10m²
= 0.50m²
!
not less than 200 mm
nicht kleiner als 200 mm
le minimum est 200 mm
9
8
Abbau des Stativs
Um das Stativ abzubauen, senken Sie die Höhen der Teleskopmaste auf die Mindesthöhe und
vergewissern Sie sich, dass alle Fixierbolzen in der untersten Position der Bohrungen
eingesetzt und alle Feststellschrauben angezogen sind. Das Stahlseil muss korrekt und
vollständig aufgerollt sein, um eine Quetschung der Fasern zu vermeiden.
Lösen Sie anschließend die Feststellschraube und ziehen den Fixierbolzen heraus.
Anschließend ziehen Sie die Stativbeine wieder zur Stativstange zusammen und setzen den
Fixierbolzen ein, danach ziehen Sie die Feststellschraube wieder fest.
Das Stativ kann in vertikaler oder horizontaler Position transportiert werden.
0% 100%
I + O
10
Instruction: +Instruction: +
www.sonlux.de
4 / 12 www.sonlux.de 9 / 12
Security Check
Be sure to check the device for damage before use. If any damage is found, stop use
immediately and return to dealer for repair.Use the original packaging or suitable transport or
storage packaging to optimally protect the product from influences such as dust, moisture,
etc. when not in use.
Assembly of the Stand
To spread out the tripod legs, first loosen the locking screw (1) and pull out the fixing bolts (2).
Insert the fixing bolts at the desired height into the hole in the stand rod and tighten the
locking screw again.
Before using the tripod, check that all locking screws and fixing bolts are tight.If the tripod is
to be set up on stairs or another uneven surface, first loosen the locking button (3)
and pull out the fixing bolt (4).Extend the tripod leg until the desired position is reached.
Now put the fixing bolt back into the hole in the tripod leg and tighten the locking knob again.
Height Adjustment
Use the hand crank with cable pull to adjust the height.First loosen the locking screw of the
upper telescopic mast (5) and pull out the fixing bolt (6).Tighten the other locking screw (7)
to ensure correct stroke sequence:
The upper small mast must be raised first, followed by the larger mast!
Now turn the hand crank (8) clockwise to raise the upper mast.
Once the desired height is reached, insert the locating bolt into the hole in the pole and
retighten the set screw.Repeat the steps with the other mast: first loosen the locking screw
of the telescopic mast (7) and pull out the fixing bolt (9).
Turn the crank counter-clockwise a little to avoid the rope carrying any load.
Disassembly the Stand
To disassemble the tripod, lower the heights of the telescopic masts to the minimum height
and ensure all mounting bolts are in the down position of the holes and all set screws
are tightened. The steel cable must be correct andfully rolled up to avoid crushing the fibers.
Then loosen the set screw and pull out the mounting bolt.Then pull the tripod legs back
together to form the tripod rod and insert the fixing bolt, then tighten the locking screw again.
The tripod can be transported in a vertical or horizontal position.
Intended Use
The "LightmaXX" crank tripod is used to hold SONLUX work lights and large-area lights.
The tripod may only be operated for this purpose and in accordance with the operating
instructions. A use of the tripod with noapproved accessories is expressly prohibited!
The lights must be attached in accordance with the information in this manual.
If necessary, set up a second, independent safeguard for the light, e.g. with a safety rope.
Other uses, as well as operation under other operating conditions, are expressly not intended
and can lead to property damage or personal injury! No liability is accepted for damage
resulting from improper use.It must be ensured that the device is only operated by trained and
competent users who are in full possession of their mental, physical and sensory abilities.
Use by other persons is expressly only permitted at the request of a person responsible for
their safety who instructs or supervises use
F > 70 N
KLICK!
1.
2.
2
3
45
open
close
ouvrir
fermer
7
Maintenance
Remove dirt and grime from the tripod after each use. Do not expose the tripod to
permanent moisture!
Maintenance and service are only to be carried out by authorized personnel.
The service of unauthorized personnel or use ofnon-approved spare parts are not permitted.
Failure to do so will void the warranty!
Instruction: +Instruction: +

www.sonlux.de
8 / 12 www.sonlux.de 5 / 12
Schraube festziehen /
tighten a screw /
serrer la vis Aus-Ein /
off-on /
eteindre-allumer
Außenbereich /Outdoor/Extérieur = 0.21m²
= 0.06m²
!
not less than 100 mm
nicht kleiner als 100 mm
le minimum est 100 mm
Vérification de sécurité
Assurez-vous de vérifier que l'appareil n'est pas endommagé avant de l'utiliser. En cas de
dommage, arrêtez immédiatement l'utilisation et retournez au revendeur pour réparation.
Utilisez l'emballage d'origine ou un emballage de transport ou de stockage approprié pour
protéger de manière optimale le produit des influences telles que la poussière, l'humidité, etc.
lorsqu'il n'est pas utilisé.
Assemblage du trépied
Pour écarter les jambes du trépied, desserrez d'abord la vis de blocage (1) et retirez les
boulons de fixation (2). Insérez les boulons de fixation à la hauteur souhaitée dans le trou de
la tige du support et serrez à nouveau la vis de blocage. Avant d'utiliser le trépied, vérifiez que
toutes les vis de blocage et les boulons de fixation sont bien serrés.Si le trépied doit être
installé sur des escaliers ou sur une autre surface inégale, desserrez d'abord le bouton de
verrouillage (3) et retirez le boulon de fixation (4). Étendez la jambe du trépied jusqu'à ce que
la position souhaitée soit atteinte.Maintenant, remettez le boulon de fixation dans le trou de la
jambe du trépied et serrez à nouveau le bouton de verrouillage.
Réglage de la hauteur
Utilisez la manivelle avec câble de traction pour régler la hauteur.Desserrez d'abord la vis
de blocage du mât télescopique supérieur (5) et retirez le boulon de fixation (6).Serrez l'autre
vis de blocage (7) pour assurer une séquence de course correcte :
Le petit mât supérieur doit être relevé en premier, suivi du plus grand mât!
Tournez maintenant la manivelle (8) dans le sens des aiguilles d'une montre pour soulever
le mât supérieur.Une fois la hauteur désirée atteinte, insérez le boulon de positionnement
dans le trou du poteau et resserrez la vis de réglage. Répétez les étapes avec l'autre mât :
desserrez d'abord la vis de blocage du mât télescopique (7) et retirez le boulon de fixation (9).
Tourner la manivelleun peu dans le sens inverse des aiguilles d'une montre pour éviter que la
corde ne supporte une charge.
Maintenance
Retirez la saleté et la crasse du trépied après chaque utilisation. N'exposez pas le trépied à
une humidité permanente! L'entretien et le service ne doivent être effectués que par du
personnel autorisé. L'entretien par du personnel non agréé ou l'utilisation de pièces de
rechange non agréées n'est pas autorisé. Ne pas le faire annulera la garantie!
Utilisation prévue
Le trépied à manivelle "LightmaXX" est utilisé pour maintenir les lampes de travail SONLUX
et les lampes de grande surface. Le trépied ne doit être utilisé qu'à cette fin et conformément
au mode d'emploi. Une utilisation du trépied sans les accessoires homologués sont
expressément interdits! Les lumières doivent être fixées conformément aux informations
contenues dans ce manuel. Si nécessaire, installez une deuxième protection indépendante
pour la lumière,par exemple avec une corde de sécurité. D'autres utilisations, ainsi que le
fonctionnement dans d'autres conditions de fonctionnement, ne sont expressément pas
prévues et peuvent entraîner des dommages matériels ou corporels ! Aucune responsabilité
n'est acceptée pour les dommages résultant d'une utilisation inappropriée.
Il faut s'assurer que l'appareil n'est utilisé que par des utilisateurs formés et compétents qui
sont en pleine possession de leurs capacités mentales, physiques et sensorielles.
L'utilisation par d'autres personnes n'est expressément autorisée qu'à la demande d'une
personne responsable de leur sécurité qui instruit et surveille l'installation.
Démontage du trépied
Pour démonter le trépied, abaissez les hauteurs des mâts télescopiques à la hauteur minimale
et assurez-vous que tous les boulons de fixation sont en position basse des trous et que
toutes les vis de réglage sont serrées. Le câble en acier doit être correct etcomplètement
enroulé pour éviter d'écraser les fibres. Desserrez ensuite la vis de blocage et retirez le boulon
de fixation.Ensuite, rapprochez les pieds du trépied pour former la tige du trépied et insérez le
boulon de fixation, puis serrez à nouveau la vis de blocage. Le trépied peut être transporté en
position verticale ou horizontale.
Instruction: +Instruction: +
www.sonlux.de
6 / 12 www.sonlux.de 7 / 12
7
open
close 1.
2.
3.
8
0% 100%
I + O
ouvrir
fermer
Beispielanwendungen / example applications /
exemples d'applications
Instruction: +
Außenbereich /Outdoor/Extérieur
= 0.20m²
= 0.33m²
Instruction: +
This manual suits for next models
1
Table of contents
Languages:


