Sonotec Sonaphone Manual
SHORT INSTRUCTIONS
ULTRASONIC TESTING DEVICE
Ultrasound occurs during a wide
range of processes. Using the
621$3+21(WHVWLQJGHYLFHDQG
associated sensors these signals
FDQEHYHULHG
Different apps are used in order to
perform recordings, evaluations and
documentation for the following
servicing tasks:
9/HDNGHWHFWLRQDQGFODVVLFDWLRQ
in gas, compressed air and
vacuum systems
9Tightness testing of
non-pressurized systems
9Steam trap and valve testing
9Machinery condition monitoring
9Detection of partial discharges
A wide range of other applications
is possible depending on the device
version and equipment.

Notes on your safety
%HIRUHFRPPLVVLRQLQJDQGXVLQJWKH621$3+21(DQGLWVDFFHVVRULHVDOZD\VUHDGDOORIWKHVDIHW\
information in the user documentation.
All applicable safety regulations for industrial facilities must be complied with without fail when carrying out
WHVWVZLWKWKH621$3+21(DQGDVVRFLDWHGVHQVRUV
7KH621$3+21(DQGLWVDFFHVVRULHVFRPSO\ZLWKWKHFXUUHQWVWDWHRIWKHDUWDQGWKHVDIHW\UHODWHG
regulations. The user must ensure that safe use is not impaired.
Do not open the device or the sensors. They do not contain any parts that need to be cleaned or maintained by
the user (information on battery replacement can be found in the user documentation).
In cases of visible damage, or if malfunctions suggest that the device or sensors are no longer working
properly, they must be taken out of operation immediately.
When using the waveguides, it is essential to ensure that no injuries are caused by the tips.
!
The short instructions set out the device functionality and explain the basic operating options.
Detailed descriptions can be found in the user documentation.
Increase or reduce volume
Device On / Off / Standby
Trigger the camera
Device Functions, Buttons and Start Screen
Brief press: "Home" button
Longer press: Active applications
Left-hand LED: Device start display
Right-hand LED: Charge state display:
Orange – device is being charged
Green – device is charged
Device status line:
Charge state, time etc.
Apps available via
quick access
Installed
apps and widgets
Display area
Back / Home /
Active applications (left to right)
Preparation
Charge the device using the supplied charger.
&RQQHFWWKHVHQVRUWRWKH621$3+21(XVLQJWKH
DSSURSULDWHFDEOH2EVHUYHWKHUHGPDUNLQJ
If necessary, connect the headphones using the cable.
Switch on the device: Press and hold the button on
the left of the device until the start screen appears.
Unlock the device: Swipe the “unlock“ icon
on the display to the side.
The device shows the most important
apps that can be opened via quick access.
Important quick-access settings:
Swipe the start screen to the side
Additional apps: Tap the icon
Start the app and log in
Select the LevelMeter app: Tap the icon
(QWHUWKHXVHUQDPHVKRZQYLDWKHDGGLWLRQDOGDWD
RQWKHGLVSOD\DQGSUHVV6WDUWWRFRQUP
2
1
The headphones are switched on at the
FDSVXOHSUHVVDQGKROGWKHEXWWRQIRUVHFRQGV
until a signal is heard). The ambient noise volume
can be adjusted by pressing the "+" and "-" buttons.
Tests with the SONAPHONE
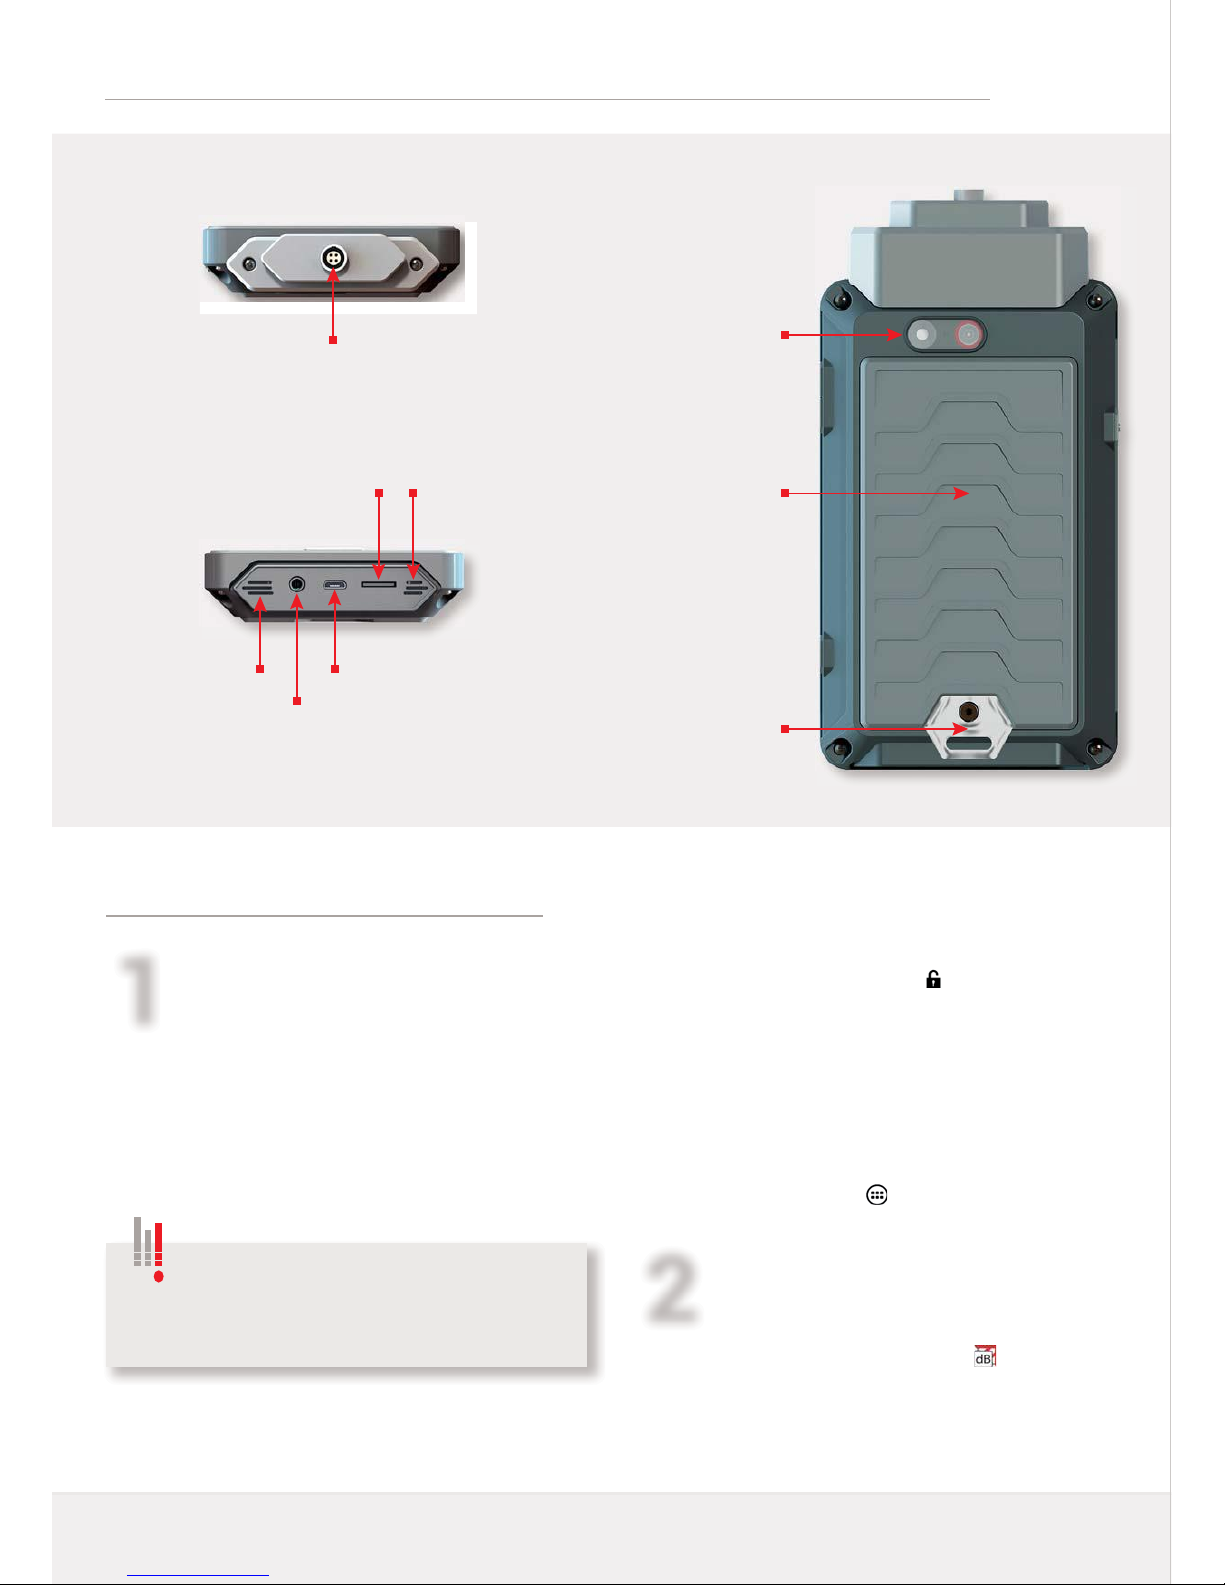
Connections, Interfaces and Additional Device Elements
&DPHUDZLWKȵDVK
and auto-focus
Cover
battery compartment
Lashing lug for
carrying strap*
Speaker
Socket for
stereo headphones
Port for sensor cable
Microphone
Slot for micro-SD
memory card
USB connection for
charger / data transfer
2QFHWKHDSSKDVEHHQVWDUWHGXSWKHWHVWYDOXHVFDQ
be read off the display (see display description on the
QH[WSDJH7KHDXGLRRXWSXWLVDFWLYDWHGDWWKHVDPH
time.
Top display area: Spectrogram
Switch to level record: Tap the icon in the top
left-hand corner
Middle display area: Test value output
Adapt the output for up to 5 test values:
Press and hold inside the display area or tap
WKHUHOHYDQWRXWSXWHOGRQFH
Bottom display area:
Start / Stop measurements, manage folders
Flip screen: Tap the icon
Important settings
Select application: In the additional data area,
WDSWKHDSSOLFDWLRQHOG1RDSSOLFDWLRQ
$FWLYDWHDSSOLFDWLRQ6HOHFWXVLQJWKHFKHFNER[
7KHFKHFNER[WXUQVJUHHQDQGWKHDSSOLFDWLRQ
automatically returns to the measurement screen
'HQHDQDPHIRUWKHFXUUHQWIROGHU
Tap the )ROGHULFRQDQGUHQDPHDQH[LVWLQJ
folder or create a new folder
7DS2.WRFRQUP
$FWLYDWHDIROGHU7DSWKHFKHFNER[WXUQVJUHHQ
The application returns to the measurement screen
3
The measurements are collected in
folders and assigned consecutive numbers.
The test data is not recorded.
7RVWDUWWKHUHFRUGLQJ6HHQH[WSDJH
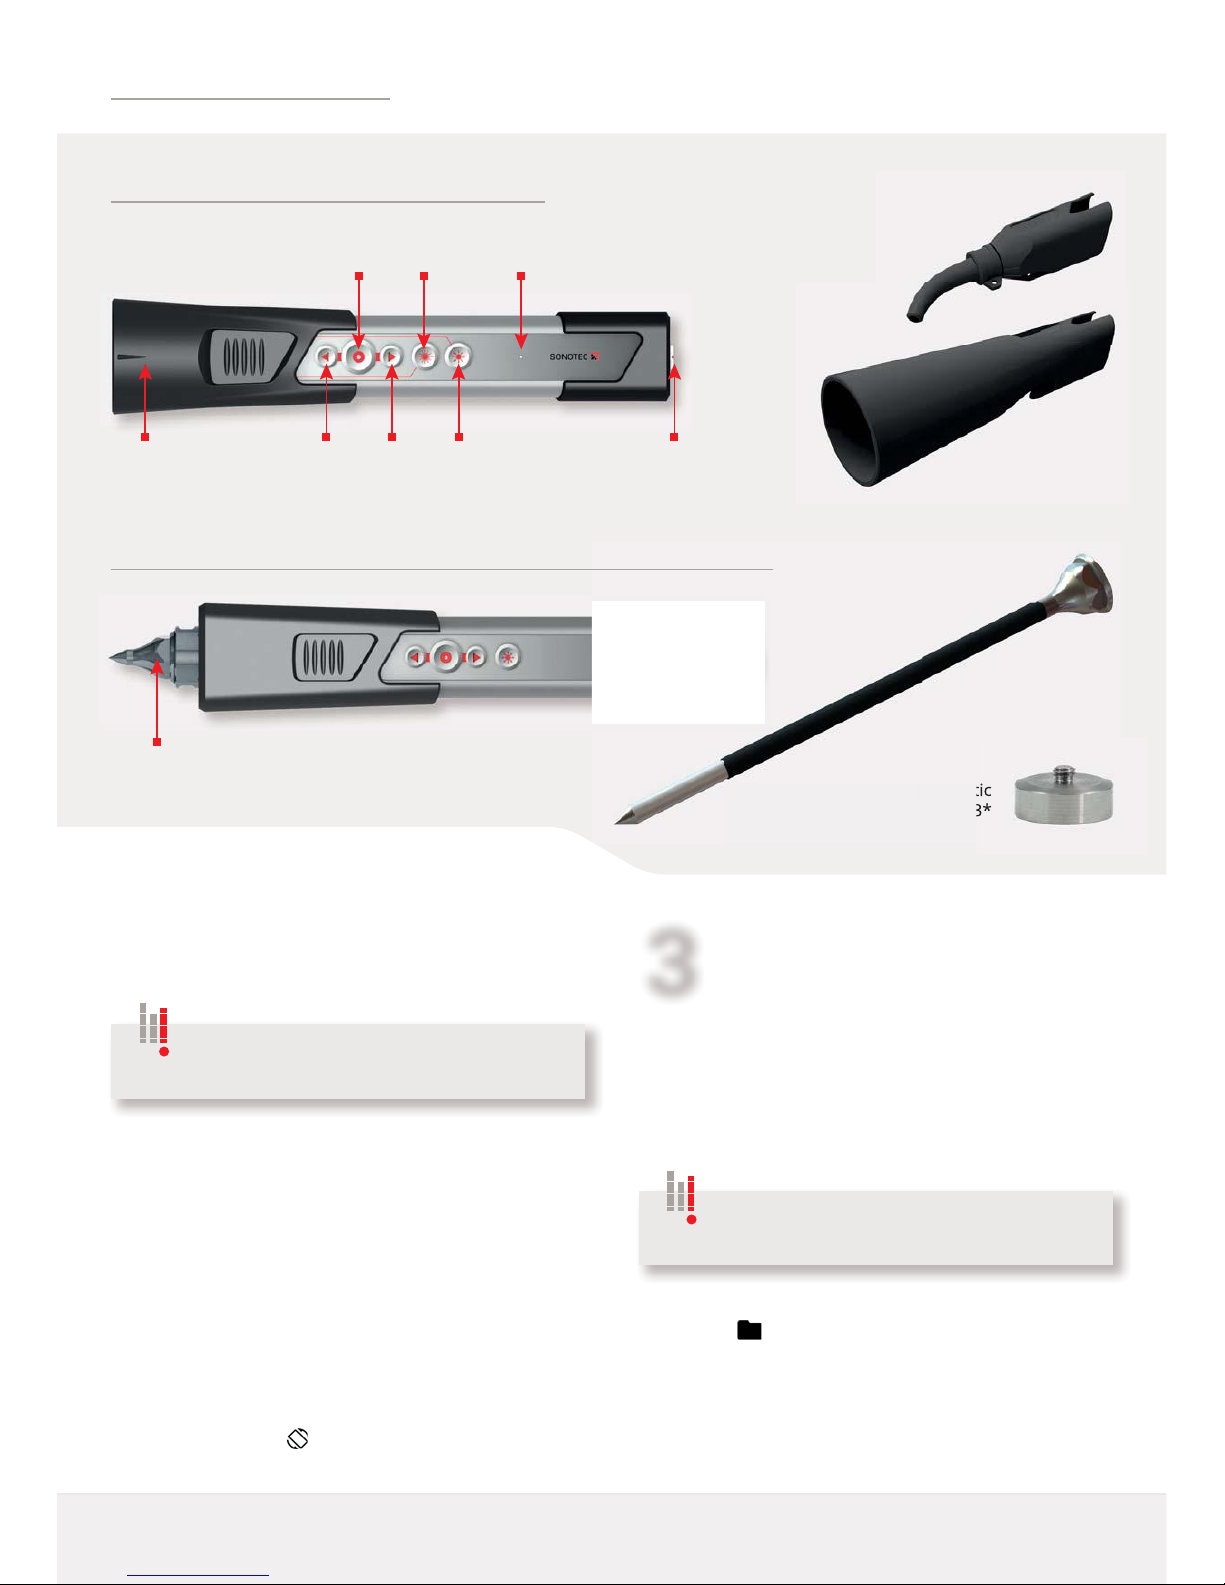
Sensor Operation
Adjusting the
volume
Start / Stop
recording
LED light
On / Off
Small acoustic horn
BS10-2
Short waveguide BS20-1
Long waveguide
BS20-2*
(For operating elements and connection:
see airborne sound sensor)
Large
acoustic horn
BS10-3*
Airborne sound sensor BS10 with accessories*
Structure-borne sound and temperature sensor BS20 with accessories*
Switch on
target laser
Port for sensor cable
Operating signal
light (green)
Precise locator
BS10-1*
Magnetic
waveguide BS20-3*
*Optional accessories
(When using other software applications, the display elements may vary from those shown).
Start / Stop recording
Start: Tap the icon to start, or press the
"Recording” button on the sensor.
The icon turns red, the device records
for 10 secs and then stops automatically
(timings can be adjusted)
Stop manually: Tap the icon / press the button.
Complete the testing data
Add photo / comment / voice memo:
Tap the icon and add the desired content.
&RQUPE\WDSSLQJ2.ERWWRPVFUHHQ
All test data and the additional data will be
VWRUHGLQWKHGHQHGIROGHU
Playback the testing data
Select the test: Tap the "Folder" icon and select
an individual measurement.
Play back the data: Tap the icon for playback
Add data retroactively:
Tap the icon (then proceed as per Point 5).
Back to Live Mode: Tap the icon.
4
56
1RWH(QGWKHWH[WLQSXWZLWK ".
Tapping the "Measurement Details"
LFRQDOORZVIRUWHVWGDWDWREHTXLFNO\H[SDQGHG
upon to include additional information after it has
been saved.
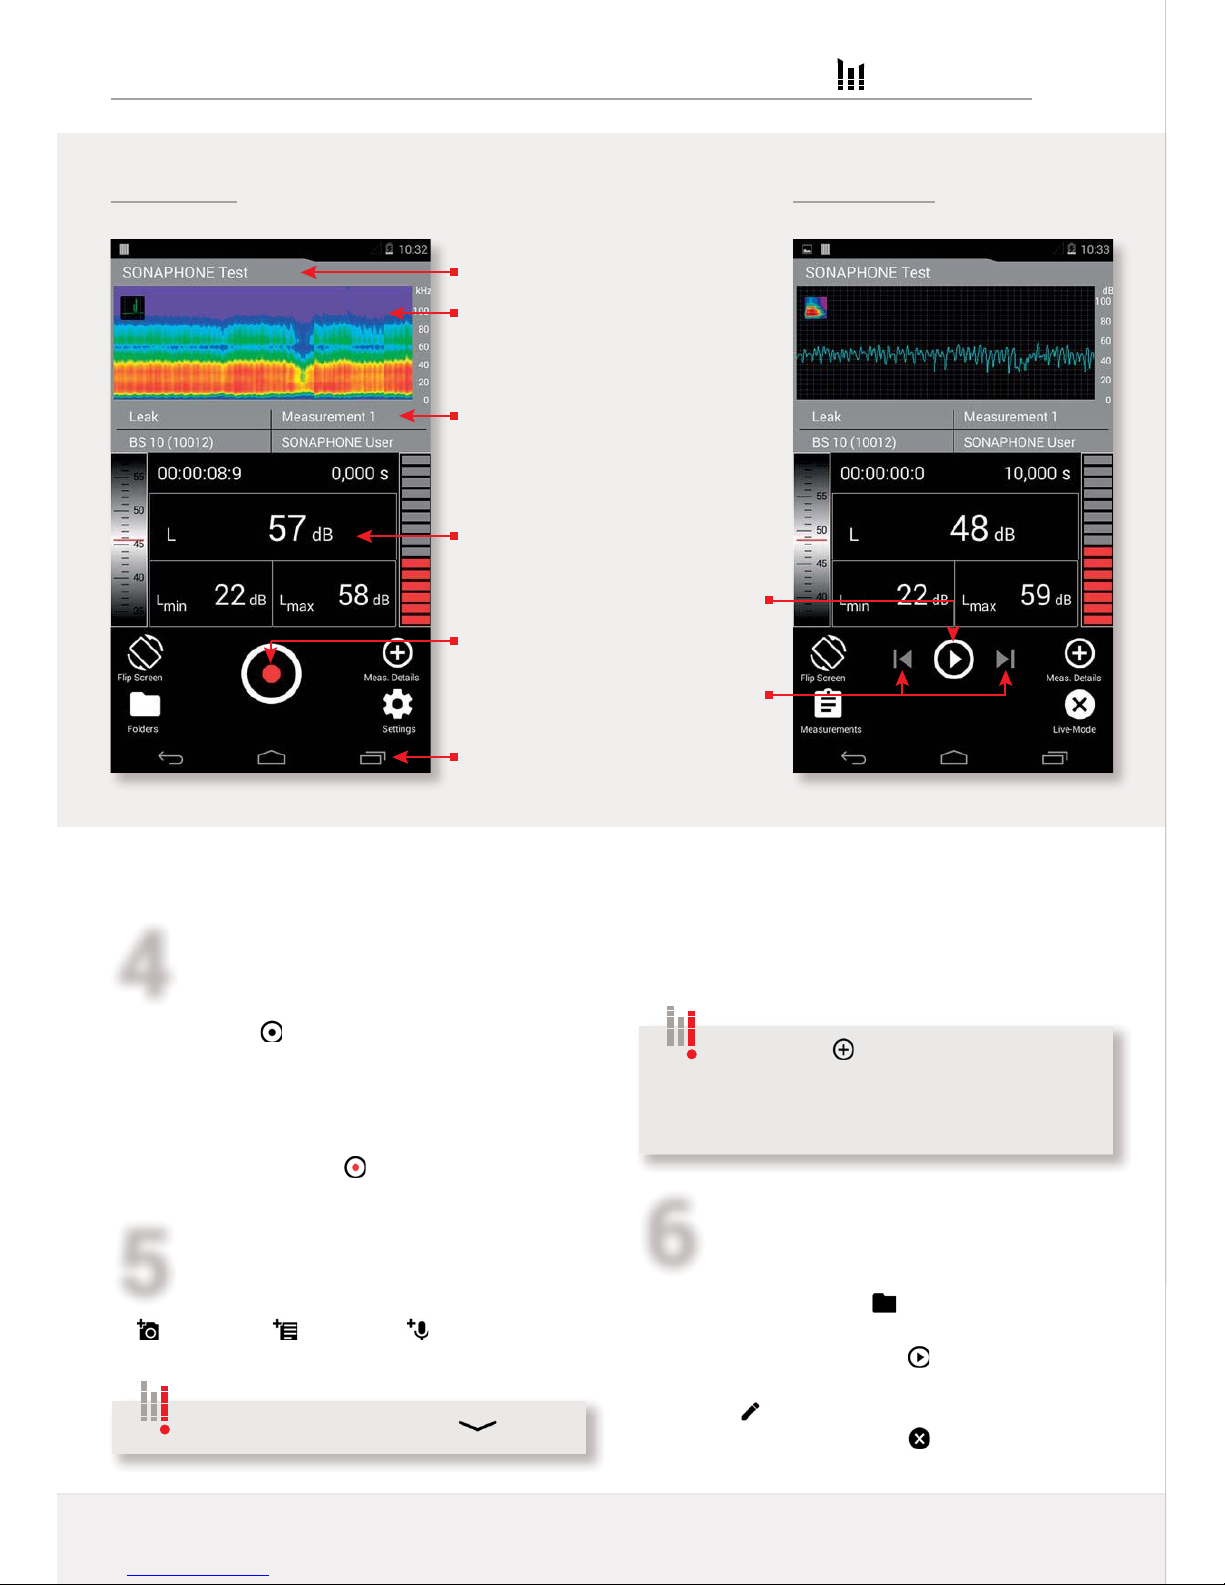
Display Elements and Functions of the LEVEL ETER App
Additional data for the test
being carried out:
Type of application (leak),
Connected sensor (BS10),
Name of test being carried out,
User (SONAPHONE User)
Back / Home /
Active applications (left to right)
Graphical output of the test data:
Spectrogram (Fig. left)
Level record (Fig. on the right)
Testing mode Playback mode
Recording: Start / Stop
Numerical output of test values
(can be adapted individually)
Playback recording
Move to the previous / next
measurement
Active folder for tests
62127(&8OWUDVFKDOOVHQVRULN+DOOH*PE+
1DXHQGRUIHU6WU+DOOH6DDOH*HUPDQ\
www.sonotec.de
© All rights reserved
7KH621$3+21(RSHUDWLQJV\VWHPLQFOXGHVIUHHVRIWZDUHXQGHUOLFHQVH0RUHLQIRUPDWLRQFDQEHIRXQGLQWKHXVHUGRFXPHQWDWLRQ
6XEMHFWWRWHFKQLFDOPRGLFDWLRQV5HYLVLRQ'DWH6RIWZDUHYHUVLRQ/HYHO0HWHU9
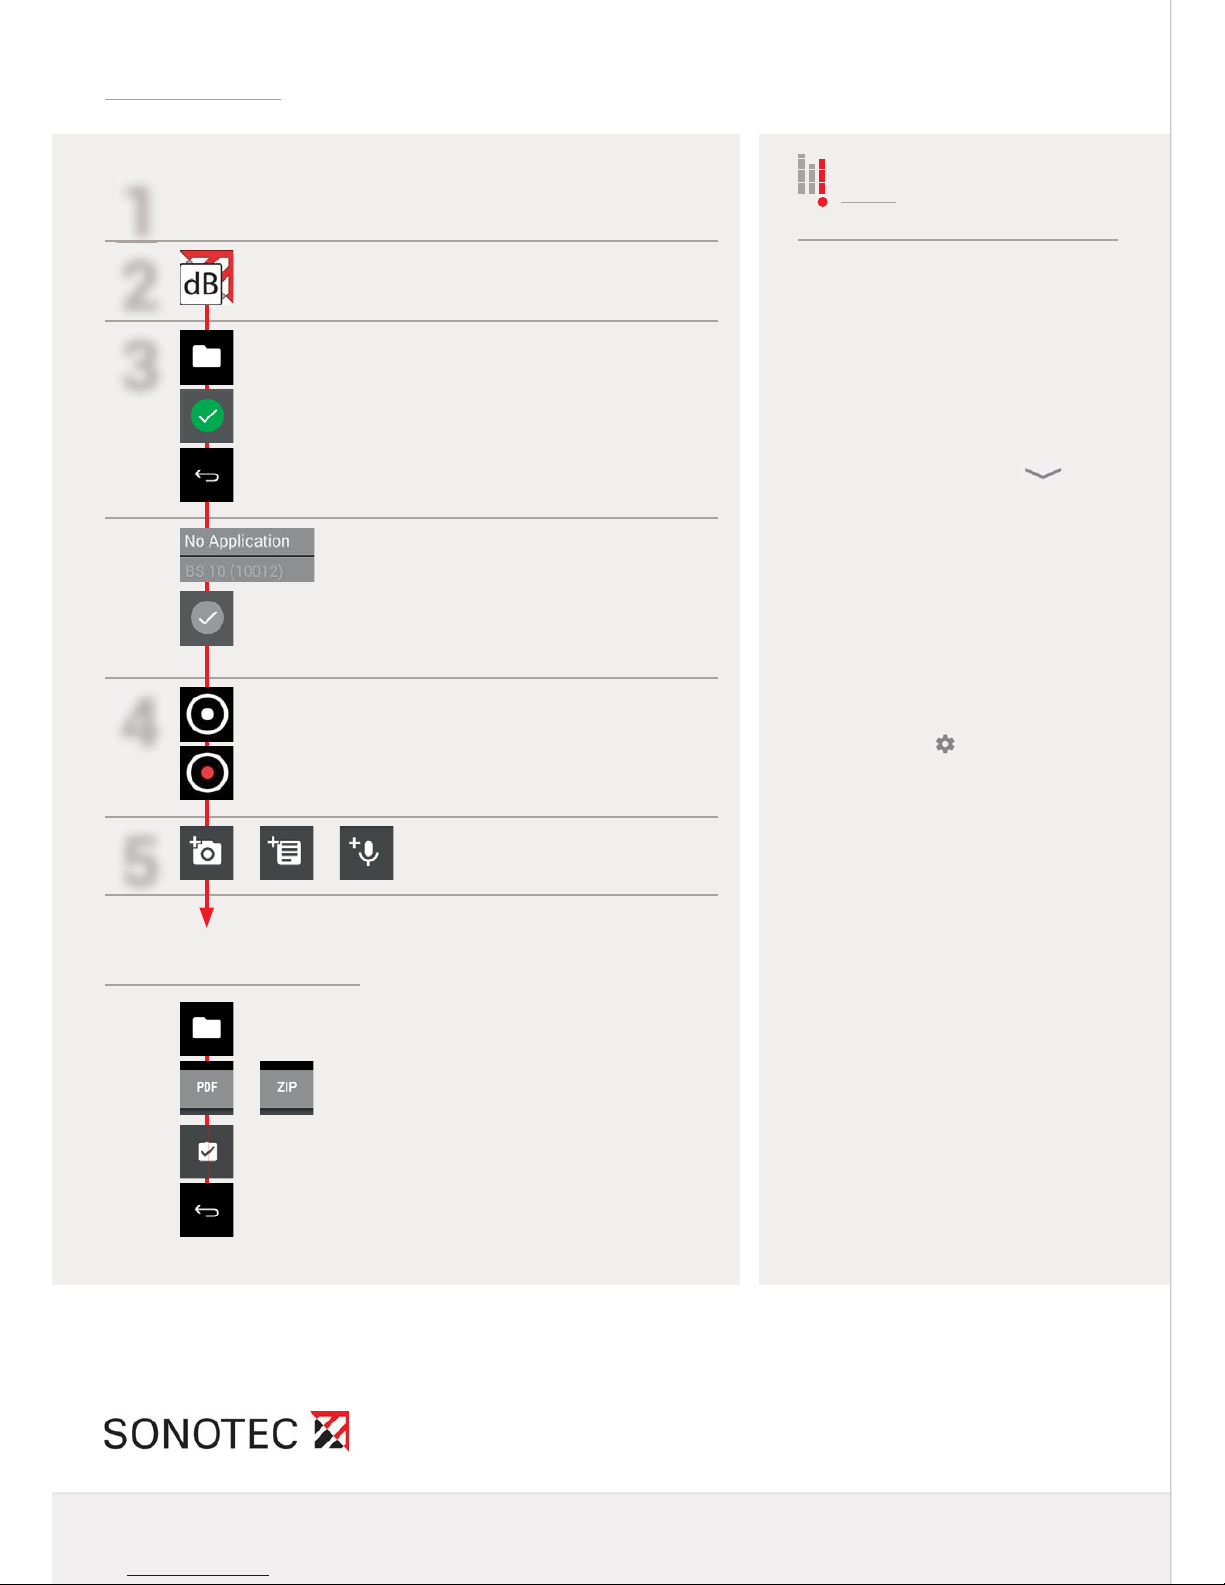
Quick Start
Notes
2SHQWKHIROGHURYHUYLHZ
Add a photo / comment /
voice memo
Tap the LevelMeter app and
create a user name
7DSWKHDSSOLFDWLRQHOG
DGGLWLRQDOGDWDLQWKHWRSOHIWKDQGHOG
Activate the required application:
Active application = green background
The device automatically returns to Live Mode
Folders are automatically assigned
consecutive numbers. The name
can be edited (tap the name).
Close the keyboard with " ".
*REDFNWRWHVWLQJPRGH
The active folder is shown on the display
The name will be shown on the
display and in the exported data.
Choose a unique name.
Start test
Recording activated: The icon turns red
For documentation purposes and for
the report, each test can be expanded
upon to include the elements on the
side.
Areas of damage can be marked
on the photos.
Compile data in a test report (.pdf)
([SRUWDOOWHVWGDWD]LS
&UHDWHDQHZIROGHURUVHOHFWDQH[LVWLQJ
folder: Active folder = green background
The recording stops automatically
after 10 seconds.
Change value: " Settings" -
"Measurement settings"
The application will be shown on the
display and in the exported data. It is
also used for evaluation.
8VHUGHQHGDSSOLFDWLRQVFDQEH
stored by selecting "Create new
application".
Stop the test manually
An active folder must be stored in
order to start a test.
6HOHFWWKHUHTXLUHGGDWD7DS2.WRFRQUP
7KHGDWDLVFRPSLOHGIRUH[SRUW
2SHQWKHIROGHURYHUYLHZ
The test data can be compiled in
the internal memory for evaluation
in Data Viewer (computer software
for LevelMeter app) and as a test
report (.pdf).
The data can then be transferred to
an end device.
*REDFNWRWHVWLQJPRGH
The data is ready for transfer.
1
2
3
4
5
3Load battery
3Connect sensor
3Switch on device
3Switch on headphones
Prepare test data for export
Other manuals for Sonaphone
3
Table of contents
Other Sonotec Test Equipment manuals

Sonotec
Sonotec Airborne Sound Sensor BS10 Operator's manual

Sonotec
Sonotec Sonaphone Pocket User manual

Sonotec
Sonotec SONAPHONE E User manual

Sonotec
Sonotec SONAPHONE E User manual

Sonotec
Sonotec Sonaphone Manual

Sonotec
Sonotec Sonaphone Operator's manual

Sonotec
Sonotec SONASCREEN User manual

Sonotec
Sonotec SONO-PR 200 User manual

Sonotec
Sonotec Sonaphone User manual


