manuals.online logo
Brands
  1. Home
  2. •
  3. Brands
  4. •
  5. Sony
  6. •
  7. Camera Lens
  8. •
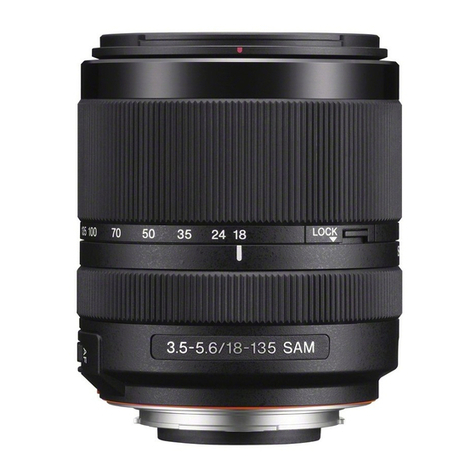
  9. Sony DT18-135mm F3.5-5.6 SAM User manual

Sony DT18-135mm F3.5-5.6 SAM User manual


–1
–2

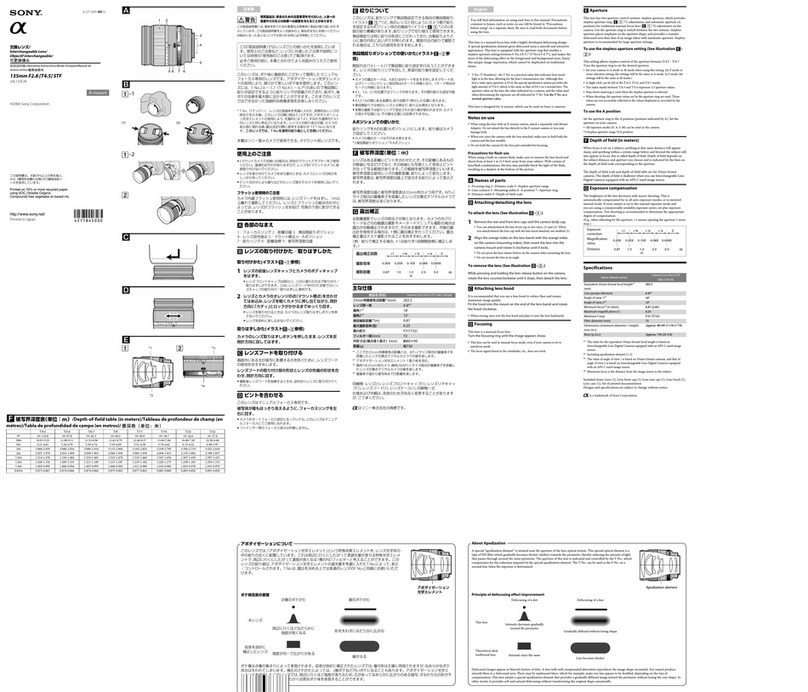
各部のなまえ
1…ズームリング 2…ズームロックスイッチ
3…フォーカスリング 4…レンズ信号接点 
5…レンズフード指標 6…焦点距離目盛
7…焦点距離指標 
8…フォーカスモードスイッチ
9…マウント標点

レンズの取り付けかた/取りはず
しかた
取り付けかた(イラスト–参照)
1 前後のレンズキャップとカメラのボディ
キャップをはずす。
レンズフロントキャップは図の(1)、(2)の2通りの方
法で取り付け/取りはずしができます。(2)は、レンズ
フードを付けた状態でのレンズキャップの取り付け
/取りはずしに便利です。
2 レンズとカメラのオレンジの点(マウント標
点)を合わせてはめ込み、レンズを軽くカメ
ラに押し当てながら、時計方向に「カチッ」と
ロックがかかるまでゆっくり回す。
レンズを取り付けるときは、カメラのレンズ取りは

ずしボタンを押さないでください。
レンズを斜めに差し込まないでください。

取りはずしかた(イラスト–参照)
カメラのレンズ取りはずしボタンを押したま
ま、レンズを反時計方向に回してはずす。
レンズフードを取り付ける
画面外にある光が描写に影響するのを防ぐために、
レンズフードの使用をおすすめします。
レンズフードの赤線をレンズの赤線(レンズ
フード指標)に合わせてはめ込み、レンズフード
の赤点とレンズの赤線が合って「カチッ」という
まで時計方向に回す。
レンズフードを正確に取り付けてください。レンズフー

ドの効果が出なかったり、画面の一部にレンズフードが
写り込むことがあります。
撮影後レンズフードを収納するときは、逆向きにレンズ

に取り付けてください。
ズームする
ズームリングを回して、希望の焦点距離(ズームの
位置)に合わせる。
ズームロックについて
携帯時など、レンズの自重による鏡筒の伸長を防ぎ
ます。
スイッチをスライドさせロックします(イラスト
-参照)。解除するにはスイッチを戻します。
ピントを合わせる
AF(オートフォーカス) /MF(マニュアルフォー
カス)の切り換え
AF(オートフォーカス:自動ピント合わせ) /
MF(マニュアルフォーカス:手動によるピント合
わせ)の設定を、レンズ側で切り換えることができ
ます。
AFで撮影する場合は、カメラ側とレンズ側両方の
設定をAFにします。カメラ側あるいはレンズ側の
いずれか一方、または両方の設定がMFの場合、MF
になります。
レンズ側の設定(イラスト参照)
フォーカスモードスイッチを、AFまたはMFのい
ずれか設定したい方に合わせる。
MFでは、ファインダー等を見ながらフォーカスリングを
回して、ピントを合わせます(イラスト-参照)。
AF/MFコントロールボタンを装備したカメラをお
使いの場合
AF時にMFに切り換えるには、カメラとレンズ両方の設

定がAFのときに、AF/MFコントロールボタンを押しま
す。
MF時にAFに切り換えるには、カメラの設定がMF、レン

ズの設定がAFのときに、AF/MFコントロールボタンを
押します。
ダイレクトマニュアルフォーカス(DMF)
AF制御自動切り換え(AF-A)、またはシングル
AF(AF-S)でフォーカスロックしているときに、
フォーカスリングを回すとDMFが作動します。
次の場合、DMFは作動しません:

ピントが合っていない場合

コンティニュアスAF(AF-C)を選択した場合

AF-Aの連続撮影中2回目のピント合わせが終了した

あと
無限遠の被写体をMFで撮影する場合
温度変化によるピントの移動を補正するため、無限
遠(∞)位置に余裕を持たせてあります。無限遠の被
写体をMFで撮影する場合は、ファインダー等で確
認しながらピント合わせをしてください。
主な仕様
商品名(型名) DT18-135mm F3.5-5.6 SAM
(SAL18135)
35mm判換算焦点距離*1
(mm)
27-202.5
レンズ群一枚 11-14
画角 76°-12°
最短撮影距離*2(m)0.45
最大撮影倍率(倍) 0.25
最小絞り F22-36
フィルター径(mm)62
外形寸法(最大径×長さ)
(約:mm)
76 × 86
質量(約:g)398
*1ここでの35mm判換算焦点距離とは、APS-Cサイズ相
当の撮像素子を搭載したレンズ交換式デジタルカメラ
での値を表します。
*2最短撮影距離とは、撮像素子面から被写体までの距離を
表します。
このレンズは距離エンコーダーを搭載しています。距離

エンコーダーにより、高精度な調光(ADI調光)をADI対応
フラッシュとの組み合わせで実現しています。
レンズの機構によっては、撮影距離の変化に伴って焦点

距離が変化する場合があります。記載の焦点距離は撮影
距離が無限遠での定義です。
同梱物
レンズ(1)、レンズフロントキャップ(1)、レンズリ
ヤキャップ(1)、レンズフード(1)、印刷物一式
仕様および外観は、改良のため予告なく変更するこ
とがありますが、ご了承ください。
はソニー株式会社の商標です。
その他、各社名及び各商品名は各社の商標または登
録商標です。
This instruction manual explains how to use lenses.
Precautions common to all lenses such as notes on use
are found in the separate “Precautions before using”. Be
sure to read both documents before using the lens.
This lens is designed for A-mount, which can be used on
Sony α cameras (models equipped with APS-C sized image
sensor). You cannot use on 35 mm-format cameras.
Notes on use
When carrying a camera with the lens attached, always firmly
hold both the camera and the lens.
Do not hold by any part of the lens that protrudes when
zooming.
When using this lens with an E-mount camera, attach a
separately sold Mount Adaptor. Do not attach the lens directly
to the E-mount camera or you may damage both.
Precautions for flash use
When using a built-in camera flash, always remove the lens
hood and shoot at least 1m (3.3 feet) away from your subject.
With certain combinations of lens and flash, the lens may
partially block the light of the flash, resulting in a shadow at
the bottom of the picture.
When a built-in camera flash is used, the corners of the screen
may appear darker at wide-angle position. Check the focal
length according to the built-in flash on your camera.
Vignetting
When using lens, the corners of the screen become darker
than the center. To reduce this phenomena (called vignetting),
close the aperture by 1 to 2 stops.
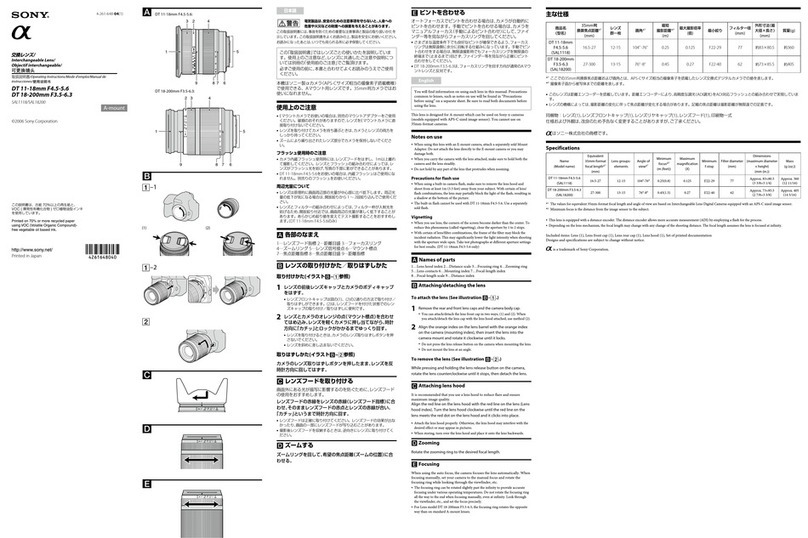
Names of parts
1...Zooming ring 2...Zoom lock switch 3...Focusing ring
4...Lens contacts 5...Lens hood index
6...Focal-length scale 7...Focal-length index
8...Focus-mode switch 9...Mounting index
Attaching and detaching the lens
To attach the lens
(See illustration –.)
1Remove the rear and front lens caps and the
camera body cap.
You can attach/detach the front lens cap in two ways, (1)
and (2). When you attach/detach the lens cap with the lens
hood attached, use method (2).
2Align the orange index on the lens barrel with
the orange index on the camera (mounting
index), then insert the lens into the camera
mount and rotate it clockwise until it locks.
Do not press the lens release button on the camera when
mounting the lens.
Do not mount the lens at an angle.
To remove the lens
(See illustration –.)
While holding down the lens release button on the
camera, rotate the lens counterclockwise until it stops,
then detach the lens.
Attaching the Lens Hood
It is recommended that you use a lens hood to reduce flare
and ensure maximum image quality.
Align the red line on the lens hood with the red line
on the lens (Lens hood index), then insert the lens
hood into the lens mount and rotate it clockwise until
the red point on the lens hood is aligned with the red
line on the lens and the lens hood clicks into place.
Attach the lens hood precisely or it may be ineffective or
appear in pictures.
When storing, fit the lens hood onto the lens backwards.
4-421-359-01 (1)
©2012 Sony Corporation
Printed in Japan
交換レンズ
/
Interchangeable Lens/
Objectif interchangeable/
取扱説明書
/Operating Instructions/Mode d'emploi/
Manual de instrucciones/





電気製品は、安全のための注意事項を守らな
いと、人身への危害や火災などの財産への損
害を与えることがあります。
この取扱説明書には、事故を防ぐための重要な注意事項と製品
の取り扱いかたを示しています。この取扱説明書をよくお読
みの上、製品を安全にお使いください。お読みになったあとは、
いつでも見られる所に必ず保管してください。
この「取扱説明書」ではレンズの使いかたを説明
しています。使用上のご注意などは別冊の「使
用前のご注意」でご覧頂けます。
必ずご使用の前に、本書と合わせてよくお読み
のうえでご使用ください。
本機はソニー製αカメラ(APS-Cサイズ相当の撮像
素子搭載機種)で使用できる、Aマウント用レンズ
です。35mm判カメラではお使いになれません。
使用上のご注意
レンズを取り付けてカメラを持ち運ぶときは、カメラと

レンズの両方をしっかり持ってください。
ズームにより繰り出されたレンズ部分でカメラを保持し

ないでください。
Eマウントカメラでお使いの場合は、別売のマウントアダ

プターをご使用ください。破損のおそれがありますので、
レンズをEマウントカメラに直接取り付けないでくださ
い。
フラッシュ使用時のご注意
カメラ内蔵フラッシュ使用時には、レンズフードをはず

して1m以上離れて撮影してください。レンズとフラッ
シュの組み合わせによっては、レンズがフラッシュ光を
妨げ、写真の下部に影ができることがあります。
カメラの内蔵フラッシュ使用時には、ワイド側で周辺が

暗くなることがあります。
お使いのカメラの内蔵フラッシュの対応焦点距離をご確
認ください。
周辺光量について

レンズは原理的に画面周辺部の光量が中心部に比べ低下
します。周辺光量の低下が気になる場合は、開放絞りか
ら1〜2段絞り込んでご使用ください。
Zooming
Rotate the zooming ring to the desired focal length.
Zoom lock
This prevents the lens barrel from extending due to the
weight of the lens while it is carried.
Slide the zoom lock switch to lock. (See illustration -.)
To unlock, slide the zoom lock switch back.
Focusing
To switch between AF (auto focus) and
MF (manual focus)
Focusing can be switched between AF and MF on the lens.
For AF photography, both the camera and lens should be
set to AF. For MF photography, either or both the camera
or lens should be set to MF.
To set the focus mode on the lens
(See illustration .)
Slide the focus-mode switch to the appropriate mode, AF or
MF. (See illustration -.)
To use a camera equipped with an AF/
MF control button
Press the AF/MF control button to switch AF to MF when
both the camera and lens are set to AF.
Press the AF/MF control button to switch MF to AF when the
camera is set to MF and the lens is set to AF.
Direct manual focus (DMF)
Rotate the focusing ring to set the correct DMF when the
focus is locked in AF-A (automatic auto focus) or AF-S
(singleshot auto focus).
DMF is not available in the following cases:
When the image is out of focus
When AF-C (continuous auto focus) is selected
When focusing of the second photo is complete in
continuous recording in AF-A
Shooting at infinity in MF
The focusing mechanism turns slightly past infinity
to provide accurate focusing under various operating
temperatures. Always confirm the image sharpness through
the viewfinder or other viewing part, especially when the
lens is focused near infinity.
Specications
Name (Model name) DT18-135mm F3.5-5.6 SAM
(SAL18135)
Equivalent 35mm-format
focal length*1(mm)
27-202.5
Lens groups-elements 11-14
Angle of view 76°-12°
Minimum focus*2(m (feet)) 0.45 (1.48)
Maximum magnification (×) 0.25
Minimum f-stop F22-36
Filter diameter (mm) 62
Dimensions (maximum
diameter × height)
(Approx., mm (in.))
76 × 86 (3 × 3 1/2)
Mass (Approx., g (oz)) 398 (14.0)
*1The equivalent 35mm-format focal length shown above is
for Interchangeable Lens Digital Cameras equipped with an
APS-C sized image sensor.
*2The minimum focusing distance is the distance between the
subject and the image sensor.
This lens is equipped with a distance encoder. The distance
encoder enables more accurate measurement (ADI) if used
with an ADI-compatible flash.
Depending on the lens mechanism, the focal length may
change with any change of the shooting distance. The focal
length assumes the lens is focused at infinity.
Included items
Lens (1), Front lens cap (1), Rear lens cap (1), Lens hood
(1), Set of printed documentation
Design and specifications are subject to change without
notice.
is a trademark of Sony Corporation.
Company names and company product names are
trademarks or registered trademarks of those companies.
Cette notice d’emploi explique comment se servir des
objectifs.
Les précautions communes à tous les objectifs, par
exemple les remarques sur l’emploi, se trouvent sur la
feuille “Précautions avant toute utilisation”. Veuillez lire
les deux documents avant d’utiliser l’objectif.
Cet objectif est conçu pour une monture A, pouvant être
utilisée sur les appareils photo Sony α (modèles équipés
d’un capteur d’image APS-C). Il ne peut pas être utilisé avec
les appareils photo de format 35 mm.
Remarques sur l’emploi
Lorsque vous portez un appareil photo avec l’objectif dessus,
tenez toujours fermement l’appareil photo et l’objectif.
Ne tenez pas l’appareil photo par la partie de l’objectif qui
ressort lors d’un zoom.
Lorsque vous utilisez cet objectif avec un appareil photo
à monture E, rattachez toujours un adaptateur pour
monture d’objectif vendu séparément. Ne fixez pas l’objectif
directement sur l’appareil photo à monture E car vous
risqueriez d’endommager l’un et l’autre.
Précautions concernant l’emploi du flash
Lorsque vous utilisez le flash intégré de l’appareil photo,
retirez toujours le parasoleil et prenez vos photos à au moins 1
m (3,3 pieds) du sujet.
Associé à certains types de flash, l’objectif peut bloquer
partiellement la lumière du flash et produire un ombre au bas
de l’image.
Lorsque le flash d’un appareil photo est utilisé, les coins de
l’écran peuvent paraître plus sombres en position grand angle.
Vérifiez la longueur focale selon le flash de votre appareil
photo.
SAL18135
DT18-135mm F3.5-5.6 SAM
(1) (2)
A-mount


(Suite à la page arrière)
Vignetage
Lorsqu’un objectif est utilisé, les coins de l’écran deviennent
plus sombres que le centre. Pour réduire ce phénomène
(appelé vignetage), fermez l’ouverture de 1 ou 2 crans.
Noms des éléments
1...Bague de zoom 2...Bouton de blocage de zoom
3...Bague de mise au point 4...Contacts d’objectif
5...Repère de parasoleil 6...Échelle de focale
7...Repère de focale
8...Commutateur de mode de mise au point
9...Repère de montage
Pose et dépose de l’objectif
Pour poser l’objectif
(Voir l’illustration –.)
1Déposez les capuchons d’objectif arrière et
avant et le capuchon de l’appareil photo.
Vous pouvez poser et déposer le capuchon d’objectif avant
de deux façons, (1) et (2). Si vous posez ou déposez le
capuchon d’objectif avec le parasoleil, utilisez la méthode
(2).
2Alignez le repère orange du barillet d’objectif
sur le repère orange de l’appareil photo
(repère de montage), puis posez l’objectif sur
la monture de l’appareil photo et tournez-le
dans le sens horaire de sorte qu’il s’encliquette.
N’appuyez pas sur le bouton de libération de l’objectif sur
l’appareil photo lorsque vous posez l’objectif.
Ne posez pas l’objectif de biais.
Pour déposer l’objectif
(Voir l’illustration –.)
Tout en appuyant sur le bouton de libération de
l’objectif sur l’appareil photo, tournez l’objectif dans le
sens antihoraire jusqu’à l’arrêt, puis déposez l’objectif.
Fixation du parasoleil
Il est conseillé d’utiliser un parasoleil pour réduire la
lumière parasite et obtenir la meilleure image possible.
Alignez la ligne rouge du parasoleil sur la ligne rouge
de l’objectif (repère de parasoleil), puis insérez le
parasoleil sur la monture d’objectif et tournez-le
dans le sens horaire jusqu’à ce que le point rouge du
parasoleil s’aligne sur la ligne rouge de l’objectif et
que le parasoleil s’encliquette.
Fixez correctement le parasoleil sinon il risque d’être inefficace
ou d’apparaître sur l’image.
Pour ranger le parasoleil, insérez-le à l’arrière de l’objectif.
Zooming
Tournez la bague de zoom selon la focale souhaitée.
Verrouillage du zoom
Ce bouton empêche le barillet de l’objectif de se déployer en
raison de son poids lorsqu’il est transporté.
Mettez le bouton de blocage de zoom en position de
blocage. (Voir l’illustration -.) Pour débloquer
le zoom, remettez le bouton de zoom dans sa position
d’origine.
Mise au point
Pour commuter entre AF (mise au point
automatique) et MF (mise au point
manuelle)
Il est possible de régler le mode de mise au point sur AF ou
MF sur l’objectif.
Pour la photographie en mode AF, l’appareil photo et
l’objectif doivent être tous les deux réglés sur AF. Pour la
photographie en mode MF, l’appareil photo ou l’objectif, ou
bien les deux, doivent être réglés sur MF.
Pour régler le mode de mise au point sur
l’objectif (Voir l’illustration .)
Réglez le commutateur de mode de mise au point sur le
mode adapté AF ou MF. (Voir l’illustration -.)
Pour utiliser un appareil photo pourvu
d’une touche de commande AF/MF
Appuyez sur la touche de commande AF/MF pour passer de
AF à MF lorsque l’appareil photo et l’objectif sont tous deux
réglés sur AF.
Appuyez sur la touche de commande AF/MF pour passer de
MF à AF lorsque l’appareil photo est réglé sur MF et l’objectif
sur AF.
Mise au point manuelle directe (DMF)
Tournez la bague de mise au point pour régler le mode
DMF correctement lorsque la mise au point est verrouillée
sur AF-A (mise au point automatique automatique) ou
AF-S (mise au point automatique unique).
Le mode DMF n’est pas disponible dans les cas suivants :
Lorsque l’image n’est pas mise au point
Lorsque AF-C (mise au point automatique continue) est
sélectionné
Lorsque la mise au point est confirmée pour la deuxième
photo lors d’un enregistrement en continu avec AF-A
Prise de vue à l’infini en mode MF
Le mécanisme de mise au point dépasse légèrement
l’infini pour atteindre une plus grande netteté à diverses
températures de fonctionnement. Vérifiez toujours la
netteté de l’image dans le viseur, etc. notamment lorsque le
réglage de l’objectif est proche de l’infini.
Spécications
Nom (Nom de modèle) DT18-135mm F3.5-5.6 SAM
(SAL18135)
Focale équivalente en
format 35 mm*1(mm)
27-202,5
Éléments-groupes de
lentilles
11-14
Angle de vue 76°-12°
Mise au point minimale*2(m
(pieds))
0,45 (1,48)
Grossissement maximal (×) 0,25
f-stop minimal F22-36
Diamètre d’objectif (mm) 62
Dimensions (diamètre
maximal× hauteur) (environ,
mm)
76 × 86 (3 × 3 1/2)
Poids (environ, g (oz)) 398 (14,0)
*1La focale équivalente en format 35 mm indiquée ci-dessus
concerne les appareils photo à objectif interchangeable avec
capteur d’image de taille APS-C.
*2La distance de mise au point minimale est la distance entre le
sujet et le capteur d’image.
Cet objectif intègre un codeur de distance. Le codeur de
distance permet d’obtenir des mesures plus précises (ADI)
lorsqu’un flash compatible ADI est utilisé.
Selon le mécanisme de l’objectif, la focale peut changer lorsque
la distance de prise de vue change. La focale présuppose que
l’objectif est réglé sur l’infini.
Articles inclus
Objectif (1), Capuchon d’objectif avant (1), Capuchon
d’objectif arrière (1), Parasoleil (1), Jeu de documents
imprimés
La conception et les spécifications peuvent être modifiées
sans préavis.
est une marque commerciale de Sony Corporation.
Les noms de sociétés et les noms de produits sont des
marques commerciales ou des marques déposées de ces
sociétés.
En este manual de instrucciones se explica cómo
utilizar objetivos. Las precauciones comunes a todos los
objetivos, como notas sobre la utilización, se encuentran
en las “Precauciones previas a la utilización del
producto” suministradas por separado. Cerciórese de
leer ambos documentos antes de utilizar el objetivo.
Este objetivo ha sido diseñado para montura A, que puede
utilizarse en cámaras α Sony (modelos equipados con sensor
de imágenes de tamaño APS-C). No podrá utilizarse con
cámaras de formato de 35 mm.
Notas sobre la utilización
Cuando transporte una cámara con el objetivo fijado, sujete
siempre firmemente tanto la cámara como el objetivo.
No sujete por ninguna parte del objetivo que sobresalga
cuando se utilice el zoom.
Cuando utilice este objetivo con una cámara con montura E,
fíjele un adaptador de montura de objetivo vendido aparte. No
fije el objetivo directamente a una cámara con montura E ya
que podría dañar ambos.
Precauciones en el uso del flash
Cuando utilice un flash incorporado en la cámara quítele
siempre el parasol del objetivo y fotografíe alejado a 1 m por lo
menos de su motivo.
Con ciertas combinaciones de objetivo y flash, el objetivo
puede bloquear parcialmente la luz del flash, lo que resultará
en una sombra en la parte inferior de la fotografía.
Cuando utilice un flash incorporado en la cámara, es posible
que se las esquinas de la pantalla aparezcan más oscuras en
la posición de gran angular. Compruebe la distancia focal de
acuerdo con el flash incorporado en su cámara.
Viñeteado
Cuando utilice el objetivo, las esquinas de la pantalla se
vuelven más oscuras que el centro. Para reducir este fenómeno
(llamado viñeteado), cierre la apertura de 1 a 2 puntos.
Nombres de las piezas
1...Anillo de zoom 2...Interruptor de bloqueo del zoom
3...Anillo de enfoque 4...Contactos del objetivo
5...Índice del parasol del objetivo
6...Escala de distancia focal 7...Índice de distancia focal
8...Interruptor del modo de enfoque
9...Índice de montaje
Colocación y extracción del
objetivo
Para colocar el objetivo
(Consulte la ilustración –.)
1Extraiga las tapas posterior y frontal del
objetivo y la tapa del cuerpo de la cámara.
Usted podrá colocar/extraer la tapa del objetivo frontal de
dos formas, (1) y (2). Cuando coloque/extraiga la tapa del
objetivo con el parasol fijado, utilice el método (2).
2Alinee el índice naranja del barril del objetivo
con el índice naranja de la cámara (índice de
montaje), y después inserte el objetivo en la
montura de la cámara y gírelo hacia la derecha
hasta que se bloquee.
No presione el botón de liberación del objetivo de la
cámara cuando monte el objetivo.
No monte el objetivo de forma inclinada.
Para extraer el objetivo
(Consulte la ilustración –.)
Manteniendo presionado el botón de liberación
del objetivo de la cámara, gire el objetivo hacia la
izquierda hasta que se pare, y después extraiga el
objetivo.
Colocación del parasol del objetivo
Es recomendable utilizar un parasol para reducir los reflejos
y garantizar la máxima calidad de la imagen.
Alinee la línea roja del parasol con la línea roja del
objetivo (índice del parasol), y después inserte el
parasol en la montura de la cámara y gírelo hacia la
derecha hasta que el punto rojo del parasol quede
alineado con la línea roja del objetivo (índice del
parasol) y el parasol chasquee en su lugar.
Fije el parasol del objetivo con precisión ya que podría ser
inefectivo o aparecer en las fotografías.
Cuando guarde la cámara, fije el parasol hacia atrás.
Utilización del zoom
Gire el anillo de zoom hasta la distancia focal que
desee.
Boqueo del zoom
Esto evita que el barril del objetivo se extienda debido al
peso del objetivo mientras se transporta.
Deslice el interruptor de bloqueo del zoom para bloquear.
(Consulte la ilustración -.) Para desbloquear, deslice
hacia atrás el interruptor de bloqueo del zoom.
Enfoque
Para cambiar entre AF (enfoque
automático) y MF (enfoque manual)
El enfoque puede cambiarse entre AF y MF en el objetivo.
Para fotografiar con AF, tanto la cámara como el objetivo
deberán ajustarse a AF. Para fotografiar con MF, tanto la
cámara como el objetivo deberán ajustarse a MF.
Para ajustar el modo de enfoque en el
objetivo
(Consulte la ilustración .)
Deslice el interruptor del modo de enfoque hasta el modo
apropiado, AF o MF. (Consulte la ilustración -.)
Para utilizar una cámara equipada con
botón de control AF/MF
Presione el botón de control AF/MF para cambiar AF a MF
cuando la cámara y el objetivo estén ajustados a AF.
Presione el botón de control AF/MF para cambiar MF a AF
cuando la cámara esté ajustada a MF y el objetivo esté ajustado
a AF.
Enfoque manual directo (DMF)
Gire el anillo de enfoque para ajustar el DMF correcto
cuando el enfoque esté bloqueado en AF-A (enfoque
automático) o AF-S (enfoque automático de un solo
disparo).
DMF no estará disponible en los casos siguientes:
Cuando la imagen esté desenfocada
Cuando haya seleccionado AF-C (enfoque automático
continuo)
Cuando haya finalizado el enfoque de la segunda fotografía
durante la grabación continua en modo AF-A
Grabar el infinito en modo MF
El mecanismo de enfoque puede girarse ligeramente más
allá de infinito para proporcionar un enfoque adecuado
con diferentes temperaturas de funcionamiento. Confirme
siempre la nitidez de la imagen a través del visor u otra parte
que permita verla, especialmente cuando el objetivo esté
enfocado cerca de infinito.
Especicaciones
Nombre (Nombre del
modelo)
DT18-135mm F3.5-5.6 SAM
(SAL18135)
Distancia focal*1(mm)
equivalente al formato de
35 mm
27-202,5
Grupos y elementos del
objetivo
11-14
Ángulo de visión 76°-12°
Enfoque mínimo*2(m) 0,45
Ampliación máxima (×) 0,25
F-stop mínimo F22-36
Diámetro del filtro (mm) 62
Dimensiones (diámetro
máximo × altura) (Aprox.,
mm)
76 × 86
Peso (Aprox., g) 398
*1Los valores mostrados arriba para la distancia focal
equivalente al formato de 35 mm y el ángulo de visión son
para cámaras digitales de lentes intercambiables equipadas
con un sensor de imágenes de tamaño APS-C.
*2La distancia mínima de enfoque es la distancia entre el
motivo y el sensor de imágenes.
Este objetivo está equipado con un codificador de distancia.
El codificador de distancia permite una medición más exacta
(ADI) si se utiliza un flash compatible con ADI.
En función del mecanismo del objetivo, es posible que la
distancia focal varíe si la distancia de toma de imagen también
lo hace. La distancia focal asume que el objetivo está enfocado
al infinito.
Elementos incluidos
Objetivo (1), Tapa frontal del objetivo (1), Tapa posterior
del objetivo (1), Parasol del objetivo (1), Juego de
documentación impresa
El diseño y las especificaciones están sujetos a cambios sin
previo aviso.
es marca comercial de Sony Corporation.
Los nombres de compañías y los nombres de productos de
compañías son marcas comerciales o marcas comerciales
registradas de esas compañías.
 对焦
切换 AF(自动对焦)/MF(手动对
焦)
在镜头上,可以在 AF 和 MF 之间
切换对焦模式。
进行 AF 拍摄时,相机和镜头均应
设定为 AF。进行 MF 拍摄时,相
机或镜头之一或者相机和镜头两者
应设定为 MF。
在镜头上设定对焦模式
(参见插图 。)
将对焦模式开关滑到相应模式:AF
或 MF。(参见插图 -。)
使用具有 AF/MF 控制按钮的相机
当相机和镜头均设定为 AF 时,按

AF/MF 控制按钮会将 AF 切换为
MF。
当相机设定为 MF 且镜头设定为 AF

时,按 AF/MF 控制按钮会将 MF 切
换为 AF。
直接手动对焦 (DMF)
当对焦在 AF-A(自动式自动对焦)
或 AF-S(单张自动对焦)中被锁
定时,转动对焦环设定正确的 DMF
模式。
在以下情况下,无法使用 DMF:

图像不清晰时

选择 AF-C(连续自动对焦)时

以 AF-A 进行连续录制的过程中为

第二张照片完成对焦时
在 MF 模式下进行无限远拍摄
对焦结构稍微转过无限远,以便在
多种操作温度下进行精确对焦。 应
始终通过取景器或其他取景部分来
确认图像锐度,尤其是当镜头对焦
于无限远附近时。
规格
名称(型号名称)
DT18-135mm
F3.5-5.6 SAM
(SAL18135)
相当于 35mm 规
格焦距*1 (mm)
27-202.5
镜头组-片 11-14
视角 76°-12°
最小对焦*2 (m) 0.45
最大放大倍数 (×) 0.25
最小光圈值 F22-36
滤光镜直径 (mm) 62
尺寸
(最大直径×高)
(约 mm)
76 × 86
质量(约 g) 398
*1 如上所示 35mm 相当规格的焦距针
对配备 APS-C 尺寸图像传感器的可
更换镜头数码相机。
*2 最小对焦距离是物体与图像传感器之
间的距离。
该镜头具有距离编码器。与支持 ADI

的闪光灯一起使用时,距离编码器可
进行更高精度的测量 (ADI)。
视镜头结构而异,焦距可能会随拍摄

距离的改变而变化。假设镜头对焦在
无限远处。
所含物品
镜头 (1)、前镜头盖 (1)、
后镜头盖 (1)、镜头遮光罩 (1)、
成套印刷文件
设计或规格如有变动,恕不另行通
知。
是 Sony Corporation 的商标。
公司名称以及公司产品名称都是这
些公司的商标或者注册商标。
制造商 : 索尼公司
总经销商 : 索尼(中国)有限公司
总经销商地址 :
北京市朝阳区太阳宫中路 12 号楼
冠城大厦 701
日本制造(主机)
出版日期 :2012 年 3 月
本使用说明书介绍镜头的用法。
有关所有镜头的一般注意事项
(如使用须知)可以在另外的
“使用前注意事项”中找到。务
必在使用镜头前阅读以上两份文
件。
本镜头专为 A 卡口系统设计,后者
可在 Sony α 相机(配备 APS-C
尺寸的图像传感器)上使用。本镜
头不能用于 35 mm 规格相机。
使用须知
当在装有镜头的情况下携带相机时,

请务必同时握紧相机和镜头。
请勿握住变焦时镜头突出的任何部

分。
将本镜头用于 E 卡口系统相机时,请

安装另售的卡口适配器。切勿将镜头
直接安装在 E 卡口系统相机上,以免
对二者造成损坏。
闪光灯使用注意事项
当使用内置相机闪光灯时,请务必取

下镜头遮光罩,并在距离拍摄物体至
少 1m 的地方拍摄。
使用镜头/闪光灯的某种组合时,镜头
可能会遮住闪光灯的部分亮光,从而
造成图片的底部出现阴影。
当使用内置相机闪光灯时,在广角位

置,屏幕的角落可能显得较暗。请根
据相机的内置闪光灯检查焦距。
晕影
使用镜头时,屏幕的角落要比其中
心暗。 为避免这种现象(称之为晕
影),请将光圈推近 1 ~ 2 圈。
 部件名
1...可变焦距圈 2...变焦锁定开关
3...对焦环 4...镜头接点
5...镜头遮光罩标记 6...焦距刻度
7...焦距标记 8...对焦模式开关
9...安装标记
 安装/拆下镜头
安装镜头
(参见插图 -。)
1 拆下前、后镜头盖和相机机身罩。
可以用 (1) 和 (2) 两种方式安装/拆
下前镜头盖。 在不取下镜头遮光罩
的情况下安装/拆下镜头盖时,请使
用方法 (2)。
2 将镜筒上的橙色标记与相机上的橙
色标记(安装标记)对准,然后将
镜头插入相机安装部位并顺时针旋
转,直至镜头锁紧。
请勿在安装镜头时按相机上的镜头

释放按钮。
请勿倾斜安装镜头。

拆下镜头
(参见插图 -。)
按住相机上的镜头释放按钮,逆时针转
动镜头直至其停止,然后拆下镜头。
 安装镜头遮光罩
建议使用镜头遮光罩以减少反光,
从而确保最佳画质。
将镜头遮光罩上的红线与镜头上的红线
(镜头遮光罩标记)对准,然后将镜头
遮光罩插入镜头安装部位并顺时针旋
转,直至镜头遮光罩上的红点与镜头上
的红线对准,且镜头遮光罩咔哒一声就
位。
请精确安装镜头遮光罩,否则可能会

影响使用效果或导致镜头遮光罩出现
在照片上。
存放时,请将镜头遮光罩倒过来放在

镜头上。
 变焦
将可变焦距圈转至所需焦距。
变焦锁定
携带镜头时,此功能可防止因镜头
自重而导致镜筒伸长。
请将变焦锁定开关滑至锁定位置。
(参见插图 -。)
如需解锁,请将变焦锁定开关向回
滑动。

–1
–2





(1) (2)
(Suite de la page avant)


SONY.
4-
191
-481-06(1)
:2:~v::;x
Interchangeable
Lens
Objectifinterchangeable
RJ:il!~ll~
http:
//
www.sony.neV
Pr
inted in Japan
11111111111111111111111111111
4191481060
C:Ol!liBJllll<l.
iSII\ 70%>LJ:Oli!lg,llfe:.
VOC
(
J!!l!!tt'lll!lltal!l)
t!Dll!!l!lilll!!:i
-1
Yo\'
~lfl!lLcn'"''·
Printed
on
70%
or
more
re
cycled
paper
using VOC (Volatile
Organic
Compound)·
free
vege
table oil
based
ink
.
mD
I
A\
-*
Illli!ll!llt.!l!llCOI::l!>COi!.lllll'fll'St<l
Lll1!i-
~\I::,Alt"-COlllWI'>lll!llt<ll::<I.>II."COIII
W'f'0~9<:1::1JI<Ii!:>li:T
o
<:OJIIII!!l!liBJllflot<t.ll!liJI'.r""
<:roObOJ!!!ll''«i!li!ll>lllct:liiil
O)~IJID:l11J'/c.~mt...."Cl1~9o
L.rJJI&ID:~BF.JW~J:<O~
{fJO)_t,~~;,r~~I:S~l
1<
IC.c!L,
lo
3J&GCI-JIC1;J.::>/c®C:Id:
,
t.,
OC'tf~St1.Qffil;:£,-g-jj~t_.,
"C
<ICc!
I.-
lo
<:O)
r
lielll~uO)
L:)jo)!!;J
cia:
~..>
Y71~#JBI
L,tc<::
)jo~tJ:C:'
.
L:~lllilill~il:l'ICd:l
l
\tcti''i'itcc
\f'-l@l~
::JlYC~B!ll/U\;l''to
I..>Y7C:cO)~l\b'tc
I~
::Jl
\C:I<I:81JfffiO)
rJW
J»
ijliBJli!i
J
l'
2
~
!
-'il
:t;J''t,
<0
9'2~1lJO)iliJI~
.
0$:11!
<'::
;§;bttc:
J:
<
<!O"'d:IO)
5~c<::~lll<ti'<:Oc\o
:;
=--~aiM.
'ii:
~
l~n5:l'l
lo~
ct1
z:c
'*9
0 l.,b'
L,
,
r.JJil!:otc~c
\b'tc1.£90c.
}..!!Jtil!l&b'<~'i'£0
R\nb'i!i5':J1B~c'to
$1&1.£fll5<:
tclbi
~/RO)i:c
1.££c9'il:l'i'f':l
<rc:cc
,,
•
3<3':0)
rc!D0)
)1sll!IIi'.r'l'0
,
•
liJI~L.,ro
Sfl;b9'
10
,
<B~L
l.ti1
J6
,
aerci<IY
=-O)m!li!
!'i:!DIO
I
!l'l!l!'\"lt\11190
o
~..>;;:X~iML,
<::.:t:fl!ilt->'l!IIW't~~tJ:c)
13
1.£c
\tclbtc
':J.
:I:
BJlO)
®:IZJ
ct<>:S.;:
cb'
35':J;J'9o
!IUI.J~O>~O>feil
<
~
Piil~
i!!!
b'T.J:c'
!Ollil!t>l
:t
b'tJ:cO)®:IZJctJ:r:J
;1'9,
(S)
Mit
•
Lo7'1"ff!
'l'Jio
*~~"llil.
'l't'l!i
l
oliiJI
1
rc
ififloL.,tao
on::
<
reel.'·
l..-:::.-70)!!!l'ti1'!1lloJ:
o.
)dlit>;JG'.,. ·
LJ
Y7PJllllO);\'~O)(jj!E!l
l
~tJtlif9.
t>ti~!ll11'*~7Cl'
'1!to<B<Illi'i
l<t
.ilD!l!\.J/7'1'.,
~7~1i11DI
11
1<:<re
Cl-'o
• l.JY:;(,7
L!:J
/J
\
-
$'
-
1J::~f~l9"~C:~~L~ffll;:t,;
01"-,llol<t.
iti"'~"""'-"'L.
\J:
31o2;1:<~
<
reeL
'0
•
fo!t'i§O)I"-,l
i
~.£\9'\.J/7,
7
\.J
:::JYI(-5'-
1
0\.J/7
""
~7'\"liliDf:tl1
<:<reel.'
o
•
iJmill.O)/iliL.\I@ilil~ll<Jlllr.llll
.
lb't<>L.Y
c<ree
L'o
tJt::b'l!!
'E90C::cb'<
l5
tlil'
9 o
• i.JY71S'"I£"''\"I!IlS'<I'Lic<i.:'eL\o J:L'tl'i!J'IOJ:tl
l£
~1'!01~tJ0
1:.
1J
;1.
5/:
0)Iil.,O)t>tJ1:
tJ
b'iE
L.,
<
!~bt19'.
1J;I.
5 b'iE
[.,(
1!11'
[.,1;<(
tJIJlJ090)<:'2)1
tf:(tCC:L,)o
li.IO::'J~\'t'
16il'Ecla:.
L->Y7<!'to:c
\t.li:fi
hb'Si®<
l~~b'c
'!!!fin"
j~'l))l,fvtC:
c'CitJ:cl~.
(..>
y:;(O)f'-liJ!IJ1":9HJI
IJI
~7./<jlj
~M<C::cc~E~1.£~i:':J~<<V:S.~Ib~
1;;
.-Mu:--71.£;J{'J'&b'J
CY
citJ:ci~J..nz:.
~
lll9'6\Jl<JRO)iJiil!E'I~IO>L;;J't!Tb'S.I1JWt±JL<::<
tCCl'o
as~A.ttlo::"J~)c::
•
LJY70)
l!<
i!iil~l~i1!!lt~tt'«L
'"<reeL
'0
•
LJ:--7b')'5tt
rc
c>!l
~.
7D:P
-
cl~c::tJ~O)'t:>!
.
~S
b'l..
'i
l\!i
l'UcrNJ-c.fl<
13"
1'
~lt!::>
L <
tCC!L,
'·
(?
IJ
-
=::;:t
?D;;<.O)C'\l;!ll'\"<599!DL.,if9
.)
•
\.JY7t>llii~O)J>'J"
J..t1I
OI~
.
'/Y'T-,A./:J/tJ/:'.0)
'llt11lll§~M
ii!'l'JIO
\l;b
tJL
1<:'
(
reel.
\o
ti118
•
~O)~~
r
;:rct:f*ruE
B
b'i~11~:t1
L
t.,
'
*90Y
C',
a)
;{L,
)
_t
1
116'C
<B'lici1QiltJ
<reeL.
'0
•
ili
>E
'Ili
.IlO)
ocJ..<BJ:r.ncii!PJ@'I"<B!!!b'II>O).t.
:*:W
io
l'i''i§L.,
<:
<
ieel\o
• l'i'
i![Jlll(!lJI
<I.
S!!il.
1
.t
i1B
J:
tJ
I
'l'r
s
l'C9,
771>-':t-1:::"7.
·~fJ'JE~It:;!~itl':J'J:
~?~
C::O)OliB!ll!lc
.
81JfffiO)rJW~&,i1B!l\i!i
J1.£
t>
s~Mc:-'li:
l~tJ::oz:<JOoiVZ<tccc),
.znct>l't§O)~c)c
1!1<1:
.s..:c\.tl1r.5.
;rrc~a::;=.-O)!§"':!Rol
~2
I§W~<ti'N
\
o
tillllllr.ai!>O>HI;J:
i!!!illl!!O)ocifii<f*.l@l<=¥~c
''Lirmlcttz:c
)/etc"£
;roo
o¥L<I<ti!!!oiT~1.£2'1i<rccc'o
tliliElllr.alilillllto.>tJIII;J:
lrmli~J:
:o
Ul!
iiWif!
i"rc
iO':S.t.>l
;§;ld:
.
2i!!'~I~J:
':l1l*4
lii
ml<:Ottn\tctC:'i'£;1'9o
J::(£~Sfa!
L.
1t!ibtt.M~1.i5Z:t.rt:l;.
;fi:
-L..-"'
-
V~~IlKt.:<!\..l.
http://www.sony.
eo
.jp/support
r· t
·=
.t~
.-
•
:JIJ
:5'-1'"\?
J
[;
71J
:$1-{i?
JV
0120-333-020
····
·· ·· ··
0120-222·330
~f!fl!l~·P
H
S·-fi)O)IF!E~
~fflii~·PHS·
-
00®
1
Pl!l~
--
--
0466-31-2511
·· ·· ··
0466·31·2531
~11~
1111
,Ej~~:
9:
00
~ 1
8:0
0
511:
1
1tli'i
l:ll
,Ej-
~:
9:00
-2
0:
00
::t
·B·
NB:
9:00
-17:00
:t·B
·l"XB:
9:00
-17
:
00
liE!t!UJJJ··IJ'E::J:AIJO).Aitl~l;
C.!iS"-<I3
~
l1fi01t<T<:<!
~
I.
FAX
<AB)
0
120-333
·389
•
.
.t:~tltG"-IIfitm
fiHJJOJt1-f~/Af.l'JifnLL1QIIDI...
r4o2J+r#J
l.rillil,"L(r.:;;!L.\"
!111.
t);!~gD"-ifSJI;I:~Li:'§"
"Precautions before using" contains information you
shou
ld read before using the
le
ns, such as precautions
common
to lenses. H
ow
to use individual lenses
is
d
esc
ribed
in
"
Op
erating
in
s
tru c
t
io
n
s~
on a
se
parate shee
t.
Be sure to read both doc
ument
s before using t
he
lens.
NI
JE1
To re
duc
e fire
or
shock hazard,
do
no
t expose
the
unit to
r
ai
n
or
moistur
e.
Do
not
directly l
ook
at the sun th rough th
is
lens.
Doing so might ha
rm
your
eyes
or
cause loss
of
eyesigh
t.
Keep the lens
ou
t
of
reach
of
small children.
There is
danger
of
accident
or
injur
y.
For
the
customers
in
the
U.S.A.
This device complies with Part 15
of
the FCC Rules.
Op
eration is subject to the followi ng two conditions:
(I)
Thi
s device may
not
cau
se
harmful interference,
and
(2)
this device must accept any interference received, including
interference that may cause undesired
op
eration.
CAUTION
You are cautioned that any changes or modifications
not
ex
pr
essly approved
in
this ma
nu
al could vo
id
yo
ur
authority
to operate this equipment.
NOTE:
Th
is equipm
ent
has been tested
and
fo
und
to
comp
ly
wi
th
the limits for a Class B digital device,
pursuant
to Part 15
oft
he FCC Rules. These limits are designed to
pr
ovide
reasonable protection against harmful
in
t
er
ference in a
residential installation. This e
quipment
generates, uses,
and can radiate radio frequency
ener
gy and, if
not
installed
and
used in accordance with the instructions,
ma
y cause
harmful interference to radio communications.
However,
there
is
no guarantee that interference
will
not
occur in a particular installation.
If
this e
quipm
ent does
cause
harmful
interference to radio
or
television recep
ti
on,
which can be determined by
turning
the
equipment
off
and
on, the user
is
encouraged to try to correct the interference
by
one
or more of t
he
following
me
asures:
-Reorient
or
re
lo
cate t
he
receiving antenna.
-
In
crease the separa
ti
on between the equipment and receiver.
-Connect the equipment into an outlet on a circuit different
from that
to
which
th
e receiver
is
connected.
-Cons
ult
the dealer or an
~xperi~nced
radio/
TV
technici
an
for
help.
For
the
customers
in
Canada
Th
is Class Bdigit
al
apparatus complies with Canadian
ICES-003.
For
the
customers
in
Europe
-Disposal
of
Old Electrical & Electronic
Equipment (Applicable in
the
European
Union
and
other
European
countries
with
separate
colledion
systems)
This sy
mbo
l on
the
product
or
on
its
packaging indicates that this
produ
ct
shall not be treated as
ho
usehold wast
e.
Instead it shall be
handed
over
to the
app
li
cable collection
po
int
fo
r the recycling
of
electrical
and
elec
tr
onic equipment.
By
ensuring
this
produ
ct is
disposed
of
correctly, you
will
help prevent
po
tential
negative consequences for the
env
ironment
and
human
h
ea
lth, which could
oth
erwise be caused by i
nappropr
iate
waste
handlin
g
of
th
is
product. The recycling
of
materials
will help to conserve natural resources. For
more
detailed
information
about
recycling
of
th
is
product, please
con
tact
y
our
local Civic Office,
your
hou
se
h
old
waste disposal
service or the sh
op
where you
purchased
the
product.
Notice
for
the
customers
in
the
countries
applying
EU
Directives
The
man
ufact
urer
of
th
is
produ
ct
is
So
ny
Co
rporation,
1-
7-1
Konan Minato-ku Tokyo, 108-0075 J
apan
. The
Authorized Representative for EMC
and
prod
uct safety
is
Sony Deutschland Gm
bH
, Hedelfinger Strasse
61,70327
Stuttgart, Germa
ny.
For
any service or guarantee
ma
tters
please refer to the addresses given
in
separate service
or
guarantee
do
c
ument
s.
Notes
on
use
• Do not
leave
the lens exposed
to
the sun
or
a bright light
source. Internal malfunction
of
the
ca
mera body and lens,
or
a
fi
re
may result due to the effect of light
focu
si
ng.
If
circumstances
ne
cessita
te
leav
i
ng
the
lens
in
sunlight,
be
sure
to attach the lens caps.
•
Be
ca
reful not to
su
bject the lens/teleconverter to mech
an
ic
al
shock while attaching
it.
•
Always
place the lens caps on the lens/telecon
ve
rter w
he
n
storing.
• Do not k
ee
p the lens
in
a very humid place for a long period
of
time
to
prevent mold.
•
Do
not touch the lens contacts. Ifdirt, etc., gets on the l
en
s
contacts, it
may
interfere
or
prevent the
se
nding and receiving
of signals b
et
ween
the lens and the camera, result
in
g in
operational malfunction.
Condensation
If your lens
is
brought
directly from a cold place to a warm
place, condensation
ma
y
appear
on
the lens. To avoid this,
place the lens in a plast
ic
bag or
someth
ing similar.
Whe
n
the air temperature inside the bag reaches
the
surrounding
t
emperat
ure, take t
he
lens out.
Cleaning
the
lens
• Do not touch the surface
of
the lens directly.
• If the lens
ge
ts dirty, brush o
ff
dust with a lens blower
and wipe with a soft, clean cloth
(Cl
eaning C
lo
th
is
recommended).
• Do not use any organic
so
lvent, such as thinner
or
benzin
e,
to
clean t
he
lens
or
the
ca
mera cone.
lijfhlfAI
La
section~
Precautions avant toute utilisation »
con
tient
des informations alire imp
Crat
ivement avant d
'u
tiliser
I'objectif, te
ll
es
que des
pr
ecautions
communes
atous l
es
objectifs. L'utilisation de
cha
que objectifest decrite
dans
le « Mode
d'emp
loi » d
ans
un
do
cument separ
e.
Veuillez
lire attentivement ces deux
documents
avant d'utiliser
l'
ob
jectif.
A
Pour
reduire les risques
d'
incendie
ou
d'tHectrocution, tenir
cet
appare
il
al'abri de Ia pluie
et
de l'
humidite
.
Ne regard
ez
pas directement
le
sol
ei!
atravers cet objectif.
Ceci peut causer d
es
I
Cs
ions visuelles
ou
entrainer
Ia
perle
de
la
vue.
Gardez
l'objectifho
rs de portCe des enfants en bas age.
II
peut
pr
esenter des risques
d'acd
dent ou de blessur
e.
A
!'intention
des
clients
aux
E.-U.
Cet
appareil est conforme a
Ia
Partie 15 de
Ia
rCg
lementation
de
Ia F
CC
des Etats-Uni
s.
Son utilisation est sujette aux
deux
conditions suivantes :
(I) C
et
appareil ne
do
it pas gCnCrer d'interferences nuisibles
et (2)
il
doit
Ctre
en mesure d'accept
er
toute interference
re.;:ue,
y compris les interferenc
es
pou
v
ant
genCrer
un
fonctionnement ind
es
irable.
AVERTISSEMENT
Par
Ia
pr
esente, vous ktes avise du fait
que
tout change
ment
ou
toute
modificat
io
n ne faisant pas ]
'o
bjet d'
une
autorisation expresse
dans
le present manuel
pourra
it
annuler
votre
dr
oit d'utiliser l'apparei
l.
REMARQUE:
L
'ap
par
eil a
Cte
teste et est
conforme
aux exigences d'un
appareil
num
Crique
deC
lasse
B,
conformement aIa Partie
15
de
Ia
regl
emen
tation de Ia FCC.
Ces
cr
iteres sont
con.;:
us
pour
fournir une
pro
tection
raisonnable
contre
les inter
fe
rences nuisibles
dan
s
un
en
vi
ronnemcnt
rCsidentiel. L
'app
areil
gCnCre,
utilise ct peut
Cmettre des frCquenc
es
radio; s'il n'est pas installe et utili
se
con
fo
rmCment aux instruction
s,
il pourrait provoquer des
interferences nuisibles aux
comm
unications radio.
Cepcn
dant, il n'est pas possible
de
garantir
qu
e des
inter
fe
rences nc seront pas provoquCes dans certaines
conditions particuli
hes.
Si l'appareil d
ev
ait provoquer d
es
interferences
nu
isibles aIa reception radio
ou
a
Ia
television,
ce
qu
i peut etre d
Cmo
ntr
Cen allumant et etei
gnant
I'appareil, il est r
ecom
mande
al'util
is
ate
ur
d'essayer de
cor
riger cette situation par
l'une
ou
]'autre des mesures
suivantes :
-RCorient
er
ou deplacer J'antenne r
ke
ptric
e.
-
Au
gmenter
Ia
distan
ce
entre
J'ap
pa
reil
et
le
rC
ce
pteur.
~
Bran
ch
er l'appa
reil
dans une prise ou sur un circu
it
different
de
ce
lu
isur lequelle recepteur
es
t branche.
-Consulter
le
dCtailla
nt ou un technicien
expC
ri
mentC
en rad
io
/
t
Clev
iseurs.
Pour
les
clients
au
Canada
Cet appareil
num
erique
de
Ia classe B est conforme a Ia
norme
NMB-003
du
Canada.
Pour
les
clients
en
Europe
Traltement
des
appareils
eledrlques
et
electroniques
en
fin
de
vie (Applicable
dans
les
pays
de
!'Union
Europeenne
et
aux
autres
pays
europftns
disposant
de
systemes
de
collecte selective)
-Ce symbole, appose
sur
le
produ
it
ou
s
ur
son emballage, indique que ce
produ
it
ne doit pas
t>
tr
e traiiC avec les dechets
mena
gers.
II
doit
et
re remis a
un
point de collecte
appropr
ie
po
ur
le recyclage des equi
pement
s Clectriques et
Clectroniqucs. En vous assurant
qu
e
ce
produit
so
nt mis au
rebut de fa\on
appropri
ee, vous participez activement aIa
prevention des consequences negatives que leur mauvais
traitement
pourrait
provoquer
s
ur
l'env
ironnement
et s
ur
Ia
sante
humain
e.
Le
recydage des materiaux
con
tribuc
par
ailleurs a
Ia
preservat
io
n des ressources naturelles.
Pour
toute information complementaire
au
sujet
du
recyclage
de
ce
produ
it, vous pouvez contact
cr
vo
tr
e
muni
ci
palit
e,
votre
deche
tt
er
ie locale ou le point de vente oUvous avez achetC
l
epro
duit.
Avis
aux
consommateurs
des
pays
appliquant
les
Directives
UE
Le
fabricant de ce
produit
est Sony
Corporation
, 1-7-1
Konan Minato-ku Tokyo, 108-0075 Japon.
Le
re
pr
esentant
agree
pour
Ia
co
mpa
ti
bi\ite electromagnCtique et
Ia
sCc
uritC
du
produ
it
est Sony Deutschland
GmbH,
He
delfinger
S
tr
asse 61, 70327 Stuttgart, Allemagne. P
our
toute
question
rela
ti
ve
a
Ia
garantie ou aux reparations, reportez-vous a
l'adresse que vous trouverez dans l
es
documents
d-joi
nt
s,
relatifs aIa garantie et aux reparations.
Remarques
sur
I'
utilisation
•
Ne
laissez
pas
J'objectifexpose au
so
l
eil
ou
il.
une autre sour
ce
de
lumihe
vive.
Cela risque de provoqucr un probi
Cme
de
fo
n
ct
ionnement
in
tern~
du boitier de
J'a
ppareil photo
et
de
l'objcctif,
voi
re de provoquer un incendie.
Si
toutefois vous ne
pouvez pas faire autrement, veillez il fixer
les
capuchons sur
!'objecti
f.
•
Ve
ill
ez
a ne pas soumettre l'objectif/le
tCICconvertisseur
il
un
choc
mkan
iqu
e lorsque vous
le
fi
xez.
• Placez toujours
Jcs
ca
pu
cho
ns
sur l'objecti
f/le
tdCconverti
sseu
r
a
va
nt de
le
ranger.
• Ne laissez
pas
l'objectif dans un endroit
tri:s
humide
pendant une
pC
riode prolongCe
afin
d
'C
vit
er
Ia
formation de
moisissure.
•
Ne
to
uch
ez
pas
l
es
contacts
de
l'object
if.
Si
de
Ia
sal
ct
C,
et
c.,
se
trouve s
ur
les
contacts
de
J'ob
j
ectif,
c
ela
risque de p
oser
un
problt>
me
ou
d'e
mp
echer
Ia
r
ece
ption et
I'
e
nv
oi
desig
nau
x
en
tre
l'ob
j
ec
tifet
l'
apparei
l photo, provoquant
ain
si
un
dysfonctionnement.
Condensation
Si
votre objectifest deplace directement d'un e
ndr
oi
t froid
aun endroit chaud, de
Ia
condensation risque de se former
sur l'objectif. Pour evil
er
ce
phenomene, placez l'objec
ti
f
dans un sac plastique
ou
autre.
So
rtez
J'
objectifdu sac
lorsquc
Ia
temperature de ]'air al
'i
nter
ie
ur du sac a atteint Ia
temperat
ur
e ambiante.
Nettoyage
de
I'
objectif
•
Ne
touchez pas directement Ia surf
ace
de I'objectif.
•
Si
l'objectifest
sa
le
, eliminez
Ia
poussihc
avec
unc soufflette
et
es
suyez-
le
ave
c·
un chiffon doux et propre (le chiffon de
ncttoyage
es
t recommande).
• N'utilisez aucun solvant organique,
tel
qu'un diluant ou de
)'essence pour nettoyer l'objectifou
le
cO
ne de l'appareil
U·fii.I.JI
"Precaucion
es
previas a
Ia
utiliz
aciO
n
del
producto"
co
nt
iene
infor
maciOn
que debe leerse antes de ut
iliz
ar
e\
objetivo
como, por cjemp
lo
,precaucio
nes
comunes relacionadas con
los
objet
ivos
.
El
funcionamie
nt
o de objetivos individuales
se
describe
en
el
~
Manua
l
de instrucciones" en una h
oja
indepcndient
e.
Asegllresc de leer ambos documentos antes de
utilizarelobjetivo.
Para re
ducir
el
riesgo de incen
dio
o descarga e\ectrica, no
exponga
Ia
un
idad a
Ia
lluvia ni a Ia humedad.
No mire directamente el sol a traves de este objetivo.
De lo c
ont
rario, podria daiiar sus oj
os
o causar una perdida
de
suvis
ta.
Mantenga el objetivo fuera del a!cance
de
los nifios.
Existe riesgo de sufrir dai10s o
un
accidente.
Para
los
clientes
de
Europa
R
Tratamlento
de
los
equlpos
elt!dricosy
eledr6nicos
al final
de
su
vtda
Util
(aplicable
en
Ia
UniOn
Europea
yen
pafses
europeos
con
sistemas
de
tratamiento
seledtvo
de
restduos)
- Este simbolo en
cl
equipo o en
su
embalaje
indica que
el
pre
sente producto no
puede
ser tratado
como
resi
duos
domCstico n
orma
l.
Debe
entregarse en el correspondiente p
unto
de recogida de
equipos
e\Cc
tr
ic
os y elcc
tr
6nicos.
AI
asegurarse de que este
produ
cto se desecha correctamente, usted ayuda a
pr
even
ir
las consecuencias potencialmente negativas para
el
medio
ambiente y Ia salud
human
a
qu
e
pod
ri
an
der
iv
arse de
Ia
incorrecta manipulaci6n en el
momento
de deshacerse de
este producto. El re
cid
aje de materiales ayuda a conservar
los recursos naturales. Para recibir informaciOn detallada
sa
bre
el
rec
idaj
e de este producto, p6ngase en contacto
con
el
ayuntamiento,
el
punta
de recogida mas cerca
no
o
el
establecimiento
donde
ha adquirido el
produ
cto.
Aviso
para
los
clientes
de
paises
en
los
que
se
aplican
las
directivas
de
Ia
UE
El fabrican
te
de este producto es Sony Corporation, l-7- 1
Kanan
Mi
nato
-
ku
Tok
yo,
108
-0075, jap6n.
El
representante
autorizado en
lo
re
fe
rente
al
cumplimiento de
Ia
directiva
EMC y a Ia seguridad de los p
roduc
tos es S
on
y Deutschla
nd
Gmb
H, Hedelfinger S
tr
asse6
1, 70327 S
tutt
gart, Alemania.
Para resol
ve
r cualquier
asunto
relacionado con
el
soporte
tC
cnico o
Ia
garantia, consulte las direcciones que se
indican en los
documentos
de soporle
tCcni
co y garantia
suministrados
por
separado.
Notas
sobre
el
uso
• No deje
el
objetivo expuesto
al
solo
a fuentes de
luz
in
tensas.
Es
posible que
se
produ
zc
an fallos de fundonamiento interno
del
cuerpo de Ia d mara y del objetivo o un incendio como
efccto de Ia l
uz
dircc
ta.
Si
las
circunstancias exigen dejar
el
objetivo cxpuesto a
Ia
l
uz
so
lar, asegllr
ese
de
co
locar
las
tapas
delobjetivo.
• Procure no exponer
e1
objetivo o
el
teleconversor a golpes
m
ie
ntras
los
coloca.
•
Col
oque siempre l
as
tapas
del
objetivo en el ob
je
ti
vo o en el
teleconversor en
el
momenta de guardarlos.
• No guarde
el
objetivo en un Iugar muy ht'tmedo durante un
la
rgo periodo de tiempo para
evi
tar
Ia
aparici6n de moho.
•
No
toque
los
contactos delobje
tiv
o.
Si
estos
se
ensucian,
es
posible que ello interficra o impida
el
e
nvi
o y Ia r
ece
pci6n de
sefiales entre el objetivo y
Ia
dma
r
a,
lo
que p
od.ria
ocasionar
un
fa
llo en
el
funcionamiento.
CondensaciOn
Si el
ob
jetivo
se
traslada direc
tam
ente
de
un
Iugar frio a
unq
d.lido, es posible que aparezca condensaci6n en el mismo.
Para evitarlo, coloque
el
objetivo en
una
bolsa de plastico
o sim
il
ar. C
uando
Ia
tempe
ratura
del interior de Ia balsa
alcance Ia t
em
peratura ambiente, extraiga el objeti
vo.
SON~
!Interchangeable Lens
LIMITED
WARRANTY
(US Only)
SonyElectronics Inc.
("Sony")
warrantsthisproductagainstdefects in material
or
workmanship
for
the
time
periods
and
as
set forth
below
when
purchased directly from Sony
or
a Sony Retailer. Pursuant
to
this Limited Warranty,
Sonywill, at its option,
(i)
repairthe product using
new
or
refurbished parts
or
(ii) replace the product
with
a
new
or
refurbished product. For purposes
of
this Limited Warranty, "refurbished" means a product
or
part that has been
returned
to
its original specifications. In
the
event
of
a defect, these are
your
exclusive remedies.
Term: For a period
of
one (
1)
year
from
the original date
of
purchase
of
the product, Sonywill, at its option, repair
or
replace
with
new
or
refurbished product
or
parts, any product
or
parts determined
to
be defective.
This Limited Warrantycovers
only
the hardwarecomponents packaged
with
the Product. Itdoes notcovertechnical
assistance
for
hardware
or
software usage and
it
does notcoveranysoftware products whether
or
notcontained in
the Product; any such software is provided
"AS
IS" unless expressly provided
for
in anyenclosed software Limited
Warranty. Please refer
to
the End UserLicenseAgreements included
with
the Product
for
your
rights and obligations
with
respect
to
the software. ·
Instructions:
To
obtain warrantyservice, you
must
deliverthe product,freightprepaid, in eitheritsoriginal packaging
or
packaging affording
an
equal degree
of
protection to the Sony authorized service facility specified.
It
is
your
responsibility
to
backup anydata,
software
or
other
materials
you
may
have stored
or
preserved on
your
unit.
It
is
likely
that
such data, software,
or
other
materials
will
be
lost
or
reformatted
during
service and
Sony
will
not
be
responsible
for
any such damage
or
loss. A dated purchase receipt
from
Sony
or
a Sony Retailer is required. For
specific instructions on
how
to
obtain warranty service for
your
product,
Visit Sony's Web Site:
www.sony.com/support
Or call the
Sony
Customer Information Service Center
1-800-222-SONY (7669)
For
an
accessory or part
not
available
from
your
authorized dealer, cail:
1-800-488-SONY (7669)
Repair I Replacement Warranty: This Limited Warranty shall apply
to
any repair, replacement part
or
replacement
product
for
the remainder
of
the original Limited Warranty period
or
for
ninety
(90)
days, whichever is longer.
Any
parts
or
product replaced underthis Limited Warranty will become the property
of
Sony.
This Limited Warranty
only
covers product issues caused
by
defects in material
or
workmanship during ordinary
use; itdoes
not
cover product issues caused
by
any other reason, including
but
not
limited
to
product issues due
to
acts
of
God, misuse, limitations
of
technology,
or
modification
of
or
to
any part
of
the Sony product
or
product
purchased
from
other than Sony
or
a Sony Retailer.
To
determine
if
a retailer is part
of
the Sony Retailer Network,
please contact Sony's Customer Service Call Center
or
go
to
www.sony.com/support. This Limited Warranty does
notcover Sony products sold AS
IS
or
WITH ALL
FAULTS
or
consumables (such
as
fuses
or
batteries). This Limited
Warranty is invalid
if
the factory-applied serial
number
has been altered
or
removed
from
the product. This Limited
Warranty
is
valid
only
in the United States.
LIMITATIONON DAMAGES: SONYSHALLNOT
BE
LIABLE
FOR
ANYINCIDENTAL
OR
CONSEQUENTIALDAMAGES
FOR
BREACH
OF
ANY
EXPRESS
OR
IMPLIED WARRANTY
ON
THIS
PRODUCT.
DURATION
OF
IMPLIEDWARRANTIES:
EXCEPT
TO
THE
EXTENTPROHIBITED BYAPPLICABLE LAW,
ANY
IMPLIED
WARRANTY
OF
MERCHANTABILITY
OR
FITNESS
FOR
A
PARTICULAR
PURPOSE
ON THIS PRODUCT
IS
LIMITED
IN
DURATION TO
THE
DURATION
OF
THIS WARRANTY.
Some states
do
not
allow
the exclusion
or
limitation
of
incidental
or
consequential damages,
or
allow
limitationson
how
long
an
implied warranty lasts, so the above limitations
or
exclusions
may
not apply
to
you. This Limited
Warranty gives you specific legal rights and you
may
have other rights which vary
from
state
to
state.
4-196-294-02
11111111111111111111111111111
Printed in Japan

Other Sony Camera Lens manuals

Sony SEL2470GM User manual

Sony

Sony SEL2470GM User manual

Sony SAL50F18 - 50mm f/1.8 SAM DT Lens User manual

Sony

Sony SAL50F18 - 50mm f/1.8 SAM DT Lens User manual

Sony VCL-HG0862 User manual

Sony

Sony VCL-HG0862 User manual

Sony E 3.5-5.6/PZ 16-50 OSS User manual

Sony

Sony E 3.5-5.6/PZ 16-50 OSS User manual

Sony SAL14TC - 1.4x Teleconverter Lens User manual

Sony

Sony SAL14TC - 1.4x Teleconverter Lens User manual

Sony SAL1118 - DT 11-18mm f/4.5-5.6 Aspherical ED Super Wide Angle Zoom... User manual

Sony

Sony SAL1118 - DT 11-18mm f/4.5-5.6 Aspherical ED Super Wide Angle Zoom... User manual

Sony VCL-DE07T User manual

Sony

Sony VCL-DE07T User manual

Sony VCL-HG2037 User manual

Sony

Sony VCL-HG2037 User manual

Sony SAL-35F18 User manual

Sony

Sony SAL-35F18 User manual

Sony SAL-135F18Z - 135mm f/1.8 Carl Zeiss Sonnar T Telephoto... Installation instructions manual

Sony

Sony SAL-135F18Z - 135mm f/1.8 Carl Zeiss Sonnar T Telephoto... Installation instructions manual

Sony SAL50M28 - 50mm f/2.8 Macro Lens User manual

Sony

Sony SAL50M28 - 50mm f/2.8 Macro Lens User manual

Sony SAL-70300G User manual

Sony

Sony SAL-70300G User manual

Sony SELP1650 User manual

Sony

Sony SELP1650 User manual

Sony NEX-VG10 - Digital Hd Video Camera Recorder Guide

Sony

Sony NEX-VG10 - Digital Hd Video Camera Recorder Guide

Sony SEL50F18F User manual

Sony

Sony SEL50F18F User manual

Sony SAL-24F20Z User manual

Sony

Sony SAL-24F20Z User manual

Sony FE 28mm F2 User manual

Sony

Sony FE 28mm F2 User manual

Sony VCL-TW25 User manual

Sony

Sony VCL-TW25 User manual

Sony VCL-HG0758 User manual

Sony

Sony VCL-HG0758 User manual

Sony SEL-24F18Z User manual

Sony

Sony SEL-24F18Z User manual

Sony SELP18110G User manual

Sony

Sony SELP18110G User manual

Sony A6000 User manual

Sony

Sony A6000 User manual

Sony Vario-Sonnar T DT 16-BOmm F3.5-4.5 ZA User manual

Sony

Sony Vario-Sonnar T DT 16-BOmm F3.5-4.5 ZA User manual

Sony SAL70200G - 70-200mm f/2.8 SSM Lens User manual

Sony

Sony SAL70200G - 70-200mm f/2.8 SSM Lens User manual

Popular Camera Lens manuals by other brands

Canon EF24-105MM F/4L IS USM Instruction

Canon

Canon EF24-105MM F/4L IS USM Instruction

Basler C23 2M Getting started guide

Basler

Basler C23 2M Getting started guide

Minolta MD 50mm f1.7 Disassembly

Minolta

Minolta MD 50mm f1.7 Disassembly

Canon FDJ-S31 Operation manual

Canon

Canon FDJ-S31 Operation manual

Hasselblad HC 2.2/100 Specification sheet

Hasselblad

Hasselblad HC 2.2/100 Specification sheet

Lensbaby Control Freak user guide

Lensbaby

Lensbaby Control Freak user guide

Canon HJ22EX7.6B Brochure & specs

Canon

Canon HJ22EX7.6B Brochure & specs

Nikon AF-S DX Zoom-Nikkor 17-55mm f/2.8G IF-ED instruction manual

Nikon

Nikon AF-S DX Zoom-Nikkor 17-55mm f/2.8G IF-ED instruction manual

Tamron SPAF17-50mm F/2.8 manual

Tamron

Tamron SPAF17-50mm F/2.8 manual

Samsung 20mm F2.8 user manual

Samsung

Samsung 20mm F2.8 user manual

Fantasea BigEye Lens MPK Series instruction manual

Fantasea

Fantasea BigEye Lens MPK Series instruction manual

Canon EF-M 18-55mm f3.5-5.6 IS STM Instruction

Canon

Canon EF-M 18-55mm f3.5-5.6 IS STM Instruction

Panasonic H-FS1442APP Service manual

Panasonic

Panasonic H-FS1442APP Service manual

Nikon NIKKORZ MC 105mm f/2.8 YRS user manual

Nikon

Nikon NIKKORZ MC 105mm f/2.8 YRS user manual

Panasonic S-R2060 operating instructions

Panasonic

Panasonic S-R2060 operating instructions

Leica SUPER-ELMAR-M 18 mm f/3.8 ASPH. manual

Leica

Leica SUPER-ELMAR-M 18 mm f/3.8 ASPH. manual

DZOFILM PICTOR Series user manual

DZOFILM

DZOFILM PICTOR Series user manual

Nikon AF-S NIKKOR 300mm f/4E PF ED VR user manual

Nikon

Nikon AF-S NIKKOR 300mm f/4E PF ED VR user manual

manuals.online logo
manuals.online logoBrands
  • About & Mission
  • Contact us
  • Privacy Policy
  • Terms and Conditions

Copyright 2025 Manuals.Online. All Rights Reserved.