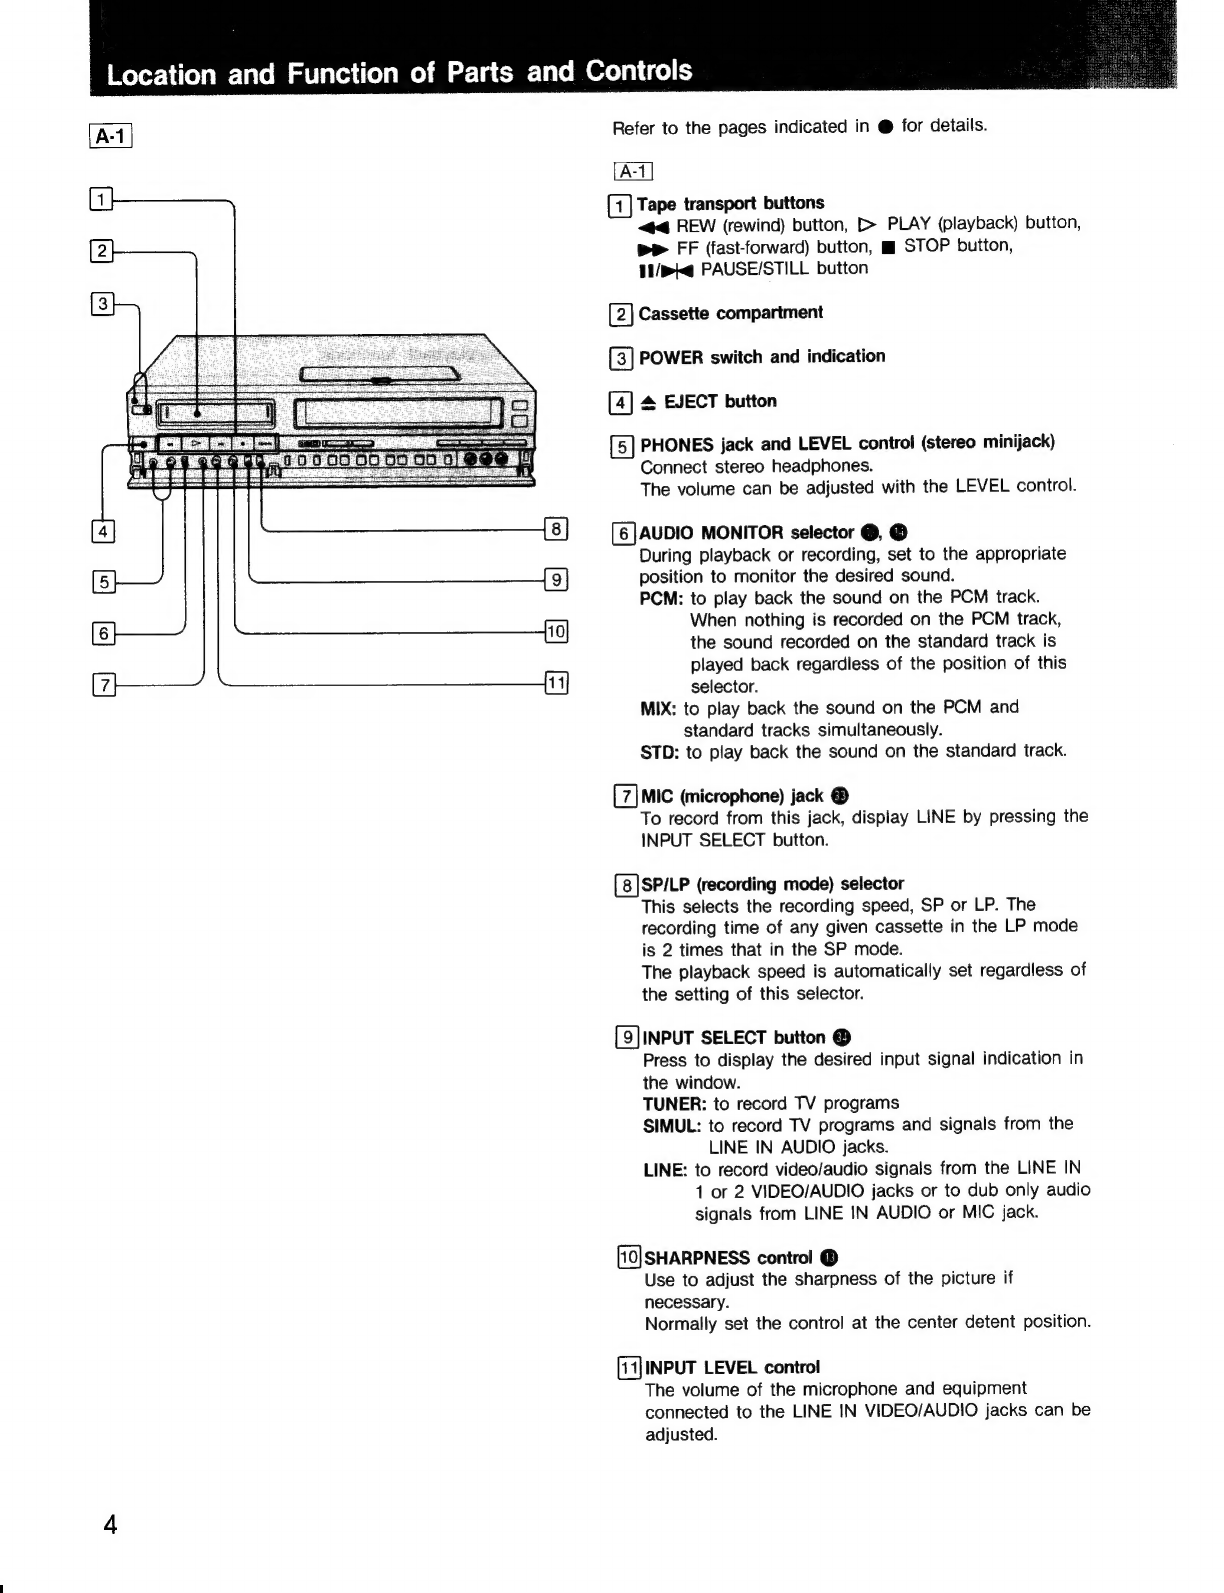
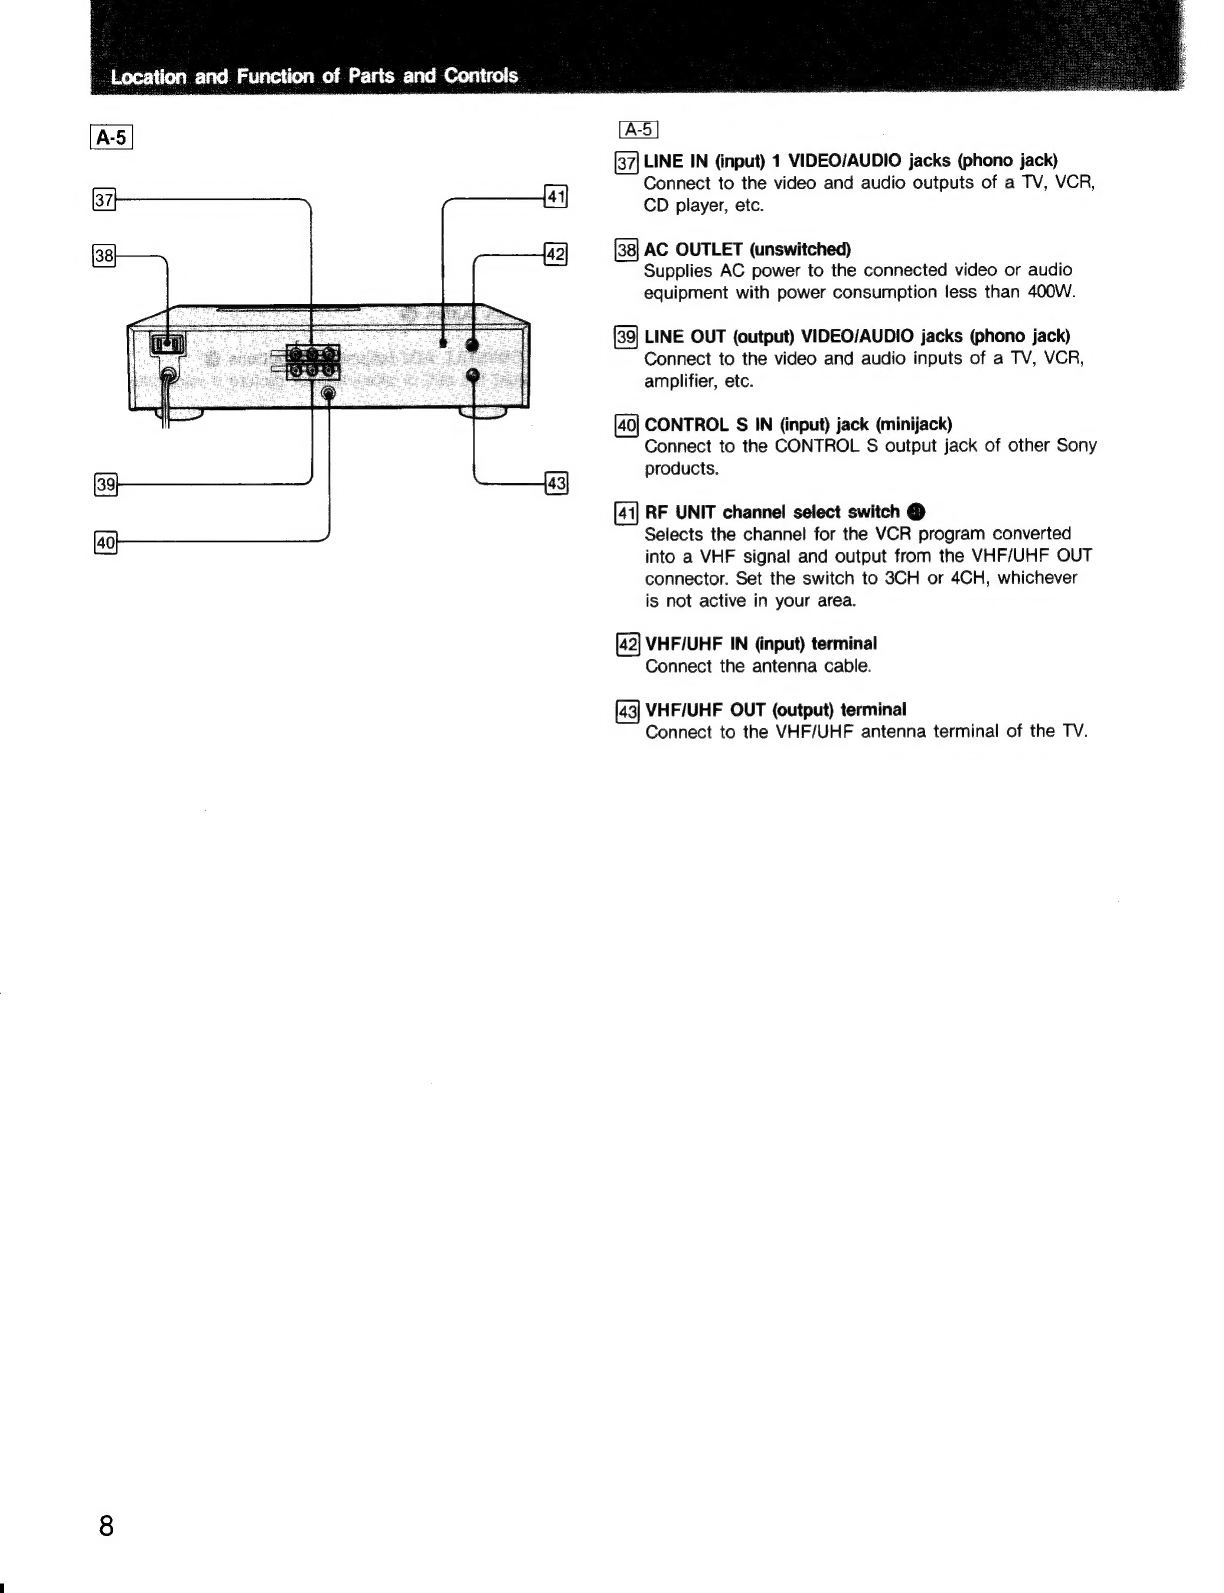
Sony EV-S350 User manual

SON
Y.
3-786-521-21
(1)
®
Stereo
Video
Cassette
Recorder
EF
EV-S350
Operating
Instructions
Before
operating
the
unit,
please
read
this
manual
thoroughly
and
retain
it
for
future
reference.
OWNER’S
RECORD
The
model
number
is
located
at
the
rear
and
the
serial
number
on
the
top.
Record
the
serial
number
in
the
space
provided
below.
Refer
to
these
numbers
whenever
you
call
upon
your
Sony
dealer
regarding
this
product.
Model
No.
EV-S350
Serial
No.
Video8
©1989
by
Sony
Corporation

To
prevent
fire
or
shock
hazard,
do
not
expose
the
unit
to
rain
or
moisture.
CAUTION
RISK
OF
ELECTRIC
SHOCK
DO
NOT
OPEN
CAUTION.
TO
REDUCE
THE
RISK
OF
ELECTRIC
SHOCK,
DO
NOT
REMOVE
COVER
(OR
BACK)
NO
USER-SERVICEABLE
PARTS
INSIDE
REFER
SERVICING
TO
QUALIFIED
SERVICE
PERSONNEL
This
symbol
is
intended
to
alert
the
user
to
the
presence
of
uninsulated
“dangerous
voltage”
within
the
product’s
enclosure
that
may
be
of
sufficient
magnitude
to
constitute
a
risk
of
electric
shock
to
persons.
This
symbol
is
intended
to
alert
the
user
to
the
presence
of
important
operating
and
maintenance
(servicing)
instructions
in
the
literature
accompanying
the
appliance.
CAUTION:
TO
PREVENT
ELECTRIC
SHOCK,
DO
NOT
USE
THIS
POLARIZED
AC
PLUG
WITH
AN
EXTENSION
CORD,
RECEPTACLE
OR
OTHER
OUTLET
UNLESS
THE
BLADES
CAN
BE
FULLY
INSERTED
TO
PREVENT
BLADE
EXPOSURE.
Caution
Television
programs,
films,
video
tapes
and
other
materials
may
be
copyrighted.
Unauthorized
recording
of
such
material
may
be
contrary
to
the
provisions
of
the
copyright
laws.
Also,
use
of
this
recorder
with
cable
television
transmission
may
require
authorization
from
the
cable
television
transmitter
and/or
program
owner.
INFORMATION
This
equipment
generates
and
uses
radio
frequency
energy
and
if
not
installed
and
used
properly,
that
is,
in
strict
accordance
with
the
manufacturer's
instructions,
may
cause
interference
to
radio
and
television
reception.
It
has
been
type
tested
and
found
to
comply
with
the
limits
for
a
Class
B
computing
device
in
accordance
with
the
specifications
in
Subpart
J
of
Part
15
of
FCC
Rules,
which
are
designed
to
provide
reasonable
protection
against
such
interference
in
a
residential
installation.
However,
there
is
no
guarantee
that
interference
will
not
occur
in
a
particular
installation.
If
this
equipment
does
cause
interference
to
radio
or
tellevision
reception,
which
can
be
determined
by
turning
the
equipment
off
and
on,
the
user
is
encouraged
to
try
to
correct
the
interference
by
one
or
more
of
the
following
measures:
Reorient
the
receiving
antenna
Relocate
the
equipment
with
respect
to
the
receiver
Move
the
equipment
away
from
the
receiver
Plug
the
equipment
into
a
different
outlet
so
that
equipment
and
receiver
are
on
different
branch
circuits.
If
necessary,
the
user
should
consult
the
dealer
or
an
experienced
radio/television
technician
for
additional
suggestions.
The
user
may
find
the
following
booklet
prepared
by
the
Federal
Communications
Commission
helpful:
“How
to
Identify
and
Resolve
Radio-TV
Interference
Problems”.
This
booklet
is
available
from
the
U.S.
Government
Printing
Office,
Washington,
DC
20402,
Stock
No.
004-000-00345-4.
This
apparatus
complies
with
the
Class
B
limits
for
radio
noise
emissions
set
out
in
Radio
Interference
Regulations.

Table
of
Contents
Location
and
function
of
parts
and
controls...................
4
Cassette:
Care:
e.cecsc.icissecidececviscceessiciliccbesdbesencdanctesezchesonders
1
Playback
PIAYDAGK
2.3
sce
ce
hectsstevce
Besccbony
tol
Meese
haste
Vessdes
occas
scetaebast
12
ODGrAtiONeczcsseces
cette
ccecacdenchceel
siecetbereccebecedesteciedeceebenecets
12
Picture
AdjUStMent
..............c
ec
ccceeceec
cc
eeeecceessseeceseeeeeeeesenes
13
To
select
the
Monitor
SOUNC..........ccccccccccssecssteeeeeeteeees
14
Various
playback
MOdES
..........c::cccccecsseeeseeeessseteseeseeaes
15
Use
of
the
tape
COUNTED
0.0...
ccc
ccccceecseceteeeeeeeeees
17
Recording
Recording
TV
program
.........cscceccceceesseeteeeneceneceeeeeesseeees
18
PCM
audio
r@COrding
.........:cccecccccccceseceesesccenseeessereesesenseere
21
Timer-activated
reCOrdiNg.........::cceccsesseesssecsseeesseeeesneseetes
22
Tape
OditiNG
vsccccececccsetcscecteceesstnceissseciesceccenccecvasdedbecdeadecuoves
28
To
dub
the
audio
Signals
.............cccecesecessecesseeeeseeeeeeeens
33
Preparation/General
CONNECTIONS
000...
eceeeccecececeeessesereeseecenseseeseecessecseenseeesesessees
35
AGJUSTING,
thE!
TV
covcenseositsteves
cess
Mscrvestbedesvieuselereecsteadsicescsoed
4
Setting
the
date
and
timMe@........
eke
ccceecseteeessceessseeeeees
43
Presetting
TV
Channel
...........c:cccccsessecsceceeseeesncsecestsseeeeens
44
PRECAUTIONS
1.
deseses:
cacwcteesses
tibia
dea
basasdevs
the
tccuses
eeviecliaetaee
aun
48
SPOCITICATIONS
.
covcezsecss
see
a
eeccdavee
Seesanbe
cela
icas
cee
vosebaedeieedancts
49
TrOUDICSHOOTING..........cccceesesesecsteesseseetecseeeeseeseecsseesseensseetees
50
This
unit
uses
8mm
video
format
cassettes.
It
records
in
the
SP
mode
(approximately
1.43cm/
second)
and
the
LP
mode
(approximately
0.72cm/
second)
and
can
play
back
in
the
SP
mode
and
the
LP
mode.
This
unit
is
equipped
with
PCM
(digital
audio)
recording/playback
functions.
Supplied
accessories
e
Remote
Commander
RMT-447
(1)
©
Size
AA
(R6)
batteries
(2)
e
Antenna
cable
with
the
F-connectors
(1)
e
Connecting
cord
(1)
e
Antenna
connector
(1)

~)
fo)
[>]
[A
=
=
—
fan)
Refer
to
the
pages
indicated
in
@
for
details.
[1]
Tape
transport
buttons
«44
REW
(rewind) button,
[>
PLAY
(playback)
button,
pe
FF
(fast-forward)
button,
m
STOP
button,
11/pKq
PAUSE/STILL
button
Cassette
compartment
POWER
switch
and
indication
[4]
&
EJECT
button
[5]
PHONES
jack
and
LEVEL
control
(stereo
minijack)
Connect
stereo
headphones.
The
volume
can
be
adjusted
with
the
LEVEL
control.
[6]AUDIO
MONITOR
selector
@,
®
During
playback
or
recording,
set
to
the
appropriate
position
to
monitor
the
desired
sound.
PCM:
to
play
back
the
sound
on
the
PCM
track.
When
nothing
is
recorded
on
the
PCM
track,
the
sound
recorded
on
the
standard
track
is
played
back
regardless
of
the
position
of
this
selector.
MIX:
to
play
back
the
sound
on
the
PCM
and
standard
tracks
simultaneously.
STD:
to
play
back
the
sound
on
the
standard
track.
[7]
MIC
(microphone)
jack
®
To
record
from
this
jack,
display
LINE
by
pressing
the
INPUT
SELECT
button.
[8]SP/LP
(recording
mode)
selector
This
selects
the
recording
speed,
SP
or
LP.
The
recording
time
of
any
given
cassette
in
the
LP
mode
is
2
times
that
in
the
SP
mode.
The
playback
speed
is
automatically
set
regardless
of
the
setting
of
this
selector.
[9]INPUT
SELECT
button
@
Press
to
display
the
desired
input
signal
indication
in
the
window.
TUNER:
to
record
TV
programs
SIMUL:
to
record
TV
programs
and
signals
from
the
LINE
IN
AUDIO
jacks.
LINE:
to
record
video/audio
signals
from
the
LINE
IN
1
or
2
VIDEO/AUDIO
jacks
or
to
dub
only
audio
signals
from
LINE
IN
AUDIO
or
MIC
jack.
[10]
SHARPNESS
control
®
Use
to
adjust
the
sharpness
of
the
picture
if
necessary.
Normally
set
the
control
at
the
center
detent
position.
(11}INPUT
LEVEL
control
The
volume
of
the
microphone
and
equipment
connected
to
the
LINE
IN
VIDEO/AUDIO
jacks
can
be
adjusted.

Ae
& &
F
Ss)
&
&
(12]Display
window
[13]EDIT
button
@,
@
When
editing
a
tape,
press
the
button
so
that
the
EDIT
indication
lights
in
the
display
window.
[14)AUDIO
DUB
button
@
Press
to
record
on
the
PCM
track
of
any
recorded
video
tape.
[15]@
REC
(recording)
switch
Slide
to
the
right
to
start
recording.
[16]
ANT
TV/VTR
button
Press
to
view
the
program
selected
on
the
recorder.
The
VTR
indicator
appears
in
the
display
window
(VTR
mode).
To
view
a
TV
program
while
recording
another,
press
this
button
again.
The
VTR
indicator
disappears.
(TV
mode).
[17]
COUNTER
RESET
button
®
Press
to
reset
the
tape
counter
to
zero.
[18]Pcm
indicator
[19]
Remote
control
detector
[20]
CHANNEL
buttons
[21]
LINE
IN
(input)
2
VIDEO/AUDIO
jacks
(phono
jack)

Location
and
Function
of
Parts
and
Controls
(a3
CLEAR
button
®
Press
to
cancel
a
timer
setting.
[23]
CHECK
button
®
Press
to
check
the
contents
of
the
timer
presettings.
[24]
TIMER
SET
button
@
Press
to
start
the
setting
or
resetting
of
timer
programs.
DATE
buttons
@,
@
[26]
TIMER
REC
ON/OFF
button
@
CHANNEL
buttons
@
[28]
TURN
OFF
time
buttons
@
[29]
TURN
ON
time
buttons
®

convene
eens
Buttons
used
for
presetting
channels
@
AFT
switch
SET
button
TUNING
buttons
ADD
button
ERASE
button
CLOCK
button
®
SLOWISTILL
ADJ
(adjustment)
buttons
@
Adjust
the
still
or
slow-monitor
picture
if
necessary.
X2
SOUND
switch
@
ANT.
(antenna)
SW
selector
@
When
connecting
to
a
TV
with
video/audio
inputs,
set
to
MANUAL.
When
connecting
to
a
TV
without
them,
set
to
AUTO.
[35]
AUTO
STEREO
switch
Usually
set
to
ON.
STD
(standard)
AUDIO
selector
®

LINE
IN
(input)
1
VIDEO/AUDIO
jacks
(phono
jack)
Connect
to
the
video
and
audio
outputs
of
a
TV,
VCR,
CD
player,
etc.
AC
OUTLET
(unswitched)
Supplies
AC
power
to
the
connected
video
or
audio
equipment
with
power
consumption
less
than
400W.
LINE
OUT
(output)
VIDEO/AUDIO
jacks
(phono
jack)
Connect
to
the
video
and
audio
inputs
of
a
TV,
VCR,
amplifier,
etc.
CONTROL
S§
IN
(input)
jack
(minijack)
Connect
to
the
CONTROL
§
output
jack
of
other
Sony
products.
RF
UNIT
channel
select
switch
@
Selects
the
channel
for
the
VCR
program
converted
into
a
VHF
signal
and
output
from
the
VHF/UHF
OUT
connector.
Set
the
switch
to
3CH
or
4CH,
whichever
is
not
active
in
your
area.
[42]
VHF/UHF
IN
(input)
terminal
Connect
the
antenna
cable.
VHF/UHF
OUT
(output)
terminal
Connect
to
the
VHF/UHF
antenna
terminal
of
the
TV.

—
|
[y]
@ESeeee
Remote
detector
Remote
Commander
RMT-447
The
buttons
on
the
Remote
Commander
with
the
same
name
as
the
ones
on
the
VCR
have
the
same
function.
ANT
TV/VTR
button
[2]
Channel
number
buttons
and
ENTER
button
Press
to
select
directly
the
TV
channel
to
be
viewed
or
recorded.
@
REC
(record)
butttons
To
start
recording,
press
these
buttons
simultaneously.
[4]
18
PAUSE
button
COUNTER
RESET
button
®
[6]
iim
FRAME
(frame-by-frame)
button
x1/10
(slow
speed
playback)
button
®
Press
to
view
slow
speed
playback
picture.
Search
(rewind)
button
@
[9]
Tape
transport
button
[>
(playback)
button,
BP
(fast-forward)
button
<4
(rewind)
button,
0
(stop)
button
POWER
switch
CHANNEL
buttons
TAPE
RETURN
button
@
Press
to
advance
or
rewind
the
tape
to
zero
point.
SKIP
button
@
Press
to
advance
the
tape
rapidly
for
30
seconds.
X2
(double
speed
playback)
button
@
Press
to
view
double
speed
playback
picture.
[15]
X1/5
(slow
speed
playback)
button
®
Press
to
view
slow
speed
playback
picture.
Search
(fast-forward)
button
@
Operable
range
The
shorter
the
distance
between
the
Commander
and
the
VCR,
the
wider
the
angle
within
which
the
Commander
can
be
operated.

10
Battery
Insertion
1
Open
the
lid.
2
Insert
two
size
AA
(R6)
batteries
with
correct
polarity.
3
Close
the
lid.
Battery
life
Under
normal
operation,
batteries
will
last
for
about
6
months.
When
the
batteries
are
exhausted,
the
remote
function
will
not
be
operated
when
the
buttons
on
the
Commander
are
pressed.
Replace
all
the
batteries
with
new
ones.
If
the
Commander
is
not
to
be
used
for
a
long
period
of
time
Remove
the
batteries
to
avoid
possible
damage
from
battery
leakage.

Video
BP
-60
To
Prevent
Accidental
Erasure
[5]
Slide
out
the
tab
on
the
cassette
so
that
the
red
appears.
To
re-record
on
the
cassette,
slide
the
tab
back.
Tape
Speed
The
LP
mode
is
twice
as
long
as
the
SP
mode.
For
better
picture,
recording
in
the
SP
mode
is
recommended.
During
playback,
the
mode
in
which
the
tape
was
recorded
is
selected
automatically.
Tape
speed
Cassette
used
SP
LP
P6-15
15
min.
30
min.
P6-30
30
min.
1h.
P6-60
1h.
2h.
P6-90
1h.
30
min.
3
h.
P6-120
2h.
4h.
Notes
¢
Always
insert
a
cassette
in
the
correct
direction.
¢
Never
insert
anything
in
the
small
holes
on
the
rear
of
the
cassette.
¢
Store
cassettes
in
their
cases
and
keep
them
in
an
upright
position
to
prevent
intrusion
of
dust
and
uneven
winding.
¢
To
record
from
the
beginning
of
the
tape,
run
the
video
camera
recorder
for
about
15
seconds
at
the
beginning
of
a
cassette
before
recording.
It
will
avoid
missing
the
starting
point
during
playback
on
a
video
cassette
recorder.
«
When
the
VCR
is
not
in
use,
remove
the
cassette.
11

Playback
a
‘*
Set
the
AUDIO
MONITOR
selector
to
PCM.
Insert
the
cassette.
Turn
on
the
TV
and
select
the
channel
for
the
VCR
or
select
the
input
for
the
VCR.
PCM
MIX
STD
AUDIO
MONITOR
Press
the
[>
PLAY
button.
Playback
will
begin
and
when
the
ANT.
SW
selector
is
set
to
AUTO,
the
VTR
indication
in
the
display
window
will
light.
rf
WN
—
ro
ta
09@e
A
12

Ny
caw
nisrwasemeteaivanetentes
inane
eieenemce
ara
tmnt
tt
[e-4]
SHARPNESS
©)
SOFT
SHARP
To
stop
playback,
press
the
(1
STOP
button.
To
advance
the
tape
rapidly,
press
the
Be
FF
button.
To
rewind
the
tape,
press
the
<q
REW
button.
When
the
tape
reaches
the
end
during
playback,
it
will
be
automatically
rewound.
Auto
play
—
To
play
back
a
tape
from
the
beginning
of
the
tape
after
rewinding
While
pressing
the
<4
REW
button
depressed,
press
the
[>
PLAY
button.
The
AUTO
indication
will
be
displayed.
When
the
TV
without
the
video
input
jack
is
used,
the
playback
picture
does
not
appear
on
the
TV.
e
Set
the
ANT.
SW
selector
in
e
Press
the
TV/VTR
button
on
When
a
blank
tape
is
played
back
The
picture
does
not
appear
and
the
tape
counter
does
not
function.
the
tuning
compartment
to
AUTO.
the
VCR
or
Remote
Commander
so
that
the
VTR
indication
is
displayed.
Picture
Adjustment
[C-4]
Turn
the
SHARPNESS
control
toward
SOFT
or
SHARP.
13

C-6
14
GYY
GUM:
Ce
PCM
MIX
STD
AUDIO
MONITOR
To
Select
the
Monitor
Sound
Enlarged
tape
©
Standard
track
@®
PCM
track
Kind
of
the
tape
Track
to
be
played
back
Position
of
the
AUDIO
MONITOR
selector
C-6
Stereo
PCM PCM
FM
simulcast
PCM
PCM
Multichannel
PCM
and/or
To
monitor
MAIN:
PCM
TV
sound
standard
To
monitor
SAP:
STD
broadcasts
To
monitor
both:
MIX
Audio
dubbed
PCM
and
MIX
standard
Tapes
recorded
|
Standard
PCM
on
VCR
(The
sound
recorded
without
PCM
on
the
standard
track
function
is
selected
automatically.)
If
the
sound
is
not
heard
or
heard
only
intermittently
When
a
tape
which
has
been
recorded
on
a
video
camera
recorder
or
a
video
cassette
recorder
without
the
PCM
function
is
played
back
on
this
unit,
set
the
AUDIO
MONITOR
selector
on
this
unit
to
STD.
(Although
the
AUDIO
MONITOR
selector
is
set
to
STD,
the
PCM
indication
may
occasionally
light.)
When
the
TV/monitor
without
the
video/audio
input
jacks
is
connected
To
monitor
the
stereo
sound,
connect
the
stereo
equipment
to
this
unit.

x2
SOUND
Various
Playback
Modes
Use
the
Remote
Commander
for
the
following
operations.
To
obtain
a
still
picture
Press
the
§1/@g
PAUSE/STILL
button
during
playback.
The
["]
mark
will
be
displayed
in
the
display
window.
To
resume
normal
playback,
press
the
[>
PLAY
button
or
press
the
1f/pq
PAUSE/STILL
button
again.
When
the
pause
mode
lasts
for
more
than
approximately
7
minutes,
it
will
be
automatically
released
and
the
unit
will
be
set
back
in
the
playback
mode.
To
advance
the
tape
rapidly
for
30
seconds
Press
the
SKIP
button
during
playback.
To
advance
the
tape
rapidly
for
1
minute,
press
the
SKIP
button
twice.
To
resume
normal
playback,
press
the
[>
PLAY
button.
After
advancing
the
tape
for
30
seconds
or
1
minute,
the
tape
is
played
back
automatically.
To
view
the
picture
at
high
speed
Locked
picture
search
Press
the
SEARCH
6&4)
or
©
button
during
playback
or
in
still
picture
mode.
To
resume
normal
playback,
press
the
[>
PLAY
button.
Picture
search
Keep
pressing
the
<q
REW
or
p®
FF
button
during
playback
or
in
still
picture
mode.
Release
the
button
for
normal
playback.
Double
speed
playback
[C-7
Press
the
X2
button
during
playback
or
in
still
picture
mode.
To
monitor
the
double
speed
sound,
set
the
X2
SOUND
switch
on
the
VCR
to
ON.
If
the
sound
is
heard
intermittently
or
disturbed,
set
it
to
OFF
and
the
sound
will
be
muted.
To
resume
normal
playback,
pess
the
[>
PLAY
button.
Slow
speed
playback
Press
the
x1/10
button
or
x1/5
button
during
playback
or
in
still
picture
mode.
To
resume
normal
playback,
press
the
[>
PLAY
button.
Frame-by-frame
Playback
Press
the
#{®
FRAME
button
in
still
picture
mode.
To
resume
normal
playback,
press
the
[>
PLAY
button.
15

C-8
16
SLOW/STILL
ADJ
To
view
the
picture
in
fast-forward
or
rewind
mode
Press
the
pw
FF
button
in
fast-forward
mode
or
press
the
<q
REW
button
in
rewind
mode.
The
picture
is
displayed
while
the
button
is
kept
pressed.
Release
the
button
to
resume
normal
fast-forward
or
rewind
mode.
To
adjust
the
still
or
double
speed
playback
picture
If
the
still
or
double
speed
playback
picture
appears
shake,
press
the
SLOW/STILL
ADJ
buttons
on
the
VCR
until
the
picture
stabilizes.
To
adjust
the
slow
speed
playback
picture
‘(e8]
If
streaks
appear
in
slow
mode,
press
the
SLOW/STILL
ADJ
buttons
on
the
VCR.
Notes
¢
Streaks
will
appear
and
the
sound
will
be
muted
in
the
high-
speed
playback
mode.
*
When
a
tape
recorded
in
SP
mode
is
played
back
in
still
picture
mode
or
picture
search
mode,
the
picture
may
appear
in
black
and
white
or
shake
depending
on
the
TV
being
used.
¢
When
a
tape
is
recorded
in
SP
mode,
streaks
will
be
wider
than
those
of
the
LP-recorded
tape.

C-9
COUNTER
RESET
Use
of
the
Tape
Counter
Use
the
button
on
the
VCR
or
Remote
Commander.
Press
the
COUNTER
RESET
button
at
the
beginning
of
the
tape
so
that
the
counter
shows
‘‘OH00m00s”.
By
noting
the
counter
reading
at
a
particular
point,
you
can
easily
find
that
point
later
by
referring
to
the
tape
counter.
To
rewind
the
tape
to
a
particular
point
(auto
play)
1
During
playback
or
recording,
press
the
COUNTER
RESET
button
at
the
point
to
be
located
later.
The
counter
is
reset
to
‘“OHOOm00s’”’.
2
When
playback
or
recording
is
finished,
press
the
O
STOP
button
to
stop
the
tape.
Press
the
TAPE
RETURN
and
[>
PLAY
buttons.
The
AUTO
indication
will
be
displayed.
The
tape
is
rewound
or
advanced
to
the
approximate
“QOHOOm00s”
point
and
played
back
automatically.
Notes
e
When
only
the
TAPE
RETURN
button
is
pressed,
the
tape
will
stop
at
the
approximate
“OHOOM00s”
point
(tape
return).
¢
The
TAPE
RETURN
functions
only
when
the
counter
reading
is
beyond
+1
minutes.
¢
The
counter
reading
and
the
point
of
the
tape
may
not
correspond
exactly.
Use
the
counter
as
a
guide.
¢
The
counter
does
not
operate
for
a
blank,
unrecorded
portion
of
a
tape.
¢
There
will
be
a
time
lag
of
several
seconds
on
the
counter
reading
after
repeated
fast-forward
and
rewind
operations.
¢
There
will
be
also
a
time
lag
of
several
seconds
when
the
tape
recorded
in
LP
and
SP
modes
mixed
or
the
tape
having
a
blank
portion
between
the
recorded
portions
is
played
back.
17

Recording
[D-1
Operation
Before
recording
¢
Turn
on
the
TV
and
select
the
channel
for
the
VCR
or
select
the
input
for
the
VCR*.
e
Press
the
INPUT
SELECT
button
so
that
the
TUNER
indication
appears.
*
Set
the
AUTO
STEREO
switch
to
ON.
*
If
your
TV/monitor
is
equipped
with
video/audio
inputs,
select
the
correct
input
on
your
TV/monitor.
INPUT
SELECT
Insert
a
cassette.
AUTO
STEREO
ON
OFF
Select
either
SP
or
LP
recording
mode
with
the
SP/LP
selector.
Press
the
TV/VTR
button.
The
VTR
indication
will
be
displayed.
Select
the
channel
to
be
recorded.
f&
©
ND
—
5
Start
recording
by
pressing
the
@
REC
buttons.
To
stop
recording
Press
the
[1
STOP
button.
To
stop
recording
for
a
moment
Press
the
1/@
PAUSE/STILL
button.
The
TV
program
can
still
be
seen
on
the
TV,
but
the
picture
is
not
recorded.
To
resume
recording,
press
the
1B/Bg@
PAUSE/STILL
button
again.
To
protect
the
video
heads
and
the
tape,
the
pause
mode
will
be
automatically
released
after
about
7
minutes
and
recording
will
stop.
Smooth
recordings
can
be
made
by
using
the
I1/i@
PAUSE/STILL
button.
See
page
20.
When
the
recording
is
made
to
the
end
of
the
tape,
the
tape
will
be
automatically
rewound
to
the
beginning
and
the
unit
will
enter
the
stop
mode.
The
power
remains
on.
If
the
tape
is
ejected
when
the
@
REC
buttons
are
pressed
The
tab
on
the
cassette
is
slid
out.
Slide
the
tab
in
or
use
a
new
cassette.
To
View
One
TV
Program
While
Recording
Another
Press
the
TV/VTR
button
so
that
the
VTR
indication
disappears.
Select
the
channel
you
want
to
view
on
the
TV.
If
your
TV
is
equipped
wih
a
TV/VTR
input
selector,
simply
set
the
selector
to
TV
and
select
the
desired
channel
on
the
TV.
18

During
recording...
AS
When
recording
SAP
broadcasts
The
STEREO
indication
will
be
displayed
in
the
display
Y
window.
LPL
IEP
LIGIER
1
Choose
the
sound
to
be
recorded
on
the
standard
©
track
by
using
the
STD
AUDIO
selector.
If
you
choose
SAP,
the
SAP
indication
willl
appear
in
the
display
window.
2
Choose
the
sound
to
be
monitored
by
the
AUDIO
MONITOR
selector.
PCM:
to
monitor
the
main
sound
(in
stereo
or
monaural)
STD:
to
monitor
the
sound
selected
by
the
STD
AUDIO
selector.
MIX:
to
monitor
both
of
the
above
sounds.
Note
If
the
SAP
mode
is
selected
and
there
is
no
SAP
broadcast,
no
sound
will
be
heard
from
the
speakers
and
no
sound
is
recorded
on
the
standard
track.
Therefore,
when
you
play
back
this
tape
on
an
8mm
VCR
without
a
PCM
function,
no
sound
will
be
heard.
The
SAP
broadcast
is
always
transmitted
with
the
MAIN
broadcast.
Recording
is
made
as
follows:
©
Standard
track
Video/audio
signals
of
the
TV
program
and
the
main
or
SAP
sound
of
a
SAP
program
are
recorded
here.
Recorded
sounds
are
monaural.
©
PCM
track
Audio
signals
from
the
connected
equipment
or
from
TV
are
recorded
in
digital
PCM
sound.
Sound
can
either
be
in
monaural
(when
sounds
for
left
and
right
channel
are
the
same)
or
in
stereo
(each
sound
for
left
and
right
channels).
Only
the
main
sound
signal
will
be
recorded.
If
the
received
stereo
signals
are
noisy
Set
the
AUTO
STEREO
switch
to
OFF.
The
sound
will
be
monaural.
19

Recording
TV
Program
aeons
je
o8
Rome
Ot
g0000
qo
00000
=
INPUT
SELECT
20
For
Smooth
Recording
Recording
should
always
be
started
from
the
recording
pause
mode
for
smooth
transitions
between
scenes.
Proceed
as
follows
if
the
recording
was
stopped
or
if
you
want
to
record
on
a
pre-recorded
tape
from
a
desired
point.
1
Play
back
the
tape
and
locate
the
point
for
recording
while
watching
the
picture.
2
Press
the
§1/mKg
PAUSE/STILL
button
to
stop
the
tape
where
you
wish
to
start
recording.
3
Press
the
@
REC
buttons.
The
recorder
will
enter
the
recording
pause
mode.
4
Press
the
#1/pwq
PAUSE/STILL
button
at
the
desired
point
to
release
the
pause
mode.
Recording
starts.
To
Record
a
TV
Program
While
Recording
an
FM
Broadcast
at
the
Same
Time
[D-3)
Sometimes
a
TV
station
and
an
FM
radio
station
will
broadcast
a
program
simultaneously
so
that
you
can
record
a
TV
program
in
high-fidelity
stereo.
The
TV
program
(video
and
monaural
audio)
is
recorded
normally
on
the
standard
track
and
the
stereo
audio
portion
is
recorded
on
the
PCM
track
from
your
FM
tuner.
For
details
on
connection,
see
page
40.
Operate
as
described
in
“Recording
TV
programs”
on
page
18
except
the
following
points:
1
Press
the
INPUT
SELECT
button
so
that
the
SIMUL
indication
appears
in
the
display
window.
2
Select
the
channel
both
on
the
VCR
and
the
FM
tuner.
Table of contents
Other Sony Cassette Player manuals

Sony
Sony TCM-450DV User manual

Sony
Sony TC-TX5 User manual

Sony
Sony Walkman WM-GX550 User manual

Sony
Sony Walkman WM-EX194 User manual

Sony
Sony CFS-515S User manual

Sony
Sony WM-FS555 - S2 SPORTS WALKMAN User manual

Sony
Sony TCM-36 User manual

Sony
Sony CFD-560 User manual

Sony
Sony Walkman WM-GX100 User manual

Sony
Sony TC-TX373 User manual

Sony
Sony TC-WR875 User manual

Sony
Sony TCW-E475 User manual

Sony
Sony SLV-ED100ME User manual

Sony
Sony TCM-40DV User manual

Sony
Sony TC-K333ESG User manual

Sony
Sony Walkman WM-F10II User manual

Sony
Sony TC-WA8ESA User manual

Sony
Sony Pressman TCM-50DV User manual

Sony
Sony TC-WR545 Primary User manual

Sony
Sony TCM-459V User manual