Sony MHC-MG510AV User manual

SONY@
Mini Hi+i
Component
System
4-233-902-12(3)
Operating Instructions
Owner’s Record
The model and serial numbers are located on the rear panel Record the serial number
in the space provided below Refer to them whenever you call upon your Sony dealer
regarding this product
Model No Serial No
MHC-MGSIOAV
MHC-MG31OAV
MHC-MG I 10
0 2001 Sony Corporation

To prevent fire or shock hazard, do not
expose the unit to ram or moisture.
To avmd electrical shock, do not open the cabmet. Refer
serwcmg to qualified personnel only.
Do not mstall the appliance ma confined space, such
as a bookcase or built-m cabmet.
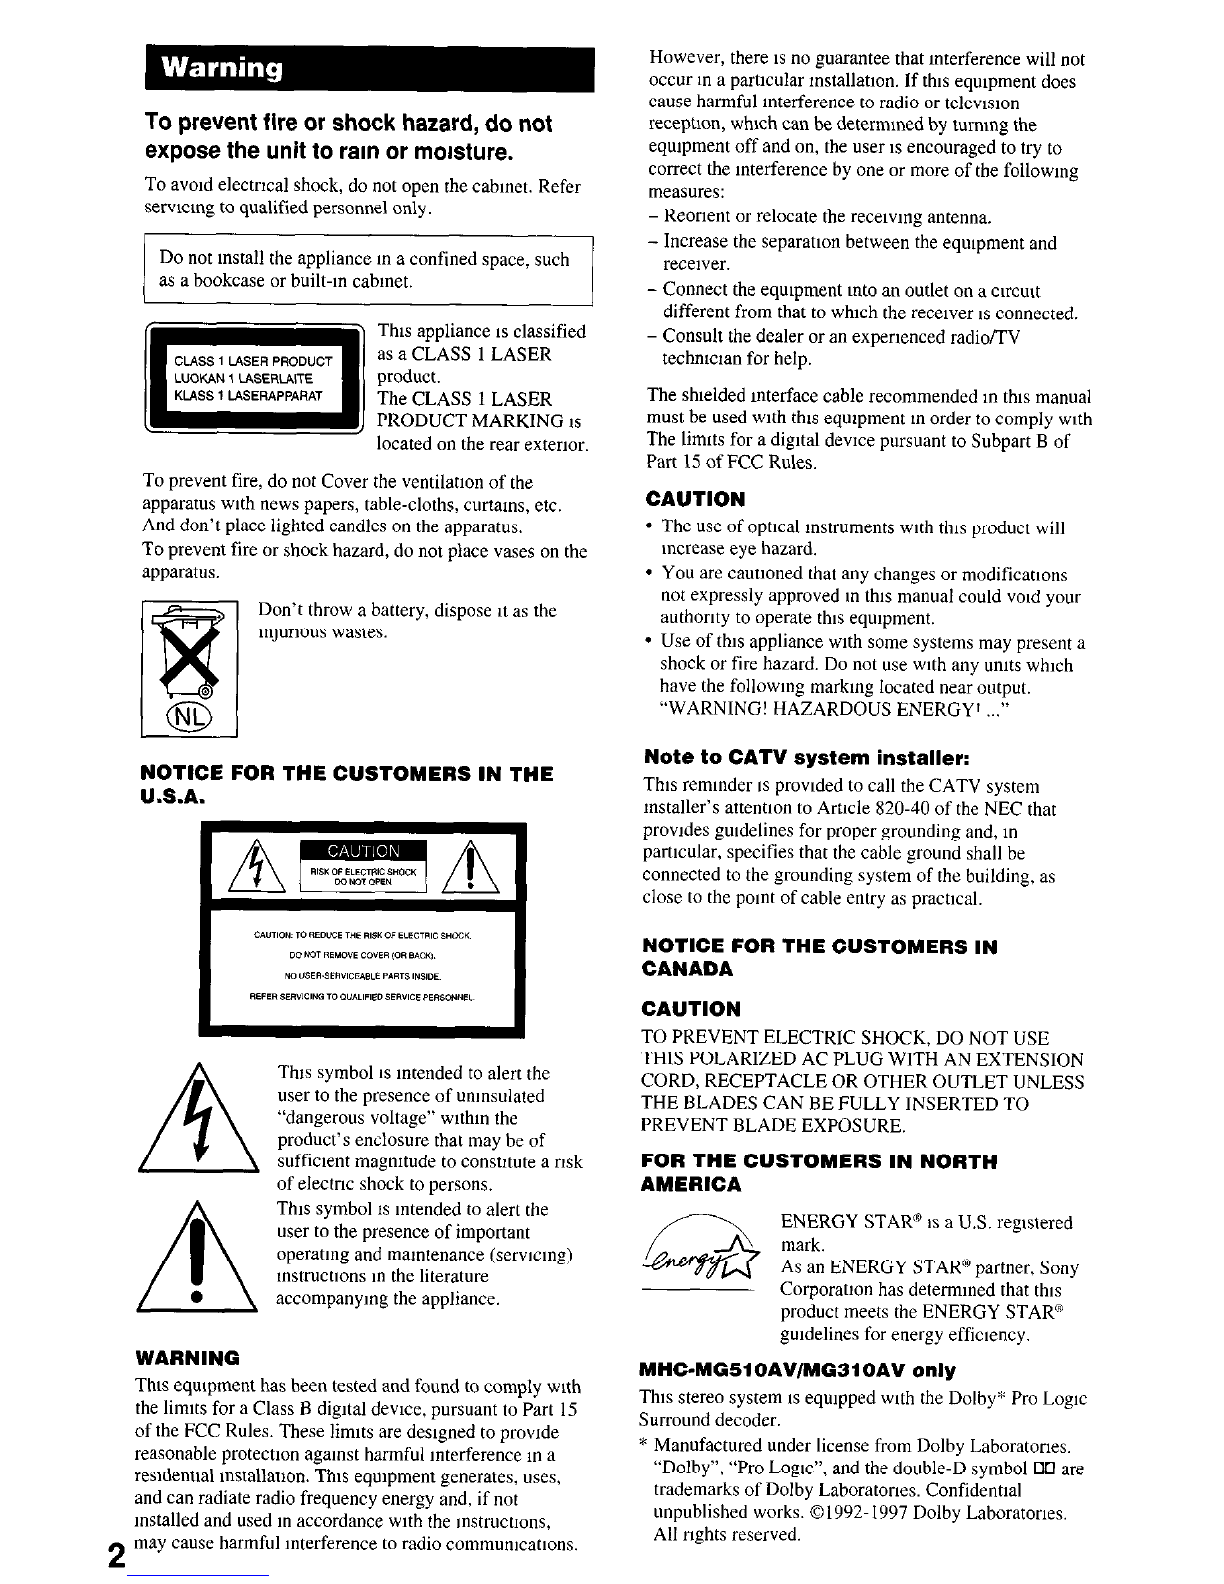
m This appliance IS classified
as a CLASS 1 LASER
product.
The CLASS 1 LASER
PRODUCT MARKING 1s~ located on the rear exterior.
To prevent fire, do not Cover the ventilation of the
apparatus wth news papers, table-cloths, curtams, etc.
And don’t place lighted candles on the apparatus.
To prevent fire or shock hazard, do not place vases on the
apparatus.
mpr~ous wastes.
NOTICE FOR THE CUSTOMERS IN THE
U.S.A.
WARNING
Thts symbol 1sIntended to alert the
user to the presence of unmsulated
“dangerous voltage” wrthm the
product’s enclosure that may be of
sufficient magmtude to constnte a risk
of electric shock to persons.
This symbol 1s Intended to alert the
user to the presence of important
operatmg and mamtenance (serwcmg)
mstructlons m the literature
accompanymg the appliance.
This eqmpment has been tested and found to comply wth
the limits for a Class B digltal dewce, pursuant to Part 15
of the FCC Rules. These limits are deslgned to prowde
reasonable protectlon agamst harmful mterference m a
resldentml mstallatlon. This eqmpmem generates, uses,
and can radiate radio frequency energy and, if not
mstalled and used m accordance wth the mstructlons,
2
may cause harmful mterference to radio commumcatlons.
However, there ISno guarantee that mterference will not
occur m a particular mstallatlon. If this eqmpment does
cause harmful mterference to radio or telews~on
reception, which can be determmed by tummg the
equtpment off and on, the user 1sencouraged to try to
correct the mterference by one or more of the followmg
measures:
- Reorient or relocate the recewng antenna.
- Increase the separation between the eqmpment and
recewer.
- Connect the eqmpment mto an outlet on a cncutt
different from that to which the recewer ISconnected.
- Consult the dealer or an expertenced radio/TV
techntclan for help.
The shlelded Interface cable recommended m this manual
must be used wth this equtpment m order to comply wth
The limits for a digltal dewce pursuant to Subpart B of
Part 15 of FCC Rules.
CAUTION
l
The use of optlcal mstruments wth this product will
mcrease eye hazard.
l
You are cautioned that any changes or modifications
not expressly approved m this manual could void your
authority to operate this eqmpment.
l
Use of this appliance wth some systems may present a
shock or fire hazard. Do not use with any tmxs which
have the followmg markmg located near output.
“WARNING! HAZARDOUS ENERGY’ ..,”
Note to CATV system installer:
This remmder ISprowded to call the CATV system
mstaller’s attention to Ar:lcle 820-40 of the NEC that
prowdes gmdelines for proper grounding and, m
partndar, specifies that the cable ground shall be
connected to the grounding system of the building, as
close to the pomt of cable entry as practical.
NOTICE FOR THE CUSTOMERS IN
CANADA
CAUTION
TO PREVENT ELECTRIC SHOCK, DO NOT USE
THIS POLARIZED AC PLUG WITH AN EXTENSION
CORD, RECEPTACLE OR OTHER OUTLET UNLESS
THE BLADES CAN BE FULLY INSERTED TO
PREVENT BLADE EXPOSURE.
FOR THE CUSTOMERS IN NORTH
AMERICA
/-\ ENERGY STARa 1sa US. reglstered
&$ Ftc ENERGY STAR@ partner, Sony
Corooratlon has determmed that this
product meets the ENERGY STAR@
gmdelines for energy efficiency.
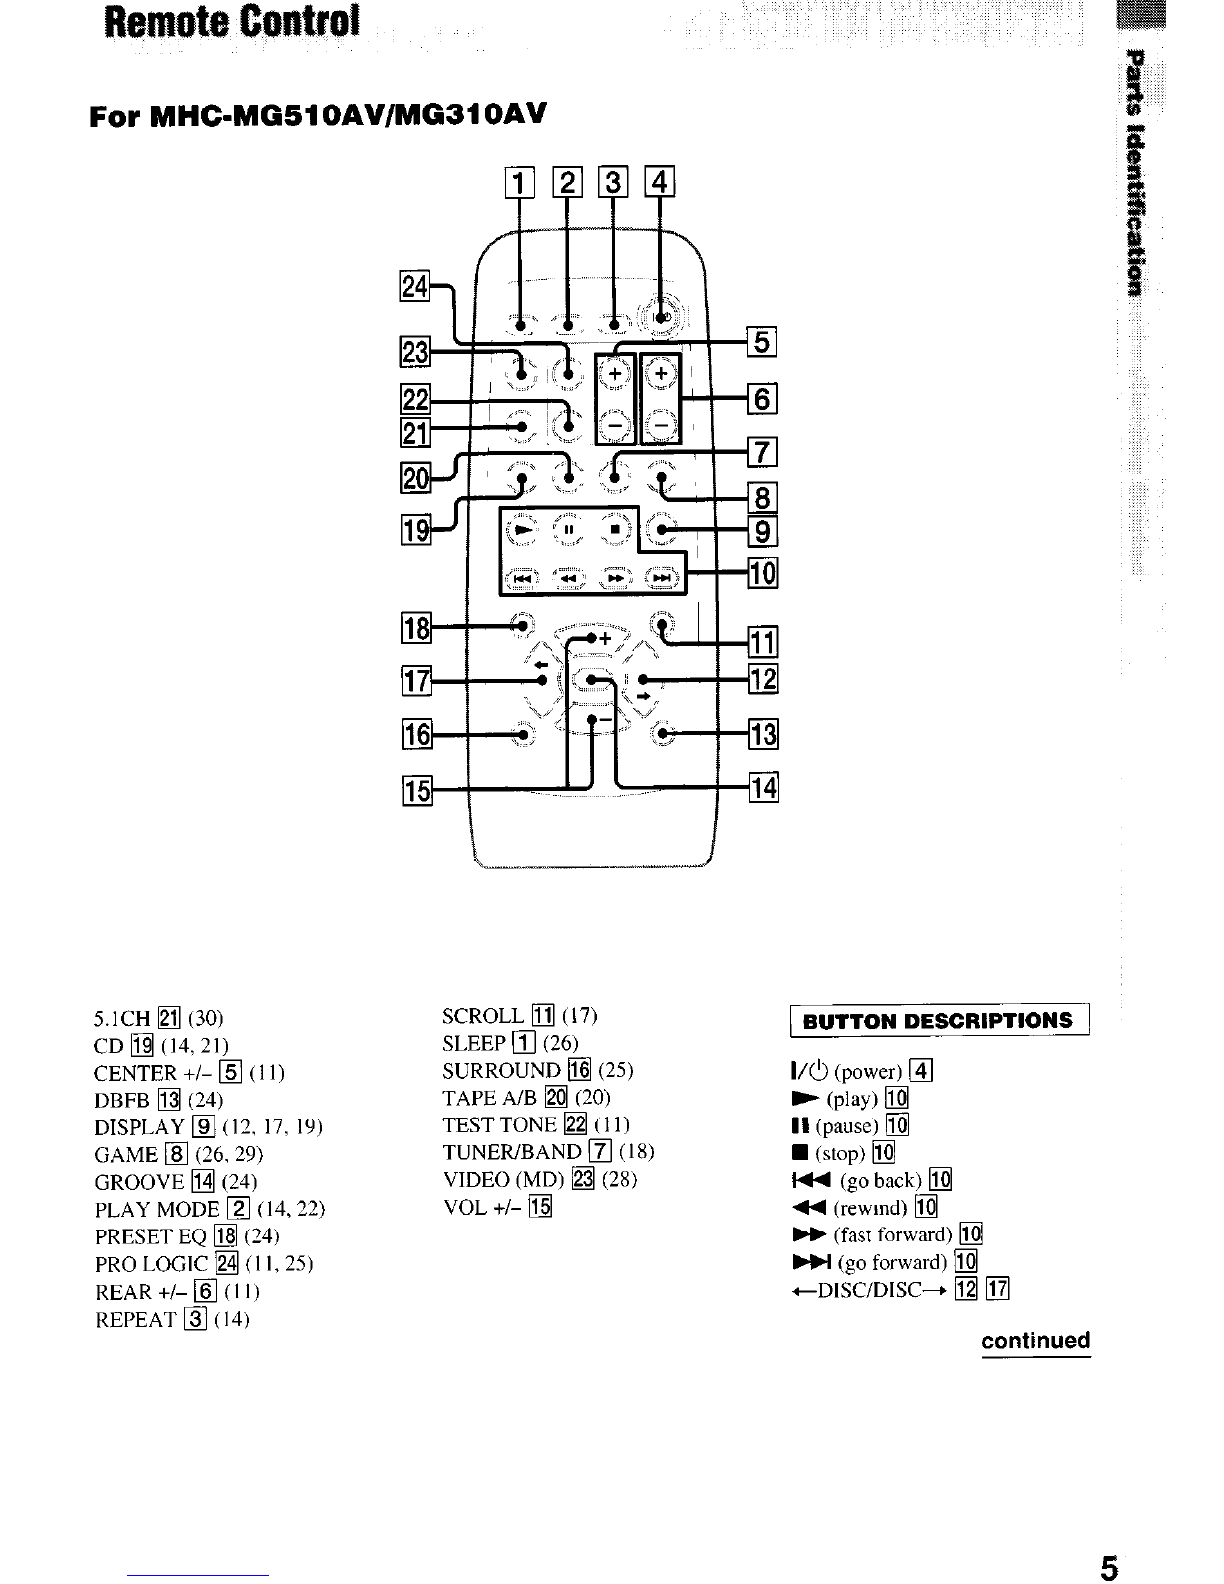
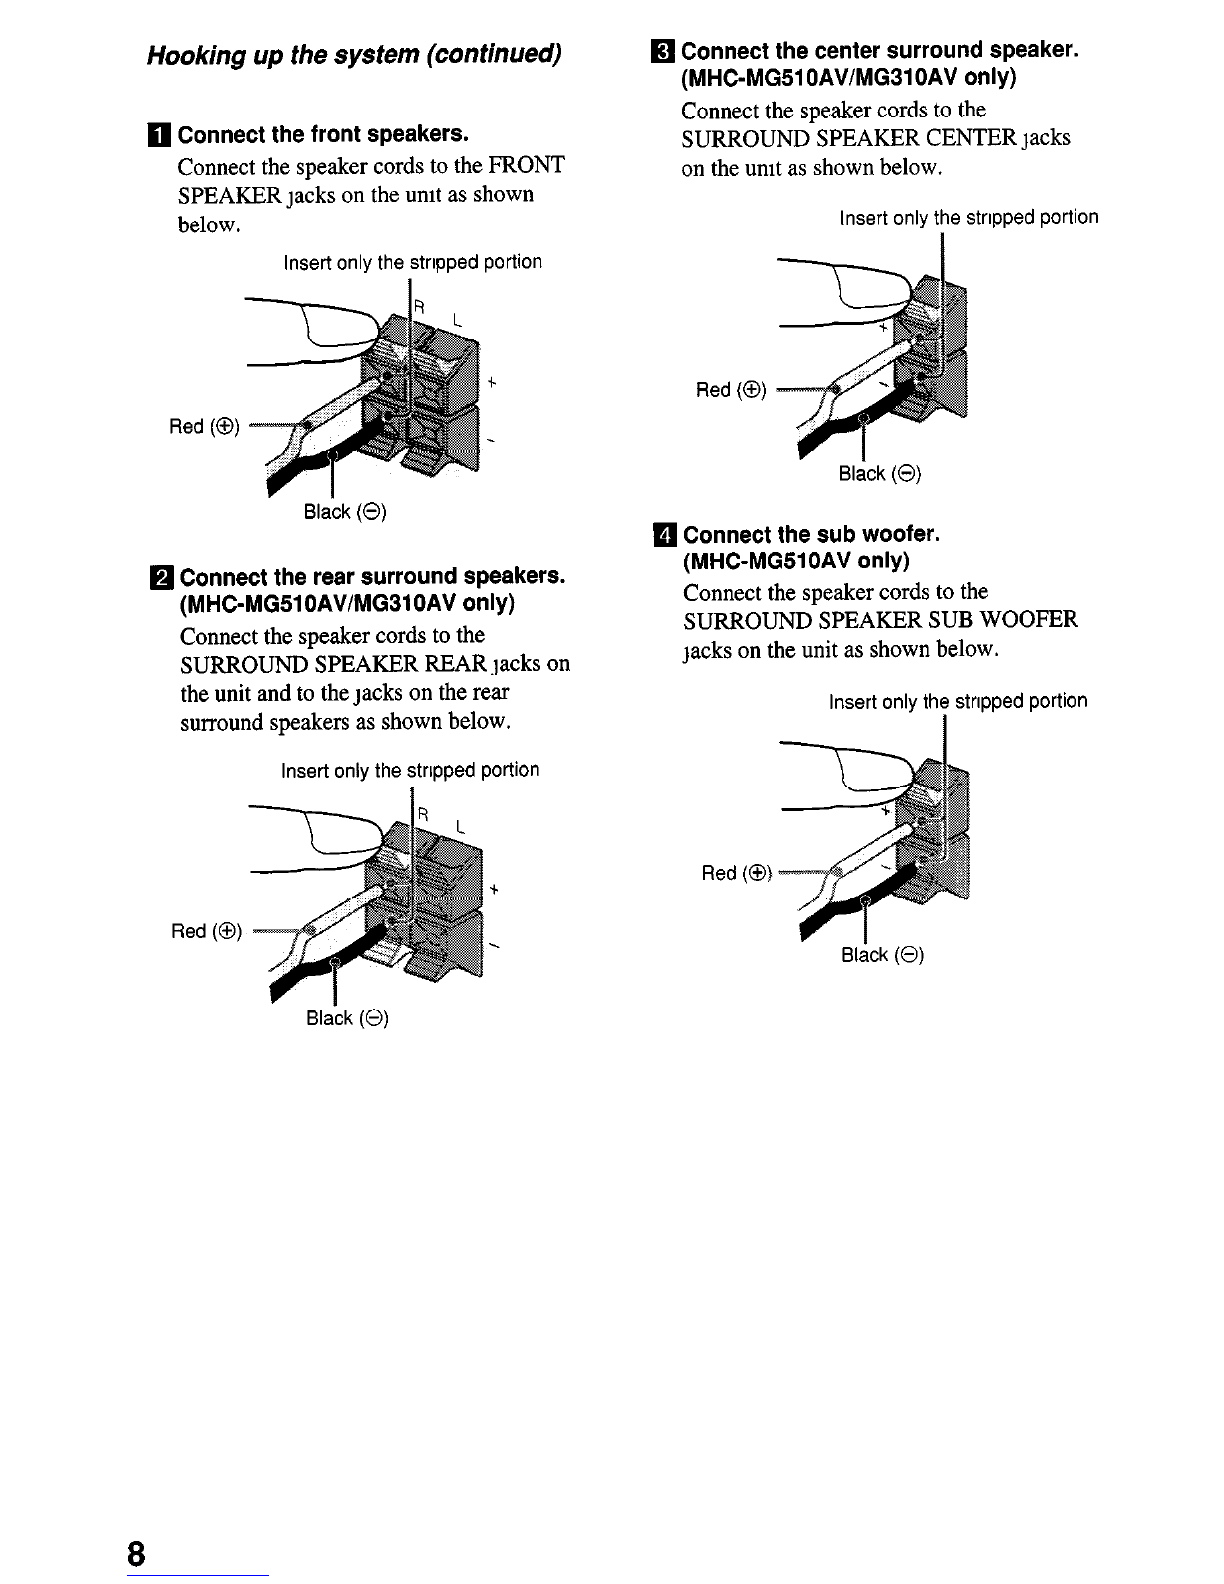
MHC-MGSlOAVIMG3lOAV only
This stereo system ISeqmpped wth the Dolby* Pro Logx
Surround decoder.
* Manufactured under license from Dolby Laboratones.
“Dolby”, “ Pro Lo&‘, and the double-D symbol 00 are
trademarks of Dolby Laboratones. Confidentlal
unpublished works. 01992-1997 Dolby Laboratones.
All rights reserved.
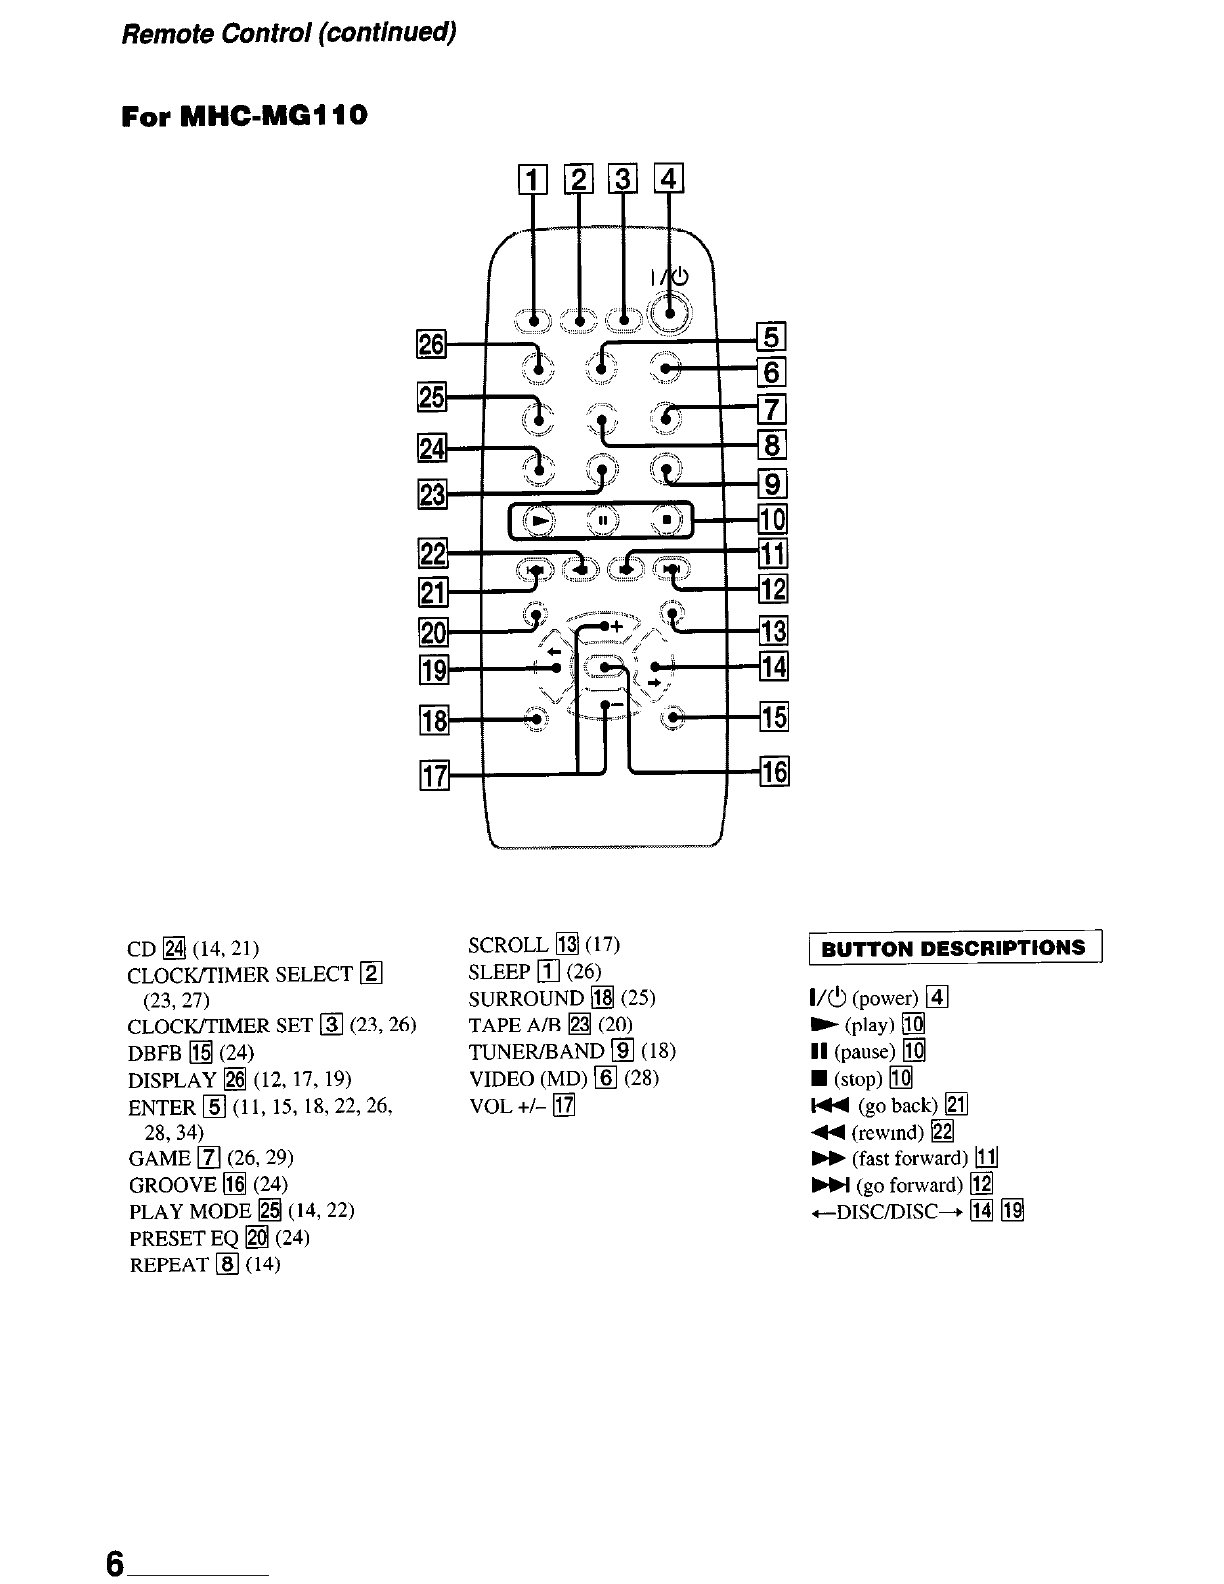
Mam unit ...............................................4
Remote Control ..................................... 5
_“.“~_,~~,.-,“”.,----- - ....._~pm---mm ~”
Getting Started
Hookmg up the system .......................... 7
Inserting two size AA (R6) battenes into
the remote ........................................ 9
Setting up your speakers for Dolby Pro
Logic” ........................................... 10
Setting the time .................................... 11
Saving the power m standby mode ...... 12
_.._ ... _--_ -,_,_--.,~= .... _“I_;Y.-l~,-~-,-_ ....
CD
Loading a CD ...................................... 12
Playing a CD - Normal Play/
Shuffle Play/Repeat Play .............. 14
Programing CD tracks
- Program Play ............................ 15
Labeling a CD
- Disc Memo ............................... 16
Using the CD display .......................... 17
Tuner
Presetting radio stations.. ..................... 18
Listening to the radio
- Preset Tuning ........................... 19
Labeling the preset stations
- Station Name ............................ 19
Tape
Loading a tape ..................................... 20
Playing a tape ...................................... 20
Recording to a tape
- CD Synchro Recording/
Recording Manually/
Program Edit ................................. 21
Timer-recording radio programs ........
.23
Sound Adjustment
Adjusting the sound
- DBFB/GROOVE/
V-GROOVE ......................*........... 24
Selecting the sound effect .................... 24
Selecting the surround effect ............... 25
Enjoying Dolby Pro Logic Surround
sound* ........................................... 25
Selecting the sound formation
- Multi room selector* ................ 25
mpp-m--_II-- ~“~____
Other Features
Enhancing video game sound
- Game Sync ............. ............. ... 26
Falling asleep to music
- Sleep Timer ....................... ...... 26
Wakmg up to music
- Daily Timer ........ ..... ............ .. 26
,_,,,, ._ ,“,,“,_.~,_“~.,~,~i,_,,_LIX_._lll,,“,,^__
~... ““.
Using an Optional Keyboard
Settmg the keyboard ............................ 27
Labeling titles through the keyboard ... 27
Operatmg the system through the
keyboard ...... .... ............. . ....... ... 28-.,, _ ,,..........“..“.““~_^__“,.~,.,,,.,,.,,.,.,,__~“.“,,~,^. -
Optional Components
Hookmg up the optional
AN components ......... .......... .. ... 28
Connectmg a video game machme ...... 29
Connectmg a sub woofer speaker** .... 30
Connecting a DVD player* ................. 30
__,I-,_-,“__,,~~.,” __ “,~,___.,~,.,,_ _,,,,,_,._- 1 “__,,-,,“..-
Additional Information
Precautions ... ............. . .......... .......... 31
Troubleshootmg ................................... 32
Messages ............................................. 34
Specifications ... . . .......... . ............ . 35
* MHC-MG5 1OAV/MGS 1OAV only
** MHC-MG3 1OAV only
3

The items are arranged m alphabetlcal order.
Refer to the pages indicated m parentheses ( ) for details.
5.1CH/VIDEO (MD)*
q
(28)
AUDIO IN L Jack
q
(29)
AUDIO IN R Jack
q
(29)
CD@(14,21)
CDSYNCHRO
q
j(21, 22)
CLEAR
q
(15, 19,34)
Deck A
q
(20)
Deck B
q
(20)
DIRECTION
q
(20)
DISC ACCESS I@ (12,2 I)
Display wndow
q
DISPLAY
q
(12, 17, 19,34)
ENTERa(l1, 15, l&22,26,28)
FRONT*
q
(25)
GAME •j (26, 29)
KEYBOARD 1NPuT~ack
q
(27)
LINK” fl(25)
MENU
q
(16, 18)
4
PHONES Jack
q
PLAY MODE
q
(14,22)
PRESET EQ
q
(24)
PRO LOGIC*
q
(I 1,25)
PUSH OPEN (Front cover)
q
(12)
REAR”
q
(25)
REC PAUSE/START •j (2 I ,22)
REPEAT •j (14)
STEREO/MONO
q
(19)
SURROUND* fl(25)
SURROUND MODE
q
(25)
TAPE A/B
q
(20)
TIMER SELECT
q
(23.27)
TIMER SET
q
(ll(23.26)
TUNER/BAND
q
(18)
VIDEO IN Jack
q
(29)
VIDEO (MD)“”
q
(28)
VOLUME conti-01
q
1 BUTTON DESCRIPTIONS /
& (deck A)
q
l/O (power)
q
44 (rewnd)
q
4 ) Way)IZd
II PAUSE
q
W (fast forward)
q
n
(stop)
q
- H1 (go back) •l
HI + (go forward)
q
f (deck B)
q
SCMHC-MG5 IOAV/MG3 IOAV
only
*:;:MHC-MG1 10 only

For MHC-MG51 OAV/MG31 OAV
5.1CH
q
(30)
CD
q
(14,21)
CENTER +/-
q
(11)
DBFB
q
(24)
DISPLAY
q
(12, 17, 19)
GAME
q
(26.29)
GROOVE
q
(24)
PLAY MODE
q
(14.22)
PRESET EQ
q
(24)
PRO LOGIC
q
(I 1.25)
REAR +/-
q
(I I)
REPEAT
q
(I 4)
SCROLL
q
(17)
SLEEP ijj (26)
SURROUND
q
(25)
TAPE A/B
q
(20)
TESTTONE
q
(11)
TUNER/BAND
q
(IS)
VIDEO (MD)
q
(28)
VOL +I-
q
BUTTON DESCRIPTIONS
I/O (power)
q
) (play) •l
II (pause)
q
n
(stop)
q
I44 (go back)
q
44 (rewmd)
q
H (fast forward)
q
HI (go forward)
q
tDISC/DISC--r
q q
continued
5

Remote Control (continued)
For MHC-NAG1 10
CD
q
(14,21)
CLOCK/TIMER SELECT
q
(23,27)
CLOCK/TIMER SET
q
(23,26)
DBFB
q
(24)
DISPLAY •j (12, 17, 19)
ENTER
q
(11, 15, 18,22,26,
28,34)
GAME
q
(26, 29)
GROOVE i&j (24)
PLAY MODE
q
(14,22)
PRESET EQ
q
(24)
REPEAT
q
(14)
SCROLL
q
(17)
SLEEP
q
(26)
SURROUND
q
(25)
TAPE A/B
q
(20)
TUNER/BAND
q
(18)
VIDEO (MD)
q
(28)
VOL +/-
q
BUTTON DESCRIPTIONS 1
I/O (power)
q
t (play)Ia
II (pause)
q
n (stop) ljjj
I44 (go back)
q
44 (rewmd)
q
W (fast forward)
q
W (go forward)
q
+-DISC/DISC--,
q q

Perform the followmg procedure
q
to
q
to hook up your system usmg the supplied cords and
f-9
AM loop antenna
Rear surround
speaker (Right)*
FM antenna
Center surround speaker* Rear surround
speaker (Left)*
MHC-MGSlOAV ISthe model used for illustration purpose.
* MHC-MGS lOAV/MG3 1OAV only
*‘: MHC-MC5 1OAV only

Hooking up the system (continued)
0 Connect the front speakers.
Connect the speaker cords to the FRONT
SPEAKER Jacks on the unit as shown
below.
Insert only the stripped portion
I
Red (0)
Black (0)
q
Connect the rear surround speakers.
(MHC-MGWOAVIMG310AV only)
Connect the speaker cords to the
SURROUND SPEARER REAR Jacks on
the unit and to the Jacks on the rear
surround speakers as shown below.
Insert only the stripped portion
Red (0)
q
Connect the center surround speaker.
(MHC-MG510AVIMG310AV only)
Connect the speaker cords to the
SURROUND SPEARER CENTER Jacks
on the unit as shown below.
Insert only the stripped portion
Red (0)
B&k (0)
q
Connect the sub woofer.
(MHC-MGJlOAV only)
Connect the speaker cords to the
SURROUND SPEARER SUB WOOFER
Jacks on the unit as shown below.
Insert only the stripped portion
I
Black (0)
B&k (0)

q
Connect the FM/AM antennas.
Set up the AM loop antenna, then connect
1t.
Jack type @
AM IOOD antenna
Extend the FM antenna
homontally
Jack type @
AM loop antenna
To connect optional components
See page 28 for details.
Notes
l
Keep the speaker cords away from the antennas to
prevent notse.
l
Do not place the rear surround speakers on top of a
TV Thts may cause distortton of the colors m the
TV screen.
l
Be sure to connect both left and rrght rear surround
speakers. Otherwtse, the sound will not be heard.
l
The type of speakers supplied vary according to the
model you purchased (see “Specificatrons” on
page 35).
l
The MHC-MGl 10 speaker system ts not
magnettcally shtelded. Therefore, leave a space of 5
to 10 cm or more when placmg the front speakers
next to a televtston.
Extend the FM antenna
horlzontally
q
Connect the power cord to a wall outlet.
The demonstration appears m the display
When you press I/b, the system turns on
and the demonstration automatically ends.
Note on placement
Be sure to place this unit on a honzontal place.
If the umt 1sslanted, it may cause malfunction
or damage to the system.
Tip
With normal use, the battertes should last for about
SIX months. When the remote no longer operates the
system, replace both battertes wrth new ones.
Note
If you do not use the remote for a long pertod of ttme.
remove the batterms to avotd possible damage from
battery leakage.
9

(MHC-MGSiOAVfMG31OAV only)
Positioning the speakers
Center
Sub woofer’
.’Front(L) -‘@ d @- Front (R)
* MHC-MGS 1OAV only
Each speaker should face the listemng position.
Better surround effect will result if all speakers
are set at the same distance from the listemng
position.
Place the front speakers 5 to 10 cm or more
away from the left and nght of the televlslon.
For MHC-MGSlOAV, place the sub woofer on
either side of the television.
Place the center speaker on the top-center of
the TV set.
The placement of rear speakers greatly depends
on the configuration of the room. The rear
speakers may be placed on both sides of the
listening position 0 or behind the listening
position 0.
Tip
For MHC-MG310AV customers, you can connect an
optmnal sub woofer speaker (see page 30).
Setting the center speaker
Attach the supplied speaker pads to the bottom
of the center surround speaker to stabilize the
speaker and prevent it from slippmg.
I I I
ki b;
Place the center surround speaker at about the
same height as the front speakers. Align the
center surround speaker with the front speakers
or place tt slightly back from the position of the
front speakers.
Setting the rear speakers
Place the rear surround speakers facmg each
other at about 60 to 90 cm above your listemng
position.
60 to 90 c
Rear surround
speaker
10

Adjusting the speaker volume
of each speaker
- Test tone
1 Press PRO LOGIC.
“DOLBY PL ON” appears.
2 Press TEST TONE on the remote.
The test tone IS heard from the speakers m
the followmg order.
Front (left) ---t Center + Front (nght) --,
Rear + Front (left) + ...
3 From your listenmg position, press
CENTER (+/-) and REAR (+/-) on the
remote to adjust the volume until the
each volume level becomes the same.
4 Press TEST TONE when you fimsh
adjusting.
The test tone turns off.
Note
The test tone feature works only for Dolby Pro Logtc
Surround sound.
1
Turn on the system.
2 Press TIMER SET
When you set the clock for the first time, go t
::
to step 5. 9
0
3 Press - Itl or W + repeatedly to fn
select “CLOCK SET” B
4 Press ENTER. 3
P
5 Press - W or W + repeatedly to set
the hour.
6
Press ENTER.
7 Press - W or H + repeatedly to set
the mmute.
8
Press ENTER.
Tip
If you made a mtstake or want to change the time,
start OYer from step 1.
Note
The clock settmgs are canceled when you disconnect
the power cord or if a power failure occurs.
11

Press DISPLAY repeatedly while the
system IS off. Each time you press the
button, the system switches cyclically as
follows:
Demonstration + Clock display + Power
Saving Mode
You can load up to 60 discs mto this unit.
Turn on the system before you load CDs.
1
Open the front cover by pushmg the
right edge of the cover.
Tips
l
I/e Indicator lights up even m the Power Savmg
Mode.
l
The timer functions mthe Power SavmgMode.
Note
You cannot setthe time m the Power Saving Mode.
To cancel the Power Saving Mode
Press DISPLAY once to show the
demonstration or twice to show the clock
display.
Front &over
2 Turn DISC ACCESS (or press +DlSC
or DISC+ on the remote) until you find
the disc slot where you want to msert a
disc, while checkmg the disc number
(written beside every slot and also
indicated in the display).
Disc slot at the loading Disc number
position
(located at the very front)
12

The disc number* at the loading posttton
appears tn the display. As you turn
DISC
ACCESS, the disc number or Disc Memo
changes.
1:If you have already loaded discs, the disc
number at the playmg posttton appears. When
you turn DISC ACCESS, the displayed disc
number changes to the one at the loading
positton. Disc number
Total number of track: and total playtng time
3 ;;;;t a disc with the label side facmg
Notes
l
Make sure you have loaded the disc mto each
slot at a rtght angle to the rotary table. If the
disc IS not put m stratght, tt may damage the
mm or the disc.
l
Make sure the rotary table comes to a complete
stop before loading or removmg discs.
With the label
4 Repeat steps 2 and 3 to load additional
discs.
5 Close the front cover by pushing the
right edge of the cover until it clicks.
The rotary table turns and the disc slot at the 8
loading posttton 1s set to the playing s
position. 0
Removing CDs
After followtng step 1 of “Loading a CD” on
page 12, remove the discs. Then close the front
cover.
Notes
* Always close the front cover except when you load
or remove discs.
l
Do not load an empty 8 cm CD adaptor. It may
damage the mm.
l
Do not attach anythmg such as seals or sleeves to
CDs. It may damage the mut or the disc.
l
If you drop a disc mto the nmt and the CD will not
go mto the slot correctly, consult your nearest Sony
dealer.
l
When transportmg the mm, remove all discs from
the mm.
l
If you want to remove the disc played,
open the front co\cr. The disc
comes to the loading posttton. Remove the disc
after the rotary table comes to a complete stop.
Tip
You can display the ongmal Disc Memos Instead of
the disc numbers (see “Labeling a CD’ on page 16) to
locate the disc easily when you start playmg.
When you select a CD-TEXT disc, the disc tttle ts
displayed Instead of the disc number.
13

- Normal Play/Shuffle Play/Repeat
Play
To
Stop play
Do this
Press W.
Pause
You can play up to 60 CDs contmuously. This
system lets you play the CD m different play
modes.
Select a track
Press II PAUSE (or II on the
remote). Press agam to resume play.
Durmg play or pause, press w +
(to go forward) or - I44 (to go
back).
Disc number
Find a
pomt
m Dung play, press and hold * (to
a track go forward) or 44 (to go back).
Release It when you find the desired
Track iumber Play& time
1
Press CD to switch the function to CD.
2Wh en you want to specify the disc for
1 DISC, turn DISC ACCESS (or press
+--DISC or DISC-+ on the remote) until
the desired disc number or Disc Memo
appears.
3 Press PLAY MODE repeatedly until the
mode vou want aooears.
Select
ALL DISCS
(Normal Play)
1 DISC (Normal
Play)
ALL DISCS
SHUF (Shuffle
Play)
1 DISC SHUF
(Shuffle Play)
PGM (Program
Play)
To play
All
CDs m
the disc tray
contmuously.
The CD you have selected
m orlgmal
order.
The tracks on all CDs m
random order.
The tracks on the CD you
have selected m random
order.
The tracks on all CDs m the
order you want them to be
played. (see “Programmg
CD tracks ” on page 15.)
Other Operations
pomt.
Turn DISC ACCESS to the right (to
go forward) or to the left (to gi
back) and release It when you reach
the desired CD (or press +-DISC or
DISC+ on the remote).
Select a CD m
stop mode
Play repeatedly
(Repeat Play) Press REPEAT durmg play until
“REP” or “REP I” appears.
ALL DISCS REP. For all the tracks
on all CDs up to five times.
1 DISC REP For all the tracks on
the current CD up to five times.
REP I *, For a smgle track only.
To cancel Repeat Play, press
REPEAT until “REP” or “REP I”
disappears.
2: When you select “REP I”, that track IS repeated
endlessly until Repeat Play IS canceled.
4 Press 4 ) (or F on the remote).
14

- Program Play
You can make a program of up to 2.5 tracks
from all the CDs m the order you want to play
them.
1
Press CD to switch the function to CD.
2 Press PLAY MODE repeatedly until
“PGM” appears.
3 Turn DISC ACCESS (or press +DlSC
or DISC+ on the remote) to select a
CD.
To program all the tracks on a CD at once,
go to step 5 with “CDAL” displayed.
4
Press - l44 or HI + (or l44 or HI
on the remote) repeatedly until the
desired track appears.
Disc number
Track number Playing time of
selected track
5 Press ENTER.
The track IS programed. The programed
track and corresponding step (playmg order)
appear.
6
Program additional discs or tracks.
To program Repeat steps
Other discs 3 and 5
Other tracks on the 4 and 5
same disc
Other tracks on other 3 to 5
discs
Other Operations
To
Do this
Cancel Program Press PLAY MODE repeatedly
plav until “PC&l” disappears.
Check the Press - I44 or W + (or HI or
program HI on the remote) repeatedly
durmg Program Play.
Clear a track or Press CLEAR m stop mode. 8
disc from the end
Clear the entxe Press and hold CLEAR.
program
Add tracks or
Perform
steps 3 to 5.
discs to the
program in stop
mode
l
The program you made remams after Program Play
fimshes. To play the same program agam, press CD,
then press 4 ) (or ) on the remote) m
Program Play mode.
l
“-- --” appears when the total CD program time
exceeds 100 mmutes, or when you select a CD track
whose number 1s 21 or over.
l
The programed disc and track numbers remam until
you erase them, so that the system plays only the
exlstmg disc and track numbers if you replace discs.
However, the disc and track numbers that are not
found m the system or on the disc are deleted from
the program, and the rest of the program IS played
m the programed order.
7 Press 4 b (or b on the remote).
15

- Disc Memo
You can label up to 60 CDs with tttles of up to
20 characters. Whenever you load a labeled
CD, the title appears m the display.
You can also label CDs usmg an optronal
keyboard (see “Labeling titles through the
keyboard’ on page 27).
Notes
l
You cannot label a CD for whtch “TEXT” appears
m the display.
l
You can label a CD only durmg Normal Play (when
“1 DISC” or “ALL DISCS’ IS displayed).
1
Press CD to switch the function to CD.
2 Turn DISC ACCESS until the disc
number you want to label appears.
3 Press MENU.
4Press-H orW+(orW 0rW
on the remote) repeatedly until “NAME
IN” appears.
5 Press ENTER.
6
Turn DISC ACCESS until the character
you want appears.
The cursor disappears and the first space for
the disc title flashes.
You can Input the followmg characters:
l
Upper cases (A - Z)
l
Numbers (0 - 9)
l
Symbols(‘-/,+<>-=‘)
7
Press W
The character you selected m step 6 stops
flashing and the cursor shifts to the nght.
8
Repeat steps 6 and 7 to complete the
entire title.
If you made a mrstake
Press 44 or W until the character you
want to change flashes, then repeat steps 6
and 7
To erase a character
Press CLEAR while the character 1s
flashing. You cannot insert characters.
9 Press ENTER to complete the labeling
procedure.
Repeat steps 2 to 9 to label addittonal discs.
To cancel labeling
Press MENU.
Tip
When you replace a disc wtth a CD-TEXT disc, the
Disc Memo of the CD-TEXT disc ts automattcally
restored. The Disc Memo of the CD-TEXT disc is no
longer stored (disappears) when the disc is removed.
Note that you cannot change the Disc Memo of a
CD-TEXT disc.
Note
The Disc Memo stores the number of the slot m
whtch the CD was loaded. Re-enter the Disc Memo
when loading a new CD mto that slot.
16

Checking the Disc Memos
1
Press CD to switch the function to CD.
2 Press MENU.
3
Press - H1 or W + (or W or W on
the remote) repeatedly until “NAME
CHECK” appears.
4 Press ENTER.
5 Turn DISC ACCESS to select the disc titles
stored m the system memory between 01 and
60.
6
Press MENU.
To check the current disc title
Press SCROLL on the remote m stop mode.
Erasing a Disc Memo
1
Press CD to switch the function to CD.
2 Press MENU.
3
Press - ld4 or W + (or Itl or W on
the remote) repeatedly until “NAME
ERASE” appears.
4 Press ENTER.
5 Turn DISC ACCESS to select the disc
number with the title you want to erase.
6 Press ENTER.
Erasing all Disc Memos of all
discs
1
Press CD to switch the function to CD.
2 Press MENU.
3
Press - W or W + (or W or W on
the remote) repeatedly until “ALL ERASE”
appears.
4 Press ENTER.
You can check the remammg time of the
current track or the entire CD. When a CD-
TEXT disc 1sloaded, you can also check the
mformatlon recorded on the disc, such as the
titles.
Press DISPLAY repeatedly. 8
The display changes cyclically as follows:
During normal play
Elapsed playmg time of the current track +
Remammg time of thecurrent track +
Track title (CD-TEXT disc only) + Clock
display --, Effect status
In stop mode
Dunng Program Play mode when there 1sa
program:
The last track number and the total playmg
time of the program + The disc number of the
program, the last track number and total
number of steps + Disc title or Disc Memo*’
+ Clock display + Effect status
In other conditions:
TOC display*2 + Disc title or Disc Memo*’
- Clock display + Effect status
*’ For labeled CD or CD wth CD-TEXT
e2 TOC = Table of Contents; displays current disc
number, total number of tracks on the disc, and
total playmg time of the disc
Depending on the disc, some CD-TEXT mformatlon
may not appears.
17

P
You can preset up to 20 stations for PM and 10
stations for AM.
1
Press TUNER/BAND repeatedly to
select “FM” or “AM”
2 Press and hold 44 or W until the
frequency Indication starts to change,
then release it.
Scanning stops automatrcally when the
system tunes m a station. “TUNED” and
“STEREO” (for a stereo program) appear.
3 Press MENU.
4
Press - W or HI + (or i44 or W
on the remote) repeatedly until
“MEMORY” appears, then press
ENTER.
A preset number appears.
Preset number
5
Press - I44 or W + (or t44 or HI
on the remote) repeatedly to select the
dewed preset number.
6
Press ENTER.
“COMPLETE” appears.
The station 1sstored.
7 Repeat steps 1 to 6 to store other
stations.
To tune in a station with a weak
signal
Press ti or w repeatedly m step 2 to tune m
the statron manually
To set another station to an existing
preset number
Start over from step 1. After step 4, press
- w or w + repeatedly to select the preset
number you want to store the other station.
To change the AM tuning interval
The AM tuning Interval 1sfactory-set to 9 kHz
(10 kHz m some areas). To change the AM
tuning interval, tune m any AM station first,
then turn off the system. While holding down
ENTER, turn the system back on. When you
change the interval, all the AM preset stations
are erased. To reset the Interval, repeat the
same procedure.
Tip
The presetstattonsareretamed for half a day even if
you unplug the power cord or if a power failure
occurs.
18

- Preset Tuning
Preset radio stations m the tuner’s memory first
(see “Presetting radio stations” on page 18).
1 Press TUNER/BAND repeatedly to
select “FM” or “AM”
2
Press - l44 or W + (or l44 or HI
on the remote) repeatedly to tune In the
desired preset station.
Preset number Frequency
To listen to non-preset radio stations
Use manual or automatic tuning in step 2.
For manual tuning, press H or W
repeatedly. For automatic tumng, press and
hold M or M
Tips
l
When an FM stereo program has static noise, press
STEREO/MONO repeatedly until “MONO”
appears. There will be no stereo effect, but the
receptmn will Improve.
* To improve broadcast reception. adjust the supplied
antennas or connect a commercially available
external antenna.
- Station Name
You can label each preset station with up to
12 characters (Station Name).
You can also label preset stations usmg an
optronal keyboard (see “Labeling titles through
the keyboard’ on page 27).
1
Tune the desired station you want to
label (see “Llstenmg to the radio” on
this page).
2 Follow the same procedures as from
steps 3 to 9 of “Labeling a CD” on
page 16.
To check the preset number and
frequency
The station name appears when you tuned the
labeled station.
To check the preset number and frequency,
press DISPLAY The preset number and
frequency are displayed for 4 seconds and it
returns to the station name display
To erase the name
1
Tune the station.
2 Press MENU.
3 Press I44 or HI repeatedly to select
“NAME IN”, then press ENTER.
4 Press CLEAR repeatedly to
erase the name.
5 Press ENTER.
19

You can use only TYPE I (normal) tape.
1
Press TAPE A/B repeatedly to select
deck A or B.
2
Press L.
3 Insert a tape In deck A* or B with the
side you want to play/record facing
forward.
With the side
you want to
play/record
facing forward
* Playback only
1
Load a tape.
2 Press DIRECTION repeatedly to select
Z to play one side. Select C=)* to
play both sides.
To play both decks In succession, select
RELAY (Relay Play)**
3P
ress + F
Press 4 ) again to play the reverse side
for the deck B. When you select CZ or
RELAY, the deck automatically stops after
repeatmg the sequence five times.
Tape playback side
>>> appears for the front side, and <<< for
the reverse side.
a% Deck A does not play the reverse side.
**After the playback of the front side of deck A,
deck B repeats the sequence five times.
Other Operations
To
Stop play
Pause
Do this
Press W.
Press II PAUSE (or II on the
remote). Press
agam to
resume
play.
Fast-forward
or rewmd Press 4 or H
Remove
the cassette
Press A.
Searching for beginning of a track
(AMS)*
Press - I44 or w + (or t+4 or w on the
remote) repeatedly durmg playback for the
number of songs you want to skip forward (or
backward).
The
display shows the number of tracks to be
slupped.
* The Automatic Musx Sensor (AMS) feature
detects a
blank space of more than four seconds
between tracks to locate tracks qmckly.
Notes
l
The AMS function may not operate correctly under
the followmg cncumstances:
- When the unrecorded space between songs IS less
than 4 seconds long.
- When the system IS placed near a televlslon.
l
If the system stops durmg tape playback or
recording
due to a
power failure or other reason, do
not attempt to forcibly eject the tape as this may
damage the heads. Walt until the power 1s restored,
then be
sure to press
I/&
to turn on the system
before ejectmg the tape.
20
This manual suits for next models
9
Table of contents
Other Sony Stereo System manuals

Sony
Sony MHC-ZX30AV User manual

Sony
Sony MHC-G330 User manual

Sony
Sony HCD-XG60 User manual

Sony
Sony MHC-GX355 - Mini Hi Fi Component System User manual

Sony
Sony LBT-LX5 User manual

Sony
Sony CMT-SPZ90DB User manual

Sony
Sony HCD-RB5 User manual

Sony
Sony HCD-GT444 User manual

Sony
Sony HCD-LV100AV User manual

Sony
Sony HCD-CP500MD User manual

Sony
Sony MHC-RV55 User manual

Sony
Sony CMT-EP305 User manual

Sony
Sony SHAKE-X7D User manual

Sony
Sony LBT-XGR90AV User manual

Sony
Sony HCD-VX55 User manual

Sony
Sony SS-CHP7 User manual

Sony
Sony ZS-2000 Primary User manual

Sony
Sony MHC-GRX40AV User manual

Sony
Sony HCD-GX750 - System Components User manual

Sony
Sony HCD-GTX777 User manual