Sony SA-WM40 User manual

4-228-525-21 (1)
SA-WM40
© 2000 Sony Corporation
Active
Subwoofer
Operating Instructions
Mode d‘emploi
GB
FR

2GB
WARNING
To prevent fire or shock
hazard, do not expose
the unit to rain or
moisture.
Do not install the appliance in a
confined space, such as a bookcase or
built-in cabinet.
For the customers in Canada
CAUTION
TO PREVENT ELECTRIC SHOCK, DO
NOT USE THIS POLARIZED AC PLUG
WITH AN EXTENSION CORD,
RECEPTACLE OR OTHER OUTLET
UNLESS THE BLADES CAN BE FULLY
INSERTED TO PREVENT BLADE
EXPOSURE.

EN
GB
3GB
TABLE OF CONTENTS
Getting Started
Unpacking 4
Installation 4
Hooking Up the System 5
Basic Operations
Listening to the Sound 8
Adjusting the Sound 9
Additional Information
Precautions 10
Troubleshooting 10
Specifications 11
Welcome!
Thank you for purchasing the Sony
Active Subwoofer. Before operating this
woofer, please read this manual
thoroughly and retain it for future
reference.

Getting Started
4GB
Unpacking
Check that you received the following items:
• Audio connecting cord (1)
• Speaker cords (2)
Installation
Since the human ear cannot detect the direction and
position where the bass sound being reproduced by a
woofer (below 170 Hz) comes from, you can install the
woofer wherever you like in your room. To obtain a
better bass reproduction, we recommend you to install
the woofer on a solid floor where the resonance is
unlikely to occur.
You can obtain a sufficient heavy bass reproduction
from a single woofer. However if you use a couple of
the woofers, you can obtain an even more effective
heavy bass reproduction.
Notes
• Always install the woofer vertically, keeping a few
centimeters from away the wall.
• Do not place an object on the woofer or sit on it.
• If the woofer is installed in the center of a room, the bass
could be extreamely weakened. This is due to the
influence of the standing wave of the room. If this
happened, move the woofer away from the center of a
room or eliminate the cause of the standing wave, by
installing a bookshelf on the wall, etc.
Getting Started

Getting Started
5GB
Hooking Up the System
Overview
Use the LINE IN jacks or the SPEAKER IN terminals of
the woofer when you connect the amplifier.
• If your amplifier has one of the following types of
output jacks, connect the LINE IN jack and the
amplifier's jack using the supplied audio connecting
cord.
— MONO OUT jack
— MIX OUT jack
— SUBWOOFER output jack(s)
— SUPER WOOFER output jack(s)
• If your amplifier does not have the above mentioned
output jacks, connect the speaker terminals of the
amplifier to the SPEAKER IN terminals instead.
Before you get started
• Turn off the power of the amplifier and the woofer
before making any connection.
• Use the audio connecting cords that are supplied to
the respective equipment. If there are not enough
audio connecting cords to make the necessary
connections, you need to purchase some optional
audio connecting cords.
• Be sure to make connections firmly to avoid noise.
• Connect the AC power cord from the woofer to a
wall outlet.
• You cannot connect the CENTER output jack for use
with Dolby Pro Logic function to the woofer. Bass
sound is not output with some Dolby Pro Logic
modes.
(continued)
LINE IN
SPEAKER IN
IN OUT
IN OUT
OFF
AUTO
LINE
L
SPEAKER
POWER SAVE
L
R R

Getting Started
6GB
Connecting to an amplifier with a single set
of speaker terminals
If your amplifier is equipped with a single set of
speaker terminals, connect the woofer to the amplifier,
and then connect the front speakers to the woofer.
What cords will I need?
Speaker cord (supplied) (1 for each speaker)
Twist the stripped ends of the cord about 2/3inch (15 mm).
Be sure to match the speaker cord to the appropriate
terminal on the componentes: + to + and – to –. If the cords
are reversed, the sound will be distorted and will lack bass.
It is useful to decide that the speaker cord marked with a
line is always the negative (-) and should be connected to the
negative (-) terminal to avoid any improper connections.
Hookups
1Connect the woofer to the amplifier.
Connect the SPEAKER IN terminals of the woofer
to the amplifier’s speaker terminals with the
speaker cords. Be sure to connect both L and R
channels.
l: signal flow
2Connect the front speakers to the woofer.
Connect the speakers to the speaker terminals of
the woofer.
Connecting to an amplifier with double
(A+B) sets of speaker terminals
If your amplifier has double (A+B) sets of speaker
terminals, connect both the woofer and the front
speakers to the amplifier.
What cords will I need?
Speaker cord (supplied) (1 for each speaker)
Twist the stripped ends of the cord about 2/3inch (15 mm).
Hookups
1Connect the front speakers to the amplifier.
Connect the speakers to your amplifier’s speaker
terminals (A).
2Connect the woofer to the amplifier.
Connect the SPEAKER IN terminals of the woofer
to the amplifier’s speaker terminals (B) using
speaker cords (supplied).
When using the double (A+B) sets of speakers, make
sure that you select the “A+B” position with your
amplifier.
Note
When you are using speaker terminal (A) only (front speaker
only) or when the power of the amplifier is turned off, turn
down the volume or turn off the power of the woofer
otherwise, hum noise may be heard.
Amplifier
This woofer
Amplifier
This woofer
This woofer
Amplifier
IN OUT
L
SPEAKER
L
R R
SPEAKER
IN OUT
L
SPEAKER
L
R R
Front
Speaker (R) Front
Speaker (L)
SPEAKER A
Front
Speaker (R) Front
Speaker (L)
IN OUT
L
SPEAKER
L
R R
SPEAKER B

Getting Started
7GB
Connecting to an amplifier with a special
jack for a subwoofer
If your amplifier has a special jack for a subwoofer (like
a MONO OUT jack, MIX OUT jack, SUBWOOFER jack
or SUPER WOOFER jack), connect the LINE IN jack of
the woofer to one of those jacks.
What cords will I need?
Audio connecting cord (supplied) (1)
Hookups
Connect the MONO OUT jack of your amplifier to the
LINE IN jack of the woofer with the supplied audio
connecting cord.
Note
If the output level of your amplifier is not large enough, the
sound may not be loud enough. In this case, connect the
speaker terminals of the amplifier directly to the SPEAKER
IN terminals of the woofer.
Amplifier This woofer
When using two or more subwoofers
Connecting the AC power cord
•Connect the AC power cord from the woofer and
from your amplifier to a wall outlet.
•Make sure that power to the woofer is turned off
before you plug in or unplug any power cord.
Amplifier
MONO OUT
IN OUT
LINE
IN OUT
LINE IN OUT
LINE
MONO OUT
This woofer Another woofer

Basic Operations
8GB
Basic Operations
Listening to the Sound
1Turn on the amplifier and select the program source.
2Press POWER (?/1).
The woofer turns on and the POWER indicator lights up in green.
3Play the program source.
Adjust the VOLUME so that sound from the front speakers is not
distorted.
If it is distorted, the sound from the woofer will also be distorted.
Note
Never set the amplifier’s tone
control (BASS, TREBLE, etc.) or the
equalizer output to a high level or
input sinewaves of 20 Hz to 50 Hz
recorded on a commercially-
available test disc or special sound
(bass sound of electronic musical
instrument, pop noise of analog disc
turntable, sound with abnormally
enhanced bass, etc.) in a high level
to this unit. These actions may
cause damage to the speakers.
When a special disc containing
abnormally enhanced bass is played,
noise may be output in addition to
the original sound. In such a case,
decrease the sound level.
Note
The subwoofer output signal
(DOLBY digital (AC-3) signal) of the
digital surround processor sold
singularly is set 10 dB higher by
Dolby laboratories Licensing
Corporation. In the case of using
normally, adjust the subwoofer
level.
Note
If you turn down the volume level
of the woofer too low, the auto
power on/off function may activate,
causing the woofer to enter power
saving mode.
To turn on and off the power automatically — Auto power on/off
function
When the woofer is on (i.e, the POWER indicator lights up green) and there is
no signal input for about seven minutes, the POWER indicator changes to red
and the woofer enters power saving mode. While in this mode a signal is
input to the woofer, the woofer automatically turns on (auto power on/off
function).
To turn this feature off, slide the POWER SAVE switch on the rear panel to
OFF.
POWER (?/1) POWER indicator
AUTO
OFF
POWER
SAVE
POWER

Basic Operations
Basic Operations
9GB
You can adjust the sound of the woofer to suit the sound of your front
speakers. Reinforcing the bass sound gives you a greater sense of
atmosphere.
1Adjust the cut-off frequency.
Turn the CUT OFF FREQ control, depending on the reproduction
frequencies of your front speakers.
Refer to the following when adjusting.
1Typical very small sized speakers: 5 –7 cm dia.
2Typical small sized speakers: 8 –15 cm dia.
3Typical medium sized speakers: 16 –24 cm dia.
4Typical large sized speakers: more than 25 cm dia.
To make the most of the low level converter function of Dolby digital,
turn the CUT OFF FREQ as high as possible when playing back the
Dolby digital (AC-3).
2Adjust the volume level of the woofer.
Turn the LEVEL control so that you can hear the bass sound a little
more than before. To increase the volume, turn the control clockwise.
To decrease the volume, turn the control counterclockwise.
3Play your favorite song and movie.
Male vocal tunes and voice containing bass sounds are most suitable
for adjustment. Turn the volume for front speakers to the same level
as usual.
4Select the phase polarity.
Use the PHASE selector to select the phase polarity.
5Repeat steps 1 to 4 to adjust for your preference.
Once you have adjusted the woofer to the settings you desire, use the
VOLUME control on the amplifier to adjust the volume of the woofer
with that of the other speakers. You don’t need to adjust the woofer
settings when you change the volume level of the amplifier.
4
32
1
50Hz 170Hz
75Hz 120Hz
150Hz
100Hz
Adjusting the Sound Basic Operations
Note
If the sound distorts when you turn
on the bass reinforcement from
your amplifier (such as, DBFB,
GROOVE, the graphic equalizer,
etc.), turn off the bass reinforcement
and adjust the sound.
Note
Do not turn the volume of the
woofer to maximum. Doing so may
weaken the bass sound. Moreover,
extraneous noise may be heard.
Note
Selecting NORMAL or REVERSE
with the PHASE selector reverses
the polarity and may provide better
bass reproduction in certain
listening environments (depending
on the type of front speakers, the
position of the woofer and the
adjustment of the cut-off
frequency). It may also change the
expanse and tightness of sound, and
effect the feeling of the sound field.
Select the setting that provides the
sound you prefer when listening in
your normal listening position.
LEVEL PHASE CUT OFF FREQ
LEVEL
MIN MAX
CUT OFF FREQ
50Hz
PHASE
170Hz
REVERSENORMAL

Additional Information
10GB
Troubleshooting
If you experience any of the following difficulties while
using the woofer, use this troubleshooting guide to
help you remedy the problem. Should any problem
persist, consult your nearest Sony dealer.
There’s no sound.
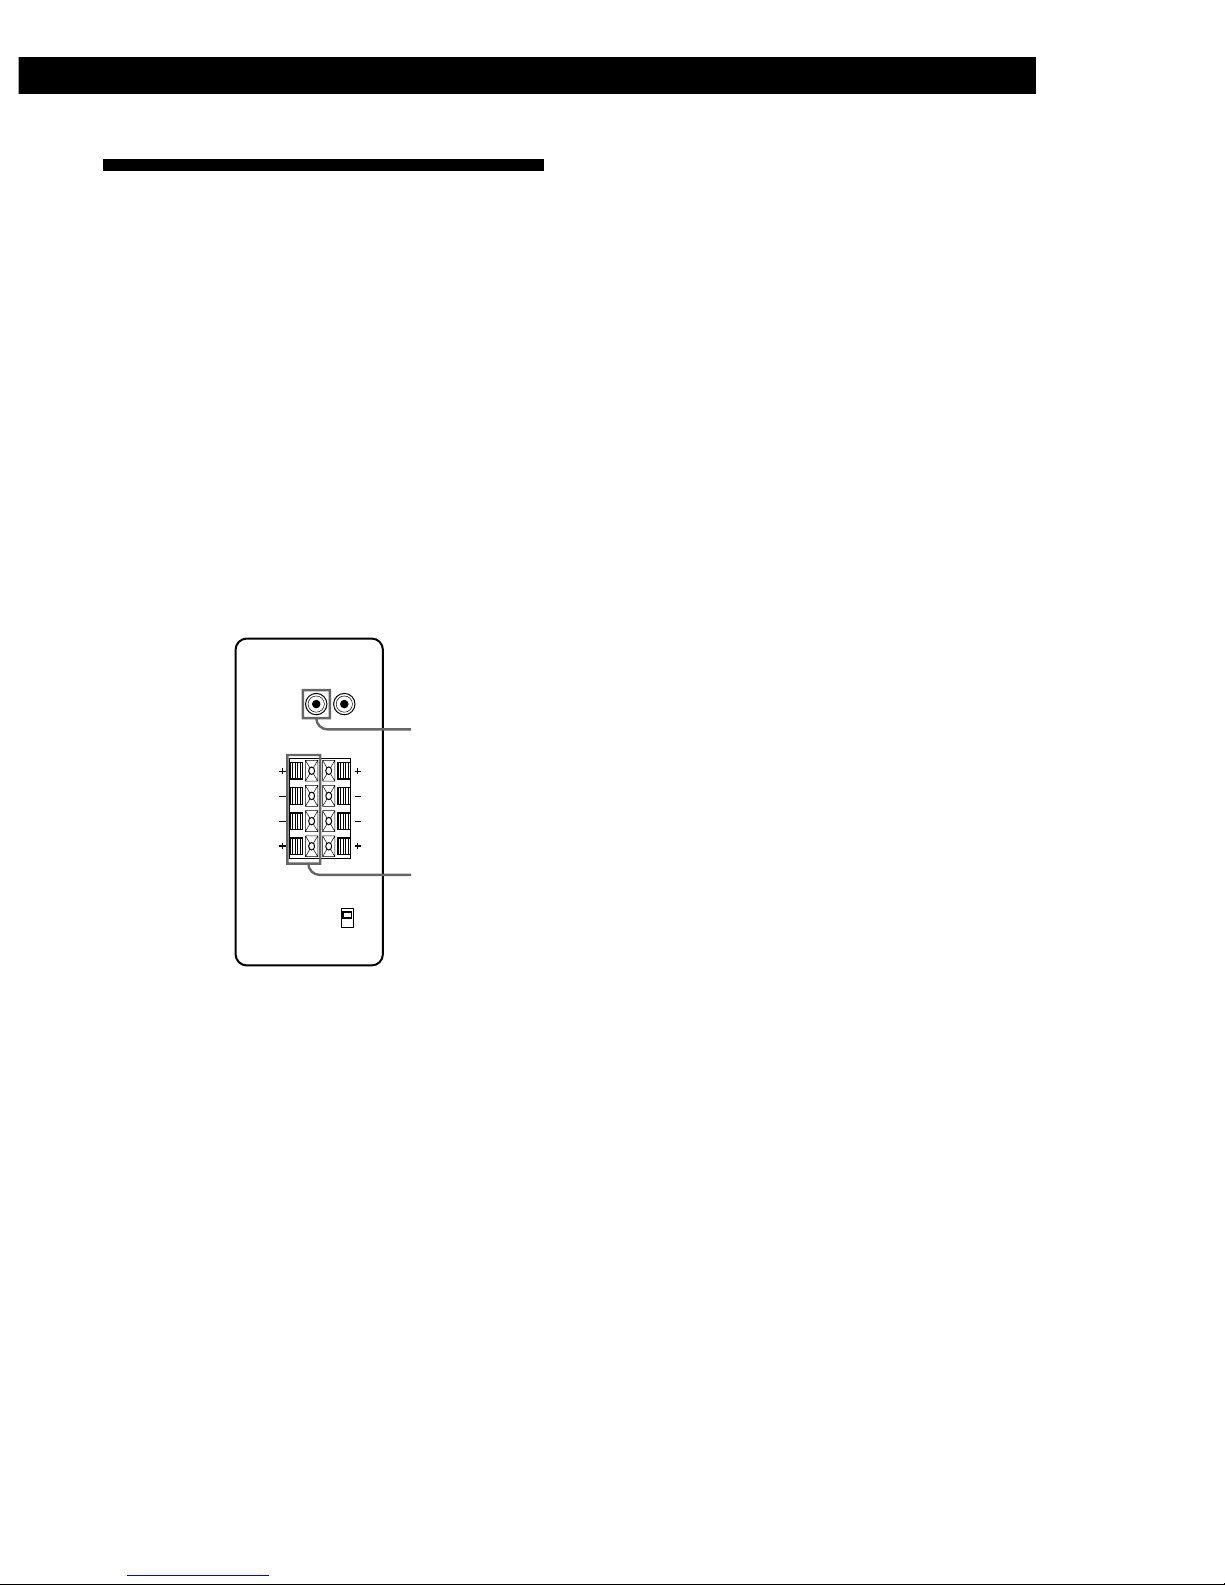
,Check that this woofer and components are
connected correctly and securely.
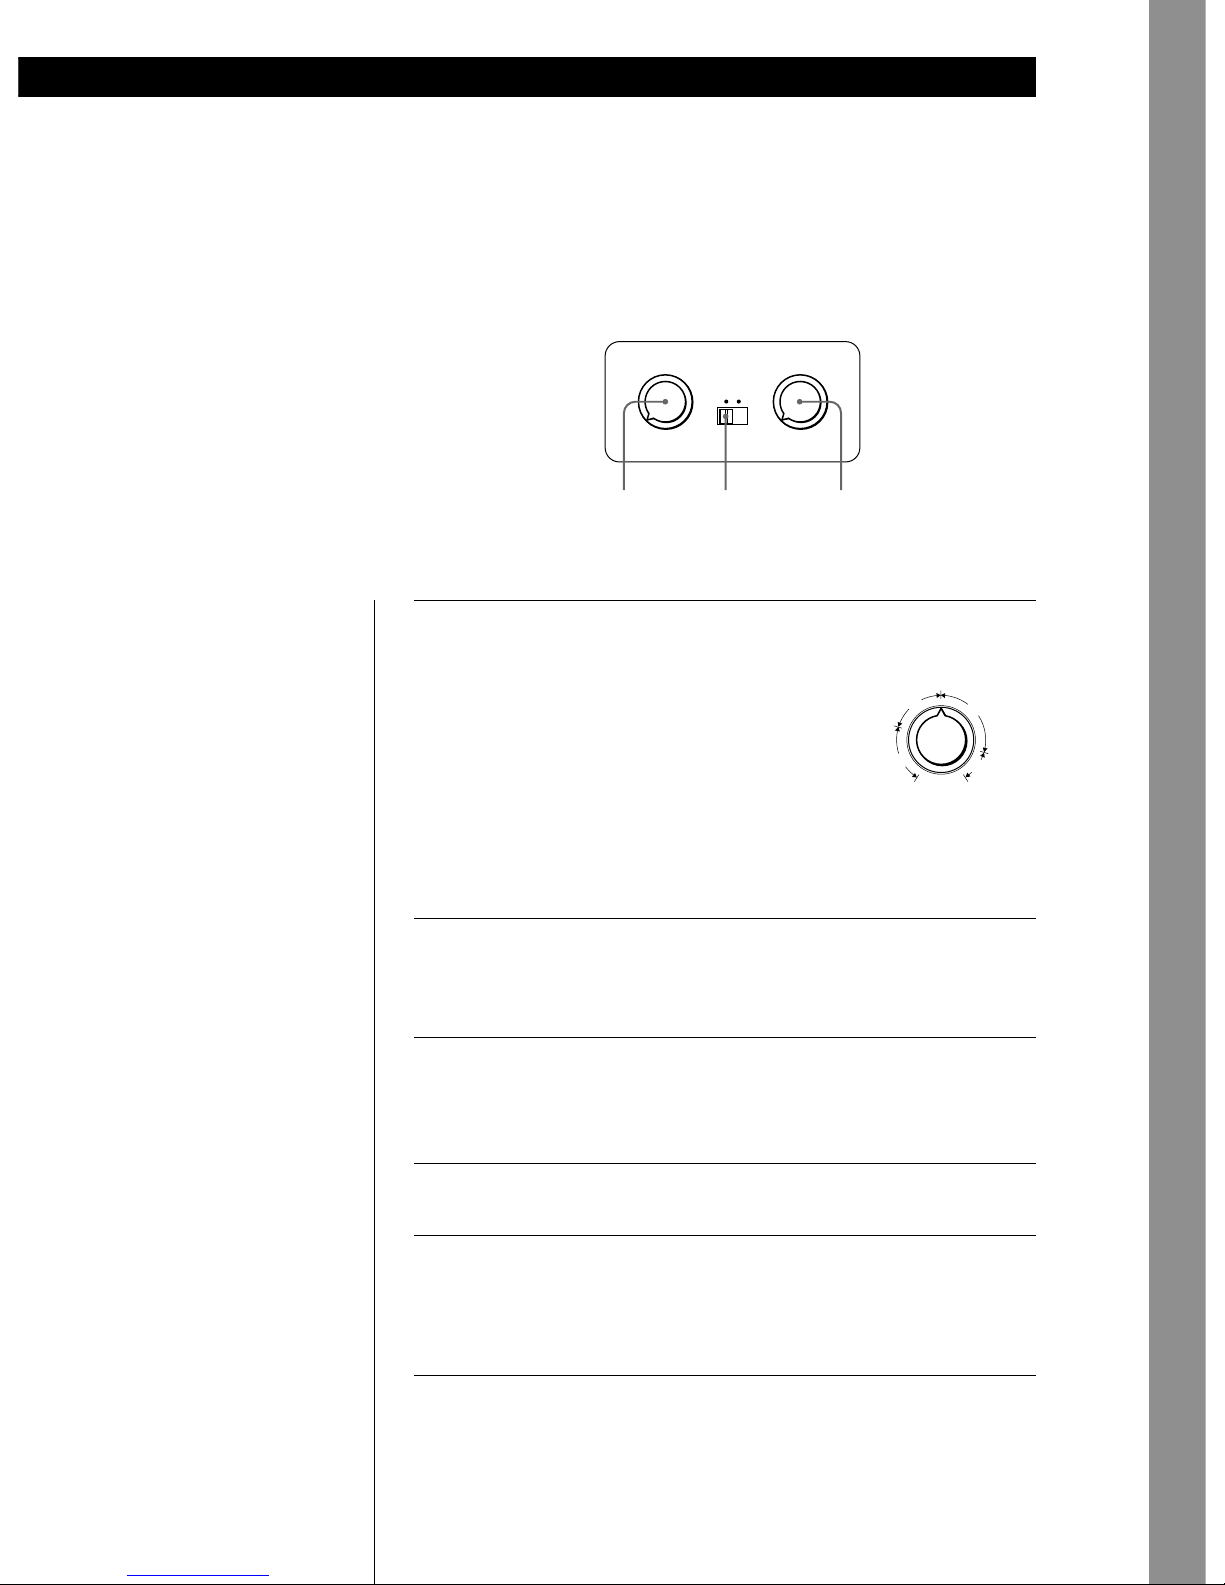
,Turn LEVEL clockwise to turn the volume up.
,Select SPEAKER or LINE with IN PUT selector.
,Reset the level.
The sound has suddenly stopped.
,The speaker cords may have short-circuited.
Connect the cords properly.
The sound is distorted.
,The input signal is imperfect.
,The input signal level is too high.
,Set the CUT OFF FREQ as high as possible
when playing back the Dolby digital (AC-3).
Severe hum or noise is heard.
,Connect the ground wire of the turntable
properly.
,The contacts between the plugs of the
connecting cords and the corresponding jacks
have not been made properly. Connect the
plugs firmly.
,The audio system is picking up some noise
from a TV set. Move the audio system away
from the TV set or turn the TV set off.
Precautions
On safety
•Before operating the woofer, be sure that the operating
voltage of your woofer is identical with that of your local
power supply.
•Unplug the woofer from the wall outlet if it is not to be
used for an extended period of time. To disconnect the
cord, pull the cord by grasping the plug. Never pull the
cord itself.
•Should any liquid or solid object fall into the woofer,
unplug the woofer and have the woofer checked by
qualified personnel before operating it any further.
•AC power cord must be changed only at the qualified
service shop.
When turning on or off an amplifier or other equipment
Lower the volume of the amplifier to minimum.
To avoid damaging the woofer
•Be careful in setting the volume control of the amplifier to
avoid an excessive input power.
•Do not attempt to open the enclosure or remold speaker
units and networks.
In case color irregularity is observed on the nearby TV
screen
With the magnetically shielded type of the speaker system,
the speakers can be installed near a TV set. However, color
irregularity may still be observed on the TV screen
depending on the type of your TV set.
If color irregularity is observed...
tTurn off the TV set once, then turn it on after 15 to 30
minutes.
If color irregularity is observed again...
tPlace the speakers further apart from the TV set.
When howling occurs
Relocate the speaker or turn down the volume of the
amplifier.
On installation
•Do not install the woofer near heat sources such as
radiators or air ducts, or in a place subject to direct
sunlight, excessive dust, mechanical vibration or shock.
•Good ventilation is essential to prevent internal heat
build-up in the woofer. Place the woofer in a location
with adequate air circulation. Do not place the woofer on
a soft surface or too close to a wall as this may obstruct the
ventilation hole on the back.
On cleaning the cabinet
Clean the cabinet with a soft cloth lightly moistened with
water. Do not use any type of abrasive pad, scouring
powder or solvent such as alcohol or benzine.
If you have any questions or problems concerning your
woofer that is not covered in this manual, please
consult your nearest Sony dealer.

Additional Information
11GB
Specifications
System
Type Active Subwoofer (magnetically shielded design)
Speaker unitWoofer: 30 cm dia. (12 in.), cone type
Continuous RMS output
Canadian model (0.8%)
120 W
European model (DIN)
120 W
Other models (0.8%)
100 W
Reproduction frequency range
20 Hz –170 Hz
High frequency cut-off frequency
50 Hz –170 Hz
Phase selector
NORMAL, REVERSE
Inputs
Input jacks LINE IN: input pin jack
SPEAKER IN: input terminals
Output jacksLINE OUT: output pin jack
SPEAKER OUT: output terminals
General
Power requirements
Canadian model
120 V AC, 60 Hz
European model
220 - 230 V AC, 50/60 Hz
Other models
220 - 240 V AC, 50/60 Hz
Power consumption
90 W
Dimensions Approx. 360 x 425 x 430 mm
(w/h/d) (14 1/4x 16 3/4x 17 in.)
Mass 18 kg (36lb 11oz)
Supplied accessories
Audio connecting cord
(1 phono plug –1 phono plug) (1)
Speaker cords (2)
Design and specifications are subject to change without
notice.

2FR
AVERTISSEMENT
Afin d’éviter tout risque
d’incendie ou
d’électrocution, ne pas
exposer cet appareil à la
pluie ou à l’humidité.
Ne pas installer l’appareil dans un
espace confiné, comme dans une
bibliothèque ou un placard mural.
NOTICE POUR LES CLIENTS
AU CANADA
ATTENTION
POUR PREVENIR LES CHOCS
ELECTRIQUES, NE PAS UTILISER
CETTE FICHE POLARISEE AVEC UN
PROLONGATEUR, UNE PRISE DE
COURANT OU UNE AUTRE SORTIE
DE COURANT, SAUF SI LES LAMES
PEUVENT ETRE INSEREES A FOND
SANS EN LAISSER AUCUNE PARTIE
A DECOUVERT.

3FR
FR
TABLE DES MATIÈRES
Préparatifs
Déballage 4
Installation 4
Raccordement du système 5
Fonctionnement de base
Pour écouter le son 8
Réglage du son 9
Informations complémentaires
Précautions 10
Guide de dépannage 10
Spécifications 11
Bienvenue !
Nous vous remercions d’avoir fait
l’acquisition d’un haut-parleur
d’extrêmes-graves active Sony. Avant
de mettre ce caisson en service, veuillez
lire attentivement le mode d’emploi et
le garder pour toute référence future.

Préparatifs
4FR
Déballage
Vérifiez si les éléments suivants se trouvent bien dans
l’emballage:
•Cordon de liaison audio (1)
•Cordons d’enceintes (2)
Installation
Comme l’oreille humaine ne peut pas détecter la
direction ni la position des basses reproduites par un
caisson de grave (en dessous de 170 Hz), vous pouvez
installer le caisson oùvous voulez dans la pièce. Pour
obtenir une meilleure reproduction du grave, il est
toutefois conseilléde l’installer sur un sol ferme, oùla
résonnance est peu probable.
Vous pouvez obtenir suffisamment de grave àpartir
d’un seul caisson. Toutefois, si vous utilisez plusieurs
caissons de grave, les basses seront naturellement plus
puissantes.
Remarques
•Installez toujours le caisson àla verticale et àplusieurs
centimètres du mur.
•Ne pas poser d’objet sur le caisson ni s’asseoir dessus.
•Si le caisson est installéau centre d’une pièce, le son grave
est extrêmement affaibli. Ce phénomème est dûaux ondes
stationnaires de la pièce. Le cas échéant, éloignez le
caisson du centre de la pièce, ou éliminez la cause des
ondes stationnaires, en installant, par exemple, une
étagère.
Préparatifs

Préparatifs
5FR
Raccordement du système
Aperçu
Utilisez les prises LINE IN ou les bornes SPEAKER IN
du caisson quand vous raccordez l’amplificateur.
•Si votre amplificateur comporte l’un des modèles de
prises de sortie suivants, raccordez-la àla prise LINE
IN et la prise de l’amplificateur àl’aide du câble de
connexion audio fourni.
—Prises MONO OUT
—Prise MIX OUT
—Prise(s) de sortie SUBWOOFER
—Prise(s) de sortie SUPER WOOFER
•Si l’amplificateur n’offre aucune des prises de sortie
indiquées, reliez les bornes d’enceintes de
l’amplificateur aux bornes SPEAKER IN.
Avant de commencer
•Eteignez l’amplificateur et le caisson de grave avant de les
relier.
•Utilisez les cordons audio fournis avec les différents
appareils. Si vous n’avez pas assez de cordons pour faire
les liaisons nécessaires, vous devrez acheter des cordons
de liaison audio en option.
•Veillez àinsérer àfond les fiches dans les prises pour
éviter toute source de bruit.
•Branchez le cordon d’alimentation secteur du caisson sur
une prise murale.
•Vous ne pouvez pas relier la prise de sortie CENTER àce
caisson pour utiliser la fonction Dolby Pro Logic.
Le son grave n'est pas fourni par certains modes Dolby
Pro Logic.
(suite)
LINE IN
SPEAKER IN
IN OUT
IN OUT
OFF
AUTO
LINE
L
SPEAKER
POWER SAVE
L
R R

Préparatifs
6FR
Raccordement àun amplificateur avec une
seule paire de bornes d’enceintes
Si votre amplificateur n’a qu’une seule paire de bornes
d’enceintes, raccordez le caisson de grave à
l’amplificateur, puis les enceintes avant au caisson de
grave.
Cordons nécessaires
Cordons d’enceintes (fournis) (1 pour chaque enceinte)
Torsadez l’extrémitédu cordon après l’avoir dénudée sur
15 mm environ.
Veillez àbrancher les cordons d’enceintes sur les bornes
appropriées: + sur + et –sur –. Si les cordons sont inversés,
le son sera déforméet les basses feront défaut.
Il est pratique de toujours prendre, par exemple, le cordon
rayépour la liaison aux bornes négatives (-). Vous ne risquez
pas ainsi de faire de mauvaises liaisons.
Raccordements
1Raccordez le caisson de grave àl’amplificateur.
Raccordez les bornes SPEAKER IN du caisson aux
bornes d’enceintes de l’amplificateur avec les
cordons d’enceintes. Veillez àraccorder les
canaux gauche (L) et droit (R).
l: Sens du signal
2Raccordez les enceintes avant au caisson de grave.
Raccordez les enceintes aux bornes d’enceintes du
caisson de grave.
Raccordement àun amplificateur avec
double paire (A + B) de bornes d’enceintes
Si votre amplificateur a une double paire de bornes
d’enceintes (A + B), raccordez le caisson de grave et les
enceintes avant àl’amplificateur.
Cordons nécessaires
Cordons d’enceintes (fournis) (1 pour chaque enceinte)
Torsadez l’extrémitédu cordon après l’avoir dénudée sur
15 mm environ.
Raccordements
1Raccordez les enceintes avant àl’amplificateur.
Raccordez les enceintes aux bornes d’enceintes de
l’amplificateur (A).
2Raccordez le caisson de grave àl’amplificateur.
Reliez les bornes SPEAKER IN du caisson de
grave aux bornes d’enceintes (B) de
l’amplificateur en utilisant les cordons d’enceintes
fournis.
Quand vous utilisez la double paire de prises (A + B),
veillez àsélectionner la position “A + B”sur
l’amplificateur.
Remarque
Quand vous utilisez les bornes d’enceintes (A) seulement
(enceintes avant seulement) ou quand l’amplificateur est
éteint, réduisez le volume ou éteignez le caisson sinon vous
entendrez un bourdonnement.
Amplificateur
Caisson de grave
Caisson de grave
Amplificateur
Caisson de grave
Amplificateur
IN OUT
L
SPEAKER
L
R R
SPEAKER
IN OUT
L
SPEAKER
L
R R
Enceinte
avant (L)
Enceinte
avant (D)
SPEAKER A
Enceinte
avant (D) Enceinte
avant (L)
IN OUT
L
SPEAKER
L
R R
SPEAKER B

Préparatifs
7FR
Raccordement àun amplificateur doté
d’une prise spéciale pour haut-parleur
d’extrêmes-graves
Si votre amplificateur comporte une prise spéciale pour
haut-parleur d’extrêmes-graves (comme une prise
MONO OUT, MIX OUT, SUBWOOFER ou SUPER
WOOFER), raccordez la prise LINE IN du haut-parleur
àl’une de ces prises.
Cordons nécessaires
Cordon de liaison audio (fourni) (1)
Raccordements
Raccordez la prise MONO OUT de votre amplificateur
àla prise LINE IN du haut-parleur àl’aide du câble de
connexion audio fourni.
Remarque
Si le niveau de sortie de l’amplificateur n'est pas suffisant, le
son peut ne pas être assez puissant. Dans ce cas, reliez les
bornes d’enceintes de l’amplificateur directement aux bornes
SPEAKER IN du caisson.
Si vous utilisez deux haut-parleurs
d’extrêmes-graves ou plus
Raccordement du cordon d’alimentation
secteur
•Branchez le cordon d’alimentation secteur du
caisson de grave et de l’amplificateur sur une prise
murale.
•Assurez-vous que le caisson de grave est hors
tension avant de brancher ou de débrancher un
câble d’alimentation.
Amplificateur Caisson de grave
Amplificateur
Un autre caisson
de grave
MONO OUT
IN OUT
LINE
IN OUT
LINE IN OUT
LINE
MONO OUT
Caisson de
grave

Fonctionnement de base
8FR
Pour écouter le son
1Allumez l’amplificateur et sélectionnez la source de
programme.
2Appuyez sur POWER (?/1).
Le caisson est mis sous tension et l’indicateur POWER s’allume en
vert.
3Reproduisez la source de programme.
Ajustez VOLUME pour que le son des enceintes avant soit sans
distorsion.
Si le son des enceintes avant présente de la distorsion, il en sera de
même du son du caisson de grave.
Remarque
Ne réglez jamais le timbre (BASS,
TREBLE, etc.) de l’amplificateur ou
la sortie de l’égaliseur sur un niveau
élevé. Ne laissez jamais entrer à
niveau élevédes ondes sinusoïdales
de 20 Hz à50 Hz enregistrées sur les
disques d’essai vendus dans le
commerce ou des sons spéciaux (son
grave d’un instrument de musique
électronique, bruit de surface d’une
platine tourne-disque, son avec des
graves excessivement accentués,
etc.), car les enceintes pourraient
être endommagées.
La lecture d’un disque qui contient
des graves excessivement accentués
peut produire des bruits en plus du
son d’origine. Dans ce cas,
diminuez le niveau sonore.
Remarque
Le signal de sortie d'extrême grave
(signal numérique DOLBY (AC-3))
du processeur de son numérique
vendu séparément est réglé10 dB
plus haut par Dolby Laboratories
Licensing Corporation. Pour une
utilisation normale, ajustez le
niveau de l'extrême grave.
Remarque
Si vous baissez de trop le niveau du
volume du haut-parleur, il se peut
que la fonction de mise sous/hors
tension automatique soit activée et
que le haut-parleur passe en mode
d’économie d’énergie.
Mise sous et hors tension automatique —Fonction de mise sous/hors
tension automatique
Si le caisson de grave est sous tension (si l’indicateur POWER s’allume en
vert) et si aucun signal n’est entrépendant environ sept minutes, l’indicateur
POWER devient rouge et le caisson de grave passe en mode d’économie
d’énergie. Si, dans ce mode, un signal est entrésur le haut-parleur, le haut-
parleur se met automatiquement sous tension (fonction de mise sous/hors
tension automatique).
Pour désactiver cette fonction, ramenez le commutateur POWER SAVE du
panneau arrière sur OFF.
POWER (?/1)POWER indicateur
AUTO
OFF
POWER
SAVE
POWER

Fonctionnement de base
9FR
4
32
1
50Hz 170Hz
75Hz 120Hz
150Hz
100Hz
Vous pouvez ajuster le son du caisson de grave pour l’adapter au son des
enceintes avant. L’amplification du grave intensifiera l’ambiance générale.
1Ajustez la fréquence de coupure.
Tournez la commande CUT OFF FREQ en fonction des fréquences
que peuvent reproduire les enceintes avant.
Pour faire le réglage, tenez compte des indications suivantes:
1Haut-parleurs typiques de très petites
dimensions dia. 5 –7 cm
2Haut-parleurs typiques de petites
dimensions dia. 8 –15 cm
3Haut-parleurs typiques de moyennes
dimensions dia. 16 –24 cm
4Haut-parleurs typiques de grandes dimensions
plus de 25 cm
Pour tirer le meilleur parti du convertisseur àbas niveau du Dolby
numérique, élevez au maximum la fréquence de coupure (CUT OFF
FREQ) lorsque vous écoutez des enregistrements en Dolby
numérique (AC-3).
2Réglez le volume du caisson de grave.
Tournez la commande LEVEL de manière àentendre un peu plus le
grave. Pour augmenter le volume, tournez la commande vers la
droite et pour le diminuer, tournez-la vers la gauche.
3Reproduisez un de vos morceaux favoris.
Les voix d’hommes contiennent des sons graves qui permettent
d’effectuer facilement les réglages. Réglez le volume des enceintes
avant au niveau habituel.
4Sélectionnez la polaritéde la phase.
Utilisez le sélecteur PHASE pour sélectionner la polaritéde la phase.
5
Refaites les réglages 1 à4 pour obtenir le son qui vous convient.
Une fois que le caisson de grave a étéajustéselon vos préférences,
utilisez la commande VOLUME sur l’amplificateur pour régler le
volume du caisson de grave et des autres enceintes. Vous n’avez pas
besoin de changer les réglages du caisson lorsque vous réglez le
volume sur l’amplificateur.
Réglage du son
Remarque
Si le son présente de la distorsion
quand le système de renforcement
des graves de votre amplificateur est
en service (DBFB, GROOVE,
égaliseur graphique, etc.) mettez-le
hors service et ajustez le son.
Remarque
N’augmentez pas le volume du
caisson de grave au maximum. Vous
risquez sinon d’atténuer les graves.
De plus, des bruits étrangers
peuvent être audibles.
Remarque
Une inversion de polaritéavec le
sélecteur PHASE (réglage sur
NORMAL ou REVERSE) peut
assurer une meilleure reproduction
du son grave dans certaines
situations d’écoute (en fonction du
type d’enceintes avant, de la
position du caisson de grave et du
réglage de la fréquence de coupure).
Elle peut aussi changer la sensation
d’expansion ou de contraction du
son et modifier le champ sonore.
Sélectionnez le réglage qui donne le
son que vous préférez àvotre
position d’écoute habituelle.
LEVEL CUT OFF FREQPHASE
LEVEL
MIN MAX
CUT OFF FREQ
50Hz
PHASE
170Hz
REVERSENORMAL

Informations complémentaires
10FR
Précautions
Sécurité
•Avant d’utiliser le caisson de grave, vérifiez que sa tension
de fonctionnement est identique àcelle du secteur local.
•Si vous prévoyez de ne pas utiliser le caisson pendant
longtemps, débranchez-le de la prise murale. Pour
débrancher le cordon d’alimentation secteur, tirez sur la
fiche. Ne jamais tirer sur le cordon proprement dit.
•Si un liquide ou un solide tombait dans le coffret,
débranchez le caisson et faites-le contrôler par un
technicien qualifiéavant de le remettre en service.
•Le cordon d’alimentation secteur doit être changépar un
professionnel seulement.
Avant d’allumer ou d’éteindre l’amplificateur ou un autre
appareil
N’oubliez pas de baisser complètement le volume.
Pour éviter d’endommager le caisson de grave
•Réglez avec soin le volume de l’amplificateur pour éviter
toute entrée de son excessive.
•Ne pas essayer d’ouvrir le coffret ou de modifier les haut-
parleurs et les circuits.
Si vous observez des anomalies de couleurs sur l’écran
du téléviseur installéàproximitédu caisson
Normalement les enceintes ont un blindage magnétique et
peuvent être installées près d’un téléviseur, mais il est
possible d’observer des anomalies de couleurs avec certains
types de téléviseur.
Si vous observez des anomalies de couleurs...
tEteignez le téléviseur, puis rallumez-le 15 à30 minutes
plus tard.
S’il n’y a aucun changement...
tEloignez les enceintes du téléviseur.
En cas de rétroaction acoustique
Changez l’emplacement des enceintes ou baissez le volume
de l’amplificateur.
Installation
•Ne pas installer le caisson de grave près d’une source de
chaleur, comme un radiateur ou une bouche d’air chaud,
dans un endroit en plein soleil ou exposéàde la poussière,
des vibrations ou des chocs mécaniques.
•Une bonne ventilation est essentielle pour éviter une
surchauffe interne du caisson. Installez le caisson dans un
endroit oùla circulation d’air est suffisante. Ne pas
l’installer sur une surface molle ou trop près d’un mur
pour ne pas boucher l’orifice de ventilation àl’arrière du
caisson.
Nettoyage du coffret
Nettoyez le coffret avec un chiffon doux légèrement
imprégnéd’eau. Ne pas utiliser de tampons abrasifs, poudre
àrécurer ou diluant, comme l’alcool ou la benzine.
Pour toute question ou problème au sujet du caisson de
grave, veuillez contacter votre revendeur Sony le plus
proche.
Guide de dépannage
Si vous rencontrez une des difficultés suivantes quand
vous utilisez le caisson de grave, lisez le guide de
dépannage pour vous aider àtrouver une solution. Si
vous n’y parvenez pas, adressez-vous àvotre
revendeur Sony le plus proche.
Aucun son
,Vérifiez si le caisson de grave et les différents
éléments sont raccordés comme il faut.
,Tournez la commande LEVEL dans le sens des
aiguilles d’une montre pour augmenter le
volume.
,Sélectionnez SPEAKER ou LINE avec le
sélecteur INPUT.
,Réajustez le niveau.
Le son s’est soudainement arrêté.
,Il y a peut-être eu un court-circuit au niveau
des cordons d’enceintes. Raccordez-les
correctement.
Le son présente de la distorsion.
,Le signal d’entrée n’est pas parfait.
,Le niveau du signal d’entrée est trop élevé.
,Réglez CUT OFF FREQ le plus possible lorsque
vous écoutez des enregistrements en Dolby
numérique (AC-3).
Bourdonnement ou bruit important.
,Raccordez le fil de masse du tourne-disque
correctement.
,Le contact entre les fiches des cordons de
liaison et les prises correspondantes est
mauvais. Insérez les fiches àfond.
,La chaîne audio capte le bruit d’un téléviseur.
Eloignez la chaîne audio du téléviseur ou
éteignez le téléviseur.
Other manuals for SA-WM40
5
Table of contents
Languages:
Other Sony Subwoofer manuals

Sony
Sony SA-WMS525 User manual

Sony
Sony SA-W551 User manual

Sony
Sony XS-L123P5B Marketing User manual

Sony
Sony SA-WSLF1 User manual

Sony
Sony XS-GSW121 User manual

Sony
Sony SAW2500 - SA Subwoofer User manual

Sony
Sony XS-GTX121LS User manual

Sony
Sony SA-WMS145 User manual

Sony
Sony XS-GTR101L User manual

Sony
Sony XS-GS80L User manual

Sony
Sony XS-L1535 User manual

Sony
Sony XS-L1040F - Subwoofer User manual

Sony
Sony XS-GTX120LW Marketing User manual

Sony
Sony SA-WD200 User manual

Sony
Sony SA-W305 User manual

Sony
Sony SA-WM500 User manual

Sony
Sony SA-WX900 User manual

Sony
Sony XS-L1000B Product guide

Sony
Sony SA-W441 User manual

Sony
Sony SA-WCT800 User manual