Soozier 9800 User manual

40
47
10
9800 USER MANUAL
Read all instructions carefully before using this product. Retain this owner’manual for
future reference
Product may vary slightly from the item pictured due to model upgrades

TABLE OF CONTENTS
1. IMPORTANT SAFETY INSTRUCTIONS 1
2. EXPLODED DIAGRAM 3
3. PARTS LIST 4
4. ASSEMBLY INSTRUCTION 5
5. ADJUSTMENT INSTRUCTIONS 10
6. COMPUTER OPERATION 11
7.EXERCISE GUIDE 12
31
33
34
41 39
7
32
10
8
5
15
23
21
26
11
25 35
117
16
20
37
38
2
18
19
12
26
22
24
13
27
28
9
40
4
325
25
25
32
33
34
34
34
36
35
35
36
37
38
44 36
35
3
34
1
34
1
35
36
2
21
22
23
24
5
28
1
9
27
43
6
10
1
31
10
41
7
40
39
4

1. IMPORTANT SAFETY INSTRUCTIONS
WARNING - Read all instructions before using this machine.
It is important your machine receives regular maintenance to prolong its useful life. Failing to
regularly maintain your machine may void your warranty.
Please keep this manual with you at all times
a. It is important to read this entire manual before assembling and using the equipment. Safe and effective
use can only be achieved if the equipment is assembled, maintained and used properly.
Please note: It is your responsibility to ensure that all users of the equipment are informed of all
warnings and precautions.
b. Before starting any exercise program you should consult your doctor to determine if you have any
medical or physical conditions that could put your health and safety at risk, or prevent you from using
the equipment properly. Your doctor’s advice is essential if you are taking medication that affects your
heart rate, blood pressure or cholesterol level.
c. Be aware of your body’s signals. Incorrect or excessive exercise can damage your health. Stop
exercising if you experience any of the following symptoms: pain, tightness in your chest, irregular
heartbeat, and extreme shortness of breath, lightheadedness, dizziness or feelings of nausea. If you do
experience any of these symptoms, you should consult your doctor before continuing with your exercise
program.
d. Keep children and pets away from the equipment. This equipment is designed for adult use only.
e. Use the equipment on a solid, flat level surface with a protective cover for your floor or carpet. To
ensure safety, the equipment should have at least 0.5 meters of free space all around it.
f. Before using the equipment, check that the nuts and bolts are securely tightened. If you hear any
unusual noises coming from the equipment during use and assemble, stop immediately. Do not use the
equipment until the problem has been rectified.
1
31
33
34
41 39
7
32
10
8
5
15
23
21
26
11
25 35
117
16
20
37
38
2
18
19
12
26
22
24
13
27
28
9
40
4
325
25
25
32
33
34
34
34
36
35
35
36
37
38
44 36
35
3
34
1
34
1
35
36
2
21
22
23
24
5
28
1
9
27
43
6
10
1
31
10
41
7
40
39
4

g. Wear suitable clothing while using the equipment. Avoid wearing loose clothing that may get caught in
the equipment or that may restrict or prevent movement.
h. This equipment is designed for indoor and family use only.
i. Care must be taken when lifting or moving the equipment so as not to injure your back.
j. Always keep this instruction manual and assembly tools at hand for quick reference.
k. The equipment is not suitable for therapeutic use.
l. There are many functions of the computer, which value will show when using the equipment according
the amount of exercise, here warmly remind you that the value of heart pulse just give you some
reference.
2
31
33
34
41 39
7
32
10
8
5
15
23
21
26
11
25 35
117
16
20
37
38
2
18
19
12
26
22
24
13
27
28
9
40
4
325
25
25
32
33
34
34
34
36
35
35
36
37
38
44 36
35
3
34
1
34
1
35
36
2
21
22
23
24
5
28
1
9
27
43
6
10
1
31
10
41
7
40
39
4
3
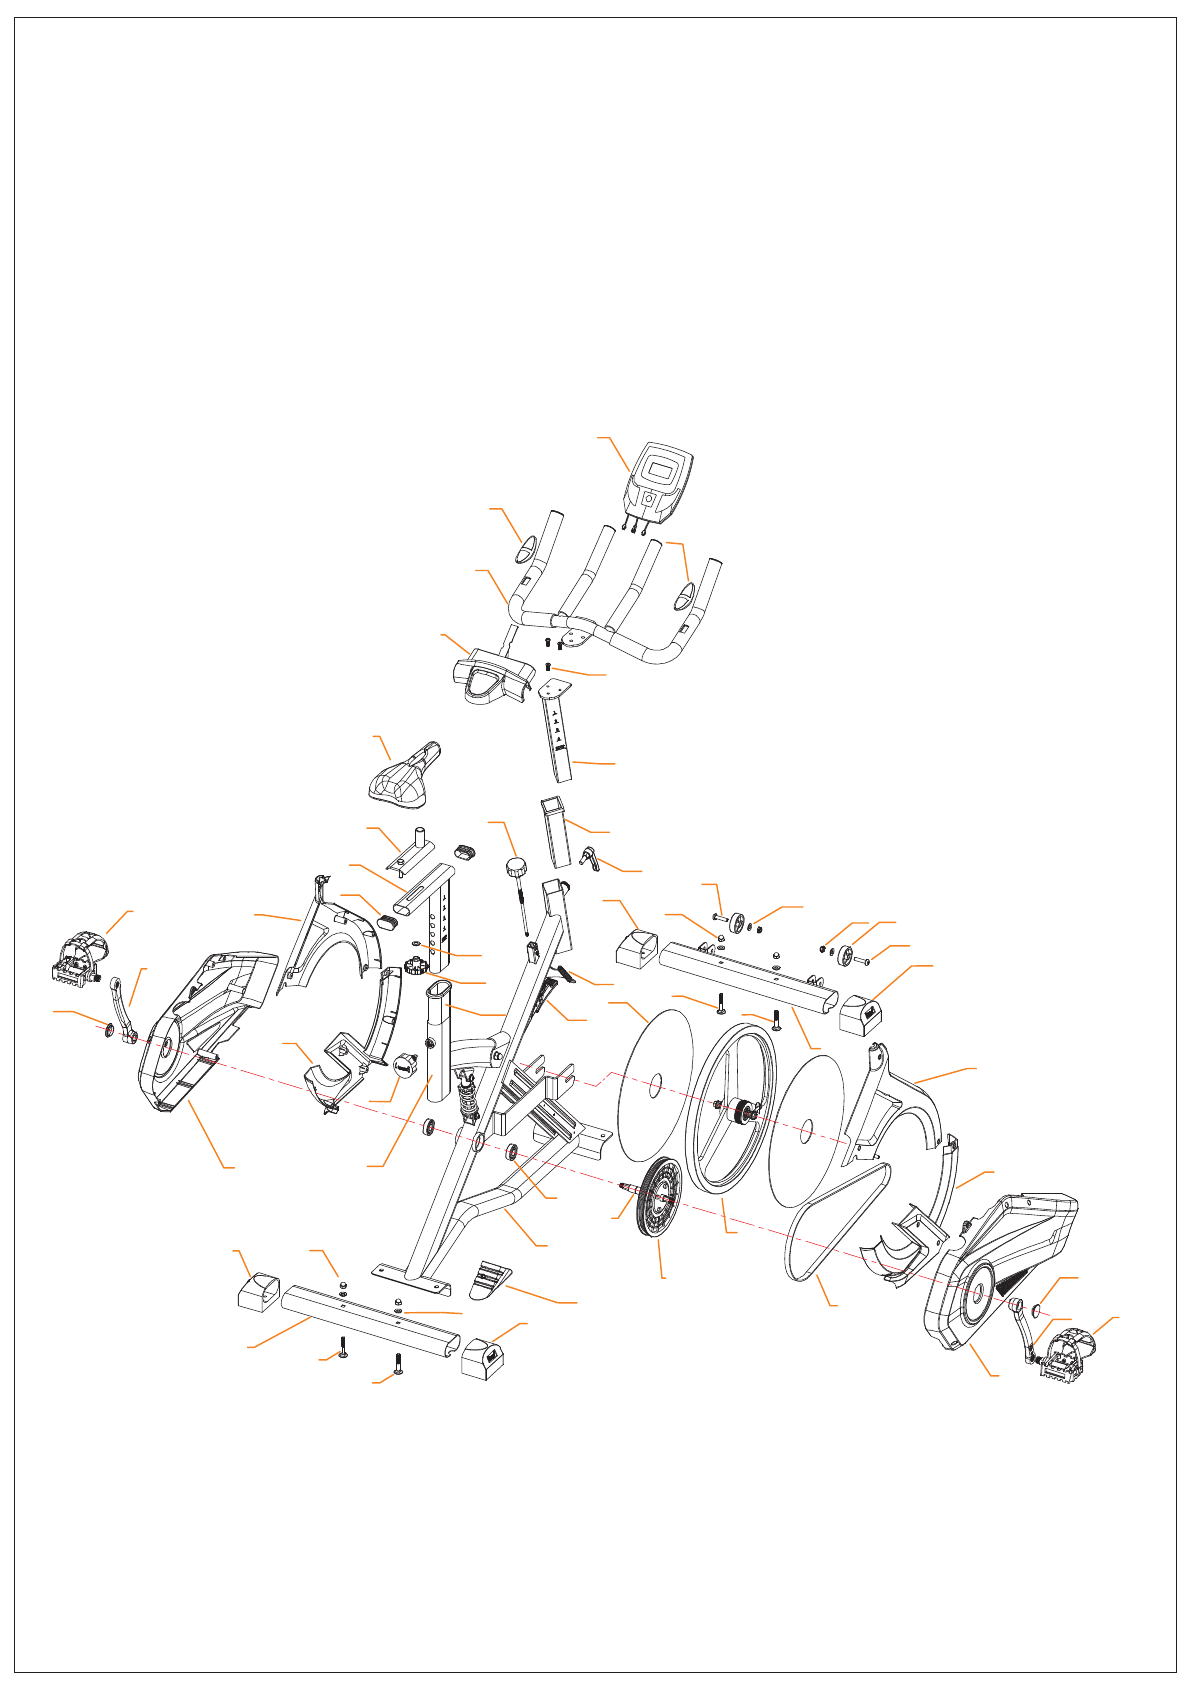
2. EXPLODED DIAGRAM
2
4
5
6
8
9
10
13
14
16
20
21
23
24
25
25
25
25
27
28
29
30
31
32
32
34
35
36
36
37
37
35
41
46
11
15
12
19
18
17
1
3
22
26
26
33
34
34
34
38
39
40
7
43
42
45
44
47
48
40
47
10

23 21
24
22
40
47
10
36
35
35
3
36
34
34
1
1
2
1
28
27
48
8
9
5
3. PARTS LIST
4
11
21
31
41
51
61
71
81
91
10 1
11 1
12 1
13 1
14 1
15 1
16 1
17 1
18 1
19 1
20 1
21 1
1
1
1
24
23
22
NO.
PARTS QTY
MAIN FRAME
FRONT STABILIZER
REAR STABILIZER
SEAT
SEAT POST
HANDLEBAR POST
HANDLEBAR
SEAT SLIDDER
SEAT
PHONE CASE
LEFT COVER
RIGHT COVER
LEFT FENDER
RIGHT FENDER
LEFT SHROUD COVER
RIGHT SHROUD COVER
BELT AXLE
BELT PULLEY
BELT
FLYWHEEL
LEFT CRANK
RIGHE CRANK
LEFT PEDAL
RIGHT PEDAL
4
2
1
1
1
1
1
2
2
4
4
4
2
4
1
1
3
1
41
42
40
39
38
37
36
34
33
32
31
30
29
28
27
26
25
35
M8 45 HALF
THREAD SCREW
-
43
44
45
46 2
1
1
2
NO.
PARTS QTY
40 80 OVAL STRAP-
CRANK PLUG
OCTAGONAL KNOB
KNOB
REAR ORNATE COVER
BRAKE POD
7 KNOB-
PULSE SENSOR
MOVE WHEEL
M8 53 CARRIGE BOLT-
D8 GASKET
M8 SCREW
M8 LOCK NUT
FIVE WAY BEARING
MONITOR
M8 SCREW
BRAKE WOOL FELT
FLYWHEEL PENAL
45 38 SQUARE SLEEVE-
40 80 OVAL SLEEVE-
25 50 OVAL SLEEVE-
LEFT PEDAL
47 1
GASKET
48 1
1
41
10 7
31
6
23 21
24
22
40
47
10
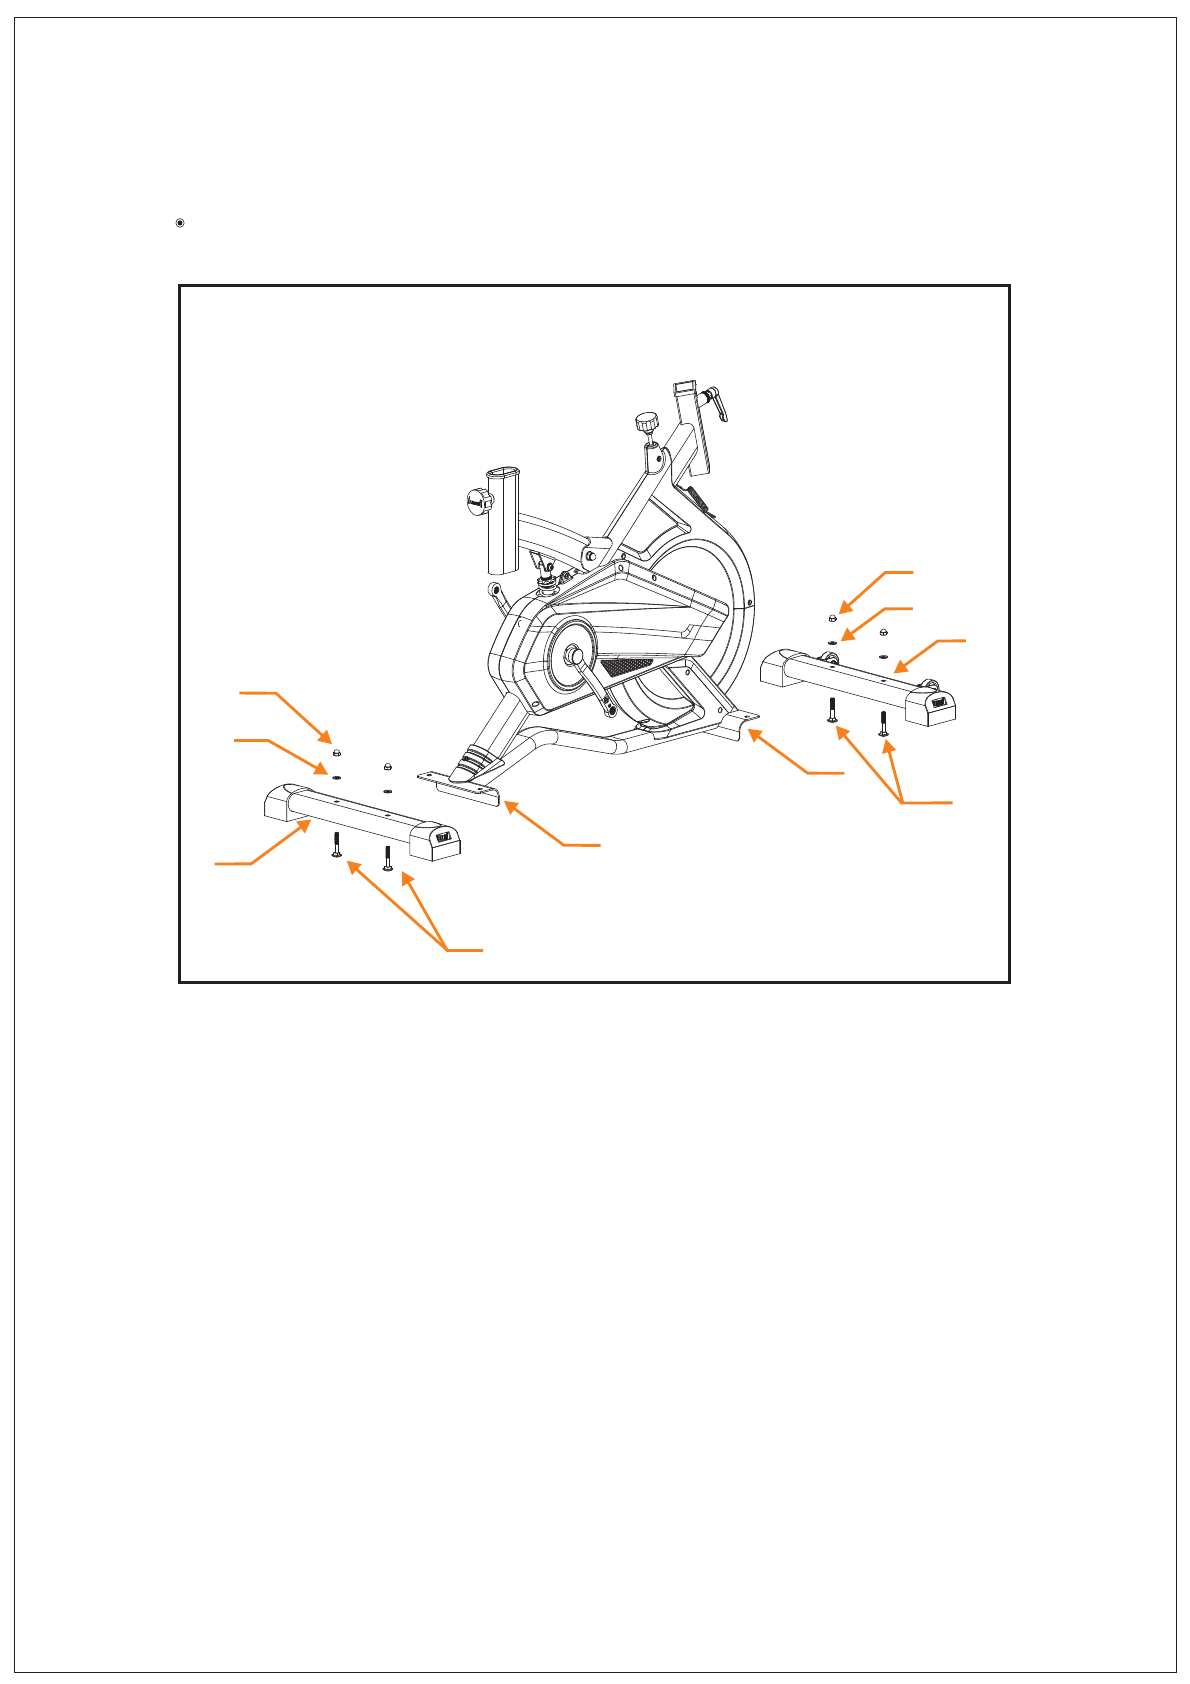
STEP 1:
4. ASSEMBLY INSTRUCTIONS
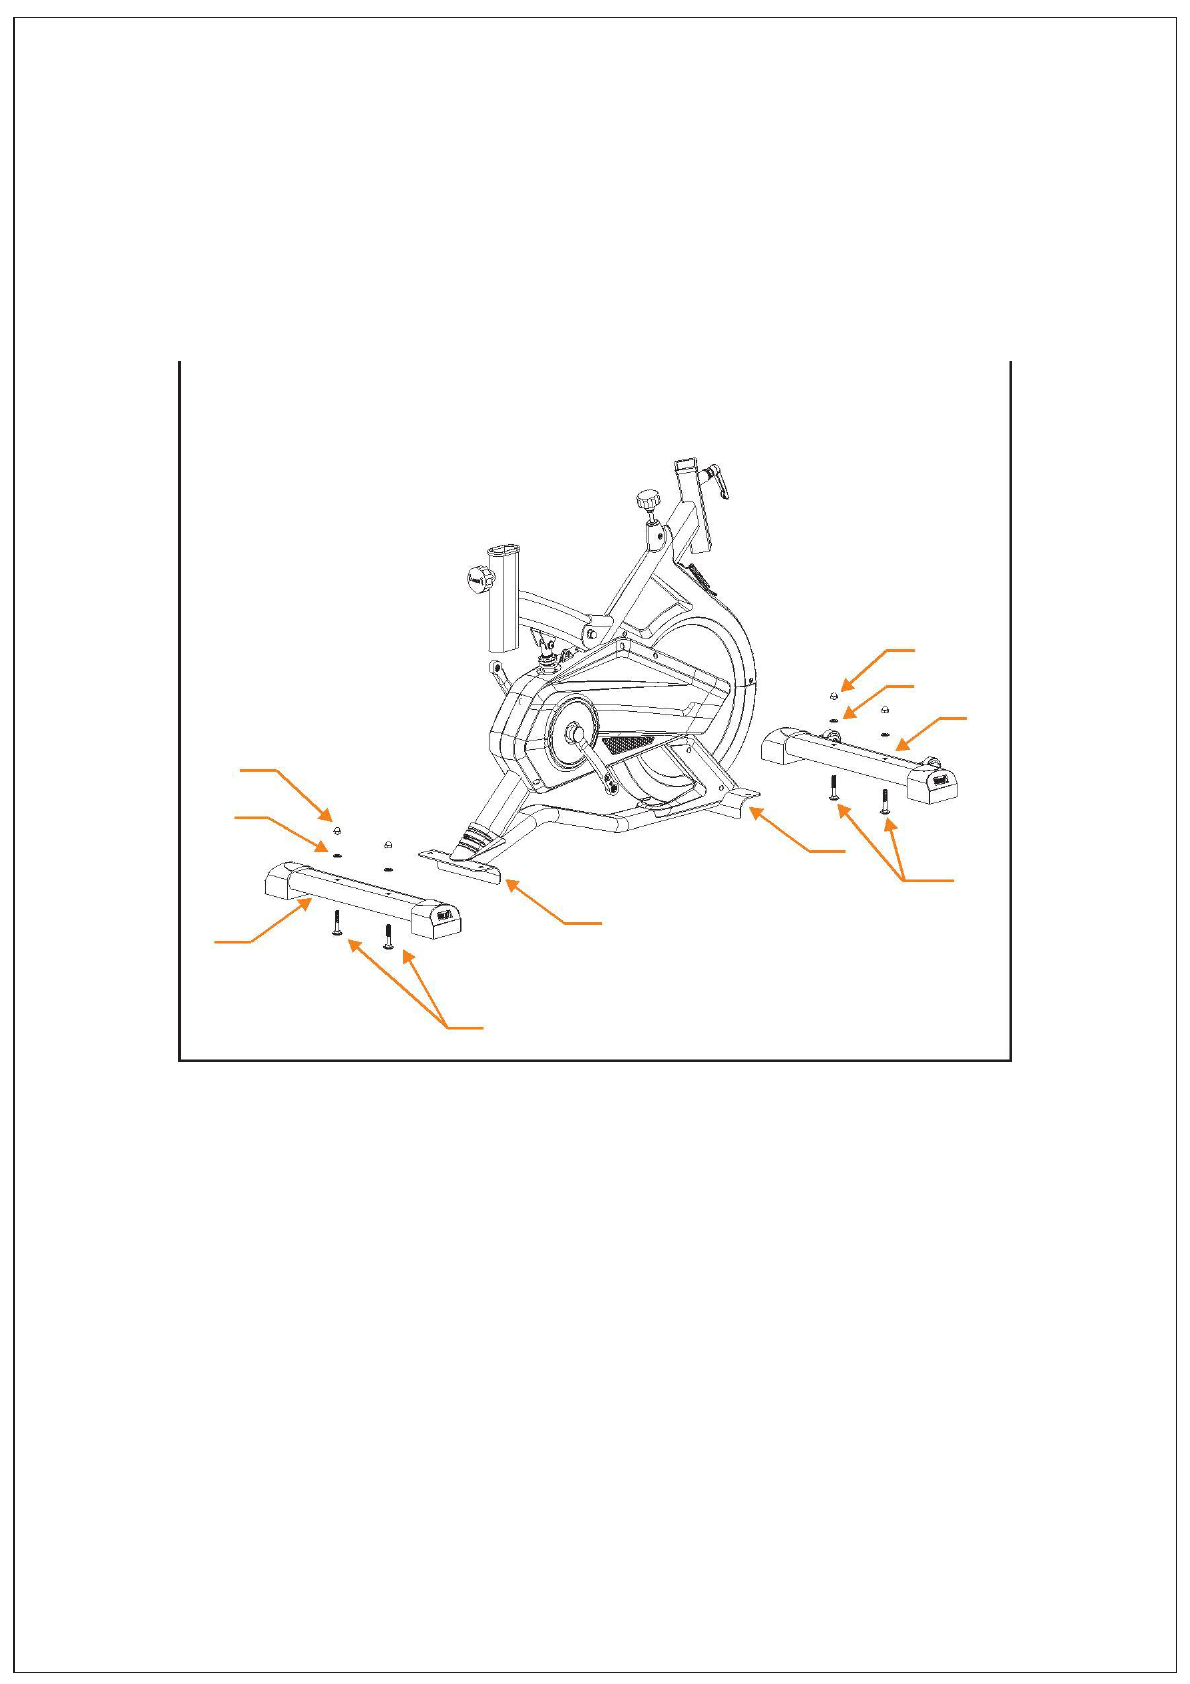
AS THE PICTURE SHOW INSERT THE 4 CARRIGE SCREW 34 TO FRONT AND REAR
STABILIZER TOGETHER WITH THE FRAM 2 3 PUT THE GASKET IN IT 35
AND FIX IT WITH NUT BOLT 36
,()
,(/).(),
().
5
36
35
35
3
36
34
34
1
1
2
1
28
27
48
8
9
5
1
41
10 7
31
6
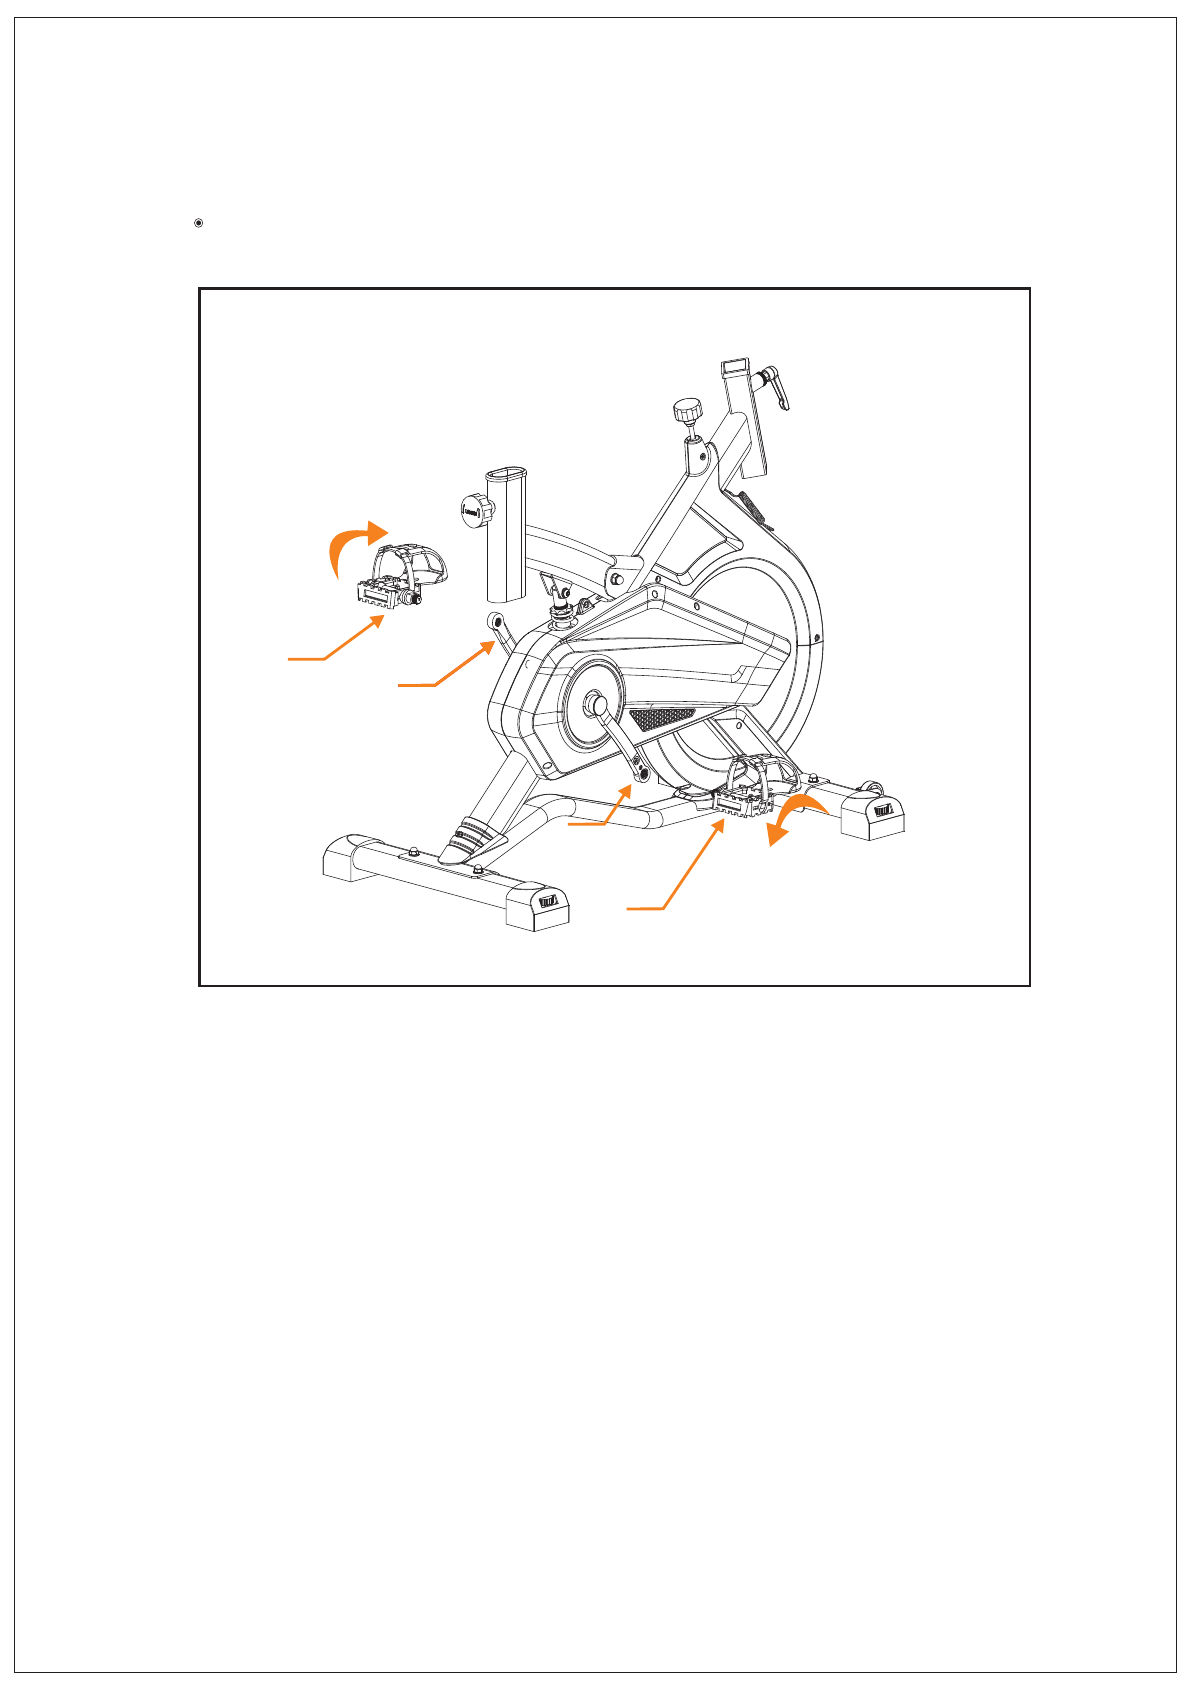
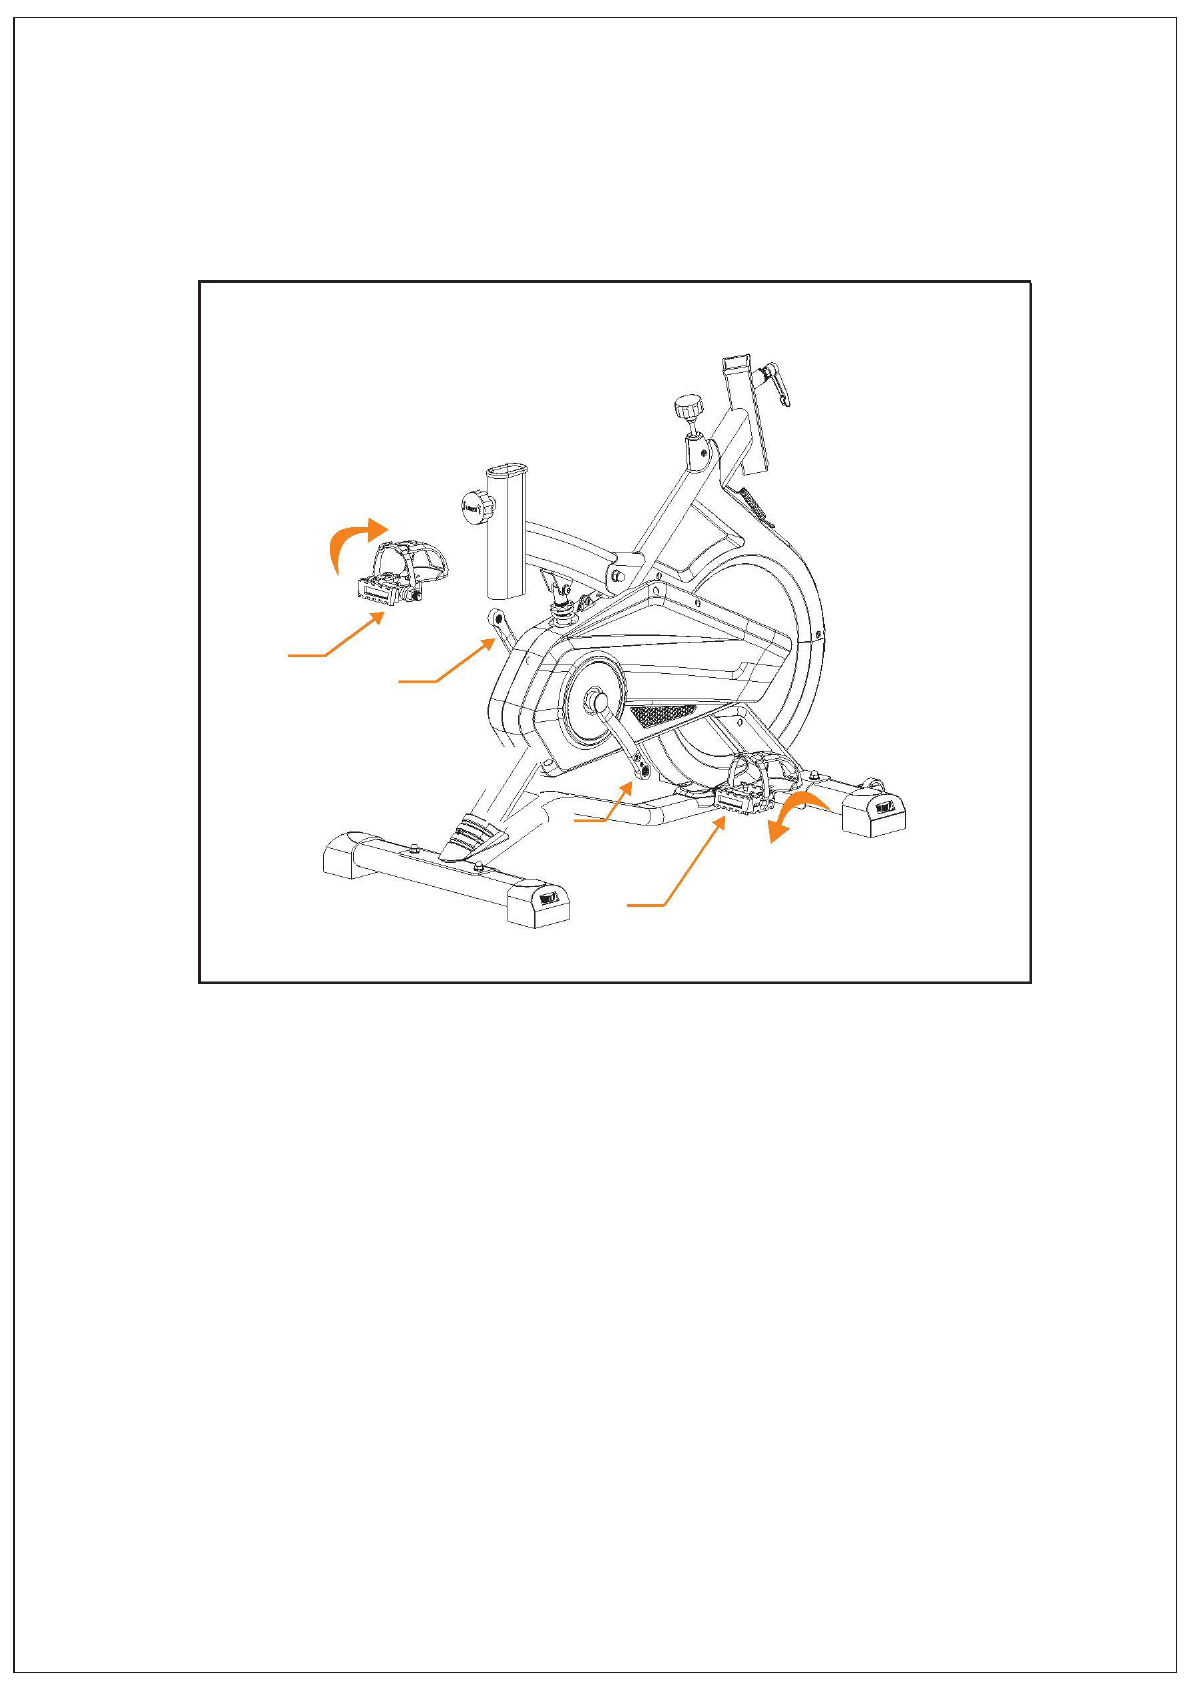
SCREW THE RIGHT AND LEFT PEDAL 23 24 TO THE LEFT AND RIGHTCRANK
21 22 SCREW 4 5 CIRCLES BY HAND THEN FASTEN IT WITH THE WRENCH
(/)
(/). - , .
STEP 2:
6
23 21
24
22
40
47
10
36
35
35
3
36
34
34
1
1
2
1
28
27
48
8
9
5
1
41
10 7
31
6
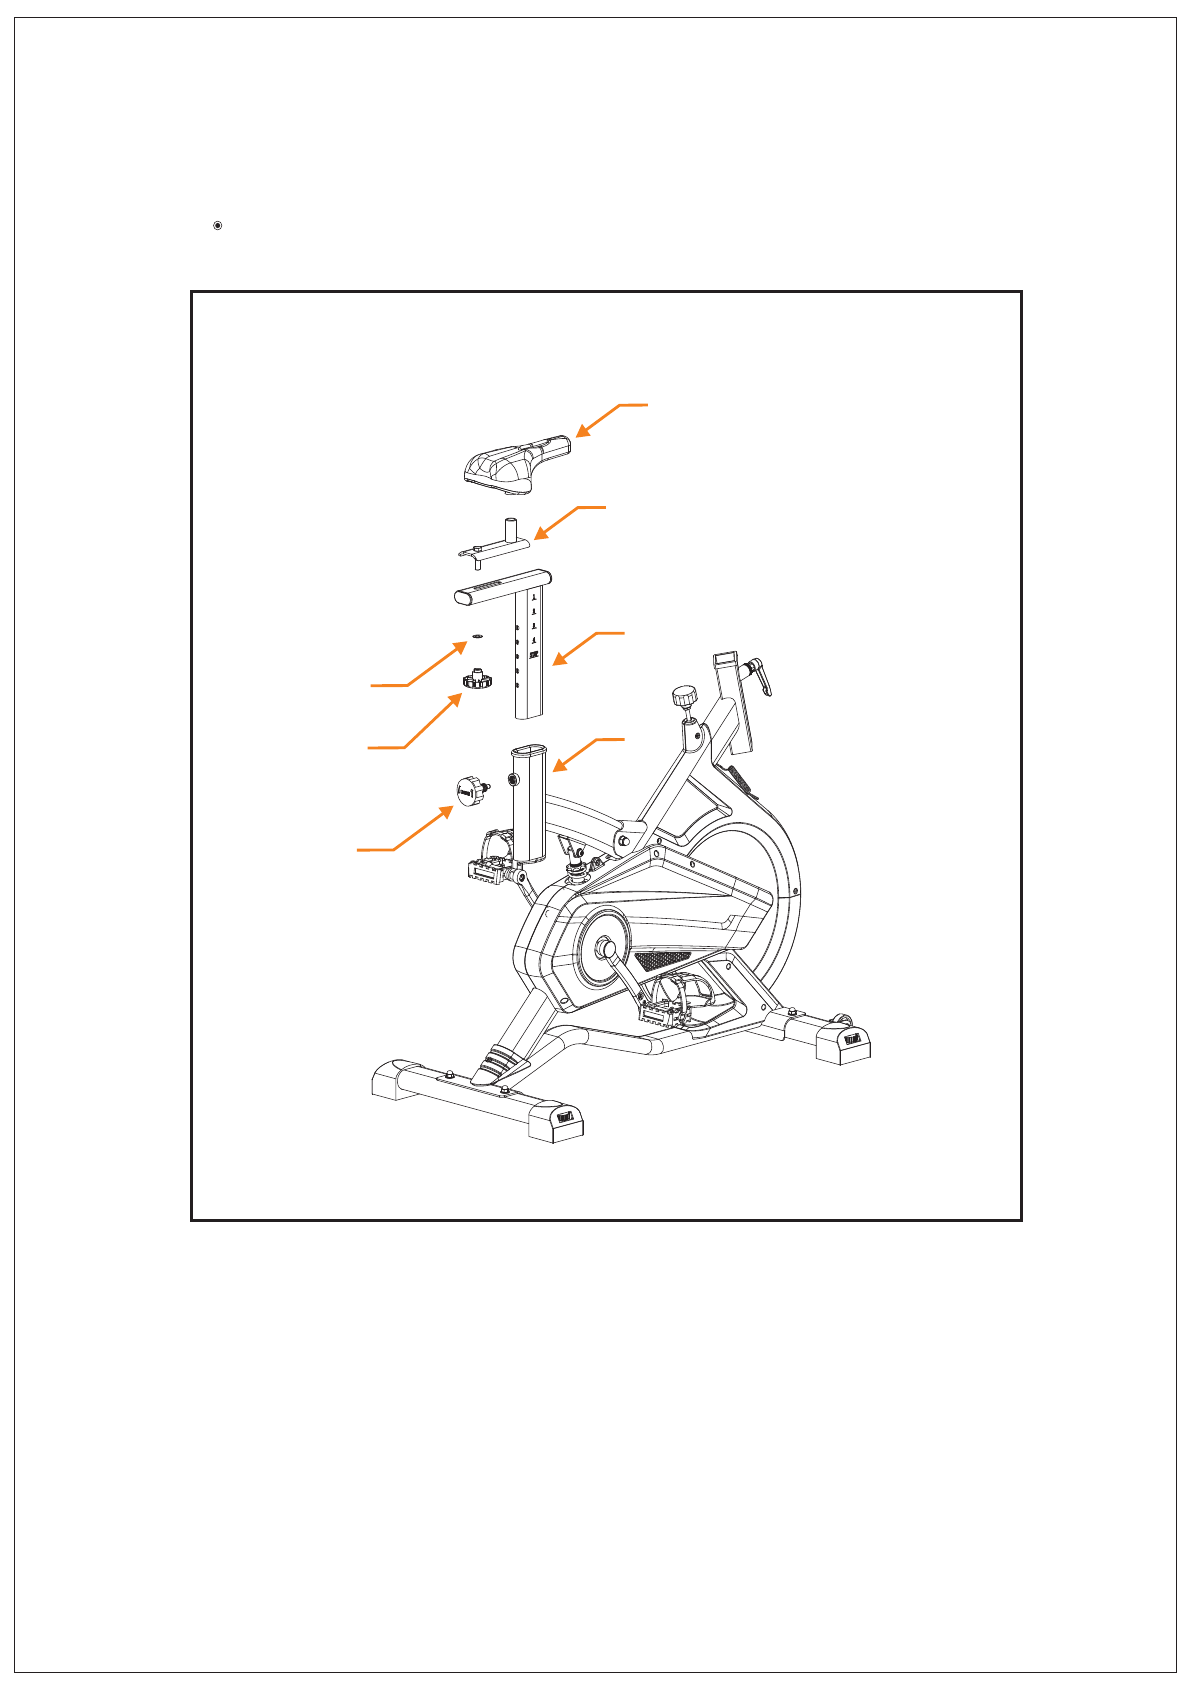
AS THE PICTURE SHOWS, FIX THE HANDLEBAR (7) WITH 2 SCREWS ( 41) TO
THE HANDLEBAR POST (6). THEN INSERT IT TO THE MAIN FRAME (1), USE
THE 7-KNOB (31) FIX TIGHTLY. PUT THE PHONE CAGE (10), PRESS IT DOWN
TO THE HANDLEBAR.
STEP 3:
7
1
28
27
48
8
9
5

23 21
24
22
40
47
10
36
35
35
3
36
34
34
1
1
2
1
28
27
48
8
9
5
AS THE PICTURE SHOWS, FIX THE HANDLEBAR (7) WITH 2 SCREWS ( 41) TO
THE HANDLEBAR POST (6). THEN INSERT IT TO THE MAIN FRAME (1), USE
THE 7-KNOB (31) FIX TIGHTLY.PUT THE PHONE CAGE (10), PRESS IT DOWN
TO THE HANDLEBAR.
STEP 4:
8
1
41
10 7
31
6
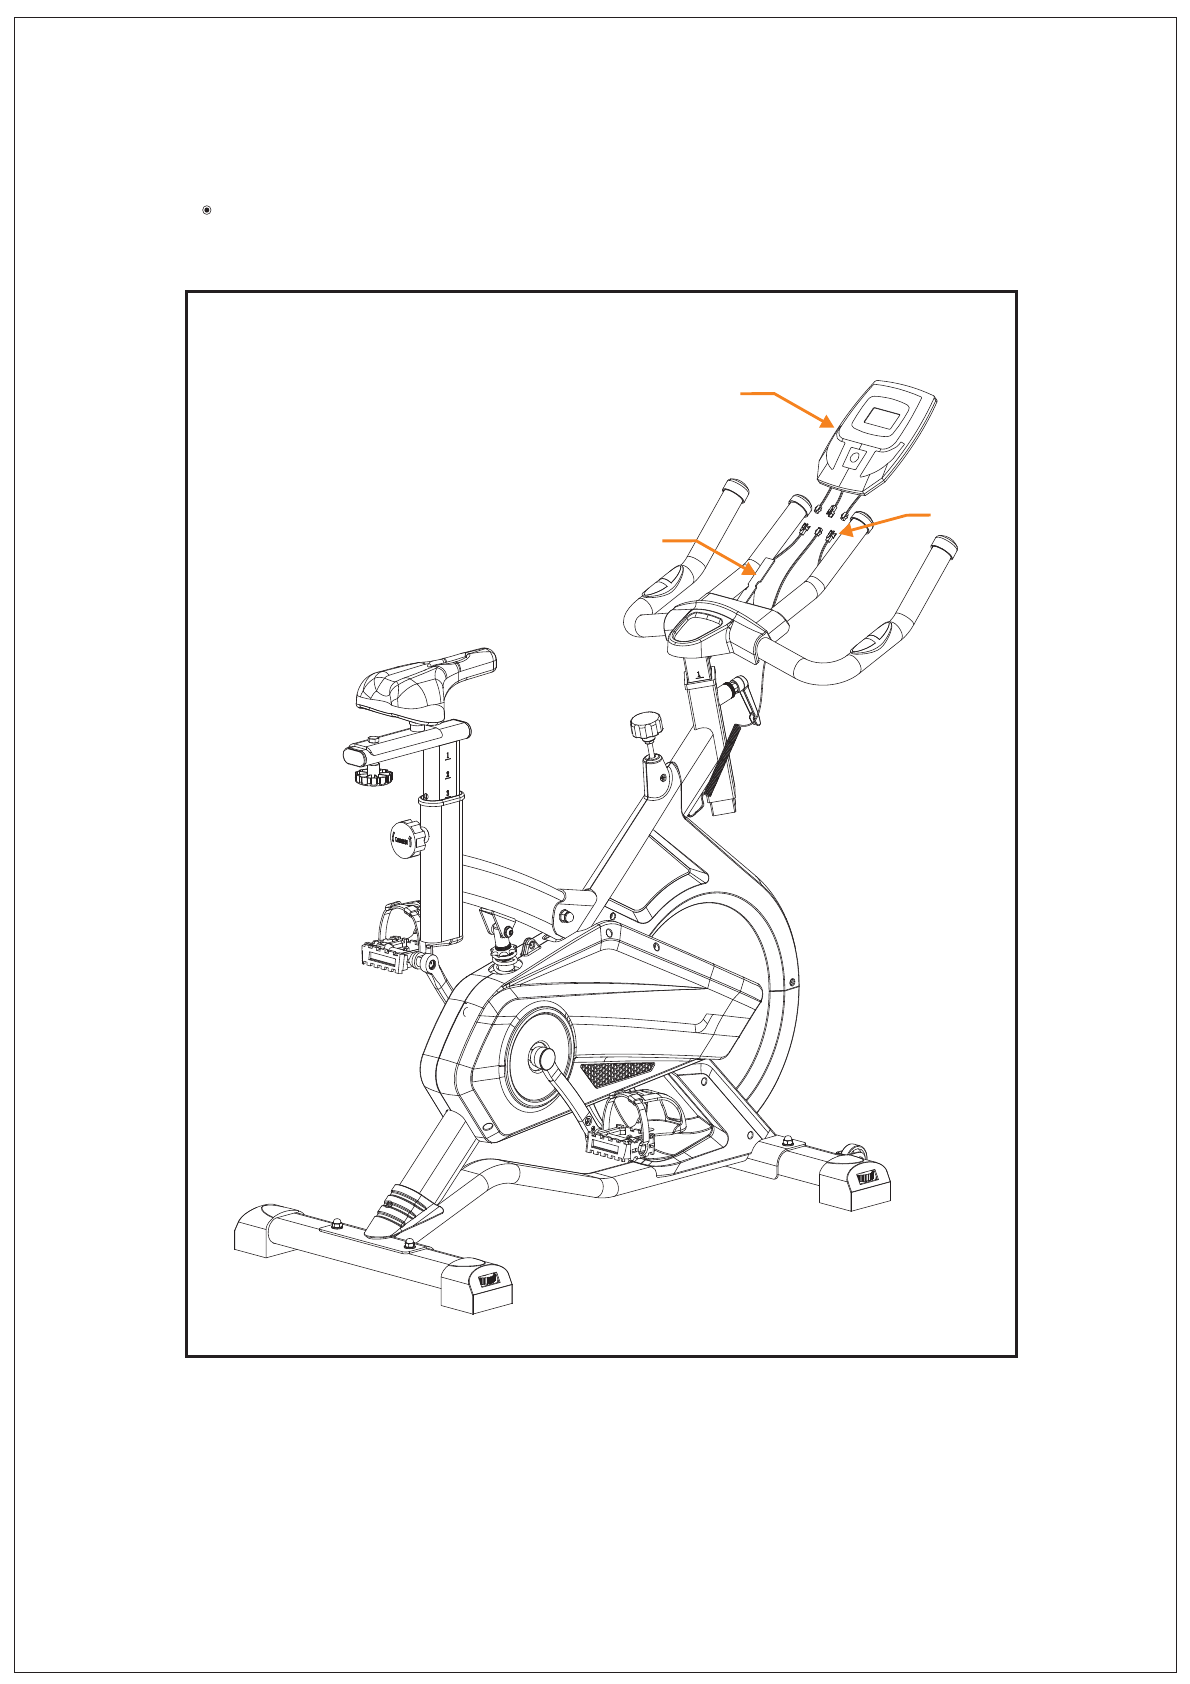
INSERT THE MONITOR (40) TO THE PHONE CAGE (10). JOIN THE SENSOR WIRES
(47).PLEASE NOTE BEFORE DOING EXERCISE, PLEASE MAKE SURE PRODUCT
IS GOOD.
STEP 5:
9
40
47
10

31
33
34
41 39
7
32
10
8
5
15
23
21
26
11
25
35
1
17
16
20
37
38
2
18
19
12
26
22
24
13
27
28
9
40
4
3
25
25
25
32
33
34
34
34
36
35
35
36
37
38
44
36
35
3
34
1
34
1
35
36
2
21
22
23
24
5
28
1
9
27
43
6
10
1
31
10
41
7
40
39
4
10
5. ADJUSTMENT INSTRUCTIONS
To adjust the seat height, slacken the spring knob on the vertical post stem on the main frame and
pullback the knob. Position the vertical seat post for the desired height so that holes are aligned,
then releasethe knob and retighten it.
To move the seat forward in the direction of the handlebar or backwards away from it, loosen the
adjusting knob and washer and pull the knob back. Slide horizontal seat post into desired position.
Align holes and then retighten the adjusting knob.
To adjust the handlebar height, slacken the spring knob and secondary knob and pull both knobs
back. Slide the handlebar post along the housing on the main frame to the desired height and,
with the holes aligned correctly, tighten the spring adjusting knob and then the secondary knob.
Vertical Seat Adjustment
Horizontal Seat Adjustment
Handlebar Height

11
6. COMPUTER OPERATION
: Selects function to preset. Pressing this button will cycle through the below modes respectively:
TIME-SPEED-DISTANCE-ODOMETER-CALORIE-PULSE
Holding this button down for 4 second will reset all function values to zero
: when the symbol ►” points to SCAN, The monitor will display the functions listed below. Each
function will remain on the screen for 4 seconds. The following modes will automatically cycle
throughrespectively:
TIME -DISTANCE- ODOMETER -CALORIE-PULSE
when the symbol ►” points to TIME. The monitor will display total workout time on the bottom
of the screen.
when the symbol ►”points to SPEED, The monitor will display the current speed on the top
area of the screen.
when the symbol ◄” points to DIST. The monitor will accumulate the total workout
distance on the bottom of the screen.
when the symbol ◄” points to ODO. The display shows the Odometer on thebottom of
the screen. The reading of the Odometer will be reset to zero after replacing the batteries.
when the symbol “ ◄” points to CAL. The monitor will accumulate the caloric consumption,
and display on the bottom area of the screen.
Press MODE button to select the pulse function, the monitor will display your current heart rate in
beats perminute.
1. If the machine is idle for over 4 minutes, the LCD will turn off automatically. All function values will be
saved. Simply press any key or start using the machine, the LCD will automatically turn back on.
2. If the monitor fails to display properly, please re-install the batteries
3. BATTERY SPEC: 1.5V AAA(2PCS)
KEY GUIDE
FUNCTION
PULSE FUNCTION (if have)
NOTE
MODE
SCAN
TIME:
SPEED:
DISTANCE:
ODOMETER:
CALORIE:
“
“
“
“
“
“
31
33
34
41 39
7
32
10
8
5
15
23
21
26
11
25
35
1
17
16
20
37
38
2
18
19
12
26
22
24
13
27
28
9
40
4
3
25
25
25
32
33
34
34
34
36
35
35
36
37
38
44
36
35
3
34
1
34
1
35
36
2
21
22
23
24
5
28
1
9
27
43
6
10
1
31
10
41
7
40
39
4
12
7. EXERCISE GUIDE
PLEASE NOTE: Before beginning any exercise program, consult your physician. This is important
especially if you are over the age of 45 or individuals with pre-existing health problems.
The pulse sensors are not medical devices. Various factors, including the user’s movement, may
affect the accuracy of heart rate readings. The pulse sensors are intended only as an exercise aid in
determining heart rate trends in general.
Exercising is great way to control your weight, improving your fitness and reduce the effect of aging
and stress. The key to success is to make exercise a regular and enjoyable part of your everyday life.
The condition of your heart and lungs and how efficient they are in delivering oxygen via your blood
to your muscles is an important factor to your fitness. Your muscles use this oxygen to provideenough
energy fordaily activity. This is called aerobic activity. When you are fit, your heart will not have to
work so hard. It willpump a lot fewer times per minute, reducing the wear and tear of your heart.
So as you can see, the fitter you are, the healthier and greater you will feel.
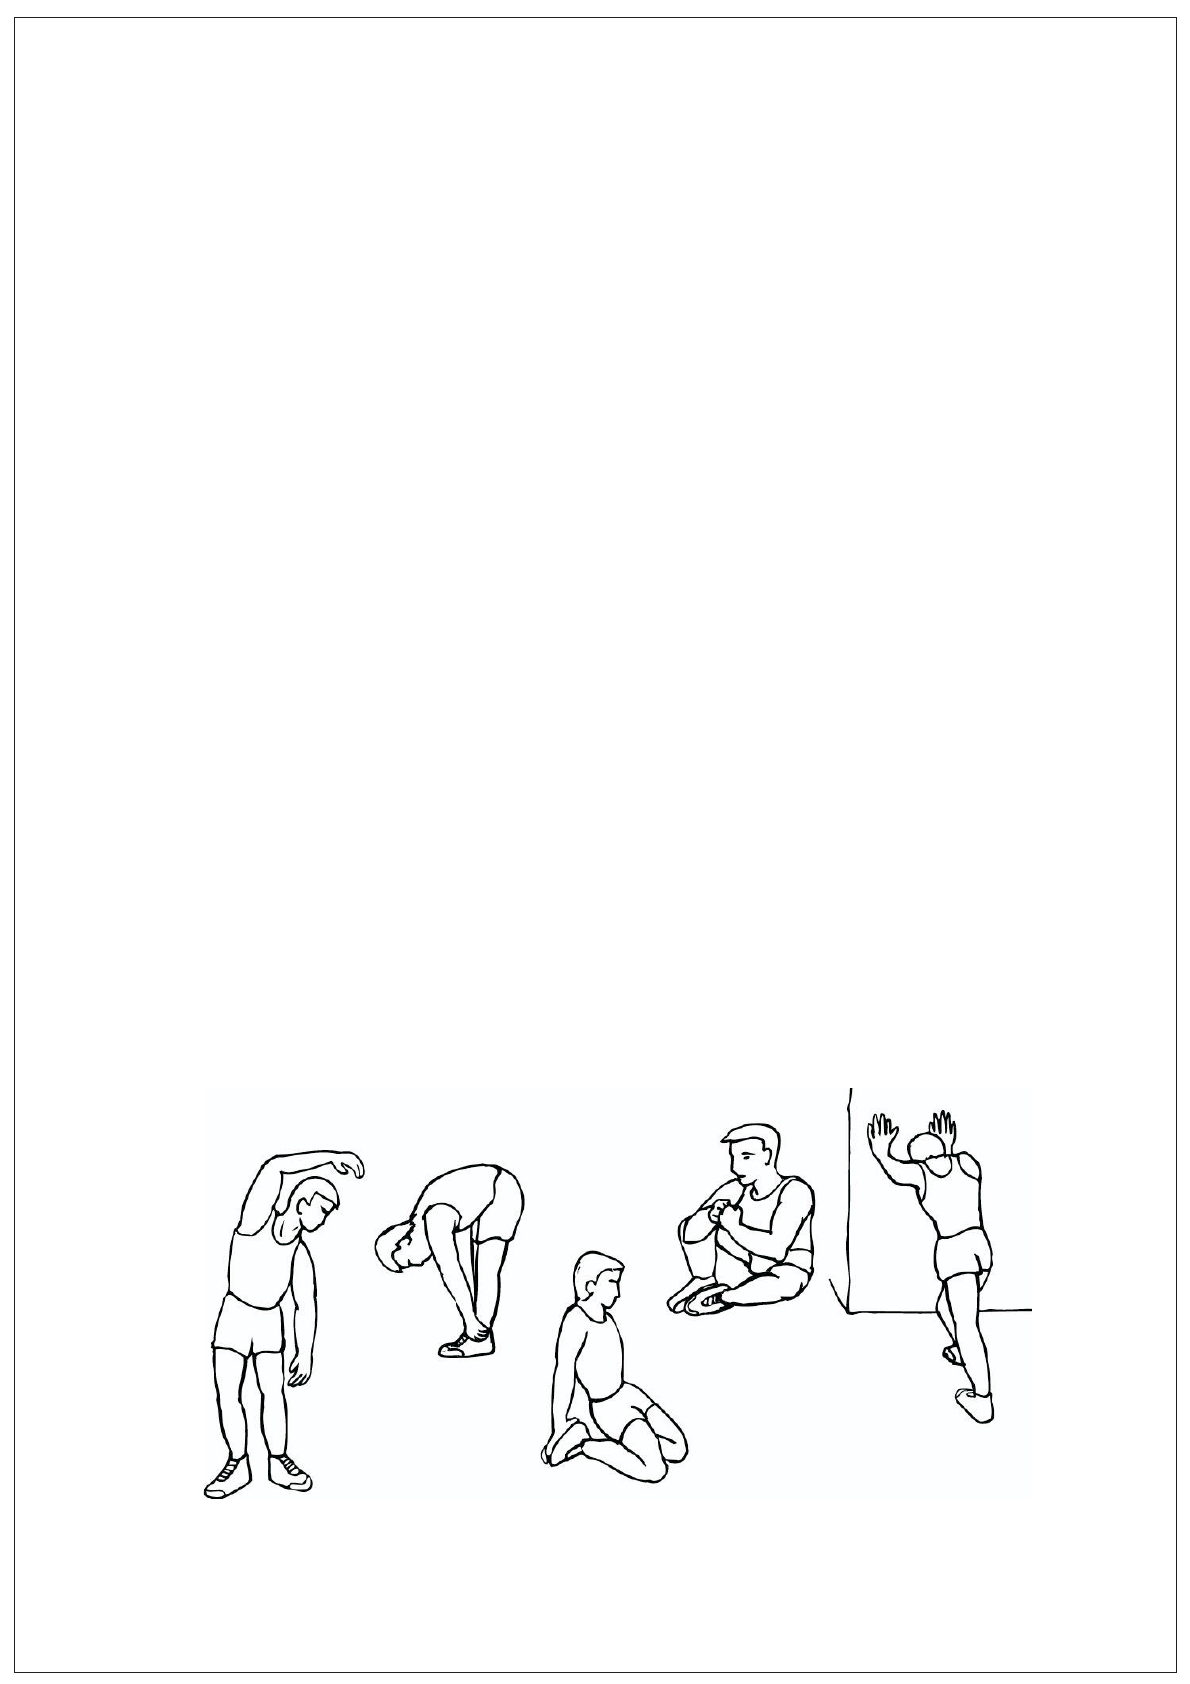
Start each workout with 5 to 10 minutes of stretching and some light exercises. A proper warm-up
increasesyour body temperature, heart rate and circulation in preparation for exercise. Ease into
your exercise.
Warm-up
31
33
34
41 39
7
32
10
8
5
15
23
21
26
11
25
35
1
17
16
20
37
38
2
18
19
12
26
22
24
13
27
28
9
40
4
3
25
25
25
32
33
34
34
34
36
35
35
36
37
38
44
36
35
3
34
1
34
1
35
36
2
21
22
23
24
5
28
1
9
27
43
6
10
1
31
10
41
7
40
39
4
Training Zone Exercise
After warming up, increase the intensity to your desired exercise program. Be sure to maintain
your intensity for maximum performance. Breathe regularly and deeply as you exercise-never
hold your breath.Cool Down Finish each workout with a light jog or walk for at least 1 minute.
Then complete 5 to 10 minutes ofstretching to cool down. This will increase the flexibility of your
muscles and will help prevent post-exercise problems.
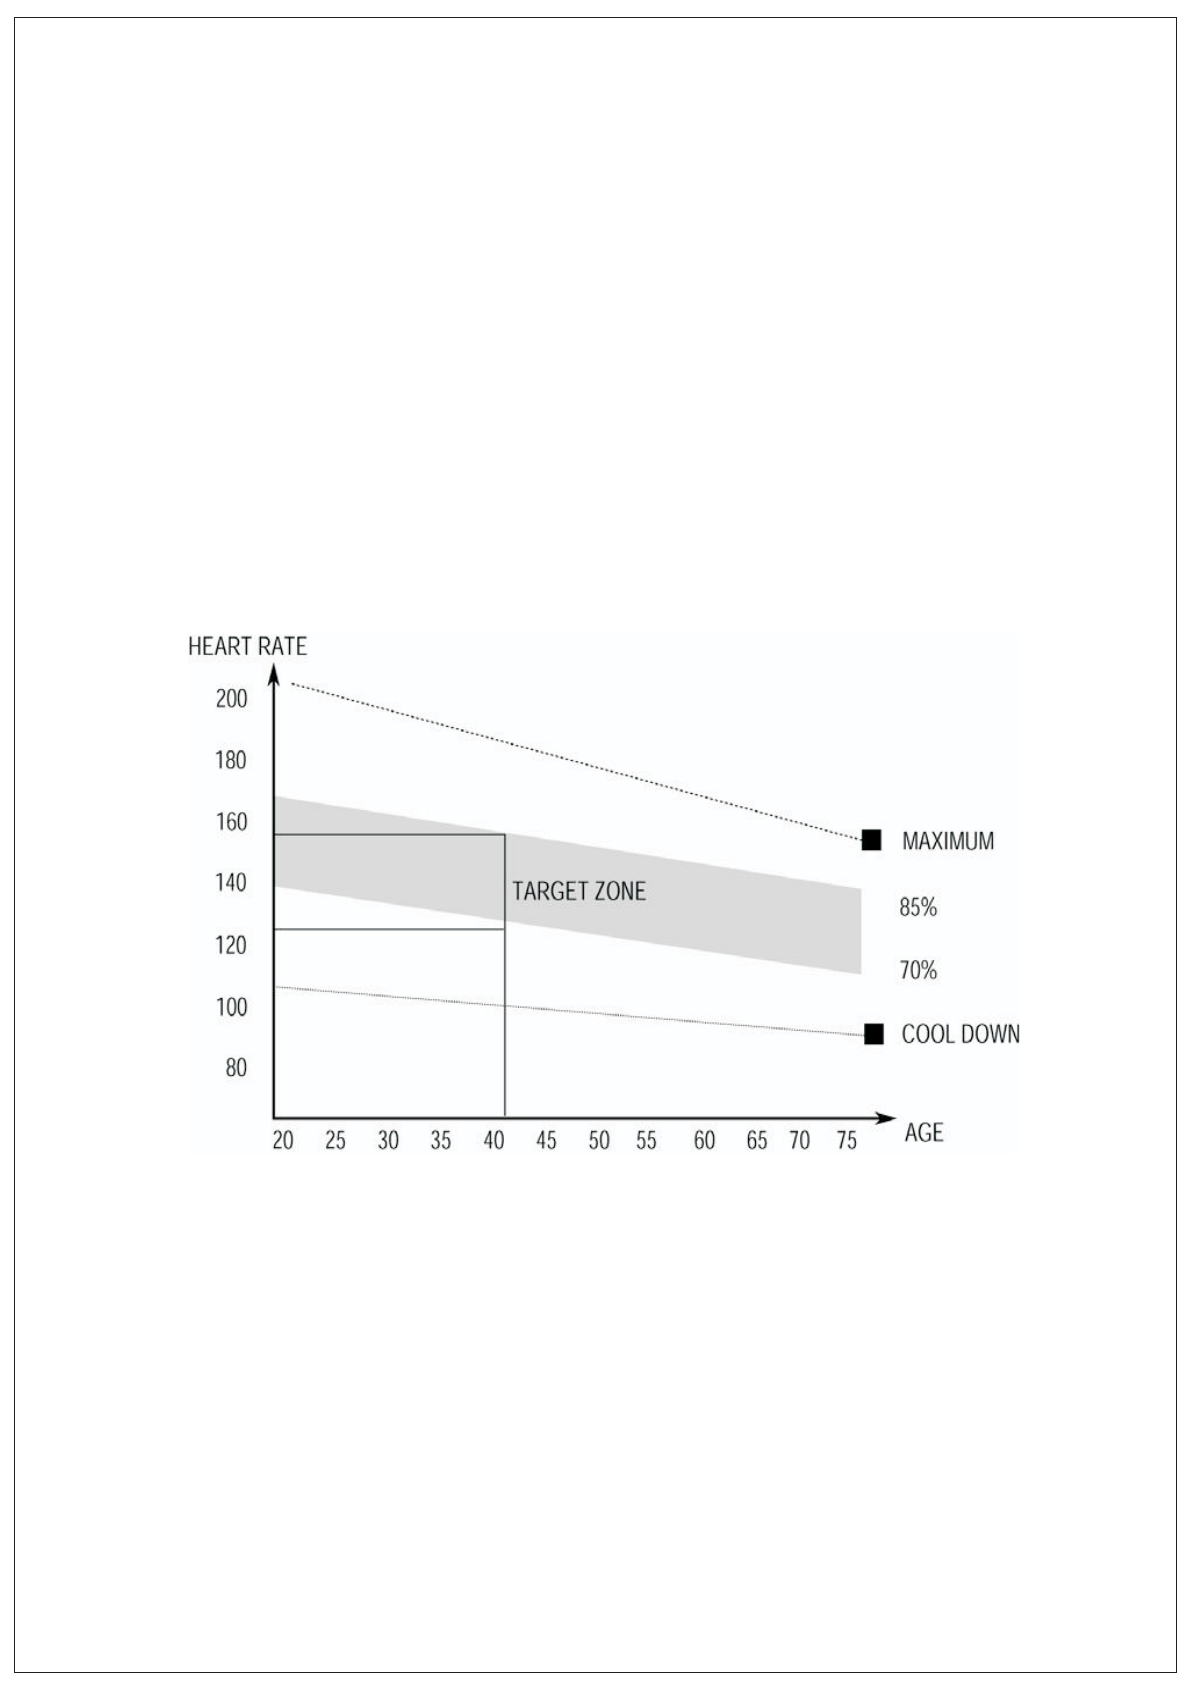
Workout Guidelines
TARGET ZONE
THIS IS HOW YOUR PULSE SHOULD BEHAVE DURING GENERAL FITNESS
EXERCISE.REMEMBER TO WARM UP AND COOL DOWN FOR A FEW MINUTES.
The most important factor here is the amount of effort you put in. The harder and longer you work,
the more calories you will burn. Effectively this is the same as if you were training to improve your
fitness, the difference is the goal.
13

MANUEL UTILISATEUR
Le produit peut varier légèrement de l'article illustré en raison des mises à
niveau du modèle.
Lisez attentivement toutes les instructions avant d'utiliser ce produit. Conserver ce
manuel de propriétaire pour référence future

CONSIGNES DE SÉCURITÉ IMPORTANTES
AVERTISSEMENT - Lisez toutes les instructions avant d'utiliser cette machine.
Il est important que votre machine soit régulièrement entretenue pour prolonger sa durée de vie utile. Échouer à
entretenir régulièrement votre machine peut annuler votre garantie.
Veuillez garder ce manuel à portée de main en tout temps
A. Il est important de lire ce manuel en entier avant d'assembler et d'utiliser l'équipement. Sûr et efficace
l'utilisation ne peut être réalisée que si l'équipement est assemblé, entretenu et utilisé correctement.
Veuillez noter: Il est de votre responsabilité de vous assurer que tous les utilisateurs de l'équipement sont
informés de tous les avertissements et précautions.
b. Avant de commencer un programme d'exercices, vous devriez consulter votre médecin pour déterminer si vous
souffrez de problèmes médicaux ou physiques qui pourraient mettre votre santé et votre sécurité en danger ou
vous empêcher d'utiliser l'équipement correctement. Les conseils de votre médecin sont essentiels si vous prenez
des médicaments qui affectent votre rythme cardiaque, votre pression artérielle ou votre taux de cholestérol.
c. Soyez conscient des signaux de votre corps. Un exercice incorrect ou excessif peut nuire à votre santé. Arrêtez
de vous entraîner si vous ressentez l'un des symptômes suivants: douleur, sensation d'oppression dans la poitrine,
rythme cardiaque irrégulier, essoufflement extrême, vertiges, étourdissements ou sensation de nausée. Si vous
présentez l'un de ces symptômes, consultez votre médecin avant de poursuivre votre programme d'exercices.
ré. Tenez les enfants et les animaux domestiques éloignés de l'équipement. Cet équipement est conçu pour un
usage adulte seulement.
e. Utilisez l'équipement sur une surface plane et solide avec une housse de protection pour votre sol ou votre
moquette. Pour assurer la sécurité, l'équipement doit avoir au moins 0,5 mètre d'espace libre tout autour.
F. Avant d'utiliser l'équipement, vérifiez que les écrous et les boulons sont bien serrés. Si vous entendez des bruits
inhabituels provenant de l'équipement pendant l'utilisation et l'assemblage, arrêtez immédiatement. N'utilisez
pas l'équipement tant que le problème n'a pas été corrigé.
g. Porter des vêtements appropriés lors de l'utilisation de l'équipement. Évitez de porter des vêtements amples
qui pourraient se coincer dans l'équipement ou qui pourraient restreindre ou empêcher les mouvements.
h. Cet équipement est conçu pour un usage intérieur et familial uniquement.
i. Des précautions doivent être prises lorsque vous soulevez ou déplacez l'équipement afin de ne pas vous blesser
au dos.
j. Gardez toujours ce manuel d'instructions et les outils d'assemblage à portée de main pour une référence rapide.
k. L'équipement ne convient pas à un usage thérapeutique.
l. Il existe de nombreuses fonctions de l'ordinateur, dont la valeur montrera lors de l'utilisation de l'équipement
en fonction de la quantité d'exercice, ici vous rappeler chaleureusement que la valeur du pouls cardiaque vous
donne juste une référence.
g. Wear suitable clothing while using the equipment. Avoid wearing loose clothing that may get
caught in the equipment or that may restrict or prevent movement.
h. This equipment is designed for indoor and family use only.
i. Care must be taken when lifting or moving the equipment so as not to injure your back.
j. Always keep this instruction manual and assembly tools at hand for quick reference.
k. The equipment is not suitable for therapeutic use.
l. There are many functions of the computer, which value will show when using the equipment according
the amount of exercise, here warmly remind you that the value of heart pulse just give you some
reference.

DIAGRAMME EXPLODÉ
40
32
32
7
10
41
9
6
30
44
8
5
31
37
46
25
23
36
13
48
21
27
47
43
34
26
45
42
15
28
11
4
39
17
25
36
1
18
35
29
25
3
34
34
35
38
33
37
25
34
2
14
16
20
26
19
22
24
12
INSTRUCTIONS D'ASSEMBLAGE
ÉTAPE1
36
35
2
36
35
1
34
3
1
34
COMME L'IMAGE MONTRE INSÉREZ LES 4 VIS DE TRANSPORT 34 À L'AVANT ET À L'ARRIÈRE
STABILISATEUR ENSEMBLE AVEC LE CADRE 2 3 METTRE LE JOINT EN IT 35
ET FIXER AVEC BOULON NUT 36
ÉTAPE2
23
21
22
24
VISSEZ LA PÉDALE DROITE ET GAUCHE 23 24 AU GAUCHE ET À LA DROITE 21 22 VIS 4 5 CERCLES
À LA MAIN PUIS FIXEZ-LE AVEC LA CLÉ
Table of contents
Languages:
Other Soozier Exercise Bike manuals


