Sophysa Pressio PSO-PB User manual

0459
Instructions for use: P. 3
PRESSIO®ICP MONITORING KIT, PARENCHYMALWITH BOLT
- Model PSO-PB -
PRESSIO®ICP & ICT MONITORING KIT, PARENCHYMALWITH BOLT
- Model PSO-PBT -
Sterile, single use
Notice d’emploi : P. 13
KIT PRESSIO®POUR MONITORING DE PIC, PARENCHYMATEUX À BOULON
- Modèle PSO-PB -
KIT PRESSIO®POUR MONITORING DE PRESSION ET DETEMPÉRATURE INTRACRÂNIENNES, PARENCHYMATEUX À BOULON
- Modèle PSO-PBT -
Stériles, à usage unique
Instruções de utilização: P. 23
KIT DE MONITORIZAÇÃO DA PIC PRESSIO®, PARA PARÊNQUIMA, COM PARAFUSO
- Modelo PSO-PB -
KIT DE MONITORIZAÇÃO DA PIC &TIC PRESSIO®, PARA PARÊNQUIMA, COM PARAFUSO
- Modelo PSO-PBT -
Esterilizado, descartável
Manual de instrucciones: P. 33
KIT DE MONITORIZACIÓN DE LA PIC PRESSIO®, PARENQUIMATOSO CONTORNILLO
- Modelo PSO-PB -
KIT DE MONITORIZACIÓN DE LA PICYTIC PRESSIO®, PARENQUIMATOSO CONTORNILLO
- Modelo PSO-PBT -
Estéril, de un solo uso
Istruzioni per l’uso: P. 43
KIT DI MONITORAGGIO ICP PRESSIO®, PARENCHIMALE CON BULLONE
- Modello PSO-PB -
KIT DI MONITORAGGIO ICP & ICT PRESSIO®, PARENCHIMALE CON BULLONE
- Modello PSO-PBT -
Sterile, monouso
Gebrauchsanweisung: S. 53
PRESSIO®ICP PARENCHYM-ÜBERWACHUNGS-KIT MIT BOLZEN
- Modell PSO-PB -
PRESSIO®ICP & ICT PARENCHYM-ÜBERWACHUNGS-KIT MIT BOLZEN
- Modell PSO-PBT -
Steriles Einmalprodukt
Οδηγίες χρήσης: σελ. 63
ΚΙΤ ΠΑΡΑΚΟΛΟΥΘΗΣΗΣ ΕΝΔΟΚΡΑΝΙΑΚΗΣ ΠΙΕΣΗΣ, ΠΑΡΕΓΧΥΜΑΤΙΚΟ ΜΕ ΚΟΧΛΙΑ PRESSIO®
- Μοντέλο PSO-PB -
ΚΙΤ ΠΑΡΑΚΟΛΟΥΘΗΣΗΣ ΕΝΔΟΚΡΑΝΙΑΚΗΣ ΠΙΕΣΗΣ & ΕΝΔΟΚΡΑΝΙΑΚΗΣ ΘΕΡΜΟΚΡΑΣΙΑΣ,
ΠΑΡΕΓΧΥΜΑΤΙΚΟ ΜΕ ΚΟΧΛΙΑ PRESSIO®
- Μοντέλο PSO-PBT -
Αποστειρωμένο, μιας χρήσης

Figure 4:
Recommended stages for the implantation of models PSO-PB and PSO-PBT / Etapes recommandées pour l’implantation des modèles PSO-PB et PSO-PBT /
Passos recomendados para a implantação dos modelos PSO-PB e PSO-PBT / Fases recomendadas para la implantación de los modelos PSO-PB y PSO-PBT /
Passaggi raccomandati per l’impianto dei modelli PSO-PB e PSO-PBT / Empfohlene Verfahrensschritte für die Implantation der Modelle PSO-PB und PSO-PBT /
Συνιστώμενα στάδια για την εμφύτευση των μοντέλων PSO-PB και PSO-PBT

3/74
Instructions for use
1. Indications .............................................................................................................................................5
2. Contra-indications ..................................................................................................................................5
3. Description and Operating Principle for parenchymal Pressio® kits with bolt ...............................................5
4. Congurations for Pressio® parenchymal kits with bolt .............................................................................6
5. Units of measurement .............................................................................................................................6
6. Sterilization of Pressio® kits .....................................................................................................................6
7. Instructions ............................................................................................................................................6
Preparation of a Pressio® catheter BEFORE IMPLANTATION: zeroing the pressure sensor ....................................................................................................................6
ImplantationTechnique ......................................................................................................................................................................................................................7
8. Precautions for monitoring, care and nursing of the patient ......................................................................9
9. Complications / Side eects .....................................................................................................................9
Infection ...........................................................................................................................................................................................................................................10
Cerebral hemorrhage ........................................................................................................................................................................................................................10
10. Guarantee ..........................................................................................................................................10
11. Processing of the products after use .....................................................................................................10
Destruction after use ........................................................................................................................................................................................................................10
Return of products ............................................................................................................................................................................................................................10
12. Symbols .............................................................................................................................................10
Technical specications ..............................................................................................................................11
References .................................................................................................................................................12
ENGLISH

4/74
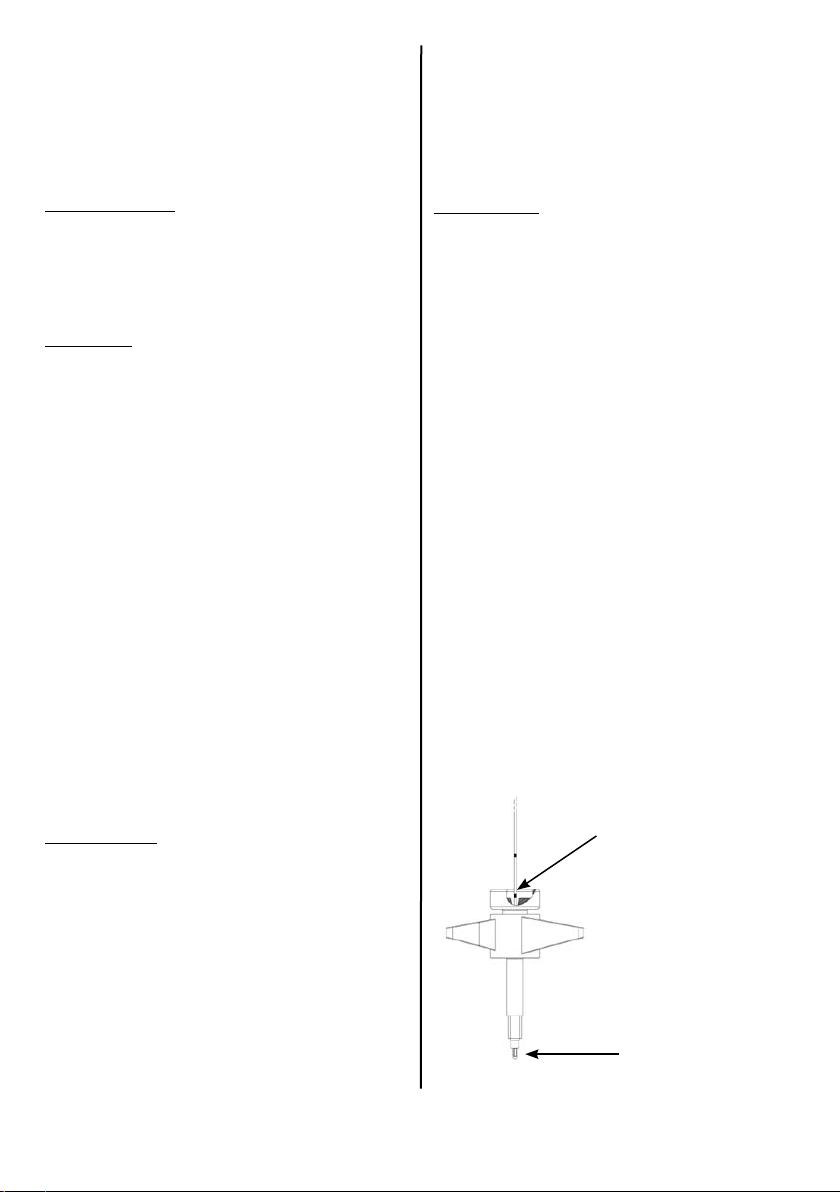
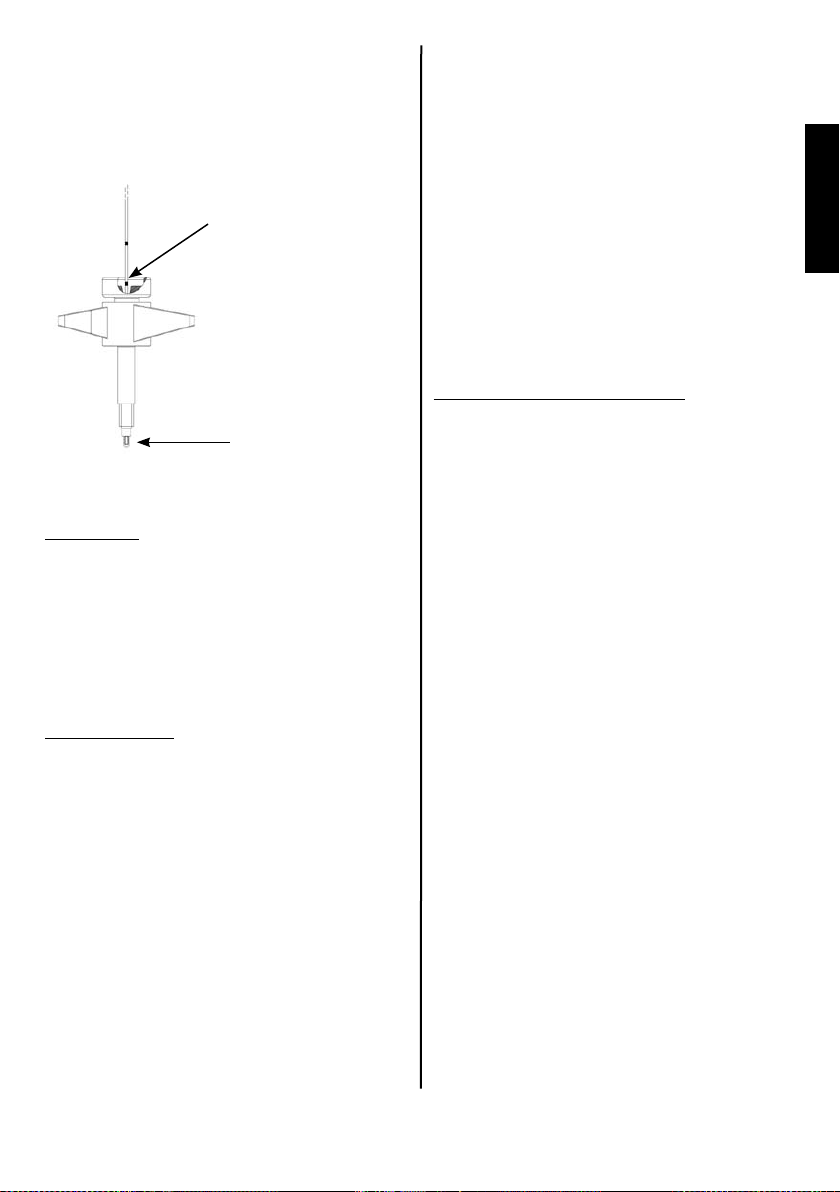
Figure 1: Pressio® ICP monitoring kit, parenchymal with bolt (Model PSO-PB).
Pressio® intracranial pressure measurement catheter
Drill bit with adjustable stop and Allen wrench Bolt for the introduction and xation
of the Pressio® sensor
Guide stylet
Figure 2: Pressio® ICP & ICT monitoring kit, parenchymal with bolt (Model PSO-PBT).
Pressio® intracranial pressure and temperature
measurement catheter
Drill bit with adjustable stop and Allen wrench Bolt for the introduction and xation
of the Pressio® sensor
Guide stylet
1000 mm
ø1.2 mm ø0.7 mm
40 mm
ø2.7 mm
1000 mm
ø1.2 mm ø0.7 mm
40 mm
ø2.7 mm

5/74
Re a d t h e i n s t R u c t i o n s f o R u s e c a R e f u l l y b e f o R e im planting t h e d e v i c e .
Indications1.
The use of a Pressio® monitoring kit is indicated in patients requiring continuous
monitoring of intracranial pressure.
In addition, the PSO-PBT model enables the intracranial temperature to be read.
No t e :
th e te m p e R a t u R e a n d p R e s s u R e v a l u e s i n d i c a t e d o n pR e s s i o ® m o n i t o R i n g s y s t e m s d o n o t
pRej udj e t h e h e a l t h s t a t u s o f t h e p a t i e n t .
Contra-indications2.
Contra-indications to the use of a Pressio® kit are the following:
- established or suspected infections in the tissues in direct contact with
monitoring system components (meningitis, ventriculitis, septicemia
or bacteremia) or any infection present in any part whatsoever of the body
- patients on anticoagulant therapy or presenting with bleeding diathesis
In addition, in young children xation using a bolt is contraindicated because
the bony plate of the skull is not suciently thick.
Wa r N i N g :
don o t u s e t h e pR e s s i o ® m o n i t o R i n g k i t if t h e R e a R e n o t R a i n e d p e R s o n n e l a v a i l a b l e
t o R o v i d e c o n t i n u o u s s u R v e i l l a n c e .
Description and Operating Principle3.
for parenchymal Pressio® kits with bolt
The Pressio® monitoring catheters are single use implantable devices.
The Pressio® monitoring catheters are of the“ BF ” type.
Only use with a Pressio® monitoring system.
Pr e c a u t i o N :
on l y c o n n e c t pR e s s i o ® c a t h e t e R s t o c a l i b R a t e d pR e s s i o ® e q u i p m e n t .
Pressio® ICP monitoring kit, parenchymal with bolt PSO-PB (Figure 1):
The PSO-PB kit makes continuous monitoring of the intracranial pressure possible.
It has a 1m long catheter with a diameter of 2.1Fr. At its end is a 1.2mm diameter
capsule enclosing a piezoresistive pressure sensor of the silicon strain gauge type
designed to be placed in the cerebral parenchyma.
Pressio® ICP & ICT monitoring kit, parenchymal with bolt PSO-PBT (Figure 2):
The PSO-PBT kit makes continuous monitoring of intracranial pressure and
temperature possible.
It has a 1m long catheter with a diameter of 2.1Fr equipped with a 1.2mm capsule at
its end, enclosing a piezoresistive pressure sensor of the silicon strain gauge type and
a thermistor temperature sensor, designed to be placed in the cerebral parenchyma.
The two kits can be distinguished visually by their respective markings
on the catheter connector.
In both cases, the catheter has centimetric graduation over 10cm from the proximal
end, as well as a marker at 15cm.
The end of the catheter opposite the capsule has a connector which makes it possible
to connect the catheter to a Pressio® monitoring system (PSO-3000 or PSO-IN00)
via a catheter extension cable (PSO-EC20).
The catheter extension cable transmits the measurement signals in the form
of analogue signals from the sensor(s) to the Pressio® monitoring system.
The catheter also exchanges a digital signal containing data, such as sensor
calibration, value and date on which the pressure sensor was zeroed,
with the Pressio® monitoring system.
This data is memorized in the catheter connector and is thus independent
of the Pressio® monitoring system used.
Pr e c a u t i o N :
don o t a l l o w t h e c o n n e c t o R t o c o m e i n t o c o n t a c t w i t h li quid.
The capsule enclosing the sensor(s) is made of titanium and the catheter sheath
is made of polyamide.
The entire length of the catheter is radiopaque.
The Pressio® monitoring kits parenchymal with bolt are latex- and phthalate-free
products.
The PSO-PB and PSO-PBT Pressio® monitoring kits make it possible to x
the parenchymal catheter using a bolt [4].
The drill bit [1] allows intracranial access.
It has a diameter (2.7mm) adapted to the screw thread [5] of the bolt.
An adjustable stop [2] makes it possible not to exceed the chosen drilling depth.
The Allen wrench [3] enables the position of this stop on the drill bit to be adjusted.
The bolt [4] allows the introduction and xation of the catheter in the parenchyma.
The tab [7] makes it possible to screw the bolt into the skull bone.
The clamping nut [6] makes it possible to x the catheter at the desired depth
in the parenchyma. The nut must therefore be unscrewed beforehand to introduce
the catheter through the bolt.
ENGLISH

6/74
A spacer ring [8] mounted on the bolt makes it possible to adjust the seating depth
for the bolt depending on the thickness of the skull bone of the patient.
The guide stylet [9] is inserted into the bolt [4] (nut [6] unscrewed). It makes it
possible to create a passage through the parenchyma to facilitate the introduction
of the Pressio® catheter.
It is delivered inserted into the bolt.
Congurations for Pressio® parenchymal kits4.
with bolt
The Pressio® parenchymal kits with bolt come in two dierent models: PSO-PB and
PSO-PBT (cf. §3: “ Description and Operating principle for Pressio® parenchymal kits
with bolt ”).
In both cases the specic accessories for the introduction of the catheter into
the parenchyma and its xation using a bolt are included in the kit, ready-to-use.
Sophysa also oers a sterile disposable hand drill (PSO-DR), enabling the skull
to be perforated in combination with the drill bit supplied in each kit.
Pressio® catheters are used with one of the Pressio® monitoring systems and the
appropriate accessories (cf. PSO-3000, PSO-IN00, and PSO-MT00 instructions for use).
Specic case for the PSO-PBT:
To make the best use of an intracranial temperature and pressure catheter, a Pressio®
monitor, Model PSO-3000 SoftwareVersion V2, must be used.
No t e s :
Ve r s i o n V2 o f t h e s o f t w a r e c a n b e identified d u r i n g t h e s e l f -t e s t o f t h e m o n i t o r :
o n s t a r t i n g t h e so p h y s a l o g o a n d s o f t w a r e V e r s i o n a r e d i s p l a y e d .
ify o u d o n o t h a V e apr e s s i o ® s o f t w a r e Ve r s i o n V2 m o n i t o r, y o u c a n u s e t h e c a t h e t e r
o n o n e o f t h e o t h e r pr e s s i o ® m o n i t o r i n g s y s t e m s , n a m e l y t h e pre s s i o ® pso-3000 m o n i t o r
s o f t w a r e V1 o r t h e pr e s s i o ® pso-in00 in t e r f a c e .
int h i s c a s e o n l y t h e p r e s s u r e w i l l b e d i s p l a y e d . th e t e m p e r a t u r e w i l l n o t b e d i s p l a y e d b u t
t h e p e r f o r m a n c e o f t h e p r e s s u r e s e n s o r w i l l b e identical.
Units of measurement5.
Catheter diameters (D)
D(mm) = Fr / 3
Fr = D(mm) x 3
Intracranial pressure
The pressures mentioned are in mmHg.
1 mmHg corresponds to 13.60 mmH2O and to 133 Pa.
Intracranial temperature
The intracranial temperature can be displayed in degrees Celsius (°C) or degrees
Fahrenheit (°F).
°F = °C x (9/5) + 32
°C= (°F - 32) x (5/9)
Equivalence in Kelvin (K):
K = °C + 273.15
K = °F x (5/9) + 255.37
Consult the Pressio® monitor instructions for use to choose the temperature unit
to be displayed.
Sterilization of Pressio® kits6.
The Pressio® monitoring kits are packed individually in double peel-o, sterile,
pyrogen-free packaging.They are sterilized with ethylene oxide.
Wa r N i N g s :
don o t u s e t h e pR e s s i o ® m o n i t o R i n g k i t if t h e s t e R i l e p a c k a g i n g is o p e n o R d a m a g e d ,
o R if t h e e x p i R y d a t e h a s p a s s e d .
pR e s s i o ® m o n i t o R i n g k i t s a R e s i n g l e u s e d e v i c e s . don o t R e -steRilize o R R e -u s e a f t e R
u n p a c k i n g a n d /o R e x p l a n t a t i o n .
t h e i R p e R f o R m a n c e (d R i f t ,e l e c t R i c a l s a f e t y ,e t c .) c o u l d b e a f f e c t e d d u R i n g d e c o n t a m i n a t i o n
a n d t h e R i s k o f i n f e c t i o n w o u l d b e signifiant.
No t e :
so p h y s a c a n n o t b e h e l d R e s p o n s i b l e f o R t h e p e R f o R m a n c e o f a n y p R o d u c t t h a t h a s b e e n
R e -s t e R i l i z e d a n d /o R R e -u s e d , n o R f o R a n y c o m p l i c a t i o n s w h i c h m i g h t R e s u l t f R o m t h i s .
Instructions7.
Before any implantation, it is recommended that the instructions for use
of the Pressio® monitoring system used be consulted for installing and
setting it up (Pressio® monitor or interface).
Preparation of a Pressio® catheter BEFORE IMPLANTATION:
zeroing the pressure sensor
Before implanting the Pressio® catheter it is necessary to zero the pressure sensor
(calibration in relation to atmospheric pressure).
The intracranial temperature sensor is factory calibrated. Therefore the temperature
setting does not need prior zeroing.
Ensure that the asepsis of the Pressio® monitoring kit is maintained throughout
this step.
1) Powering up the monitoring system
Connect the catheter extension cable (PSO-EC20) to the Pressio® monitoring system.
Before opening the packaging which guarantees the sterility of the Pressio®
monitoring kit, turn on the Pressio® monitoring system (PSO-3000 or PSO-IN00).
Refer to the instructions for use of the Pressio® Monitor or Interface.
2) Connecting the catheter to the monitoring system
Make the connection between the catheter and the extension cable (PSO-EC20)
respecting the guide pin.
Align the blue arrow on the catheter connector and the blue arrow on the cable
connector: the catheter connector will be guided safely into the cable connector.
Push up to the stop to ensure that the connection is complete.

7/74
The message“ZERO SENSOR”is then displayed on the Pressio® monitor (PSO-3000).
The appearance of error codes, “E001”, “E002”, “E005” or the message, “CONNECT
SENSOR”on the Pressio® monitor after connecting the catheter to the extension cable
may be a sign of an incorrect connection.
In this case, make sure that the catheter connector is pushed right up to the stop
in the catheter extension cable, and that the latter is correctly connected
to the Pressio® monitor.
3) Preparation of the sterile water cup
Prepare a sterile saline solution (or even sterile water) and a cup in a sterile environment.
Pour the sterile saline solution (or sterile water) into the cup.
Pr e c a u t i o N :
pR e s s u R e s e n s o R z e R o i n g m u s t b e p e R f o R m e d in s h a l l o w liquid (~5m m ). us i n g ad e e p
R e c e p t a c l e c o u l d l e a d t o h y d R o s t a t i c p R e s s u R e g R e a t e R t h a n a t m o s p h e R i c z e R o , w h i c h
w o u l d t h e n l e a d t o a n e R R o n e o u s R e f e R e n c e z e R o .
4) Zeroing the catheter
Immerse the sensor (metal part) in the liquid completely.
Be careful not to touch the cup with the sensor.
When the sensor is ready, press the zeroing key.
No t e :
du R i n g z e R o i n g k e e p t h e s e n s o R i m m e R s e d a n d a v o i d m o v i n g it in t h e c u p .
Pr e c a u t i o N s :
av o i d m a k i n g a n y c o n t a c t w i t h t h e e n d o f t h e c a t h e t e R d u R i n g s e n s o R z e R o i n g .
calibRation in R e l at i o n t o a t m o s p h e R i c p R e s s u R e c o u l d b e f a l s i f i e d .
en s u R e t h e e n d o f t h e c a t h e t e R is i m m e R s e d in t h e s t e R i l e w a t e R o R as t e R i l e s a l i n e s o l u t i o n
d u R i n g z e R o i n g . se n s o R z e R o i n g i n c o n d i t i o n s o t h e R t h a n t h o s e R e c o m m e n d e d m a y c a u s e
i n a c c u R a t e p R e s s u R e R e a d i n g s .
Movement of a task progress bar makes it possible to follow the correct performance
of the zeroing.
The procedure takes about 3 seconds.
5) Verication that the zeroing procedure took place correctly
When the progress bar reaches the end, the message “ZERO SENSOR OK – INSERT
SENSOR”shows that the procedure has taken place correctly.
Check that the Pressio® monitor screen displays the value“0 mmHg”(or the patient
monitor screen if the Pressio® interface is used).
If during zeroing, the sensor suers parasite pressure variations or is damaged,
the screen will display the message ”ZERO SENSOR FAILURE – REPLACE SENSOR”.
In thiscase,disconnectand thenreconnectthecatheter,andtry the zeroingsequence
again.
If this fails again, change the catheter.
Also refer to the instructions for use for the Pressio® monitoring system used
(PSO-3000 or PSO-IN00, §“Anomaly in operation: symptoms / suggested measures”).
No t e :
se n s o R z e R o i n g c a n o n l y b e d o n e o n c e . ifan e w a t t e m p t t o z e R o t h e s a m e s e n s o R is m a d e ,
t h e m e s s a g e ,“sensoR alReady zeRoed”is d i s p l a y e d .
Storing data in the catheter connector memory (cf. §3) makes it possible to use
Pressio® monitors or interfaces (PSO-3000 models software V2, PSO-3000 software
V1 and PSO-IN00) other than the model on which the zeroing was performed.
Specic case for the PSO-PBT:
No t e :
wh e n t h e t e m p e R a t u Re R e a d b y t h e s e n s o R is l o w e R t h a n 20°c, t h e pR e s s i o ® m o n i t o R
d i s p l a y s :“ - - - “. th i s m e a n s t h a t t h e m e a s u R e m e n t is in t h e s e n s o R m e a s u R e m e n t R a n g e
b u t o u t s i d e t h e d i s p l a y R a n g e s f o R t h e pR e s s i o ® s y s t e m .
Implantation Technique
Positioning of the bolt and implantation of the Pressio® catheter must take account
of current aseptic neurosurgical practices.
Use the insertion accessories supplied by Sophysa in the Pressio® monitoring kit.
ENGLISH
8/74
The surgeon will choose the technique depending upon his experience and
the clinical status of the patient.
The nal implantation of the device must satisfy the conditions for optimal
positioning of the sensor in the parenchyma.
Pr e c a u t i o N :
don o t p e R f o R m t h e i m p l a n t a t i o n o f am o n i t o R i n g c a t h e t e R w i t h o u t h a v i n g aR e p l a c e m e n t
k i t a v a i l a b l e in c a s e it is R e q u i R e d .
Choice of implantation area
Indication for implantation area: the standard right and left prefrontal areas are
the main implantation areas. This region allows the patient to turn his/her head
while remaining in the decubitus position without interfering with the intracranial
pressuremonitoringfunction. Additionally, inmostcases,the incisionismade behind
the hairline, which is acceptable from an esthetic point of view.
Intracranial access
Once the implantation site has been chosen, the area is shaved and prepared
aseptically. A local anesthetic is applied in the incision area.
This is generally 2 to 3 centimeters in front of the coronal suture on the mid-pupillary line.
An incision of about one centimeter is made down to the bone.
Make sure the bony plate is well exposed and perform hemostasis on the wound edges.
The adjustable stop on the drill bit supplied in the kit may be positioned as required
by loosening the locking screw with the Allen wrench.
Position the adjustable stop depending upon the drilling depth chosen and retighten
the locking screw to maintain this position.
Wa r N i N g :
in c o m p l e t e t i g h t e n i n g o f t h e l o c k i n g s c R e w w i l l p R e ve n t t h e a d j u s t a b l e s t o p f R o m p l a y i n g
i t s R o l e , w i t h t h e R i s k o f d R i l l i n g t o o d e e p l y.
The drill bit is then xed to a helical drill and the perforation is performed through
the internal and external skull plates.The surgeon must ensure that any possibility of
a parenchymal lesion when he crosses the internal plate is avoided.
Pr e c a u t i o N :
ma k e s u R e ac o m p l e t e l y R o u n d h o l e is m a d e w i t h t h e d R i l l b i t : t h e s h a f t o f t h e d R i l l
m u s t n o t m o v e d u R i n g p e R f o R a t i o n . ma i n t e n a n c e o f t h e b o l t in t h e b u R R h o l e c o u l d b e
a f f e c t e d b y t h i s .
After having crossed the internal plate, the drill bit is withdrawn and the hole
is irrigated with sterile normal saline.
Incise the dura mater.
Putting the bolt in place
- Make sure that the dura mater has been perforated.
- Screw the Pressio® bolt into the skull using the tab (cf. Figure 4-1).
It is a matter for the competence of the surgeon to judge the depth of the bolt seating
depending on the thickness of the skull.
The spacer ring may be used to reduce the implantation depth of the bolt, otherwise
remove and discard it.
Use of the Pressio® bolt is contraindicated in young children because the bony plate
of the skull is not suciently thick.
Wa r N i N g :
en s u R e t h a t t h e b o l t i s n o t s c R e w e d t o o d e e p l y. th e b o l t s h o u l d e R a n d i t s s p a c e R R i n g
a R e as i m p l e v i s u a l m a R k e R a n d n o t as t o p : t h e y w i l l n o t s t o p d e e p e R p e R f o R a t i o n d u R i n g
s c R e w i n g o f t h e b o l t .
Pr e c a u t i o N :
en s u R e t h a t t h e b o l t is n o t u n s c R e w e d a n d t h e n R e t i g h t e n e d in t h e s a m e b u R R h o l e .
ma i n t e n a n c e o f t h e b o l t in t h e b u R R h o l e c o u l d b e a f f e c t e d b y t h i s .
Catheter implantation
Wa r N i N g :
limit t h e R e p e t i t i o n o f i n t R a c e Re b R a l c a t h e t e R i m p l a n t a t i o n s : f R e q u e n t incisions i n t o
t h e b R a i n t o e n a b l e t h e i n s e R t i o n o f t h e c a t h e t e R c o u l d p R e d i s p o s e it t o e d e m a a n d
i n t R a c e Re b R a l h e m o R R h a g e , R e s u l t i n g in aR i s e in i n t R a c R a n i a l p R e s s u R e .
- Introduce the guide stylet into the Pressio® bolt to create a passage through
the parenchyma in order to facilitate the introduction of the Pressio® catheter
(cf. Figure 4-2).
- Remove the guide stylet and irrigate the bolt with normal saline (cf. Figure 4-3).
- Introduce the catheter into the bolt.
Ensure that the pressure sensor has been zeroed beforehand (cf. § “Preparation
of a Pressio® catheter BEFORE IMPLANTATION: zeroing the pressure sensor”).
Wa r N i N g :
don o t p e R f o R m t h e “sensoR zeRo” o n c e t h e c a t h e t e R is i m p l a n t e d ; it is e s s e n t i a l
t o p e R f o R m t h e “sensoR zeRo”b e f o R e it i s i m p l a n t e d t o c a l i b R a t e it w i t h a t m o s p h e R i c
p R e s s u R e .
To perform a parenchymal measurement of intracranial pressure, the implantation
depth must be 1-3cm in the cerebral parenchyma.
- Push the catheter through the parenchyma. Position the catheter at the depth
desired using the centimetric marking:
A thicker marker located 4cm from the end of the catheter represents the length
of the bolt.
Once the catheter is introduced into the bolt this marker is no longer visible when
the sensor at the end of the catheter just emerges from the bolt. The sensor is then
in the sub-arachnoid space (cf. Figures 3 and 4.4).
Figure 3
“4 cm”marker on the clamping nut.
Sensor at the end of the bolt.

9/74
- Push the catheter several centimeters further into the cerebral parenchyma
(1-3cm) in relation to the bolt exit marker (cf. Figure 4-5).
Catheter xation
- Once the chosen introduction depth is reached, turn the clamping nut
on the Pressio® bolt clockwise to x the catheter in place (cf. Figure 4-6).
No t e :
th e c l a m p i n g n u t m u s t b e t i g h t e n e d c o m p l e t e l y (t o t h e s t o p ) t o e n s u R e o p t i m a l
m a i n t e n a n c e o f t h e c a t h e t e R in t h e b o l t .
At this stage the Pressio® monitor displays the mean intracranial pressure in mmHg.
Specic case for the PSO-PBT:
At this stage, the Pressio® monitor displays the mean intracranial pressure in mmHg.
The temperature is also displayed and will stabilize at its precise value in a maximum
of 150 seconds.
No t e :
a t e m p e R a t u Re m e a s u R e m e n t c a n o n l y b e a c c u R a t e if t h e s e n s o R is i m p l a n t e d . th e s e n s o R
is n o t s u i t a b l e f o R m e a s u R i n g t e m p e R a t u R e in t h e a i R.
In both cases (PSO-PB and PSO-PBT), instability in the pressure value, the appearance
of error codes“E001”,“E002”,“E005”or the message“CONNECT SENSOR”on the Pressio®
monitor after connecting the catheter to the extension cable may be a sign
of an incorrect connection.
In this case, make sure that the catheter connector is pushed right up to the stop in
the catheter extension cable, and that the latter is correctly connected to the Pressio®
monitor.
The appearance of error codes “- - -”, “999”, “E001”, “E002”, “E005” or the message
“CONNECT SENSOR” on the Pressio® monitor after implantation of the catheter,
even though the catheter is correctly connected, may be a sign that the sensor
on the end of the catheter is damaged.
In this case, try to reposition the catheter, and if it fails again, try with a new catheter.
The maximum recommended duration for the catheter to be implanted is 5 days.
After the rst 24 hours the Pressio® monitor displays the duration of implantation
for the catheter in the form of a message“Implantation: X days”. This is then shown
throughout the implantation period.
This message starts to ash on the Pressio® monitor from the 6th day of implantation
meaning that the catheter has exceeded the recommended implantation duration.
If the Pressio® interface is used, the diode showing the implantation duration for the
catheter will ash as soon as the catheter exceeds the recommended implantation
duration.
Once the catheter is implanted it can be disconnected and then reconnected
to the same or another unit from the Pressio® range (PSO-3000 software V2,
PSO-3000 softwareV1, PSO-IN00) without the necessity of recalibration to atmospheric
pressure. In fact, the monitoring catheter keeps all the zeroing data in the memory.
Recommended stages for explantation of the catheter
- Stop the Pressio® monitor.
- Disconnect the catheter from the extension cable.
- Proceed with the explantation of the catheter.
- Check the integrity of the explanted catheter.
- Remove the bolt, unscrewing it very carefully.
Pr e c a u t i o N :
wh e n t h e b o l t is R e m ov e d , m a k e s u R e t h a t t h e s p a c e R R i n g is a l s o R e m o ve d .
Precautions for monitoring, care and nursing8.
of the patient
Wa r N i N g :
don o t u s e t h e pR e s s i o ® m o n i t o R i n g k i t if t h e R e a R e n o t R a i n e d p e R s o n n e l a v a i l a b l e
t o p R o v i d e c o n t i n u o u s s u R v e i l l a n c e .
Pr e c a u t i o N s :
th e p a t i e n t s h o u l d o n l y b e m o n i t o R e d b y a n a n e s t h e t i s t , an e u R o s u R g e o n o R o t h e R
q u a l i f i e d p e R s o n .
itis R e c o m m e n d e d t h a t t h e c l i p b e u s e d o n t h e c a t h e t e R e x t e n s i o n c a b l e t o p R e v e nt a n y
d i s c o n n e c t i o n o f t h e c a t h e t e R.
During monitoring, look after the catheter implantation site in compliance with
standard hospital procedures.
Pr e c a u t i o N s :
ha n d l e t h e p a t i e n t w i t h c a R e t o p R e v e n t a n y d i s c o n n e c t i o n o f t h e c a b l e o R a n y m o v e m e n t
o f t h e i m p l a n t e d c a t h e t e R. ch e c k t h e c o n n e c t i o n o f t h e c a t h e t e R t o t h e e x t e n s i o n c a b l e
a n d t o t h e pR e s s i o ® m o n i t o R i n g s y s t e m a f t e R h a n d l i n g t h e p a t i e n t .
th e pR e s s i o ® c at h e t e R s a R e n o t s e n s i t i v e t o t h e e f f e c t s t h a t c o u l d o c c u R d u R i n g a n mRi
e x a m i n a t i o n b u t t h e y c o u l d b e as o u R c e o f a R t i f a c t s .
don o t u s e apR e s s i o ®m o n i t o R i n g s y s t e m a n d t h e i m p l a n t e d pR e s s i o ®c a t h e t e R a t t h e s a m e
t i m e a s ah i g h f R e q u e n c y e l e c t R o -s u R g i c a l i n s t R u m e n t o R ad e f i b R i l l a t o R. th e c a t h e t e R
a n d /o R m o n i t o R i n g s y s t e m c o u l d b e d a m a g e d o R t h e i R o p e R a t i o n c o u l d b e d i s t u R b e d .
Complications / Side eects9.
Complications which may result from the implantation of a Pressio® monitoring
system include the inherent risks in any surgical intervention and the insertion of
a foreign body.
Infection
The major complication associated with this type of monitoring is infection.
The infection risks can be reduced by adhering to asepsis techniques for the handling
and implantation of the catheter and also adhering to the maximum duration for
catheter implantation (5 days). If monitoring must be continued after this timescale,
it is recommended that a new system is put in place on another site.
If there is infection, removal of the system is indicated in conjunction
with the start of a specic treatment by a general or intrathecal route.
Cerebral hemorrhage
Cerebral hemorrhage may also be observed during monitoring of this type.
The probability of this complication may be reduced by limiting the number
of cerebral incisions during the introduction procedure and by ensuring that
this procedure is only performed by trained, competent professionals.
These complications require the rapid intervention of a doctor.
ENGLISH
10/74
Guarantee10.
TThe performances of the Pressio® monitoring kit are only guaranteed with
the range of Pressio® monitoring systems and the accessories designed,
tested and manufactured by Sophysa.
Sophysa guarantees that this medical device is free from defects in material
or manufacturing. Apart from this guarantee, Sophysa does not grant any other
guarantee, express or implicit, including marketing or adaptation for a specic
use. Sophysa cannot be held responsible for any incident, complication, damage
or prejudice resulting directly or indirectly from the use of this device. Sophysa does
not authorize anyone to take responsibility on its behalf for its products.
Processing of the products after use11.
Destruction after use
An unpacked, used or explanted Pressio® monitoring kit must be destroyed
in accordance with the procedures in force in the medical establishment.
Return of products
If an explanted Pressio® monitoring kit needs to be returned to Sophysa for analysis,
indicating if necessary whether cleaning has been performed.
In order to assess the returned product properly, it must be accompanied
by an explanatory Return to Manufacturer Authorization form.
No t e s :
fo R m o R e e f f e c t i v e a n a l y s i s , it is R e c o m m e n d e d t h a t t h e d e v i c e is n o t c l e a n e d .
int h e c a s e o f apR e s s i o ® p a R e n c h y m a l k i t w i t h b o l t , R e m o v e t h e c a t h e t e R f R o m t h e b o l t
c a R e f u l l y.
Symbols12.
Catalog reference
Manufacturer
Sterilization Method using Ethylene Oxide
Do not re-use
Do not re-sterilize
Use until
Batch code
LOT
Serial number
CE Conformity Marking
Refer to the instructions for use
BF TYPE EQUIPMENT: Procuring an appropriate
degree of protection against electric shock,
having aType F insulated applied section
(oating).
Temperature conditions for storage and
transport
Store in a dry place
Fragile, handle with care

11/74
Technical specications
Capsule diameter 1.2mm
Catheter diameter 2.1 Fr (0.7mm)
Catheter length 1000mm
Catheter marked every cm from the proximal end
Pressure
Type of sensor Piezoresistive
Reference pressure Atmospheric pressure
Display range (complete system) -40 to +100 mm Hg
Accuracy of the pressure measurement
(Linearity and hysteresis) (complete system)
± 2% reading in the range 0 to +100 mmHg
Bandwidth > 100 Hz
Functional range of overpressure without damage -700 mmHg to + 1250 mmHg
Temperature coecient 0.1 mmHg/°C max.
Input resistance 667 Ω
Output resistance 810 Ω
Excitation voltage 1 to 8V AC or DC
Drift from zero Less than 1 mmHg during the rst 24 hours,
at 37°C
Less than 2 mmHg in the rst week at 37°C
Temperature
Type of sensor Thermistor
Display range (complete system) +20°C to +45°C
+68°F to +113°F
Maximum tolerated error (Accuracy) in the reference conditions (complete system) ± 0.2°C max from 25°C to 45°C
± 0.4°C max from 20°C to 25°C
± 0.4°F max from 77°F to 113°F
± 0.7°F max from 68°F to 77°F
Resolution (complete system) 0.1°C / 0.1°F
Leakage current <10 µA to 120VAC
Environmental conditions during use (complete system)
Ambient temperature
Atmospheric pressure
Relative humidity
10°C to 40°C (50°F to 104°F)
500 hPa to 1060 hPa
30% to 75%
Conditions for storage / transport
Temperature
Atmospheric pressure
Relative humidity
0°C to 50°C (32°F to 122°F)
500 hPa to 1060 hPa
20% to 95%
Weight 11g
ENGLISH

12/74
References
Name/Description Reference
PRESSIO® MONITORING KITS
Only use with a Pressio® monitoring system
Pressio® ICP monitoring kit, parenchymal with bolt PSO-PB
Pressio® ICP & ICT monitoring kit, parenchymal with bolt PSO-PBT
Pressio® ICP monitoring kit, parenchymal tunneling PSO-PT
Pressio® ICP & ICT monitoring kit, parenchymal tunneling PSO-PTT
Pressio® ICP monitoring kit, ventricular tunneling
with external CSF drainage function
PSO-VT
Pressio® ICP & ICT monitoring kit, ventricular tunneling
with external CSF drainage function
PSO-VTT
PRESSIO® MONITORING SYSTEMS
ICP monitor
Mains power supply cable and Catheter extension cable included
PSO-3000
ICP interface control unit PSO-IN00
PRESSIO® ACCESSORIES
Catheter extension cable PSO-EC20
Patient monitor cable
Only use with a Pressio® monitoring system.
PSO-MCxx
PHILIPS (AGILENT) 12 PINS -MC01
SIEMENS (SIRECUST) 10 PINS -MC02
SPACELABS & MINDRAY 6 PINS -MC03
GE DATEX-Ohmeda 10 PINS -MC04
GE Solar (MARQUETTE) 11 PINS -MC05
HELLIGE 10 PINS -MC06
SIEMENS 7 PINS -MC07
NIHON KOHDEN 5 PINS -MC08
DATASCOPE 6 PINS -MC10
Intracranial temperature module
Enables the temperature value to be displayed on the patient monitor
Use only with a Pressio® PSO-3000 monitoring system.
To be used with appropriate patient monitor cables (pressure and temperature).
PSO-MT00
Patient monitor cable – temperature
Use only with the Pressio® intracranial temperature module.
PSO-MCT-y
PHILIPS (AGILENT) - 2 PINS -MCT-A
SIEMENS - 7 PINS -MCT-B
SPACELABS - 10 PINS -MCT-C
GE Solar (MARQUETTE), GE DATEX-Ohmeda - 11 PINS -MCT-E
HELLIGE, DATEX-Ohmeda, NIHON KOHDEN, MINDRAY & DATASCOPE - JACK 6.35mm -MCT-F
Disposable hand drill PSO-DR
Serial transmitter PSO-TX00
Technical specications and List of product references may be modied without notice.
Availability may vary according to country.

13/74
Notice d’emploi
1. Indications ...........................................................................................................................................15
2. Contre-indications ................................................................................................................................15
3. Description et Principe de fonctionnement des kits Pressio® parenchymateux à boulon ..............................15
4. Congurations des kits Pressio® parenchymateux à boulon ......................................................................16
5. Unités de mesure ...................................................................................................................................16
6. Stérilisation des Kits Pressio® .................................................................................................................16
7. Mode d’emploi ......................................................................................................................................16
Préparation d’un cathéter Pressio® AVANT IMPLANTATION : mise à zéro du capteur de pression .......................................................................................................16
Technique d’implantation .................................................................................................................................................................................................................18
8. Précautions pour le monitoring, le suivi et le nursing du patient ...............................................................19
9. Complications / Eets secondaires ..........................................................................................................20
Infection ...........................................................................................................................................................................................................................................20
Hémorragie cérébrale .......................................................................................................................................................................................................................20
10. Garantie .............................................................................................................................................20
11. Traitement des produits après usage ....................................................................................................20
Destruction après usage ...................................................................................................................................................................................................................20
Retour des produits ..........................................................................................................................................................................................................................20
12. Symboles ............................................................................................................................................20
Spécications techniques ............................................................................................................................21
Références .................................................................................................................................................22
FRANÇAIS

14/74
Figure 1 : Kit Pressio® pour monitoring de PIC, parenchymateux à boulon (Modèle PSO-PB).
Cathéter de mesure de pression intracrânienne Pressio®
Trépan avec butée ajustable et clé Allen Boulon d’introduction et de xation
du capteur Pressio®
Guide de passage
Figure 2 : Kit Pressio® pour monitoring de pression et de température intracrâniennes, parenchymateux à boulon (Modèle PSO-PBT).
Cathéter de mesure de pression et de température
intracrâniennes Pressio®
Trépan avec butée ajustable et clé Allen Boulon d’introduction et de xation
du capteur Pressio®
Guide de passage
1000 mm
ø1,2 mm ø0,7 mm
40 mm
ø2,7 mm
1000 mm
ø1,2 mm ø0,7 mm
40 mm
ø2.7 mm

15/74
li R e a t t e n t i v e m e n t l a n o t i c e d’e m p l o i a v a n t d’i m p l a n t e R l e dispositif.
Indications1.
L’utilisation d’un kit Pressio® pour monitoring est indiquée chez les patients
nécessitant un monitoring continu de la pression intracrânienne.
Le modèle PSO-PBT permet en outre de connaître la température intracrânienne.
No t e :
le s v a l e u R s d e p R e s s i o n e t d e t e m p é R a t u R e d o n n é e s p a R l e s s y s t è m e s d e m o n i t o R i n g
pR e s s i o ® n e p R é j u g e n t p a s d e l’é t a t d e s a n t é d u m a l a d e .
Contre-indications2.
Les contre-indications à l’utilisation d’un kit Pressio® sont les suivantes :
- infections établies ou suspectées dans des tissus en contact direct avec
les composants dusystèmedemonitoring(méningite,ventriculite, septicémieou
bactériémie) ou toute infection présente dans un endroit quelconque du corps.
- patients sous anticoagulant ou présentant une diathèse hémorragique.
De plus, chez les jeunes enfants, la xation avec un boulon est contre-indiquée du fait
de la faible épaisseur de la table osseuse au niveau du crâne.
Mi s e e N g a r d e :
nep a s u t i l i s e R d e k i t pR e s s i o ® p o u R m o n i t o R i n g s i a u c u n p e R s o n n e l f o R m é n’e s t d i s p o n i b l e
p o u R a s s u R e R u n e s u R v e i l l a n c e c o n t i n u e .
Description et Principe de fonctionnement3.
des kits Pressio® parenchymateux à boulon
Les cathéters de monitoring Pressio® sont des dispositifs implantables à usage unique.
Les cathéters de monitoring Pressio® sont de type « BF » .
Utiliser uniquement avec un système de monitoring Pressio®.
Pr é c a u t i o N :
co n n e c t e R l e s c a t h é t e R s pR e s s i o ® u n i q u e m e n t àd e s é q u i p e m e n t s pR e s s i o ® c a l i b R é s .
Kit Pressio® pour monitoring de PIC, parenchymateux à boulon PSO-PB
(Figure 1) :
Le kit PSO-PB permet le monitoring en continu de la pression intracrânienne.
Il comprend un cathéter de longueur 1m et diamètre 2.1Fr muni à son extrémité
d’une capsule de 1.2mm de diamètre renfermant un capteur de pression piézorésistif
de type jauge de contrainte sur silicium destiné à être placé dans le parenchyme
cérébral.
Kit Pressio® pour monitoring de pression et de température intracrâniennes,
parenchymateux à boulon PSO-PBT (Figure 2) :
Le kit PSO-PBT permet le monitoring en continu de la pression et de la température
intracrâniennes.
Il comprend un cathéter de longueur 1m et diamètre 2.1Fr muni à son extrémité
d’une capsule de 1.2mm de diamètre renfermant un capteur de pression piézorésistif
de type jauge de contrainte sur silicium et un capteur de température de type
thermistance, destinés à être placé dans le parenchyme cérébral.
Les deux kits se distinguent visuellement par leurs marquages respectifs
sur le connecteur du cathéter.
Dans les deux cas, le cathéter a une graduation centimétrique sur 10cm à partir
de l’extrémité proximale, ainsi qu’un repère à 15cm.
L’extrémité du cathéter opposée à la capsule comprend un connecteur qui permet
le branchement du cathéter sur un système de monitoring Pressio® (PSO-3000
ou PSO-IN00) via un câble d’extension de cathéter (PSO-EC20).
Le câble d’extension de cathéter achemine les signaux de mesure du (des) capteur(s)
sous forme de signaux analogiques jusqu’au système de monitoring Pressio®.
Le cathéter échange également avec le système de monitoring Pressio® un signal
numérique contenant des données telles que le calibrage des capteurs, la valeur
et la date de la mise à zéro du capteur de pression.
Ces données sont conservées en mémoire dans le connecteur du cathéter et sont donc
indépendantes du système de monitoring Pressio® utilisé.
Pr é c a u t i o N :
nep a s e x p o s e R l e c o n n e c t e u R a u c o n t a c t d’u n l i q u i d e .
La capsule renfermant le (les) capteur(s) est en titane, et la gaine du cathéter
est en polyamide.
Le cathéter est radio-opaque sur toute sa longueur.
Les kits Pressio® pour monitoring parenchymateux à boulon sont des produits sans
latex ni phtalates.
Les kits Pressio® pour monitoring PSO-PB et PSO-PBT permettent de xer le cathéter
parenchymateux à l’aide d’un boulon [4].
Le trépan [1] permet l’accès intracrânien.
Il a un diamètre (2.7mm) adapté au pas de vis [5] du boulon.
Une butée ajustable [2] permet de ne pas aller au-delà d’une profondeur de perçage
choisie. La clé Allen [3] permet de régler la position de cette butée sur le trépan.
Le boulon [4] permet l’introduction et la xation du cathéter dans le parenchyme.
FRANÇAIS

16/74
L’ailette [7] permet le vissage du boulon dans l’os du crâne.
L’écrou de serrage [6] permet de xer le cathéter à la profondeur souhaitée dans
le parenchyme. L’écrou doit donc préalablement être dévissé pour introduire
le cathéter à travers le boulon.
Une bague d’espacement [8] montée sur le boulon permet d’ajuster la profondeur
d’assise du boulon en fonction de l’épaisseur d’os crânien du patient.
Le guide de passage [9] s’insère dans le boulon [4] (écrou [6] desserré). Il permet
de créer un passage au travers du parenchyme pour faciliter l’introduction du cathéter
Pressio®.
Il est livré inséré dans le boulon.
Congurations des kits Pressio®4.
parenchymateux à boulon
Les kits Pressio® parenchymateux à boulon existent sous deux modèles diérents :
PSO-PB et PSO-PBT (cf. §3 : « Description et Principe de fonctionnement des kits
Pressio® parenchymateux à boulon »).
Dans les deux cas, les accessoires spéciques à l’introduction du cathéter dans
le parenchyme et sa xation à l’aide d’un boulon sont compris dans le kit, prêt
à l’emploi.
Sophysaproposeégalementuneperceusestérileàusageunique (PSO-DR)permettant
la perforation crânienne en association avec le trépan fourni dans chaque kit.
Les cathéters Pressio® s’utilisent avec l’un des systèmes de monitoring Pressio®
et les accessoires appropriés (cf. notices du PSO-3000, de PSO-IN00, de PSO-MT00).
Cas particulier du PSO-PBT :
Pourproterpleinementd’uncathéterde pressionetdetempératureintracrâniennes,
il faut utiliser un moniteur Pressio® modèle PSO-3000 logiciel versionV2.
No t e s :
laV e r s i o n V2 d u lo giciel e s t identifiable l o r s d e l’a u t o te s t d u m o n i t e u r : a u d é m a r r a g e,
a f f i c h a g e d u l o g o so p h y s a e t d e l a V e r s i o n d u logiciel.
siV o u s n e d i s p o s e z p a s d’u n m o n i t e u r pr e s s i o ® V e r s i o n logiciel V2, V o u s p o u V e z utiliser
l e c a t h é t e r s u r u n a u t r e d e s s y s t è m e s d e m o n i t o r i n g pre s s i o ®, às a V o i r l e mo n i t e u r pre s s i o ®
pso-3000 logiciel V1 o u l’in t e r f a c e pr e s s i o ® pso-in00.
da n s c e c a s , s e u l e l a p r e s s i o n s e r a a f f i c h é e . lat e m p é r a t u r e n e s e r a p a s a f f i c h é e m a i s
l e s p e r f o r m a n c e s d u c a p t e u r d e p r e s s i o n s e r o n t i d e n t i q u e s .
Unités de mesure5.
Diamètre (D) des cathéters
D(mm) = Fr / 3
Fr = D(mm) x 3
Pression intracrânienne
Les pressions mentionnées sont en mmHg.
1 mmHg correspond à 13.60 mmH2O et à 133 Pa.
Température intracrânienne
La température intracrânienne peut être achée en degrés Celsius (°C) ou en degrés
Fahrenheit (°F).
°F = °C x (9/5) + 32
°C= (°F - 32) x (5/9)
Equivalence en Kelvin (K) :
K = °C + 273,15
K = °F x (5/9) + 255.37
Consulter la notice du moniteur Pressio® pour choisir l’achage de l’unité
de température.
Stérilisation des Kits Pressio®6.
Les kits Pressio® pour monitoring sont conditionnés individuellement sous double
emballage pelable, stérile et apyrogène. Ils sont stérilisés à l’oxyde d’éthylène.
Mi s e s e N g a r d e :
nep a s u t i l i s e R s i l’e m b a l l a g e s t é R i l e d e s k i t s pR e s s i o ® e s t o u v e R t o u d é t é R i o R é ,
o u s i l a d a t e d e p é R e m p t i o n e s t d é p a s s é e .
le s k i t s pR e s s i o ® p o u R m o n i t o R i n g s o n t d e s dispositifs àu s a g e u n i q u e : n e p a s R e s t é R i l i s e R
n i R é u t i l i s e R a p R è s d é c o n d i t i o n n e m e n t e t /o u e x p l a n t a t i o n .
le u R s p e R f o R m a n c e s (d é R i v e , s é c u R i t é é l e c t R i q u e …) p o u R R a i e n t ê t R e a f f e c t é e s l o R s
d’u n e d é c o n t a m i n a t i o n , e t l e R i s q u e d’i n f e c t i o n s e R a i t i m p o R t a n t .
No t e :
so p h y s a n e p e u t ê t R e t e n u e R e s p o n s a b l e d e l a p e R f o R m a n c e d e t o u t p R o d u i t a y a n t é t é
R e s t é R i l i s é e t /o u R é u t i l i s é , n i d e s c o m p l i c a t i o n s q u i p o u R R a i e n t e n R é s u l t e R.
Mode d’emploi7.
Avant toute implantation, il est recommandé de se reporter à la notice
du système de monitoring Pressio® utilisé pour l’installer et le congurer
(moniteur ou interface Pressio®).
Préparation d’un cathéter Pressio® AVANT IMPLANTATION :
mise à zéro du capteur de pression
Avant l’implantation du cathéter Pressio®, il est nécessaire de procéder à la mise
à zéro du capteur de pression (étalonnage par rapport à la pression atmosphérique).
Le capteur de température intracrânienne est étalonné en usine. Le paramètre
température ne nécessite donc pas de mise à zéro préalable.
Veiller à maintenir l’asepsie du kit Pressio® pour monitoring durant toute cette étape.
1) Mise sous tension du système de monitoring
Connecter le câble d’extension de cathéter (PSO-EC20) au système de monitoring
Pressio®.
Avant l’ouverture du conditionnement garantissant la stérilité du kit Pressio® pour
monitoring, mettre sous tension le système de monitoring Pressio® (PSO-3000
ou PSO-IN00).
Se reporter à la notice d’emploi du Moniteur ou de l’Interface Pressio®.
2) Branchement du cathéter au système de monitoring
Eectuer le branchement entre le cathéter et le câble d’extension (PSO-EC20)
en respectant le détrompeur.
Aligner la èche bleue du connecteur du cathéter et la èche bleue du connecteur
du câble : le connecteur du cathéter sera guidé de façon sécurisée dans le connecteur
du câble.
Pousser jusqu’à la butée pour assurer une connexion complète.

17/74
Le message « FAIRE ZERO CAPTEUR » s’ache alors sur le moniteur Pressio® (PSO-3000).
L’apparition des codes erreurs « E001 », « E002 », « E005 » ou du message « BRANCHER
CAPTEUR » sur le moniteur Pressio® après branchement du cathéter au câble
d’extension peut être le signe d’une mauvaise connexion.
Dans ce cas, s’assurer que le connecteur du cathéter est bien enfoncé jusqu’en butée
dans le câble d’extension de cathéter, et que ce dernier est bien connecté au moniteur
Pressio®.
3) Préparation de la cupule d’eau stérile
Dans un environnement stérile, préparer une solution saline stérile (ou bien de l’eau
stérile) et une cupule.
Verser la solution saline stérile (ou l’eau stérile) dans la cupule.
Pr é c a u t i o N :
lam i s e àz é R o d u c a p t e u R d e p R e s s i o n d o i t ê t R e e f f e c t u é e d a n s u n e f a i b l e p R o f o n d e u R d e
l i q u i d e (~5m m ). l’utili sation d’u n R é c i p i e n t p R o f o n d p o u R R a i t c o n d u i R e àu n e p R e s s i o n
h y d R o s t a t i q u e s u p é R i e u R e a u z é R o a t m o s p h é R i q u e q u i s e t R a d u i R a i t p a R u n z é R o d e R é f é R e n c e
e R R o n é .
4) Mise à zéro du cathéter
Immerger le capteur (partie métallique) complètement dans le liquide.
Prendre garde à ne pas toucher la cupule avec le capteur.
Lorsque le capteur est prêt, appuyer sur la touche de mise à zéro
No t e :
pe n d a n t l a m i s e àz é R o , g a R d e R l e c a p t e u R i m m e R g é , e t é v i t e R d e l e b o u g e R d a n s l a c u p u l e .
Pr é c a u t i o N s :
ev i t e R d’e x e R c e R t o u t c o n t a c t a v e c l’e x t R é m i t é d u c a t h é t e R p e n d a n t l a m i s e àz é R o d u c a p t e u R .
l’é t a l o n n a g e p a R R a p p o R t àl a p R e s s i o n a t m o s p h é R i q u e p o u R R a i t ê t R e f a u s s é .
ve i l l e R ài m m e R g e R l’e x t R é m i t é d u c a t h é t e R d a n s d e l’e a u s t é R i l e o u u n e s o l u t i o n s a l i n e
s t é R i l e p e n d a n t l a m i s e àz é R o . un e m i s e àz é R o d u c a p t e u R d a n s d e s c o n d i t i o n s d i f f é R e n t e s
d e c e l l e s R e c o m m a n d é e s p e u t e n t R a î n e R d e s l e c t u R e s d e p R e s s i o n i n e x a c t e s .
La progression d’une barre d’accomplissement de tâche permet de suivre la bonne
réalisation de la mise à zéro.
La procédure prend 3 secondes environ.
5) Vérication du bon déroulement de la procédure de mise à zéro
A la n de la barre de progression, le message « ZERO CAPTEUR OK IMPLANTER
CAPTEUR » indique que la procédure s’est déroulée correctement.
Vérier que l’écran du moniteur Pressio® ache la valeur « 0 mmHg » (ou l’écran
du moniteur patient dans le cas où l’interface Pressio® est utilisée).
Si pendant la mise à zéro, le capteur subit des variations de pressions parasites ouest
endommagé, l’écran ache le message « ECHEC ZERO CAPTEUR CHANGER CAPTEUR ».
Dans ce cas, débrancher puis rebrancher le cathéter, et tenter à nouveau la séquence
de mise à zéro.
En cas de nouvel échec, changer le cathéter.
Se référer également à la notice d’emploi du système de monitoring Pressio® utilisé
(PSO-3000 ou PSO-IN00, § « en cas d’anomalie de fonctionnement : symptômes /
mesures suggérées »).
FRANÇAIS

18/74
No t e :
lam i s e àz é R o d u c a p t e u R n e p e u t ê t R e f a i t e q u ’u n e s e u l e f o i s . enc a s d e n o u v e l l e t e n t a t i ve
d e m i s e àz é R o s u R l e m ê m e c a p t e u R, l e m e s s a g e « zeRo capteuR deja fait »
s’a f f i c h e .
La conservation de données en mémoire dans le connecteur du cathéter (cf. §3)
permet l’utilisation de moniteurs ou d’interfaces Pressio® (modèles PSO-3000 logicielV2,
PSO-3000 logiciel V1 et PSO-IN00) diérents de celui sur lequel a été faite la mise
à zéro.
Cas particulier du PSO-PBT :
No t e :
lo R s q u e l a t e m p é R a t u R e l u e p a R l e c a p t e u R e s t i n f é R i e u R e à20°c, l e m o n i t e u R pRe s s i o ®
a f f i c h e : « - - - ». ce l a signifie q u e l a m e s u R e e s t d a n s l a p l a g e d e m e s u R e d u c a p t e u R
m a i s h o R s d e s p l a g e s d’a f f i c h a g e d u s y s t è m e pR e s s i o ®.
Technique d’implantation
La pose du boulon et l’implantation du cathéter Pressio® se réfèrent aux pratiques
neurochirurgicales aseptiques courantes.
Utiliser les accessoires de pose fournis par Sophysa dans le kit Pressio® pour
monitoring.
Le chirurgien choisira la technique en fonction de sa propre expérience et de l’état
clinique du patient.
L’implantation nale du dispositif devra satisfaire les conditions d’un positionnement
optimal du capteur dans le parenchyme.
Pr é c a u t i o N :
nep a s p R o c é d e R àl’i m p l a nt a t i o n d’u n c a t h é t e R d e m o n i t o R i n g s a n s d i s p o s e R d’u n k i t
d e R e m p l a c e m e n t e n c a s d e b e s o i n .
Choix de la zone d’implantation
Zone d’implantation indicative : les zones préfrontales droite et gauche standard
sont les zones principales d’implantation. Cette région permet au patient de tourner
la tête de part et d’autre tout en restant en décubitus sans interférence avec la
fonction de surveillance de la pression intracrânienne. De plus, l’incision est pratiquée
dans la plupart des cas derrière la naissance des cheveux, ce qui est acceptable
d’un point de vue esthétique.
Accès intracrânien
Lorsque le site d’implantation a été choisi, la zone est rasée et préparée de façon
aseptique. Une anesthésie locale est pratiquée au niveau de la zone d’incision.
Celle-ci se situe généralement 2 à 3 centimètres en avant de la suture coronale
au niveau de la ligne mi-pupillaire.
Une incision d’environ un centimètre est pratiquée jusqu’à l’os.
Veiller à bien exposer la table osseuse et à réaliser l’hémostase des bords de la plaie.
La butée ajustable du trépan fourni dans le kit peut être positionnée selon les besoins
en desserrant la vis de blocage à l’aide de la clé Allen.
Positionner la butée ajustable en fonction de la profondeur de perçage choisie
et resserrer la vis de blocage pour maintenir cette position.
Mi s e e N g a r d e :
uns e R R a g e i n c o m p l e t d e l a v i s d e b l o c a g e n e p e R m e t t R a p a s àl a b u t é e a j u s t a b l e d e j o u e R
s o n R ô l e , a v e c l e R i s q u e d e p e R c e R t R o p p R o f o n d é m e n t .
Le trépan est alors xé à une perceuse hélicoïdale, et une perforation est réalisée
au travers des tables externe et interne du crâne. Le chirurgien doit veiller à éviter
toute possibilité de lésion parenchymateuse lorsqu’il traverse la table interne.
Pr é c a u t i o N :
ve i l l e R àR é a l i s e R u n t R o u b i e n R o n d a v e c l e t R é p a n : l’a x e d e l a p e R c e u s e n e d o i t p a s
b o u g e R p e n d a n t l a p e R f o R a t i o n . lat e n u e d u b o u l o n d a n s l e t R o u d e t R é p a n p o u R R a i t e n
ê t R e a f f e c t é e .
Après avoir traversé la table interne, le trépan est retiré et le trou est irrigué avec
du sérum physiologique stérile.
Percer une ouverture dans la dure-mère.
Mise en place du boulon
- S’assurer que la dure-mère a bien été percée.
- Visser le boulon Pressio® dans le crâne à l’aide de l’ailette (cf. Figure 4-1).
Il relève de la compétence du chirurgien de juger de la profondeur d’assise du boulon
selon l’épaisseur du crâne.
La bague d’espacement peut être utilisée pour réduire la profondeur d’implantation
du boulon, sinon la retirer et la jeter.
L’utilisation du boulon Pressio® est contre-indiquée chez les jeunes enfants du fait
de la faible épaisseur de la table osseuse au niveau du crâne.
Mi s e e N g a r d e :
ve i l l e R àn e p a s v i s s e R l e b o u l o n t R o p p R o f o n d é m e n t . l’é p a u l e m e n t d u b o u l o n e t s a
b a g u e d’e s p a c e m e n t s o n t u n s i m p l e R e p è R e v i s u e l e t n o n u n e b u t é e : i l s n’e m p ê c h e n t p a s
u n e p e R f o R a t i o n p l u s p R o f o n d e l o R s d u v i s s a g e d u b o u l o n .
Pr é c a u t i o N :
ve i l l e R àn e p a s d é v i s s e R p u i s R e v i s s e R l e b o u l o n d a n s u n m ê m e t R o u d e t R é p a n . lat e n u e
d u b o u l o n d a n s l e t R o u d e t R é p a n p o u R R a i t e n ê t R e a f f e c t é e .
Implantation du cathéter
Mi s e e N g a r d e :
limiteR l a R é p é t i t i o n d’i m p l a n t a t i o n s i n t R a c é R é b R a l e s d e c a t h é t e R s : l e s p e R f o R a t i o n s
f R é q u e n t e s d u c e R v e a u p o u R p e R m e t t R e l’i n s e R t i o n d u c a t h é t e R p e u v e n t p R é d i s p o s e R
àu n œ d è m e e t u n e h é m o R R a g i e i n t R a c é R é b R a l e s e s o l d a n t p a R u n e h a u s s e d e l a p R e s s i o n
i n t R a c R â n i e n n e .
- Introduire le guide de passage dans le boulon Pressio® pour créer un passage
au travers du parenchyme an de faciliter l’introduction du cathéter Pressio®
(cf. Figure 4-2).
- Retirer le guide de passage et irriguer le boulon avec du sérum physiologique
(cf. Figure 4-3).
- Introduire le cathéter dans le boulon.
Veiller à avoir eectué préalablement la mise à zéro du capteur de pression
(cf. §«Préparation d’uncathéter Pressio® AVANTIMPLANTATION : miseàzéro ducapteur
de pression »).
Mi s e e N g a r d e :
nep a s f a i R e l e « zeRo capteuR » u n e f o i s l e c a t h é t e R i m p l a n t é ; f a i R e i m p é R a t i v e m e n t
l e « zeRo capteuR » a v a n t s o n i m p l a n t a t i o n p o u R l’é t a l o n n e R s u R l a p R e s s i o n
a t m o s p h é R i q u e .
Pour eectuer une mesure parenchymateuse de la pression intracrânienne,
la profondeur d’implantation doit être de 1-3cm dans le parenchyme cérébral.
- Pousserlecathéterà traversleparenchyme.Positionnerlecathéter àla profondeur
désirée à l’aide du marquage centimétrique :
19/74
Un repère plus épais situé à 4cm de l’extrémité du cathéter représente la longueur
du boulon.
Une fois le cathéter introduit dans le boulon, ce repère cesse d’être visible lorsque
le capteur situéàl’extrémité ducathéterémergejusteduboulon. Le capteursetrouve
alors dans l’espace sous arachnoïdien (cf. Figures 3 et 4.4).
Figure 3
- Pousser le cathéter de quelques centimètres supplémentaires dans le parenchyme
cérébral (1-3cm) par rapport au repère de sortie du boulon (cf. Figure 4-5).
Fixation du cathéter
- Une fois que la profondeur d’introduction choisie est atteinte, tourner l’écrou
de serrage du boulon Pressi® dans le sens des aiguilles d’une montre pour xer
le cathéter en place (cf. Figure 4-6).
No t e :
l’é c R o u d e s e R R a g e d o i t ê t R e s e R R é àf o n d (e n b u t é e ) p o u R a s s u R e R u n e t e n u e o p t i m a l e
d u c a t h é t e R d a n s l e b o u l o n .
A ce stade, le moniteur Pressio® ache la pression intracrânienne moyenne en mmHg.
Cas particulier du PSO-PBT :
A ce stade, le moniteur Pressio® ache bien la pression intracrânienne moyenne en
mmHg. La température est également achée et se stabilisera à sa valeur précise
en 150s maximum.
No t e :
un e m e s u R e d e t e m p é R a t u R e n e p e u t ê t R e p R é c i s e q u e s i l e c a p t e u R e s t i m p l a n t é . lec a p t e u R
n’e s t p a s a d a p t é àu n e m e s u R e d e t e m p é R a t u Re d a n s l’a i R.
Dans les deux cas (PSO-PB et PSO-PBT), une instabilité de la valeur de pression,
l’apparition des codes erreurs « E001 », « E002 », « E005 » ou du message « BRANCHER
CAPTEUR » sur le moniteur Pressio® après branchement du cathéter au câble
d’extension peut être le signe d’une mauvaise connexion.
Dans ce cas, s’assurer que le connecteur du cathéter est bien enfoncé jusqu’en butée
dans le câble d’extension de cathéter, et que ce dernier est bien connecté au moniteur
Pressio®.
L’apparition des codes erreurs « - - - », « 999 », « E001 », « E002 », « E005 »
ou du message « BRANCHER CAPTEUR » sur le moniteur Pressio® après implantation
du cathéter, alors que le cathéter est correctement branché, peut être le signe que
le capteur situé à l’extrémité du cathéter est endommagé.
Dans ce cas, tenter de repositionner le cathéter, et en cas de nouvel échec essayer
avec un nouveau cathéter.
La durée d’implantation maximale recommandée du cathéter est de 5 jours.
Au-delà des24premièresheures, lemoniteurPressio® achela duréed’implantation
du cathéter sous la forme du message « Implantation : X jours », et cela pendant toute
la durée de son implantation.
Ce message se met à clignoter sur le moniteur Pressio® à partir du 6ème jour
d’implantation signiant que le cathéter a dépassé la durée d’implantation
recommandée.
Dans le cas où l’interface Pressio® est utilisée, la diode indiquant la durée
d’implantation du cathéter clignotera dès que le cathéter aura dépassé la durée
d’implantation recommandée.
Une fois le cathéter implanté, il peut être déconnecté puis reconnecté au même ou
à un autre appareil de la gamme Pressio® (PSO-3000 logiciel V2, PSO-3000 logiciel
V1, PSO-IN00) sans nécessiter un nouvel étalonnage à a pression atmosphérique.
En eet, le cathéter de monitoring garde en mémoire toutes les données de la mise
à zéro.
Etapes recommandées pour l’explantation du cathéter
- Arrêter le moniteur Pressio®.
- Déconnecter le cathéter du câble d’extension.
- Procéder à l’explantation du cathéter.
- Vérier l’intégrité du cathéter explanté.
- Retirer le boulon en le dévissant délicatement.
Pr é c a u t i o N :
ve i l l e R àR e t i R e R l a b a g u e d’e s p a c e m e n t l o R s d u R e t R a i t d u b o u l o n .
Précautions pour le monitoring,8.
le suivi et le nursing du patient
Mi s e e N g a r d e :
nep a s u t i l i s e R d e k i t pR e s s i o ® p o u R m o n i t o R i n g s i a u c u n p e R s o n n e l f o R m é n’e s t d i s p o n i b l e
p o u R a s s u R e R u n e s u R v e i l l a n c e c o n t i n u e .
Pr é c a u t i o N s :
lem o n i t o R i n g d u p a t i e n t d o i t ê t Re a s s u R é u n i q u e m e n t p a R u n a n e s t h é s i s t e ,
u n n e u R o c h i R u R g i e n o u a u t R e p e R s o n n e q u a l i f i é e .
ile s t R e c o m m a n d é d’u t i l i s e R l a p i n c e d e fixation s u R l e c â b l e d’e x t e n s i o n d e c a t h é t e R p o u R
p R é v e n i R t o u t e d é c o n n e x i o n d u c a t h é t e R.
Durant le monitoring, entretenir le site d’implantation du cathéter conformément
aux procédures hospitalières standard.
Pr é c a u t i o N s :
ma n i p u l e R l e p a t i e n t a v e c p R é c a u t i o n p o u R é v i t e R t o u t e d é c o n n e x i o n d u c â b l e o u t o u t
d é p l a c e m e n t d u c a t h é t e R i m p l a n t é .vé R i f i e R l a c o n n e x i o n d u c a t h é t e R a u c â b l e d’e x t e n s i o n
e t a u s y s t è m e d e m o n i t o R i n g pR e s s i o ® a p R è s a v o i R m a n i p u l é l e p a t i e n t .
le s c a t h é t e R s pR e s s i o ® s o n t i n s e n s i b l e s a u x e f f e t s p o u v a n t s u R v e n i R l o R s d’u n e s é q u e n c e
d’iRm, m a i s i l s p e u v e n t ê t R e u n e s o u R c e d’a R t é f a c t s .
nep a s u t i l i s e R u n s y s t è m e d e m o n i t o R i n g pR e s s i o ® e t l e c a t h é t e R i m p l a n t é pR e s s i o ®
e n m ê m e t e m p s q u ’u n i n s t R u m e n t é l e c t R o -c h i R u R g i c a l àh a u t e f R é q u e n c e o u q u ’u n
d é f i b R i l l a t e u R. lec a t h é t e R e t /o u l e s y s t è m e d e m o n i t o R i n g p o u R R a i e n t ê t R e e n d o m m a g é s
o u l e u R f o n c t i o n n e m e n t p e R t u R b é .
Repère de « 4 cm » au niveau de l’écrou
de serrage.
Capteur à l’extrémité du boulon.
FRANÇAIS

20/74
Complications / Eets secondaires9.
Les complications qui peuvent résulter de l’implantation d’un système de monitoring
Pressio® comprennent les risques inhérents à tout geste chirurgical et à la mise
en place d’un corps étranger.
Infection
La complication majeure associée à un monitoring de ce type est l’infection.
Les risques d’infections peuvent être réduits en respectant les techniques d’asepsie
de manipulation et d’implantation du cathéter et en respectant la durée maximale
d’implantation du cathéter (5 jours). Si le monitoring doit sepoursuivre au-delà de ce
délai, il est recommandé de mettre un nouveau système en place dans un autre site.
En cas d’infection, l’ablation du système est indiquée parallèlement à
l’instauration d’un traitement spécique par voie générale ou intrathécale.
Hémorragie cérébrale
On peut également constater une hémorragie cérébrale lors de ce type
de monitoring.
La probabilité de cette complication peut être réduite en limitant le nombre
de ponctions cérébrales lors de la procédure d’introduction et en s’assurant que
cette procédure est uniquement réalisée par des professionnels formés et habilités.
Ces complications nécessitent une intervention rapide d’un médecin.
Garantie10.
Les performances du kit Pressio® pour monitoring sont assurées uniquement
avec la gamme de systèmes de monitoring Pressio® et les accessoires conçus,
testés, et fabriqués par Sophysa.
Sophysa garantit que ce dispositif médical est exempt de tout défaut de matériel
et de fabrication. A l’exception de cette garantie, Sophysa n’accorde aucune autre
garantie, expresse ou implicite, y compris de commercialisation ou d’adaptation
à un usage particulier. Sophysa ne saurait être tenue responsable pour tout incident,
complication, dommage ou préjudice survenu directement ou indirectement
suite à l’usage de ce dispositif. Sophysa n’autorise quiconque à assumer pour elle
la responsabilité de ses produits.
Traitement des produits après usage11.
Destruction après usage
Un kit Pressio® pour monitoring déconditionné, utilisé ou explanté devra être détruit
selon les procédures en vigueur dans l’établissement de santé.
Retour des produits
Si un kit Pressio® pour monitoring explanté devait être retourné à Sophysa pour
analyse, signaler le cas échéant si un nettoyage a été eectué.
An d’analyser correctement le produit retourné, celui-ci devra être accompagné
d’une che de retour explicative.
No t e s :
ile s t R e c o m m a n d é d e n e p a s n e t t o y e R l e d ispositif p o u R u n e m e i l l e u R e a n a l y s e .
da n s l e c a s d’u n k i t pR e s s i o ® p a R e n c h y m a t e u x àb o u l o n , R e t i R e R l e c a t h é t e R d u b o u l o n
a v e c p R é c a u t i o n .
Symboles12.
Référence du catalogue
Fabricant
Méthode de Stérilisation utilisant
de l’Oxyde d’Ethylène
Ne pas réutiliser
Ne pas restériliser
Utiliser jusqu’au
Code du lot
LOT
Numéro de série
Marquage CE de conformité
Se référer à la notice d’emploi
ÉQUIPEMENT DE TYPE BF : Procurant un degré
approprié de protection contre les chocs
électriques, ayant une partie appliquée isolée
de type F (ottante).
Conditions de température pour le stockage
et le transport
Conserver au sec
Fragile, à manipuler avec précaution
This manual suits for next models
1
Table of contents
Languages:
Popular Medical Equipment manuals by other brands


Getinge
Getinge Arjohuntleigh Nimbus 3 Professional Instructions for use

Mettler Electronics
Mettler Electronics Sonicator 730 Maintenance manual

Pressalit Care
Pressalit Care R1100 Mounting instruction

Denas MS
Denas MS DENAS-T operating manual

bort medical
bort medical ActiveColor quick guide

AccuVein
AccuVein AV400 user manual


