Sound Oasis S-560-03 User manual

Model S-560-03
Instruction Manual
Sound Oasis®
Sound Therapy System
sleep better. feel better. live better.
HW_S-560-03_UserMan_ENG_02.indd 1HW_S-560-03_UserMan_ENG_02.indd 1 9/25/08 10:31:23 AM9/25/08 10:31:23 AM

Important Safeguards 2
Key Buttons & Features 3
Front of Unit 3
Rear of Unit 4
Power Sources 5
Using Battery Power 5
Using AC Power 5
Setting the Clock & Alarm 5
Setting the Clock 5
Setting the Alarm 5
Turning the Alarm On & Selecting Wake-up Sounds 6
Setting Alarm Sounds 6
Turning The Alarm Off 6
Snooze Cycle 7
To Operate 7
Using The Programmable Snooze•Off/Resume Button 8
Placement of Unit 9
Using Headphones/Pillow Speaker 9
Built-in Sounds 9
Operating The Sound Card Feature 10
Caution 11
FCC Information 12
Contact 13
Table of Contents
HW_S-560-03_UserMan_ENG_02.indd 2HW_S-560-03_UserMan_ENG_02.indd 2 9/25/08 10:31:23 AM9/25/08 10:31:23 AM

Page 1
sleep better. feel better. live better.
Sound Oasis makes life better!
Thank you for choosing Sound Oasis®!
Sound Oasis® is the world leader in sound therapy systems and we
are dedicated to making your life healthier and more enjoyable with
creative sound solutions that combine superior quality with the very
latest technology.
Pleasetakeafewmomentstoreviewthefollowingimportantinformation
before using this item.
Thank You!
sleep better. feel better. live better.
HW_S-560-03_UserMan_ENG_02.indd 3HW_S-560-03_UserMan_ENG_02.indd 3 9/25/08 10:31:23 AM9/25/08 10:31:23 AM

Page 2 Sound Oasis®
Important Safeguards
Read all instructions.•
To protect against electrical shock, do not immerse cord, plug•
or unit in water or other liquid. Care should be taken so that
objects do not fall on and liquids are not spilled through
openings in the unit.
Unplug the power cord from the wall outlet when unit is left•
unused for a long period of time.
Do not operate with a damaged cord or plug, or after the unit•
malfunctions or has been damaged in any manner.
The unit should be situated away from heat sources such as•
direct sunlight, radiators, heat registers, stoves or other heat-
producing appliances.
The unit should only be connected to the enclosed power•
supply or one described in these instructions, or as marked
on the appliance.
To clean, gently wipe with a soft cloth moistened with warm water•
or mild detergents only, and then remove all moisture with a soft,
dry cloth. Do not use harsh solvents or chemicals for cleaning.
HW_S-560-03_UserMan_ENG_02.indd 4HW_S-560-03_UserMan_ENG_02.indd 4 9/25/08 10:31:24 AM9/25/08 10:31:24 AM
Page 3
sleep better. feel better. live better.
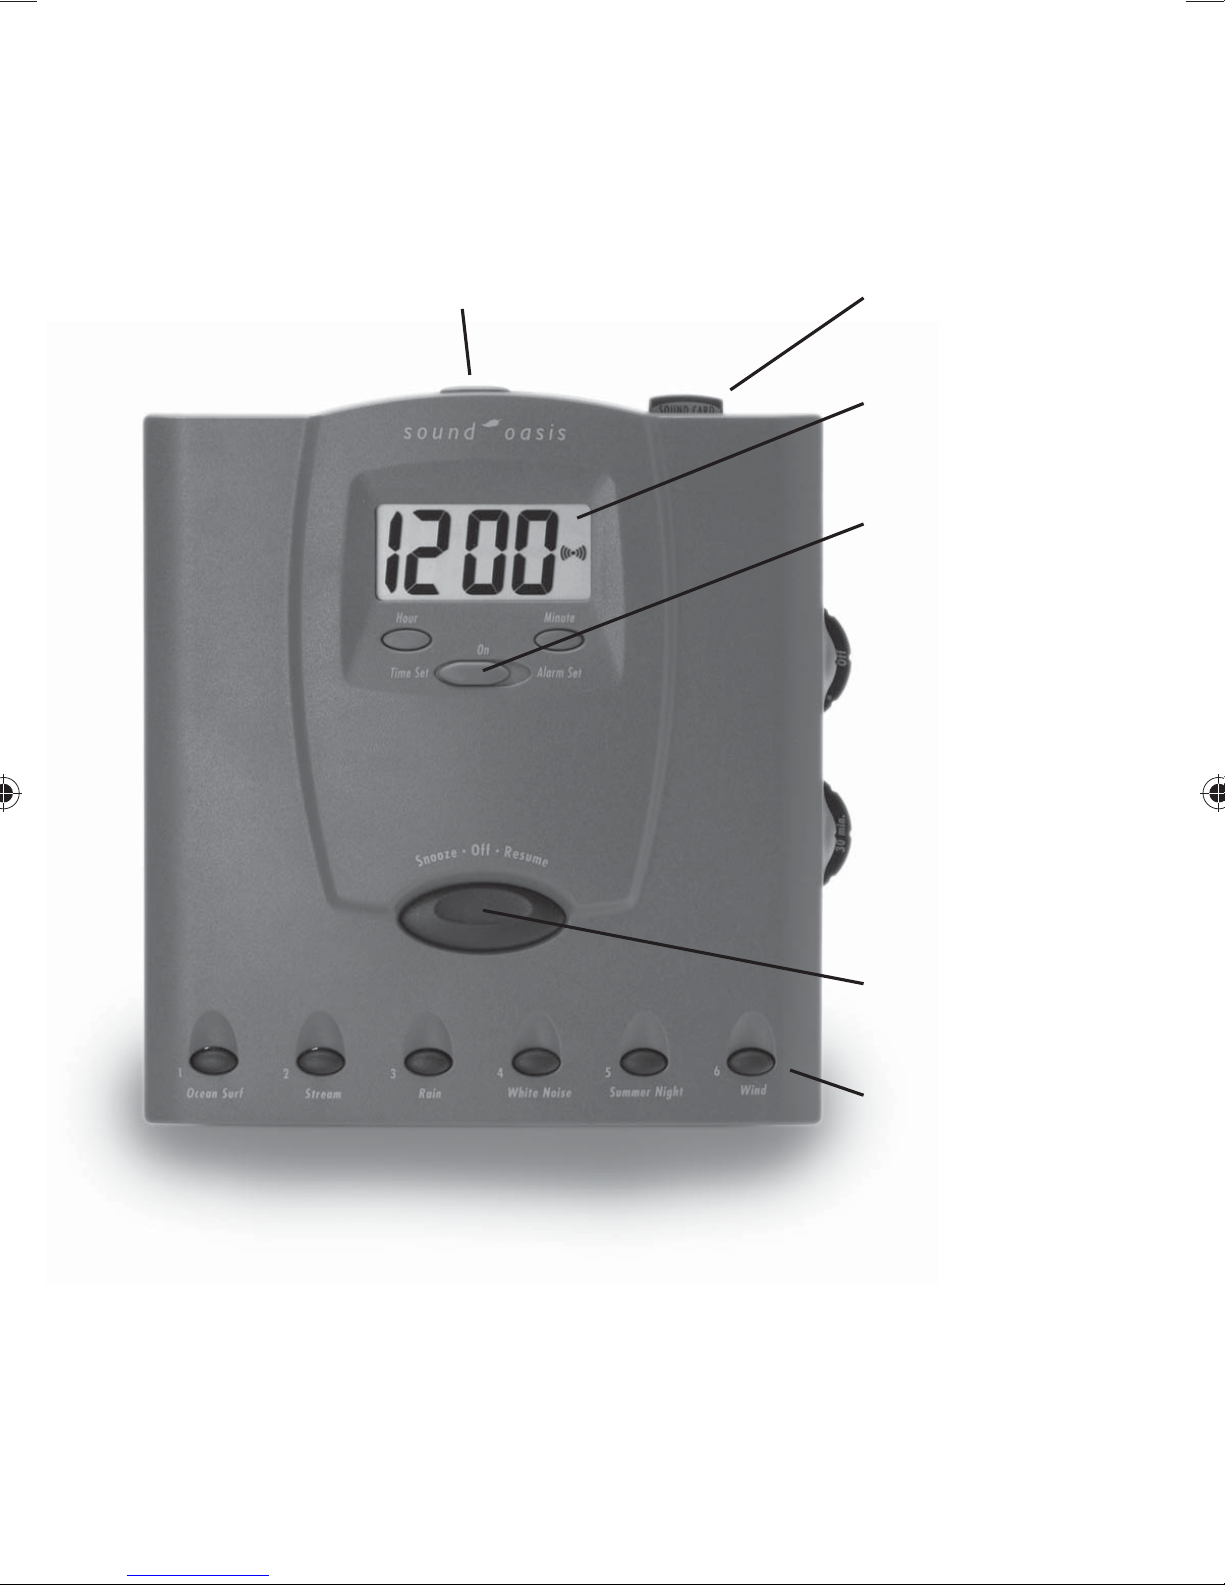
Key Buttons & Features
Front of Unit
Programmable
off/resume
Built-in sounds
Rotary on/off/
Volume control
Time Set /
Alarm Set
LCD Clock & Alarm
Sound Card Button
Alarm Off/Sound Selector switch
4 position timer
continuous, 30, 60,
and 90 minute
settings
HW_S-560-03_UserMan_ENG_02.indd 5HW_S-560-03_UserMan_ENG_02.indd 5 9/25/08 10:31:24 AM9/25/08 10:31:24 AM

Page 4 Sound Oasis®
Removable stand
position unit upright or flat
Battery Compartment
Key Buttons & Features
Rear of Unit
Adapter jack
(adapter included)
Omni directional
reflective speaker
Integral wall
mount hook
Sound Card Button Sound Card Slot
Headphone/Speaker
Pillow Jack
HW_S-560-03_UserMan_ENG_02.indd 6HW_S-560-03_UserMan_ENG_02.indd 6 9/25/08 10:31:24 AM9/25/08 10:31:24 AM

Page 5
sleep better. feel better. live better.
Power Sources
Your Sound Oasis® unit can be powered by an AC Adapter (included) or
by 4“AA”batteries (not included).
Using Battery Power
To install batteries, open the Battery Compartment located at the
bottom of the unit. Insert 4 “AA” alkaline batteries in the direction
marked by the indicators inside the Battery Compartment.Replace the
Battery Compartment Door.
Using AC Power
Connect the supplied AC Adapter to the AC Adapter Jack located on
the side of the unit and plug the AC Adapter into a wall outlet. When
plugged in, the unit will draw no power from any batteries that you may
have installed in the unit’s Battery Compartment. If a power outage
occurs, the unit will automatically switch over to battery power.
Setting the Clock & Alarm
Setting the Clock
To set the clock, slide the Time Set/Alarm Set switch on the front of the
unit to the Time Set position. Press the Hour and Minute buttons until
your desired time is shown on the Clock Display. A “P” in the upper left
corner indicates PM. To exit the Time Set mode, move the Time Set/
Alarm Set switch to the middle ON position.
Setting the Alarm
To set the alarm, slide the Time Set/Alarm Set switch on the front of
the unit to the Alarm Set position. An “AL” icon will be displayed to
show you that you are in Alarm Set mode. Press the Hour and Minute
buttons until your desired alarm time is shown on the Clock Display. To
exit the Alarm Set mode, move the Time Set/Alarm Set switch to the
middle“On” position.
HW_S-560-03_UserMan_ENG_02.indd 7HW_S-560-03_UserMan_ENG_02.indd 7 9/25/08 10:31:24 AM9/25/08 10:31:24 AM

Page 6 Sound Oasis®
Turning the Alarm On & Selecting Wake-up Sounds
To turn the alarm “On”, simply move the Alarm Sound selector switch
(located on the top of the unit above the Clock Display) to Buzzer for a
buzzer alarm,or to Sounds for a nature sound alarm (see Setting Alarm
Sounds for more details). When the alarm is turned “On”, the Alarm On
Icon [ ] will be visible on the right side of the Clock Display.
Note:
To wake to a nature sound alarm, the unit’s Rotary On/Off Volume
Control must be turned ON. If the Rotary On/Off Volume Control
is turned ON, sound playback can still be stopped with the 30, 60,
90-minute timer function or by the Snooze•Off/Resume Button.
Setting Alarm Sounds
You can wake to a buzzer or any one of the six (6) built-in nature sounds.
If you are using a Sound Card, you may also wake to any one of the six
(6) Sound Card sounds (so long as the Sound Card Button is in the ON
position).
Note:
If you choose to wake to a nature sound, your unit will play whatever
nature sound was last played.
Turning The Alarm Off
The alarm can be turned off by:
Moving the• Alarm Sound selector switch to the Alarm Off
position.The Alarm On Icon [ ] will disappear from the Clock
Display to show that the alarm is OFF.
Pressing the• Snooze•Off/Resume Button.
(See Snooze Cycle for more details)
HW_S-560-03_UserMan_ENG_02.indd 8HW_S-560-03_UserMan_ENG_02.indd 8 9/25/08 10:31:24 AM9/25/08 10:31:24 AM

Page 7
sleep better. feel better. live better.
Snooze Cycle
When waking to either the buzzer or a nature sound, pressing the
Snooze•Off/Resume Button when the alarm sounds will turn off the
alarm and start a four (4) minute snooze cycle (the Alarm On Icon
[ ] will flash signifying that you are in the snooze cycle).The snooze
cycle will repeat (for a limitless number of cycles) every time the
Snooze•Off/Resume Button is pressed until the Alarm Sound selector
switch is moved to the Alarm Off position.
Note:
Ifyouwaketoanaturesound alarm and theSnooze•Off/ResumeButton
is Not pressed, the nature sound alarm will continue for whatever time
duration is selected on the 4 Position Timer dial (30, 60, 90 minutes or
continuous setting).
If you awake to the buzzer sound and the Snooze•Off/Resume Button
is Not pressed, the buzzer will sound for one (1) minute and then
automatically turn off.
To Operate
Follow these steps to use your Sound Oasis®.
Install batteries into the• Battery Compartment at the bottom of
the unit or connect the AC Adapter to the unit.
Your Sound Oasis® unit includes a• Removable Stand.To install the
stand, hold the stand so the arrows point to the front of the unit.
Then insert the stand’s tabs into the recess holes located on the
bottom of the case. Slide the stand in the direction of the arrows
until both tabs“snap”into place.
Turn the unit on by rotating the• On/Off Volume Control Dial
to your desired volume.When first turned on, the unit will
automatically play its factory sound setting – “Ocean Surf ”. To
select a different sound, simply press one of the other sound
buttons located at the front of the unit.
HW_S-560-03_UserMan_ENG_02.indd 9HW_S-560-03_UserMan_ENG_02.indd 9 9/25/08 10:31:25 AM9/25/08 10:31:25 AM

Page 8 Sound Oasis®
Select the length of time you want the sound to be played by•
rotating the Timer Control Dial to the desired setting. Four
positions are available; Continuous (Cont.) for constant playback;
“30”for 30 minutes,“60”for 60 minutes and“90” for 90 minutes. On
the“30”,“60”and “90”minute timer positions, the sound gradually
fades away in the last 12 minutes before the unit turns itself off.
In addition to the timer feature, the unit may be turned off•
manually by turning the On/Off Volume Control Dial off or by
pressing the programmable Off/Resume Button once. (Described
in more detail below.)
Note:
After turning the unit off with the On/Off Volume Control Dial, wait
at least 15 seconds before turning the unit on again. This will allow the
units’computer controlled electronics to reset.If you do not wait at least
15 seconds, you may hear a mixture of sounds coming from the unit.
Using The Programmable Snooze•Off/Resume Button
The unique programmable Snooze•Off/Resume Button located at
the front of the unit allows you to conveniently turn the unit off during
sound playback or to repeat your last played sound sequence.
Pressing the programmable Snooze•Off/Resume Button once during
sound playback turns the sound off automatically without having to
turn the unit off with the On/Off Volume Control Dial. Pressing the
programmable Snooze•Off/Resume Button a second time repeats
your last played sound at the same volume and timer setting.
Example:
If you are listening to the “Ocean Surf ” sound at half volume on the
60-minute timer position, pressing the programmable Snooze•Off/
Resume Button once will turn the unit off. Pressing it again will
automatically repeat the entire sequence by automatically playing
back the “Ocean Surf ” sound at half volume for another full 60-minute
period.
HW_S-560-03_UserMan_ENG_02.indd 10HW_S-560-03_UserMan_ENG_02.indd 10 9/25/08 10:31:25 AM9/25/08 10:31:25 AM

Page 9
sleep better. feel better. live better.
Placement of Unit
The design of Sound Oasis® allows the unit to be placed flat on its back,
hung on a wall, or placed in an upright position to save table space. To
place the unit on its back, remove the stand by simply pulling it away
from the base of the unit in the opposite direction of the arrows. To
mount the unit on a wall, hang the unit from a wall hook or nail using
the integral wall mount.The unit will lie flush against the wall.
Note:
The Removable Stand allows you to conserve luggage space when
traveling.
Using Headphones/Pillow Speaker
For listening to sounds in private, your Sound Oasis® unit includes a
Headphone/Pillow Speaker Jack (headphones or pillow not included).
The headphone jack accepts a 1/8”(3.5mm) monaural or stereo plug, for
monaural sound playback.
Built-in Sounds
Sound Oasis® incorporates 6 built-in sounds that have been digitized
from actual sounds of nature by the world’s leading recorder of nature.
Choose from Ocean Surf, Stream, Rain, White Noise, Summer Night
and Wind.
1. Ocean Surf
The ocean surf provides a calm rhythm that helps you drift off to sleep
or creates a relaxing oceanside environment.
2. Stream
A rippling mountain stream helps you unwind and creates an excellent
background sound for daily activities in the home or at the office.
HW_S-560-03_UserMan_ENG_02.indd 11HW_S-560-03_UserMan_ENG_02.indd 11 9/25/08 10:31:25 AM9/25/08 10:31:25 AM

Page 10 Sound Oasis®
3. Rain
A tranquil rainfall provides a peaceful setting for relaxation and sleep.
The shower sound is particularly good at masking higher-toned
background noise.
4. White Noise
The steady flow of a cascading waterfall is perfect as a “natural white
noise” for masking unwanted background sounds.
5. Summer Night
A gentle chorus of crickets provides a peaceful and restful environment
for contemplation, rest and sleep.
6. Wind
Dramatic, but calming, gusts of wind sweep you away to a wilderness
retreat.
Operating The Sound Card Feature
You can conveniently add 6 additional sounds to your Sound Oasis®
with our unique Sound Oasis® Sound Cards (available separately).Follow
these steps to use the Sound Cards.
Insert a• Sound Card into the Sound
Oasis® Sound Card Slot with the
indicator arrow on the Sound Card
pointing into the slot and facing the
front of your Sound Oasis®.
Push the• Sound Card down until you
feel the Sound Card meet the bottom
of the slot (about 1/2”/ 10mm of the
Sound Card will go into the slot).
To activate the• Sound Card function,
press the Sound Card Button located
next to the Sound Card Slot.The
Sound Card Button will pop-up to
HW_S-560-03_UserMan_ENG_02.indd 12HW_S-560-03_UserMan_ENG_02.indd 12 9/25/08 10:31:25 AM9/25/08 10:31:25 AM

Page 11
sleep better. feel better. live better.
indicate that the Sound Card is
activated.
To play back the sounds stored•
on the Sound Card, turn your
unit on (if not on already), and
press the Sound Button next to
the number that corresponds to
the sound number you want to
listen to from the Sound Card.
Example:
If“Ocean Rain”is the 5th Sound Card
sound, pressing the sound button
with a“5”next to it will play the“Ocean
Rain” sound.
To deactivate the• Sound Card function, press the Sound Card
Button down.You may then listen to the sounds built into your
Sound Oasis® in the normal manner.
Caution
Do not touch the metal contact on the• Sound Card.Touching
these electrical contacts with statically charged objects, including
your fingers, could erase the sounds stored in the Sound Card.
If you remove the• Sound Card from your Sound Oasis® system,
store the card inside its carton to protect the card’s electrical
contacts from dust and debris.
Do not place excessive pressure on the• Sound Cards.
Do not expose• Sound Cards to heat, cold or liquids.
HW_S-560-03_UserMan_ENG_02.indd 13HW_S-560-03_UserMan_ENG_02.indd 13 9/25/08 10:31:25 AM9/25/08 10:31:25 AM

Page 12 Sound Oasis®
FCC Information
This equipment has been tested and found to comply with the limits
for a class B digital Device, pursuant to part 15 of the FCC Rules. These
limits are designed to provide reasonable protection against harmful
interference in a residential installation.This equipment generates,uses,
and can radiate radio frequency energy, and if not installed and used
in accordance with the instructions, may cause harmful interference to
radio communications.However,there is no guarantee that interference
will not occur in a particular installation.
If this equipment does cause harmful interference to radio or television
reception, which can be determined by turning the equipment off and
on, the user is encouraged to try to correct the interference by one or
more of the following measures:
Reorient or relocate the receiving antenna.•
Increase the separation between the equipment and receiver.•
Connect the equipment to an outlet on a circuit different from•
which the receiver is connected.
Consult the dealer or an experienced radio/TV technician for help.•
This device complies with Part 15 of the FCC Rules. Operation is subject
to the following two conditions:
This device may not cause harmful interference.1.
This device must accept any interference received, including2.
interference that may cause undesired operation.
HW_S-560-03_UserMan_ENG_02.indd 14HW_S-560-03_UserMan_ENG_02.indd 14 9/25/08 10:31:25 AM9/25/08 10:31:25 AM

Page 13
sleep better. feel better. live better.
Contact
Sound Oasis Company
P.O. Box 526,
Marblehead, MA 01945-0526
1-866-625-3218
www.sound-oasis.com
HW_S-560-03_UserMan_ENG_02.indd 15HW_S-560-03_UserMan_ENG_02.indd 15 9/25/08 10:31:25 AM9/25/08 10:31:25 AM

Art:95 A200 01
HW_S-560-03_UserMan_ENG_02.indd 16HW_S-560-03_UserMan_ENG_02.indd 16 9/25/08 10:31:25 AM9/25/08 10:31:25 AM
Table of contents
Other Sound Oasis Personal Care Product manuals


