Sound Sation MHL-200 User manual

USER’S MANUAL
Please read this manual carefully and proper take care of this manual.
MHL-200
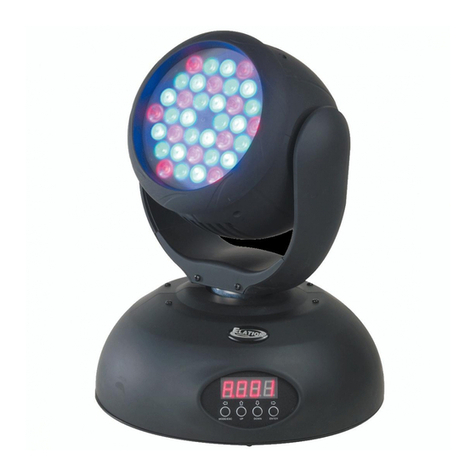
200W Beam Moving Head
with philips 5R lamp

2
ENGLISH
Dear customer,
First of all thanks far purchasing a SOUNDSATION® product. Our mission
is to satisfy all possible needs of musical instrument, professional audio and
lighting users offering a wide range of products using the latest technologies.
We hope you will be satised with this item and, if you want to collaborate, we
are looking for a feedback from you about the operation of the product and
possible improvements to introduce in the next future. Go to our website www.
soundsationmusic.com and send an e-mail with your opinion, this will help
us to build instruments ever closer to customer’s real requirements.
One last thing: read this manual before using the instrument, an incorrect
operation can cause damages to you and to the unit. Take care!
The SOUNDSATION Team

3
ENGLISH
TABLE OF CONTENTS
1. GETTING STARTED....................................................................................4
1.1 Important Safety Symbols ........................................................................................4
1.2. Important Safety Instructions...................................................................................4
2. INTRODUCTION..........................................................................................7
2.1 Features ...................................................................................................................8
2.2 Before You Start .......................................................................................................8
3. INSTALLATION..........................................................................................10
3.1. Lamp Fitting/Replacing..........................................................................................10
3.2. Brightness adjustment...........................................................................................10
3.3. Rigging and Hook:.................................................................................................10
4. CONNECTIONS.........................................................................................12
4.1. Mains Connections................................................................................................12
4.2. DMX-512 Connection ............................................................................................13
4.3. Building a Serial DMX Chain .................................................................................13
4.4. DMX Channels ......................................................................................................14
5. ADDRESSING............................................................................................17
5.1. Addressing setting .................................................................................................17
5.2. Controlling .............................................................................................................18
6. TECHNICAL SPECIFICATIONS................................................................18
7. MAINTENANCE AND CLEANING ............................................................19
7.1. Replacing The Fuse ..............................................................................................20
8. WARRANTY AND SERVICE .....................................................................22
9. WARNING .................................................................................................23

4
ENGLISH
1. GETTING STARTED
1.1 IMPORTANT SAFETY SYMBOLS
The symbol is used to indicate that some hazardous live termi-
nals are involved within this apparatus, even under the normal
operating conditions, which may be sufcient to constitute the
risk of electric shock or death.
The symbol is used in the service documentation to indicate
that specic component shall be replaced only by the compo-
nent specied in that documentation for safety reasons.
Protective grounding terminal
Alternating current/voltage
Hazardous live terminal
Denotes the apparatus is turned on
Denotes the apparatus is turned off
WARNING: Describes precautions that should be observed to prevent the
danger of injury or death to the operator.
CAUTION: Describes precautions that should be observed to prevent dan-
ger of the apparatus.
1.2. IMPORTANT SAFETY INSTRUCTIONS
fRead these instructions
fKeep these instructions
fHeed all warning
fFollow all instructions
This device has left our premises in absolutely perfect condition. In order to
maintain this condition and to ensure a safe operation, it is absolutely neces-
sary for the user to follow the safety instructions and warning notes written
in this user manual. Damages caused by non-observance are not subject to

5
ENGLISH
MHL-200 User’s manual
warranty.
Water / Moisture
This lighting is intended to indoor use only. To prevent risk of re or shock,
do not expose xture to rain or moisture. Make sure there are no ammable,
explosive or corrosive materials surrounded in 10 meters while operating.
Heat
The apparatus should be located away from heat sources such as radiators,
stoves or other appliances that produce heat. Fixture may carry high heat, do
not aim at objective exceeding 2 minutes.
If the device has been exposed to drastic temperature uctuation, (e.g. after
transportation), do not open the light at once. The agglomeration of vapor is
likely destroying your product. Do not open the product until it reach normal
temperature.
CAUTION: During the operation, the housing becomes very hot.
Ventilation
The unit must be installed in a location with adequate ventilation, at least 5m
away from adjacent surfaces. Be sure that no ventilation slots are blocked.
Object and Liquid Entry
Objects do not fall into and liquids are not spilled into the inside of the appara-
tus for safety.
Installation
Always secure xture using a safety chain and carrying handles. Never carry
the xture by its cord.
Power Cord and Plug
This device falls under protection class 1. The power plug must only be plug-
ged into a protection class 1 outlet. Handle the power cord all connections with
the mains with particular caution! Protect it from being walked on or pinched
particularly at plugs, convenience receptacles, and the point where they exit
from the apparatus.
Do not defeat the safety purpose of the polarized or grounding-type plug. A
polarized plug has two poles; a grounding-type plug has two poles and a third
grounding terminal. The third prong is provided for your safety. If the provided
plug does not t into your outlet, refer to an electrician for replacement.
Power Supply
Always make sure that you are connecting to the proper voltage and the line
voltage not higher than stated on the decal or rear panel of the xture. Unplug
this apparatus during lightning storms or when unused for long periods of time.

Fuse
To prevent the risk of re and damaging the unit, please use only of the rec-
ommended fuse type as described in the manual. Before replacing the fuse,
make sure the unit turned off and disconnected from the AC outlet.
Electrical Connection
Always disconnect from the power source before servicing or replacing fuse/
lamp and be sure to replace with same fuse/lamp size and type. Cut off power
before moving, repairing and cleaning the machine. Improper electrical wiring
may invalidate the product warranty. To avoid electric shock, all xtures must
be connected to circuits with a suitable ground.
Do not power on and power off the xture in a short time. Never frequently
open/close the lighting for reducing the life of the lamp. During the initial start-
up some smoke or smell may arise. This is a normal process and does not
necessarily mean that the device is defective.
DMX connection
When use DMX controller, please make sure that there is no interference
sources (e.g. intercom, high frequency radio waves and radiation source).
Cleaning
Clean only with a dry cloth. Do not use any solvents such as benzol or alcohol.
Servicing
In case of failure or misfunction occurred, stop using the unit immediately.
Never try to repair the unit by yourself. Repairs carried out by unskilled people
can lead to damage or malfunction. Please contact the nearest authorized
technical assistance center. Buy the same spare parts/components from ma-
nufacturer directly.
Any damage that cased by violating this manual is out of insurance, our com-
pany will not take the responsibility.
Warning
Never look directly into the light source, as sensitive persons may suffer an
epileptic shock (especially meat for epileptics)! Avoid direct eye exposure to
the light source while it is on.
Keep away children and amateurs!
6
ENGLISH
MHL-200 User’s manual

7
ENGLISH
MHL-200 User’s manual
2. INTRODUCTION
Thanks for purchasing our MHL-200 Beam Moving Head Light. You acquired a
versatile, powerful and intelligent lighting-effect for creating decorative effects.
This xture has been designed for indoor use only and thought for profession-
al use, for example, on stages, in discotheques, theatres, etc. Lighting effects
are not designed for permanent operation. Consistent operation breaks will
ensure that the device will serve you for a long time without defects. Do not
shake the device. Avoid brute force when installing or operating the device.
Never lift the xture by holding it at the projector head, as the mechanic may
be damaged. Always hold the xture at the transport handles. When choosing
the installation spot, please make sure that the device is not exposed to ex-
treme heat, moisture or dust. There should not be cables lying around. Make
sure the safety of others and yours. Always x the xture with an appropriate
safety-rope. Fix the safety rope at the correct holes only.
Only operate the xture after having checked that the housing is rmly closed
and all screws are tightly fastened. The lamp must never be ignited if the
objective lens or any housing cover is open, as discharge lamps may explode
and emit a high ultraviolet, which may cause burn. The maximum ambient
temperature must never be exceeded.
CAUTION: The lens has to be replaced when it is obviously dam-
aged, so that its function is impaired, e.g. dug to cracks or deep
scratches.
Operate the device only after you have familiarized with its functions. Persons
not qualied are not allowed to operate the device. Most damages are the
result of unprofessional operation.
CAUTION: The lamp has to be replaced when it is damaged or de-
formed due to the heat!
Please use the original packing if the device is to be transported. Also consid-
er that unauthorized modications on the device are forbidden due to safety
reasons. Never remove the serial barcode from the device as this would make
the guarantee void.
If this device will be operated in any way different to the one described in this
manual, the product may suffer damages and the guarantee becomes void.
Furthermore, any other operation may lead to dangers like short-circuit, burns,
electric shock, lamp explosion, crash.

8
ENGLISH
MHL-200 User’s manual
2.1 FEATURES
fColor wheel with fourteen color diachronic lters plus white
fGobo wheel with 17 plugged gobos plus white, with high speed gobo rota-
tion effect
fHigh speed rotating 8-facet prism
f15 times/second strobe frequency
fAddressing, special functions setting, effects calibration via control panel
with 4-digit LED display
fReadout xture and lamp usage, receiving DMX values, temperature, etc
fMacro-function for rotating gobo/rotating prism combinations
fBlackout while the light head moving or gobo color changing
fRemote reset function
fIntelligent control panel with 4-digit LED display
fSilent fans cooling
f16 DMX channels
fPan movement rang 530°, Tilt movement rang 280°
fHigh luminous-efciency parabolic mirror and double condenser system
fMechanical multi-step focus
fDMX controllable Focus is
fPre-programmed / changeable grating pulse effect
fAll lenses are anti-reection coated
f9 high quality stepper-motors for smooth movement
fSelf-resettable thermo-fuse
fFor PHILIPS 5R 189W lamp
This user manual is made to provide both an overview of the con-
trols, as well as information on how to use them. In order to help you
understand the links between the various controls, we have gathe-
red in groups according to their functions.
2.2 BEFORE YOU START
2.2.1 Unpacking
Carefully unpack the box and check the contents to ensure that all parts are
present and in good conditions.

9
ENGLISH
MHL-200 User’s manual
• 1pc xture (5R lamp installed)
• 1pc User Manual
• 1pc Power Cable
• 1pc Signal Cable
If anything damaged during transit, notify the shipper immediately and keep
the packing material for inspection. Again, please save the carton and all
packing materials. If the xture must be returned to manufacturer, it is impor-
tant that the xture be returned in the original manufacturer box and packing.
2.2.2 Getting Started
Make sure there is enough space around the unit for proper ventilation and
prevent overheating; do not place the unit on top of hot devices such as
radiators or power ampliers. The xture is connected to mains through the
supplied cable. The product meets the required safety standards. Blown fuses
must be replaced with fuses of the same type and specication.
Make sure that all units must be properly grounded. For your safe-
ty, you should never remove any ground connector from electrical
devices or power cables, or make them inoperative.
Our products are subject to a process of continual further development. There-
fore modications to the technical features remain subject to change without
further notice.

10
ENGLISH
MHL-200 User’s manual
3. INSTALLATION
DANGER: Install the lamp with the device switched off or unplug
from mains!
3.1. LAMP FITTING/REPLACING
Open the small lamp cover by loosening 3 screws. Open the small back cover
at the back panel from the lighting, and gently pull the lamp out. If you want to
change the lamp, remove the old lamp from the socket.
Do not install the lamp with a higher wattage! If so, the lamp will generate high
temperatures, and the device is not designed for that case.
Damages caused by non-observance are not subject to warranty. Please
follow the lamp manufacturer’s announcement! Do not touch the glass bulb
bare handed during the installation. Make sure that the lamp is installed tightly
into the lamp holder. Reinstall the top cover of the head and tighten those 4
screws.
Donotoperatethexturewithoperatehousing-cover!
3.2. BRIGHTNESS ADJUSTMENT
The brightness of the lighting has been aligned at the factory. Due to the diffe-
rence between lamps, ne adjusted may improve light performance.
Strike the lighting, open the grating and the diaphragm, adjust the brightness
to 100%, and then focus the light on a at surface (e.g. on a wall). Through
using three “A/B/C” adjusting screws, you can make the light focus on the hot
spot (the brightest of the light line). Rotate one screw once to drag the hot spot
through projectile shadow in the direction of diagonal.
If you cannot nd the hot spot, adjust the lamp until the light line is even.
Through adjusting three “A/B/C” screws at the same time and rotate 1/4 rotate
until the light line distribute equably then pull the lamp into, doing so can redu-
ce hot spot.
If the light in the edge is brighter than in the center, or the light output is very
low, it means the lamp is too back at the reecting shelf. Through adjusting
three “A/B/C” screws at the same time and rotate 1/4 rotate to push out the
lamp until the light is bright and distribute equably.
3.3. RIGGING AND HOOK:

11
ENGLISH
MHL-200 User’s manual
Pay attention to the safety! Please respectively consider the EN
60598-2-17 and the national standard during the installation. The
authorized dealer must only carry out the installation.
The installation of the xture has to be built and constructed in a way that it
can hold 10 times the weight for 1 hour without any harming demolishment.
The installation must always be secured with a secondary safety attachment,
e.g. an appropriate catch net. This secondary safety attachment must be
constructed in a way that no part of the installation can fall down if the main
attachment fails.
When rigging, de-rigging or servicing the xture staying in the area below the
installation place, on bridges, under high working places and other endange-
red areas is forbidden. The operator has to make sure that the safety measure
and the machine’s technical installation is approved by an expert before taking
into operation for the rst time and after changes before taking into operation
anther time. He has also to make sure that an expert approves safety measu-
re and the machine’s technical installation once a years.
WARNING:Thextureshouldbeinstalledoutsideareaswhereper-
sons may walk by or be seated.
IMPORTANT:Overheadriggingrequiresextensiveexperience,inclu-
ding (but not limited to) calculating working load limits, installation
material being used, and periodic safety inspection of all installa-
tionmaterialandtheprojector.Ifyoulackthesequalications,do
not attempt the installation yourself, but instead use a professional
structural rigger. Improper installation can result in bodily injury or
property loss.
If the xture shall be lowered from the ceiling or high joists, professional trus-
sing systems have to be used. The xture must never be xed swinging freely
in the room. Before rigging make sure that the installation area can hold a
minimum point load of 10 times the projector’s weight.
CAUTION:Fixturemaycausesevereinjurieswhencrashingdown.If
you have doubts concerning the safety of a possible installation, do
notinstallthexture!
CAUTION:Usetwoappropriateclampstorigthextureonthetruss.
Follow the instructions mentioned at the bottom of the base. Make
surethatthedeviceisxedproperly!Ensurethatthestructure
(truss)towhichyouareattachingthexturesissecure.

12
ENGLISH
MHL-200 User’s manual
DANGER OF FIRE! When installing the device, make sure there is
nohighlyinammablematerial(decorationarticles,etc.)withina
distance of minimum 0.5 metre.
The moving-head light can be placed directly on the oor or rigged in any
orientation on a truss without altering its operation characteristics. There are
two possibilities to x the base of the lighting. Use the rigging clamp to merge
M10 or M12 screw – please check the base.
For overhead use, always install a safety rope that can hold at least 10 times
the weight of the xture.
4. CONNECTIONS
4.1. MAINS CONNECTIONS
Connect the device to the mains with the power-plug. The wire corresponden-
ce is as follow:
Cable Pin Intermational
Brown Live L
Blue Neutral N
Yellow/Green Earth
The earth must to be connected! Pay attention to the safety!
Before taking into operation for the rst time, the installation has to be appro-

13
ENGLISH
MHL-200 User’s manual
ved by an expert.
4.2. DMX-512 CONNECTION
The wires must not come into contact with each other; otherwise the xtures
will not work at all, or will not work properly.
Only use a stereo-shielded cable and 3-pin XLR-plugs and connectors in order
to control with the xture or one xture with another.
DMX use of XLR connectors
1 = Ground / Shield
2 = DMX +
3 = DMX -
INPUT OUTPUT
If you are using the recommended controllers, you can connect the DMX-
output of the controller directly with the DMX-input of the rst xture in the
DMX-chain. If you wish to connect DMX-controllers with other XLR-output, you
need to use adapter-cables.
4.3. BUILDING A SERIAL DMX CHAIN
Connect the DMX-output of the rst xture in the DMX-chain with the DMX-in-
put of the next xture. Always connect one output with the input of the next
xture until all xtures are connected.
A word on termination: DMX is a resilient communication protocol, however
errors still occasionally occur. Termination reduces signal errors, and there-
fore best practices include use of a terminator in all circumstances. If you are
experiencing problems with erratic xture behavior, especially over long signal
cable runs, a terminator may help improve performance.
120ohm, 1/4W
resistor
To build your own DMX Terminator: Obtain a 120-ohm, 1/4-watt resistor, and

14
ENGLISH
MHL-200 User’s manual
wire it between pins 2&3 of the last xture. They are also readily available
from specialty retailers.
Complimentarysignalcablecantransmitssignalsto20unitxtures
atmost.Signalamplierisamusttoconnectmorextures.
4.4. DMX CHANNELS
DMX Channel Description
DMX Chan-
nel Function Data Function Description
CH1 Pan 0-255 Rotate 540 degree
CH2 Tilt 0-255 Rotate 270 degree
CH3 Pan Fine 0-255 Pan ne
CH4 Tilt Fine 0-255 Tilt ne
CH5 Pan/Tilt Speed 0-255 Control Pan/Tilt speed
CH6 Frost 0-127 Frost excluded
128-255 Frost inserted
CH7 Strobe
0-3 Strobe from slow to fast
4 Slow strobe
.... ....
103 Fast strobe
104-107 Open
108 Slow pulsation
.... ....
207 Fast pulsation
208-212 Open
213-225 Random slow strobe
226-238 Random medium strobe
239-251 Random fast strobe
252-255 Open
CH8 Dimmer
0 0%
.... ....
255 100%

15
ENGLISH
MHL-200 User’s manual
CH9 Color Wheel
0-6 White
7-13 Red
14-20 Yellow
21-27 Blue
28-34 Green
35-41 Orange
42-48 Magenta
49-55 UV
56-62 CTO
63-69 Yellow green
70-76 Amber
77-83 Light blue
84-90 Pink
91-97 CTB
98-104 Cold white
105-110 Cold white + White
111-116 Cold white +CTB
117-122 CTB + Pink
123-128 Pink + Light blue
129-134 Light blue + Amber
135-140 Amber + Yellow green
141-146 Yellow green + CTO
147-152 CTO +UV
153-158 UV + Magenta
159-164 Magenta + Orange
165-170 Orange + Green
171-176 Green + Blue
177-182 Blue + Yellow
183-188 Yellow + Red
189-191 Red + White
192-223 Color wheel clockwise rotation (fast-slow)
224-225 Color wheel anticlockwise rotation (slow-
fast)

16
ENGLISH
MHL-200 User’s manual
CH10 Gobo Wheel
0-4 White
5-9 Gobo1
10-14 Gobo2
15-19 Gobo3
20-24 Gobo4
25-29 Gobo5
30-34 Gobo6
35-39 Gobo7
40-44 Gobo8
45-49 Gobo9
50-54 Gobo10
55-59 Gobo11
60-64 Gobo12
65-69 Gobo13
70-74 Gobo14
75-79 Gobo15
80-84 Gobo16
85-89 Gobo17
90-95 Gobo17 shakes (slow-fast)
96-101 Gobo16 shakes (slow-fast)
102-107 Gobo15 shakes (slow-fast)
108-113 Gobo14 shakes (slow-fast)
114-119 Gobo13 shakes (slow-fast)
120-125 Gobo12 shakes (slow-fast)
126-131 Gobo11 shakes (slow-fast)
132-137 Gobo10 shakes (slow-fast)
138-143 Gobo9 shakes (slow-fast)
144-149 Gobo8 shakes (slow-fast)
150-155 Gobo7 shakes (slow-fast)
156-161 Gobo6 shakes (slow-fast)
162-167 Gobo5 shakes (slow-fast)

17
ENGLISH
MHL-200 User’s manual
CH10 Gobo Wheel
168-173 Gobo4 shakes (slow-fast)
174-179 Gobo3 shakes (slow-fast)
180-185 Gobo2 shakes (slow-fast)
186-191 Gobo1 shakes (slow-fast)
192-223 Gobo wheel clockwise rotation (fast-slow)
224-225 Gobo wheel anticlockwise rotation (slow-
fast)
CH11 Dark Movement
0-85 Position
86-171 Dark Moment
172-255 Position
CH12 Function 0-255 Inside Program
CH13 Focus 0-255 Focus 0% - 100%
CH14 Prism insertion 0-127 Prism excluded
128-255 Prism inserted
CH15 Prism Rotation
0-2 Position
3-127 Rotating anticlockwise from fast to slow
128 Stop
129-255 Rotating clockwise from slow to fast
CH16 Lamp Control /
Rest
0-127 Unused Range
128-200 Lamp off (staying 5 seconds)
201-254 Lamp on (staying 5 seconds)
255 Rest (staying 5 seconds)
5. ADDRESSING
The control board on the front side of the base allows you to assign the DMX
xture the address, which is dened as the rst channel. For example, if you
set the address to channel 5, this lighting will use the channel 5 to 16 for con-
trol.
Please make sure that you do not have any overlapping channels in order to
control each lighting correctly and independently from any other xture on the
DMX data link.
5.1. ADDRESSING SETTING
1. Turn on the moving head. Wait till nishing the reset (RST ashes on the
display).

18
ENGLISH
MHL-200 User’s manual
2. The main menu is accessed by pressing the [MODE] key, press this one
until the display shows message “R001”. Press [ENTER] to conrm.
3. Use the [UP] and [DOWN] keys to select the required address.
4. Press [ENTER] to conrm or press [MODE] to cancel.
5.2. CONTROLLING
After having addressed the lighting, you may now start operating these via
your lighting controller.
Note: After switching on, the lighting will automatically detect
whether DMX512 signal is received or not. If there is no signal recei-
vedattheDMXinput,thedisplaywillnotash.Thissituationcan
occur if:
• The three-pin XLR plug (cable with DMX signal from controller)
is not connected with the input of the moving head light.
• The controller is switched off or defective, if the cable or con-
nector is defective or the signal wires are swap in the input
connector.
Note:It’snecessarytoinserttheXLRterminationplug(with120
Ohm) in the link in order to ensure proper transmission on the DMX
data link.
6. TECHNICAL SPECIFICATIONS
Power Supply 230/240V AC, 50Hz
Fuse T5A, 250V
Lamp PHILIPS 5R 189W
Power consumption 500W
Optical System High luminous efciency parabolic mirror and double condenser system
All lenses are anti-reection coated
Color Fourteen different colors, interchangeable dichroic lters plus white,
color wheel with variable rotation speed
Gobo Rotation Seventeen interchangeable gobos plus white, with high speed gobo
rotation effect
Strobe Strobe frequency can be 15 times / second
Dimmer Smooth dimmer from 0-100%

19
ENGLISH
MHL-200 User’s manual
Prism 8-facet prism rotating in both directions at different speed
Focus DMX controlled. Mechanical multi-step focus with three different angles
(15 degree, 18 degree and 22 degree)
Shutter Mechanical (non step can be adjusted) shutter are suitable for different
line angles
Effect Seven big prism gobos
Pre-programmed and changing shutter pulse effect
Motor 9 high quality stepping-motor controlled by microprocessors
Electronics DMX512 digital serial input
Pan range: 530 degree
Tilt range: 270 degree
Rigging Stands directly on the oor
Use two clamps to install
Two truss orientation
Safety chain/cord attachment point
Temperature Maximum ambient temperature: 40 degree
Maximum housing temperature: 80 degree
Dimensions and
Weight
Length of base (including handles): 520mm
Width: 520mm
Height (head horizontal): 700mm
Net weight 28kg
Shipping weight 30kg
7. MAINTENANCE AND CLEANING
The operator must make sure that correlative safety equipment and an expert
inspects machine’s technical installations after every four years in the course
of an acceptance test.
The operator must make sure that correlative safety equipment and machine’s
technical installations are inspected by a skilled technician once a year.
The following points need to be considered during the inspection:
1. All screws used for installing the devices have to be tightly connected and
must not be corroded.
2. There cannot be any deformations on housing, xations and installation
spots (ceiling, suspension, trussing).

20
ENGLISH
MHL-200 User’s manual
3. Mechanically moved parts like axles, eyes and others must not show any
traces of wearing (e.g. material abrading or damages) and must not rerate
with unbalances.
4. The electric power supply cables must not show any damages, material fa-
tigue (e.g. porous cables) or sediments. Further instructions depending on
the installation spot and usage have to be adhered by a skilled installer and
any safety problems have to be removed.
Danger! High power! Danger to life!
Disconnect from mains before starting maintenance operation!
We recommend a frequent cleaning of the device. Please use moist ax to
clean. Never use alcohol or solvents.
CAUTION! The lens has to be replaced when it is obviously dama-
ged, so that its function is impaired, e.g. due to cracks or deep scra-
tches!
The objective lens will require weekly cleaning as smoke uid tends to building
up residues, reducing the light-output very quickly. The cooling-fans should be
cleaned monthly.
The gobos may be cleaned with a soft brash. The interior of the xture should
be cleaned at least annually using a vacuum cleaner or an air-jet.
The dichroic color lters, the gobo-wheel and the internal lenses should be
cleaned monthly.
To ensure a proper function of the gobo-wheel, we recommend lubrication in
six-month intervals. The quantity of oil must not be excessive in order to avoid
that oil runs out when the gobo-wheel rotates.
There are no serviceable parts inside the device except for the lamp and the
fuse. Maintenance and service operations are only to be carried out by autho-
rized dealers. Please refer to the “inserting and exchanging lamp” chapter in
this manual.
7.1. REPLACING THE FUSE
If the lamp burns out, the ne-wire fuse of the device might fuse, too. Only re-
place th fuse of same trpe and rating. Before replacing the fuse, unplug mains
lead.
Procedure:
Table of contents

