SoundForce SFC-8 User manual

SFC-8 User Manual
Document version 1.0
27 dec 2022

1. Intro
Thank you for purchasing the SFC-8 MIDI controller. It means a lot to me that you put your
trust in my product. I hope you will have a great experience using this device and that it will
inject some fun in your music. Many new features will be integrated in the future and I am
interested to get your feedback and requests: nicolas@sound-force.nl
2. Installation and start-up:
a. As a USB-MIDI device
The SFC-8 is a class-compliant USB-MIDI device which means that no drivers are necessary.
The controller should directly be recognized by your computer when plugged-in. USB devices
should preferably be connected directly to the computer USB ports. Please make sure that
your USB ports/hubs are providing enough power to every single device in your configuration.
To use the controller with your DAW and plugins you need to make sure that the controller is
set-up in your DAW. In some DAWs, Logic for example, it’s automatic when you plug it in and
you don’t need to do anything. In others, you might need to turn on an option in the
preferences. Please refer to your DAW manual for details.
The controller is sending by default MIDI CC messages and can be mapped to plugins using
their MIDI mapping functions. To specify which instance of a plugin you want to control,
simply route the MIDI to the right track. This is usually down by scrolling (or clicking) from one
track to another and thus putting a specific track in "record-arm". In some DAW, you can
specify which MIDI devices are used on a specific track, so you can filter per device and
sometimes also per channel. Please refer to your DAW user manual for specific details.
b. As a DIN MIDI device
To power the controller, connect the USB cable to either a USB host, such as a computer, or
a USB power block, such as a smartphone charger. Connect the SFC-8 DIN-MIDI output to the
MIDI input of other gear you would like to control. Connect any MIDI keyboard or sequencer
to the SFC-8 DIN-MIDI input. The incoming messages will be forwarded to both the USB-MIDI
and DIN-MIDI outputs, along with all the sliders, pots and switches messages of the SFC-8
front panel. This eliminates the needs for any MIDI merger or other accessories. This also
means that you could also use the SFC-8 as a MIDI to USB-MIDI interface if you don’t own
one.

3. USB-MIDI Troubleshooting on MAC:
If the device turns on (red LEDs are on and you can change the switches positions) but it is
not recognized by the computer, please go through this guide completely. Please also try
another USB cable, USB port and if possible another computer or OS. Before getting in touch
for support, please confirm that the device is sending out MIDI correctly (or not) using a MIDI
monitor (in google Chrome you can use the control panel app). If it does send MIDI messages
as expected then the problem should be in the DAW and plugin configuration, make sure the
controller is setup in your DAW and the plugin is mapped.
4. Plugin-specific informations
The controller front panel layout was designed to fit as many Jupiter styled plugins as possible.
As there are differences between different plugin interfaces, specific modes are needed to
make the controller compatible with each plugin. As firmware v1.1, 2 modes are available for
the Arturia Jup-8 V4 and TAL-J-8. Roland Cloud Jupiter mode will be added soon. The
controller is shipped with the Arturia mode as the default.
a. Switching between Arturia and TAL modes
This is the procedure for firmware v1.1:
• Press and keep the shift button down, 3 LEDs will start blinking
• Press and release once the ENV2 KEY FLW switch, the blinking LED will move up to the
OFF position
• Release the shift knob and the controller is now in TAL mode
• To go back to Arturia mode, shift click the ENV2 KEY FLW switch again to move the
blinking LED back down to the ON position.
Few things are different between the 2 modes. For example some switches have different
amount of positions. Some messages polarity needed to be inverted. For the user, this is not
important, just make sure you are in the right mode for the right plugin.
b. Arturia Jup-8 V4
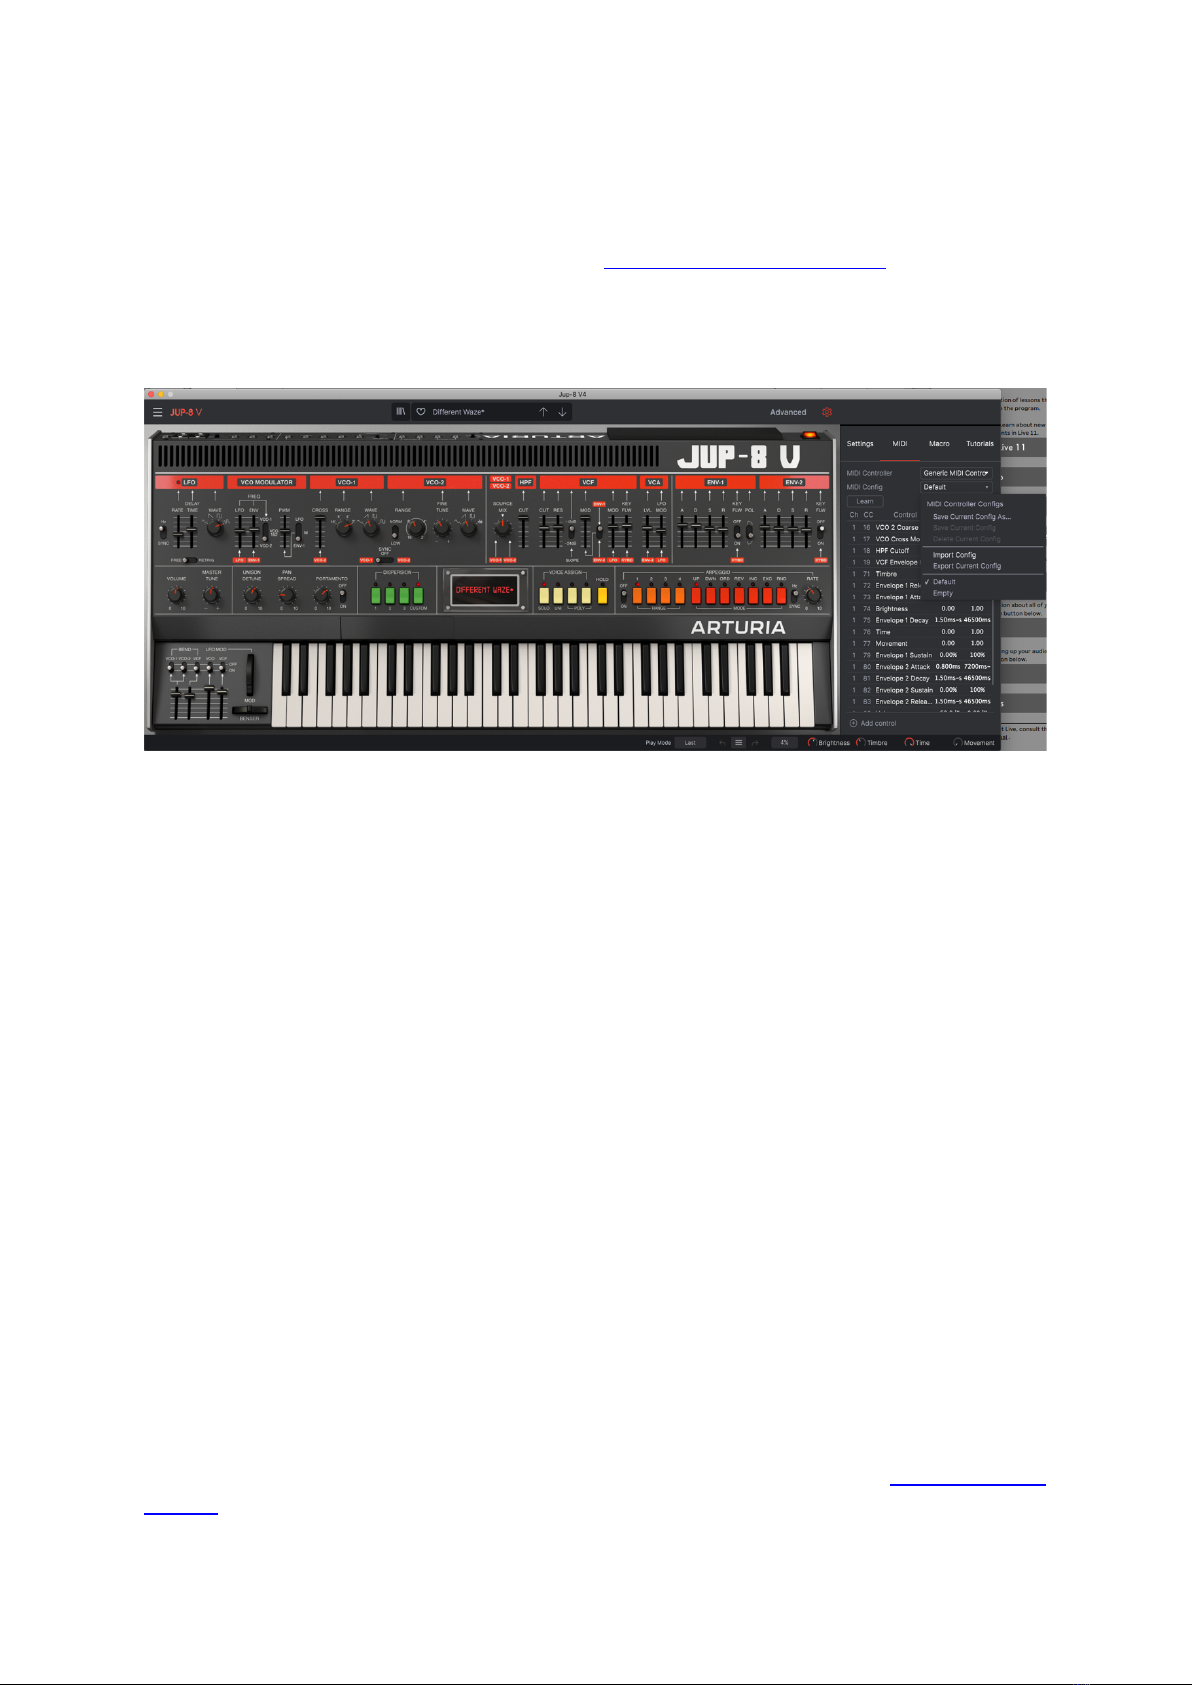
The Arturia Jup-8 V4 has a MIDI mapping config system that makes it really easy to get the
plugin ready to work with the SFC-8. On the sound-force.nl support page, you can find a
mapping preset that works with the SFC-8 default set of CC numbers. In the Arturia Jup-8 V4,
click on the cogwheel, then MIDI, then in the Menu MIDI config select import config and
browse for the unzipped mapping config from the support page.
Please note, for both the LFO rate and the Arpeggio rate pots, the Jup-8 V4 is expecting 2
different CCs depending on the clock source. The Arturia mode is taking care of that. So in
reality the physical pots on the controller are sending different CCs depending on position of
the clock source switches associated to the LFO rate and Arp rate. This doesn’t affect the user,
but it is a specific thing of the Arturia plugin.
c. TAL-J-8
The TAL plugins don’t have a mapping preset system but the MIDI mapping is saved within
the plugin presets. The trick is to map the controller to the plugin once and then save that
preset as your default preset. But please note, and this is from the TAL-J-8 manual: The plug-
in normally keeps the mapping when changing the preset as long as the preset does not have
its own mapping. To always avoid losing the mapping when changing presets, you can turn
on the LOCK option on the top-right section of the plugin
The TAL plugins have few modulation sliders that have bipolar modulation control: VCF ENV
MOD, VCF LFO MOD, VCF KEY FLW, VCA LFO MOD, VCO MODULATOR LFO MOD and VCO
MODULATOR ENV1 MOD. You can spot those with the yellow line and 10/-10 range in the
plugin interface. As Firmware V1.1 in TAL mode, the SFC-8 is only sending MIDI CCs from 63
to 127 in order to control only the positive modulation range. So the inverted/negative range
is not reachable with the controller. During testing, I found it annoying that a slider that was
completely down would still introduce negative/inverted modulation. If you think that this
needs to change and you need the negative range, please send me a request: nicolas@sound-
force.nl

5. Recall
When the synth/plugin parameters and the physical controller parameters are in all different
positions, it is sometimes preferable to "push" the state of the controller to the plugin
interface. That way nothing is jumping around when you start moving the controls and it helps
getting the controller and plugin synced up when you get starting. Recall is reading every
control and sending a pack of CC messages to the plugin.
To launch the recall function, double press the "SHIFT" switch on the bottom right side in the
controller. The full front panel LEDs will do an animated cycle.
6. Preset system
The SFC-8 has 5 banks of 4 presets to save and load your sounds. It is built using the
Arpeggiator mode and range switches. It doesn’t offer the most practical interface but it is
done on purpose to avoid the need of dedicated switches and screen to keep the controller
more compact.
a. Loading a preset
• Press and release the load switch
• 1 of the Arpeggatior mode LEDs will blink, this represents the selected bank
• You can now change the bank by pressing any of the Arp modes (from OFF to Rand)
• Now you can select 1 of the 4 presets with the Arp Range switches (from 1 to 4)
• The preset will load and the full interface will perform a LED light cycle
• As a preset is loaded, the full interface is sent out as a packet of MIDI messages to sync
the plugin or hardware synth with the controller, this is similar to the recall function
You can cancel the operation anytime by pressing and releasing the load switch again.
Please note that if the select preset is empty, the ARP LEDs with animate from 4 to OFF to
indicate that the preset couldn’t be loaded.
b. Save a preset
• Press and release the save switch
• 1 of the Arpeggatior mode LEDs will blink, this represents the selected bank
• You can now change the bank by pressing any of the Arp modes (from OFF to Rand)
• Now you can select 1 of the 4 presets with the Arp Range switches (from 1 to 4)
• The preset will be saved. The controller needs 1 second to do the save and afterwards
the full interface will perform a LED light cycle
You can cancel the operation anytime by pressing and releasing the save switch again.

c. Clear a preset
• Press and release both the save and load switches
• 1 of the Arpeggatior mode LEDs will blink fast, this represents the selected bank
• You can change the bank by pressing any of the Arp modes (from OFF to Rand)
• Now you can select 1 of the 4 presets with the Arp Range switches (from 1 to 4)
• The preset will be cleared. The controller needs 1 second and afterwards the range
LEDs will perform a fast LED light cycle twice
You can cancel the operation anytime by pressing and releasing the load switch again.
d. Behaviour after loading a preset
When loading a preset, the user will be in a situation where most of the controller sliders and
pots are in a different position then the MIDI data just loaded from the preset and sent to
either a plugin or a hardware synth. The SFC-8 has 3 modes to define the behavior of the
controller when a slider or pot is moved after loading a preset. There are 3 options:
• Jump:
When a slider/pot is moved, the controller will send instantly its new physical slider/pot value
and the control in the plugin/synth will do a discontinuous jump.
• Pick-up:
The controller will only send new slider/pot values after the physical control has reached the
plugin or synth slider/pot position. The LEDs Save/Lower and Load/Upper switches will blink
to let you if you need to go lower (Lower blinks) or higher (Upper blinks). After the controller
silder/pot has reached the plugin/synth position, then the controller will start to send the new
messages..
• Scaling:
The controller will rescale the values sent to the plugin elastically so that a move on the
controller matches the range of a move on the plugin/synth control. Only smooth transitions
are created. As soon as the control reaches one extremities (0 or 127), the scale is back to the
normal 1:1 proportion.
To switch between the options:
• press and keep down the shift button
• press and release the VCO Sync switch
• VCO2 LED blinking = Jump
• OFF LED blinking = Pick-up
• VCO1 LED blinking = Scaling

7. Default start-up state of the controller
interface
To change the default start-up state of the controller, you can change the Preset 1 in the Off
Bank. After it is saved for the first time, it will be loaded by default at start-up and the full
interface status will be then sent out as a MIDI messages packet on the USB-MIDI and DIN-
MIDI outputs as the preset is loaded.
8. Loading hardware configurations
There are 4 different hardware configurations that can be saved and loaded on the controller.
Those configurations allow the user to switch between plugins and synths during
performance without the use of a computer. Every plugin or synth is different and especially
hardware synths usually need specific MIDI CC mappings or even defined sysex
implementation. Those will be included in future firmware updates. Using the Chrome control
panel app (see below), the user can save a hardware configuration to 1 of the 4 slots and
recalling them from the controller’s interface.
To load different hardware configurations:
• press and keep the Shift button down
• press one the of the Arp Range switches (from 1 to 4)
To save hardware configuration see section 9.
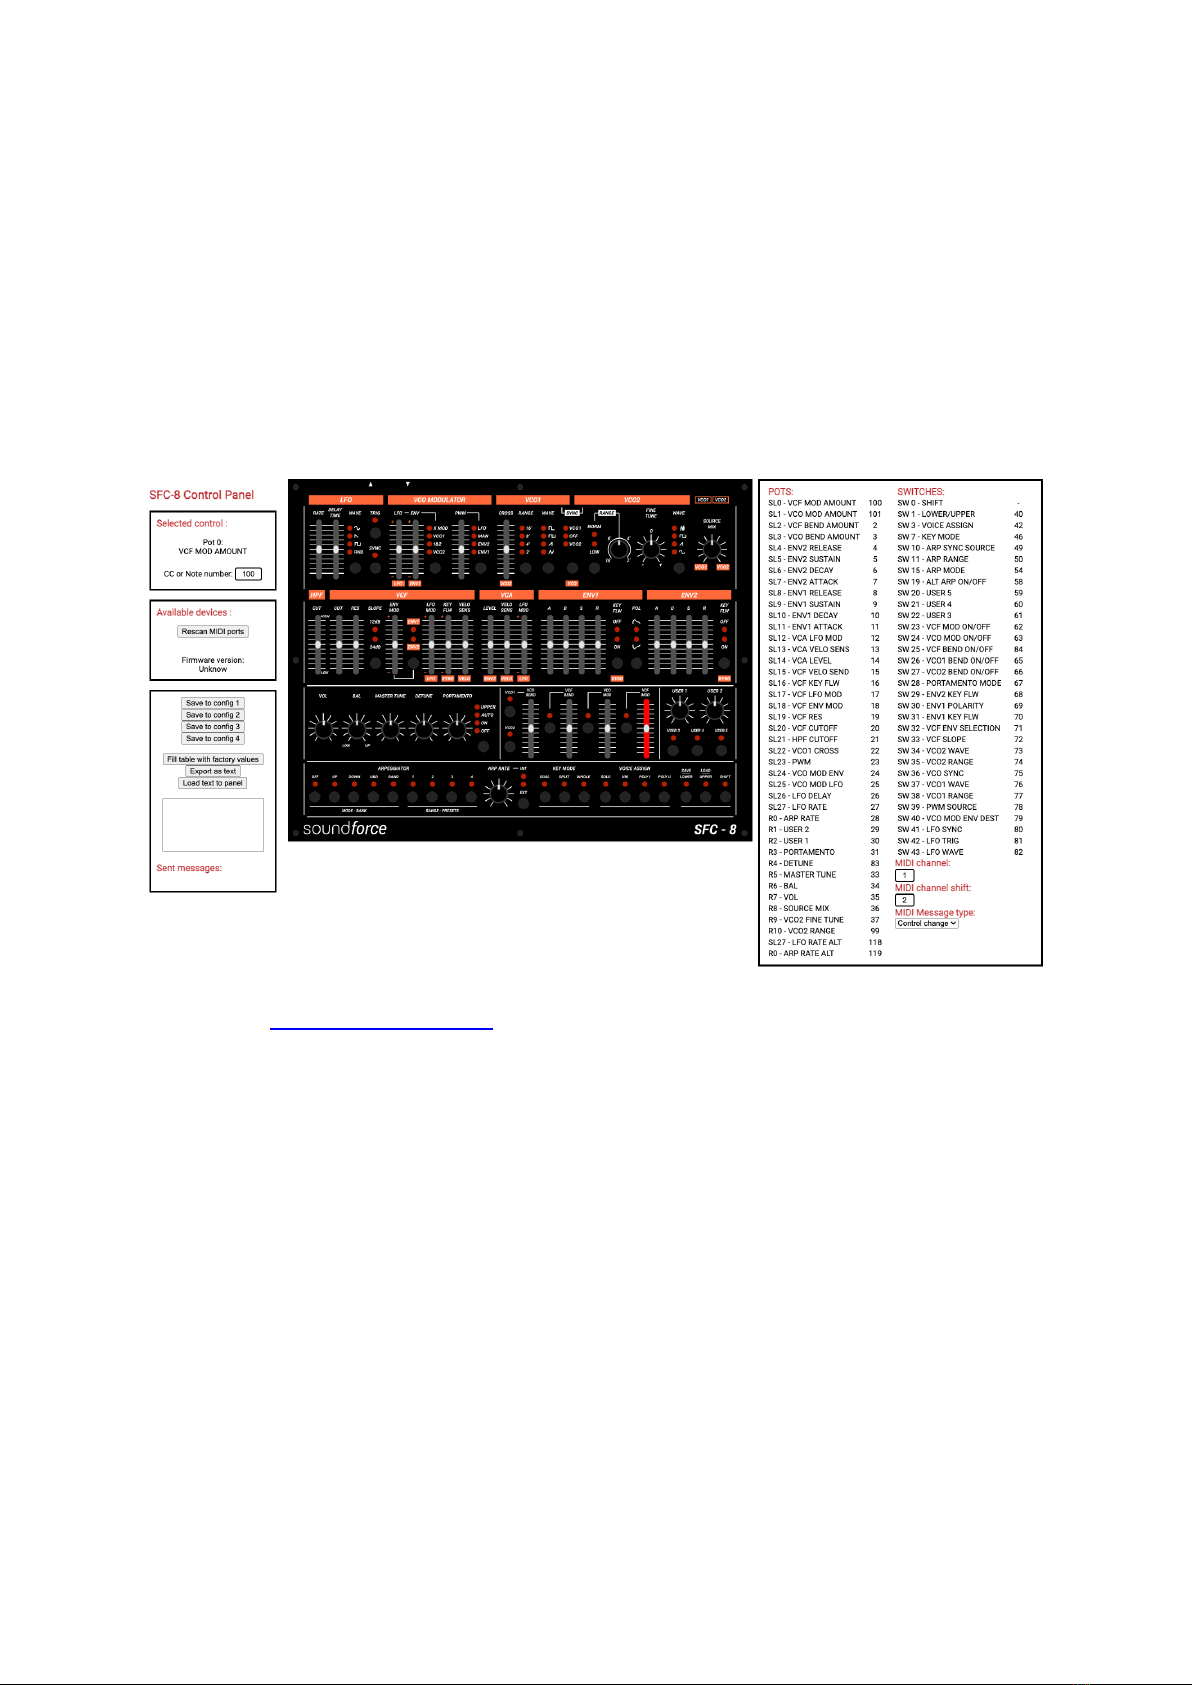
9. Control panel
The Control Panel is a Google-Chrome app that allows you to change the CC numbers of each
control as well as the MIDI channel. This is especially useful if you want to use the controller
with external hardware or if you are using plugins with non-mappable fixed CC's. Also, in some
situations certain CCs are highjacked by DAWs and hard routed to specific functions, so some
edits are necessary.
You can save 4 different mappings in the 4 hardware configurations slots. In the future,
specific hardware synth integration will be available to save in 1 of the 4 slots as well.
• First plug in your SFC-8
• Then open the control panel in Google Chrome latest version
• The device should be recognized and the message “Connected to SFC-8” will be
displayed on the left middle container. The firmware version will also be displayed.
• You can now click on a switch/pot/slider in the panel image and change its CC
number in the left field
• When you are done with your changes, click “Save to config #”
• You have 4 different configurations available
You can save a MIDI map on your computer:
• click Export as text
• click in the filled text field
• copy and paste that list of comma-separated numbers
• save that on a text file on your computer
Similary, you can copy a saved text field from a text file and paste it in the control panel text
field. Then click “Load text to panel”.
You can go back to the default CC values with “Fill table with factory values”

10. User slider and button :
Please note that there are extra “User” pots and switches that you can map to whatever you
want. For example, an other plugin reverb wet/dry or an FX return fader level.
Other manuals for SFC-8
1
Table of contents
Other SoundForce Recording Equipment manuals


Popular Recording Equipment manuals by other brands


HME
HME TI7000 Quick Reference Installation Guide

Omega
Omega Carlink OMEGA-CARLINK Installation & Testing Booklet

Erica Synths
Erica Synths POLIVOKS-INSPIRED EG Guide to assembly

Yamaha
Yamaha CS6R Data list

Klark Teknik
Klark Teknik DN2360 operating instructions

Roland
Roland MV-8800 Production Studio Appendices


