South-Tek Systems N2Blast FPS-650 User manual
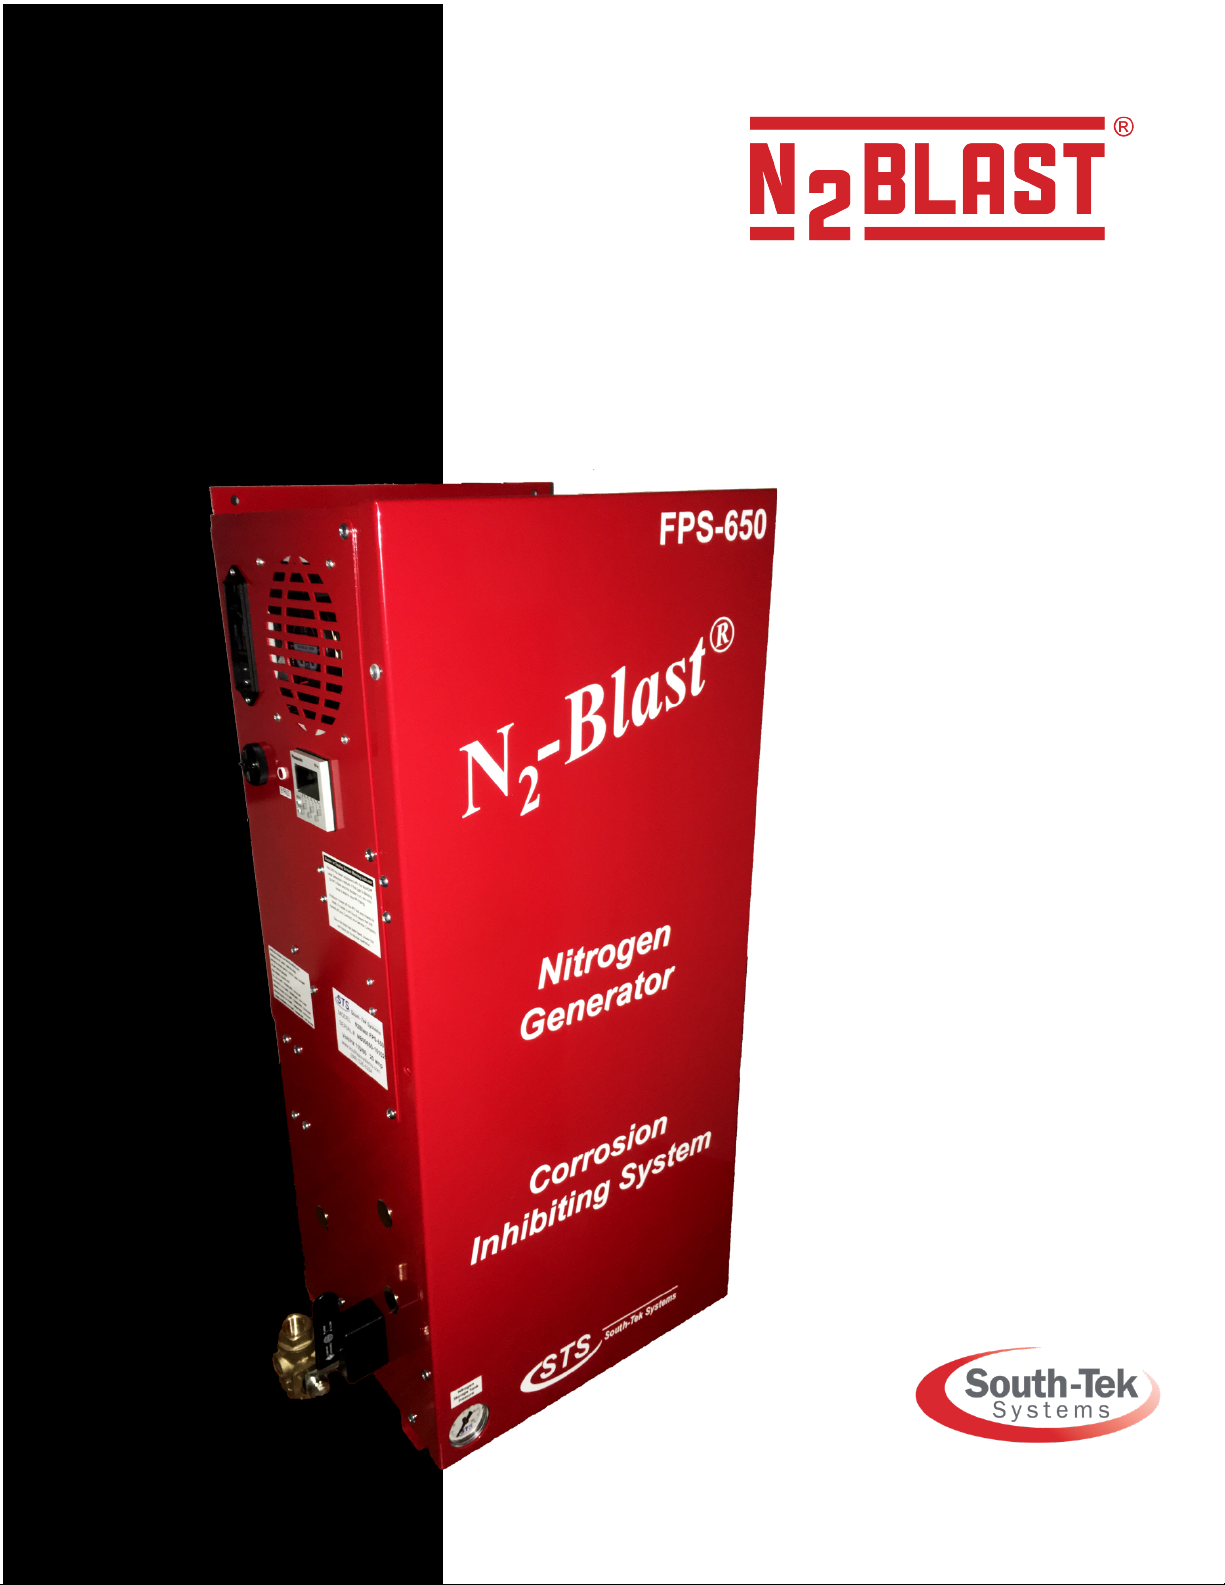
FPS-650
FPS-1250
Fire Protection Systems
O&M Manual
Version 7; 09/06/2019
© 2020
The Leader in Nitrogen Generation Technology

FPS-650 and FPS-1250 South-Tek Systems
Version: 7
Revision Date: 9/6/19Page 2 of 29
VERSION HISTORY
Revision
#
Implemented
By
Revision
Date
Approved
By
Approval
Date
Reason
1
J. Nguyen
10/13/15
A. Norman
10/13/15
Initial Release
2
J. Nguyen
7/5/15
A. Norman
7/5/15
3
J. Nguyen
8/15/16
A. Norman
8/15/16
4
J. Nguyen
4/27/16
A. Norman
4/27/16
Updated Bypass Info
5
Matt Thomas
9/20/16
A.Norman
9/30/16
Updated EU rating info
6
Kyle Mellott
8/10/17
J. Nguyen
8/14/17
MiniPSAv7 Release
7
Kyle Mellott
8/9/19
M. Thomas
9/6/19
MiniPSAv9 Release
----------------------------------------Notes----------------------------------------

FPS-650 and FPS-1250 South-Tek Systems
Version: 7
Revision Date: 9/6/19Page 3 of 29
TABLE OF CONTENTS
1INTRODUCTION .....................................................................................................................4
Purpose..................................................................................................................................... 4
Audience ................................................................................................................................... 4
Important Information.............................................................................................................. 4
2SAFETY GUIDELINES .............................................................................................................5
General...................................................................................................................................... 5
3SYSTEM DESCRIPTION..........................................................................................................7
Key Features ............................................................................................................................. 7
Specifications........................................................................................................................... 8
System Operations................................................................................................................... 9
4PRODUCT INSTALLATION ...................................................................................................10
Unpacking and Preparation ...................................................................................................10
Electrical Requirements .........................................................................................................11
Installation (For FPS-650)......................................................................................................11
Installation (For FPS-1250).................................................................................................... 13
Panel Layout and Gas Connections ......................................................................................14
Air Bypass Setup (optional) ................................................................................................... 17
Start-up Procedures ............................................................................................................... 17
Checking for Leaks................................................................................................................. 18
Access Controls ..................................................................................................................... 19
Starting the System..............................................................................................................19
Stopping the System ............................................................................................................ 19
5SYSTEM USAGE...................................................................................................................20
Instructions.............................................................................................................................20
Alarm Notification .................................................................................................................. 20
6SYSTEM MAINTENANCE .....................................................................................................21
7KEY CONTACTS ...................................................................................................................24
8FAQS ...................................................................................................................................24
Power Issues .......................................................................................................................... 24
Pressure Issues......................................................................................................................24
Gas Leaks ............................................................................................................................... 24
BlastOff™ - Leak Detection System: ...................................................................................... 25
APPENDIX A: WARRANTY.........................................................................................................26
APPENDIX B: INTERNAL QUICK FILL COMPRESSOR OPTION FOR FPS-1250 ...........................27

FPS-650 and FPS-1250 South-Tek Systems
Version: 7
Revision Date: 9/6/19Page 4 of 29
1INTRODUCTION
PURPOSE
The N2-BLAST® FPS-650 and FPS-1250, provide an economical, precise
means of generating high purity
Nitrogen. Since air is comprised of ~79%
N2, the N2 Generator is a simple and cost-effective way to separate the N2
from the air. Nitrogen is an inert gas (non-combustible) and widely used in
thousands of industries along with Fire
Protection Systems. The N2 is
“generated” by means of the air compressor pushing air into the simple,
safe
filtering vessels, which in turn mechanically separates N2 molecules from
other molecules found within air.
**The installer and the user should read this manual in its entirety.
AUDIENCE
This manual is intended for Installer/Supervisory Staff and should be read in
its entirety prior to operation.
Please contact your local distributor provider for any operation and
maintenance first prior to contacting the manufacturer.
IMPORTANT INFORMATION
All personnel (and their supervisors) installing, operating, and maintaining
the N2-BLAST® must read and fully understand this manual prior to
installing, operating or performing maintenance on the system.
The N2-BLAST® produces Nitrogen (N2) at a low flow rate, which quickly
dissipates into the air. N2 gas is not poisonous but the gas should not be
directly inhaled since in high concentrations it can cause
asphyxiation.
Ensure the unit is installed within a well-ventilated room, one that is not
sealed off from
normal living space air changes.
All personnel involved with installation, operations, and maintenance of the
N2-BLAST® must follow safe
working practices, OHSA, and local
health/safety code regulations during the installation, operation, and
maintenance of the unit.

FPS-650 and FPS-1250 South-Tek Systems
Version: 7
Revision Date: 9/6/19Page 5 of 29
2SAFETY GUIDELINES
GENERAL
Correct use of the FPS-650 and FPS-1250 is important for your personal
safety and for trouble-free functioning of the FPS-650 and FPS-1250.
Incorrect use can cause damage to the FPS-650 and FPS-1250 or can lead to
incorrect gas supply.
The FPS-650 and FPS-1250 produces Nitrogen (N2) at a low flow rate, which
quickly dissipates into the air. N2gas is not poisonous but it should not be
directly inhaled, since in high concentrations, they can cause asphyxiation.
Ensure that the unit is installed within a well-ventilated room, one that is not
sealed off from normal living space air changes.
Read carefully and act accordingly before installing, operating, or repairing
the unit.
Operator must use safe working practices and rules when operating
the nitrogen generator.
The owner is responsible for keeping the unit in safe operating
condition at all times.
Always use approved parts when performing maintenance and
repairs. Make sure that replacement parts meet or exceed the original
parts’ specification.
Only authorized, trained, and competent individuals can perform
installation, operation, maintenance, and repair.
Completely isolate incoming and outgoing pressures to the generator,
and make sure to depressurize the service/repair section prior to
performing any mechanical work, including changing the filters. The
nitrogen generator’s exhaust gas and/or any venting gas must be
vented to the outside or to a large, well-ventilated room to avoid
suffocation due to lack of oxygen.
Safety glasses should be worn if the cabinet door is open while the
machine is operating.
Use ear protection when the equipment is operating.
WARNING: Pressurized gases are contained within the generator, the
receiver, and product tanks. Pressurized gases are dangerous and may
cause injury or death if handled or used inappropriately.
Never allow pressurized gas to exhaust from an unsecured hose. An
unsecured hose may exhibit a whipping action, which can cause
serious injury. If a hose should burst during use, immediately close all
isolation valves if it is safe to do so and power down the unit.

FPS-650 and FPS-1250 South-Tek Systems
Version: 7
Revision Date: 9/6/19Page 6 of 29
Never disable or bypass any safety relief valves.
Always make certain that the nitrogen generator is disconnected from
the supply power prior to performing any electrical work.
NOTE: Always following local and site safety regulations in conjunction with
this manual.
Correct use of the nitrogen generator is important for your personal safety.
Incorrect safety practices can cause damage to yourself and/or to the
equipment.
All personnel involved with installation, operations, and maintenance of the
FPS-650 and FPS-1250 must follow safe working practices, OSHA, and local
health/safety code regulations during the installation, operation, and
maintenance of the unit.
Warning:
This manual must be read in its entirety to installing and operating
the FPS-650 and FPS-1250 to prevent accidents and damage to the
FPS-650 and FPS-1250.
Contact your supplier if you detect a problem that you cannot solve
with this manual.
Only use the FPS-650 and FPS-1250 in accordance with its designed
purpose.
Only service-engineers, that are qualified to work on electric and
pneumatic equipment, can do the installation, maintenance and
repairs. Unqualified people are not allowed to repair the equipment.
Do not tamper or experiment with the equipment or exceed the
technical specifications

FPS-650 and FPS-1250 South-Tek Systems
Version: 7
Revision Date: 9/6/19Page 7 of 29
3SYSTEM DESCRIPTION
KEY FEATURES
The FPS-650 and FPS-1250 key features include the following:
-Air compressor
-Air Filters
-Programmable Logic Controller (PLC)
-Pressure Swing Adsorption Beds
-Safety Relief Valves
-N2 Storage Tank
-Automatic Pressure Cut-in/Cut-out
-STS Patented Blast-Off (optional)
Air Compressor:
The air compressor is designed internally to the cabinet and features
engineered dampening system to reduce vibration and noise throughout the
cabinet. It is an oil-less compressor with a pre-filter attached to the air input.
The recommended replacement on the pre-filter is 1000 run hours or 1 year
(whichever comes first). Dirtier environments may be required to be changed
out more frequently. Consult your supplier for a different filter maintenance
schedule if you are installing the generator in dirty environment.
Air Filters:
The generator has two filters after the air compressor: the particulate and
coalescing. The Particulate has a 5-micron filter that will catch any of the
larger particles. The Coalescing has a 0.1-micron filter that will catch the
remaining smaller particles. Both filters feature and auto-drain that will drain
the water captured after the air compressor. The drain is plumbed to the
outside of the cabinet where the end-user can then connect ¼” tubing and
drain to a safe location.
Programmable Logic Controller (PLC):
There’s an integrated PLC within the cabinet. It features smart and efficient
coding to maximize the performance of the generator. It controls the timing
and sequencing of the valves to effectively move compressed gas
throughout the system. It also has a smart feature to automatically go into
different “modes” based on the current run stages. It comes with a visual
screen that will display run hours and alarms.
FPS-650 and FPS-1250 South-Tek Systems
Version: 7
Revision Date: 9/6/19Page 8 of 29
Safety Relief Valves:
Safety Relief Valves have been placed throughout the system for maximum
safety. They are designed and put in place to minimize failure of other
components. They all come with an ASME stamp.
N2 Storage Tank:
A N2 Storage Tank is housed inside the cabinet with manual ball valves and
gauge. It is plumbed to an external manual ball valve so that the end-user will
not have to do any plumbing within the cabinet.
Automatic Cut-In/Out:
The generator comes with a built-in pressure switch that is tied into the PLC.
This will provide a low voltage signal back to the PLC to put the system in a
“Standby Mode” when the tank is full of Nitrogen.
Patented Blast-Off Detection (optional):
The Blast-Off Leak Detection will provide the end-user with an alarm when it
detects characteristics of a leak somewhere on the system. It will trigger an
audible alarm, display it on the screen, and the end-user can tie into the dry
contact so that the alarm can be relayed back to the Building Management
System (BMS).
SPECIFICATIONS
Table 1: Specification Data
N2-Blast® FPS-650 and FPS-1250 –Specifications
Nitrogen Purity
98.0+%
Installation
Wall Mount (FPS-650) / Floor standing (FPS-1250)
Display
Run Hours / Run Status / Alarm Status
N₂Storage Pressure
55-75 PSIG
Cabinet Port
Connections
1/2" NPT Female
Electrical
110-240V / 50-60Hz / 1Phase; 20 Amp Breaker
Compressor
Integral / Oil-Free
Ambient Temperature
40° to 90°F
Noise Level (dbA)
< 75 dBa (Nitrogen Generator)
Size
12.68” W x 10” D x 29.5” H (FPS-650 Cabinet Dimensions)
26" W x 18" D x 59" H (FPS-1250 Cabinet Dimensions)
15.1” OD x 50” H (100# Tank for FPS-650 Only)
Weight
Appx: 84 lbs (FPS-650)
Appx: 265 lbs (FPS-1250)
Appx: 75 lbs (100# Tank)
FPS-650 and FPS-1250 South-Tek Systems
Version: 7
Revision Date: 9/6/19Page 9 of 29
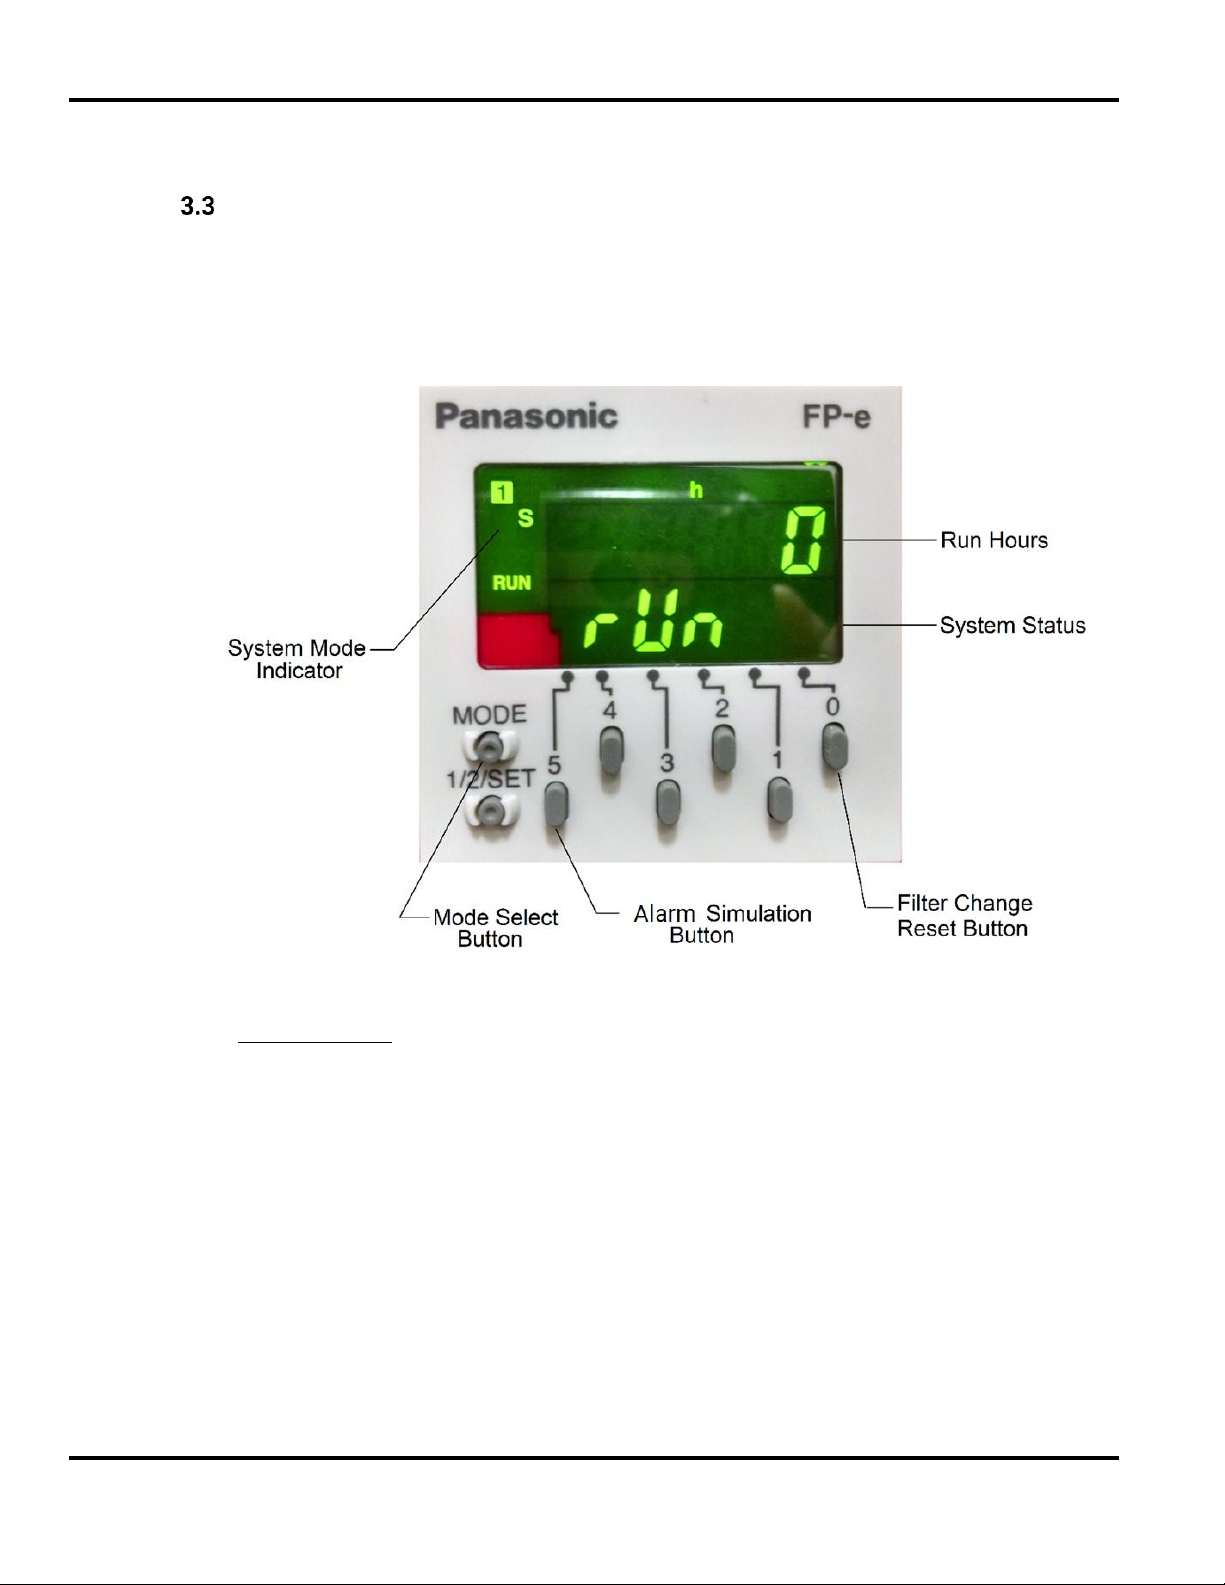
SYSTEM OPERATIONS
The system has two standard run modes –Run and Standby. When the
power switch is turned on, the controller will automatically determine which
mode to enter and will display the current run mode on the screen –“Run” in
Green and “StdbY” in Yellow. The layout of the controller can be seen on the
next page.
System Status
“Run” mode is when the FPS-650 and FPS-1250 is producing nitrogen and
feed it to the storage tank. The system will automatically enter “Standby”
mode when the tank is fully pressurized (65-75 psig). It will remain in
“Standby” mode until the tank pressure falls 7-10 psig.
Figure 1: Controller Display

FPS-650 and FPS-1250 South-Tek Systems
Version: 7
Revision Date: 9/6/19Page 10 of 29
Lock and Unlock Controller
To utilize the buttons on the front of the controller the unit must be unlocked.
If the system is displaying “LOCK” the Mode Select Button may be pressed
and held to unlock the controller (Repeat this step if a system lockout is
desired). Unlocking the controller allows access to two features:
Alarm Simulation (5) –Hold the Alarm Simulation Button for 3
seconds to activate. This will simulate an alarm condition and trip
the alarm dry contact in the unit (if installed) for 2 seconds so that
proper functioning can be confirmed.
Filter Change Reset (0) –When a new FRP (Filter Replacement Kit)
is installed, the 1000-hour filter change time must be reset. After
replacing the filter elements, press and hold the Filter Change Reset
Button for 7 seconds. An audible beep will confirm that the filter
change time and filter alarm are reset.
4PRODUCT INSTALLATION
UNPACKING AND PREPARATION
The N2-BLAST® FPS-650 System’s cardboard carton should be carefully
opened and all parts should be
inspected for damage upon receipt. For
the N2-BLAST® FPS-1250 system, a wooden crate is used for
shipping and
should be opened on the side noted on that crate. Identify and verify that
all parts listed
on the packing list are present and undamaged. South-Tek
Systems (STS) is not responsible for damages that have occurred during
the shipping and handling of the N2-BLAST®. Any visual damages should
be
immediately documented and reported to the shipping company
responsible. Then, contact STS at
(888)526-6284 to assess the damages
only after the shipping company has been notified.
Until Installation:
oStore the N2-BLAST® in a dry and climate controlled (60-80°F
recommended) room.
oAlways keep N2-BLAST® in an upright position / or in box as
shipped.
oDo not connect the AC power cable until this manual has been
read completely and all connections are made as stated within.
oKeep all gas lines dry so moisture does not enter generator upon
hookup.
oNever place/stack objects on top of the N2-BLAST®.
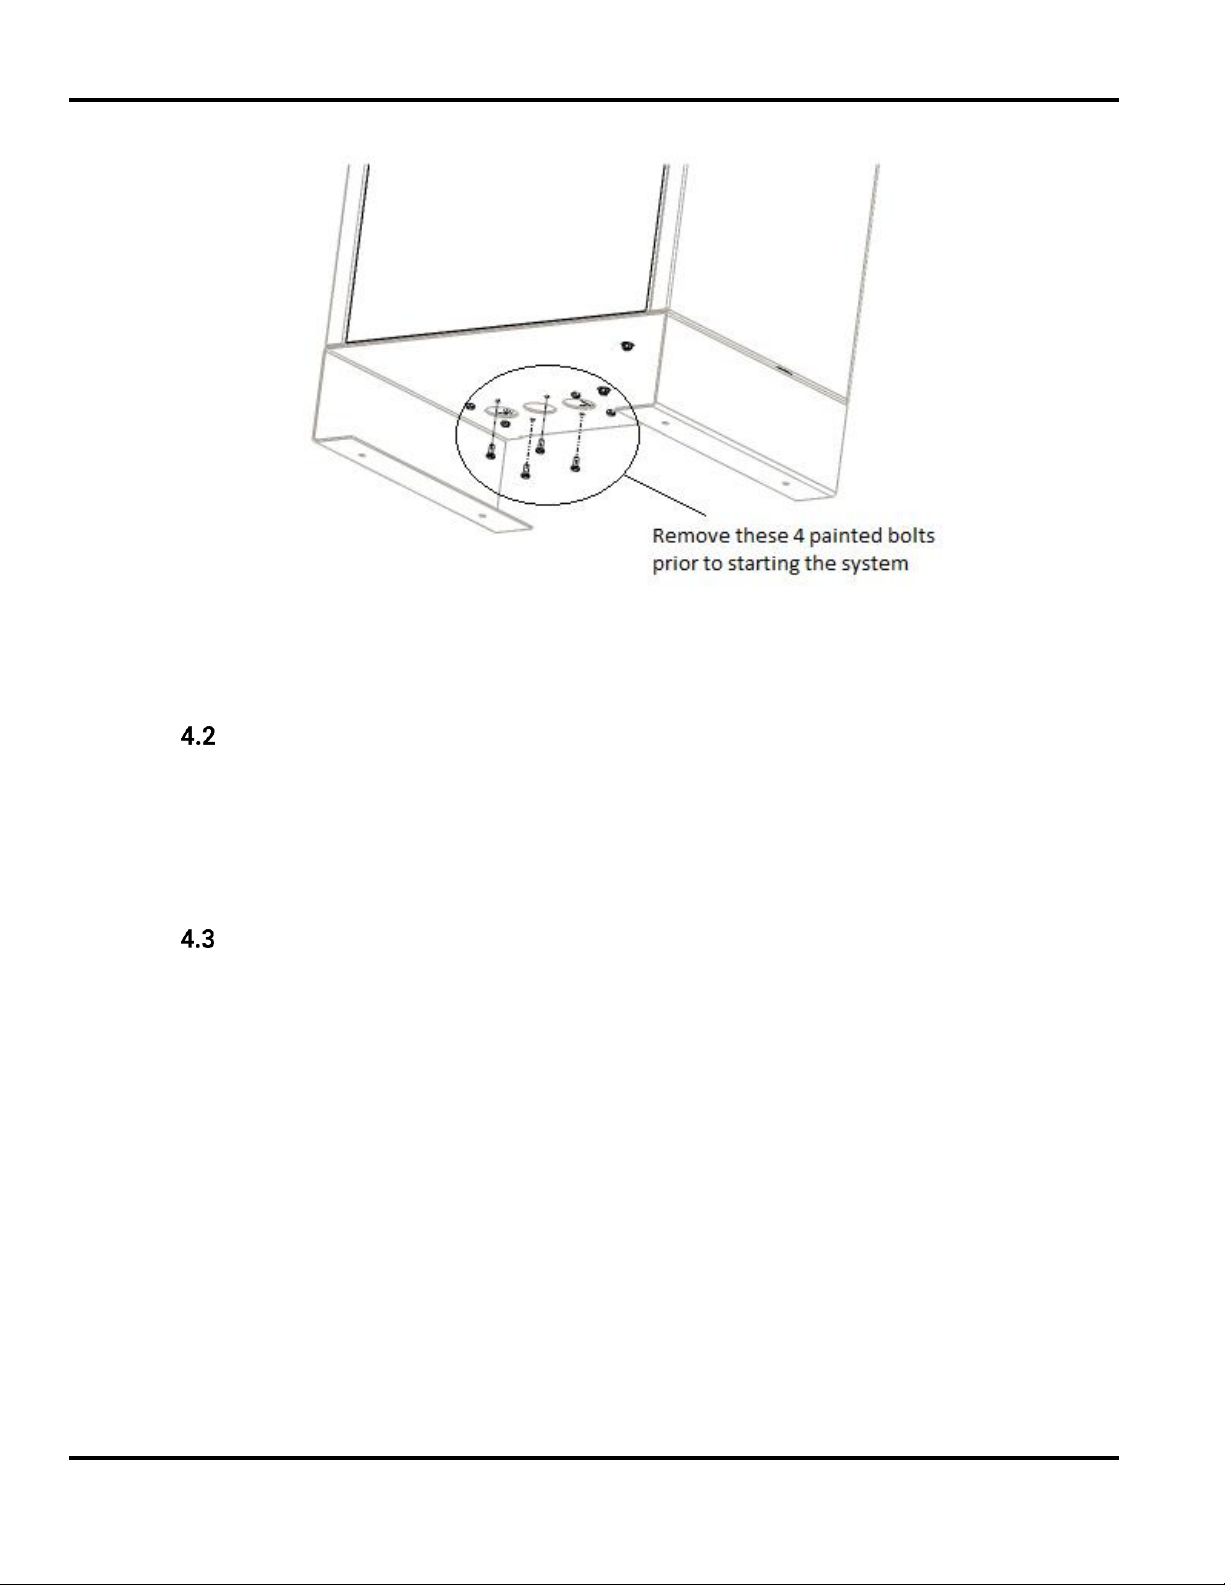
To remove FPS-1250 from crate, unbolt cabinet from the crate. Carefully, lift
unit from the crate and set it on the floor. Use a floor jack to move it to the
final location. Once in place, unbolt the 4 colored bolts at the bottom of the
cabinet.
FPS-650 and FPS-1250 South-Tek Systems
Version: 7
Revision Date: 9/6/19Page 11 of 29
Carefully, break down the crate and store in a safe location in the case that it
may need to be sent back to the factory for service.
ELECTRICAL REQUIREMENTS
The FPS-650 and FPS-1250 requires 110–125VAC / 50-60hz / 1ph / 20A or
220-240VAC / 50-60hz / 1ph / 20A connection. A dedicated circuit is
suggested for each install. The electrical panel as a 20A circuit breaker built
into the on/off rocker switch. The system is UL 508A ICP approved. Electrical
schematic available upon request.
INSTALLATION (FOR FPS-650)
The N2-BLAST® FPS-650 can be mounted to a wall or placed on a floor. It
is recommended that the N2- BLAST® FPS-650 be mounted to a weight-
bearing wall that can support its weight as specified in 3.2 Specifications.
If placed on t h e floor, it should still be fastened in place so that it
cannot move due to vibration or damaged from falling over. The N2-
BLAST® should always be installed indoors in an environment between
40° and 90° F in the upright position where it will not be damaged by water
or
moving equipment. Leave at least 6” on the left side of the cabinet for
ventilation, but 36” is recommended for access to the control panel,
tube/pipe connections, and the front cover. There is a ¼” OD tube drain port
on the bottom right of the cabinet. This can be plumbed to the nearest site
drain.
There is an optional mounting bracket kit (STS Part #: A05-TYP1-RD), that
allows you to mount the system on a standard 16” wall stud width.
Otherwise, use the mounting holes on the cabinet for mounting the N2-
BLAST® securely and level, directly to the wall.
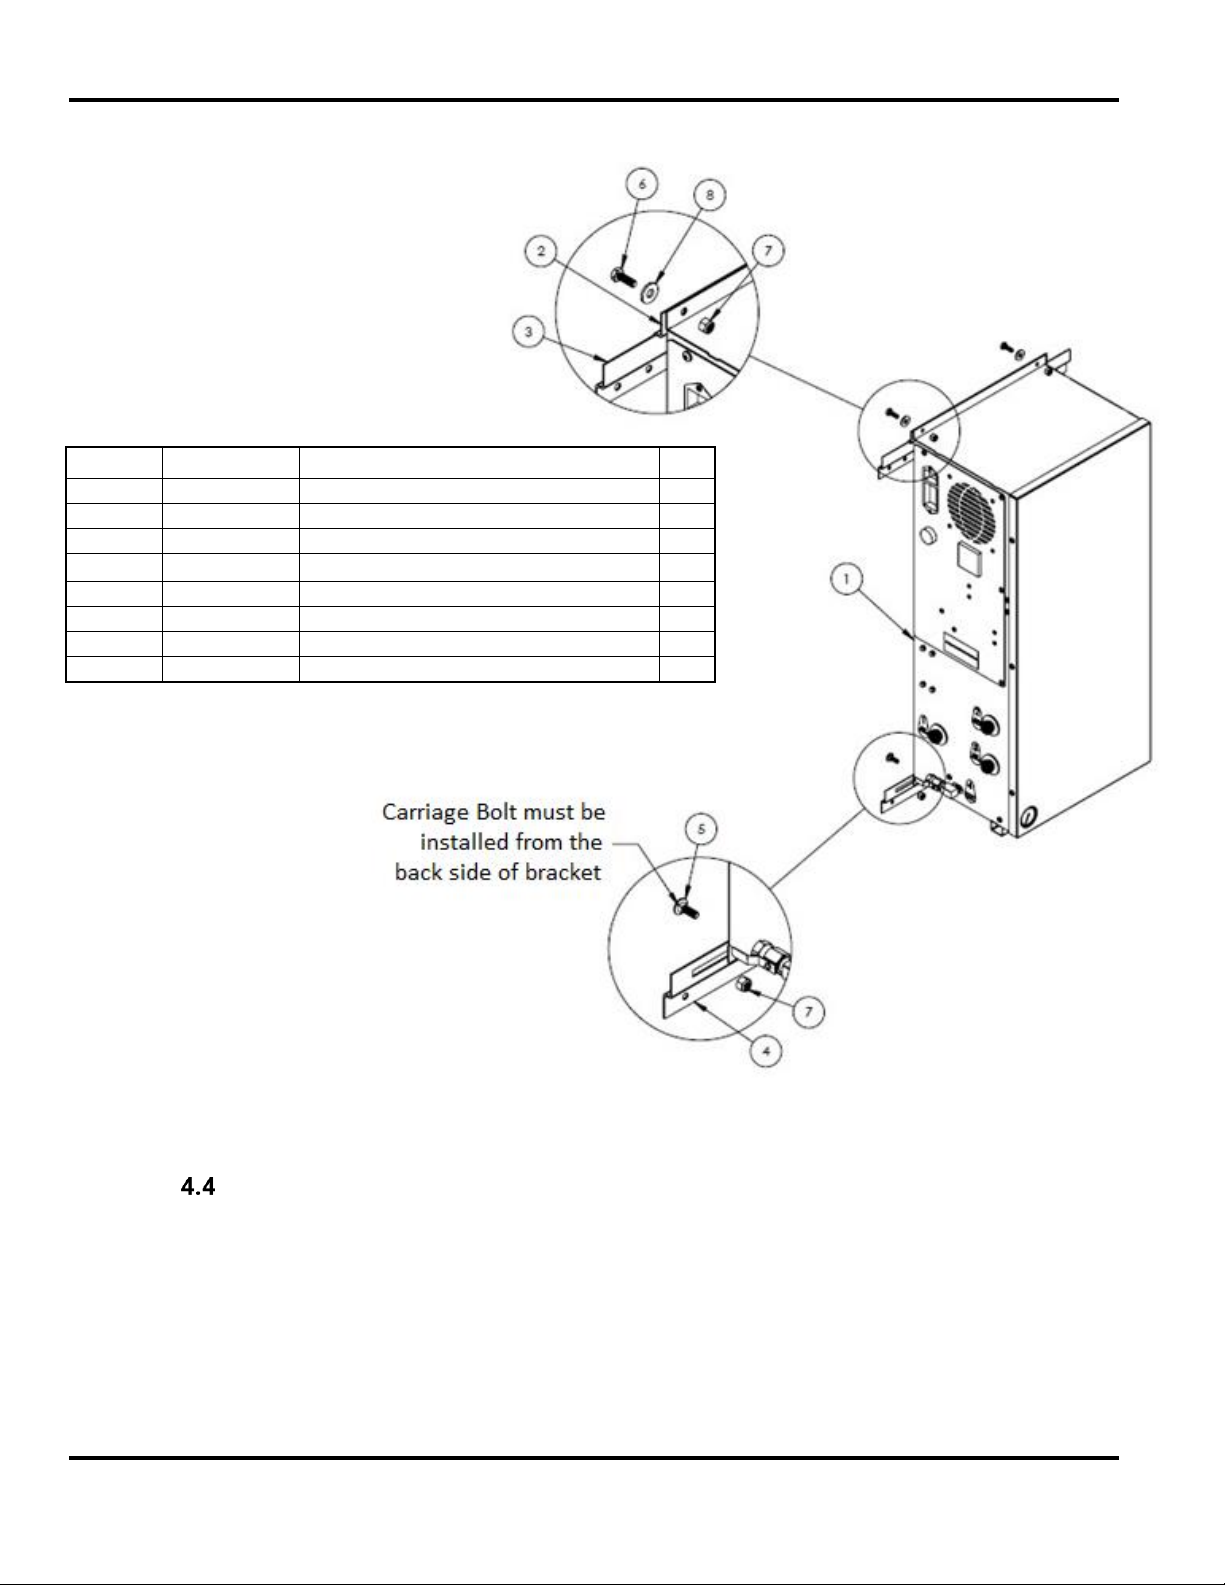
Figure 2: Shipping Lock Bolts

FPS-650 and FPS-1250 South-Tek Systems
Version: 7
Revision Date: 9/6/19Page 12 of 29
Optional Mounting Bracket Kit Procedures
1. All N2-BLAST® mounting holes and optional mounting bracket
holes are for ¼” screws/anchors.
2. All brackets must be installed in orientation as shown to work
correctly.
3. Install the cabinet-mounting brackets on the N2-BLAST® first with
the bolts/lock nuts that are provided.
4. Locate the wall-mounting bracket. It is an 18” bracket without the
rectangular cutouts and will need to be installed on the wall at the
desired height and level. The bracket has 16” center to center
holes so the unit can be mounted directly to studs. This bracket
will need to be mounted per the diagram below using appropriate
for your type of wall material (wood, sheet metal, masonry, etc.…).
Once the 18” bracket has been wall-mounted, this will allow the
12” bracket that is fastened to the top flange of the cabinet a
fixed anchor to hang from. See diagram as to how the angles are
to be oriented on the back of the cabinet vs the wall.
a. Use the supplied nuts and bolts to attach the upper 12”
bracket onto the top flange per the diagram.
b. Use the supplied carriage bolts and nuts to attach the 18”
lower bracket to the bottom flange, don’t overtighten the
nuts yet. After installing the system, you may want to
offset the bracket slightly, hence the rectangular slots.
5. Optional: if wall studs are not 16” center-to-center or you have the
need to reinforce the mounting area, a ½” or thicker board of
plywood is recommended to be installed prior to hanging the
system. Use best general practices to ensure that the wood and
system will be secure at its full weight and remember that it will
be vibrating from compressor running.
6. Once the mounting brackets are all in place, hang the N2 Blast
cabinet from the top bracket making sure it is centered.
a. The cabinet should have at least 4” on either side for
breathing/cooling purposes.
b. Do not install near heat source or where steam or water is
present. Damage to system or bodily harm may result as
well as voiding warranty.
Warning: Secure the N2-BLAST® to the wall at the top and bottom flanges.
Failure to do so could cause damage or bodily injury.
FPS-650 and FPS-1250 South-Tek Systems
Version: 7
Revision Date: 9/6/19Page 13 of 29
Figure 3: FPS-650 Wall Mounting Diagram
INSTALLATION (FOR FPS-1250)
The N2-BLAST® FPS-1250 must be installed on a flat level hard surface
as there are no wall mount
options available. Anchoring to the floor is not
required (unless by local code). Make sure there is clearance room on the
top for N2 gas connection, clearance room on the left side for access to
the panel, and clearance room on the front for maintenance access.
See Figure 6 for dimensions and overall connections to the system.
Item #
STS Part #
Description
Qty
1
FPS-650
Mini PSA
1
2
800-133
S-100/200 12" Mounting Bracket
1
3
800-134-B
S-100/200/400 18" Mounting Bracket
1
4
800-129
Type 1 Lower Wall Mount Bracket
1
5
Misc
0.250" -20 x 0.750" Carriage Bolt
2
6
Misc
0.250" -20 x 0.750" Hex Cap Screw
2
7
Misc
0.250" Nylock Nut
4
8
Misc
0.250" Flat Washer
2

FPS-650 and FPS-1250 South-Tek Systems
Version: 7
Revision Date: 9/6/19Page 14 of 29
PANEL LAYOUT AND GAS CONNECTIONS
See figures below for panel layout and gas connections. Double-check all
connection locations before
turning on the system or opening any valves.
Note: All N2-BLAST® models are factory equipped with ½” NPT Female
connections. For FPS-650 Layout See Figure 4. For FPS-1250-Layout See
Figure 6.
Figure 4: FPS-650 Panel Layout
FPS-650 and FPS-1250 South-Tek Systems
Version: 7
Revision Date: 9/6/19Page 15 of 29
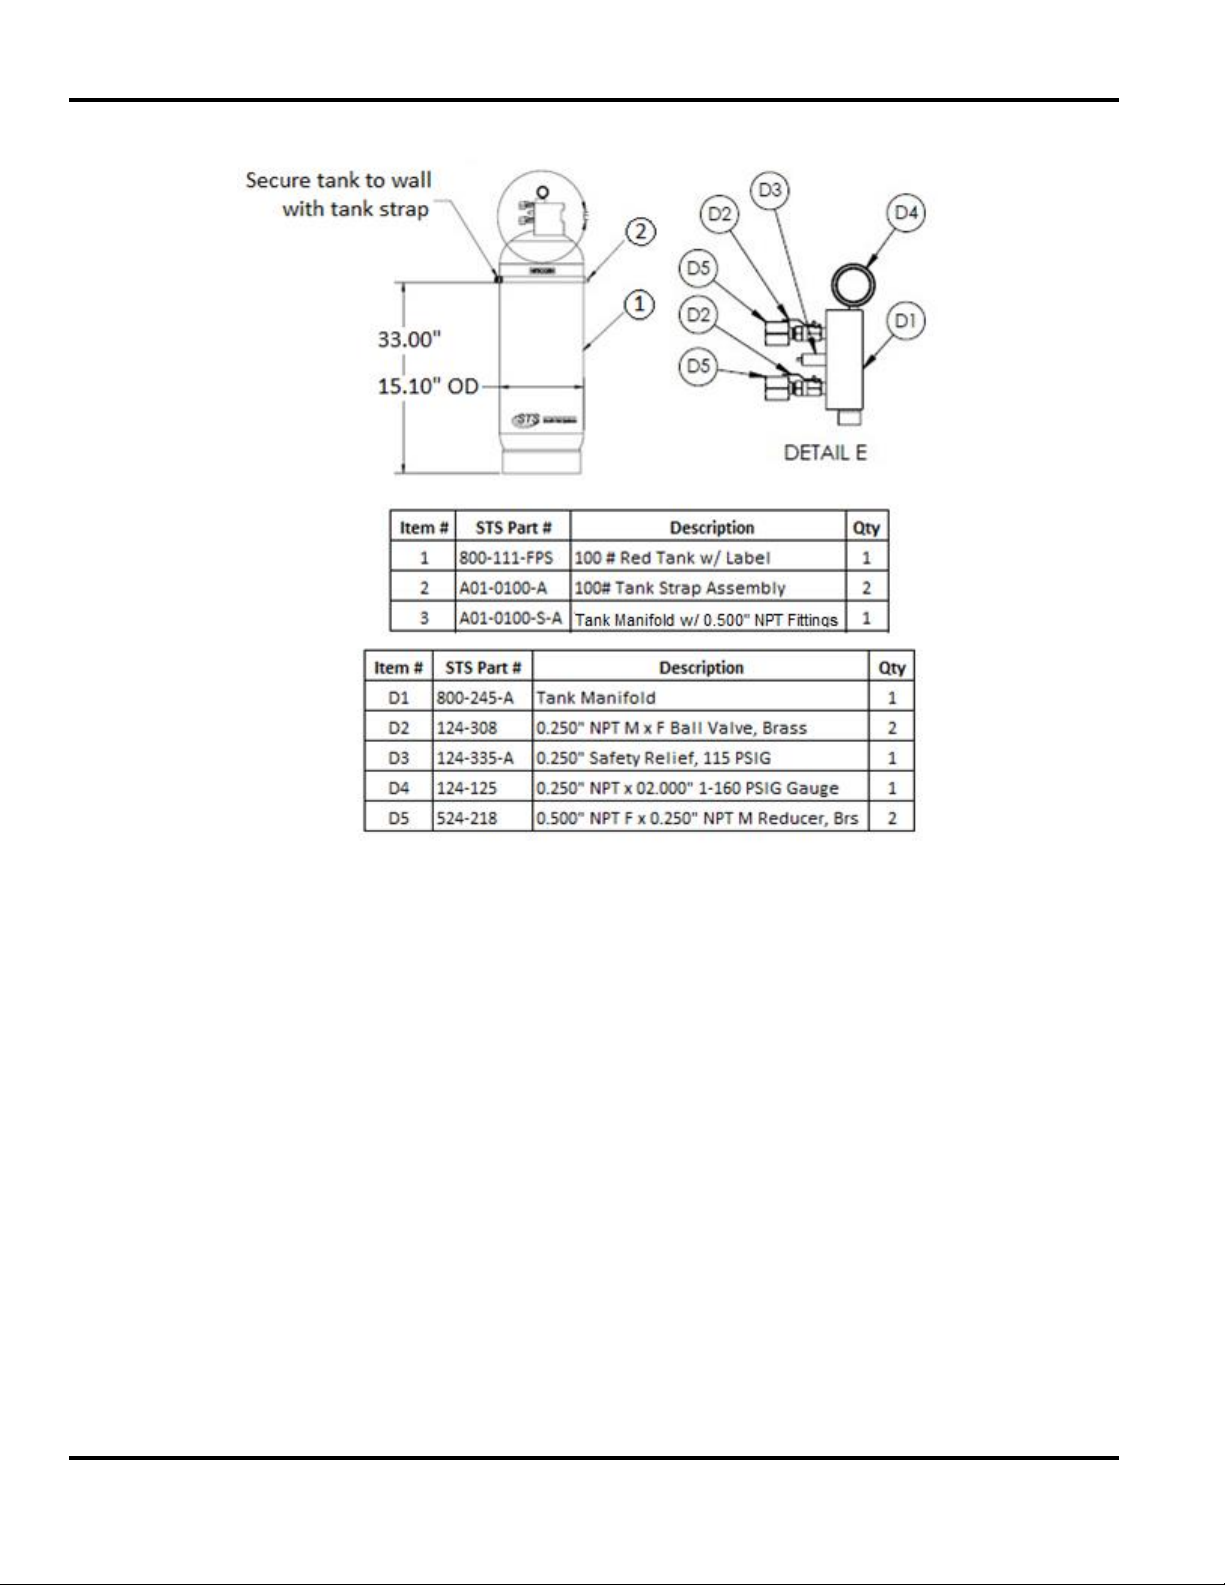
Figure 5: 100# N2 Storage Tank Setup

FPS-650 and FPS-1250 South-Tek Systems
Version: 7
Revision Date: 9/6/19Page 16 of 29
Figure 6: FPS-1250 Dimensions and Connections

FPS-650 and FPS-1250 South-Tek Systems
Version: 7
Revision Date: 9/6/19Page 17 of 29
AIR BYPASS SETUP (OPTIONAL)
The Air Bypass Option ensures that nitrogen is the only supervisory gas
entering the FPS. It safeguards your installation all while providing piece of
mind knowing the FPS is being filled with nitrogen vs any other gas. It will
alarm if the N2-Blast Generator is being bypassed by the air compressor. It
safeguards against a maintenance technician from inadvertently leaving the
“air bypass” open or the N2-Blast being powered in the off position. It will
provide a visual alarm when it is in alarm mode. See wiring diagram and
installation drawing included with this package. For electronic copies, please
contact your local distributor.
START-UP PROCEDURES
It is necessary to use caution when working with pressurized gas, making
sure that all fittings and gas
lines are installed correctly. Always leak check
(see Checking for Leaks section) every line before using the system.
Note: Line leaks will cause the N2-BLAST® to run excessively, shortening
its life and cause excess wear on the compressor.
The installation layout drawings are provided with your system in the
documentation package of the system. For electronic copies, please contact
your local distributor. Review and make sure the setup installation is
completed per the installation layout drawings. Ensure that you follow the
correct installation drawing per your system’s design. In some cases, a N2
Bypass system for pre-filling is required in the installations to meet code.
If your system requirements are more complex, please consult your sales
representative or equipment
installer for more detailed installation
instructions.
1. The N2-BLAST® is supplied with ½” NPT Female inlet and outlet
fittings. Make sure to use Teflon tape or similar on all fittings to make
sure they don’t leak.
2. Install the “Supply Line” coming from the air compressor to the N2-
BLAST®’s Air Inlet.
3. Connect the N2-BLAST® to the storage tank and then to the systems Air
Maintenance Device(s).
4. Once connections are made and the air compressor is on, you can
slowly open the System’s
On/Off Valve.
a. You will hear air rushing through the system and N2 filling the FPS
system.
b. If you hear a leak or have a bad connection, shut the valve off and

FPS-650 and FPS-1250 South-Tek Systems
Version: 7
Revision Date: 9/6/19Page 18 of 29
make the correction.
c. If there is a leak within the unit, remove the cover and locate the
issue. If you must replace any parts, only use factory parts
supplied from your distributor or South-Tek
Systems. Consult
the factory if there are any questions.
5. Once the N2-BLAST® fills the 100# storage tank to 70 PSIG, the system
will enter standby –the system’s green N2 Production light will change
to orange indicating that the system is in standby. This will shut the air
flow off through the generator and eventually shutting off the air
compressor once it reaches air tank cutout pressure.
a. This will save air and time on your compressor’s motor.
b. This also prolongs life of nitrogen generator’s media and filter life.
i. Lesser quality systems have a constant purge flow
through their systems which decreases system life and
increases the need for maintenance.
6. When you draw N2 off the system and the tank pressure falls below
cut-in pressure
(approximately 62 PSIG), the pressure switch will trigger
the system back into run mode and start
recharging the storage tank
automatically. The pressure switch is preset at the factory –no field
adjustment is required.
CHECKING FOR LEAKS
When a leak is suspected, first try to listen for leaks and/or spray with soapy
water around the connection ports. If a leak is found, isolate the area and
relieve any pressure on it prior to working on it. Fix the leaking part and return
the system back to operation. If no leak is heard (or visually seen with the
soapy water), turn off the unit and try isolating sections to see if there’s a
pressure loss. If the BlastOff™ option is included with your unit, the system
will alarm indicating that there is a leak in the line. Consult with your installer
if you cannot locate the leakage area.
To determine if the leak is within the Generator to the N2 Storage Tank:
1. With the unit powered on, close off both ball valves on the N2
storage tank. Note the storage tank pressure.
2. Allow the system to continue running. Within 10 minutes or less,
the system should reach the “Standby” mode.
3. Wait for 5 minutes and if the system remains in the “standby”
mode, then the leak is after the N2 Generator. Read the N2
storage tank pressure and if the pressure has changed, the leak
is within the storage tank fittings. If the N2 storage tank pressure
did not change, check the pipe lines in the building for leaks.

FPS-650 and FPS-1250 South-Tek Systems
Version: 7
Revision Date: 9/6/19Page 19 of 29
4. If the unit goes back into “run” mode, the leak is within the
cabinet. Check all the lines going to the blender and back to the
tank.
To find the leak within the cabinet:
1. Open the front cabinet door and locate the N2 storage tank.
2. Close off the output ball valve from the tank (upper ball valve on
the red manifold).
3. Watch the exterior gauge above the cabinet for 60 seconds. If you
see the pressure dropping, the leak is somewhere between the
output ports, to the blender (if one is present), and back to the
closed off ball valve on the tank. Fill and/or listen for leaks and
fix them once found. If the pressure is not dropping go to the next
step.
4. With the unit still running, close off the input ball valve to the tank
(lower ball valve on the red manifold).
5. Within 5 minutes, the system should go into “Standby” Mode. If
it doesn’t, contact your local provider/installer for further
assistance.
6. Once in “Standby” mode, wait 60 seconds. After 60 seconds, the
system should remain in “standby” mode. If it doesn’t, the leak is
somewhere between the check valve and the output ball valve on
the tank.
7. If the system remains in standby, contact your local
provider/installer for further assistance.
ACCESS CONTROLS
Do not attempt to modify the program or the warranty will be voided. In case
of the program failure, first attempt to cycle the power to the system. If that
does not work, please contact your provider for further instructions.
STARTING THE SYSTEM
To start the system, turn on the power switch and make sure any valves to
the gas lines are in the open position.
STOPPING THE SYSTEM
To stop the system, close off any valves on the gas lines. Powering down the
system is not necessary. If emergency shut off is required, turn off the power
switch on the side on the control panel.

FPS-650 and FPS-1250 South-Tek Systems
Version: 7
Revision Date: 9/6/19Page 20 of 29
5SYSTEM USAGE
INSTRUCTIONS
The FPS-650 and FPS-1250 is intended to be used to generate Nitrogen, and
provide nitrogen for the fire protection piping system. Follow the installation
instructions above and only use in an approved environment. The generator
generates enough nitrogen to maintain zone pressure requirements. Please
consult with your local provider for questions not answered in this manual.
The system is design for 24-hour operation, but routine maintenance on the
filters must be performed. See section “System Maintenance” for detail
maintenance instructions.
ALARM NOTIFICATION
Filter Alarm:
All FPS-650 and FPS-1250 comes standard with a “Filter Alarm” notification.
The controller will display “FILtr” message in red when the filter change is
overdue. It is recommended that the filters be changed once every year or
every 1000 hours, whichever comes first. See section “System Maintenance”
for detail maintenance instructions.
BlastOff™ - Leak Detection System Alarm
An optional feature that can be included with the system is the BlastOff™ -
Leak Detection System. It is a patented system when installed into the FPS-
650 and FPS-1250 detects line leaks within the downstream gas lines from
the N2 Generator to the FPS piping. Line leaks could be due to pin hole leaks
in the pipe lines, loose fittings, faulty connection, etc. These leaks are
potential safety hazards, they can cause the nitrogen to deplete quickly, and
could cause your FPS-650 and FPS-1250 to run in excess (decreasing the
life of the unit).
Once a leak has been detected, the BlastOff™ is set to initiate a buzzer,
displays “b ōFF” in red on the controller screen, and shuts off the FPS-650
and FPS-1250 until the problem has been remedied. To reset the BlastOff™,
simply turn off the FPS-650 and FPS-1250 and turn it back on. The FPS-650
and FPS-1250 can be ordered with the BlastOff™ System Factory installed or
the system can be retrofitted in the field. Some rewiring is required to field
install.
Never reset repeatedly; if the BlastOff™ goes off daily, there is a potential
issue. Consult your installer for a solution. The label on the next page will be
on your FPS if factory installed.
This manual suits for next models
1
Table of contents
Other South-Tek Systems Inverter manuals

South-Tek Systems
South-Tek Systems BEERBLAST 7 KPH Operating instructions

South-Tek Systems
South-Tek Systems N2Blast FPS-900 User manual

South-Tek Systems
South-Tek Systems N2Blast FPS-1750 User manual

South-Tek Systems
South-Tek Systems N2-BLAST FPS-500 User manual

South-Tek Systems
South-Tek Systems N2Blast FPS-15000 User manual


