South S660N User manual

S660N GNSS Network RTK Receiver
S660N GNSS Network RTK Receiver
User Manual
*All Rights Reserved

S660N GNSS Network RTK Receiver
Directory
Chapter ⅠBrief Introduction .................................................................................................................................... 4
1.1. Preface .......................................................................................................................................................... 4
1.2. Introduction .................................................................................................................................................. 4
1.3. Main Features ............................................................................................................................................... 4
1.3.1. Smart platform ................................................................................................................................... 4
1.3.2. WiFi performance .............................................................................................................................. 4
1.3.3. Intelligent storage ability ................................................................................................................... 5
1.3.4. Full satellite constellation support ..................................................................................................... 5
1.3.5. Outstanding protection capability ..................................................................................................... 5
Chapter ⅡHardware Component ............................................................................................................................. 6
2.1. Main Structure .............................................................................................................................................. 6
2.2. Front Control Panel ....................................................................................................................................... 7
2.3. Bottom Component ....................................................................................................................................... 8
2.4. User Interface................................................................................................................................................ 8
Chapter ⅢHardware Operation ................................................................................................................................ 9
3.1. Switch ON/OFF ............................................................................................................................................ 9
3.1.1. Switch ON .......................................................................................................................................... 9
3.1.2. Switch OFF ......................................................................................................................................... 9
3.2. Reset ........................................................................................................................................................... 10
3.3. Self-check ................................................................................................................................................... 10
3.4. Factory Reset .............................................................................................................................................. 11
3.5. Charging ..................................................................................................................................................... 12
Chapter ⅣInternal Web UI Operation .................................................................................................................... 13
4.1. Overview .................................................................................................................................................... 13
4.1.1. WIFI hotspot connection mode ....................................................................................................... 13
4.1.2. USB connection mode ..................................................................................................................... 14
4.2. Web UI Main Interface ............................................................................................................................... 18
4.2.1. Status ............................................................................................................................................... 19
4.2.2. Configuration ................................................................................................................................... 21
4.2.3. Satellite Information ........................................................................................................................ 27
4.2.4. Data Record ...................................................................................................................................... 29
4.2.5. Data Transfer .................................................................................................................................... 31
4.2.6. Network Config ................................................................................................................................ 37
4.2.7. Firmware Update ............................................................................................................................. 41
4.2.8. User Management ........................................................................................................................... 44
4.2.9. Help .................................................................................................................................................. 44
Chapter ⅤHow to achieve the WIFI functions ...................................................................................................... 45
5.1. WIFI Hotspot (AP) ..................................................................................................................................... 45
5.2. WIFI Client (Datalink) ................................................................................................................................ 47
5.2.1. Configure on Web UI ........................................................................................................................ 47
5.2.2. Configure on Controller Software .................................................................................................... 55
Chapter ⅥRTK Measurement ................................................................................................................................ 61

S660N GNSS Network RTK Receiver
6.1. How to connect with GIStar for Android .................................................................................................... 61
6.2. How to connect with EGSTAR ................................................................................................................... 66
6.3. How to connect with SurvCE ..................................................................................................................... 68
6.4. How to use FieldGenius to configure S660N ............................................................................................. 73
Chapter ⅦStatic Measurement ............................................................................................................................... 77
7.1. Antenna Height Measuring ......................................................................................................................... 77
7.2. Field operation procedure ........................................................................................................................... 78
7.3. Mode Configuration .................................................................................................................................... 78
7.4. Data Download ........................................................................................................................................... 82
7.5. Data Processing .......................................................................................................................................... 83
Chapter ⅧStandard Configuration ......................................................................................................................... 86
Chapter ⅨTechnical Specification ......................................................................................................................... 87

S660N GNSS Network RTK Receiver
Chapter ⅠBrief Introduction
1.1. Preface
Welcome to South Surveying&Mapping Instruments Co., Ltd, which is Chinas leading surveying instrument
production and sales enterprises, including GNSS products and TS, has been committed to spread the international
advanced GPS mapping survey techniques and products to the users. To know more information about SOUTH,
please visit our official website http://www.southinstrument.com/
1.2. Introduction
This manual takes SOUTH new compact GNSS network RTK receiver –S660N for example, to explain what new
features achieved on this compact and miniaturizing unit, and how to install, set up and uses the RTK system as
well as the use of the accessories. We recommend that you read these instructions carefully before using the
instrument.
This kind of receiver is the product we made a comprehensive upgraded for hardware and system on the basis of
original model S660, which according to long period time market research and user demand research, greatly
improves the stability of product performance, as well as to the user experience.
1.3. Main Features
1.3.1. Smart platform
Embedded Linux operating system and SOUTH intelligent cloud platform, S660N receiver is no more a simple and
compact RTK receiver, now it is a complete intelligent operation system with web UI management platform.
The smart internal web UI management platform allows users to monitor working status of receiver and configure
the equipment with the help of WIFI connection or USB connection to PC.
1.3.2. WiFi performance
According to current trend of RTK surveying, WiFi is the brand-new and useful technology to RTK measurement
that makes effective use of GNSS receiver, which greatly improves the working efficiency and the flexibility.
The WiFi of S660N is not only able to be a wifi hotspot that allows users to connect it and access to the web UI
management of S660N, but also can work as datalink that makes S660N have a quick connection to internet for
corrections from CORS network.

S660N GNSS Network RTK Receiver
1.3.3. Intelligent storage ability
SOUTH S660N is equipped with 8GB Solid State Disk that make sure enough storage space for data collection, as
well as to the stability of data recording speed.
With the smart storage technology, S660N is able to connect an external storage for data collection or downloading
data to this external storage directly.
Base on the intelligent platform, S660N supports STH, Rinex2.x and Rinex3.x format data storage, and the
sampling rate can be up to 20Hz.
The automatic circular storage performance can remove the primary data automatically once the memory is full,
which makes sure instrument has enough space for next job.
1.3.4. Full satellite constellation support
Equipped with most advanced GNSS board, 220 channels and unmatched GNSS multi-constellation tracking
performance, SOUTH S660N is able to track most signals from all kinds of running satellite constellations. And
this compact device owns the ability of enable or disable constellation tracking .
1.3.5. Outstanding protection capability
This compact unit is built with magnesium alloy material to make sure it can work in extremely tough conditions
like heavy rain, and the rubber ring can protect the instrument from dropping onto concrete.
S660N GNSS Network RTK Receiver
Chapter ⅡHardware Component
In this chapter, the appearance of S660N will be presented in detail, you can grasp detail information about each
component as your expectation.
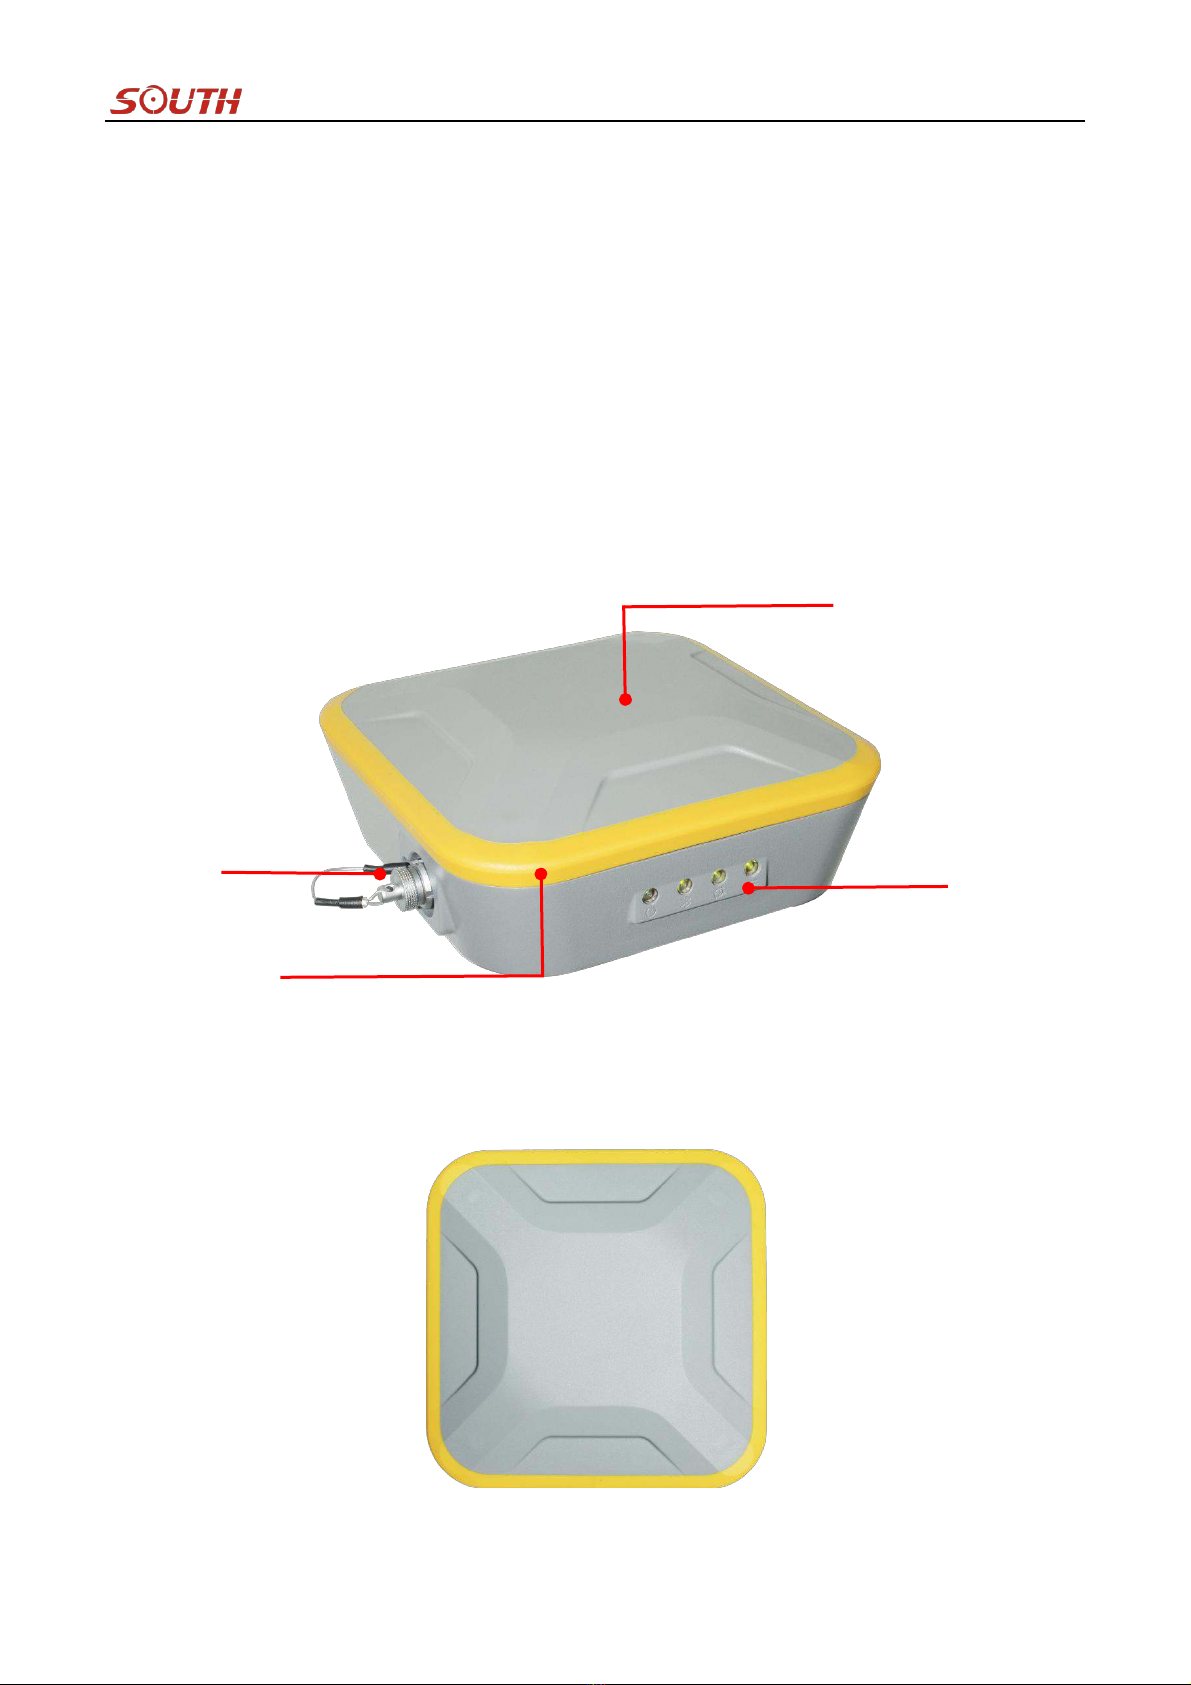
2.1. Main Structure
S660N receiver is similar to a flat structure box with concave-convex texture upper cover. Concentrate on the
protective property, the main body of S660N is made by magnesium alloy material which is applied to aviation
industry, it makes overall the S660N be more rugged and durable.
The upper cover is designed with concave-convex texture structure, perfect combination of fashionable design and
industrial aesthetics.
Upper cover
LEMO port
Rubber ring
Control panel
S660N GNSS Network RTK Receiver
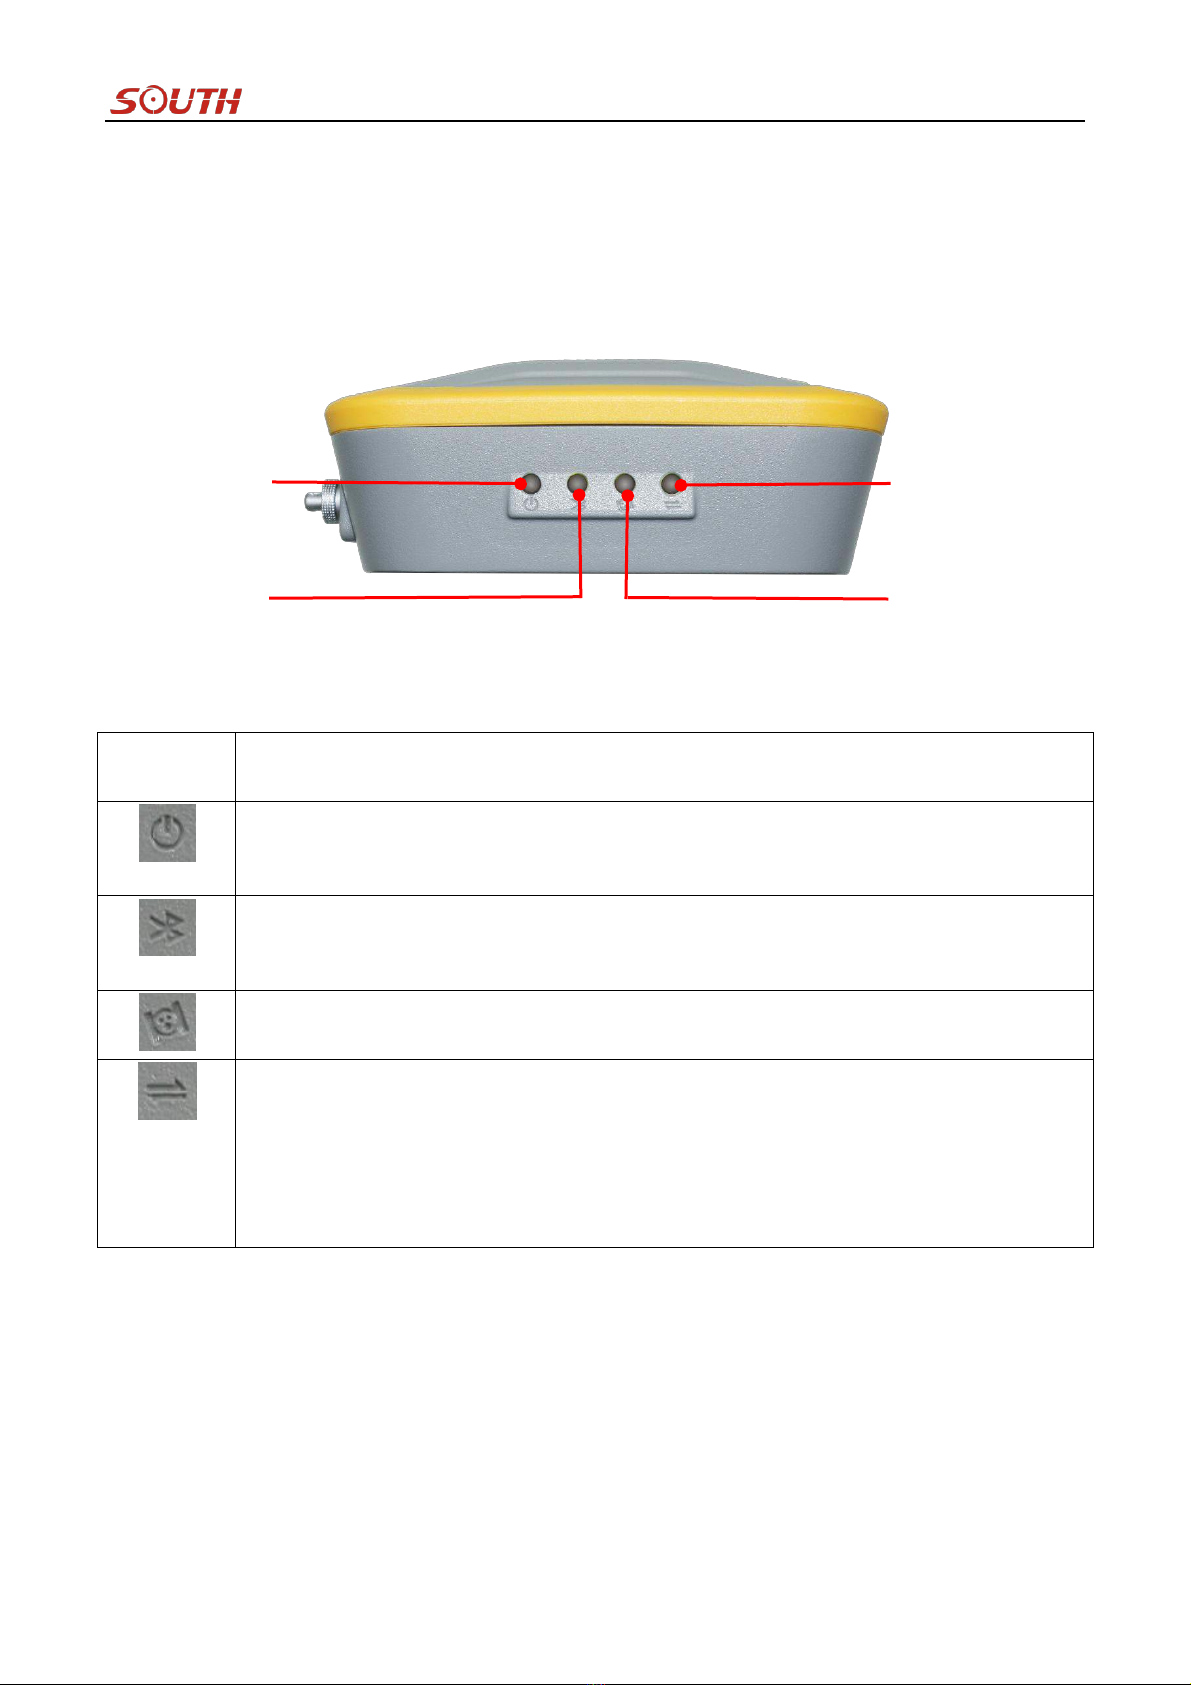
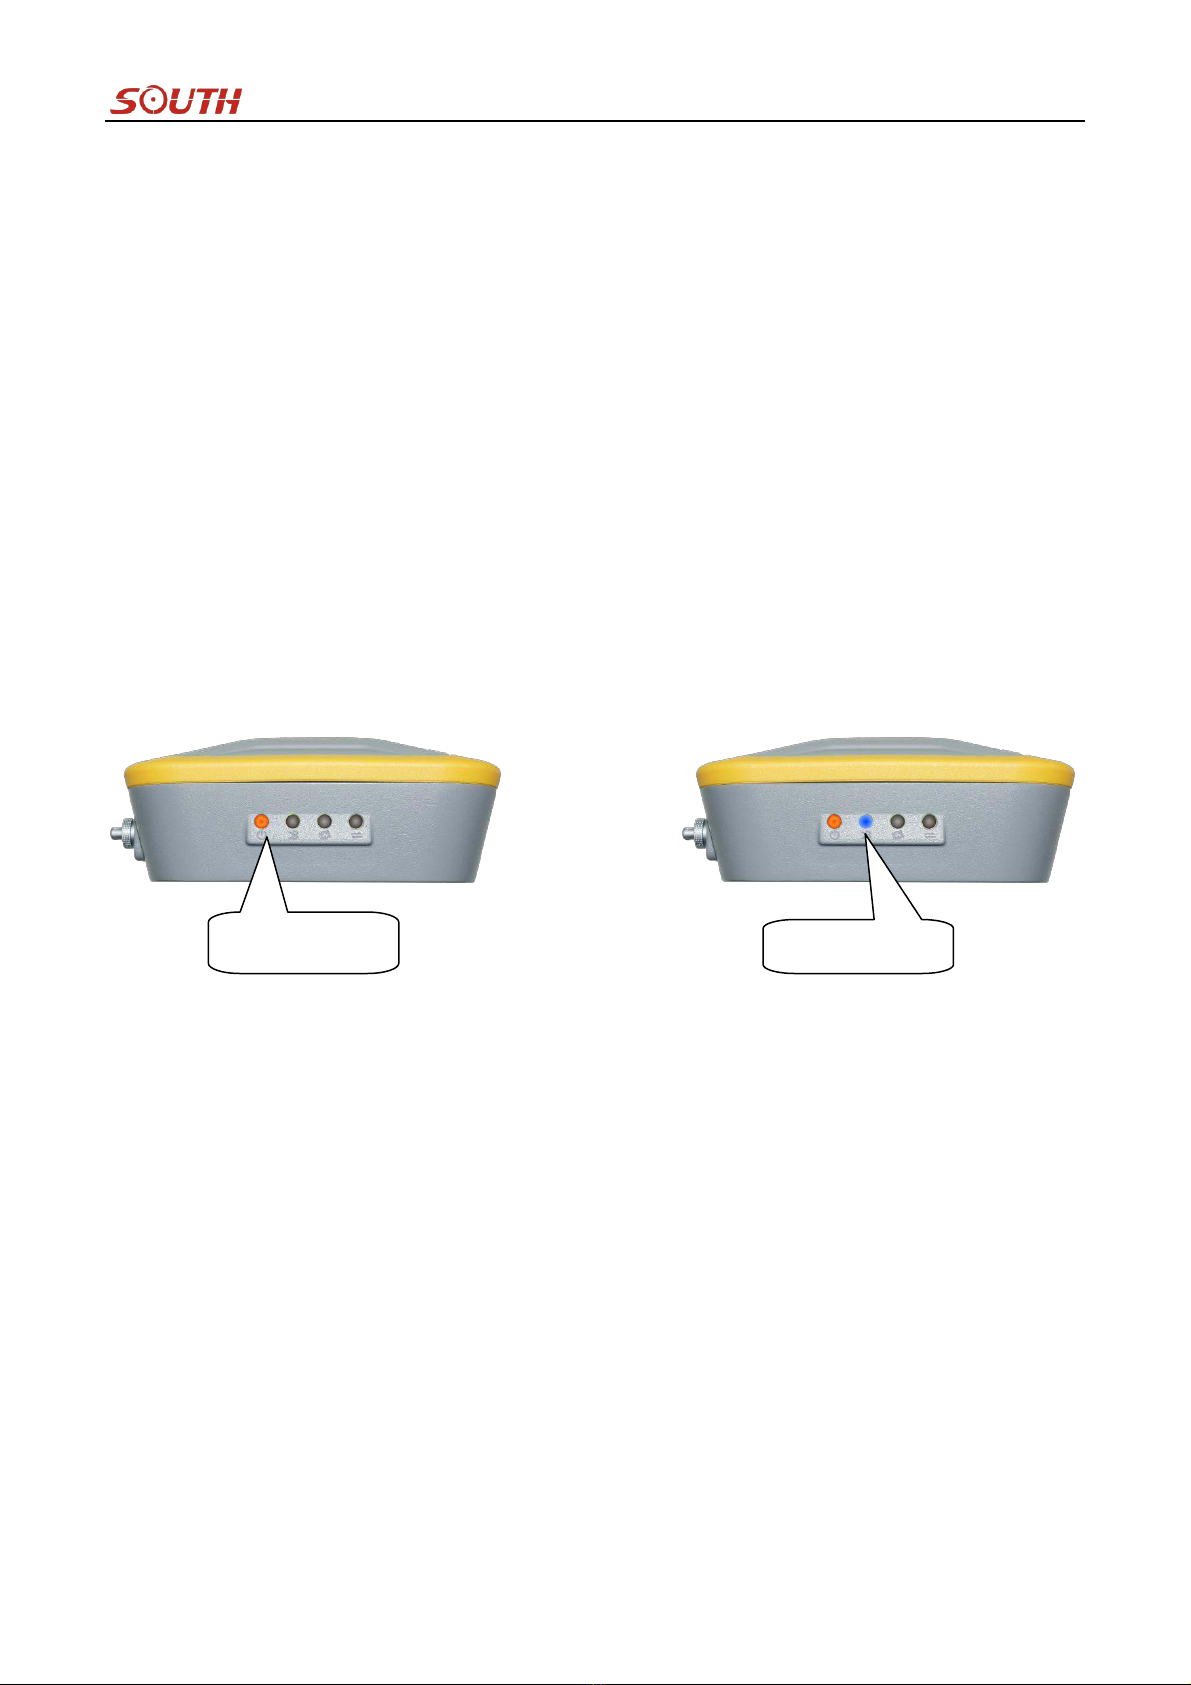
2.2. Front Control Panel
The control panel of S660N adopts the LED design to indicate working status and charging state, which are
intuitive to understand well. There is detail description for each indicator in following table.
Items
Description
①Glows in green to indicate there is enough power supply for instrument after switching it on.
②Flashes in green to indicate that the battery is low in power.
③Glows in red to indicate that the instrument is under charging after plugging on charger.
①If this indicator glows in green, that means the Bluetooth connection has established between
receiver and controller.
②If it is glows in green in charging mode, that means the battery has been full charged.
①If the indicator flashes in green, that means the receiver begins searching satellites, the number
of times flashing indicates the quantity of satellites the receiver searches.
①In Rover mode, if this indicator flashes in green, the meaning is that correction is coming from
reference station.
②In Static mode, the indicator flashes in green to indicate that the static observation data is
being recorded.
③In Base mode, this indicator flashes in green to indicate that correction is being transmitting by
the WIFI connection to internet.
Satellites indicator
Data communication indicator
Bluetooth indicator
Power indicator

S660N GNSS Network RTK Receiver
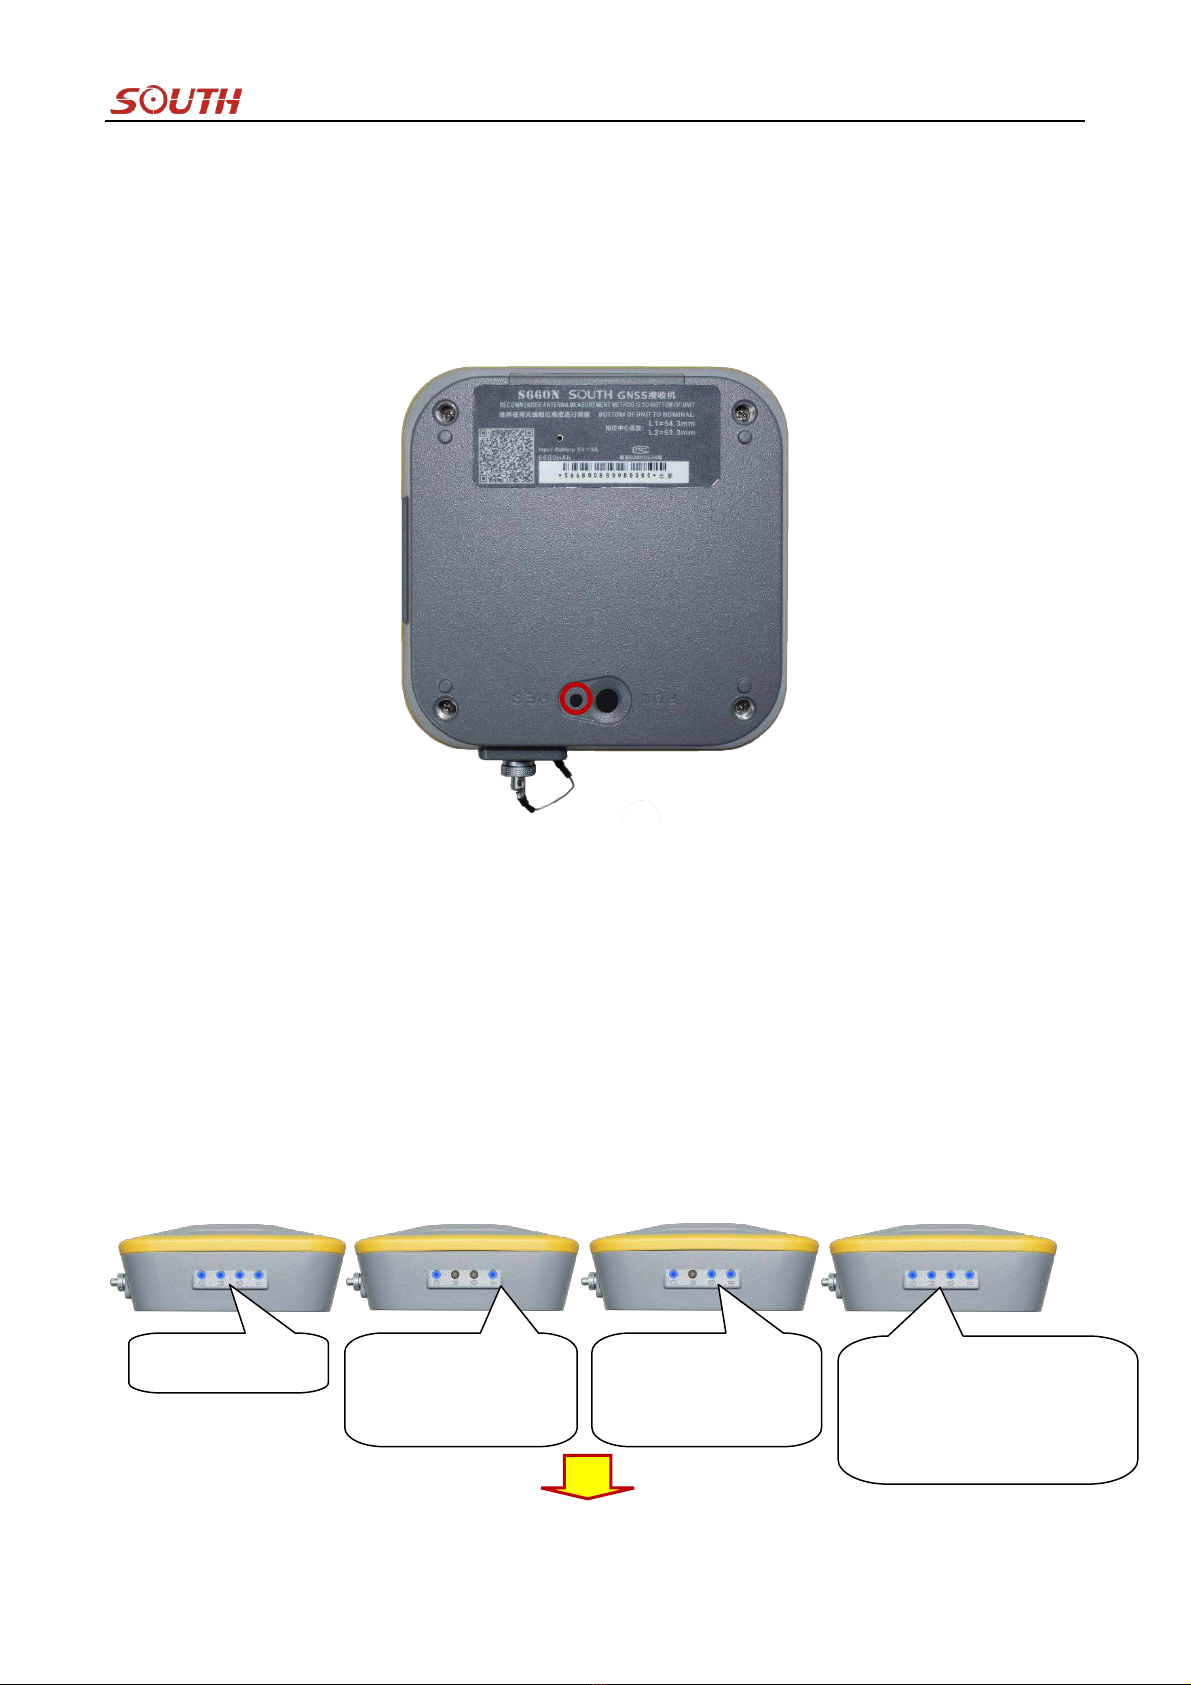
2.3. Bottom Component
At the bottom component, a lot of information is contained on the label attached to the receiver, including
instrument model, L1/L2 information, serial number of the device and a QR code for GIStar software downloading.
The other components include power button, reset button and screw caves for fixing with holder.
2.4. User Interface
This part is mainly to introduce the communication port which is mainly used for data downloading and battery
charging. However, except the function we mentioned, there is an additional function which allows users access its
internal web UI server with the help of L7U50 cable.
Holder screw cave
Control panel
QR code for GIStar
Power button
Reset button
Serial number label
LEMO port
LEMO port
S660N GNSS Network RTK Receiver
Chapter ⅢHardware Operation
3.1. Switch ON/OFF
3.1.1. Switch ON
To switch on the receiver, you only need to press the power button for short time until you can hear beeping from
receiver once and all indicators light up, at this moment, release the power button and the receiver will switch on.
Then the receiver will complete initialization automatically around 8 seconds, and the unit starts to work in normal
situation.
3.1.2. Switch OFF
To switch off the receiver, hold on power button for several seconds until you can hear 3 beeping sounds, then
release the power button, the receiver will switch off after all of indicators flash together twice.
Light up together for a
while
Stays in normal state
Flashes together twice
The receiver is off
S660N GNSS Network RTK Receiver
3.2. Reset
At the bottom of S660N receiver, there is a small key besides to Power button, that is the Reset key mainly used to
force turning off receiver if there is something block with power button to switch off the receiver.
For example, if the receiver cant be switched off by power button, use this key to force switching off receiver, then
restart the unit in normal way.
3.3. Self-check
Self-check is an important operation for south receiver during its use on the field. If there is something abnormal on
receiver or the receiver doesnt work properly, performing self-check operation for receiver will be helpful on
judging roughly what happen to the receiver.
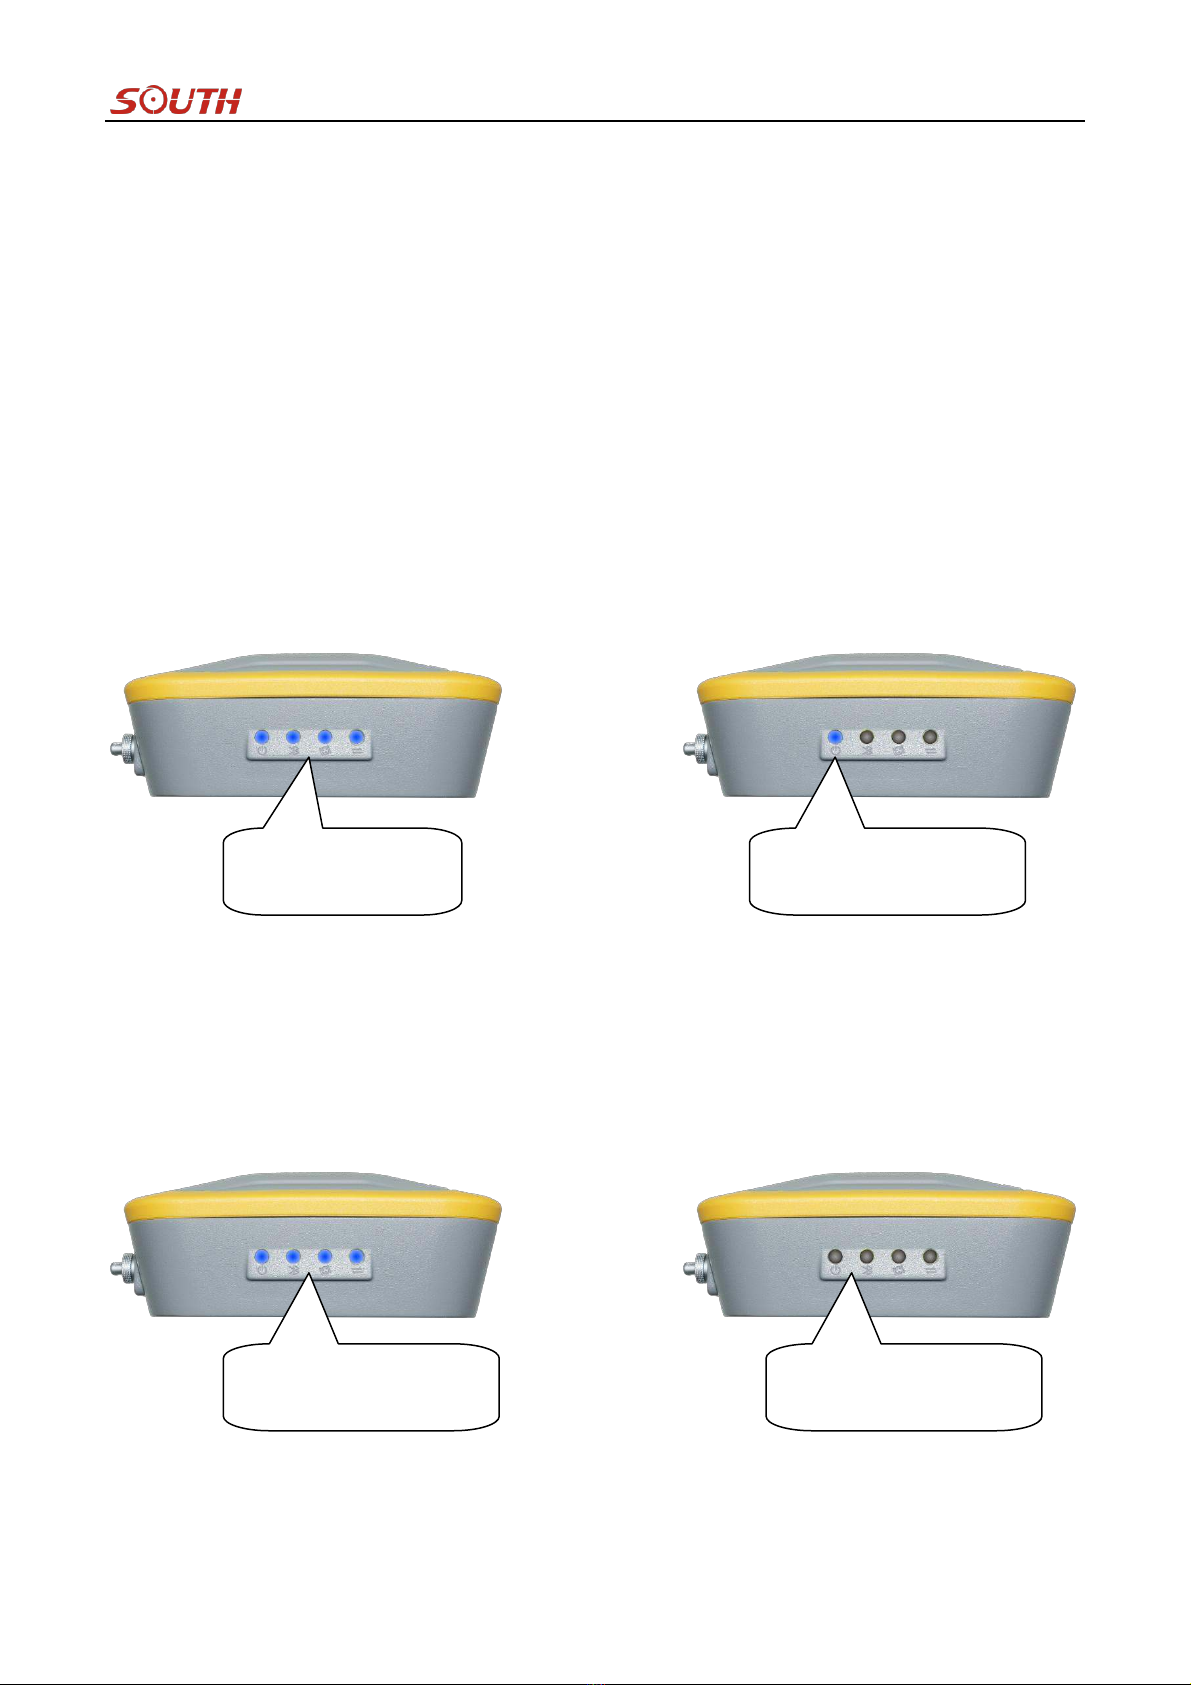
Self-check operation is easy to perform on S660N receiver, keep pressing power button for a while (about 8
seconds) until all of indicators light up together, at this moment, release power button and the receiver is
performing self-check procedure, then the indicator will light up one by one from right to left, after that the
self-check is completed and the receiver will get into normal state, starts to track satellites.
Light up together
Lights up, OEM board
is checked and
completed
Lights up, WiFi
module is checked
and completed
Lights up, Bluetooth module
is checked and completed,
the self-check procedure is
completed

S660N GNSS Network RTK Receiver
The meaning of all indicators during self-check
Items
Description
Glows in green to indicate the enough power supply for receiver
If this indicator glows in green during self-check procedure, it represents the Bluetooth module is
checked and completed.
If this indicator glows in green during self-check procedure, it represents the WIFI module is
checked and completed.
If this indicator glows in green during self-check procedure, it represents the OEM board is
checked and completed.
3.4. Factory Reset
Factory reset is a new interactional operation on S660N receiver, it is mainly used to bring internal configuration of
receiver back to factory default setting. Such as reset the function of LEMO port from normal USB to Ethernet
function, and reset the WIFI function from client mode to AP mode (WiFi hotspot).
Factory reset is similar to the operation of self-check, keep pressing power button for a while (after self-check
entrance) until the indicators flash one by one from left to right, at this moment, release power button and the
receiver gets into factory reset procedure. This procedure would take about 10 seconds, after that the receiver will
switch off automatically.
Normal state, starts
tracking satellites
Factory reset is
completed
Factory reset is performing, indicators
light up one by one from left to right
S660N GNSS Network RTK Receiver
3.5. Charging
S660N GNSS Network RTK receiver adopts built-in 6800mAh huge capacity battery, typically can last 8 hours
continuous work or more. Equipped with a specified charging socket and charger, ensure the safety of equipment
during charging. This unit is also able to be charged with phone charger and L7U50 cable, or recharge with a
portable power source.
While the power indicator flashes in green, this status indicates that the battery is low in power, and the receiver
really needs to charge within 10 minutes.
Before the use, please recharge the equipment first, and please take in mind that make sure the charging time reach
6-8 hours at the first several times, and fully discharged, so that to maximize the battery capacity and extend the
battery life at the same time.
When plug charger to S660N, the power indicator lights up all the time during charging, after the Bluetooth
indicator lights up, that means the battery is full charged.
Charging
Full charged
S660N GNSS Network RTK Receiver
Chapter ⅣInternal Web UI Operation
4.1. Overview
Because of using the smart embedded Linux operating system and SOUTH intelligent cloud technology, S660N is
allowed configuring and monitoring the status of itself in real-time on internal web UI. And the accessing way not
only supports the WIFI connection, but also supports the USB connection to computer with the help of LEMO port.
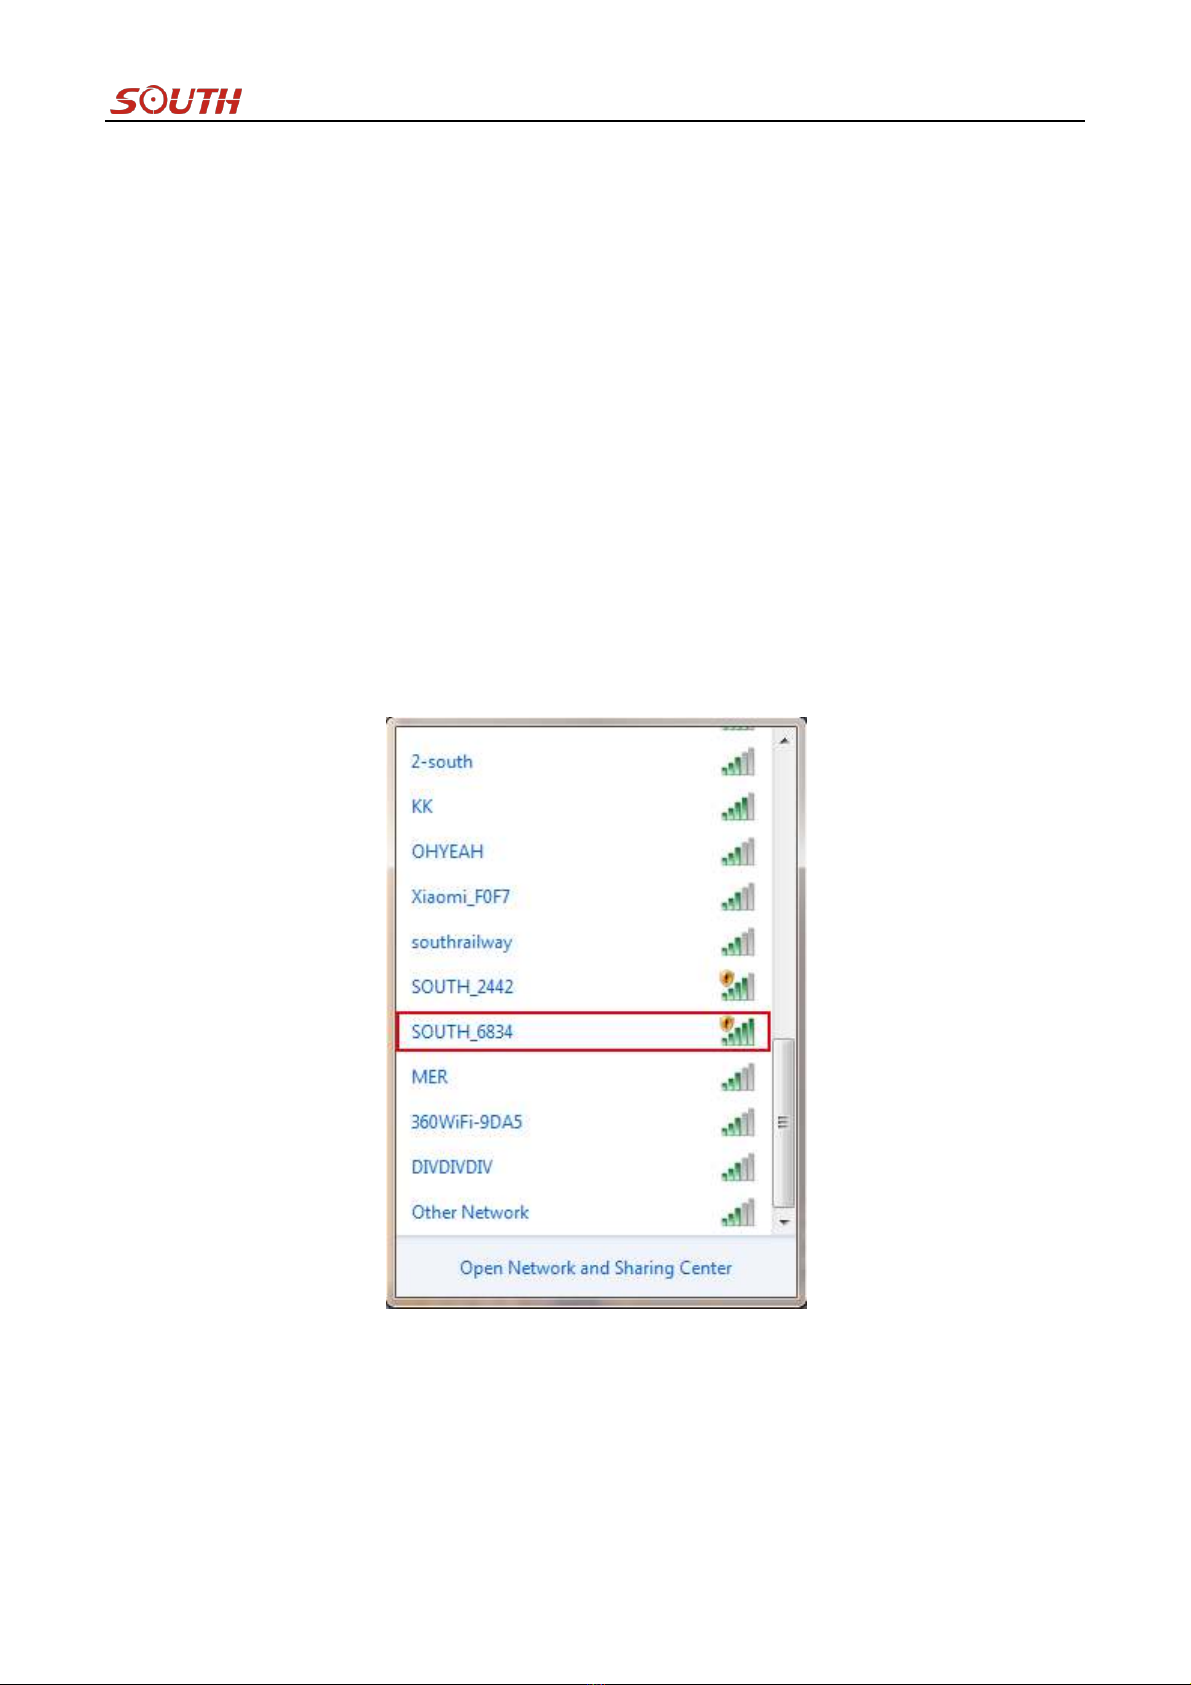
4.1.1. WIFI hotspot connection mode
First of all, the WIFI hotspot is default broadcasted by S660N, search the WIFI hotspot with the name of
SOUTH_xxxx using smartphone, tablet or laptop, then establish the WIFI connection and input the default IP
(10.1.1.1) into explorer, apply the default username and password for login.
For example, search the WIFI hotspot broadcasted by a S660N receiver using laptop PC, choose the WIFI hotspot
and click on connect button to establish the connection without password.
After that, run IE explorer on computer and input the default IP into address bar, after a while, the system login
interface is refreshed, then apply the default username and password for login.

S660N GNSS Network RTK Receiver
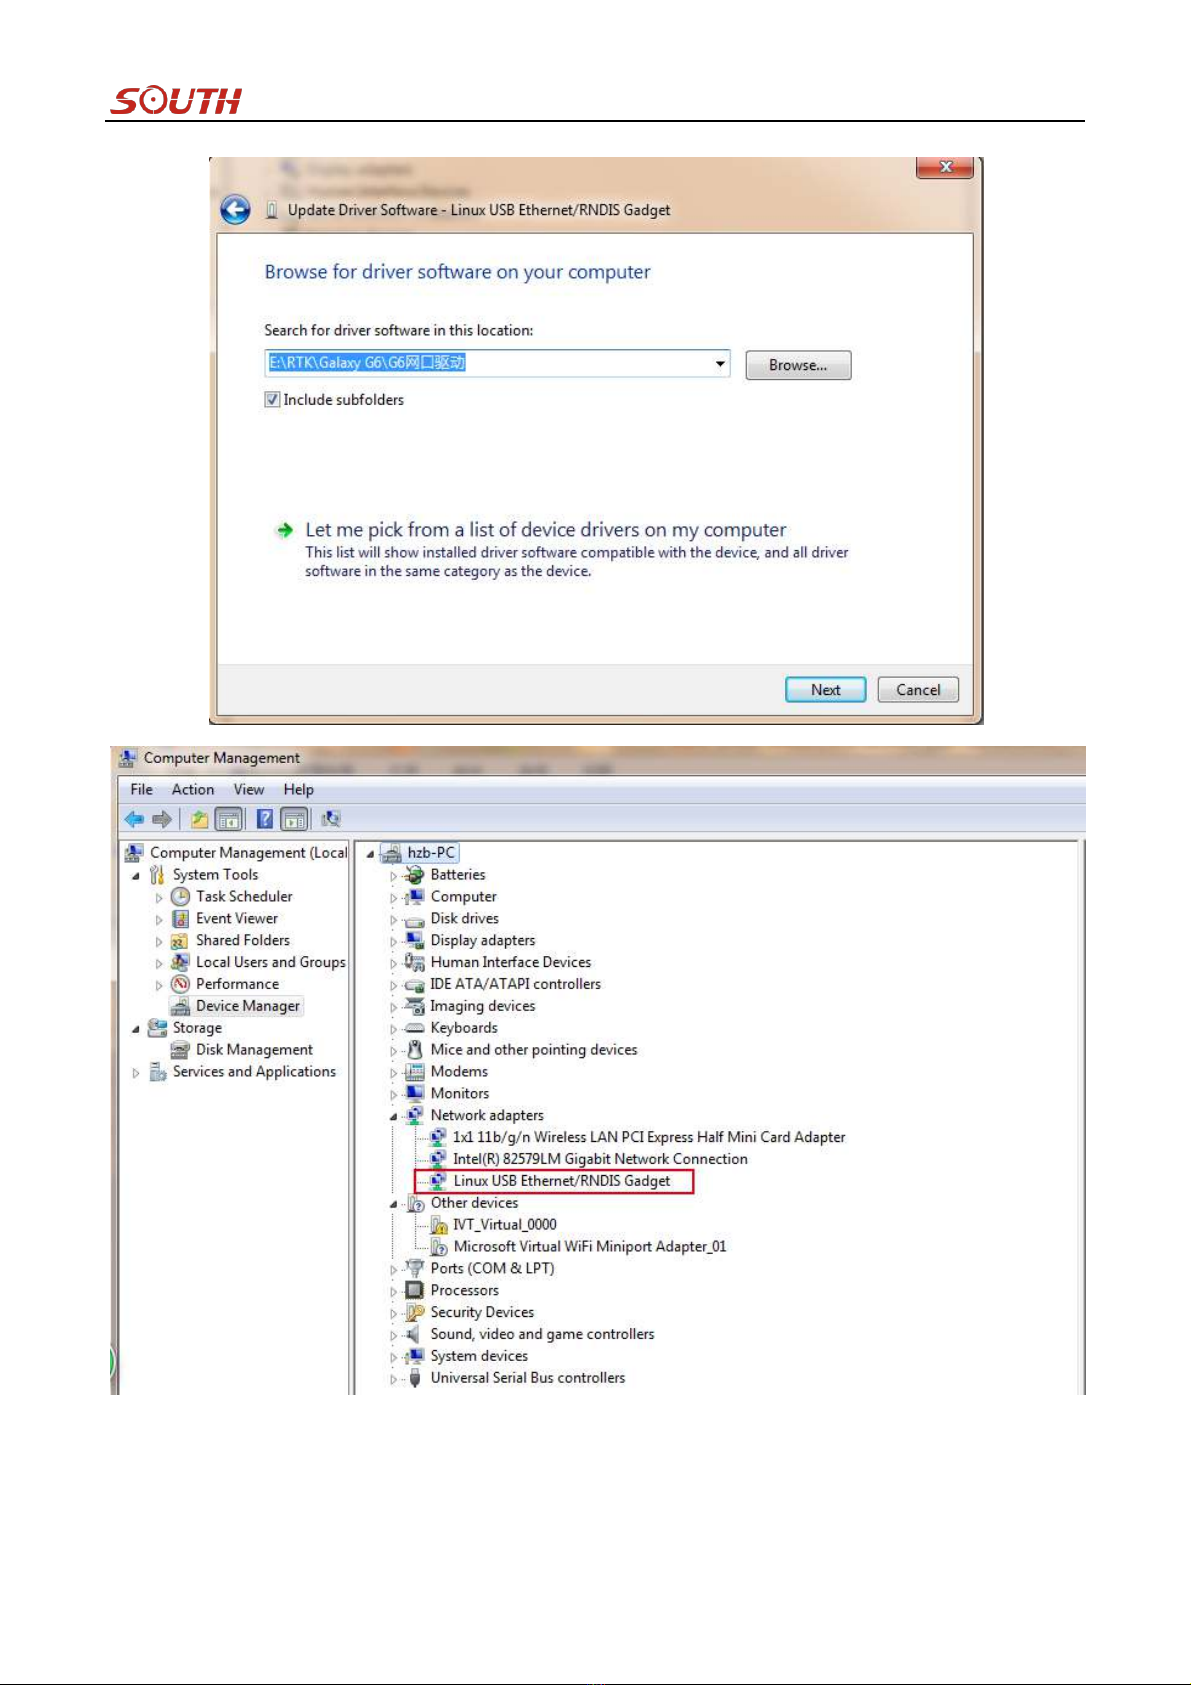
4.1.2. USB connection mode
On this mode, the LEMO port of S660N must work as an Ethernet port, then internal web UI shall be accessed via
L7U50 cable connects to computer.
The LEMO port of S660N is default set as Ethernet function, then connect S660N receiver to computer via L7U50
cable. Run the IE explorer on computer and type IP 192.168.155.155 into IP address bar, then input the default
username (admin) and password (admin) for login.

S660N GNSS Network RTK Receiver
At the first time to connect to a computer, a corresponding driver is required to install to the computer, then this
function could be activated.
S660N GNSS Network RTK Receiver
NOTE: The driver can be downloaded from official website automatically or please contact with us for more
supports.
S660N GNSS Network RTK Receiver
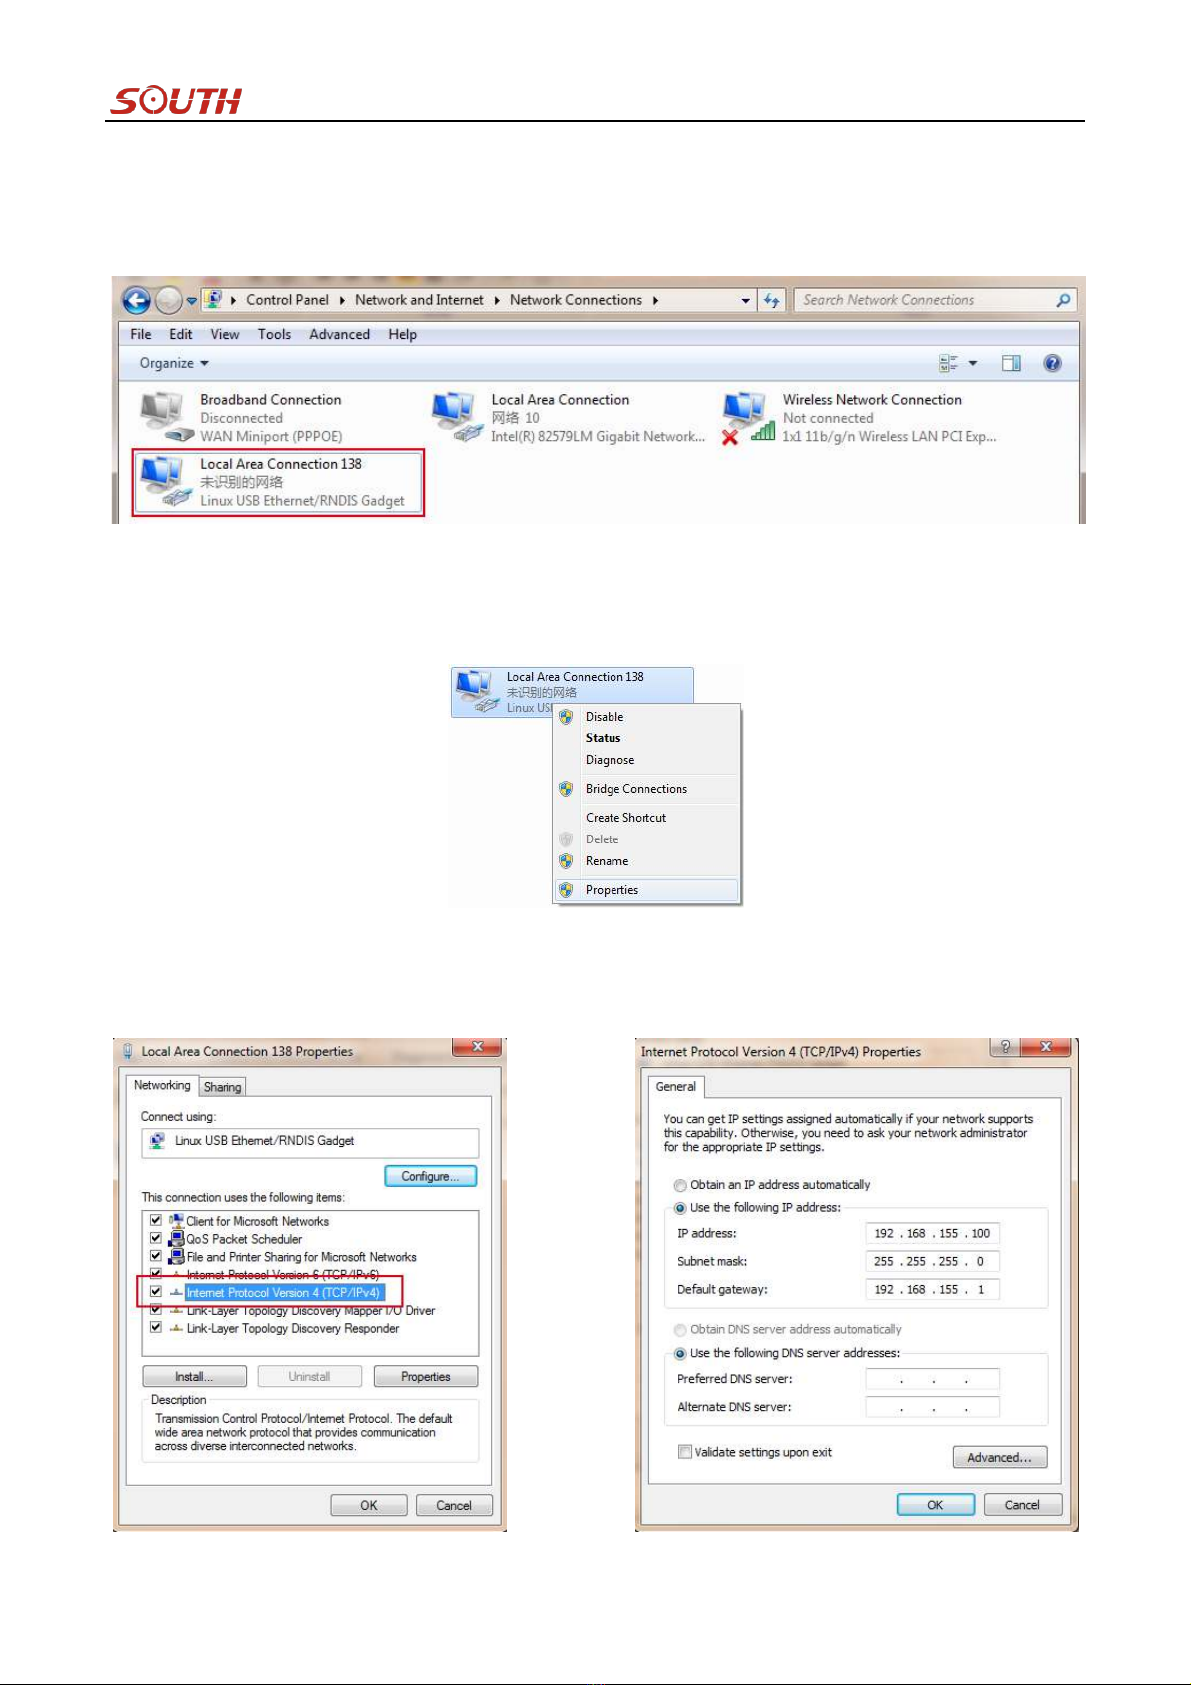
If the driver has been successfully installed, the LEMO port of S660N will be recognized as Linux USB
Ethernet/RNDIS Gadget, and a local area connection will generate in Network Connections on the computer.
For example, Local Area Connection 138 generates after connecting S660N receiver to computer via LEMO
Ethernet port.
However, sometimes the computer cannot detect the receiver by LEMO Ethernet port because there is something
wrong with acquiring IP automatically, therefore, we need to do something to avoid such problem, we can set a
fixed LAN IP for the connection: right click on the local area connection which is new generated, choose properties
to call out the local area connection properties window.
Then double click on Internet Protocol Version 4 (TCP/IPv4) option or click on properties button to call out
Internet Protocol Version 4 (TCP/IPv4) properties window, set the fixed LAN IP address as shown in following,
then click OK button and confirm the settings, return to the IE browser and use the IP address 192.168.155.155 to
access the internal web UI.
S660N GNSS Network RTK Receiver
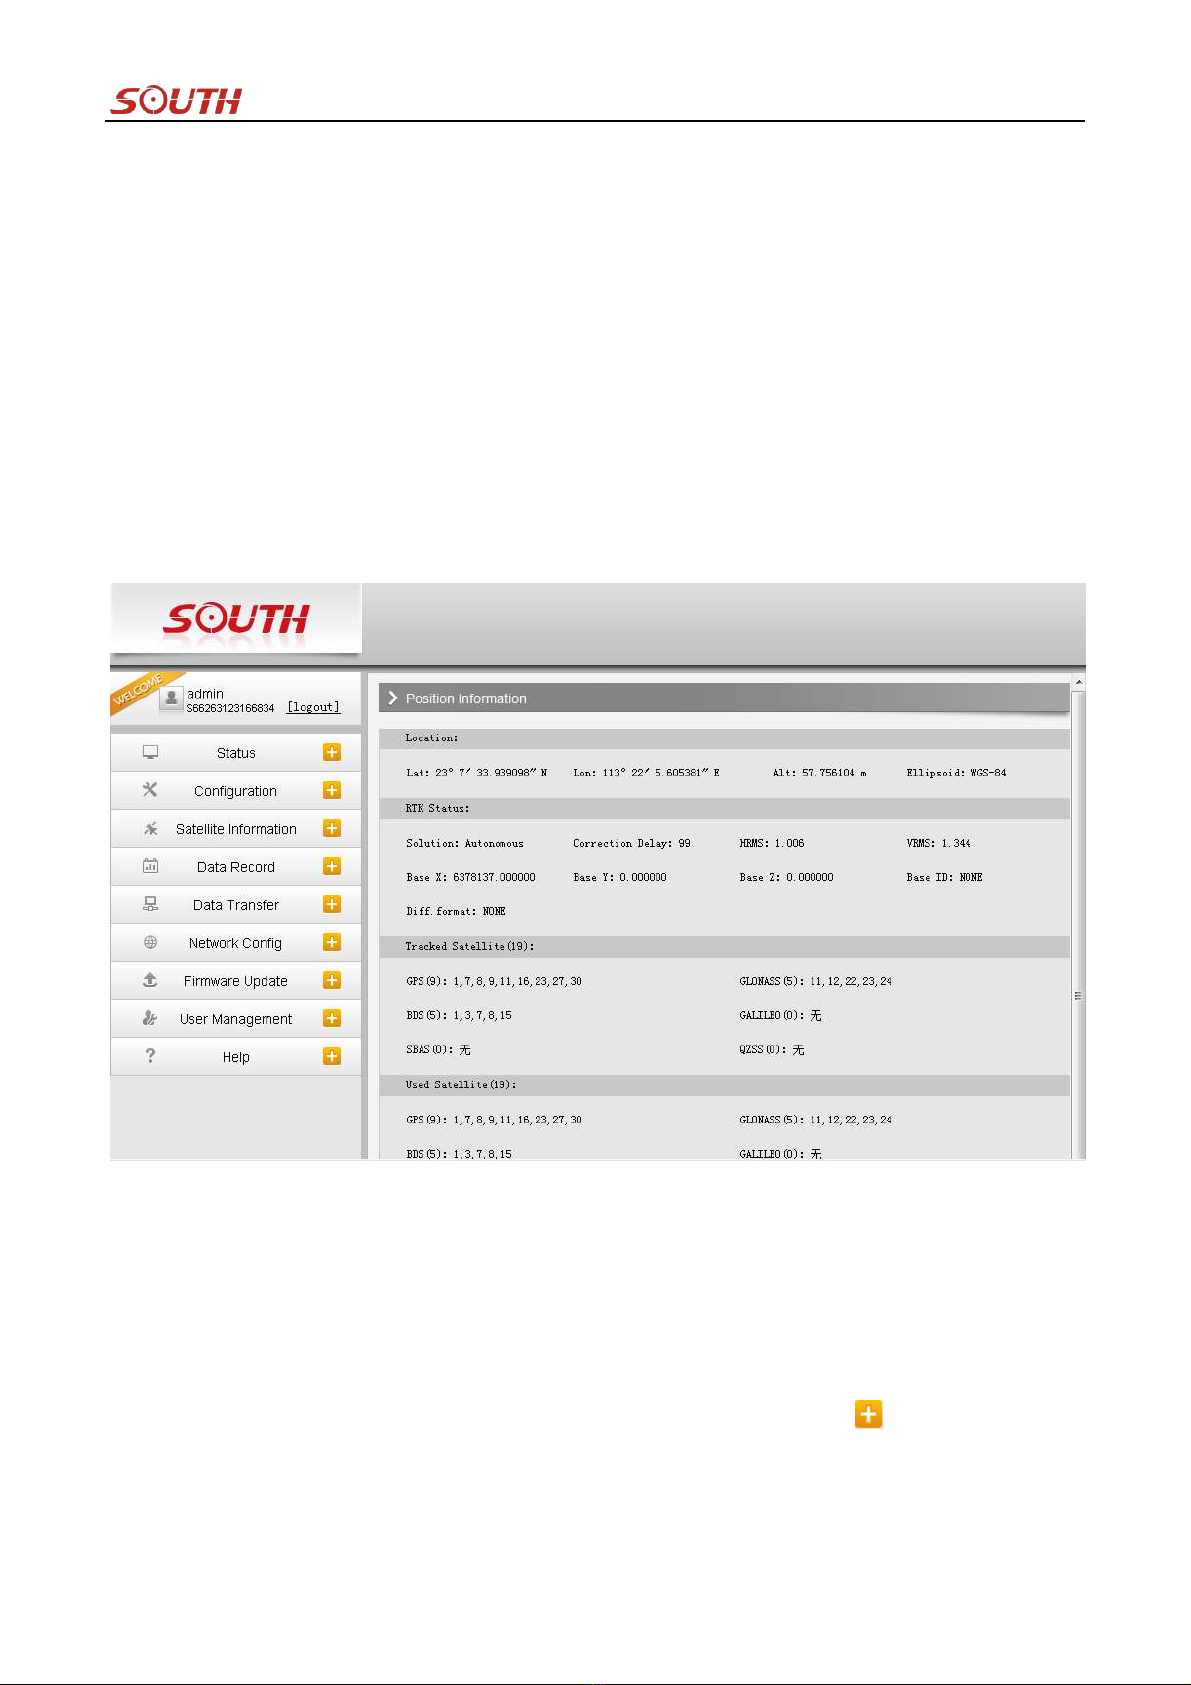
4.2. Web UI Main Interface
As shown in the following screenshot, this is the main interface of web UI of S660 while login, it contains the
common used operation menu and the information window including detail information and settings.
For example, the operation menu is listed at the left column that includes Status, Configuration, Satellite
Information, Data Record, Data Transfer, Network Config, Firmware Update, User Management and Help. At the
right information window, there is Position Information includes Location coordinates, RTK Status, Tracked
Satellite, Used Satellites and so on.
Click on the menu, the corresponding information or settings will be displayed at the right information window, it
is very intuitive and easy to understand, as well as to the operation.
The table below is the instruction for the menu listed at the left side of main interface, take a reference to this
table, you will grasp the main points of each item.
Some associated sub-items are contained under each main menu, click on the icon or the main menu to
unfold the sub-items.
S660N GNSS Network RTK Receiver
Ref
Component
Description
Status
Positioning information, satellite tracking and the others will be
displayed in this page
Configuration
It contains general operation on receiver, base configuration, antenna
setting, satellite configuration, receiver control and system setting.
Satellite Information
Display and control the satellites used or not
Data Record
Configure the parameters for static mode and raw data download
Data Transfer
Contains NTRIP configuration, TCP/IP configuration and data
transferring with PC
Network Config
Contains network parameters configuration, WIFI configuration and the
other functions
Firmware Update
It is used to upgrade the firmware for receiver
User Management
Add and manage the Web UI users
Help
Offer solutions
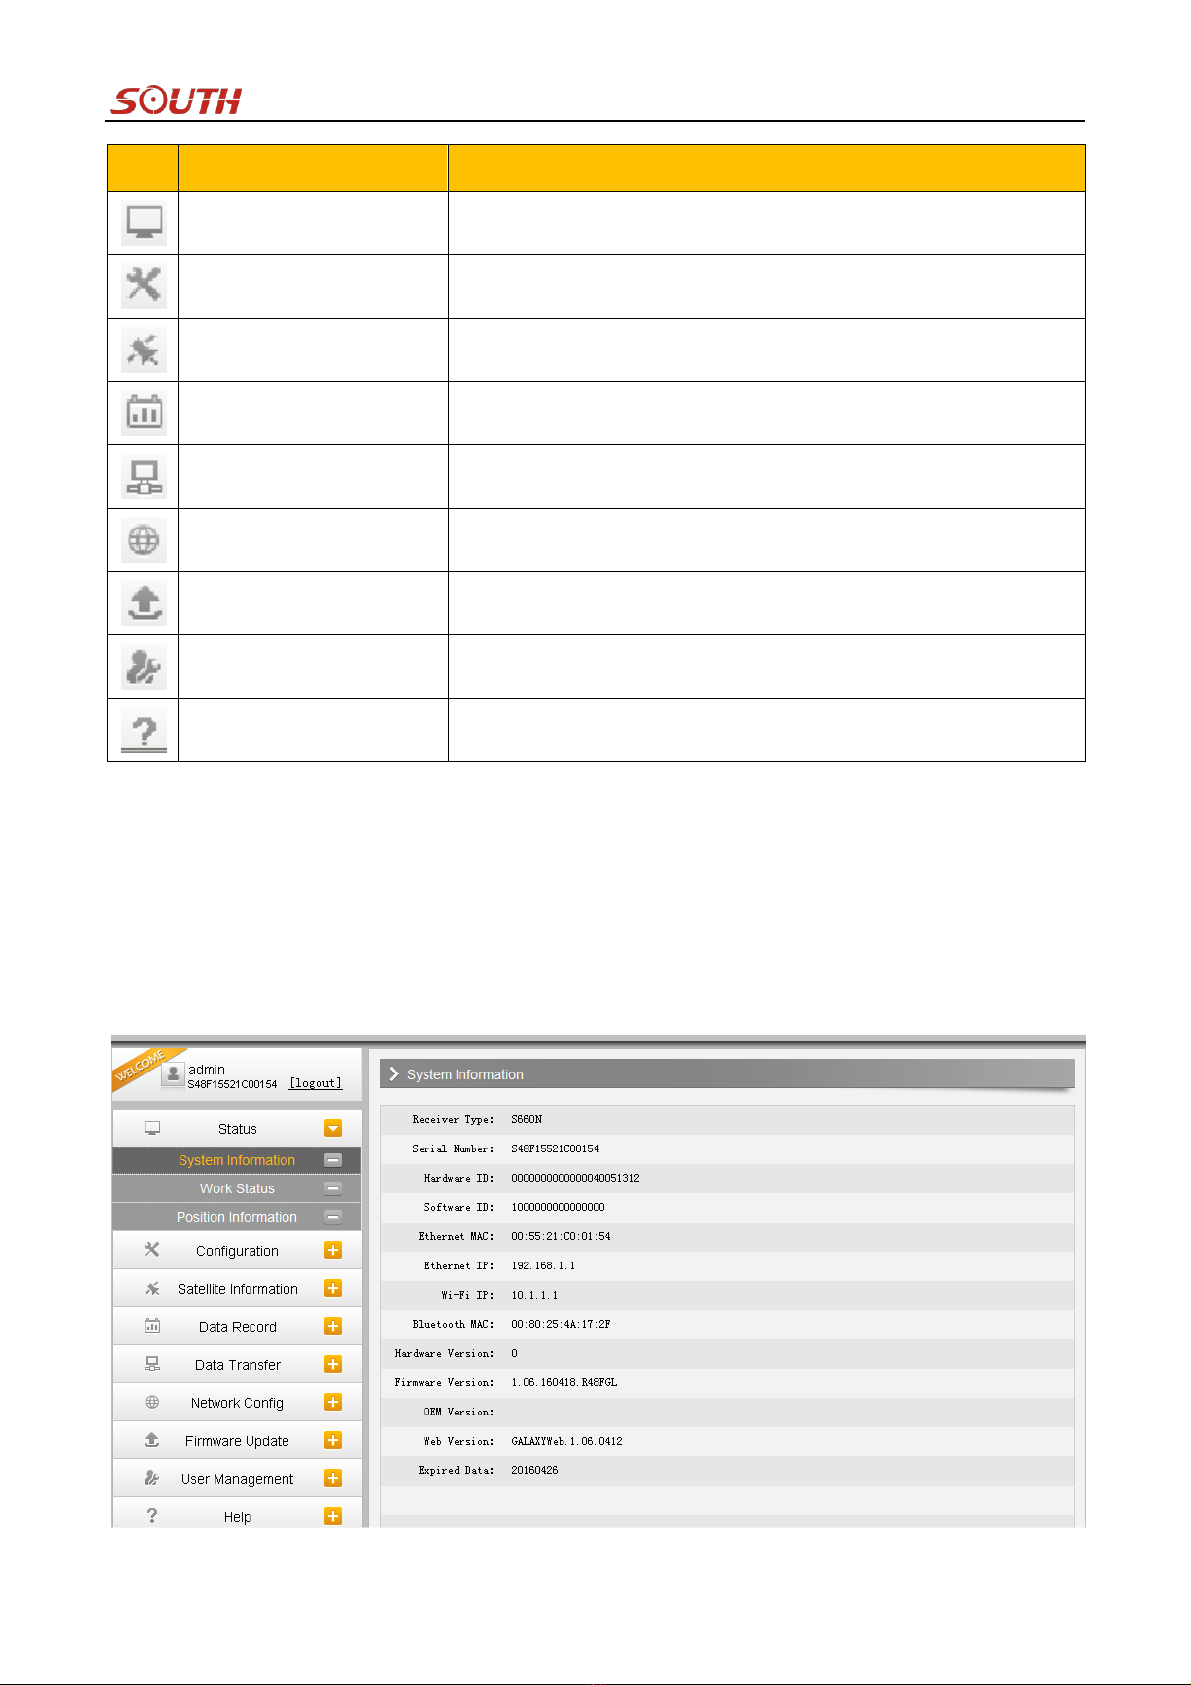
4.2.1. Status
System Information, Work Status and Position Information are listed under Status menu.
System Information
In this page, all the information of S660N is diplayed such as serial number, hardware ID, MAC address, firmware
version, registation information and so on.

S660N GNSS Network RTK Receiver
Work Status
The physical state of S660N is displayed at the right field including working mode, battery type, storage type,
remaining power and the free memory.
The datalink, host temperature, OEM temperature are not supported displaying because of the hardware design and
the OEM board performance.
Position Information
As mentioned at the beginning of this chapter, the positioning information is displayed on this page, including
locating coordinates, RTK status, tracked satellites, as well as to used satellites, users can be clear at a glance on
this page to grasp the main information.
Table of contents
Other South Receiver manuals


