Beninca RR.1WBV User manual

L8542098
Rev. 09/05/00
RR.1WBV
RR.2WBV
RR.1WIV
RR.2WIV
Radioricevitori 433,92MHz mono/bicanale rolling-code
433.92MHz single/dual channel rolling-code radio receivers
1-/2-Kanal-Rolling-Code-Funkempfänger 433,92MHz
Récepteurs radio 433,92 MHz mono/bicanal à code variable
Radiorreceptores 433,92MHz mono/bicanal rolling-code
Odbiorniki radiowe 433,92MHz jedno/dwukanałowe rolling-code
Manuale istruzioni
Operating instructions
Betriebsanleitung
Livret d’instructions
Manual de instrucciones
Książeczka z instrukcjami
UNIONE NAZIONALE COSTRUTTORI
AUTOMATISMI PER CANCELLI, PORTE,
SERRANDE ED AFFINI

3

3
P
LED
RR.1WIV
RR.2WIV
�
�
*
*solo RR.2WIV
*only RR.2WBV
*nur RR.2WIV
*uniquement RR.2WIV
*sólo RR.2WIV
*tylko RR.2WIV

4
5
RR.1WBV
RR.2WBV
1 2 3 4 5 6 7 8
LED
P
�
�
*
*solo RR.2WBV
*only RR.2WBV
*nur RR.2WBV
*uniquement RR.2WBV
*sólo RR.2WBV
*tylko RR.2WBV

4
5
ITALIANO
Radioricevitori 433,92MHz mono/bicanale rolling-code com-
patibili con il sistema ADVANTAGE
Disponibili con innesto molex o in box plastico con morsettiera.
La memoria standard può contenere un massimo di 512 trasmet-
titori rolling-code. È disponibile una versione speciale con una
memoria che può contenere 2048 trasmettitori. Il completamento
della memoria viene indicato da 10 lampeggi Arancio.
Nota: Il programmatore palmare Advantage, ed il relativo software
di gestione, consentono l’utilizzo di alcune funzionalità avanza-
te, descritte nelle istruzioni specifiche, a cui vi rimandiamo per
ulteriori informazioni.
Consigli per l’utilizzo
Per avere una buona ricezione si consiglia di installare l’antenna
lontano da masse metalliche e di evitare il posizionamento rav-
vicinato di più ricevitori. In assenza di antenna la ricezione risulta
notevolmente ridotta.
Memorizzazione trasmettitori - Procedura semplificata
Se si desidera semplicemente inserire uno o più trasmettitori
per l’attivazione del primo canale, seguire questa procedura
semplificata:
1 Premere il pulsante P della ricevente e rilasciare.
2 Si accende il LED Rosso per 3s, quindi si spegne per 1s e si
riaccende per 5s.
3 Premere, con il LED Rosso acceso, il pusante del trasmettitore
che si vuole associare al canale 1.
4 Altri trasmettiori possono essere inseriti successivamente
premendo un tasto entro 5s dall’inserimento precedente.
5 Al termine attendere 5s, la ricevente esce dalla programma-
zione.
Memorizzazione trasmettitori - Apprendimento remoto
Se si dispone di un trasmettitore già memorizzato nella ricevente
è possibile effettuare l’apprendimento radio remoto (senza ne-
cessità di accedere al pulsante P della ricevente).
Procedere come segue:
1 Premere il tasto nascosto del trasmettitore già memorizzato.
2 Premere, entro 5s, il tasto del trasmettitore già memorizzato
corrispondente al canale da associare al nuovo trasmettito-
re.
3 Premere, entro 5s, il tasto del nuovo trasmettitore da associare
al canale scelto al punto 2.
4 La ricevente memorizza il nuovo trasmettitore ed esce imme-
diatamente dalla programmazione.
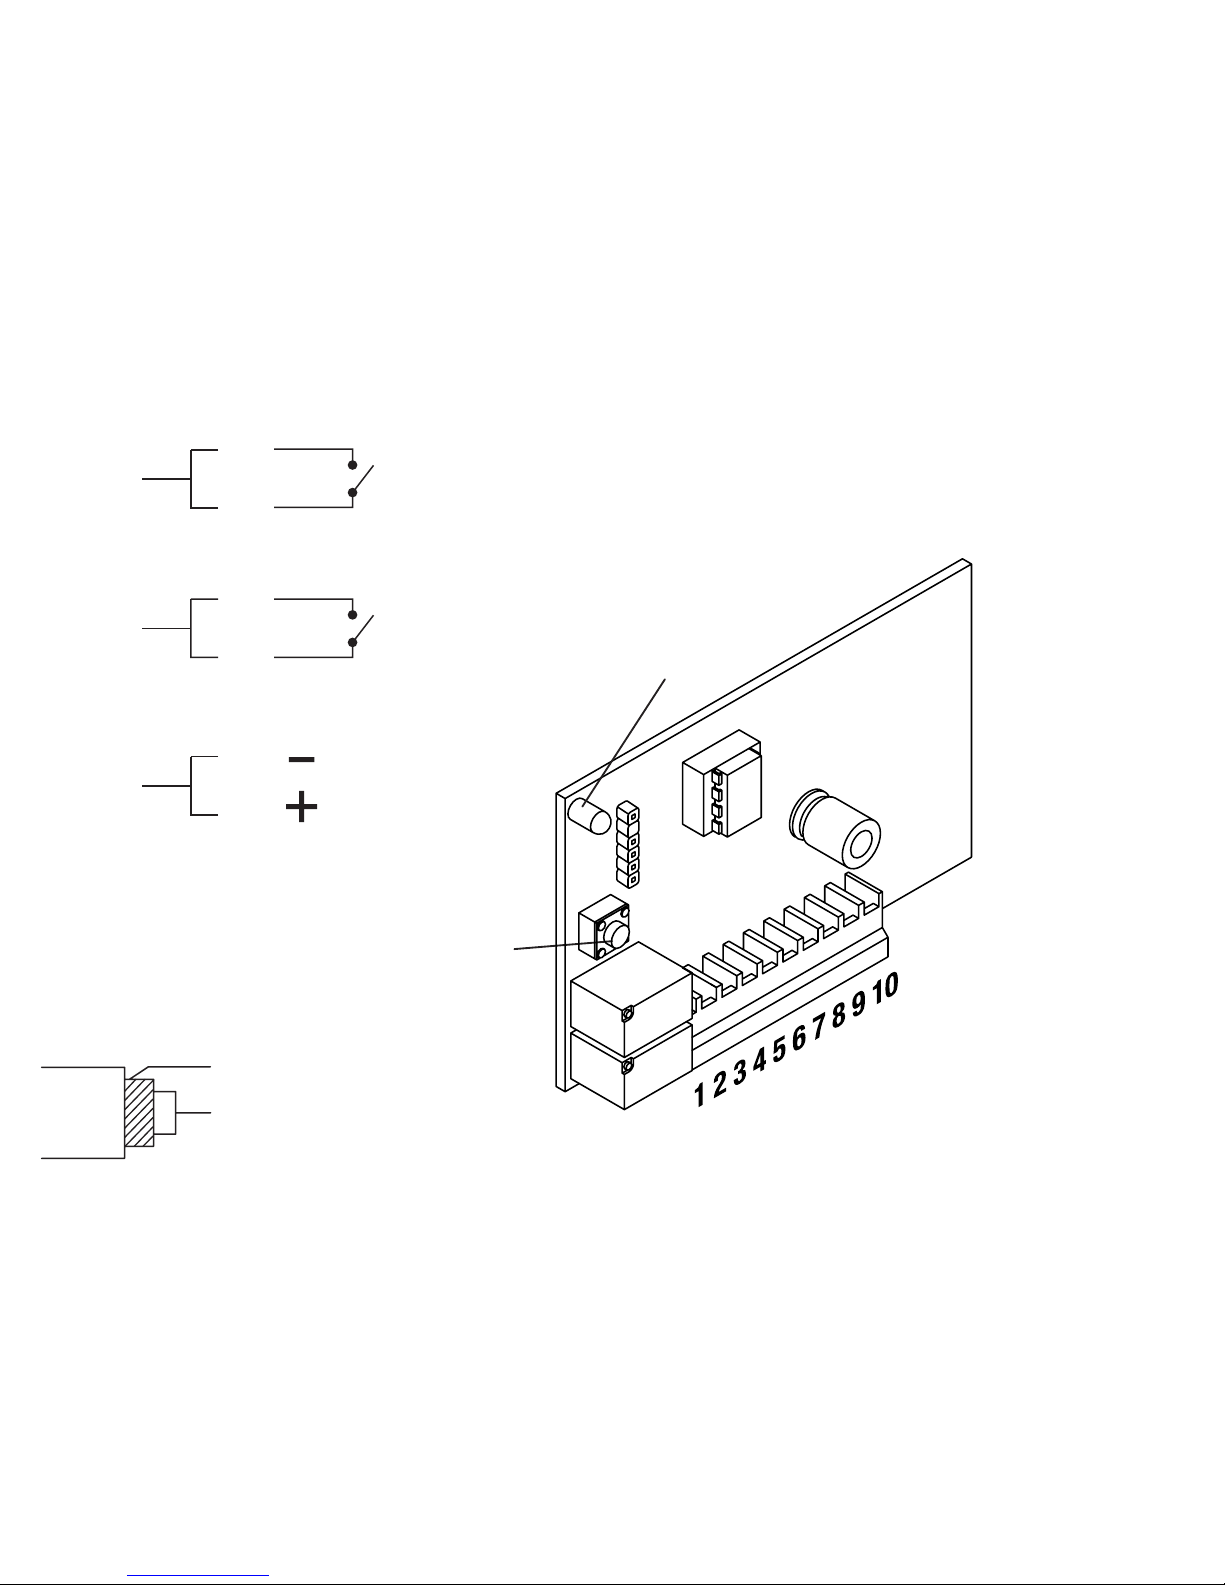
Programmazione
La memorizzazione dei trasmettitori e l’impostazione della
modalità dei singoli canali si effettua utilizzando il pulsante “P”
(vedi Fig.1/2).
Per passare da una fase di programmazione alla seguente
premere il pulsante P senza lasciare passare più di 3s tra una
pressione e la successiva.
Selezionata la fase desiderata, attendere per circa 3/4s, una se-
gnalazione del LED indicherà l’ingresso nella programmazione
(vedi colonna “Operazioni”).
Nella Tabella 1 sono indicate le varie fasi di programmazione.

6
7
TABELLA 1
Fase LED Funzione Operazioni
0 Spento Nessuna funzione Stato normale.
Premere il pulsante P
1 Rosso Memorizzazione del 1° canale radio
Si accende il LED Rosso, attendere 3s, il LED si spegne e si riaccende,
premere entro 5s il tasto del trasmettitore che si desidera associare al
canale 1.*
Premere entro 3s il pulsante P
2 Verde Memorizzazione del 2° canale radio
(solo per ricevitori bicanali “RR.2”)
Si accende il LED Verde, attendere 3s, il LED si spegne e si riaccende,
premere entro 5s il tasto del trasmettitore che si desidera associare al
canale 2.*
Premere entro 3s il pulsante P
3 Arancio
Memorizzazione automatica del 1° e
2° canale radio
(solo per ricevitori bicanali “RR.2”)
Si accende il LED Arancio, attendere 3s, il LED si spegne e si riaccende,
premere entro 5s un tasto qualsisiasi del trasmettitore.
Il tasto 1 verrà associato al canale 1, il tasto 2 verrà associato al canale 2.*
Premere entro 3s il pulsante P
4Rosso
lampeggiante Settaggio tempi del canale 1
Il LED emette 5 lampeggi veloci. Premendo il pulsante P durante questi 5
lampeggi si passa alla fase successiva. Dopo i 5 lampeggi veloci si entra
nel menu Tempi. Vedi Paragrafo “Modalità tempi”
Premere entro 3s il pulsante P
5Verde
lampeggiante
Settaggio tempi del canale 2
(solo per ricevitori bicanali “RR.2”)
l LED emette 5 lampeggi veloci. Premendo il pulsante P durante questi 5
lampeggi si passa alla fase successiva. Dopo i 5 lampeggi veloci si entra
nel menu Tempi. Vedi Paragrafo “Modalità tempi”
Premere entro 3s il pulsante P
0 LED spento Nessuna funzione Stato normale.

6
7
* Dopo la pressione del tasto del 1° trasmettitore, la ricevente
resta in attesa per 5s di un altro trasmettitore da memorizzare.
E’ pertanto possibile inserire in modo sequenziale tutti i trasmettitori da
associare al canale desiderato. Terminati i 5s di attesa la ricevente esce
dalla fase di programmazione. Nel caso di inserimenti sequenziali è consi-
gliabile scollegare momentaneamente l’antenna, si riduce così la portata
della ricevente e la possibilità di ricevere dei segnali di disturbo.
Nota: Una volta entrata in una qualsiasi fase di programmazione, la
ricevente non consente il passaggio alla fase successiva.
Nel caso si desideri programmare più di una funzione, attendere il termine
della programmazione in corso, segnalato dallo spegnimento del LED, e
procedere con una nuova programmazione.
Modalità tempi
La programmazione di questa funzione è necessaria solo se si
vuole impostare uno dei due canali come temporizzato (da 1s a
10 min), oppure con funzionamento bistabile. Il modo di funziona-
mento di default è impostato impulsivo (1s di commutazione).
Per impostare la modalità tempi è necessario entrare nella fase
4 (per il canale 1) o nella fase 5 (per il canale 2) e attendere il
termine dei 5 lampeggi veloci.
Si entra così nel sottomenu Tempi, descritto nella seguente
tabella 2.
TABELLA 2
Fase LED Funzione Operazioni
1
1
lampeggio
veloce
Impostazione
modalità Impulsiva
Se non si preme il pulsante P, dopo 5s il canale viene ripristinato alla modalità
di default: Impulsivo (1s di commutazione).
Premere il pulsante P per almeno 2s
2
2
lampeggi
veloci
Selezione del tempo di
commutazione
Se non si preme il pulsante P, dopo 5s il LED inizia a lampeggiare con frequen-
za di 1 lampeggio al secondo, in attesa della pressione del pulsante P.
Il numero di lampeggi effettuati prima della pressione del pulsante P seleziona
il tempo di commutazione, come indicato nella tabella 3.
Premere il pulsante P per almeno 2s
3
3
lampeggi
veloci
Impostazione
modalità Bistabile
Se non si preme il pulsante P, dopo 5s il canale viene impostato con modalità
Bistabile: ad ogni impulso il relè cambia stato.
Premere il pulsante P per almeno 2s
4 Spento Nessuna funzione Stato normale.

8
9
Caratteristiche tecniche RR.1/2WBV - RR.1/2WIV
Frequenza 433,92 MHz
Alimentazione 21÷28 Vac
12÷28 Vdc
Portata senza antenna 30m
con antenna 100m
Canali 1/2
Contatto relè 1A/24Vdc
Temp. funzionamento -20/+70°C
Consumo a riposo 10 mA
Consumo 1 ch o 2 ch eccitato 42 mA
Consumo 1 ch e 2 ch eccitato 66 mA
TABELLA 3
N°
Lampeggi LED
Tempo di commu-
tazione
N°
Lampeggi LED
Tempo di commu-
tazione
N°
Lampeggi LED
Tempo di commu-
tazione
11s 11 30s 21 1m
22s 12 60s 22 2m
33s 13 1,5m 23 3m
44s 14 2m 24 4m
55s 15 2,5m 25 5m
66s 16 3m 26 6m
77s 17 3,5m 27 7m
88s 18 4m 28 8m
99s 19 4,5m 29 9m
10 10s 20 5m 30 10m
Cancellazione completa della memoria
Togliere alimentazione alla ricevente. Premere e mantenere pre-
muto il pulsante P. Ridare alimentazione mantenendo premuto il
pulsante P sulla ricevente.
Il LED si accende con colore rosso, dopo 5s inizia a lampeggiare
velocemente con sequenza verde-rosso, rilasciare il pulsante.
Attendere lo spegnimento del LED. Ora la memoria è comple-
tamente cancellata.
Vengono cancellate anche le impostazioni effettuate in modalità
tempi e la password inserita dal programmatore ADVANTAGE,
se presente.

8
9
ENGLISH
433.92MHz single/dual channel rolling-code radio receivers
compatible with the ADVANTAGE system.
They are available with Molex socket or in a plastic box with
terminal board. The standard memory can hold a maximum
of 512 rolling-code transmitters. A special version is available
with a memory that can hold 2048 transmitters. A full memory is
indicated by 10 orange blinks.
N.B: The Advantage palm programmer and related management
software permit the use of certain advanced functions, please
consult the relevant instruction manual for more information.
Note
To optimise reception install the antenna away from metal
bodies and avoid positioning several receivers next to each
other. If no antenna is used reception will be considerably
reduced.
Memorising transmitters – Simplified procedure
To merely record one or more transmitters to activate the first
channel, follow this simplified procedure:
1 Press and release the button P on the receiver.
2 The Red LED will light up for 3 secs, then go out for 1 sec and
then light up again for 5 secs.
3 While the red LED is on, press the button on the transmitter
to associate with channel 1.
4 Other transmitters can be then be recorded by pressing a
button within 5 secs from recording the previous transmitter.
5 To end wait 5 secs, the receiver will exit programming.
Memorising a transmitter – Remote self-learning
If a transmitter has already been memorised on the receiver the
remote radio self-learning feature can be used (without having
to use the receiver button P).
Proceed as follows:
1 Press the hidden button on the memorised transmitter.
2 Press, within 5 secs., the button on the memorised transmit-
ter corresponding to the channel to associate with the new
transmitter.
3 Press, within 5 secs., the button on the new transmitter to
associate with the channel selected at point 2 above.
4 The receiver will memorise the new transmitter and promptly
exit programming.
Programming
Transmitters can be memorised and separate channel modes
can be set using the button “P” (see Fig.1/2).
To go from one programming mode to the next press the button
P within 3 secs from one press and another.
Once having selected a programming mode, wait for about 3-4
secs and a LED signal with indicate that programming has been
entered (see “Operations” column).
Table 1 lists the various programming modes.

10
11
TABLE 1
Mode LED Function Operations
0 Off No function Normal status.
Press the button P
1 Red Memorise channel 1
The red LED will light up, wait 3 secs, the LED will go out and light up again,
press within 5 secs the button on the transmitter to associate with channel 1.*
Press within 3 secs the button P
2 Green Memorise channel 2 (only for
dual channel receivers “RR.2”)
The green LED will light up, wait 3 secs, the LED will go out and light up
again, press within 5 secs the button of the transmitter to associate with
channel 2.*
Press within 3 secs the button P
3 Orange
Memorise automatically
channels 1 and 2
(only for dual channel receivers
“RR.2”)
The orange LED will light up, wait 3 secs, the LED will go out and light up
again, press within 5 secs any button on the transmitter.
Button 1 will be associated with channel 1, button 2 with channel 2.*Il tasto 1
verrà associato al canale 1, il tasto 2 verrà associato al canale 2.*
Press within 3 secs the button P
4Red
Blinking Set channel 1 times
The LED will give 5 rapid blinks. If button P is pressed during these 5 blinks
the next mode is entered. After the 5 rapid blinks the Times menu is entered.
See section “Times Mode”
Press within 3 secs the button P
5Green
Blinking
Set channel 2 times
(only for dual channel receivers
“RR.2”)
The LED will give 5 rapid blinks. If button P is pressed during these 5 blinks
the next mode is entered. After the 5 rapid blinks the Times menu is entered.
See section “Times Mode”
Press within 3 secs the button P
0 LED Off No function Normal status.

10
11
* After pressing the button on the first transmitter the receiver will
wait 5 secs to memorise another transmitter.
In this way all the transmitters being associated with one channel
can be recorded in sequence. After the 5 secs the receivers exits
the programming mode. When using this method of recording in
sequence it is best to temporarily remove the antenna thereby
reducing the receiver’s range and limiting disturbance.
N.B.: Once a programming mode has been entered, other modes
cannot be accessed.
When programming several functions complete one programming
sequence, indicated by the LED going out, and restart with a new
programming mode.
Times Mode
This function is only necessary when one of the two channels
has to be set to be timed (from 1 sec to 10 min) or with bistable
operation. The pulse operating mode is set by default (1 sec
switching).
To set the times enter mode 4 (for channel 1) or mode 5 (for
channel 2) and wait until the end of the 5 rapid blinks.
The Times submenu is described in table 2 below.
TABLE 2
Mode LED Function Operations
11
rapid blink Set pulse mode If the P button is not pressed within 5 secs the channel is reset to the default
pulse mode (1 sec switching).
Press the button P for at least 2 secs
22
rapid blinks
Select switching time
If the P button is not pressed within 5 secs the LED will start blinking at a rate
of 1 blink/sec until the button P is pressed.
The number of blinks counted before pressing the P button selects the
switching time, as shown in table 3.
Press the button P for at least 2 secs
33
rapid blinks
Set
Bistable mode
If the P button is not pressed within 5 secs the channel is set to the bistable
mode: the relay changes status on each pulse.
Press the button P for at least 2 secs
4 Off No function Normal status.

12
13
TABLE 3
LED Blinks Switching
Time LED Blinks Switching
Time
11s 11 30s 21 1m
22s 12 60s 22 2m
33s 13 1,5m 23 3m
44s 14 2m 24 4m
55s 15 2,5m 25 5m
66s 16 3m 26 6m
77s 17 3,5m 27 7m
88s 18 4m 28 8m
99s 19 4,5m 29 9m
10 10s 20 5m 30 10m
Resetting the memory
Cut off the power to the receiver. Press and keep pressed the
button P. Restore the power keeping the button P pressed.
The LED will light up red, after 5 secs it will blink rapidly
alternating green-red, release the button. Wait for the LED to go
out. The memory is now completely erased.
Technical Characteristics RR.1/2WBV - RR.1/2WIV
Frequency 433,92 MHz
Power supply 21÷28 Vac
12÷28 Vdc
Range Without antenna 30m
with antenna 100m
Channels 1/2
Relay contact 1A/24Vdc
Working temperature -20/+70°C
Consumption in standby 10 mA
Consumption ch. 1 or 2 actuated
42 mA
Consumption ch. 1 and 2 actuated
66 mA

12
13
DEUTSCH
1-/2-Kanal-Rolling-Code-Funkempfänger 433,92MHz
kompatibel mit dem System ADVANTAGE
Verfügbar mit Molex-Verbindung oder in Plastikbox mit
Klemmenleiste. Der Standardspeicher kann bis zu maximal
512 Rolling-Code-Sender aufnehmen. Daneben steht ein
Sonderspeicher mit einer Kapazität von 2048 Sendern zur
Verfügung. Das Vollsein des Speichers wird durch 10maliges
orangefarbenes Blinken angezeigt.
NB: Das Handheld-Programmiergerät und die entspre-
chende Betriebs-Software ermöglichen die Nutzung einiger
weiterführender Funktionen, die in den spezifischen Anleitun-
gen beschrieben sind, auf die wir für weitere Informationen
verweisen.
Gebrauchsanweisung
Für guten Empfang empfiehlt es sich, die Antenne fern
von Metallmassen zu installieren und auch nicht mehrere
Empfänger nahe einander zu positionieren. Ohne Antenne ist
der Empfang wesentlich schlechter.
Speichern der Sender - Schnellverfahren
Wenn lediglich ein oder mehrere Sender für die Aktivierung
des ersten Kanals eingegeben werden sollen, kann dies mit
dem nachstehenden Schnellverfahren geschehen:
1 Die Taste P des Empfängers drücken und loslassen.
2 Die rote LED schaltet sich für die Dauer von 3 s ein, geht 1
lang aus und schaltet sich für 5 s wieder ein.
3 Bei eingeschalteter roter LED die Taste des Senders drü-
cken, der dem Kanal 1 zugeordnet werden soll.
4 In der Folge können weitere Sender einspeichert werden,
indem innerhalb von 5 s nach der vorherigen Eingabe eine
Taste gedrückt wird.
5 Zum Schluss 5 s abwarten, bis der Empfänger die Program-
mierung verlassen hat.
Speicherung der Sender – Fernprogammierung
Verfügt man über einen bereits im Empfänger gespeicherten
Sender, kann die Eingabe über Funk erfolgen (ohne die Taste
P des Empfängers zu betätigen).
Dazu wie folgt vorgehen:
1 Die verborgene Taste des bereits gespeicherten Senders
drücken.
2 Innerhalb von 5 s die Taste des gespeicherten Senders
drücken, der dem Kanal entspricht, der dem neuen Sender
zugeordnet werden soll.
3 Innerhalb von 5 s die Taste des neuen Senders drücken,
der dem unter Punkt 2 gewählten Kanal zugeordnet werden
soll.
4 Der Empfänger speichert den neuen Sender und verlässt
dann sofort die Programmierung.
Programmierung
Die Speicherung der Sender und die Einstellung des Modus
der einzelnen Kanäle erfolgt mit der Taste “P” (siehe Abb.1/2).
Um von der einen zur anderen Phase der Programmierung
zu wechseln, die Taste P mit Pausen von höchstens 3 s
drücken.
Nachdem die gewünschte Phase gewählt wurde, ungefähr
3-4 s warten, bis ein Signal der LED den Zugriff auf die
Programmierung meldet (siehe Spalte “Operationen”).
In der Tabelle 1sind die verschiedenen Phasen der
Programmierung beschrieben.

14
15
TABELLE 1
Phase LED Funktion Operationen
0 Aus Keine Funktion Normaler Status.
Die Taste P drücken
1 Rot Speicherung des 1. Funkkanals
Die rote LED schaltet sich ein, 3 s warten, die LED schaltet sich aus und
wieder ein, innerhalb von 5 s die Taste des Senders drücken, der dem Kanal
1 zugeordnet werden soll.*
Innerhalb von 3 s die Taste P drücken
2 Grün
Speicherung des 2. Funkkanals
(nur bei 2-Kanal-Empfängern
“RR.2”)
Die grüne LED schaltet sich ein, 3 s warten, die LED schaltet sich aus und
wieder ein, innerhalb von 5 s die Taste des Senders drücken, der dem Kanal
2 zugeordnet werden soll.*
Innerhalb von 3 s die Taste P drücken
3 Orange
Automatische Speicherung des
1. und 2. Funkkanals
(nur bei 2-Kanal-Empfängern
“RR.2”)
Die orange LED schaltet sich ein, 3 s warten, die LED schaltet sich aus und
wieder ein, innerhalb von 5 s eine beliebige Taste des Senders drücken.
Die Taste 1 wird dem Kanal 1, die Taste 2 dem Kanal 2 zugeordnet.*
Innerhalb von 3 s die Taste P drücken
4Rot
blinkend Zeiteingabe des Kanals 1
Die LED blinkt 5 Mal schnell. Wird während dieser 5 Blinksignale die Taste
P gedrückt, wird zur folgenden Phase übergegangen. Nach den 5 schnellen
Blinksignalen erfolgt der Zugriff auf das Zeit-Menü. Siehe Absatz “Zeit-Mo-
dus”
Innerhalb von 3 s die Taste P drücken
5Grün
blinkend
Zeiteingabe des Kanals 2
(nur bei 2-Kanal-Empfängern
“RR.2”)
Die LED blinkt 5 Mal schnell. Wird während dieser 5 Blinksignale die Taste
P gedrückt, wird zur folgenden Phase übergegangen. Nach den 5 schnellen
Blinksignalen erfolgt der Zugriff auf das Zeit-Menü. Siehe Absatz “Zeit-Mo-
dus”
Innerhalb von 3 s die Taste P drücken
0 LED aus Keine Funktion Normaler Status.

14
15
* Nachdem die Taste des 1. Senders gedrückt wurde, wartet
der Empfänger 5 s auf einen weiteren zu speichernden Sender.
Auf diese Weise können nacheinander alle dem gewünschten Kanal
zuzuordnenden Sender eingespeichert werden. Nach Ablauf der 5
s Wartezeit verlässt der Empfänger die Phase der Programmierung.
Im Falle der sequentiellen Eingabe empfiehlt es sich die Antenne
momentan auszubauen, so dass die Reichweite des Empfängers
und die Möglichkeit des Empfangs von Störsignalen vermindert
werden.
NB: Sobald auf eine beliebige der Programmierungsphasen zuge-
griffen wurde, lässt der Empfänger den Übergang auf die folgende
Phase nicht mehr zu.
Falls mehr als eine Funktion programmiert werden soll, das Ende
der laufenden Programmierung abwarten, das durch das Verlö-
schen der LED angezeigt wird, und dann ein neue Programmierung
beginnen.
Zeit-Modus
Diese Funktion muss nur dann programmiert werden, wenn ei-
ner der beiden Kanäle zeitgeregelt (von 1s bis 10 min) sein soll,
oder bei bistabiler Funktion. Der Default-Funktionsmodus ist als
Impulsfunktion eingestellt (1 s Umschaltung).
Zur Eingabe des Zeit-Modus auf die Phase 4 (für Kanal 1) oder
die Phase 5 (für Kanal 2) zugreifen und warten, bis die 5 schnellen
Blinksignale verlöscht sind.
Auf diese Weise wird das Untermenü Zeiten geöffnet, das in der
nachstehenden Tabelle 2 beschrieben ist.
TABELLE 2
Phase LED Funktion Operationen
11 schnelles
Blinksignal
Eingabe
Impulsmodus
Wird die Taste P nicht gedrückt, wird der Kanal nach 5 s erneut auf De-
fault-Modus gestellt: Impulsmodus (1 s des Umschaltens).
Die Taste P mindestens 2 s lang drücken
22 schnelle
Blinksignale
Wahl der
Umschaltzeit
Wird die Taste P nicht gedrückt, beginnt die LED nach 5 s einmal pro
Sekunde zu blinken, bis die Taste P gedrückt wird.
Die Zahl der vor dem Drücken der Taste P erfolgten Blinksignale selektiert
die Umschaltzeit, wie aus der Tabelle 3 hervorgeht.
Die Taste P mindestens 2 s lang drücken
33 schnelle
Blinksignale
Eingabe des
bistabilen Modus
Wird die Taste P nicht gedrückt, wird der Kanal nach 5 s auf den bistabilen
Modus gestellt: bei jedem Impuls wechselt das Relais seinen Status.
Die Taste P mindestens 2 s lang drücken
4 Aus Keine Funktion Normaler Status.

16
17
TABELLE 3
Zahl der
Blinksignale LED Umschaltzeit Zahl der
Blinksignale LED Umschaltzeit
11s 11 30s 21 1m
22s 12 60s 22 2m
33s 13 1,5m 23 3m
44s 14 2m 24 4m
55s 15 2,5m 25 5m
66s 16 3m 26 6m
77s 17 3,5m 27 7m
88s 18 4m 28 8m
99s 19 4,5m 29 9m
10 10s 20 5m 30 10m
Vollständiges Löschen des Speichers
Den Empfänger spannungslos machen. Die Taste P drücken
und gedrückt halten. Die Spannung wieder zuschalten, wobei
die Taste P am Empfänger weiterhin gedrückt gehalten wird.
Die LED leuchtet rot auf und beginnt nach 5 s ein schnelles
grün-rotes Blinken; die Taste loslassen. Das Verlöschen der LED
abwarten. Damit ist der Speicher vollständig gelöscht.
Technische Charakteristiken RR.1/2WBV - RR.1/2WIV
Frequenz 433,92 MHz
Versorgung 21÷28 Vac
12÷28 Vdc
Reichweite ohne Antenne 30 m
mit Antenne 100 m
Kanäle 1/2
Relaiskontakt 1A/24Vdc
Betriebstemperatur -20/+70°C
Verbrauch in Standby 10 mA
Verbrauch 1-K oder 2-K erregt 42 mA
Verbrauch 1-K und 2-K erregt 66 mA

16
17
FRANÇAIS
Récepteurs radio 433,92 MHz mono/bicanal à code variable,
compatibles avec le système ADVANTAGE
Disponibles avec connexion molex ou dans boîtier plastique avec
bornier. La mémoire standard peut contenir un maximum de 512
émetteurs à code variable. Une version spéciale est disponible
avec une mémoire qui peut contenir 2048 émetteurs. La satura-
tion de la mémoire est indiquée par 10 clignotements orange.
N.B. : Le programmateur portable Advantage et son logiciel
de gestion permettent l’utilisation de certaines fonctionnalités
avancées décrites dans les instructions spécifiques auxquelles
nous vous renvoyons pour plus de détails.
Conseils d’utilisation
Pour avoir une bonne réception, il est conseillé d’installer
l’antenne loin de masses métalliques et d’éviter le positionnement
rapproché de plusieurs récepteurs. En l’absence d’antenne, la
réception est considérablement réduite.
Mémorisation émetteurs – Procédure simplifiée
Si l’on souhaite simplement mémoriser un ou plusieurs
émetteurs pour l’activation du premier canal, suivre cette
procédure simplifiée :
1 Presser la touche P du récepteur et la relâcher.
2 La LED rouge s’allume pendant 3 s puis s’éteint pendant 1 s
et se rallume pendant 5 s.
3 Presser, avec la LED Rouge allumée, la touche de l’émetteur
que l’on veut associer au canal 1.
4 D’autres émetteurs peuvent être mémorisés ensuite en pressant
une touche dans les 5 s de la mémorisation précédente.
5 À la fin, attendre 5 s, le récepteur sort de la programmation
Mémorisation émetteurs – Apprentissage à distance
Si l’on dispose d’un émetteur déjà mémorisé dans le récepteur,
il est possible d’effectuer l’apprentissage radio à distance (sans
avoir besoin d’accéder à la touche P du récepteur).
Procéder comme suit :
1 Presser la touche cachée de l’émetteur déjà mémorisée.
2 Presser, dans les 5 s qui suivent, la touche de l’émetteur
déjà mémorisé correspondant au canal à associer au nouvel
émetteur.
3 Presser, dans les 5 s qui suivent, la touche du nouvel émetteur
à associer au canal choisi au point 2.
4 Le récepteur mémorise le nouvel émetteur et sort immédiate-
ment de la programmation.
Programmation
La mémorisation des émetteurs et le réglage du mode de
fonctionnement de chaque canal s’effectue en utilisant la
touche « P » (voir Fig.1/2).
Pour passer d’une phase de programmation à la suivante,
presser la touche P sans laisser passer plus de 3 s entre une
pression et la suivante.
Après avoir sélectionné la phase désirée, attendre environ 3-4 s,
une signalisation de la LED indiquera l’entrée en programmation
(voir colonne « Opérations »).
Le Tableau 1 indique les différentes phases de programmation.

18
19
TABLEAU 1
Phase LED Fonction Opérations
0 Éteinte. Aucune fonction État normal.
Presser la touche P
1 Rouge Mémorisation du 1er canal radio La LED Rouge s’allume, attendre 3 s, la LED s’éteint et se rallume, presser
encore 5 s la touche de l’émetteur que l’on souhaite associer au canal 1.*
Presser dans les 3 s qui suivent la touche P
2 Verte
Mémorisation du 2e canal radio
(uniquement pour les récep-
teurs bicanaux « RR.2 »)
La LED Verte s’allume, attendre 3 s, la LED s’éteint et se rallume, presser
encore 5 s la touche de l’émetteur que l’on souhaite associer au canal 2.*
Presser dans les 3 s qui suivent la touche P
3 Orange
Mémorisation automatique du
1er et du 2e canal radio
(uniquement pour les récep-
teurs bicanaux « RR.2 »)
La LED Orange s’allume, attendre 3 s, la LED s’éteint et se rallume, presser
encore 5 s une touche quelconque de l’émetteur.
La touche 1 sera associée au canal 1, la touche 2 sera associée au canal 2.*
Presser dans les 3 s qui suivent la touche P
4Rouge
clignotante Réglage temps du canal 1
La LED émet 5 clignotements rapides. En pressant la touche P durant ces 5
clignotements, on passe à la phase successive. Après les 5 clignotements
rapides, on entre dans le menu Temps. Voir Paragraphe « Modalités temps »
Presser dans les 3 s qui suivent la touche P
5Verte
clignotante
Réglage temps du canal 2
(uniquement pour les récep-
teurs bicanaux « RR.2 »)
La LED émet 5 clignotements rapides. En pressant la touche P durant ces 5
clignotements, on passe à la phase successive. Après les 5 clignotements
rapides, on entre dans le menu Temps. Voir Paragraphe « Modalités temps »
Presser dans les 3 s qui suivent la touche P
0 LED éteinte Aucune fonction État normal.

18
19
* Après la pression de la touche du 1er émetteur, le récepteur reste en
attente pendant 5 s d’un autre émetteur à mémoriser.
Il est donc possible de mémoriser de manière séquentielle tous les émet-
teurs à associer au canal désiré. À la fin des 5 s d’attente, le récepteur
sort de la phase de programmation.
Dans le cas de mémorisations séquentielles, il est conseillé de décon-
necter momentanément l’antenne, on réduit ainsi la portée du récepteur
et la possibilité de recevoir des signaux parasites.
N.B. : Une fois que l’on est entré dans l’une des phases de programmation,
le récepteur ne permet pas le passage à la phase successive.
Si l’on souhaite programmer plus d’une fonction, attendre la fin de la
programmation en cours, signalée par l’extinction de la LED, et procéder
à une nouvelle programmation.
Modalité temps
La programmation de cette fonction n’est nécessaire que si l’on
veut programmer l’un des deux canaux comme étant temporisé
(d’1 s à 10 min), ou avec fonctionnement bistable. Le mode de
fonctionnement par défaut est programmé par impulsion (1 s
de commutation).
Pour régler la modalité temps il faut entrer dans la phase 4 (pour
le canal 1) ou dans la phase 5 (pour le canal 2) et attendre la fin
des 5 clignotements rapides.
On entre ainsi dans le sous-menu Temps, décrit dans le tableau
2 qui suit.
TABLEAU 2
Phase LED Fonction Opérations
11 clignotement
rapide
Paramétrage
mode par impulsions
Si on n’appuie pas sur la touche P, au bout de 5 s le canal est rétabli
dans le mode par défaut : Par impulsions (1 s de commutation).
Presser la touche P pendant au moins 2 s
22 clignotements
rapides
Sélection du temps de
commutation
Si on n’appuie pas sur la touche P, au bout de 5 s la LED commence à
clignoter à la fréquence d’1 clignotement à la seconde, en attente de la
pression de la touche P.
Le nombre de clignotements effectués avant la pression de la touche P
sélectionne le temps de commutation, comme l’indique le tableau 3.
Presser la touche P pendant au moins 2 s
33 clignotements
rapides
Paramétrage
Mode bistable
Si on n’appuie pas sur la touche P, au bout de 5 s le canal est réglé en
mode Bistable : à chaque impulsion le relais change d’état.
Presser la touche P pendant au moins 2 s
4 Éteinte. Aucune fonction État normal.

20
21
TABLEAU 3
Nb Clignotements
LED
Temps de
commutation
Nb Clignotements
LED
Temps de
commutation
Nb Clignotements
LED
Temps de
commutation
11s 11 30s 21 1m
22s 12 60s 22 2m
33s 13 1,5m 23 3m
44s 14 2m 24 4m
55s 15 2,5m 25 5m
66s 16 3m 26 6m
77s 17 3,5m 27 7m
88s 18 4m 28 8m
99s 19 4,5m 29 9m
10 10s 20 5m 30 10m
Effacement complet de la mémoire
Couper l’alimentation au récepteur. Presser et maintenir
enfoncée la touche P. Rétablir l’alimentation en maintenant
enfoncée la touche P sur le récepteur. La LED s’allume avec
couleur rouge, au bout de 5 s elle commence à clignoter
rapidement avec une séquence vert-rouge, relâcher alors
la touche. Attendre l’extinction de la LED. Le contenu de la
mémoire est maintenant complètement effacé.
Caractéristiques techniques
RR.1/2WBV - RR.1/2WIV
Fréquence 433,92 MHz
Alimentation 21÷28 Vac
12÷28 Vdc
Portée sans antenne 30 m
avec antenne 100 m
Canaux 1/2
Contact relais 1A/24Vdc
Temp. fonctionnement -20/+70°C
Consommation au repos 10 mA
Consom.1 canal ou 2 canaux excités
42 mA
Consom. 1 canal et 2 canaux excités
66 mA
This manual suits for next models
3
Table of contents
Languages:
Other Beninca Receiver manuals

Beninca
Beninca SC.RF User manual

Beninca
Beninca ONE.4WB User manual

Beninca
Beninca ONE2 WI User manual

Beninca
Beninca CALL User manual

Beninca
Beninca ONE.4WB User manual

Beninca
Beninca RR.1WBP User manual

Beninca
Beninca ONE2 WI User manual

Beninca
Beninca LO.R4WCV User manual

Beninca
Beninca LO.R1-2 Series User manual

Beninca
Beninca RR.4WBP User manual