manuals.online logo
Brands
  1. Home
  2. •
  3. Brands
  4. •
  5. SouthShore
  6. •
  7. Indoor Furnishing
  8. •
  9. SouthShore 3877-038 User manual

SouthShore 3877-038 User manual

Model/ / ModeloModèle
Article/ / ArticuloItem
1-800-290-0465
ASSEMBLY INSTRUCTIONS
INSTRUCCIONES DE ENSAMBLAJE
INSTRUCTIONS D’ASSEMBLAGE
10008999 Rev.:E 30.09.2011
ADULT ASSEMBLY REQUIRED
DOIT ÊTRE ASSEMBLÉ PAR UN ADULTE
DEBE SER ENSAMBLADO POR UN ADULTA
FRANÇAIS
ESPANOL ENGLISH
N.B.: It is important to carefully read the instructions
before beginning the assembly.
for future use
Identify all the parts and hardware.
We recommend that you assemble the unit on a carpeted floor
to avoid scratches. To facilitate assembly .
Keep the assembly instructions and
for warranty purposes. It contains all pertinent
information regarding replacement parts and maintenance.
2 people are required
N.B. Il est important de bien lire les instructions
avant de commencer l’assemblage.
é er
utilisation future
Bien identifier les pièces et la quincaillerie.
Il est recommand d’assembl l’unité sur un tapis pour
éviter les égratignures. Pour un assemblage facile et agréable
; .
Gardez les instructions d’assemblage pour et pour
la garantie. Elles contiennent toutes les informations pour un
remplacement de pièce ou pour l’entretien périodique.
2 personnes sont requises
N.B. Lea con detenimiento las instrucciones
antes de comenzar a ensamblar su mueble.
Guarde
un futuro y para usos
Identifique las piezas y los articulos de ferretería.
Se recomienda ensamblar la unidad sobre una alfombra
para evitar los rasguños. Para un ensamblaje mas facil
se necesitan dos personas. el instructivo de ensamble
para uso de garantía.
Este instructivo contiene todas las informaciones necesarias
para un sustitución de pieza o un mantenimiento periodico.
Door Chest
Cómoda con puertas
Commode à portes
-038-
-3877-
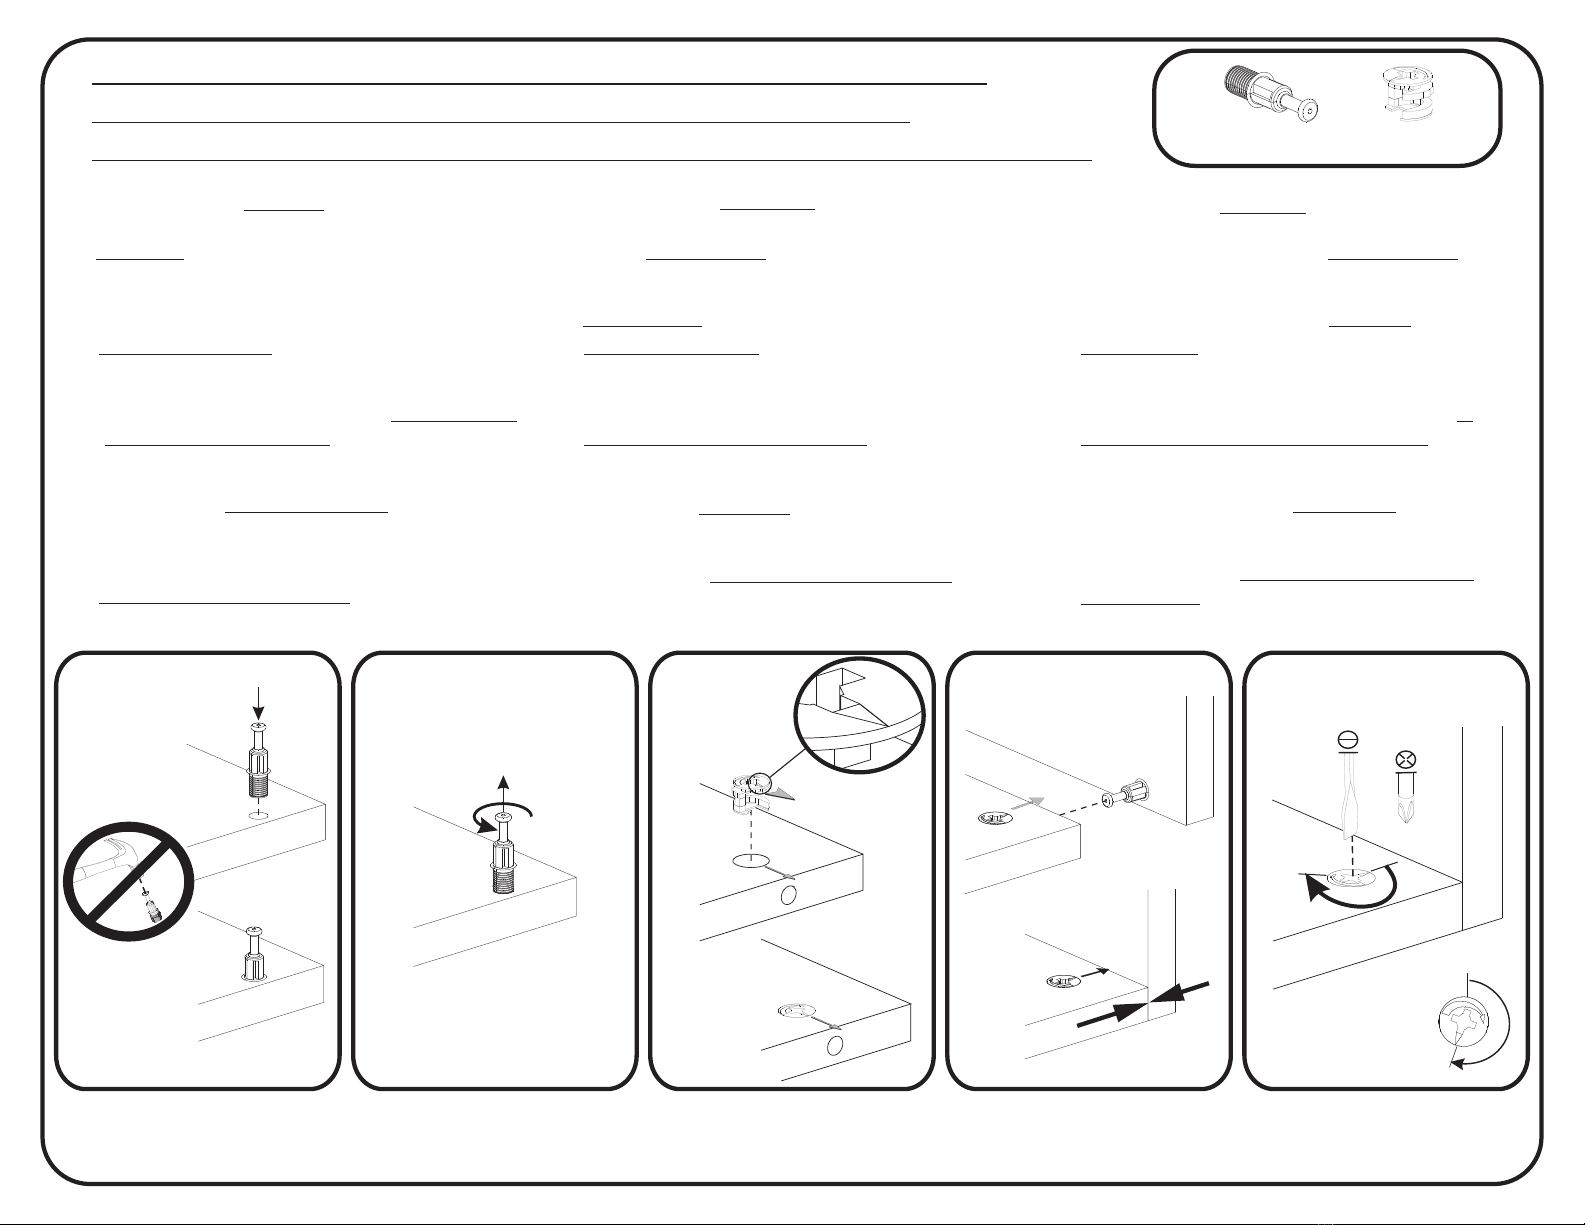
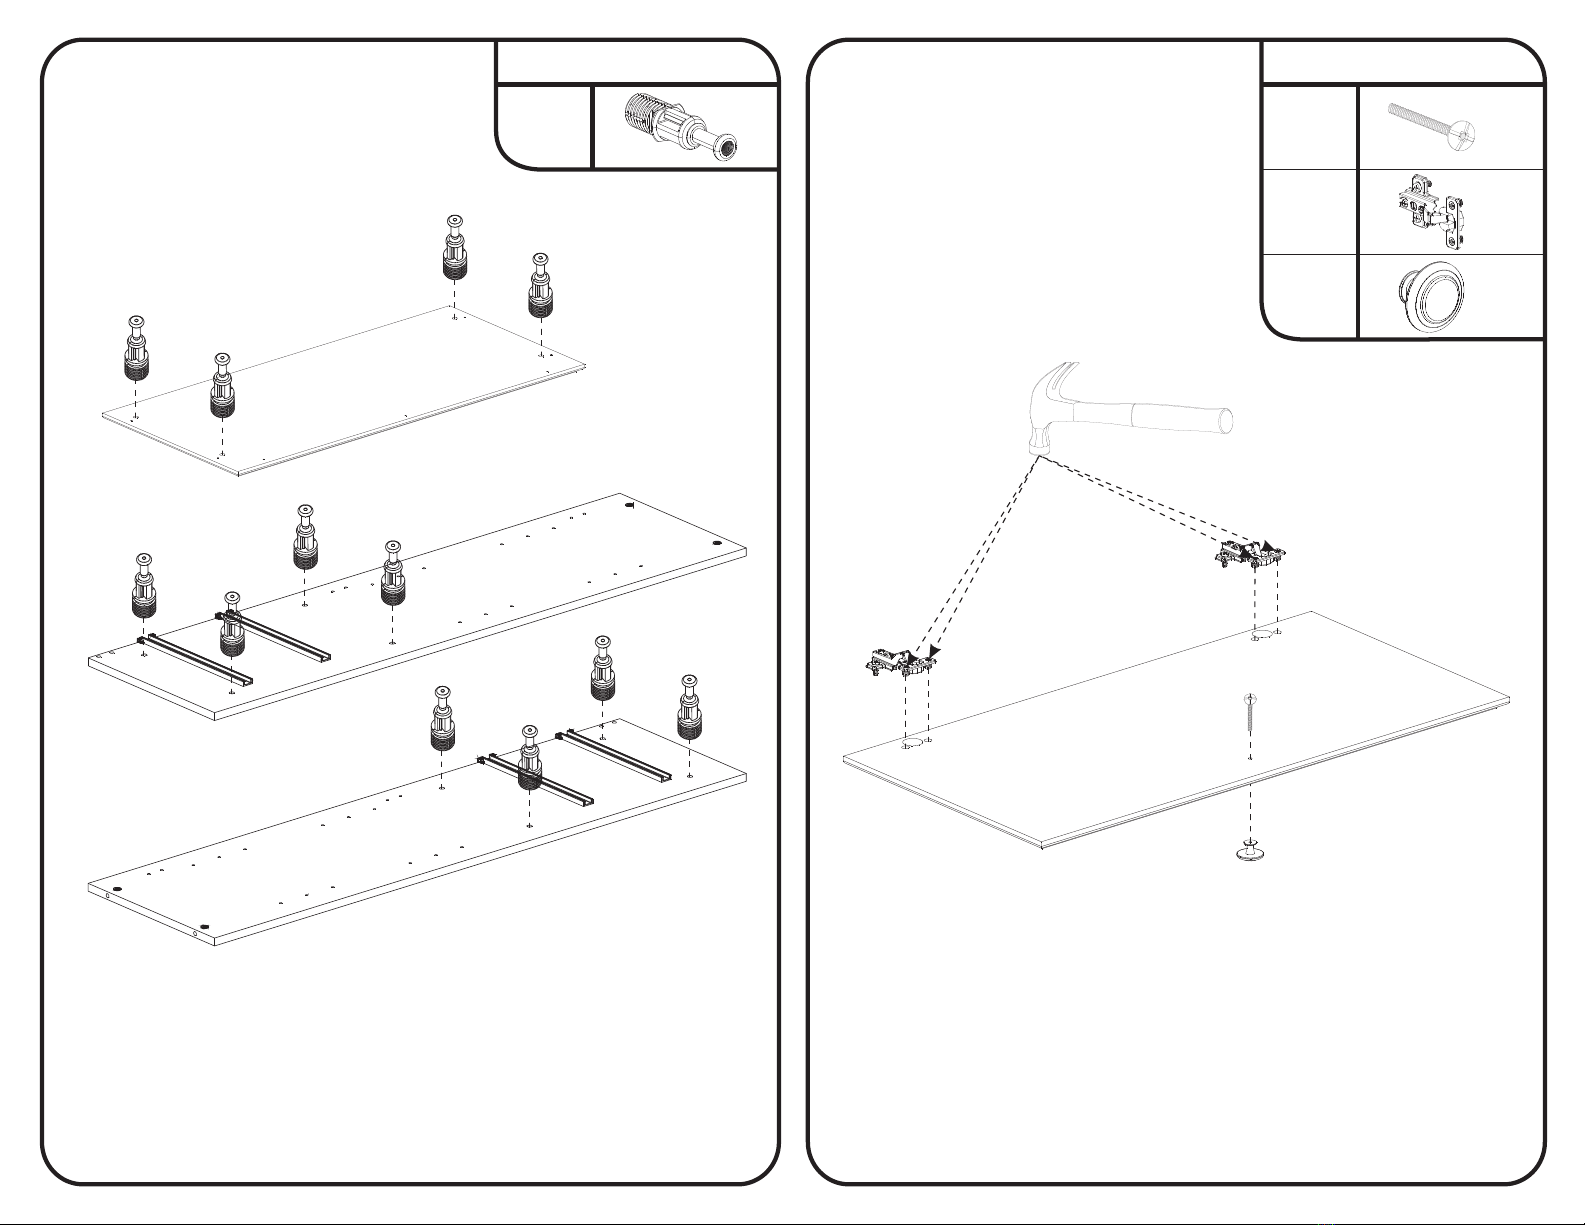
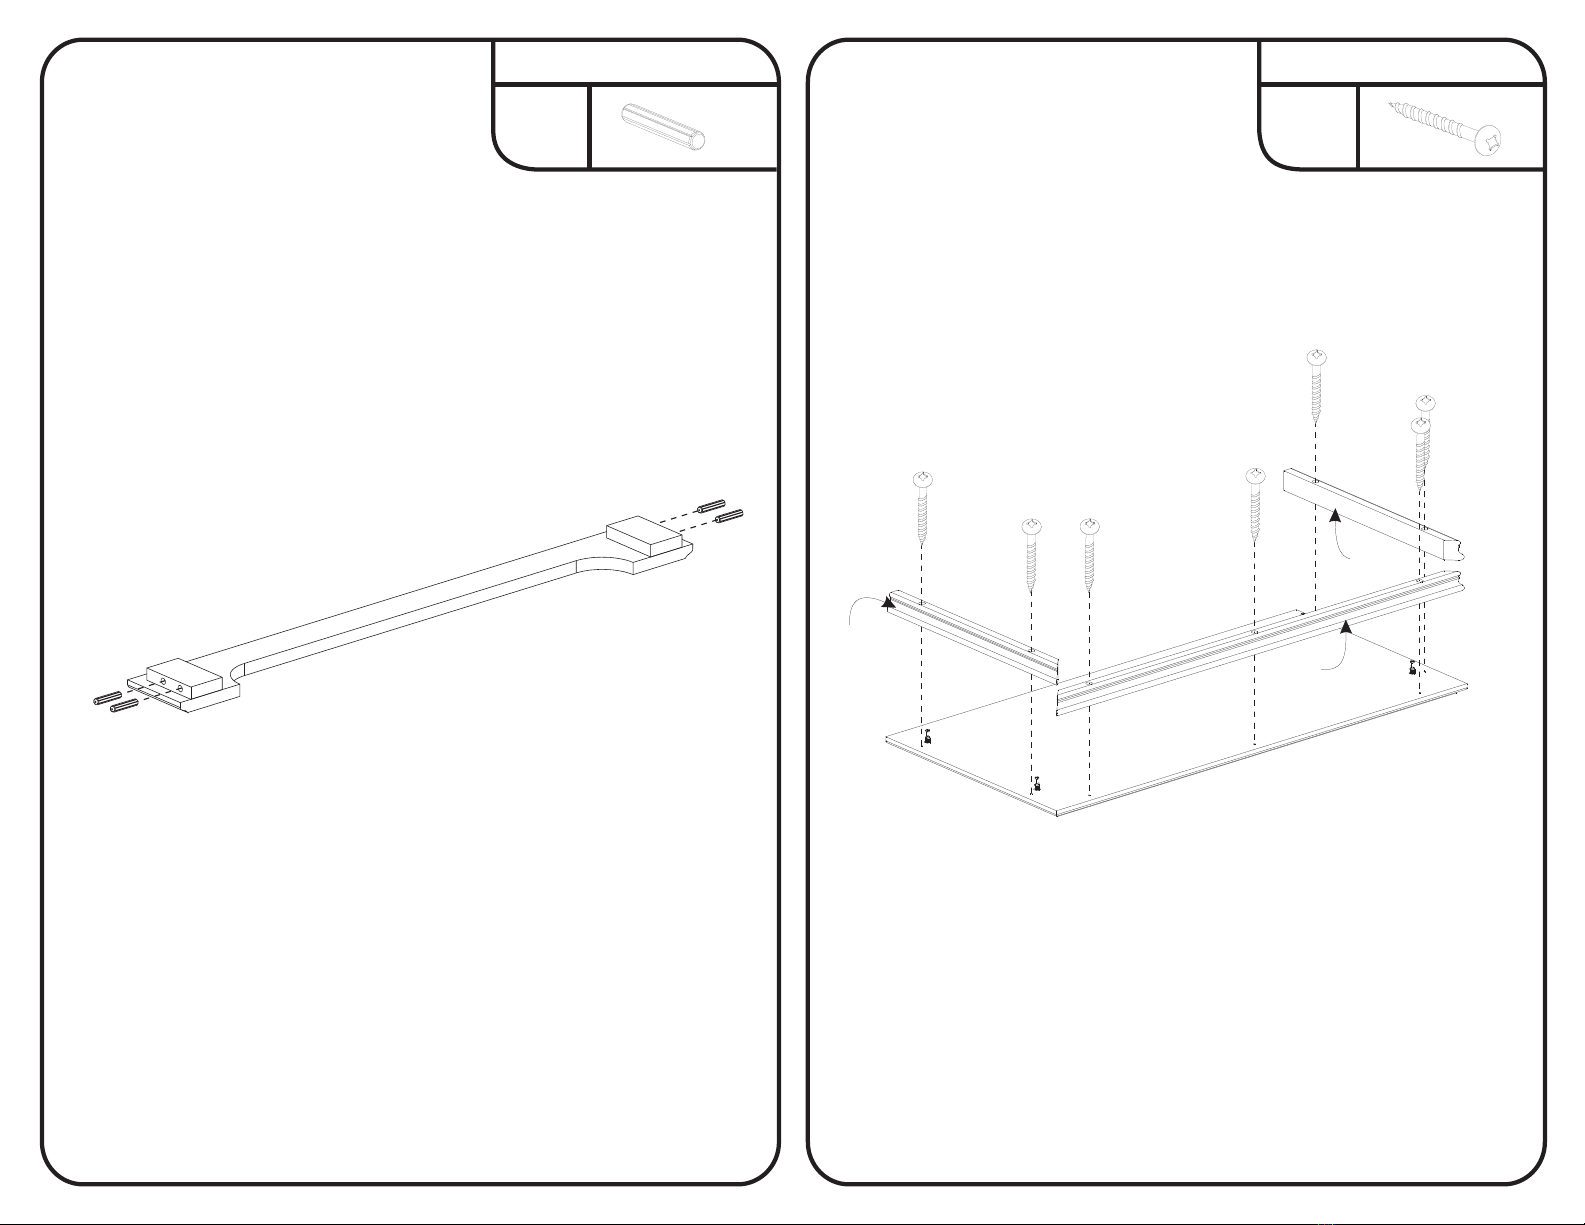
N.B.: Discard two end packing parts.
These are for protection during shipping.
N.B.: Las piezas en las extremidades de la caja son inútiles para ensamblar
el mueble. Sirven únicamente para protejerlo.
N.B.: Les pièces aux extrémités de la boîte ne vous sont d’aucune
utilité pour l’assemblage du meuble. Ce ne sont que des protecteurs.
MAINTENANCE TIPS/ /CONSEJOS DE MANUTENIMIENTOCONSEILS D'ENTRETIEN
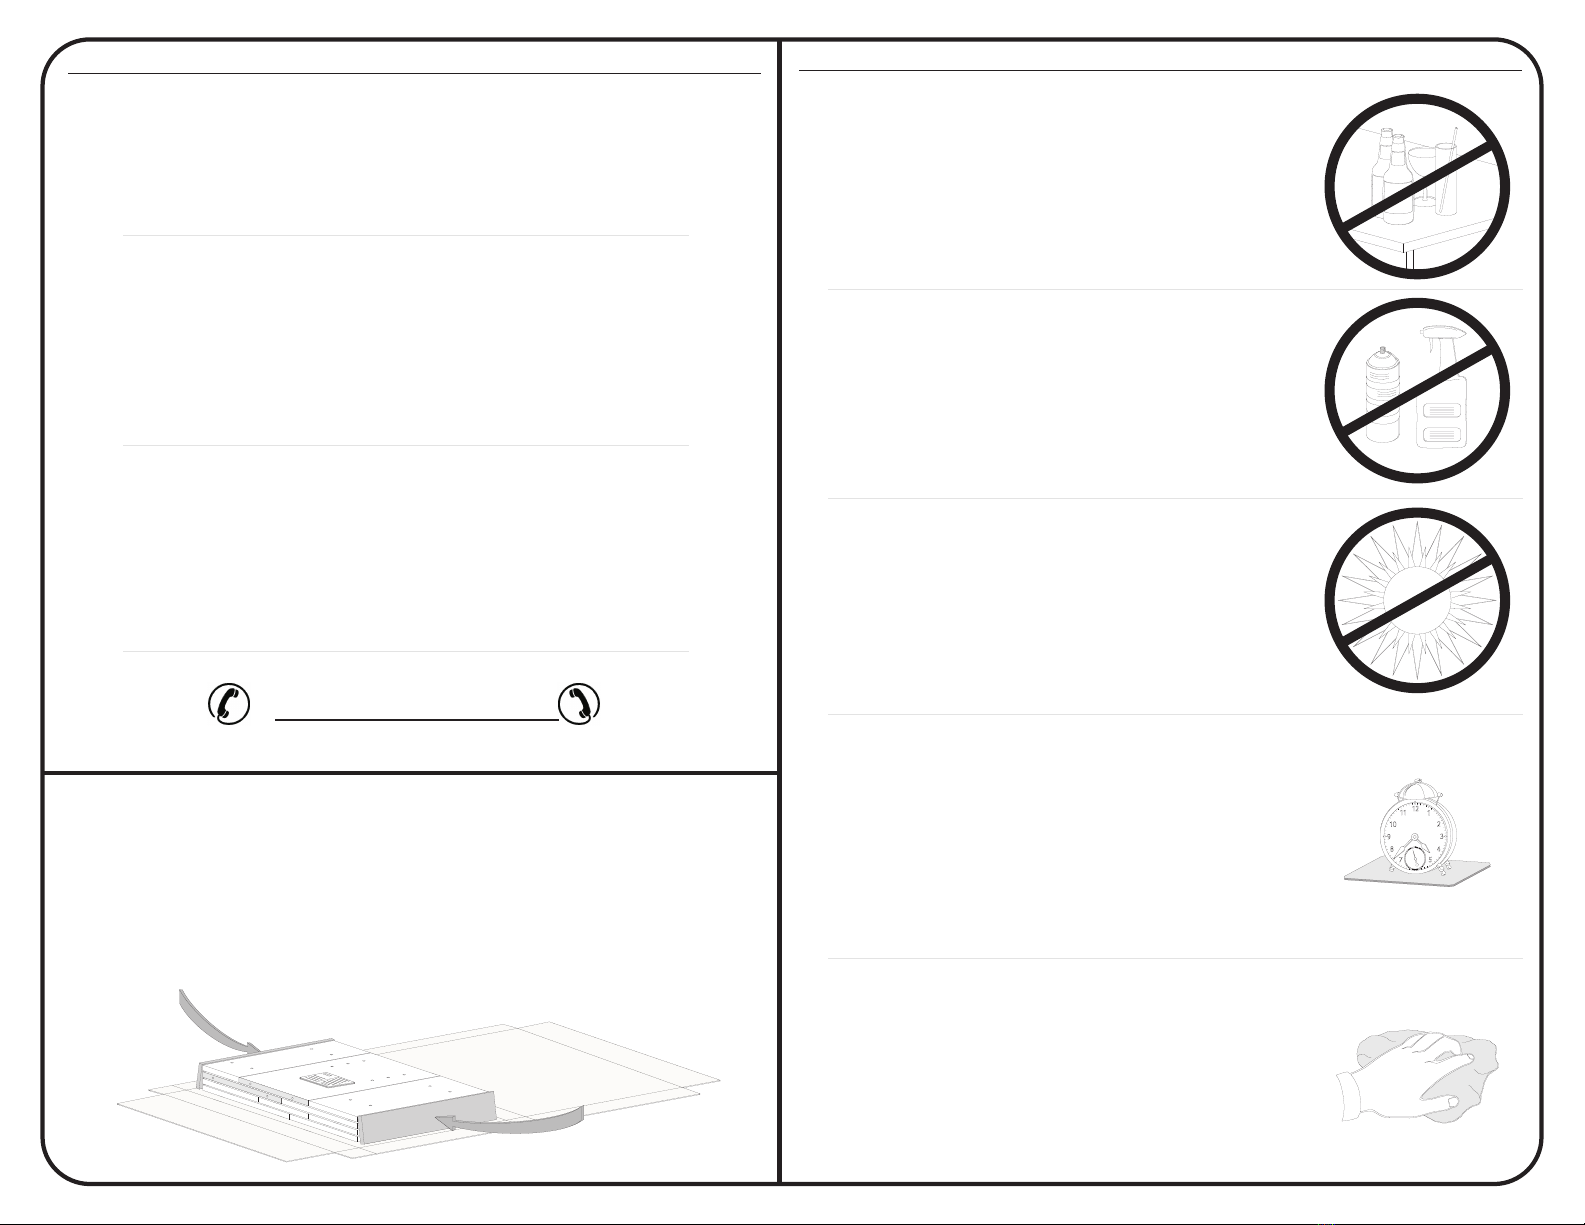
- Never let liquids or damp cloths sit on this furniture.
-
- Nunca deje un líquido o un trapo húmedo
sobre el mueble.
Ne jamais laisser de liquide ou linge humide
sur le meuble.
- Never use ammonia-based cleaning products,
as they will damage the finish.
- Nunca utilice un producto de limpieza a base
de amoníaco, esto dañará el acabado.
- Ne jamais utiliser de nettoyeur à base
d'ammoniaque, cela va endommager le fini.
- To avoid dulling of the finish, do not place
furniture in direct sunlight.
- No exponga el mueble directamente al sol para
prevenir empañamiento.
- Ne pas placer le meuble directement au soleil
pour prévenir le ternissement.
- To clean, use a soft or slightly damp cloth,
then wipe with a clean, dry cloth.
- Para limpiar, utilice un trapo suave o ligeramente
humedecido. Seque luego con un trapo limpio y seco.
- Pour nettoyer, utilisez un linge doux ou
légèrement humecté.
Essuyez par la suite avec un linge propre et sec.
- Do not put plastic or rubber rings under appliances.
Use cloth of felt protectors.
- Evite apoyar aparatos con redondeles de plástico
o de goma. Utilizar un protector de tela o de fieltro.
- Évitez de déposer des appareils avec des rondelles
de plastique ou de caoutchouc. Utilisez un
protecteur en tissu ou en feutre.
If you have any difficulty assembling this unit, or to order
replacement parts, do not hesitate to contact us.
Si el Ensamblaje del mueble presenta ciertas dificultades,
o para enviarle unas piezas de reemplazo, no dude en llamarnos.
No traiga ninguna pieza al comercio.
I
Si vous éprouvez des difficultés à assembler les
pièces, ou pour commander des pièces de
remplacement, n’hésitez pas à communiquer avec nous.
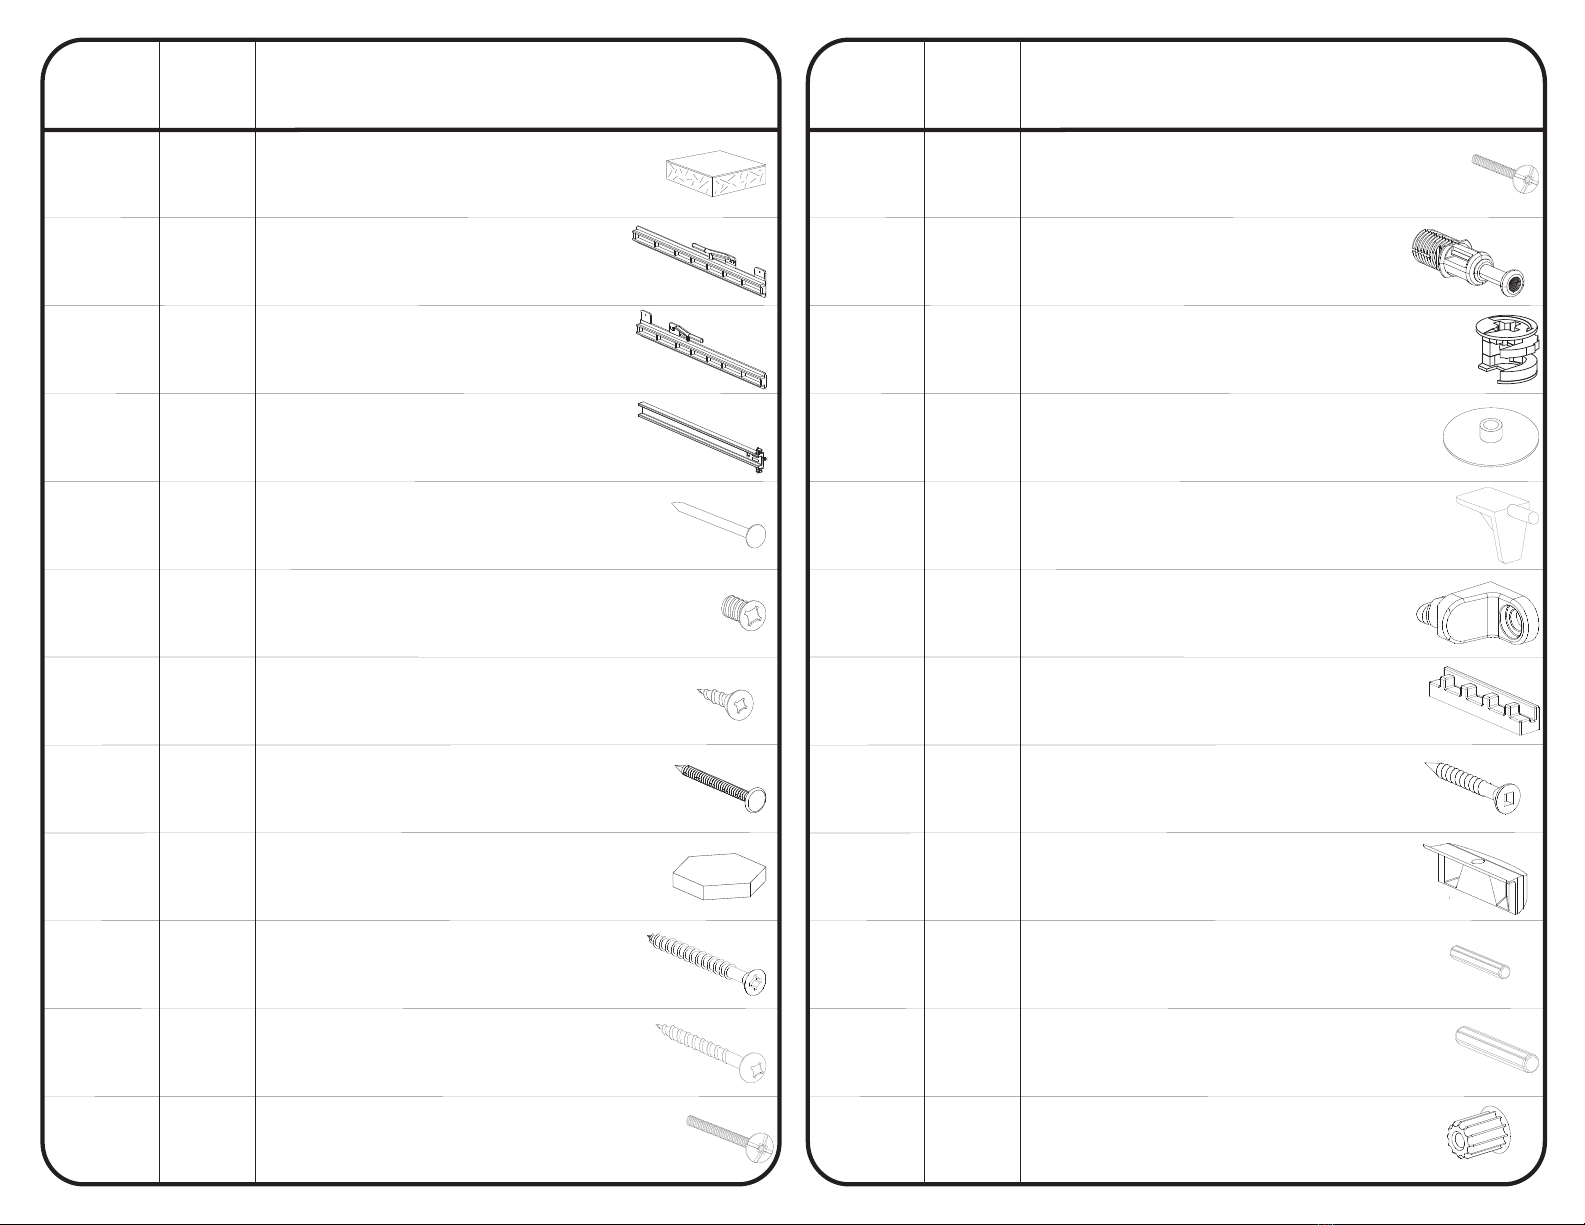
Do not return any parts to the store, find the number(s)
of the part(s) in the “Exploded view” or the “Hardware list”,
and CALL our customer service !
dentifique el o los número(s) de la(s) pieza(s)
en cuestión en "la Lista de ferretería" o la
"visión de conjunto" y LLAME a nuestro
servicio a la clientela.
Ne rapporter aucune pièce au magasin,
repérez le(s) numéro(s) de(s) pièce(s) en question,
dans la “Vue explosée” ou "la Liste de quincaillerie",
et TÉLÉPHONEZ à notre service à la clientèle.
CUSTOMERS SERVICE/ / SERVICIO A LA CLIENTELASERVICE À LA CLIENTÈLE
1-800-290-0465
A
A. the “quick fit dowel -144-”
into the specified holes.
Fully insert
B.
.
.
To withdraw the “quick fit dowel -144-",
, unscrew it with the hand.
With your thumb, insert the “eccentric-nut -158-”
into the specified holes with the
.
Insert the pieces into one another and make
sure they are .
To lock the pieces together, turn (tighten)
the “eccentric-nut -158-”to the right for
.
do not use any tool
arrow pointing
towards the insertion hole
completely united
slightly more than half a turn
C
D.
E
A.
.
C
nsérer le «goujon à
enfoncer -144-» dans les trous mentionnés.
jusqu’au fondI
«goujon à enfoncer -144-»,
, dévisser le à la main.
Avec le pouce, insérer «l’écrou excentrique
-158-» dans les trous mentionnés,
Joindre les pièces l’une dans l’autre et s’assurer
qu’elles sont l’une contre l’autre
Tourner (serrer) «l’écrou excentrique -158-»
vers la droite, ,
pour bloquer les pièces ensemble.
B
.
D.
E.
Pour retirer le
n’utiliser aucun outil
la flèche vers le trou d’insertion.
bien unies
un peu plus d’un demi tour
.
A. Introduzca el “clavija -144-”
en todos los agujeros mencionados.
hasta el fondo
B.
.
.
.
Para retirar el “clavija -144-”,
, desatornillar el a la mano.
Introduzca con el pulgar la “tuerca excéntrica
-158-”en los agujeros mencionados, con
inserción.
Una las piezas entre sí. Asegúrese
de que se encuentren .
Haga girar hacia la derecha y ajuste la “tuerca
excéntrica -158-”
para que las piezas queden
atrancadas.
no utilizar
herramientas
la
flecha apuntando hacia el agujero de
bien unidas
dando algo más que una
media vuelta
C
D
E
B D
HOW TO USE THE DOWEL(-144-) AND THE ECCENTRIC NUT(-158-)
EJEMPLO DE UTILIZACIÓN (CLAVIJA(-144-) Y TUERCA EXCÉNTRICA(-158-)
EXEMPLE D'UTILISATION (GOUJON(-144-) ET ECROU(-158-))
-144- -158-
FRANÇAIS ESPAÑOL
ENGLISH
*** À RETENIR LORS DE L'ASSEMBLAGETHINGS TO REMEMBER FOR ASSEMBLING/ / A RECORDAR DURANTE EL ENSAMBLAJE***
POUR INFORMATION SEULEMENT A TÍTULO INFORMATIVOFOR YOUR INFORMATION ONLY
-158-
-144-
or
ou
o
-158-
-158-
E
-144-
C
-158-
-EXPLODED VIEW
VISIÓN DE CONJUNTO
(Piece numbers for reference)FACING THE UNIT
(Número de las piezas para referencia)FRENTE AL MUEBLE
-
-
VUE EXPLOSÉE (Numéros des pièces pour références)FACE AU MEUBLE
LEFT SIDE
LADO IZQUIERDO
CÔTÉ GAUCHE
U(2)
R(2)
T(2)
S(2)
S1(2)
RIGHT SIDE
LADO DERECHO
CÔTÉ DROIT
- All parts, except for F and U(2) are marked out or labelled on one side.
Todas las piezas, a excepción de F y U(2) están identificadas con
una marca en los lados o con etiquetas en una de las caras.
-
-
Toutes les pièces, sauf F et U(2) sont repérées par marquage sur un
des côtés, ou par étiquetage sur une des faces.
A
G2
G2
C1
C
J
J
G
G1
F
P2 P3
P1
P
CODE
CODIGÓ
CODE
QTY
CANTIDAD
QTE
12
QUICK FIT DOWEL
TARUGO DE FIJACION
GOUJON À ENFONCER
12
15 X 12 MM CAM KLIX
TUERCA KLIX 15 X 12 MM
ÉCROU KLIX 15 X 12 MM
PLASTIC DOWEL
TARUGO DE PLASTICO
GOUJON DE PLASTIQUE
7
SHELF SUPPORT
SOPORTE DE ANAQUEL
SUPPORT DE TABLETTE
11
PLASTIC CAP
CAPUCHÓN DE PLÁSTICO
CAPUCHON DE PLASTIQUE
7
CODE
CODIGÓ
CODE
QTY
CANTIDAD
QTE
FELT
FIELTRO
FEUTRE
4
30
3/4”COMMON NAIL
CLAVO DE 3/4”CON CABEZA
CLOU À TÊTE 3/4”
8
5/8" HANDLE SCREW
TORNILLO 5/8" PARA MANIJA
VIS 5/8" POUR POIGNÉE
7/8”HANDLE SCREW
TORNILLO 7/8”PARA MANIJA
VIS 7/8”POUR POIGNÉE
2
HARDWARE DESCRIPTION
DESCRIPCION DE LA
DESCRIPTION DE LA QUINCAILLERIE
FERRETERÍA
HARDWARE DESCRIPTION
DESCRIPCION DE LA FERRETERÍA
DESCRIPTION DE LA QUINCAILLERIE
8
29mm FLAT HEAD SCREW
TORNILLO 29mm CABEZA PLANA
VIS 29mm TÊTE PLATE
FIXING BRACKET
ESCUADRA DE FIJACIÓN
ÉQUERRE DE FIXATION
8
4
10 MM EURO SCREW
TORNILLO EURO 10 MM
VIS EURO 10 MM
LEFT DRAWER SLIDE
CORREDERA DE CAJÓN IZQUIERDO
COULISSE DE TIROIR GAUCHE
2
RIGHT DRAWER SLIDE
CORREDERA DE CAJÓN DERECHO
COULISSE DE TIROIR DROIT
2
LEFT DRAWER SLIDE
CORREDERA DE CAJÓN IZQUIERDO
COULISSE DE TIROIR GAUCHE
4
4
4
BUMPER
COJINETE
COUSSINET
12
CRENELATED NAIL
CLAVO DENTADO
CLOU CRÉNELÉ
1
TOOL FOR INSERTION OF THE SLIDES
HERRAMIENTA DE INSERCIÓN DE LOS CORREDERAS
OUTIL D'INSERTION DES COULISSES
7
1 1/4”ROUND HEAD SCREW
TORNILLO 1 1/4”CABEZA REDONDA
VIS 1 1/4”TÊTE RONDE
13,3mm FLAT HEAD SCREW
TORNILLO 13,3mm CABEZA PLANA
VIS 13,3mm TÊTE PLATE
DRAWER STABILIZER SCREW
TORNILLO 1" PARA ESTABILIZADOR
VIS 1" POUR STABILISATEUR
2
DRAWER STABILIZER
AJÓN ESTABILIZADORC
STABILISATEUR FOND DE TIROIR
2
PLASTIC DOWEL
TARUGO DE PLASTICO
GOUJON DE PLASTIQUE
8
4
PLASTIC DOWEL
TARUGO DE PLASTICO
GOUJON DE PLASTIQUE
6 129
21 144
22 158
23 171
90 180
92 184
101 221
106 227
109 228
111 229
120 231
121 242
* In the hardware package, you have spare parts
-171-, -180- and -231-.
*
* En la , tenemos las piezas de reemplazo
-171-, -180- y -231-.
Dans la quincaillerie, vous avez les pièces de remplacement
-171-, -180- et -231-.
ferretería
-171- -180- -231-
CODE
CODIGÓ
CODE
QTY
CANTIDAD
QTE
HARDWARE DESCRIPTION
DESCRIPCION DE LA
DESCRIPTION DE LA QUINCAILLERIE
FERRETERÍA
4
HANDLE
MANIJA
POIGNÉE
* TOOLS REQUIRED/ HERRAMIENTAS REQUERIDAS:OUTILS REQUIS/
- HAMMER /MARTILLO/MARTEAU
- STANDARD /PLANO/PLAT
- PHILLIPS ESTRELLA/ÉTOILE/
- ROBERTSON/ /CUADRADOCARRÉ
/ou/or o
- 2 PEOPLE/ /2 PERSONAS2 PERSONNES
8
13 MM EURO SCREW
TORNILLO EURO 13 MM
VIS EURO 13 MM
2
BUMPER
COJINETE
COUSSINET TRANSPARENT
2
KNOB
TIRADOR
BOUTON
METAL HINGE AND MOUNTING PLATE
BISAGRA DE METAL Y PLACA DE MONTAJE
CHARNIÈRE DE MÉTAL ET PLAQUE DE MONTAGE
4
252
278
374
380
381
1
1
2 1/2”ROUND HEAD SCREW
TORNILLO 2 1/2”CABEZA REDONDA
VIS 2 1/2”TÊTE RONDE
116
1SECURITY BRACKET
ESCUADRA DE SECURIDAD
ÉQUERRE DE SÉCURITÉ
199
99
9/16”ROUND HEAD SCREW
TORNILLO 9/16”CABEZA REDONDA
VIS 9/16”TÊTE RONDE
2
Required/Requis/Requerido
X12 -158-
- With thumb, insert -158-(12) into G, C, C1 and G1.
(Make sure the little arrow is towards the insertion hole.)
- Con el pulgar, insertar -158-(12) en G, C, C1 y G1.
(Asegurarse que la flecha esté orientada hacia el hueco de
inserción.)
- Avec le pouce, insérer -158-(12) dans G, C, C1 et G1.
(Assurez-vous que la flèche pointe vers le trou d'insertion.)
E
C
A
H
A
C
I
A
E
L
H
E
C
O
/
/
F
L
H
U
-158-
A
R
R
O
W
T
O
W
A
R
D
S
T
H
E
H
O
L
E
/
F
L
È
C
H
E
V
E
R
S
L
E
T
R
O
U
G1
G
C
C1
1
-
-
To insert -23-(4) on C, and C1 use -221- by
placing it into -23-(4), and knock it in with a hammer.
- Screw -92-(4) through -23-(4) into C and C1.
Para insertar -23-(4) sobre C y C1 poner -221-
en -23-(4) y golpear sobre -221- con un martillo.
- Atornillar -92-(4) a través -23-(4) en C y C1.
-
- Visser -92-(4) à travers -23-(4) dans C et C1.
Pour insérer -23-(4) sur C et C1 utiliser -221- en
le plaçant dans -23-(4), et cogner dessus avec un marteau.
-23- C
-92-
-23-
C1
-92-
-23-
-23-
Required/Requis/Requerido
-23-
X4
-92-
X4
X1
-23-
-221-
-221-
4X2
X2
-380-
-121-
- With the hammer, insert -252-(4) to J(2).
- Screw -121-(2) through J(2) into -380-(2).
-
- Con a martillo, insertar -252-(4) en J(2).
- Atornillar -121-(2) a través J(2) en -380-(2).
- Avec le marteau, insérer -252-(4) à J(2).
Visser -121-(2) à travers dans - -(2)J(2) 380 .
Required/Requis/Requerido
-252-
X4
-252-
J(2)
-252-
-380-
-121-
X12
-144-
3
- Insert -144-(4) .
-
- Insertar -144-(4) .
on A
- Insert -144-(8) on C and C1.
-
sobre A
- Insertar -144-(8) sobre C y C1.
Insérer -144-(4) .sur A
Insérer -144-(8) sur C et C1.
Required/Requis/Requerido
A
C
C1
6X7 -120-
Required/Requis/Requerido
A
P2
P3
P1
- Screw -120-(7) through P1, P2 and P3 into A.
- Atornillar -120-(7) a través P1, P2 y P3 en A.
- Visser -120-(7) à travers P1, P2 et P3 dans A.
5
- Insert -231-(4) into P.
- Insertar -231-( ) en .
- Insérer -231-(4) dans P.
4 P
X4 -231-
P
Required/Requis/Requerido
R(2)
X4 -229-
Required/Requis/Requerido
7
-229-
-229-
- Insert -229- into
-
- Insertar -229- en
R(2). (2 drawers)
R(2). (2 cajones)
Insérer -229- dans R(2). (2 tiroirs)
-21-/-22-
-221-
8X2 -21-
Required/Requis/Requerido
X1
- To insert -22- on S(2) and -21- on S1(2), use -221- by placing it on
-21- and -22-, and knock it in with a hammer.
- Para insertar -22- sobre S(2) y -21- sobre S1(2), poner -221- sobre
-21- y -22-, y golpear sobre con un martillo.
- Pour insérer -22- sur S(2) et -21- sur S1(2), utiliser -221- en le
plaçant sur -21- et -22-, et cogner dessus avec un marteau.
-221-
X2 -22-
S
-22-
S1
-21-
9X8 -242-
-242-
-242-
-242-
-242-
Required/Requis/Requerido
T(2)
- Insert -242- into T(2).
-
- Insertar -242- en T(2).
Insérer -242- dans T(2).
10 X8
Required/Requis/Requerido
-184-
-184-
-184-
-184-
-184-
- Insert -184- tilted in S(2) and S1(2) then swivel.
- Insertar -184- inclinados en S(2) y S1(2) luego, girar.
- Insérer -184- incliné dans S(2) et S1(2) puis pivoter.
S1
S
-184-
- Insert S and S1 into R(2).
- Insertar S y S1 en
- Insérer S et S1 dans R(2).
R(2).
11
R(2)
S1
S
12
Required/Requis/Requerido
X8 -278-
Screw -278- through -184- into R(2).
R(2).
Atornillar -278- a través -184- en R(2).
-
-
- Visser -278- à travers -184- dans
-278-
S
S1
R(2)
-278-
U
S1
R(2)
13
- Slide U (not printed) into the grooves of S(2), S1(2) and R(2).
R(2).
- Deslizar U (no escrito) en las ranuras de S(2), S1(2) y R(2).
- Glisser U (non inscrit) dans les rainures de S(2), S1(2) et
14 X8 -111-
Required/Requis/Requerido
- T(2) S(2) and S1(2).
- 111 h S(2) and S1(2) into T(2).
T(2) S(2) y S1(2).
- 111 a S(2) y S1(2) (2).
Insert between
Screw - - throug
- Insertar entre
Atornillar - - través de en T
- Insérer T(2) entre S(2) et S1(2).
- Visser -111- à travers de S(2) et S1(2) dans T(2).
With care
Con preconción
Avec précaution
T
S
S1
U
-111-
-111-
-111-
-111-
-106-
76mm
U
15
-106-
-106-
-106-
-106-
-106-
-106-
U
T
S
S1
Each side
Chaque côté
Cada lado
-101-
X4
-106-
X12
Required/Requis/Requerido
-101-
-101-
- Align U(2) with T(2).
- Nail U(2) to T(2) with -106-.
- Screw -101- through -22- into S(2) and -21- into S1(2).
- Alinear U(2) con T(2).
- Clavar U(2) a T(2) con -106-.
- Atornillar -101- a través de -22- en S(2) y -21- en S1(2).
- Aligner U(2) avec T(2).
- Clouer U(2) à T(2) avec -106-.
- Visser -101- à travers de -22- dans S(2) et -21- dans S1(2).
-227-
-228-
Required/Requis/Requerido
- Put the drawer upside down with the back toward yourself.
- Slide -228-(2) into the groove of R(2) with your thumbs.
- Screw -227-(2) through -228-(2) into R(2),
- : Make sure that -228-(2) is completely flush with R(2)
and U(5) before inserting screw.
Important
holding R(2) with your
hand.
- Positionner le tiroir à l’envers avec le dos vers soi.
- Glisser -228-(2) dans la rainure de R(2) avec les pouces.
- Visser -227-(2) à travers -228-(2) dans R(2)
- : S’assurer que -228-(2) est complètement
appuyé sur R(2) et U(2) avant de visser.
Important
en retenant R(2)
avec une main.
- Coloque el cajón al revés con su espalda hacia ti.
- Rodar -228-(2) en la ranura de R(2) con los pulgares.
- Atornillar -227-(2) a través de -228-(2) dentro de R(2),
- : Asegurarse que -228-(2) está completamente
apoyado a R(2) y a U(2) antes de atornillar.
Importante
reteniendo R(2) con una mano.
FRANÇAIS
ESPAÑOL ENGLISH
“
R
U
“
-228-
-227-
16 X2
X2
18
- Insert G and G1 into C1.
- Tighten right -158-(4)
on and G1 to lock them together.
- Insertar y G1 en C1.
- Girar -158-(4) hacia
la derecha sobre G y G1 para trancarlos juntos.
little more than a half turn
G
un poco màs que una media vuelta
- Insérer G et G1 dans C1.
- Tourner -158-(4) à
droite sur G et G1 pour les barrer ensemble.
G
un peu plus qu'un demi tour
-158-
correct/
correcto
incorrect/
incorrecto
G
C1
G1
X4
X8
-129-
-381-
17
Required/Requis/Requerido
X4 -109-
- Screw -381-(4) to R(2) with -129-(8).
- Stick -109-(4) on R(2).
-
- Atornillar -381-(4) en R(2) con -129-(8).
- Pegar -109-(4) sobre R(2).
Visser -381-(4) à R(2) avec -129-(8).
- Coller -109-(4) sur R(2).
R(2)
-381-
-129-
-381-
-129-
-109-
-109-
20 -171-
X4
- Insert A into C and C1.
- Tighten right -158-(4)
on C and C1 to lock them together.
- Cover -158-(4) with -171-(4).
-
- Insertar A en C y C1.
- Girar -158-(4) hacia
la derecha sobre C y C1 para trancarlos juntos.
- Cubrir -158-(4) con -171-(4).
little more than a half turn
un poco màs que una media vuelta
Insérer A dans C et C1.
- Tourner -158-(4) à
droite sur C et C1 pour les barrer ensemble.
- Couvrir -158-(4) avec -171-(4).
un peu plus qu'un demi tour
A
C
C1
-158-
correct/
correcto
incorrect/
incorrecto
-158-
-171-
Required/Requis/Requerido
19
- Insert P into C1.
- Tighten right -158-(4)
on and G1 to lock them together.
- Insertar P en C1.
- Girar -158-(4) hacia
la derecha sobre y G1 para trancarlos juntos.
- Insert C into G, P and G1.
- Insertar C en G, P et G1.
little more than a half turn
G
un poco màs que una media vuelta
G
- Insérer P dans C1.
- Tourner -158-(4) à
droite sur G et G1 pour les barrer ensemble.
- Insérer C dans G, P et G1.
un peu plus qu'un demi tour
-158-
correct/
correcto
incorrect/
incorrecto
G1
C1
P
CG
-6-
Pull the paper off.
Quitar el papel.
Enlever le papier.
22
- Draw a pencil line on the back
following indicated dimensions.
- Nail down the back to G1 with -90-(4) on the line.
- Stick -6-(4) under C and C1.
-
- Trace una línea con un lápiz en la espalda
siguiendo las dimensiones indicadas.
- Clave la espalda en G1 con -90-(4) sobre la línea.
- Pegar -6-(4) debajo C y C1.
Tracer une ligne au crayon sur le dos
suivant les dimensions indiquées.
- Clouer le dos à G1 avec -90-(4) sur la ligne.
- Coller -6-(4) sous C et C1.
-6-
-6-
-6-
-6-
C1 C
488 mm
“
191/4
488 mm
“
191/4
Back
Dos
Espalda
X4
X4
-90-
-6-
Required/Requis/Requerido
- Make sure the unit is level (squared).
- In beginning by the corners, nail the back to A, G, C and C1
with -90-(26).
- Cerciorarse de que la unidad se encuentre a nivel.
- Comenzando por las esquinas, clavar la espalda a A, G, C y C1
con -90-(26).
- Assurez vous que l'unité soit au niveau (à l'équerre).
- En commençant par les coins, clouer le dos à A, G, C et C1
avec -90-(26).
21 X26 -90-
Required/Requis/Requerido
F
C1
C
G
A
Back
Dos
Espalda
WARNING
Serious or fatal crushing injuries
can occur from furniture tip-over.
To help prevent tip-over:
• Place heaviest items in the lowest
drawers.
• Do not set TVs or other heavy
objects on the top of this product.
Never allow children to climb or
hang on drawers, doors, or shelves.
• Never open more than one drawer
at a time.
Use of tip-over restraints only
reduce, but not eliminate, the risk
of tip-over.
AVERTISSEMENT
Des blessures graves ou fatales
peuvent résulter du basculement
du meuble.
Afin d’éviter le basculement :
• Placer les items les plus lourds
dans les tiroirs du bas.
• Ne pas placer de TV ou d’autres
objets lourds sur ce produit.
Ne jamais laisser un enfant grimper
sur les tiroirs, les portes et les
tablettes ou s’accrocher à ceux-ci.
• Ne jamais ouvrir plus d’un tiroir à
la fois.
L’utilisation de dispositif anti-
basculement ne peut que réduire
les risques de basculement, sans
les éliminer totalement.
ADVERTENCIA
El vuelco del mueble puede ser
causa de lesiones graves o de un
aplastamiento fatal.
Para evitar el vuelco:
• Ponga las cosas pesadas en los
cajones más bajos.
• No ponga televisores u otros
objetos pesados encima de este
producto.
Nunca permita que un niño se
trepe o se cuelgue en cajones,
puertas o estantes.
• Nunca abra más de un cajón a la
vez.
El uso de sujetadores para evitar
el vuelco sólo puede disminuir el
riesgo de un vuelco, pero no lo
elimina.
- TO PREVENT THE UNIT FALLING ON CHILDREN
Locate a stud in the wall behind the unit.
Screw -199- under the top with -99-.
And through the back of the unit with -116- into the solid part of the wall.
- POR IMPEDIR EL MUEBLE QUE VOLCAR SOBRE LOS NINOS.
Localizar uno entramado, en la anchura del mueble.
Atornillar -199- debajo la pieza del encima con -99-.
Y a traves del dorso del mueble con -116-, en la parte solida del muro.
-POUR EMPÊCHER LE MEUBLE DE BASCULER SUR LES ENFANTS
Localiser un colombage, dans la largeur du meuble. Visser -199- sous le dessus du meuble avec -99-.
Et à travers le dos du meuble avec -116-, dans la partie solide du mur.
-Safety bracket installation
-Instalacion del escuadra de seguridad
-Installation de l’équerre de sécurité
Wall/
Muro
Mur/
-99-
-116- -199-
23

This manual suits for next models

2

Other SouthShore Indoor Furnishing manuals

SouthShore 3232 User manual

SouthShore

SouthShore 3232 User manual

SouthShore 222 User manual

SouthShore

SouthShore 222 User manual

SouthShore 3840010 User manual

SouthShore

SouthShore 3840010 User manual

SouthShore 3880087 User manual

SouthShore

SouthShore 3880087 User manual

SouthShore 3177 User manual

SouthShore

SouthShore 3177 User manual

SouthShore Exhibit TV Stand 4479 User manual

SouthShore

SouthShore Exhibit TV Stand 4479 User manual

SouthShore 3569-098 User manual

SouthShore

SouthShore 3569-098 User manual

SouthShore 4257B User manual

SouthShore

SouthShore 4257B User manual

SouthShore 027 User manual

SouthShore

SouthShore 027 User manual

SouthShore 3347 User manual

SouthShore

SouthShore 3347 User manual

SouthShore 3642 User manual

SouthShore

SouthShore 3642 User manual

SouthShore 211 User manual

SouthShore

SouthShore 211 User manual

SouthShore Ezra 14580 User manual

SouthShore

SouthShore Ezra 14580 User manual

SouthShore 3170045 User manual

SouthShore

SouthShore 3170045 User manual

SouthShore 3232 User manual

SouthShore

SouthShore 3232 User manual

SouthShore 5227 User manual

SouthShore

SouthShore 5227 User manual

SouthShore 3156270 User manual

SouthShore

SouthShore 3156270 User manual

SouthShore 235 User manual

SouthShore

SouthShore 235 User manual

SouthShore 3407 User manual

SouthShore

SouthShore 3407 User manual

SouthShore 550B035 User manual

SouthShore

SouthShore 550B035 User manual

SouthShore 4347 User manual

SouthShore

SouthShore 4347 User manual

SouthShore 2246 Series User manual

SouthShore

SouthShore 2246 Series User manual

SouthShore 010 User manual

SouthShore

SouthShore 010 User manual

SouthShore 3576 User manual

SouthShore

SouthShore 3576 User manual

Popular Indoor Furnishing manuals by other brands

convenience concepts 131556 Assembly instructions

convenience concepts

convenience concepts 131556 Assembly instructions

Matt Blatt DUBLIN MBDUBL2STBA user guide

Matt Blatt

Matt Blatt DUBLIN MBDUBL2STBA user guide

Union Home LOUISIANA LVR00665 manual

Union Home

Union Home LOUISIANA LVR00665 manual

PATIOJOY HW70831-4 manual

PATIOJOY

PATIOJOY HW70831-4 manual

Julian Bowen Limited Oklahoma Coffee Table Assembly instructions

Julian Bowen Limited

Julian Bowen Limited Oklahoma Coffee Table Assembly instructions

Teknion complements YTH Installation guides

Teknion

Teknion complements YTH Installation guides

Ethnicraft BED WITH SLATS Assembly instruction

Ethnicraft

Ethnicraft BED WITH SLATS Assembly instruction

JWA MARCEL 70577 Assembly instruction

JWA

JWA MARCEL 70577 Assembly instruction

Be Mobiliário Inteligente 1003 FREE Assembly instructions

Be Mobiliário Inteligente

Be Mobiliário Inteligente 1003 FREE Assembly instructions

kingsley-bate Nantucket Settee NT55 Assembly instructions

kingsley-bate

kingsley-bate Nantucket Settee NT55 Assembly instructions

Treca Interiors CAD 3 Assembly and handling instructions

Treca Interiors

Treca Interiors CAD 3 Assembly and handling instructions

ferm living Lager Trolley Assembly manual

ferm living

ferm living Lager Trolley Assembly manual

ROOMS TO GO 40 CREEKSIDE 2.0 Assembly instructions

ROOMS TO GO

ROOMS TO GO 40 CREEKSIDE 2.0 Assembly instructions

Cuckooland MG 7775 Assembly instructions

Cuckooland

Cuckooland MG 7775 Assembly instructions

FourStar 11226724 Assembly instructions

FourStar

FourStar 11226724 Assembly instructions

BCE Pilot Task operating instructions

BCE

BCE Pilot Task operating instructions

J.Burrows Typhoon Esport Pro Assembly instructions

J.Burrows

J.Burrows Typhoon Esport Pro Assembly instructions

Office Star ECH89181 operating instructions

Office Star

Office Star ECH89181 operating instructions

manuals.online logo
manuals.online logoBrands
  • About & Mission
  • Contact us
  • Privacy Policy
  • Terms and Conditions

Copyright 2025 Manuals.Online. All Rights Reserved.