Sparco Corsa F300i User manual

GB
ECE R44/04
GROUP 0+
ISOFIX BASE for Group
0+ Sparco F300i
INSTRUCTION MANUAL

Know Your Infant Carrier Base GB
3
1
2
3
4
5
6
7
8
11
10
9
1. ISOFIX install label
2. Shock bar
3. Infant carrier axis solid system
4. Grey release button
5. Safety leg
6. Adjustment button
7. Support leg
8. ISOFIX base
9. ISOFIX release buttons
10. Locking arms
11. Insert guides

*ECE = European Standard for Safety Equipment
The child safety seat has been designed, tested and
certified to the requirements of the European Standard
for Child Safety Equipment (ECE R44/04).
The seal of approval E (in a circle) and the approval
number are located on the approval label (sticker on
the child safety seat).
This approval shall be invalidated if you make any
modifications to the child safety seat. No modifications
may be made to the child safety seat other than by the
manufacturer.
Caution! Neither of these two parts may be used in
combination with other ISOFIX adapters or infant
carrier.
Suitability
4
These infant carriers are marked with the
ISOFIX symbol.
EU Standard ECE R44 04
Group Weight Age Orientation Fixing of child
Group
0+
Backward
facing
Child seat belt
(5 points)
0-18
months
0-13kg

Use in The Vehicle GB
5
DO NOT use on a passenger seat
with a front airbag!
DANGER!
An airbag hitting the infant carrier
can cause serious injuries to your
child, possibly resulting in death.
Please observe the instructions in
your vehicle manual for the use of
child seats.
The ISOFIX-Adapter fastening system is based on
semi-universal or vehicle-specific approval. The seat may
be used only in those vehicles cited in the enclosed
vehicle type list. This type list is constantly updated.
With ISOFIX fastening and support leg
(semi universal;vehicle-specific)
You can use your child car seat as follows:
In the direction of travel
Against the direction of travel
On seats featuring:
ISOFIX fastening points
(between seat surface and
backrest)
NO
YES
YES
(Please observe the regulations applicable to your particu-
lar country).
6
Installation in the vehicle
For the protection of your baby
For the protection of all vehicle occupants
Please do not leave your child unattended in the child
safety seat in the vehicle.
Do not place any objects in the foot well in front of your
ISOFIX-Adapter.
In the case of an emergency stop or an accident
unsecured persons or objects may cause injury to
other vehicle occupants. Please always check that…
To protect your vehicle
Some vehicle seat covers of sensitive materials (e.g.
velour, leather, etc.) may develop wear marks when
child seats are used. This can be avoided by placing a
blanket or towel under the child seat.
The backrests of the vehicle seats are locked (i.e.
that a foldable rear seat bench latch is engaged).
All heavy or sharp-edged objects in the vehicle (e.g.
on the parcel shelf) are secured.
All persons in the vehicle have their seat belts
fastened.
The child safety seat is always secured when it is in
the vehicle, even if no child is being transported.

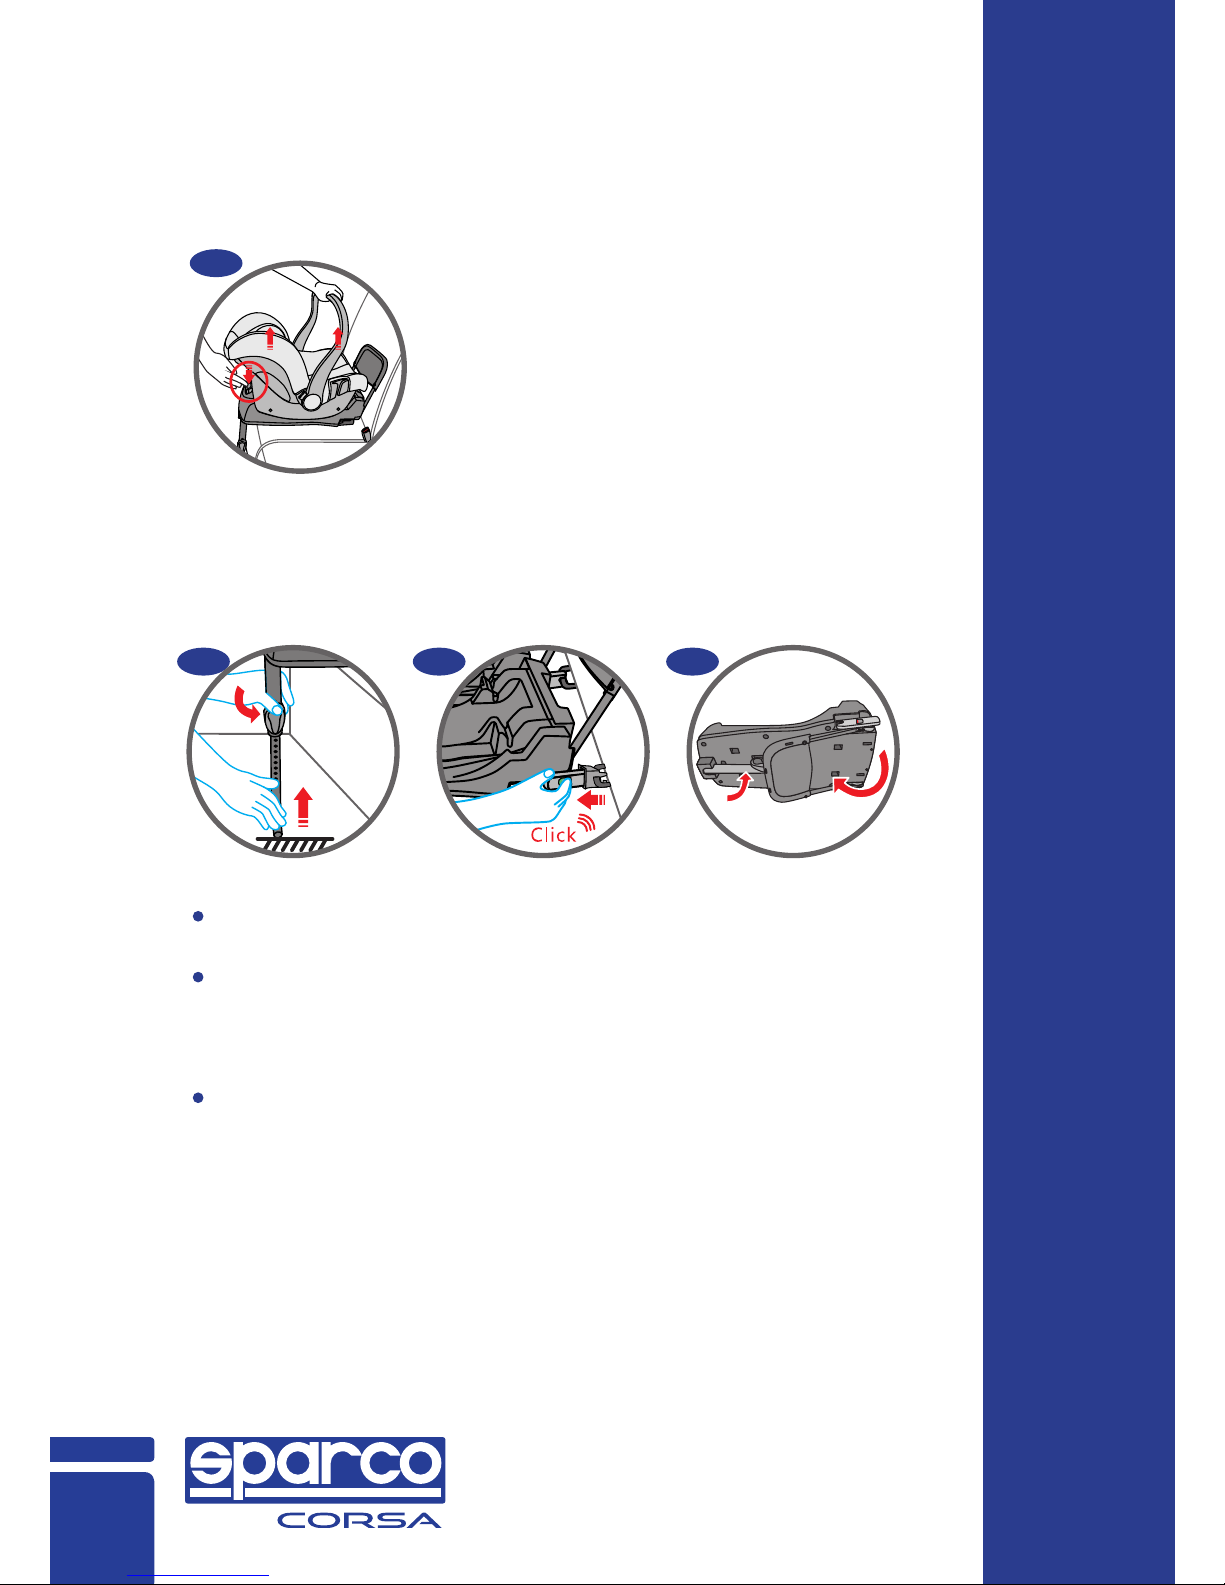
1. Fastening the infant carrier using the ISOFIX adapter GB
7
Clip the two yellow insert guides, recess facing
upwards, to the two ISOFIX fastening points. (3-D)
Tip! The ISOFIX fastening points are located between
the surface and the backrest of the vehicle seat.
Fold the shock bar and the two locking arms on the
ISOFIX base in an upwards direction. (3-E)
Fold the safety leg on the ISOFIX base in a
downwards direction. (3-F)
Take hold of the ISOFIX base with both hands. (3-G)
Push both locking arms into the yellow insert guides
until the arms engage on both sides. “CLICK!” (3-H)
Caution! Always hold on to the shock bar when carrying
the ISOFIX base, to avoid that it folds back (risk of injury).
3-D 3-E 3-F
3-H
3-G
8
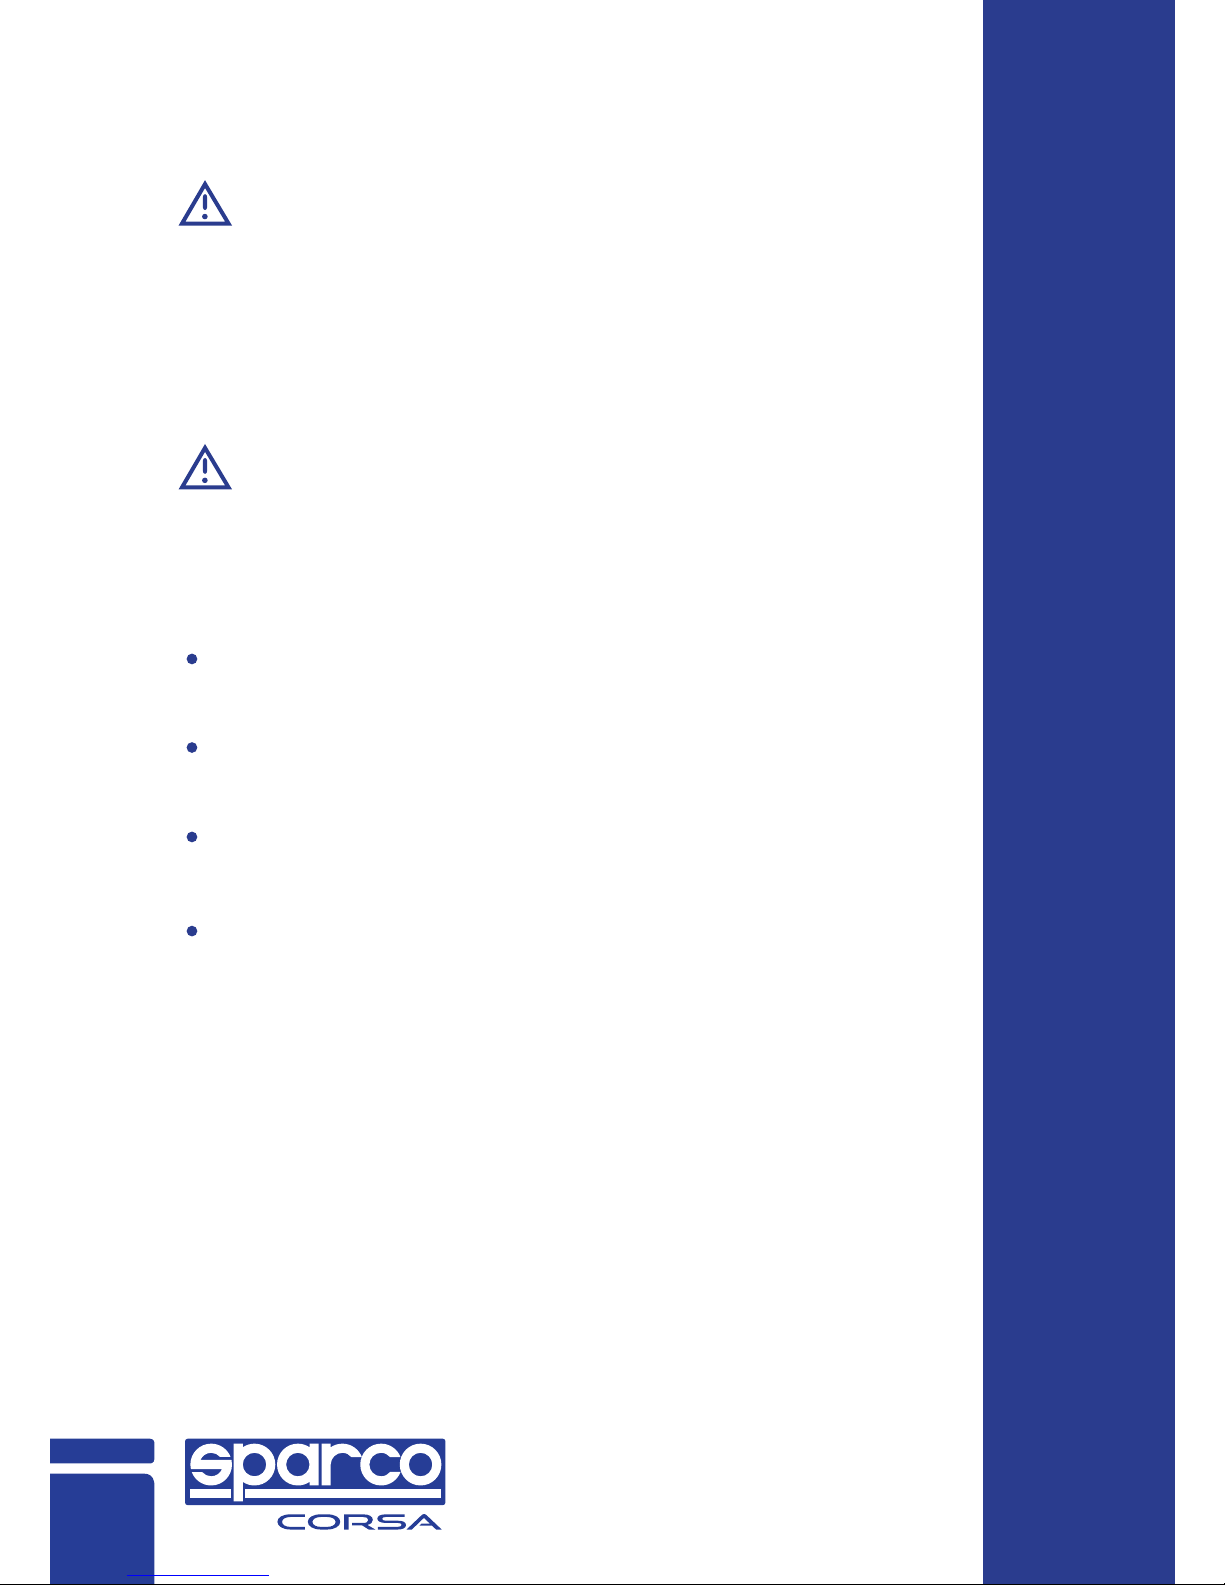
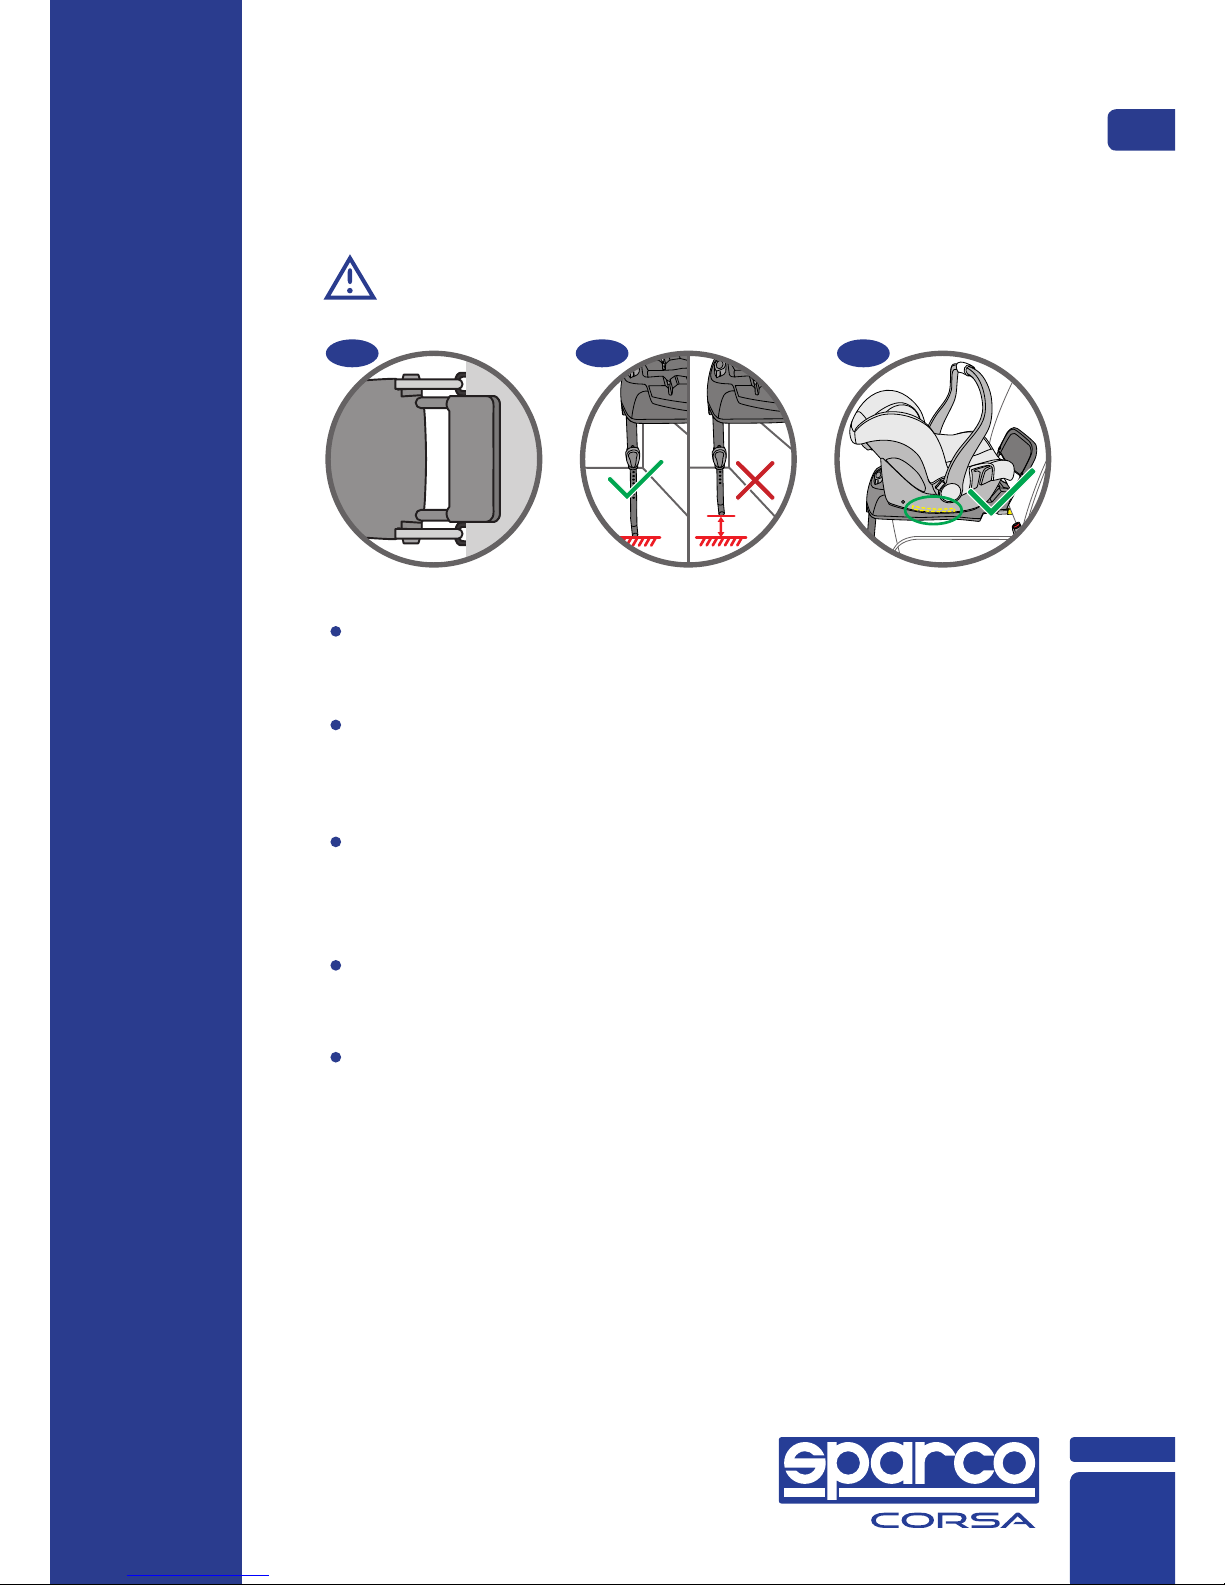
2. Adjusting the support leg
3-I 3-J 3-K
Caution! The support leg must never be suspended in
mid-air or supported by other objects. Also ensure that
the support leg does not raise the ISOFIX base from the
seat surface. (3-J/3-K)
Press the adjustment button and pull out the support
leg until it rests firmly on the floor of the vehicle. (3-I)
3-L
3-O
3-M
3-P 3-Q
3-N
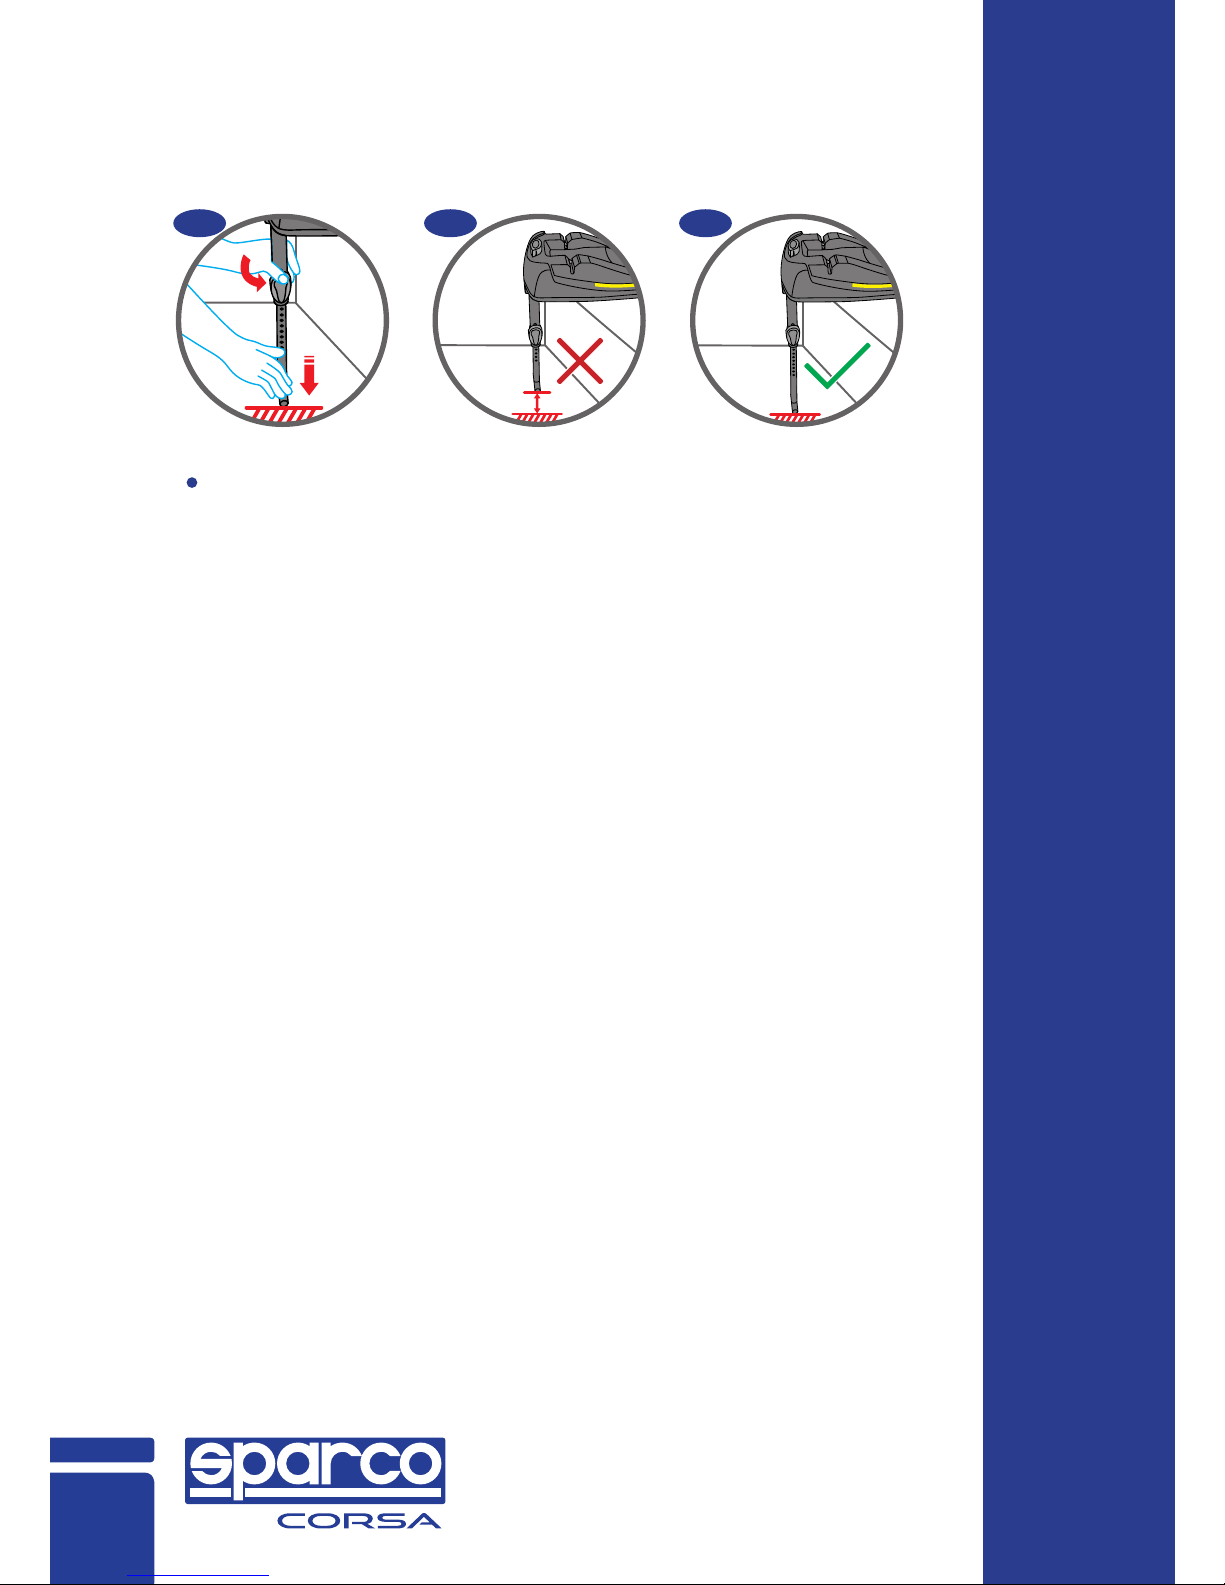
3. Locking the infant carrier GB
9
Ensure that the top surface of the ISOFIX base is free
of foreign bodies.
Ensure that the handle is in the upper position A. (3-L)
Position the infant carrier on the ISOFIX base against
the direction of travel (baby facing backwards) and
lock the infant carrier in place. "CLICK!" (3-M)
Pull on the infant carrier to check it is fully engaged.
Caution! The yellow mark must not be visible on both
side of the ISOFIX base. (3-N)
Tip! The infant carrier can be locked into position only
when the safety leg is folded out.
4-A
4-B 4-C 4-D
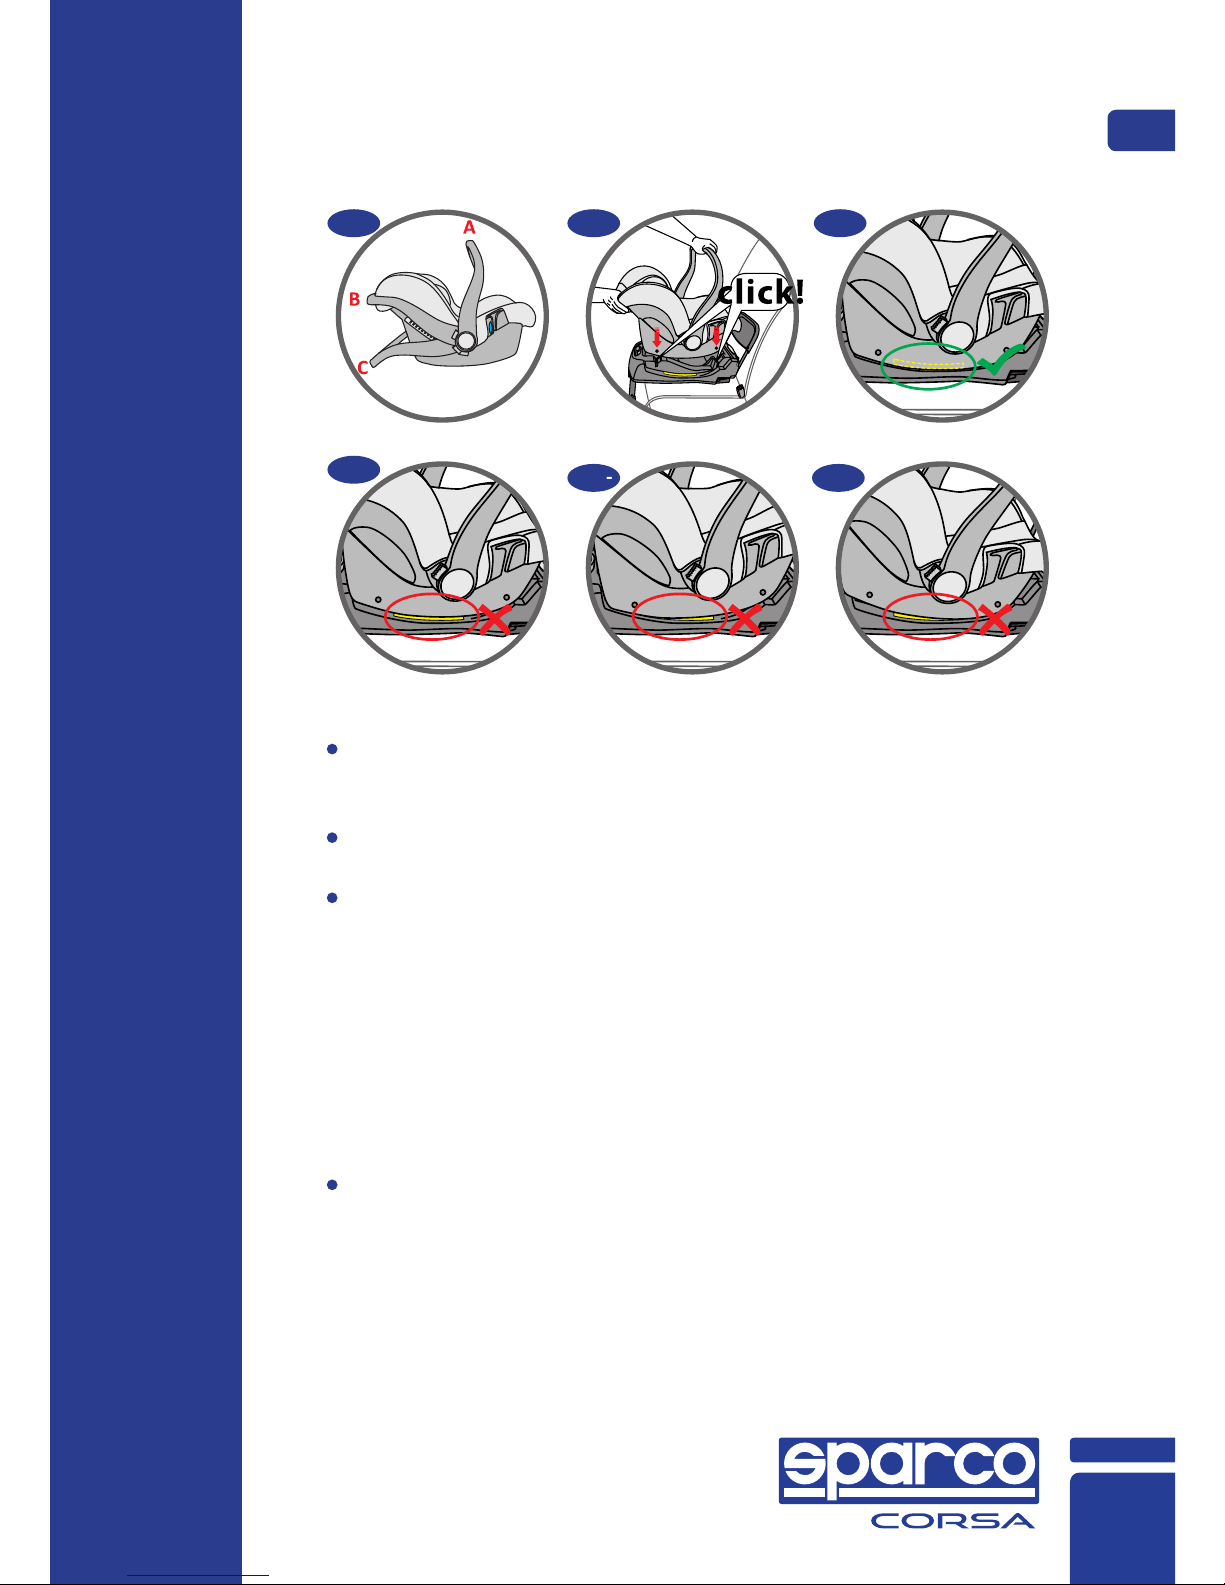
Removal
10
Press the grey release button,
lifting the infant carrier at the same
time. (4-A)
Tip! For day-to-day use, you can
leave the ISOFIX base installed in
your vehicle, and remove only the
infant carrier.
Fold back the support leg. (4-B)
Press the red safety button and push the ISOFIX
release buttons on the two locking arms towards.
The locking arms release. (4-C)
Swivel the locking arm and the shock bar
downwards. (4-D)
1. Removal the infant carrier
2. Removal the ISOFIX base
Tip! This protects the locking arms from damage.
5-A 5-B 5-C
For your baby's safety, please check that...
Fitting your infant carrier with
ISOFIX base correctly
GB
11
The ISOFIX base is engaged on both sides with the
locking arms into the ISOFIX fastening points. (5-A)
The support leg is firmly on the vehicle floor and the
ISOFIX base does not move away from the seat
surface. (5-B)
The infant carrier is locked firmly onto the ISOFIX
base and the yellow mark on the both sides of the
ISOFIX base is not visible. (5-C)
The infant carrier is fastened against the direction of
travel.
If the infant carrier is fastened on the passenger
seat, there is no front airbag that could interfere
with the infant carrier.

Care instructions
In an accident at a collision speed above 10 km/h
the child safety seat could suer damage which is
not necessarily obvious.
In such cases it is extremely important that you
replace the child seat. Please dispose of it properly.
Regularly check all important parts for damage.
Ensure the correct operation of all mechanical
components.
To prevent damage or breakage, ensure that the
child seat does not become jammed in the car door,
seat runners, etc.
Should the child seat be damaged (for example after
dropping it) it must be inspected by the manufactur-
er.
12
To retain the protective eect
1. This ISOFIX base is only compatible to our SPC3004
child seat.
2. Please read this manual to install the ISOFIX base into
the SPC3004 child seat before using it in vehicles fitted
with ISOFIX anchorages system.
3. This is an ISOFIX CHILD RESTRAINT SYSTEM; It is
approved to Regulation No.44, 04 series of amendments
for general use in vehicles fitted with ISOFIX anchorages
systems.
4. It will fit vehicles with position approved as ISOFIX
positions (as detailed in the vehicle handbook),
depending on the category of the child seat and of the
fixture.
5. The mass group and the ISOFIX size class for which
this device is intended are: Group 0+ (0-13kg) and ISOFIX
size class C.
NOTICE
GB
13
Table of contents
Other Sparco Corsa Car Seat manuals


