Spark Sparrow Ascent User manual

Quick Start Guide

Table of Contents
Introducing the Sparrow Ascent. . . . . . . . . . . . . . . . . . . . . . . . . . . . . . .1
Get Started With Sparrow Ascent . . . . . . . . . . . . . . . . . . . . . . . . . . . . . . 2
Apply the Earpiece . . . . . . . . . . . . . . . . . . . . . . . . . . . . . . . . . . . 2
Connect the Cable. . . . . . . . . . . . . . . . . . . . . . . . . . . . . . . . . . . .4
Turn ON the Patient Controller . . . . . . . . . . . . . . . . . . . . . . . . . . . . . 6
Toggle ON/OFF and Adjust Stimulation . . . . . . . . . . . . . . . . . . . . . . . . .6
Turn OFF the Patient Controller . . . . . . . . . . . . . . . . . . . . . . . . . . . . . . . . 7
Menu Options . . . . . . . . . . . . . . . . . . . . . . . . . . . . . . . . . . . . . . . . 8
Patient Controller Screens . . . . . . . . . . . . . . . . . . . . . . . . . . . . . . . 8
Stimulation Tips . . . . . . . . . . . . . . . . . . . . . . . . . . . . . . . . . . . . . . . 9
Notications . . . . . . . . . . . . . . . . . . . . . . . . . . . . . . . . . . . . . . . .10
Troubleshooting . . . . . . . . . . . . . . . . . . . . . . . . . . . . . . . . . . . . . . 12
Indication for Use
Sparrow Ascent is a transcutaneous nerve eld stimulator that is intended to be used in patients experiencing opioid
withdrawal in conjunction with standard symptomatic medications and other therapies for opioid withdrawal symptoms
under the supervision of trained clinical personnel.
Introducing Sparrow®Ascent
Overcoming opioid withdrawal doesn’t have to be painful. Sparrow
Ascent provides safe, comfortable, drug-free treatment for opioid
withdrawal symptoms.
Sparrow Ascent is designed to provide mild stimulation to the nerves on and around the ear to
help reduce opioid withdrawal symptoms. You can safely use the discreetly wearable device
at home, at work, or as you go about most daily activities. However, you should always use
Sparrow Ascent as prescribed by your physician.
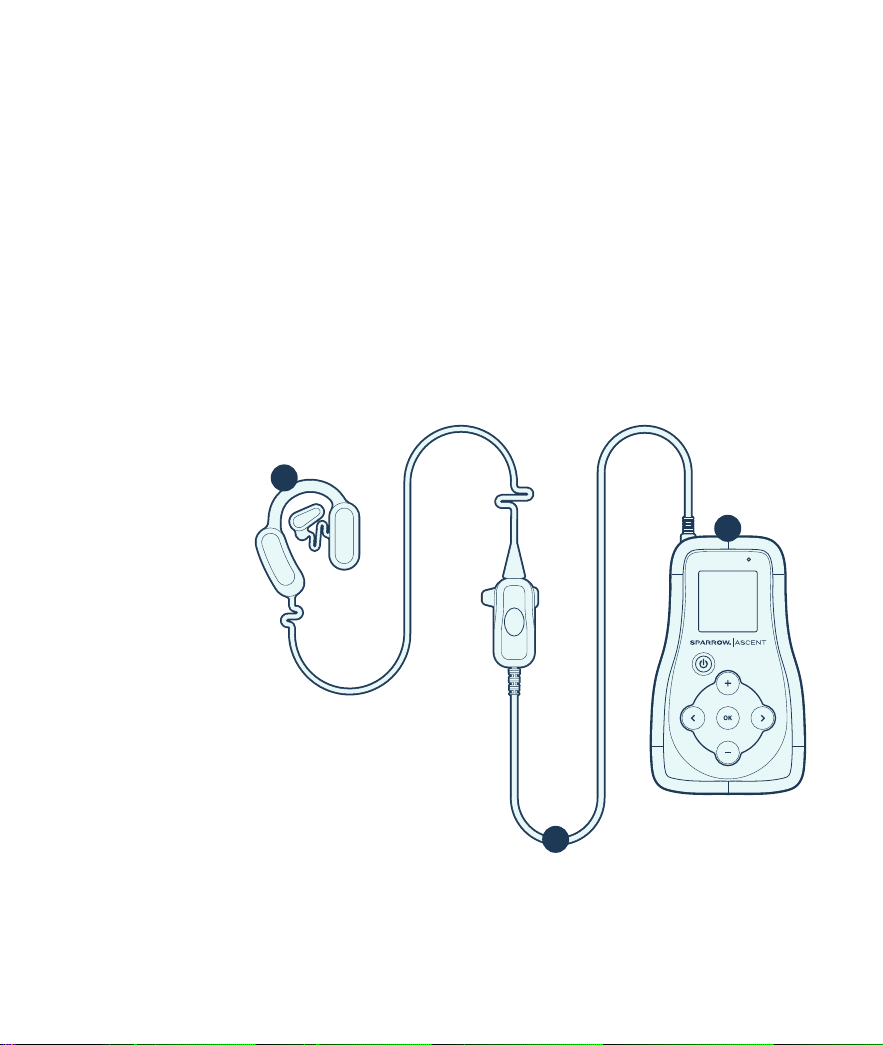
Parts Included
1. Earpiece
2. Cable
3. Patient Controller
4. AAA Batteries
5. Alcohol Wipes
6. Belt Clip
1
1
2
3
Get Started With Sparrow Ascent
1) Apply the Earpiece
1.1 Apply the Earpiece while in front of a mirror when applying to yourself. Be sure all hair
is pulled back, and the areas in and around where the Earpiece will be placed are clear
of hair or jewelry. This may require trimming or shaving hair in small areas in front of
or behind the ear. Gently clean in and around the ear with one of the provided alcohol
wipes. Allow the ear to dry before proceeding to the next step.
1.2 Open an Earpiece pouch. Then, open the Earpiece tray and gently remove the Earpiece.
Next, place the Earpiece over the ear so the Outer Electrode is in front of the ear. To
place the electrodes, start with either the Outer Electrode or the Inner Electrode as
shown in Figure 1.2.
Back
Electrode
Inner
Electrode
Outer
Electrode
Figure 1.2
Tip: Check your
Earpiece label
to determine
whether the
Earpiece is
intended for the
Left or Right ear.
2

NO
NO
NO
NO
NO
NO
NO
NO
NO
NO
Figure 1.4
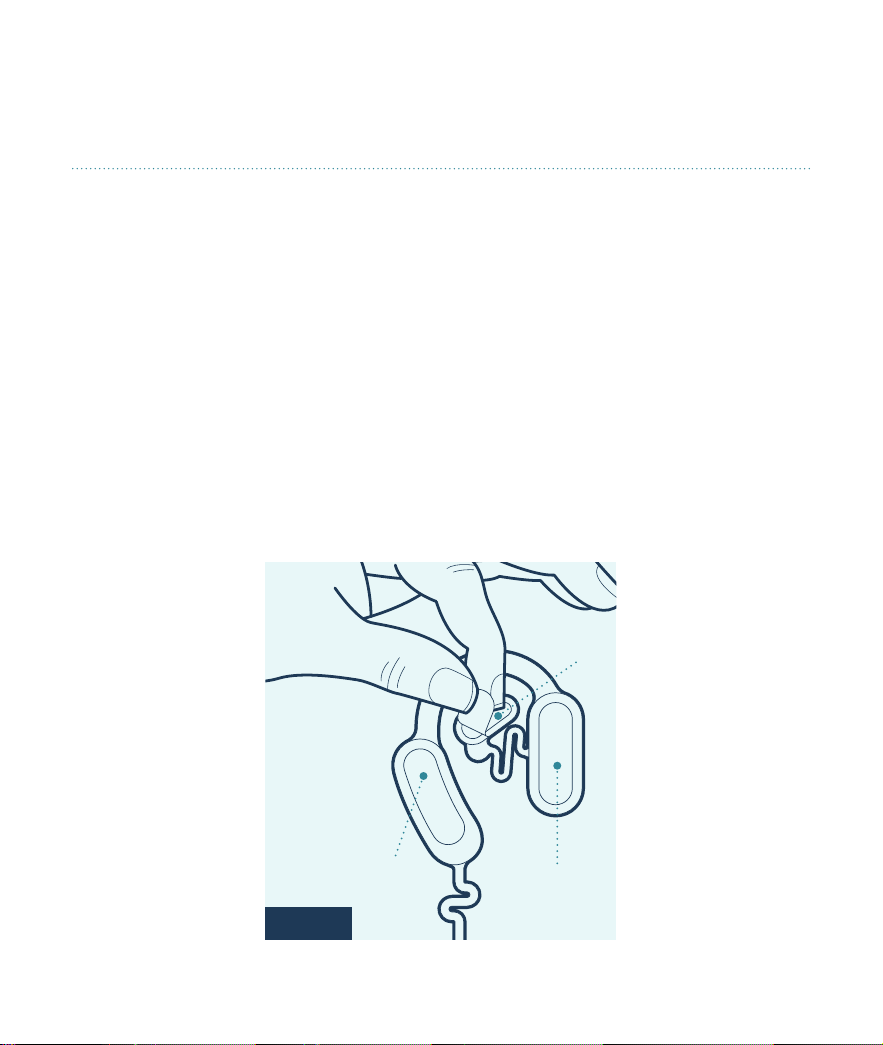
Remove the adhesive liner from the Electrodes one at a time as you place each Electrode.
To insert the Inner Electrode, place your index nger on the nonsticky part of the Inner
Electrode and gently guide it into the hollow area just above the ear canal, as shown in
Figure 1.3. Once in place, press down and hold for three to ve seconds to secure it.
1.3 Remove the adhesive liner from the Outer Electrode and press to apply, as shown in
Figure 1.3. Press rmly and hold to ensure the entire Outer Electrode adheres to the
skin. Repeat with the Back Electrode.
1.4 Do NOT place any electrodes in the orange areas shown in Figure 1.4. All liners should
be peeled away from the Earpiece, and the electrodes should be fully adhered to the skin
before beginning stimulation.
No
Electrodes
Here
Outer
Electrode
Inner
Electrode
Back
Electrode
Figure 1.3
Tip: To avoid irritation, do not let the
arch of the Earpiece remain rested
on the ear for the nal Earpiece
placement.
3

Cable Button
(Press here)
Cable
Connector
2) Connect the Cable
2.1 Locate the Cable and nd the end with the white box and grey Cable Button. This is the
Cable Connector. Press down fully on the Cable Button and insert the Earpiece end
(Figure 2.1) into the Cable Connector slot until the Earpiece end is ush against the
white box (Figures 2.1a and 2.1b), then release the Button. The Earpiece end can be
inserted either direction.
Tip: The Earpiece end should easily insert into the Connector slot. If there is resistance,
increase pressure to the Cable Button and try again.
2.2 Next, clip the Cable Connector to your shirt near or at the neckline. Then, insert the
Cable Jack into the Patient Controller, as shown in Figure 2.2.
NO YES
Figure 2.1 Figure 2.1a Figure 2.1b
4
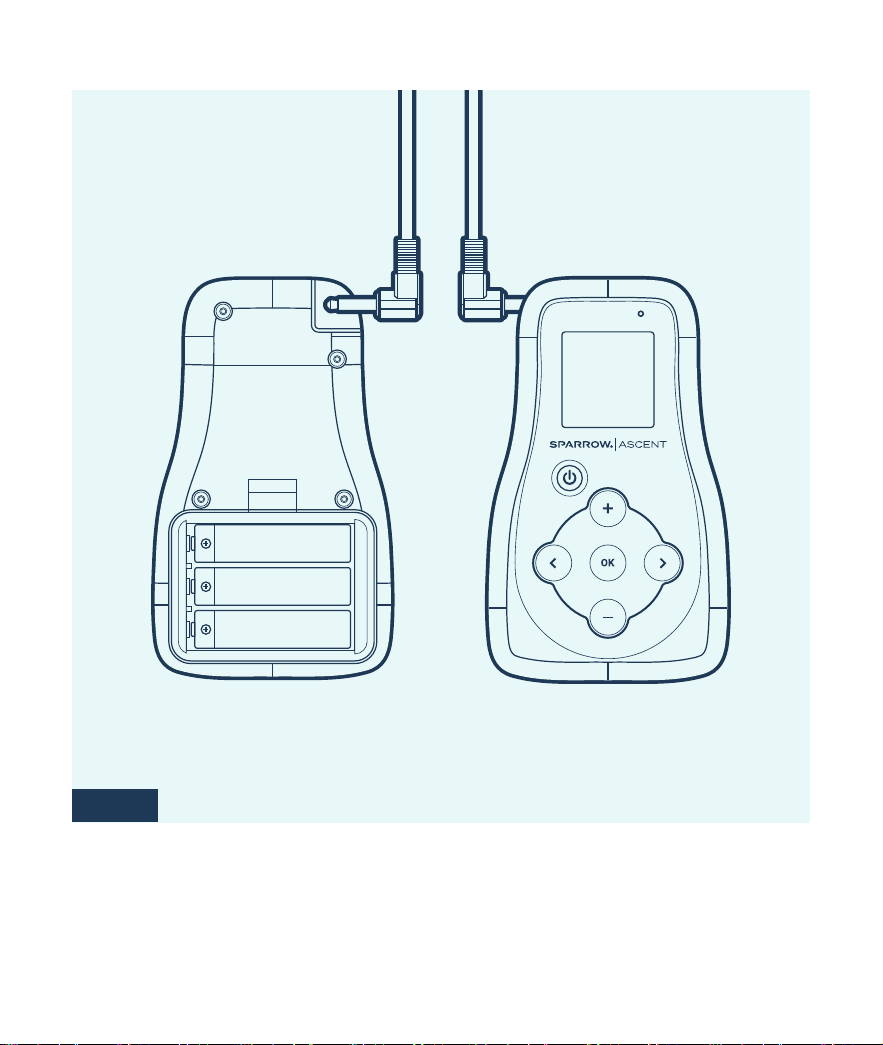
AAA
AAA
AAA
Figure 2.2
Back Front
5

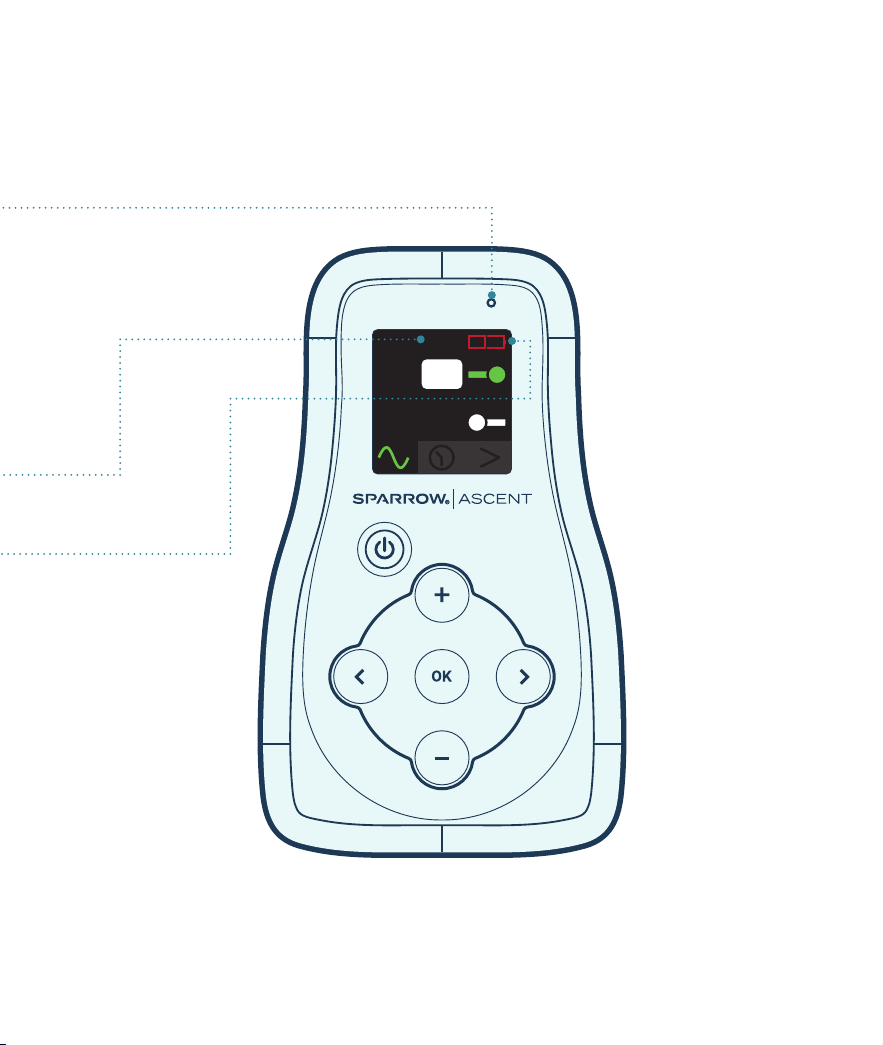
3) Turn ON the Patient Controller
3.1 Press and hold the Power Button located on the front of the controller, just below the
word “Sparrow,” for one to three seconds. You’ve successfully turned the device ON
when the Spark logo appears on screen.
4) Toggle ON/OFF and Adjust Simulation
4.1 Press either arrow to move the cursor on the screen until you highlight the toggle bar
for the Inner or Outer Electrodes. The Inner Electrode is the small electrode placed in
the hollow of your ear just above your ear canal. The Outer Electrode is the electrode in
front of your ear.
4.2 Press OK to activate stimulation. Stimulation is ON when the toggle bar is green. Grey
toggle bar(s) indicate stimulation is OFF for the designated Electrode(s).
4.3 Next, use either arrow to move the cursor and highlight the stimulation strength (0–50).
Press OK to enable stimulation strength adjustments. NOTE: The stimulation strength
will ash when adjustments are enabled.
Press the + or - buttons to increase (+) or decrease (-) the stimulation strength from
0 to 50 , you should be feeling a comfortable tingling sensation. If stimulation is
uncomfortable, reduce stimulation strength. Press OK to save your settings.
6

NOTE: Quickly tap the Power Button to wake the device then click OK to unlock the Patient
Controller. The controller interface will dim after 15 seconds and lock after 30 seconds of
inactivity, but stimulation will continue. You can also lock the device by quickly tapping the
Power Button.
Inner
Outer 10
10
Stimulation
Strength
Toggle Bar
Power
Button
5) Turn OFF The Patient Controller
Press and hold the Power Button for two to four seconds. When prompted, select OK to turn
the device OFF.
7

Menu Options
The Patient Controller has a menu bar located at the bottom of the screen. Use the arrow
buttons to highlight an icon in the menu bar. Select the highlighted icon by pressing the OK
button on the Patient Controller. There are four screens to select:
Stimulation status
Therapy timer
Bluetooth connectivity
* For manufacturer use only
Device Information
Patient Controller Screens
Stimulation
Status Therapy Timer
*Bluetooth
Connectivity
Device
Information
Inner 10
Outer 10
01:15
Clear
01:15
Pause
Connected
Disconnect?
SN Xyyww0001
FW v2.0
YYMMDD
Inner 10
Outer 10
Menu Bar
8
Stimulation Tips
Turn stimulation ON or OFF by using the toggle bars for the Inner and Outer Electrode(s).
Stimulation may be felt in the Inner ear, at the Outer ear, and behind the ear at the Back
Electrode. When therapy is toggled ON, stimulation will slowly increase to the preset
stimulation strength (0–50). When therapy is toggled OFF, stimulation will quickly decrease
over three seconds. Lower the stimulation strength if stimulation is uncomfortable. If you
notice any muscle spasms in your face or neck, you may need to slightly reposition the
Earpiece (Figure 1.3).
When stimulation is active, it will cycle ON and OFF automatically — ON for ve minutes and
OFF for 10 seconds. It is normal to feel it increase and decrease in strength throughout therapy.
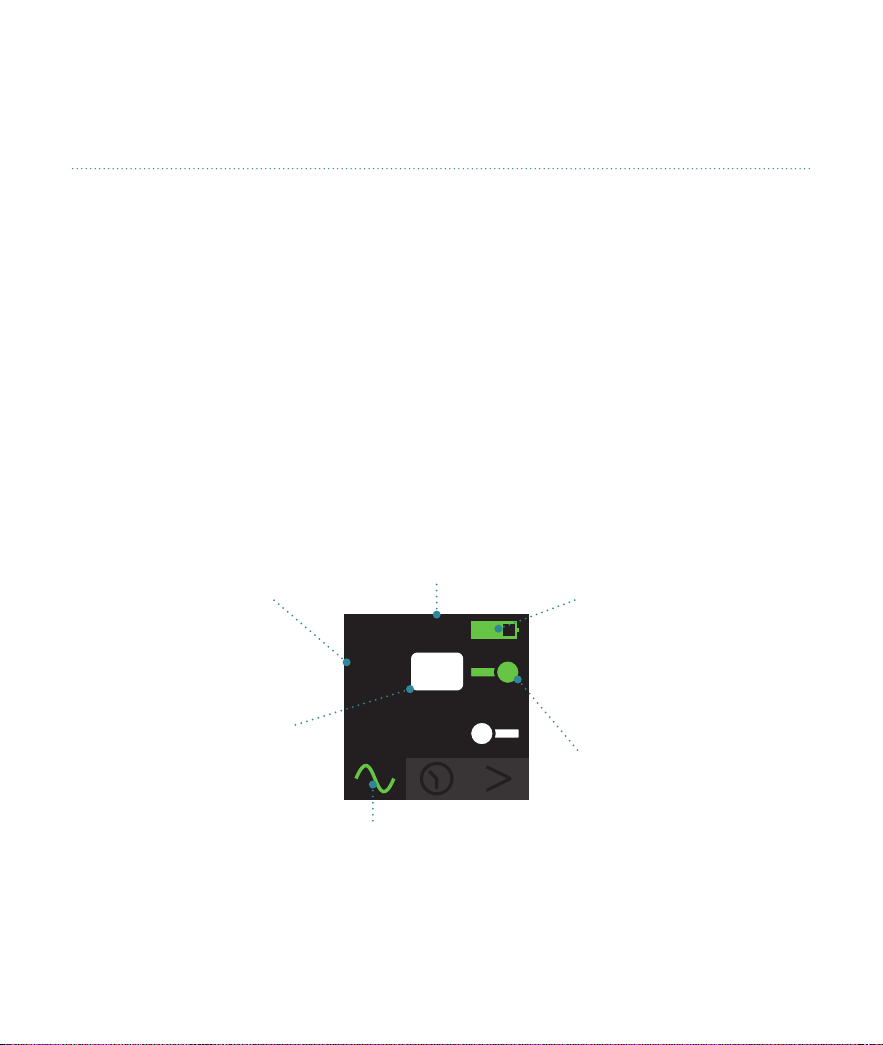
Green indicates
stimulation is ON.
Error Notication
See Troubleshooting to resolve.
Battery Life is always
displayed.
Toggle Bar
Highlight the toggle
bar with the cursor
and press OK to turn
stimulation ON or
OFF.
Stimulation Strength
Highlight the strength
and press OK to enable
adjustments. Press
(+) or (-) to adjust
stimulation strength.
Press OK again to save
the setting for that
electrode.
Stimulation Icon
The stimulation icon will turn
green when stimulation is active.
Inner
ERR
Outer 10
10
9

Notications
Top Light – The top LED will ash periodically to indicate stimulation status while the Patient
Controller is locked.
• Green Light — A green ashing light means stimulation is active, and no errors
are detected.
• Red Light — A red ashing light indicates an error. Unlock the Patient Controller by
tapping the power button to wake the device then press OK. You should then see an
error notication on screen. See the troubleshooting section to resolve the error.
ERR – A minor system error is detected. See the Troubleshooting section on pages 12–13
for help resolving error notications.
Low Battery Icon – Power OFF the Patient Controller and replace the batteries with three
new AAA batteries. Power ON the Patient Controller and resume therapy. Expected battery
life is 2–3 days, depending on use.
10
Inner
ERR
Outer 10
10
11

Troubleshooting
What does “ERR” at the top of the screen mean?
A low battery, mild impedance error, or slight system disconnection is detected. Check battery
level and ensure all three electrodes on the Earpiece are making full contact with the skin.
While troubleshooting, stimulation must complete ramping before the ERR alert will clear.
Loose Earpiece. Check connection at ear and cable.
Gently press each Electrode to the skin to improve adherence. If doing
so does not x the error, disconnect the Earpiece from the Cable, then reinsert. Resume
therapy and allow stimulation to complete ramping.
The Cable or Earpiece is disconnected.
Check the Cable Jack connection at the Patient Controller end. Ensure the Earpiece end is
inserted fully into the Cable Connector and that each Electrode is adhered to the skin. If doing
so does not x the error, disconnect the Earpiece from the Cable, then reinsert. Stimulation
will be turned OFF automatically when the Cable or Earpiece is disconnected. Resume
therapy and allow stimulation to complete ramping. Re-insert the Earpiece end into the Cable
connector if the Alert reappears after turning stimulation back ON.
12

Skin irritation around the ear.
The Sparrow Earpiece is latex free; however, if you experience any skin irritation from
use, please discontinue use of the Earpiece until skin irritation has resolved. Apply a
dermatologist-recommended ointment for sensitive skin, such as Aquaphor healing
ointment. Medicated ointments are not recommended. If irritation does not improve within 24
hours, contact your physician.
Cleaning and Removal
Earpieces are daily disposable. Earpieces are not intended to be cleaned or reused. You should
change the Earpiece every 24 hours, or sooner if needed. Applying a warm compress for 30
seconds loosens Earpiece adhesive, making removal easier. Always unplug the Earpiece from
the Cable before using the warm compress. To clean the Patient Controller or Cable, wipe the
outer case with a clean, damp cloth and then dry with a clean cloth or paper towel.
For more detailed instructions, see training videos and Instructions for
Use at SparrowRx.com/Resources
If additional support is needed, contact Spark Biomedical Customer
Success 24/7 at (844) 654-SPRK (7775).
13

LBL-040 Rev 2
Spark Biomedical, Inc.
18208 Preston Road, Suite D9-531, Dallas, TX 75252, USA
www.sparkbiomedical.com | (844) 654-SPRK (7775)
Copyright 2023 Spark Biomedical, Inc., All rights reserved.
Scan for Sparrow Ascent
Tools and Resources
Other manuals for Sparrow Ascent
1
Table of contents
Other Spark Medical Equipment manuals


Popular Medical Equipment manuals by other brands

Fukuda Denshi
Fukuda Denshi MGU-810 Series Operation manual

Halyard
Halyard INDISCAL Instructions for use

Spencer
Spencer SHERPA Instructions for use

Integra
Integra CUSA Clarity Cleaning Instruction Guide

illumina
illumina NextSeq 550Dx Instrument Safety and Compliance Guide

Henry Schein
Henry Schein 900-6368 Operator's manual


Welch Allyn
Welch Allyn 88000A Service manual

Arjo
Arjo Typhoon Instructions for use

IACER
IACER I-TECH MAG2000 PLUS user manual

Bridge Network
Bridge Network SmartCam Instructions for installing and using

MedGuard
MedGuard SUPER VEGA User instruction manual

Sunrise Medical
Sunrise Medical Jay Care Back 3500 Series User instruction manual & warranty