Spark Sparrow Ascent User manual

Sparrow®Ascent
Clinician Checklist
Scan the QR code to access training videos, FAQs, and
more at sparkbiomedical.com/sparrow-ascent/resources.

Getting Started
❑1. What you’ll need:
❑a. 1 Patient Controller (with 3 AAA batteries installed)
❑b. 1 Cable
❑c. 1 Earpiece
Check the pouch label to determine if the Earpiece is for the LEFT or RIGHT ear
Most Earpieces are for the LEFT ear.
❑d. 1 Alcohol Wipe
❑e. Quick Start Guide for the Patient
❑2. Insert the Cable into the Patient Controller and attach the retention clip:
❑a. Plug the Cable Jack end into the Patient Controller as shown:
❑b. Use the retention clip to attach the Cable Connector to the patient’s shirt collar.
Attach at the same side that the Earpiece will be placed on.
AAA
AAA
AAA
SPARROW ASCENT CLINICIAN CHECKLIST 1

Applying the Earpiece
❑1. Open one Earpiece pouch and gently remove the Earpiece from the tray. Inspect the
Earpiece for any defects. Adhesive liners should fully cover all three electrodes. DO NOT
REMOVE THE ADHESIVE LINERS at this time.
❑2. Pull back any hair that may interfere with the Electrodes from making contact with the
skin around the ear.
❑a. Remove all jewelry from the ear.
❑3. Using one alcohol wipe, thoroughly clean in and around the ear where the Earpiece will
make contact. Allow the alcohol to dry fully before continuing to the next step.
❑4. With the adhesive liners still attached, place the Earpiece over the ear to map out where
youwillplaceeachelectrode,asshowninthegures.
❑ 5. Remove the adhesive liner from the Electrodes one at a time as you place each
Electrode.ToinserttheInnerElectrode,placeyourindexngeronthenon-stickytabat
the bottom of the Inner Electrode and gently guide it into the hollow area just above
theearcanal,asshowninFigure1.3.Onceinplace,pressdownandholdforthreetove
seconds to secure it.
NO
NO
NO
NO
NO
NO
NO
NO
NO
NO
No
Electrodes
Here
Outer
Electrode
Inner
Electrode
Back
Electrode
Tip: To avoid irritation, do not let
the arch of the Earpiece remain
restedontheearforthenal
Earpiece placement.
SPARROW ASCENT CLINICIAN CHECKLIST 2
❑6. Continue to remove the adhesive liners one at a time as you place each Electrode.
RemovethelinerfromtheOuterElectrodeandpresstoapply.Pressrmlyandhold
to ensure the Outer Electrode adheres to the skin.
❑a. Repeat for the Back Electrode.
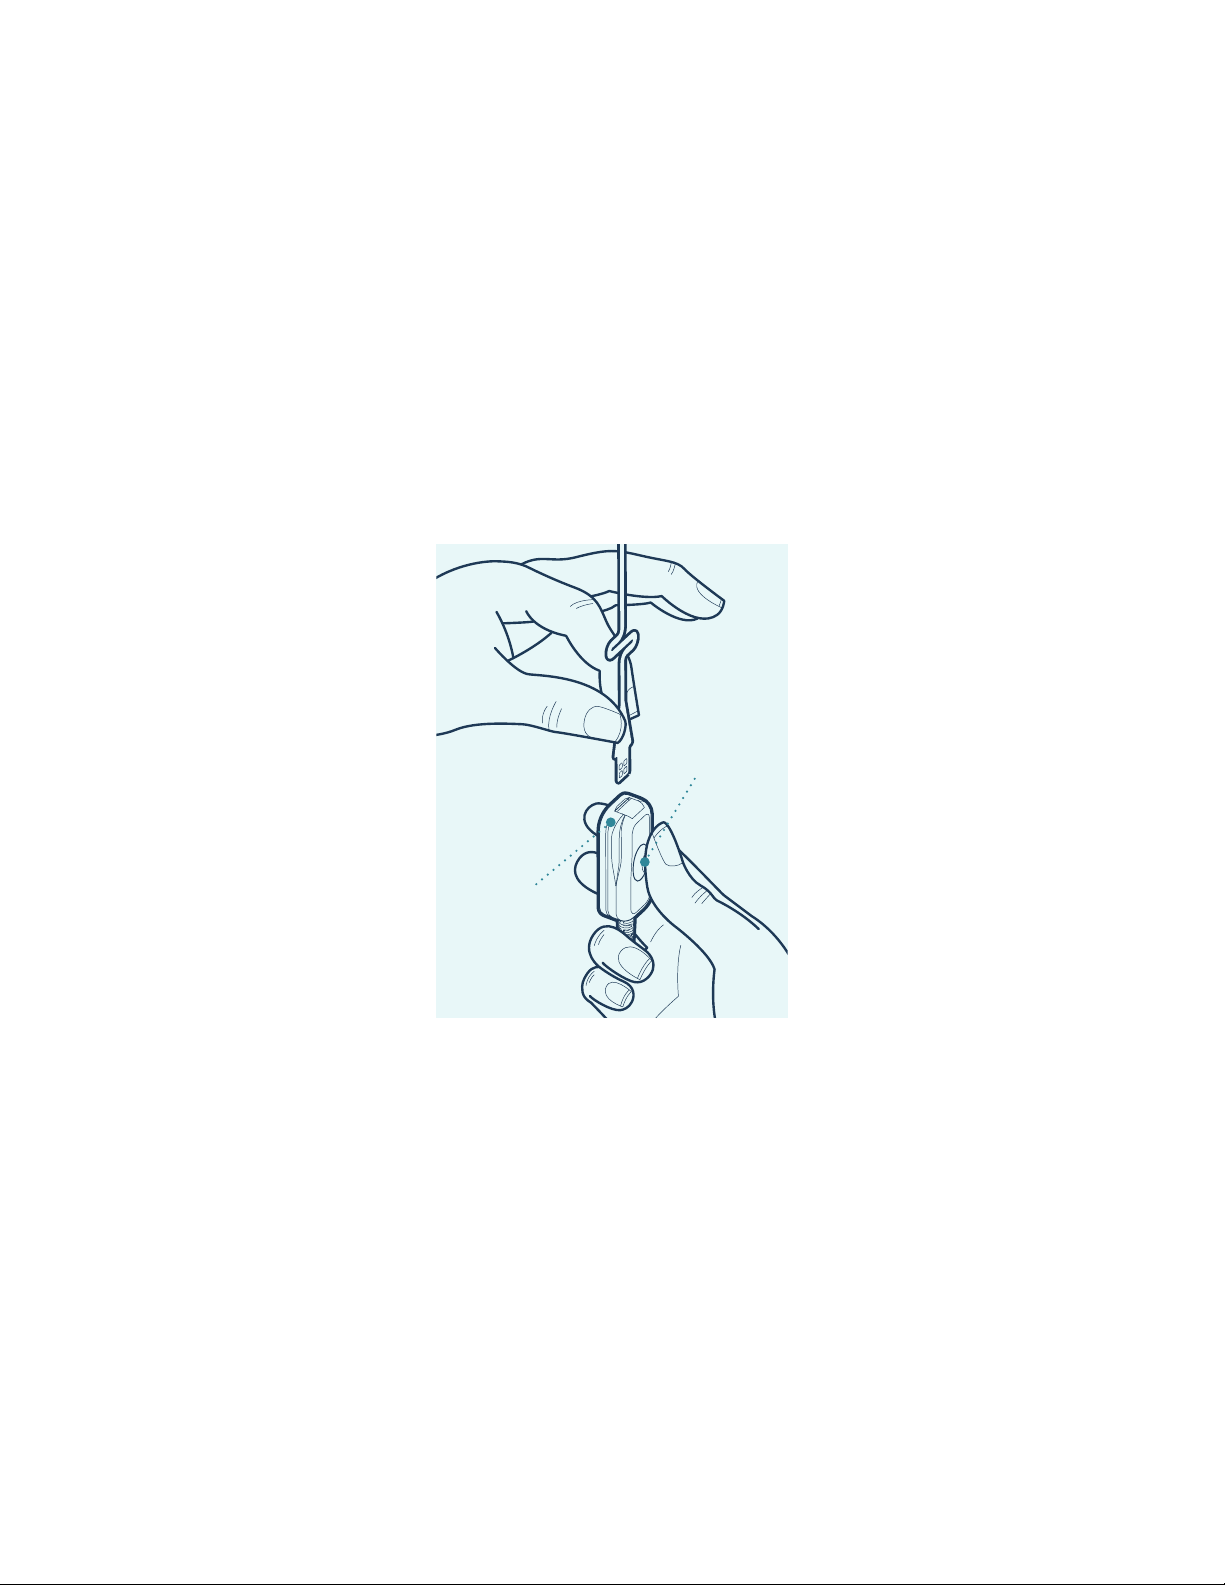
Connect the Cable
❑1.LocatetheCableandndtheendwiththewhiteboxandgreyCableButton.Thisisthe
Cable Connector.
❑2.PressrmlydownonthegreyCableButtonandfullyinserttheEarpieceendintothe
Cable Connector. Note: the Earpiece end can insert in either direction.
Cable Button
(Press here)
Cable
Connector
SPARROW ASCENT CLINICIAN CHECKLIST 3

❑3. Ensure the Earpiece end is inserted correctly.
Starting Stimulation
❑1. Turn on the Patient Controller by pressing and holding the power button until the
screen lights up.
If stimulation strength was not previously set, both channels are off and defaulted to zero.
Inner
Outer 0
0
NO YES
SPARROW ASCENT CLINICIAN CHECKLIST 4

❑2. Press the right arrow on the Patient Controller to move the cursor over to the toggle bar
for the Outer channel. Press the OK button to turn the Outer channel on.
Now that the Outer channel is ON, the patient will feel the stimulation as you increase
the Outer channel strength in the next step.
❑3. To increase the Outer channel strength, press the left arrow on the Patient Controller
to cursor back to the Outer channel strength and press the OK button to enable strength
adjustments.Strengthadjustmentsareonlyallowedwhenthecursorisashing.
Inner
Outer 0
0
Inner
Outer
0
0
SPARROW ASCENT CLINICIAN CHECKLIST 5
❑4. While adjustments are enabled, slowly press the + button to increase the
strength from 0. Increase until stimulation is noticeable yet comfortable. Press the –
button if the stimulation strength is uncomfortable.
❑a.PressOKtosavethesetting.Thecursorwillstopashingoncethestrength
setting is saved.
❑5. Repeat steps 2-4 for the Inner channel. Toggle the Inner channel ON, then slowly
increase the strength from 0 to a noticeable yet comfortable strength. Press OK to save
the setting.
*The strength settings shown are examples only; settings will vary per person.
Note: The Patient Controller screen will lock after 30 seconds of inactivity, but stimulation will
continue. Quickly tap the power button to wake the device and press OK to unlock.
Inner
Outer 14
10
Inner
Outer
0
14
SPARROW ASCENT CLINICIAN CHECKLIST 6
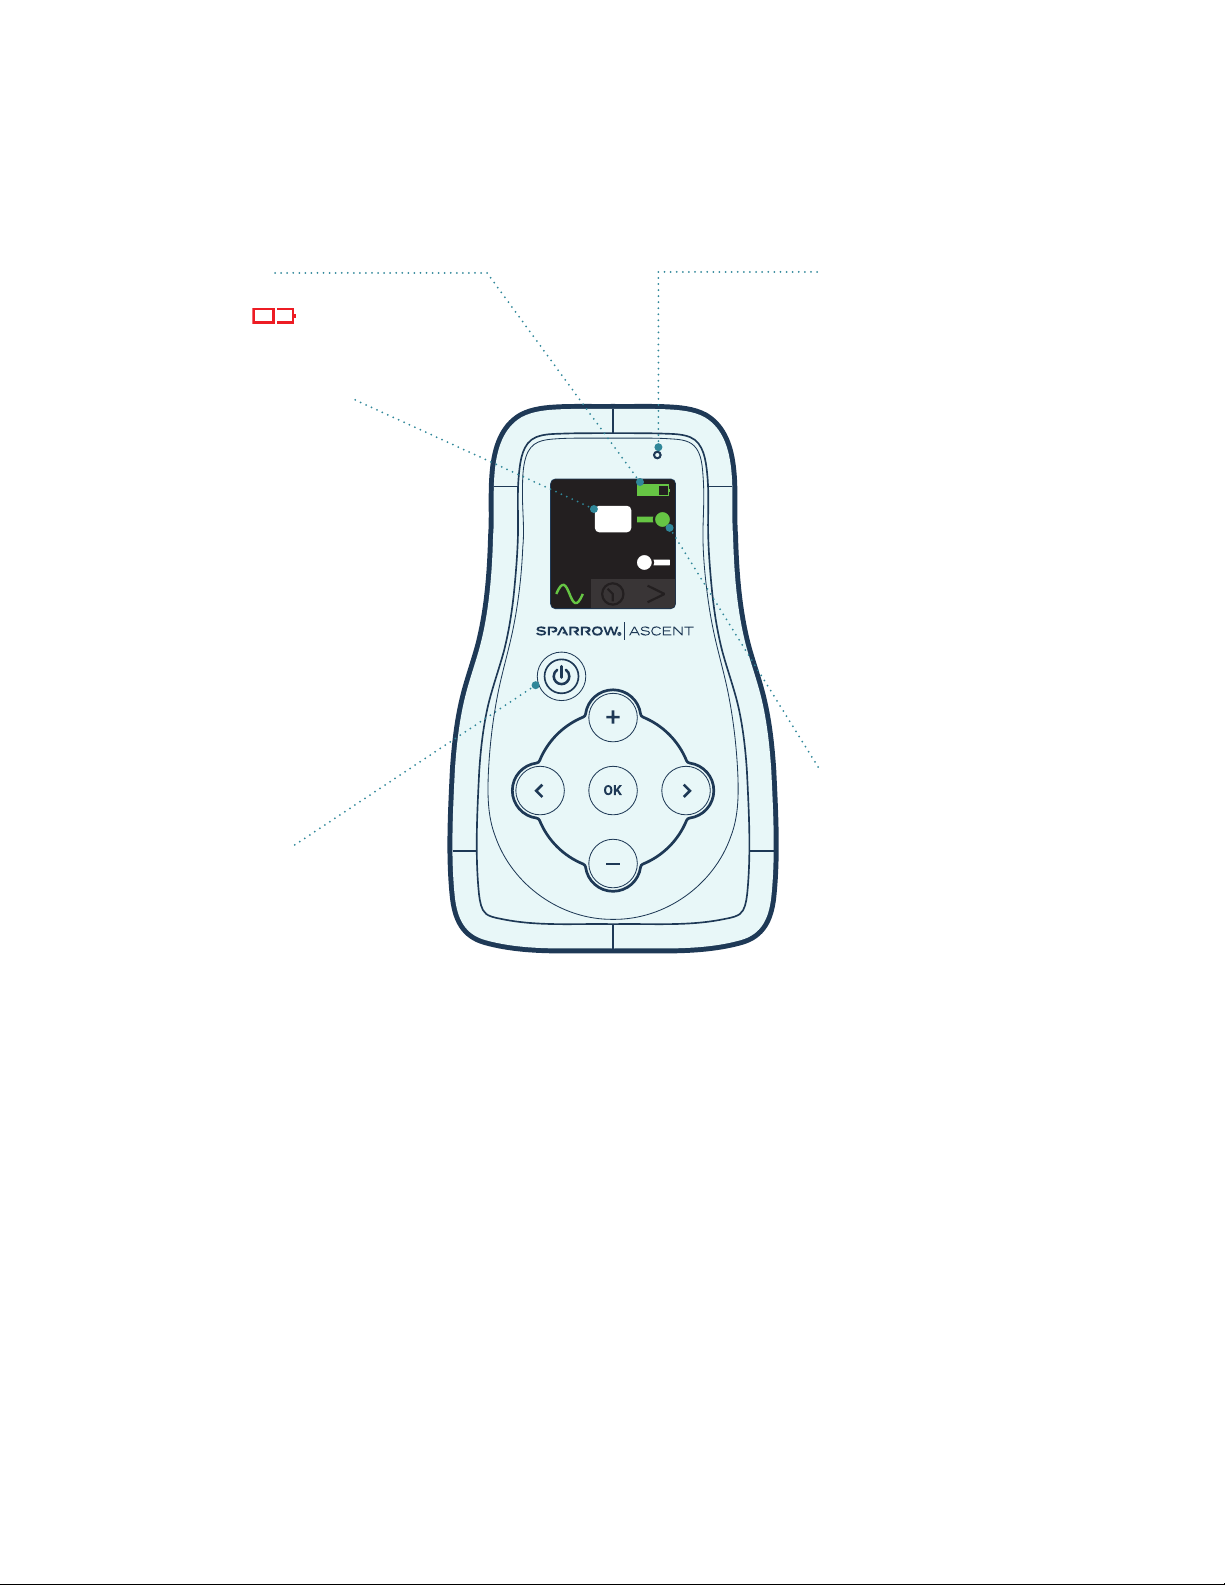
Patient Controller Guide
Inner
ERR
Outer 10
10
BATTERY LIFE
Change batteries when the battery
icon turns red.
ADJUST STIMULATION
Enable Adjustments – First, use
the directional buttons to highlight
stimulation strength (0-50) for
the Inner or Outer Electrode.
Press OK to enable adjustments.
Thestrengthwillashwhen
adjustments are enabled.
Increase / Decrease Stimulation
– Next, press the + and - buttons
to adjust the strength from 0-50.
Press OK to save your settings and
disable adjustments.
Stimulation Icon – Turns green
when stimulation is ON.
POWER BUTTON
Turn ON – Press and hold the
power button until the Spark Logo
appears on screen.
Turn OFF – Press and hold the
power button. When prompted,
select OK to turn the device OFF.
Wake / Unlock – Click the power
button to wake the Patient
Controller. Then press OK to
unlock.
Return to Sleep Mode – Click the
power button.
NOTIFICATIONS
ERR – A minor system error
is detected. Check the Cable
connectionandpressrmly
against the Earpiece at the
Electrodes to ensure full contact
with the ear. See Troubleshooting
section to resolve.
Top Light – The top LED will
periodicallyashtoindicate
stimulation status.
• Green: Stimulation is ON.
• Red: System error. Unlock
Patient Controller to view alert.
See Troubleshooting section to
resolve.
TURN ON / OFF
STIMULATION
Toggle Stim ON / OFF – Use the
directional buttons to highlight
atogglebar.PressOKtoipthe
toggle switch. Green toggle bar(s)
indicate stimulation is ON for
that Electrode. Grey toggle bar(s)
indicate stimulation is OFF for that
Electrode.
Ramping Stimulation – When
stimulation is toggled ON,
stimulation will slowly ramp
to the pre-set strength (0-50).
When stimulation is toggled OFF,
stimulation will ramp down in 3
seconds.
SPARROW ASCENT CLINICIAN CHECKLIST 7
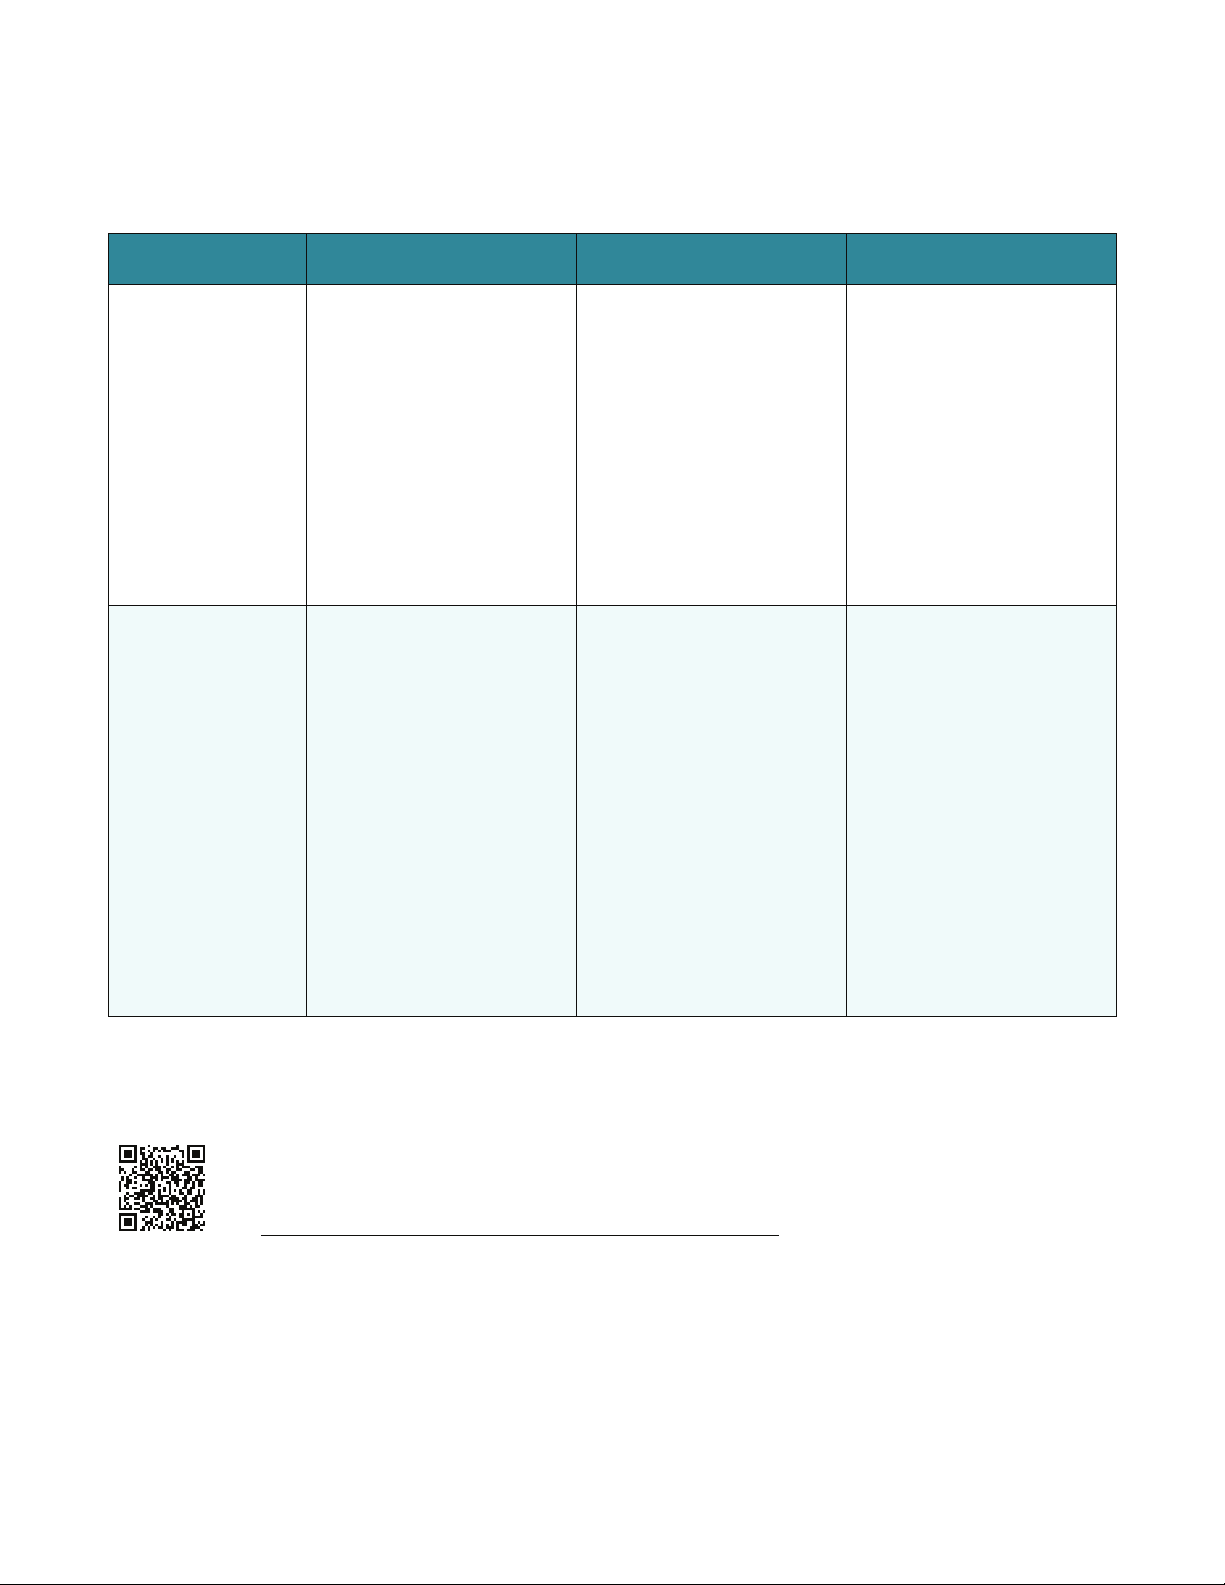
Troubleshooting
Problem Cause Solution Comments
Alert Message
Loose Earpiece.
Check connection
at ear and cable.
The Earpiece may not be
making a connection with
the skin, or the Earpiece
hydrogels are worn out.
The stimulation strength
of the loose electrode
will automatically
decrease. Gently press
the Earpiece to the skin
to improve adherence
at the Electrodes. Once
resolved, you may
increase the stimulation
to the previous strength.
Ifthisdoesnotxthe
problem,oronlyxesthe
problem temporarily, you
may need to change the
Earpiece.
Alert Message
"The Cable or
Earpiece is
disconnected."
The system has lost
connection with the
Earpiece or Patient
Controller.
Check the Cable Jack
connection at the Patient
Controller end. Ensure
the Earpiece end is
inserted fully into the
Cable Connector and that
each Electrode adheres
to the skin. Re-insert
the Earpiece end into
the Cable Connector if
the Alert appears after
turning the Stimulation
back ON.
Stimulation will
automatically be turned
OFF when the Cable is
disconnected, or the
Earpiece is removed.
Stimulation will need to
be manually turned back
ON once the problem is
resolved.
This alert may appear if
the Earpiece is loose and
only one electrode, Inner
or Outer, is turned on.
More Resources
Scan the QR code to access training and troubleshooting videos, FAQs, and more
at sparkbiomedical.com/sparrow-ascent/resources.
SPARROW ASCENT CLINICIAN CHECKLIST 8

Spark Biomedical, Inc., 18208 Preston Road, Ste D9-531, Dallas, TX 75252, USA
www.sparkbiomedical.com | (844) 654-SPRK (7775)Version: MKT-023 Rev 0
Other manuals for Sparrow Ascent
1
Table of contents
Other Spark Medical Equipment manuals


Popular Medical Equipment manuals by other brands

Richard Wolf
Richard Wolf PowerDrive ART1 instruction manual

Conair
Conair True Glow Instruction & styling guide

TELUS
TELUS LivingWell Companion Home user manual

MIR
MIR Spirobank II Service guide

eNeura
eNeura sTMS mini Instructions for use

Chattanooga
Chattanooga Intelect Mobile 2 Ultrasound quick start guide

Actron
Actron ABS BrakeScan CP9449 user manual

Dräger
Dräger DrugTest 5000 Technical manual

Richard Wolf
Richard Wolf FLUID CONTROL Lap 2216 manual

Organ recovery systems
Organ recovery systems Lifeport Kidney Transporter Cover Instructions for use

KLS Martin
KLS Martin independant Care Vertical ES Instructions for use

Richmar
Richmar HydraTherm quick start guide


