2
7.1 Einrichten von analogem Stereo-Audio
So geben Sie Audio von der Videoquelle in Stereo wieder:
1. Schalten Sie die Geräte aus, die Sie anschließen möchten.
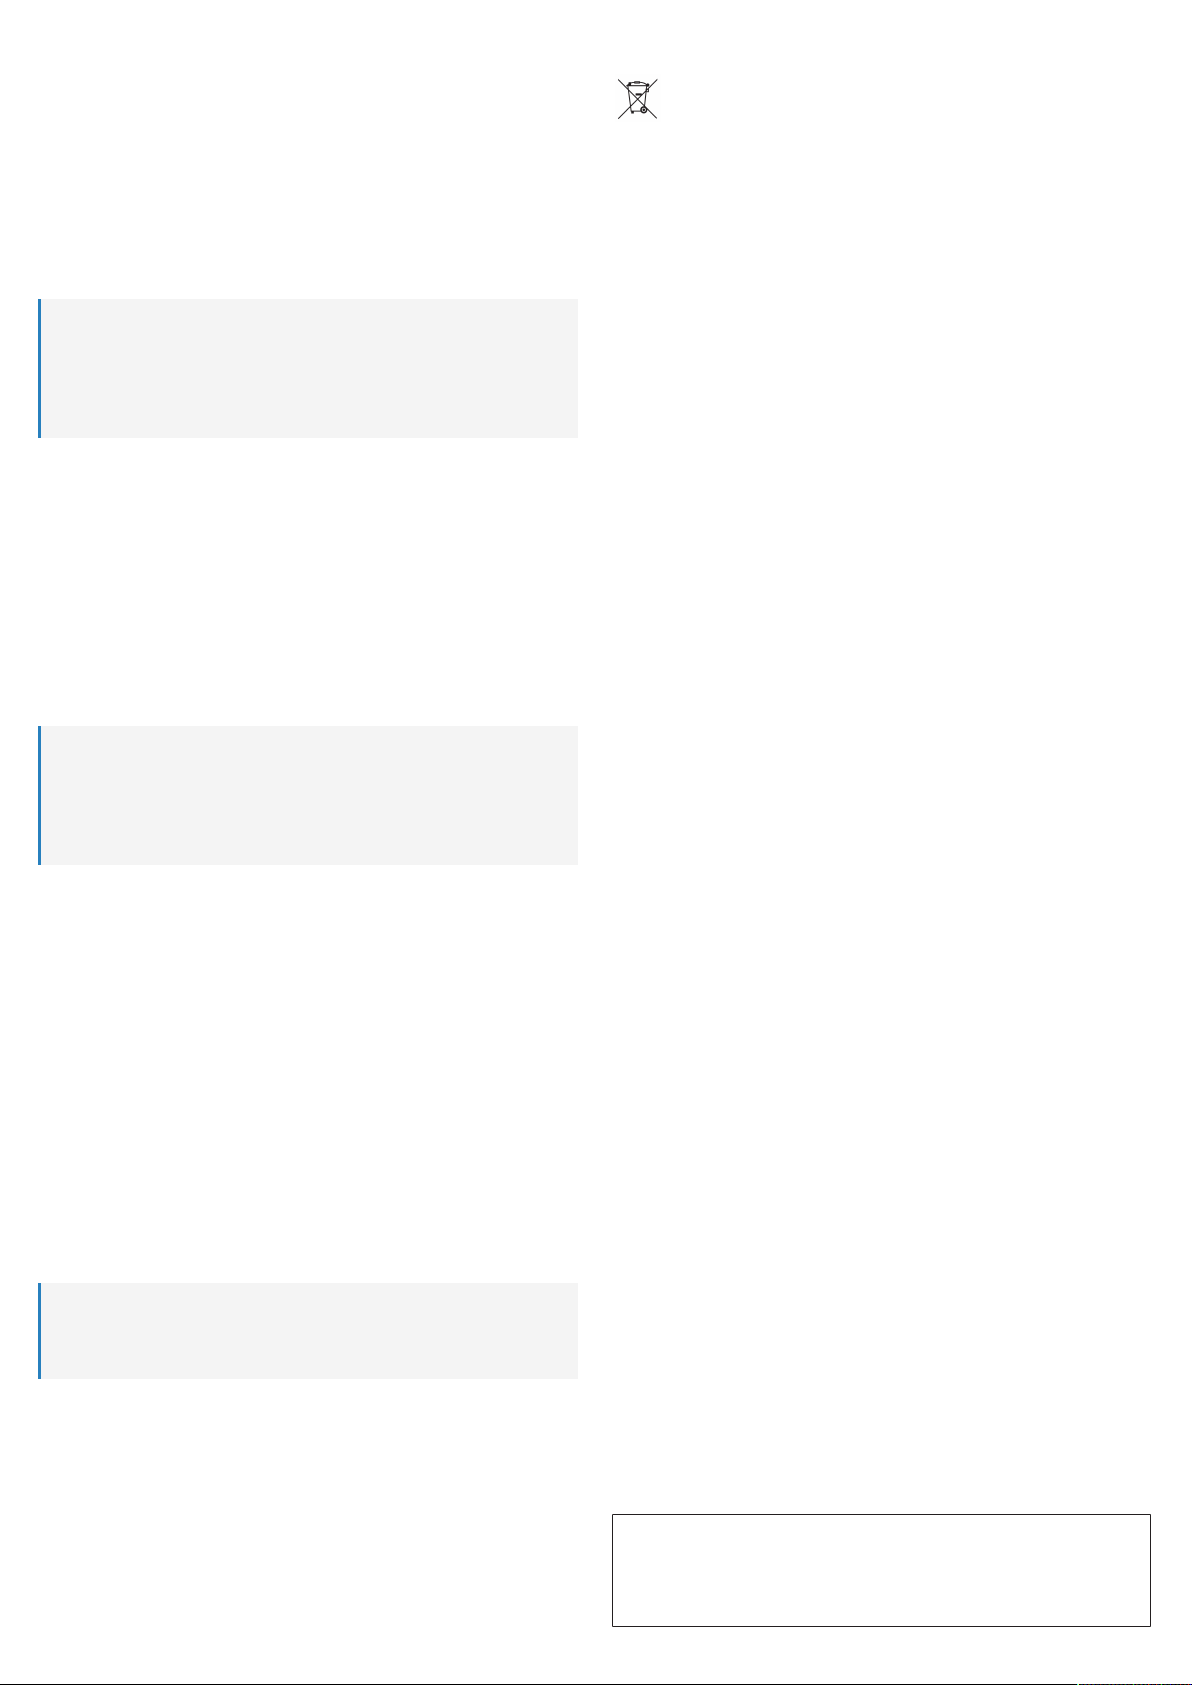
2. Schließen Sie die Videoquelle an den HDMI-Eingang HDMI IN an.
3. Schließen Sie das Anzeigegerät an den HDMI-Ausgang HDMI OUT an.
4. Schließen Sie Ihr Soundsystem an die 3,5-mm-Stereo-Kopfhörerbuchse oder die analo-
gen RCA-Audiobuchsen L/R an.
5. Stellen Sie den EDID-Schalter auf die Position 2.0.
6. Schieben Sie den ARC-Schalter ARC nach links (weg vom HDMI-Eingang).
7.2 Einrichten von 5.1-Surround-Sound-Audio
So geben Sie Audio von der Videoquelle in 5.1-Surround-Sound wieder:
1. Schalten Sie die Geräte aus, die Sie anschließen möchten.
2. Schließen Sie die Videoquelle an den HDMI-Eingang HDMI IN an.
3. Schließen Sie das Anzeigegerät an den HDMI-Ausgang HDMI OUT an.
4. Schließen Sie Ihr Soundsystem an den optischen Audioanschluss S/PDIF an.
5. Stellen Sie den EDID-Schalter auf die Position 5.1.
6. Schieben Sie den ARC-Schalter ARC nach links (weg vom HDMI-Eingang).
7.3 Einrichten von Pass-Through-Audio
Im Pass-Through-Modus wird das HDMI-Signal 1:1 durchgereicht. Alle angeschlossenen
Geräte werden über die EDID-Einstellungen (Extended Display Identification Data) des an
den HDMI-Ausgang HDMI OUT angeschlossenen HDMI-Geräts (Beispiel: Smart TV) ange-
sprochen. Auf diese Weise kann das Audiosignal höchstens LPCM 7.1 sein.
Hinweise:
– Ob der optische Audioanschluss S/PDIF ein Audiosignal überträgt, hängt von den Be-
sonderheiten Ihres Audiosystems ab.
– Ob die analogen RCA-Audiobuchsen L/R ein Audiosignal übertragen, hängt von den
Besonderheiten Ihres Audiosystems ab.
– Die 3,5-mm-Kopfhörerbuchse überträgt kein Audiosignal.
So stellen Sie den Anschluss her:
1. Schalten Sie die Geräte aus, die Sie anschließen möchten.
2. Schließen Sie die Videoquelle an den HDMI-Eingang HDMI IN an.
3. Schließen Sie das Anzeigegerät an den HDMI-Ausgang HDMI OUT an.
4. Schließen Sie Ihr Soundsystem an den optischen Audioanschluss S/PDIF oder die ana-
logen RCA-Audiobuchsen L/R an.
5. Stellen Sie den EDID-Schalter auf die Position TV.
6. Schieben Sie den ARC-Schalter ARC nach links (weg vom HDMI-Eingang).
7.4 Einrichten des Audio Return Channel (ARC)
Mit der Funktion Audio Return Channel (ARC) können Sie das Audiosignal vom Anzeigege-
rät (Beispiel: Smart TV) zum Soundsystem zurückführen. Dadurch entfällt die Notwendigkeit
eines separaten Audioanschlusses zwischen dem Anzeigegerät und dem Soundsystem.
Hinweise:
– Ob der optische Audioanschluss S/PDIF ein Audiosignal überträgt, hängt von den Be-
sonderheiten Ihres Audiosystems ab.
– Ob die analogen RCA-Audiobuchsen L/R ein Audiosignal übertragen, hängt von den
Besonderheiten Ihres Audiosystems ab.
– Die 3,5-mm-Kopfhörerbuchse überträgt kein Audiosignal.
So stellen Sie den Anschluss her:
1. Schalten Sie die Geräte aus, die Sie anschließen möchten.
2. Schließen Sie das Anzeigegerät an den HDMI-Ausgang HDMI OUT an.
3. Schließen Sie Ihr Soundsystem an den optischen Audioanschluss S/PDIF oder die ana-
logen RCA-Audiobuchsen L/R an.
4. Stellen Sie den EDID-Schalter auf die Position TV.
5. Schieben Sie den ARC-Schalter ARC nach rechts (hin zum HDMI-Eingang).
8 Bedienung
1. Schalten Sie die Geräte ein, die an den Audio Extractor angeschlossen sind.
2. Schließen Sie das USB-Kabel an die Stromeingangsbuchse DC 5V an.
3. Schließen Sie das USB-Kabel an das Netzteil an.
4. Schließen Sie das Netzteil an das Stromnetz an.
àDie HDMI-Eingangsanzeige leuchtet auf, um die angeschlossene HDMI-Videoquelle
anzuzeigen.
à(Wenn ARC aktiviert ist), leuchtet die ARC-Anzeige auf.
5. Starten Sie die Videowiedergabe.
9 Reinigung und Wartung
Wichtig:
– Verwenden Sie keine aggressiven Reinigungsmittel, Reinigungsalkohol oder andere
chemische Lösungsmittel. Diese können zu Schäden am Gehäuse und zu Fehlfunktio-
nen des Produkts führen.
– Tauchen Sie das Produkt nicht in Wasser.
1. Trennen Sie das Produkt von der Stromversorgung.
2. Verwenden Sie zum Reinigen des Produkts ein trockenes, faserfreies Tuch.
10 Entsorgung
Alle Elektro- und Elektronikgeräte, die auf den europäischen Markt gebracht wer-
den, müssen mit diesem Symbol gekennzeichnet werden. Dieses Symbol weist
darauf hin, dass dieses Gerät am Ende seiner Lebensdauer getrennt von unsor-
tiertem Siedlungsabfall zu entsorgen ist.
Jeder Besitzer von Altgeräten ist verpflichtet, Altgeräte einer vom unsortierten
Siedlungsabfall getrennten Erfassung zuzuführen. Die Endnutzer sind verpflich-
tet, Altbatterien und Altakkumulatoren, die nicht vom Altgerät umschlossen sind,
sowie Lampen, die zerstörungsfrei aus dem Altgerät entnommen werden können,
vor der Abgabe an einer Erfassungsstelle vom Altgerät zerstörungsfrei zu tren-
nen.
Vertreiber von Elektro- und Elektronikgeräten sind gesetzlich zur unentgeltlichen Rücknah-
me von Altgeräten verpflichtet. Conrad stellt Ihnen folgende kostenlose Rückgabemöglich-
keiten zur Verfügung (weitere Informationen auf unserer Internet-Seite):
■in unseren Conrad-Filialen
■in den von Conrad geschaffenen Sammelstellen
■in den Sammelstellen der öffentlich-rechtlichen Entsorgungsträger oder bei den von Her-
stellern und Vertreibern im Sinne des ElektroG eingerichteten Rücknahmesystemen
Für das Löschen von personenbezogenen Daten auf dem zu entsorgenden Altgerät ist der
Endnutzer verantwortlich.
Beachten Sie, dass in Ländern außerhalb Deutschlands evtl. andere Pflichten für die Altge-
räte-Rückgabe und das Altgeräte-Recycling gelten.
11 Technische Daten
11.1 Produkt
Eingang .......................................... 5 V/DC, 1 A
HDCP-Unterstützung...................... HDCP 2.2
HDMI-Auflösung ............................. 4K2K (bei 60 Hz wie in HDMI 2.0 angegeben) / 3D /
1080p / 1080i / 720p / 720i / 576p / 576i / 480p / 480i
Farbtiefe ......................................... 24 Bit / 30 Bit / 36 Bit
HDMI-ARC-Unterstützung.............. Ja
Optischer Audioausgang ................ S/PDIF
Analoger Audioausgang ................. 3,5-mm-Stereo-Kopfhöreranschluss / RCA
Digitales Audioformat ..................... DTS-HD / Dolby TrueHD / LPCM7.1 / DTS /
Dolby-AC3 / DSD
Betriebsbedingungen...................... -15 bis +55 °C, 5 - 90 % rF (nicht kondensierend)
Lagerbedingungen.......................... -15 bis +55 °C, 5 - 90 % rF (nicht kondensierend)
Abmessungen (B x H x T) .............. 84,5 x 21 x 62 mm
Gewicht........................................... ca. 135 g
11.2 Netzteil
Eingang ......................................... 100 - 240 V/AC, 50/60 Hz, 0,3 A
Ausgangsspannung/-strom ............ 5,0 V/DC, 1 A
Dies ist eine Publikation der Conrad Electronic SE, Klaus-Conrad-Str. 1, D-92240 Hirschau (www.conrad.com).
Alle Rechte einschließlich Übersetzung vorbehalten. Reproduktionen jeder Art, z. B. Fotokopie, Mikroverfilmung, oder
die Erfassung in elektronischen Datenverarbeitungsanlagen, bedürfen der schriftlichen Genehmigung des Herausge-
bers. Nachdruck, auch auszugsweise, verboten. Die Publikation entspricht dem technischen Stand bei Drucklegung.
Copyright by Conrad Electronic SE.
*2587734_V1_0722_jh_mh_de 9007199815995147-1 I2/O1 en