6
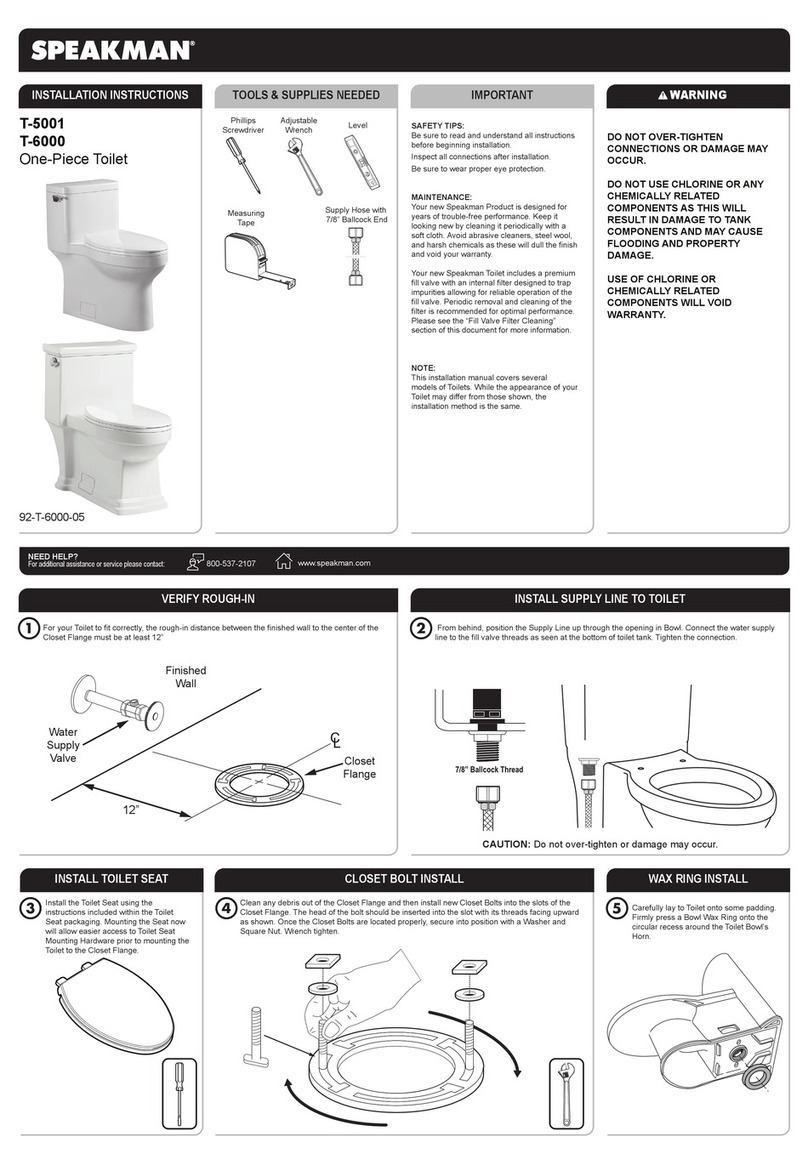
WAX RING INSTALL
Carefully lay the Toilet down on it’s back
onto some padding. Firmly press a Bowl
Wax Ring onto the circular recess around
the Toilet Bowl’s Horn.
7
CLOSET BOLT INSTALL
Clean any debris out of the Closet Flange and then install new Closet Bolts into the slots of the
Closet Flange. The head of the bolt should be inserted into the slot with its threads facing upward
as shown. Once the Closet Bolts are located properly, secure into position with a Washer and
Square Nut. Wrench tighten.
POSITION TOILET ONTO WAX RING
9Turn the Toilet upright and gently lower into position over the Closet Flange and Closet Bolts. With
the Toilet properly aligned, firmly press on both sides of Toilet Rim to set the Bowl Wax Ring.
Ensure Toilet is properly aligned.
8
INSTALL TOILET SEAT
Install the Toilet Seat using the
instructions included within the Toilet
Seat packaging. Mounting the Seat now
will allow easier access to Toilet Seat
Mounting Hardware prior to mounting the
Toilet to the Closet Flange.
CAUTION: Do not over-tighten or damage may occur.
SECURE BOWL INTO POSITION
10
CAUTION: Do not move the Bowl after
the Bowl Wax Ring is set.
Position a Flat Washer over the Closet
Bolt. Secure into position with a Brass
Acorn Nut. Tighten evenly until the Bowl
is snug to the Closet Flange.
11
COVER PLATE INSTALL
Install Cover Plates over Closet Bolt
Access Panel.
3/8” COMPRESSION
9/16”-24 UNEF
CONNECT TO WATER SUPPLY
12
Flush the water supply line for a few
seconds to remove any debris that may
enter the Fill Valve. (For new home
constructions and/or additions, flush the
water supply line for more than a minute
to help remove any residual PVC
adhesives, solder flux, and/ or pipe
sealants that were used for the new
plumbing.)
Install the Supply Line to the Supply Stop.
Wrench tighten into position. Turn ON the
Supply Stop.
CAUTION: Do not over-tighten or damage may occur.
VERIFY HANDLE INSTALLATION
13
Position the Handle through the opening
in the side of the Tank with the Trip Lever
facing forward. The square post on the
Handle stem should align with the square
opening within the Tank as shown below.
Secure into position with the included
Nut. Hand tighten.
CAUTION: Remove the Tape securing the Flapper in position if present.
VERIFY PROPER CHAIN LENGTH
14
Attach the Chain from the Flapper to one of the corresponding holes within the Handle Lever.
When correctly installed the Flapper should fully seal against the Flush Valve when the Handle is
in the resting position, yet open appropriately when the Handle is activated to flush the Toilet.
Additional adjustments to the length of the Chain may be required to achieve this.
15
TEST FLUSH
Flush toilet a few times to check for
issues and leaks. Make sure there are
NO WATER LEAKS on Bowl or Tank.
WATER LEVEL ADJUSTMENT
16
The Fill Valve is factory pre-set. If adjustments are required:
To increase the water level, turn the Rotating Dial counterclockwise while holding the body of the
Fill Valve to prevent any unnecessary movement.
To decrease the water level, turn the Rotating Dial clockwise while holding the body of Fill Valve
to prevent any unnecessary movement.
There are 24 marked dots on the Rotating Dial. Each dot represents a level of adjustment in
regards to the water level in tank.
17
TANK LID INSTALL
Place the Tank Lid onto the Tank.


