SpectraPure FLEX 5600S User manual

Whole House Water Softeners &
Carbon Tank
WARNING
Please read carefully before proceeding with installation. Failure to follow any attached
instructions or operating parameter may lead to the product’s failure and
possible damage to property.
SpectraPure®Inc.assumes no responsibility for water damage due to leaks. It is
the user’s responsibility to determine that the system is leak-free.
REV. 05-26-2015

SpectraPure
®
SpectraPure
®
Inc.
480.894.5437 Call us toll-free 1.800.685.2783
2167 East Fifth St, Tempe, Arizona 85281
2
Copyright © 2015 by SpectraPure Inc.
ALL RIGHTS RESERVED
No part of this publication may be reproduced, stored in a retrieval system, or transmitted in any
form or by any means, electronic, mechanical, photocopying, recording or otherwise without the
prior written permission of SpectraPure Inc.
WARNING:
Disconnect power at the main electrical box before installing or servicing the
unit. Do not plug in unit or change fuses while standing on wet or damp surfaces and do not
touch any other metal surfaces while plugging in product or changing fuses. Do it with one
hand while keeping the other hand free.
TABLE OF CONTENTS:
Thank You for your purchase of a SpectraPure®System. With proper installation and maintenance, this system will
provide you with high quality water for years to come. All SpectraPure®products are rigorously tested by us for
safety and reliability. If you have any questions or concerns, please contact our customer service department at
1.800.685.2783 or refer to our online troubleshooting at www.spectrapure.com.
Installation
PreInstallation Checklist 3
Installation for optional Carbon Tank 4-6
Installation for Water Softener and Brine Tank 7-8
Control Operation
Regeneration Valve Programming and Override Setup 9-11
Things you should know
Procedure for replacing water softener resin 12
Procedure for replacing media in carbon tank 13
Questions concerning salt in brine tank 14
Troubleshooting Guide
Troubleshooting problems and solutions 15-20
Warranty Coverage 21-22

SpectraPure
®
SpectraPure
®
Inc.
480.894.5437 Call us toll-free 1.800.685.2783
2167 East Fifth St, Tempe, Arizona 85281 3
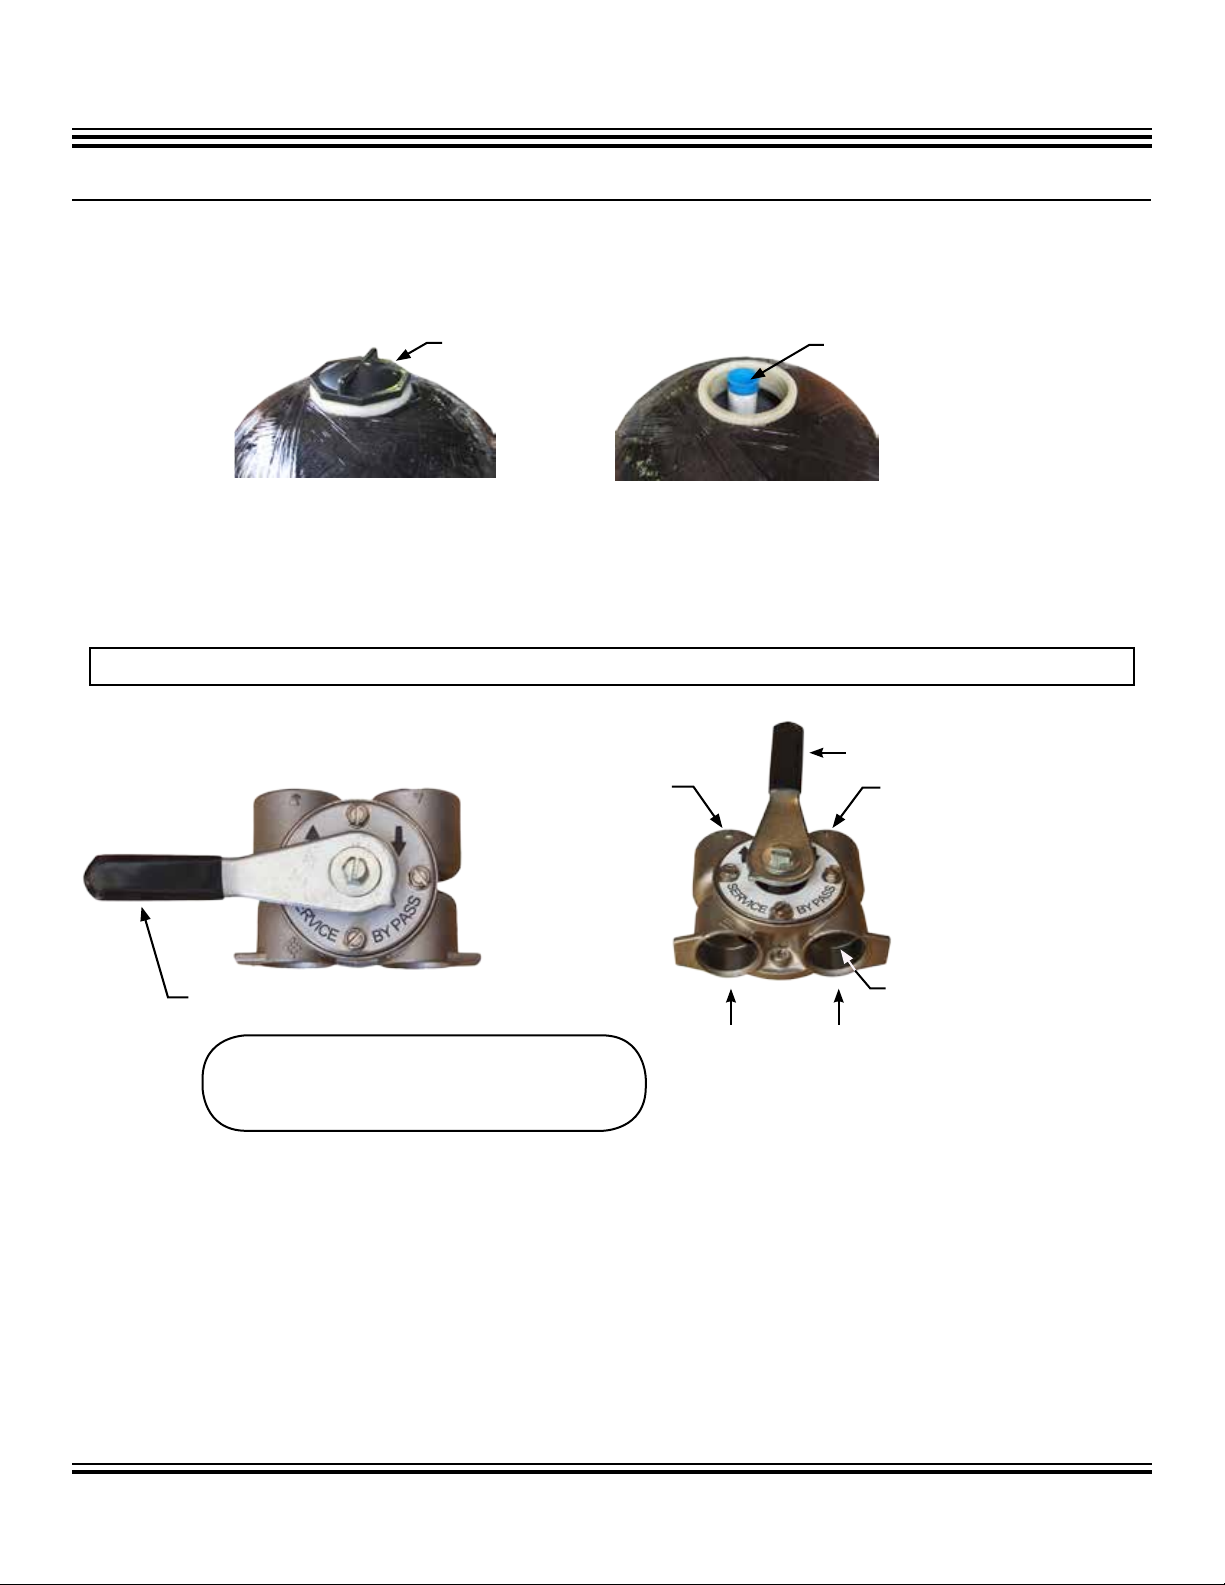
PREINSTALLATION CHECK LIST FOR CARBON OR WATER SOFTENER:
1.
WATER PRESSURE:
A minimum of 25 lbs of water pressure is required for regeneration valve to operate effectively
.
2.
ELECTRICAL:
An uninterrupted alternating current (A/C) supply is required. Please make sure voltage
supply is compatible with unit before installation. Make certain the electrical outlet is grounded
by having it checked by an electrician or by using a UL Listed Circuit analyzer. Units are
furnished with 3-prong grounded plugs to protect you against the possibility of electrical shock.
The outlet must be within reach of the power cord. Do not use an extension cord. Extension cords that are too
long or too light do not deliver sufficient voltage to the unit and could present a safety hazard if the insulation were
to become damaged. The receptacle should be located four (4) feet above the basement floor to guard against the
possibility of immersion.
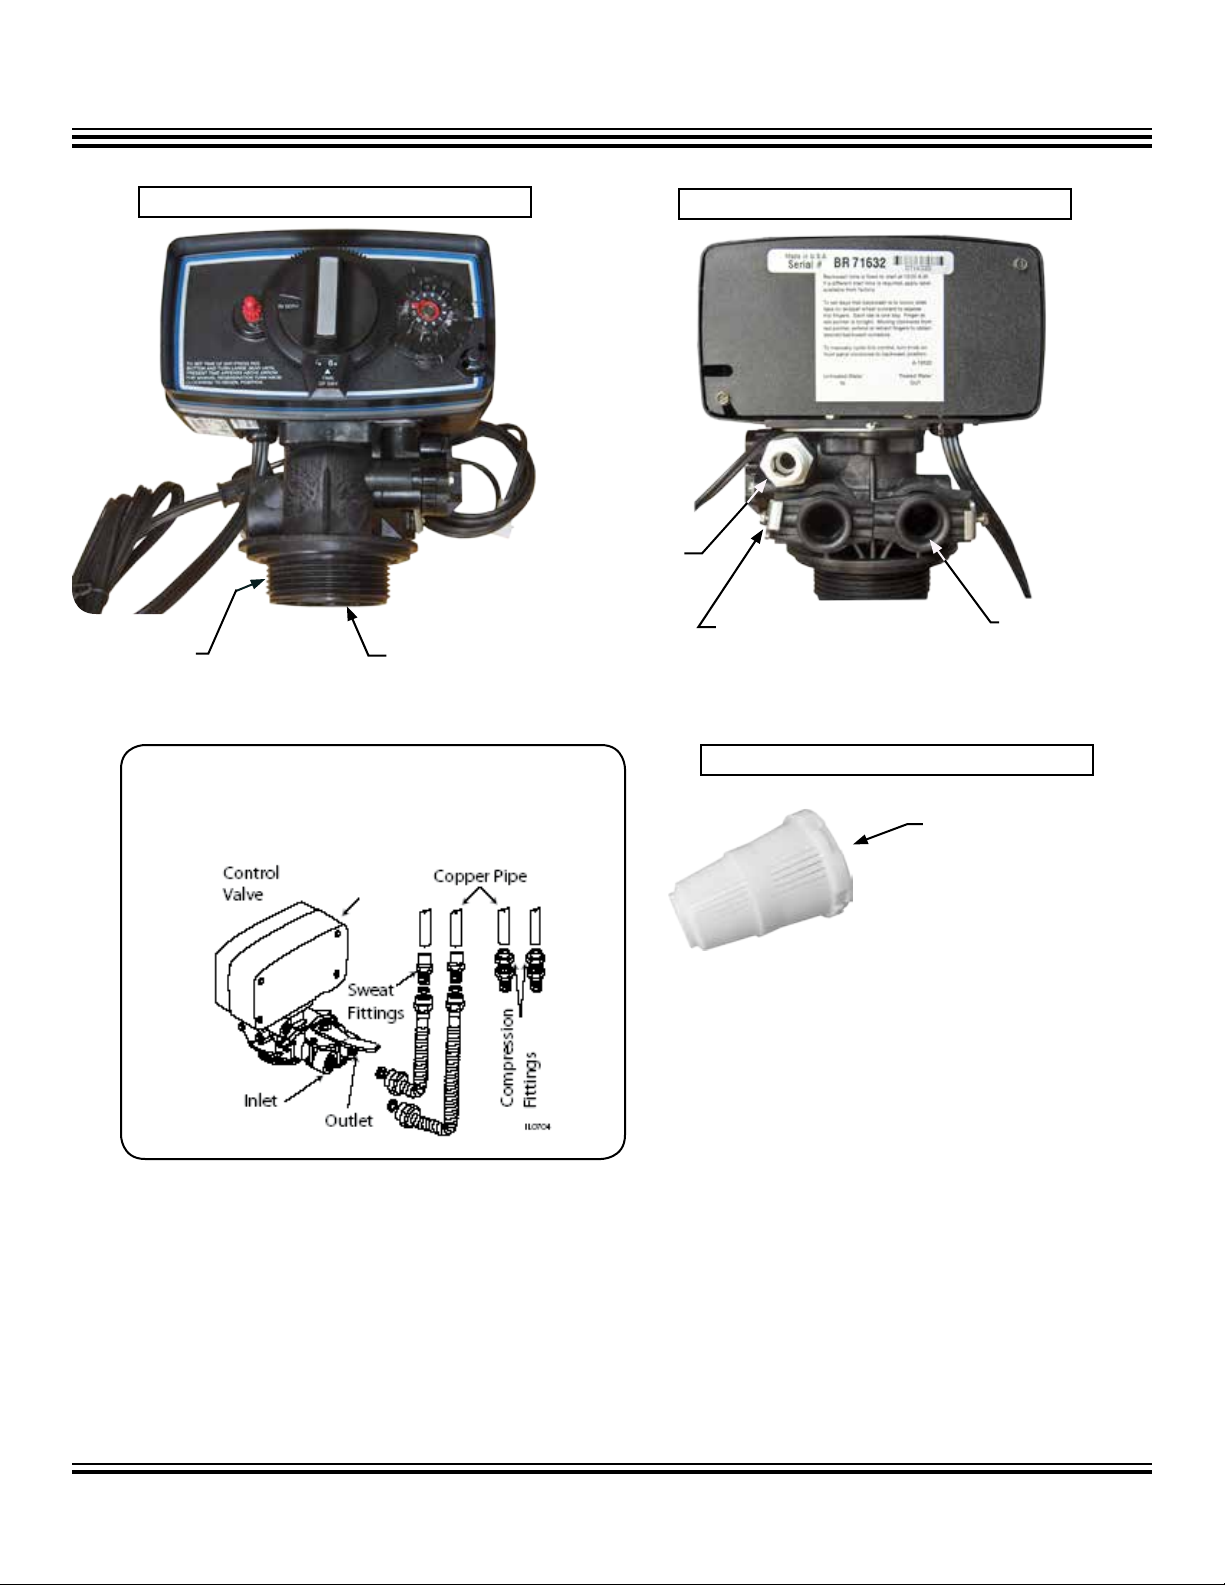
3. PLUMBING: Condition of existing plumbing should be free from lime and iron buildup. Replace piping that has
heavy lime and/or iron build-up. If piping is clogged with iron, install a separate iron filter unit ahead of the water
softener.
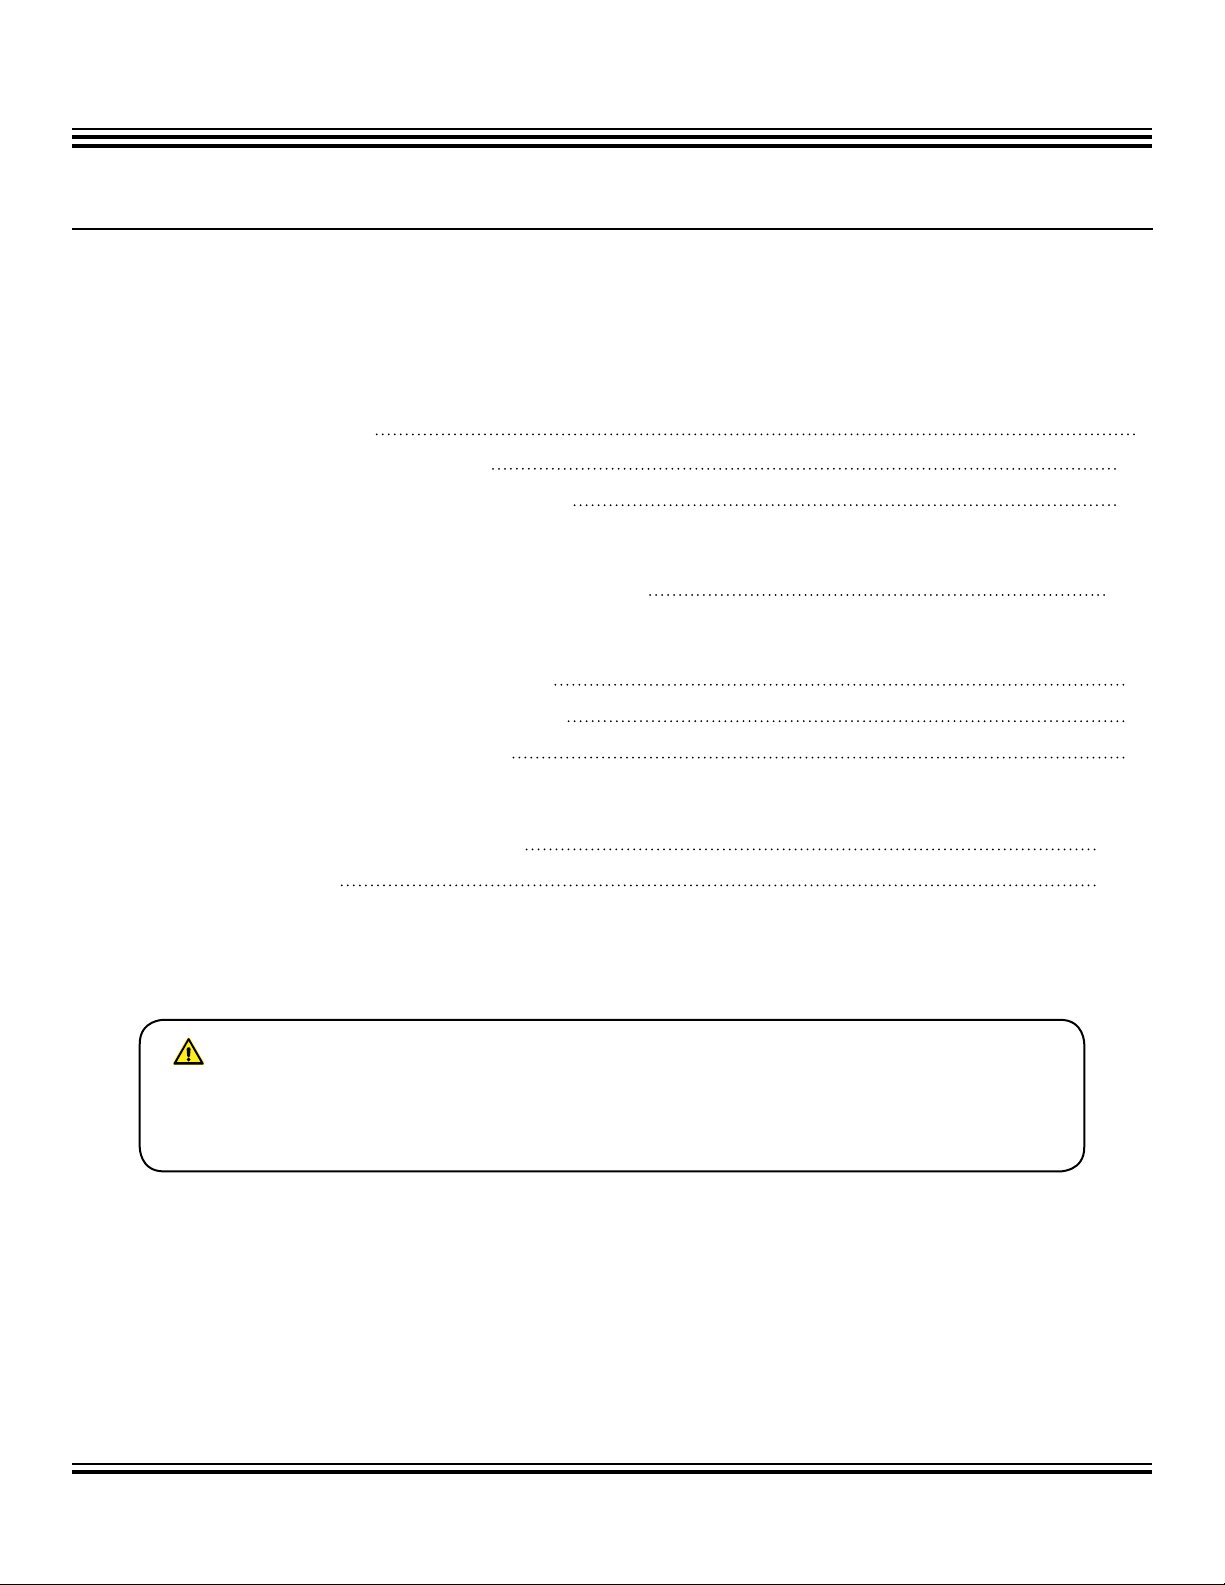
4. LOCATION OF SOFTENER AND DRAIN: Locate the softener close to a clean working drain and connect
according to local plumbing codes.
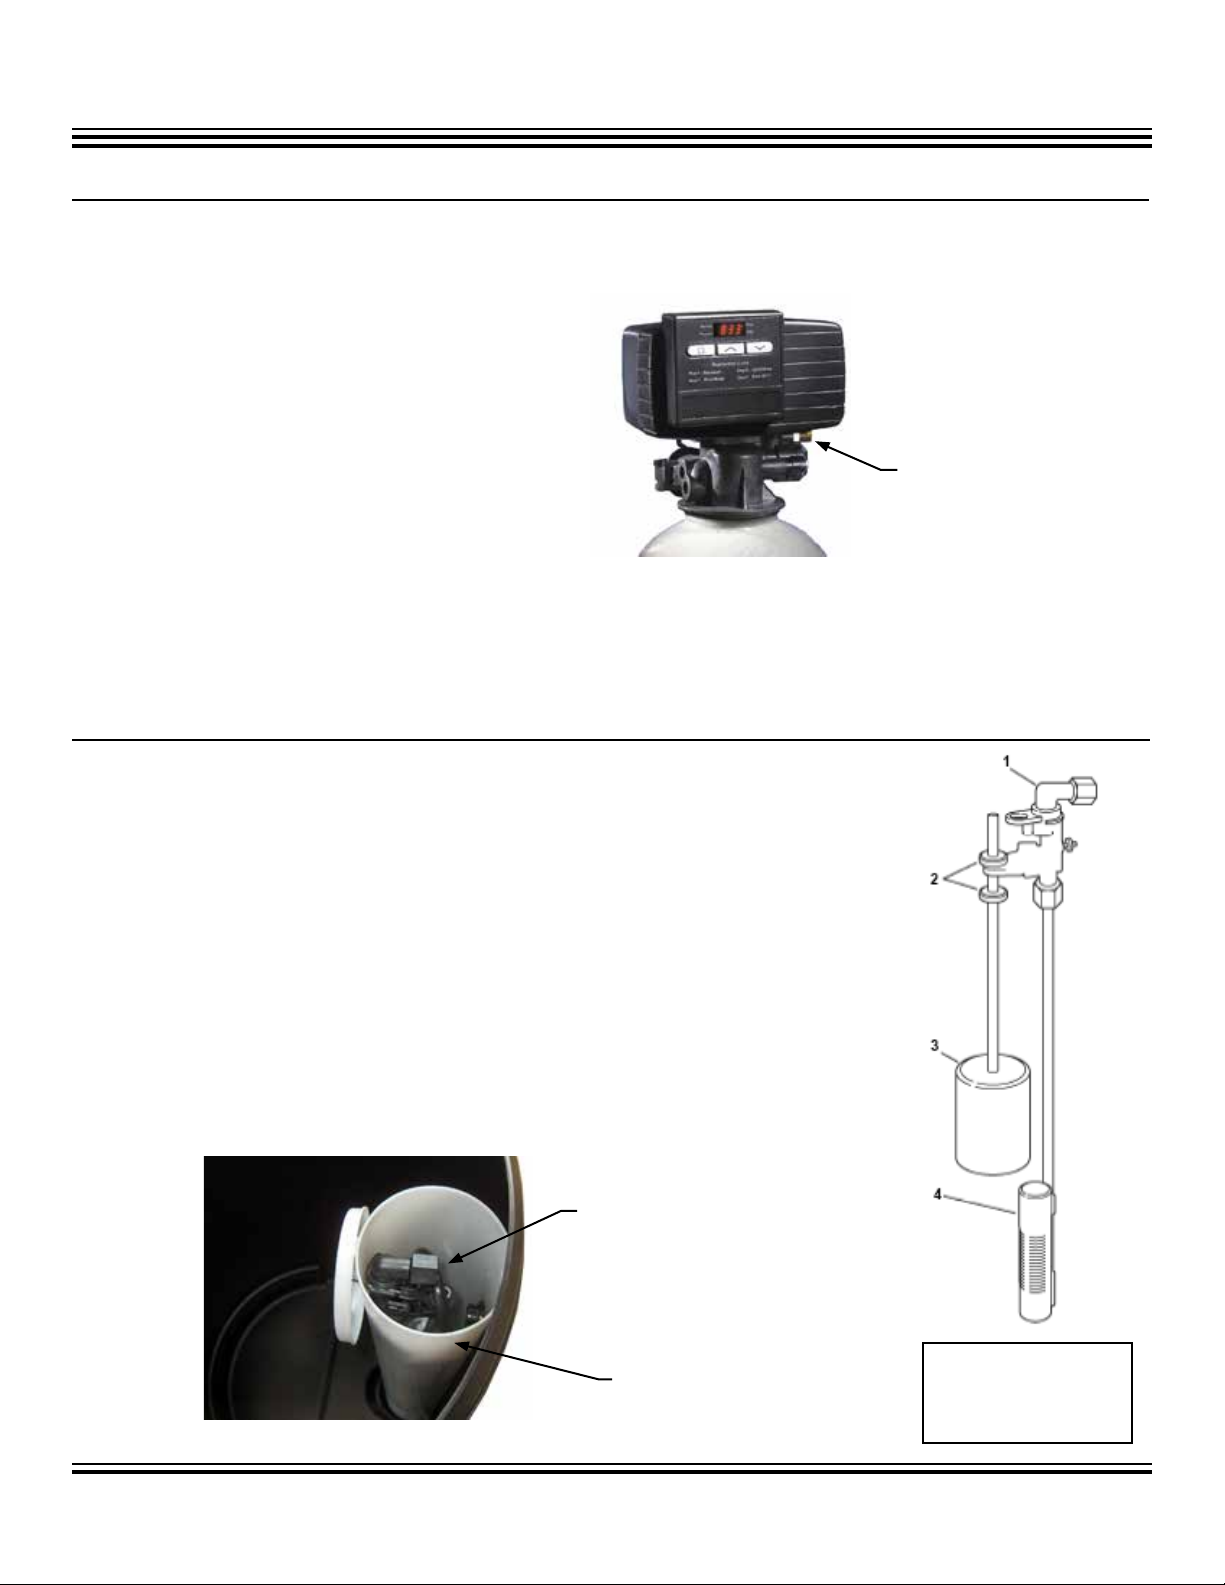
Place the softener tank where you want to install the unit. If you have a carbon tank, you will install it in front of
the water softener. Both the water softener and carbon tank will need a drain line.
NOTE: Be sure the tank(s) are level and on a firm base.
CAUTION: DO NOT exceed 120 psi water pressure. DO NOT exceed 110° F water temperature. (Keep system
away from extreme hot and cold temperatures.) DO NOT subject unit to freezing conditions.
SAFETY INFORMATION
1. Read instructions carefully and learn the specific detail regarding installation and use. Failure to do so
could cause serious bodily injury and/or property damage.
2. Check to be sure your power source is capable of handling the voltage requirements of the unit. Plug
into a dedicated grounded receptacle which contains a fuse or circuit breaker of 20 amps or less.
3. INSTALL WATER CONDITIONER IN AN AREA PROTECTED FROM FLOODING, RAIN, DIRECT SUNLIGHT,
DUST, SNOW AND FREEZING. THE WARRANTY DOES NOT COVER DAMAGE INCURRED AS A RESULT
OF EXPOSURE TO WEATHER.
* All water treatment installations must conform to local plumbing, electrical and sanitation codes. These
codes are established for your protection.
When scale buildup is this bad,
you must replace piping before
installation of a water softener
to prevent pipes from corrosion
and possible leakage.
Perform all plumbing according to local plumbing codes.
— Use a 1/2" minimum pipe size for the drain.
— Use a 3/4" drain line for backwash flow rates that
exceed 7 gpm or length that exceeds 20’ (6 m).
WARNING:
Do not under any circumstances remove ground prong and never splice or cut the electrical
cord.

SpectraPure
®
SpectraPure
®
Inc.
480.894.5437 Call us toll-free 1.800.685.2783
2167 East Fifth St, Tempe, Arizona 85281
4
INSTALLATION FOR OPTIONAL CARBON TANK:
INSTALLATION FOR CONTROL HEAD AND BYPASS VALVE:
(FOLLOW THESE STEPS BELOW AFTER YOU HAVE POSITIONED WHERE YOU WANT THE TANK (S) TO GO)
1. First, unscrew cap on top of Carbon Tank and remove the plug or tape off of the distributor tube. (Make sure
that the distributor tube is flush with the top of the tank.)
2. Now, take the Control Head and the ByPass Valve and connect them together:
–Lightly lubricate the o-ring seal on the ByPass Valve & Control Head. (NOTE: only use silicone lubricant.)
– Remove the two metal screws that hold the clips in place. (Shown on page 5)
–Position the two ports, as noted below, and secure bypass valve with the two metal clips to the control
head (page 5). For now, leave the valve on “ByPass” mode.
3. Next, attach the collector screen to the lock connection and screw the control head onto the tank.
(DO NOT over-tighten control head to tank. It does not need to be airtight.)
4. Connect the 3/8 drain line to the Back Wash connection on the back of the control head (see page 5). Con-
nect this line to a drain pipe.
5. Turn on main water supply. Open a cold water faucet in the house and let water run a few minutes
or until the system is free of foreign material (usually solder) resulting from the plumbing installation.
NOTE: If you are going to install a Water Softener after the Carbon Tank, follow steps 1-3 for installation
of ByPass Valve on Softener Control Head, then proceed to page 7.
WARNING: If you are installing a Water Softener after the Carbon Tank, keep the WS valve in “ByPass” mode
when doing step 4 AND when setting the startup procedure on page 6.
CAP BLUE PLUG OR
TAPE
THESE TWO PORTS
CONNECT TO THE
CONTROL HEAD
HANDLE IS IN SERVICE POSITION
TAP WATER “IN”
(THREADED PORT)
WATER “OUT”
(THREADED PORT)
HANDLE IS IN BYPASS POSITION Lubricate surface lightly.
CAUTION: YOU MUST PAY ATTENTION TO
THE IN AND OUT ARROWS ON THE VALVE
TO BE SURE THAT IT IS PIPED PROPERLY.
BYPASS VALVE DESCRIPTION

SpectraPure
®
SpectraPure
®
Inc.
480.894.5437 Call us toll-free 1.800.685.2783
2167 East Fifth St, Tempe, Arizona 85281 5
Lubricate surface
lightly on both
connections
METAL CLIP
W/ SCREW
BACKWASH
TO DRAIN
INTERNAL LOCK CONNECTION
FOR COLLECTOR SCREEN
THREADING
TO TANK
Insert this side into lock
connection on Control
Head.
NOTE: Install the Carbon Tank with the
inlet, outlet and drain connections that
meet applicable plumbing codes.
Perform all plumbing according to local plumbing codes.
— Use a 1/2" minimum pipe size for the drain.
— Use a 3/4" drain line for backwash flow rates that
exceed 7 gpm or length that exceeds 20’ (6 m).
Plumbing components (as shown in picture) such as
copper piping, braided tubing and fitting do not come
with the water softener. They are readily available at
any hardware store or your local plumber.
FRONT VIEW FOR CONTROL HEAD BACK VIEW FOR CONTROL HEAD
COLLECTOR SCREEN

SpectraPure
®
SpectraPure
®
Inc.
480.894.5437 Call us toll-free 1.800.685.2783
2167 East Fifth St, Tempe, Arizona 85281
6
INSTALLATION & STARTUP PROCEDURES FOR CARBON CONTROL HEAD:
Before Plugging electricity to the Unit:
1. Position ByPass Valve to “Service” mode and turn Regeneration Knob (clockwise) to the “In Service” position.
NOTE: The water flowing from the downstream tap is cloudy and/or contains media fines as well as air. Allow
the water to run until it appears clean and free of air.
2. When a steady clean flow appears at the tap, close the tap and the main water supply valve and allow the filter
media bed to settle for 15–20 minutes.
3. Manually index the filter to the “Backwash” position.
4. To prevent a sudden surge of water and air, partially open the main water supply valve so that the flow at the
drain of the filter is approximately 1 gpm. The water at the drain is cloudy again and/or contains media fines as
well as air. Allow water to flow at the drain until it appears clean and free of air.
5. Continue to open the water supply valve until it is completely open. Allow water to flow at the drain until all
media fines are washed out of the filter.
6. Manually index the filter to the “In Service” position, and again open the downstream tap. Check to be sure that
the water flows clear. If necessary, allow water to flow until all media fines are gone. If the tap is equipped with
an aerator check that is not plugged with media fines and pipe scale.
7. Plug in the electrical cord and look in the sight hole on the back of the timer motor to ensure that it is running.
Set the days back washing to occur by sliding tabs on the skipper wheel outward to expose trip fingers.
– Each tab is one day.
– Finger at red pointer is tonight.
– Moving clockwise from red pointer, extend or retract fingers to obtain the desired backwash schedule.
8. Set time of day by pushing red button and spin the 24-hour gear until the present time of day is visible above the
time of day arrow. The Carbon Control Head will count down until it needs to backwash. Backwash time is set
to be from 2-3 AM. If you have a Water Softener installed after the Carbon tank, it too will want to regenerate at
2-3 AM. When the Carbon Tank and Water Softener backwash, they may over flood the drain line. To avoid this
situation, you can trick the timer to backwash at different times by setting the time of day a few hours ahead or
behind.
NOTE: Manually dial the various regeneration positions by turning the knob on the front of the control until
the indicator shows that it is in the desired position.
Red Timer
Set Button
Manual
Regeneration
Knob
Skipper Wheel
(shows every other
day regeneration)
24 Hour Gear
Red Pointer
Time of Day Arrow

SpectraPure
®
SpectraPure
®
Inc.
480.894.5437 Call us toll-free 1.800.685.2783
2167 East Fifth St, Tempe, Arizona 85281 7
INSTALLATION FOR CONTROL HEAD ON WATER SOFTENER:
FOLLOW THE STEPS BELOW AFTER YOU HAVE POSITIONED THE TANK(S) WHERE YOU WANT THEM TO GO
1. Follow steps 1-3 listed on page 4 for installation
of ByPass Valve and Control Head.
2. If you installed a Carbon Tank in front of
the Water Softener, keep its ByPass Valve in
“service” mode.
3. (Make sure you leave the bypass valve, that
is installed on the water softener head, on
“bypass” for this step). Turn on the main water
supply. Open a cold soft water tap nearby and
let water run a few minutes or until the system
is free of foreign material (usually solder)
resulting from the plumbing installation. Close
the water tap when water runs clean.
4. Follow steps below on installation for Brine Tank and plug both valves into an approved power source.
(FYI: When the valve has power it will drive the Bypass Valve to the “Service” mode.)
FLEX 5600SE Water Softener
Head with collector screen
BRINE LINE CONNECTION
FROM WATER SOFTENER
CONTROL HEAD
INSTALLATION FOR BRINE TANK:
1. Be sure that the floor under the Brine Tank is stable, clean and level.
2. Connect Brine Tube to compression nut fitting (diag on page 8) on both the
Brine Tank and Control Head. (Located on the Safety Brine Valve and the side of
the Control Head).
3. Place approximately 1” (25 mm) of water above the grid plate. If a grid is not
utilized, fill to the top of the air check in the Brine Tank. (The air-check is a gray
valve that is located inside the Brine Draw Tube at the bottom.)
NOTE: DO NOT ADD SALT OR POTASSIUM AT THIS TIME
4. Place the ByPass valve in “Service” mode and let water flow into brine tank. When
water flow stops, slowly open a cold water tap nearby and let water run until air
is purged.
5. Close tap.
LINE CONNECTION
FROM WATER SOFTENER
CONTROL HEAD
BRINE DRAW TUBE 1. SAFETY BRINE VALVE
2. GROMMET
3. FLOAT ASSEMBLY
4. AIR-CHECK ASSEMBLY

SpectraPure
®
SpectraPure
®
Inc.
480.894.5437 Call us toll-free 1.800.685.2783
2167 East Fifth St, Tempe, Arizona 85281
8
TAP WATER INTO CARBON SOFT WATER OUT
CHLORINE FREE WATER
BRINE TANK
CONNECTION
TO DRAIN
TO DRAIN
BRINE DRAW TUBE
BRINE TANK
BRINE TANK OVERFLOW
TO DRAIN
FEED LINE FROM WATER
SOFTENER CONTROL
HEAD THROUGH HERE
BRINE TANK
TUBING
COMPRESSION
NUT
COMPRESSION
SLEEVE
INSERT
COMPRESSION FITTING DIAGRAM
WATER FLOW DIAGRAM FOR CARBON TANK AND WATER SOFTENER
BRINE TANK DESCRIPTION TANK CONNECTIONS

SpectraPure
®
SpectraPure
®
Inc.
480.894.5437 Call us toll-free 1.800.685.2783
2167 East Fifth St, Tempe, Arizona 85281 9
REGENERATION EVERY
7 DAYS MINIMUM
IN SERVICE
PROGRAM
FLOW
P.M.
A- -7
SET TIME OF DAY:
In normal operation the Time of Day display alternates with Volume Remaining display. As treated
water is used, the Volume Remaining display counts down (in gallons) from a maximum value
to zero or (- - -). Once this occurs, a regeneration cycle initiates immediately or delayed to the set
Regeneration Time. Water flow through the valve is indicated by the flashing Flow Dot Indicator.
1. When the ByPass valve is in service mode, push either the
SET UP or SET DOWN button once to adjust the time of
day by one digit. Push and hold the adjust by several digits.
TIME OF DAY
IN SERVICE
PROGRAM
FLOW
P.M.
12:00
IN SERVICE
PROGRAM
FLOW
P.M.
833
IN SERVICE
PROGRAM
FLOW
P.M.
- - - -
833 GALLONS OF TREATED
WATER REMAINING
0 GALLONS OF TREATED
WATER REMAINING
PROGRAMMING SETUP:
1. Push and hold both the SET UP and SET DOWN buttons for 5
seconds.
2. Set TREATED WATER CAPACITY: Using the SET UP or SET DOWN
buttons, set the amount of treated water to flow through the unit
before a regeneration is required.
3. Push the EXTRA REGENERATION button.
4. Set the REGENERATION TIME: Use the SET UP or SET DOWN
buttons to set the desired time of day for regeneration to occur.
5. Push the EXTRA REGENERATION button.
6. Set the REGENERATION DAY OVERRIDE: Use the SET UP or SET
DOWN buttons to set the maximum number of days before a
regeneration cycle must occur.
7. Push the EXTRA REGENERATION button to exit the program
650 GALLON CAPACITY
IN SERVICE
PROGRAM 650 FLOW
P.M.
2:00 A.M.
REGENERATION TIME
IN SERVICE
PROGRAM
FLOW
P.M.
2:00

SpectraPure
®
SpectraPure
®
Inc.
480.894.5437 Call us toll-free 1.800.685.2783
2167 East Fifth St, Tempe, Arizona 85281
10
FAST REGENERATION CYCLE:
Perform the following Fast Cycle Regeneration if setting up the system for the first time.
1. Push the Extra Regeneration button for 5 seconds to force an extra regeneration
immediately.
2. Once the valve reaches Regeneration, step 1, let water run to drain for approximately 5 minutes.
3. Push the Extra Regeneration button once to advance valve to Regeneration, step 2.
4. Push the Extra Regeneration button once to advance valve to Regeneration, step 3 (if active).
5. Push the Extra Regeneration button once to advance valve to Regeneration, step 4 (if active).
6. Push the Extra Regeneration button once to advance valve to Regeneration, step 5 (if active)
7. Push the Extra Regeneration button once more to advance the valve back to In Service.
FINAL SETUP:
(With proper valve operation verified)
1. Manually step the valve to the Brine Draw position and allow the valve to draw water from the
brine tank until it stops.
NOTE: The air check will check at approximately the midpoint of the screened intake area.
2. Manually step the valve to the Brine Refill position and a low the valve to return to the In Service
position automatically.
3. With the valve in the Service position, check that there is approximately 1” (25 mm) of water
above the grid in the brine tank, if used.
4. Fill the brine tank with salt.
5. Setup is complete, the control can now run automatically.
FYI: You can start an extra regeneration cycle immediately by pushing and holding down on
for 5 seconds. If you want to start an extra regeneration tonight, push once.

SpectraPure
®
SpectraPure
®
Inc.
480.894.5437 Call us toll-free 1.800.685.2783
2167 East Fifth St, Tempe, Arizona 85281 11
CONTROL OPERATION
:
Immediate Regeneration Valves with Days Between Regeneration Override Set
When the valve reaches its set Days Since Regeneration Override value, a regeneration cycle initiates immediately.
This event occurs regardless of the Volume Remaining display having reached zero gallons.
Delayed Regeneration Valves With Days Between Regeneration Override Set
When the valve reaches its set Days Since Regeneration Override value a regeneration cycle initiates at the preset
Regeneration Time. This event occurs regardless of the Volume Remaining display having reached zero gallons.
Control Operation During Regeneration
In Regeneration the control displays a special Regeneration display. In this display the control shows the current
regeneration step number the valve is advancing to, or has reached, and the time remaining in that step. The
step number that displays flashes until the valve completes driving to this regeneration step position. Once all
regeneration steps are complete the valve returns to In Service and resumes normal operation. Pushing the Extra
Cycle button during a Regeneration cycle immediately advances the valve to the next cycle step position and
resumes normal step timing.
Control Operation During Programming
The control only enters the Program Mode with the valve In Service. While in the Program Mode the control
continues to operate normally monitoring water usage and keeps all displays up to date. Control programming
is stored in memory permanently. There is no need for battery backup power.
Control Operation During A Power Failure
During a power failure all control displays and programming are stored for use upon power re-application. The
control retains these values for years, if necessary, without loss. The control is fully inoperative and any calls for
regeneration are delayed. The control, upon power re-application, resume normal operation from the point that
it was interrupted. An indication that a power outage has occurred is an inaccurate Time Of Day display.
LESS THAN 6 MINUTES
REMAINING IN
REGENERATION. STEP 1
IN SERVICE
PROGRAM
FLOW
P.M.
1- -5

SpectraPure
®
SpectraPure
®
Inc.
480.894.5437 Call us toll-free 1.800.685.2783
2167 East Fifth St, Tempe, Arizona 85281
12
TAPE
THINGS YOU SHOULD KNOW :
1. Water Softener resin should last between 15 -20 years. Below is the procedure on replacing the resin:
a. Disconnect the Control Head from your tap water plumbing. Unscrew the Control Head
from the water softener and empty the resin into a trash can. (You will need more than
one person to do this).
b. Once the resin is removed, wash the tank clean and insert the distributor
tube. (The distributor tube should be placed in the softener or carbon
tank with the lower collector screen basket end down). Turn the tube a
couple times to make sure that the bottom basket seats properly in the
bottom of the tank. Make sure the distributor
tube is in the tank BEFORE YOU ADD THE
RESIN or CARBON!
c. Cover the open upper end of the distributor
tube with tape or a cap (as shown) to keep
any resin from falling into the distributor tube
while pouring the resin into the tank.
Remove
the tape after filling the tank.
d. Place the funnel into the softener tank (as shown), and slowly pour the
resin into the softener tank.
CAUTION: If you
purchased a water softener that came with a bag
containing gravel, you must add the gravel first before the
resin. You will need enough gravel to completely bury the
collector screen.
e. Be careful to keep the distributor tube centered as best you can, while filling. Once
the filling of the softener tank is completed, carefully remove the tape or cap from the
distributor tube. Do not pull upwards on the distributor tube.
(If you do pull on the tube
you will have to reposition it by blowing compressed air in the hole and pushing it back
down to position).
f. The control valve head can now be screwed back onto the softener tank. Be sure the large
O-ring is in place, and lubricated. As you start to screw the control valve onto the tank,
make sure the hole in the center of the control valve fits over the distributor tube (page
13). The control valve should be hand tightened, snug and tight to eliminate a possible
leaks.
NOTE: Our Water Softeners do not come with a gravel bed because the tank is set up as
downflow. Downflow means that the water passes through the resin first and is
sucked up through the distributor tube.
(continued on next page)

SpectraPure
®
SpectraPure
®
Inc.
480.894.5437 Call us toll-free 1.800.685.2783
2167 East Fifth St, Tempe, Arizona 85281 13
(continued on next page)
LOWER COLLECTOR
SCREEN
DISTRIBUTOR
TUBE
Tank Sizes:
9" x 48" = 1 cu ft of Carbon
10" x 54" = 1.5 cu ft of Carbon
2" x 52" = 2.1 cu ft of Carbon
2. Carbon Tank media should last between 2-6 years. Below is the procedure on replacing the carbon.
a. Follow steps a-c on page 12.
b. Fill the empty carbon tank with approximately 2 gallons of water.
c. Place the distributor tube into the tank and keep centered. Tape the end.
d. Pour in enough gravel to completely bury the collector screen.
e. Place the funnel into the tank (as shown), and slowly pour
the carbon into the softener tank. You will need to add a
specific amount of carbon to the tank which depends on
what size tank you have.
f. Be careful to keep the distributor tube centered as best you can, while filling. Once the filling
of the carbon tank is completed, carefully remove the tape or cap from the distributor tube.
Do not pull upwards on the distributor tube.
(If you do pull on the tube you will have to
reposition it by blowing compressed air in the hole and pushing it back down to position.)
g. The control valve head can now be screwed back onto the carbon tank. Be sure the large
O- ring is in place, and lubricated. As you start to screw the control valve onto the tank,
make sure the hole in the center of the control valve fits over the distributor tube. The
control valve should be tightened by hand in a clockwise direction until it is snug and tight
to eliminate a possible leaks.
h. BEFORE YOU TURN ON THE WATER TO THE CARBON TANK, MAKE SURE YOU HAVE THE
WATER SOFTENER’S “BYPASS” VALVE ON BYPASS MODE.
– Turn on the main water supply with the water softener on bypass.
– Open a cold water faucet in the house and let the water run through the carbon
tank for a few minutes or until the water runs clear.
NOTE: A carbon tank must have a gravel bed because the tank is set up as upflow. Upflow means
that the water passes through the distributor tube first, then through the gravel bed and finally
through the carbon. The gravel bed helps to disperse the water evenly through the carbon.

SpectraPure
®
SpectraPure
®
Inc.
480.894.5437 Call us toll-free 1.800.685.2783
2167 East Fifth St, Tempe, Arizona 85281
14
3. When do I add Salt, and how much should I add?:
Add salt whenever the water level in the Brine Tank is higher than the salt level. A brine tank is
designed to be filled to the top with sodium or potassium chloride.
4. What is “mushing” and why do I need to avoid it?:
When salt pellets or cube-style salt is used, it may form tiny crystals of salt. The crystals might bond,
creating thick masses in the brine tank. This is called “mushing” and may interrupt the brine production.
If this happens, a water softener may not be able to produce soft water.
5. Is softened water harmful to a septic system?:
NO. Back washing or Regeneration water does not cause any harm to the septic system.
6. The Sodium that is used, is it harmful to my health?:
NO. Many people don’t realized but the research discussed with salt and its effects on a person’s
health is usually referred to sodium chloride, and not sodium bicarbonate, which is the result of
softening. Sodium Free alternatives are available:
– Potassium Chloride rather that Sodium Chloride can be used. Potassium-
based crystals can be used directly in the brine tank of your current
Water Softener.
– Connect the Water Softener to only the hot water line. This will make it
possible to drink and cook with unsoftened water.
– Install a Whole House Reverse Osmosis System. Gives you full benefits
of water purification technologies. (This method is best used with PVC
piping throughout the house or an alternative RO Custom system)
Please call for more Information on this subject.
7. What size water softener do I need?:
Ask yourself this question.. What amount of hardness is contained in your tap water? You can
measure your hardness content by using a Hardness Test Kit. There are some simple calculations
you can do as well:
a. Calculate how much water your household goes through: Multiply the number of people
in your family by 75. ( the #75 is an estimate number of gallons of water used per person
per day.)
b. Find the GPG (Gallons Per Grain) hardness of your water. (20 GPG is common in most
areas). Use a hardness test kit.
c. Multiply the water usage by the GPG. Example: for a 4 person household, in an area with
GPG of 20:4 x 75 = 300, then 300 x 20 = 6,000 GPG Total Hardness Per Day.
NOTE: It is recommended that the softener has enough capacity to last approximately 3 days between
regeneration of the resin. A typical household capacity for the Softener is about 20,000-40,000
grains. Example: A 4-person household, over a 3 day period, 18,000 grains would pass through
the softener. Therefore a resin capacity of 20,000 grains would meet your household needs.

SpectraPure
®
SpectraPure
®
Inc.
480.894.5437 Call us toll-free 1.800.685.2783
2167 East Fifth St, Tempe, Arizona 85281 15
TROUBLESHOOTING:
PROBLEM CAUSE CORRECTION
1. Softener fails to regenerate A. Electrical service to unit has been
interrupted.
A. Assure permanent electrical service
(check fuse, plug, pull chain of
switch).
B. Timer is defective. B. Replace timer.
C. Power failure C. Reset time of day.
2. Softener delivers hard water. A. Bypass Valve is open. A. Close bypass valve.
B. No salt in brine tank. B. Add salt to brine tank and maintain
salt level above water level.
C. Injectors or screen plugged. C. Replace injectors and screen.
D. Insufficient water flowing into brine
tank.
D. Check brine tank fill time and clean
brine line flow control if plugged.
E. Hot water tank hardness. E. Repeat flushing for the hot water
tank is required.
F. Leak at distributor tube. F. Make sure distributor tube is not
cracked. Check O-ring & tube pilot.
G. Internal valve leak. G. Replace seals and spacers and/or
piston.
3. Unit uses too much salt. A. Improper salt setting. A. Check salt usage and salt setting.
B. Excess water in brine tank. B. See Problem 7.
4. Loss of water pressure. A. Iron buildup in line to softener. A. Clean line to water conditioner.
B. Iron buildup in water softener. B. Clean control and add resin cleaner
to resin bed. Increase frequency of
regeneration.
C. Inlet of control plugged due to
foreign material loose from pipes by
recent work done on plumbing.
C. Remove piston and clean control.
5. Loss of resin through drain line. A. Air in water system. A. Assure that well system has proper
air elimination control. Check for dry
well condition.
6. Iron in conditioned water. A. Fouled resin bed. A. Check backwash, brine draw and
brine tank fill; increase frequency of
regeneration; increase backwash
time.
7. Excessive water in brine tank. A. Plugged drain line flow control. A. Clean flow control.
8. Salt water in service line. A. Plugged injector system. A. Clean injector and replace screen.
B. Timer not cycling. B. Replace timer.
C. Foreign material in brine line. C. Clean or replace brine valve.
D. Foreign material in brine flow control. D. Clean brine line flow control.

SpectraPure
®
SpectraPure
®
Inc.
480.894.5437 Call us toll-free 1.800.685.2783
2167 East Fifth St, Tempe, Arizona 85281
16
TROUBLESHOOTING (continued):
PROBLEM CAUSE CORRECTION
9. Softener fails to draw brine. A. Draw line flow control is plugged. A. Clean drain line flow control
B. Injector is plugged. B. Clean or replace injectors.
C. Injector screen plugged. C. Replace screen.
D. Line pressure is too low. D. Increase line pressure (min. 30 psi).
E. Internal control leak. E. Change seals, spacers and/or piston
assembly.
10. Control cycles continuously. A. Faulty timer mechanism. A. Replace timer.
11. Drain flows continuously. A. Foreign material in control. A. Remove piston assembly and inspect
bore; remove foreign material and
check control in various regeneration
positions.
B. Internal control leak. B. Replace seals and/or piston assembly.
C. Control valve jammed in Brine or
Backwash position.
C. Replace seals and/or piston assembly.
D. Timer motor stopped or jammed. D. Replace timer.
GENERAL SERVICE “HINTS” FOR METER CONTROL (if meter controller is used for water softener)
PROBLEM CAUSE CORRECTION
1. Softener delivers hard water. A. Reserve capacity has been
exceeded.
A. Check salt dosage requirements and reset
program wheel to provide additional
reserve.
B. Program wheel is not rotating with
meter output.
B. Pull cable out of meter cover and rotate
manually. Program wheel must move
without binding and clutch must give
positive “clicks” when program wheel
strikes regeneration stop. (If not, replace
timer.)
C. Meter is not measuring flow. C. Check output by observing rotation of
small gear on front of timer. (Program
wheel must not be against regeneration
stop for this check.) Each tooth is
approximately 30 gallons. (If not, replace
meter.)
2. Filter fails to backwash. A. Electrical service to unit has been
interrupted.
A. Assure permanent electrical service.
(Check fuse, plug, pull chain or switch.)
B. Timer is defective. B. Replace timer.
C. Power failure. C. Reset time of day.

SpectraPure
®
SpectraPure
®
Inc.
480.894.5437 Call us toll-free 1.800.685.2783
2167 East Fifth St, Tempe, Arizona 85281 17
TROUBLESHOOTING (continued):
PROBLEM CAUSE CORRECTION
3. Filter “bleeds” iron. A. Bypass Valve is open. A. Close bypass valve.
B. Excessive water usage. B. Reduce days between backwashing.
(See timer instructions.) Make sure
that there are no leaking valves in
the toilet bowl or sinks.
C. Hot water tank is rusty. C. Repeated flushing of the hot water
tank is required.
D. Leak at distributor line. D. Make sure distributor tube is not
cracked. Check O-ring and tube pilot.
E. Defective or stripped filter medium
bed.
E. Replace bed.
F. Inadequate backwash flow rate. F. Make sure filter has correct drain flow
control and that the flow control is
not clogged or drain line restricted.
Check that the water pressure has
not dropped. Increase backwash
flow rate according to specifications
for your unit. See your dealer for
recommendations.
4. Loss of water pressure. A. Iron or turbidity buildup in water
filter.
A. Reduce days between backwashing
so filter backwashes more often.
Make sure filter is sized large enough
to handle water usage.
B. Inlet plugged due to foreign material
broken loose from pipes by recent
plumbing work.
B. Remove piston and clean control.
5. Loss of filter medium through
drain line.
A. Broken or missing top screen. A. Replace top screen. The top screen
must have 0.020" wide slots.
6. Drain flows continuously. A. Foreign material in control. A. Remove piston assembly and inspect
bore. Remove foreign material
and check control in various cycle
positions
B. Internal control leak. B. Replace seals and/or piston assembly.
C. Control valve jammed in rinse or
backwash.
C. Replace piston, seals and spacers
(and drive motor, if necessary).

SpectraPure
®
SpectraPure
®
Inc.
480.894.5437 Call us toll-free 1.800.685.2783
2167 East Fifth St, Tempe, Arizona 85281
18
- CYCLE TIMES for WATER SOFTENER -
(for further information and servicing, please refer to manufacture’s manual).
SERVICE POSITION:
Standard operation
BACKWASH POSITION:
With standard filter piston, 10 min.

SpectraPure
®
SpectraPure
®
Inc.
480.894.5437 Call us toll-free 1.800.685.2783
2167 East Fifth St, Tempe, Arizona 85281 19
BRINE / SLOW RINSE POSITION:
This cycle eliminates brine solution in resin tank. 60 minute pause. (No water flows during this time)
SECOND BACKWASH POSITION (Double Backwash Units Only):
With standard filter piston, 10 min.

SpectraPure
®
SpectraPure
®
Inc.
480.894.5437 Call us toll-free 1.800.685.2783
2167 East Fifth St, Tempe, Arizona 85281
20
FINAL, RAPID RINSE
5-10 minutes, depending on house pressure.
BRINE TANK REFILL POSITION
5-10 minutes, depending on house pressure.
Table of contents
Other SpectraPure Water Dispenser manuals
Popular Water Dispenser manuals by other brands

BRIO
BRIO CLPOU420UVF2 Setup manual

Aquacentrum
Aquacentrum AquaVolta NANO manual

Elkay
Elkay EZSTL8WS 1G Series Installation & use manual

Montgomery Ward
Montgomery Ward GD-2TCCTW instruction manual

Excalibur Water Systems
Excalibur Water Systems 2.0" High Capacity Premium Flow Series Installation and operation manual

lancer
lancer TOUCHPOINT SERIES 4800T Operation manual