Spectur HD5 User manual

1300 802 960 | www.spectur.com.au
HD5 Installation
Guide

Spectur Guide for HD5 Installation
1300 802 960 | www.spectur.com.au
2
Contents
A Message From the CEO: Gerard Dyson ............................................................................................. 4
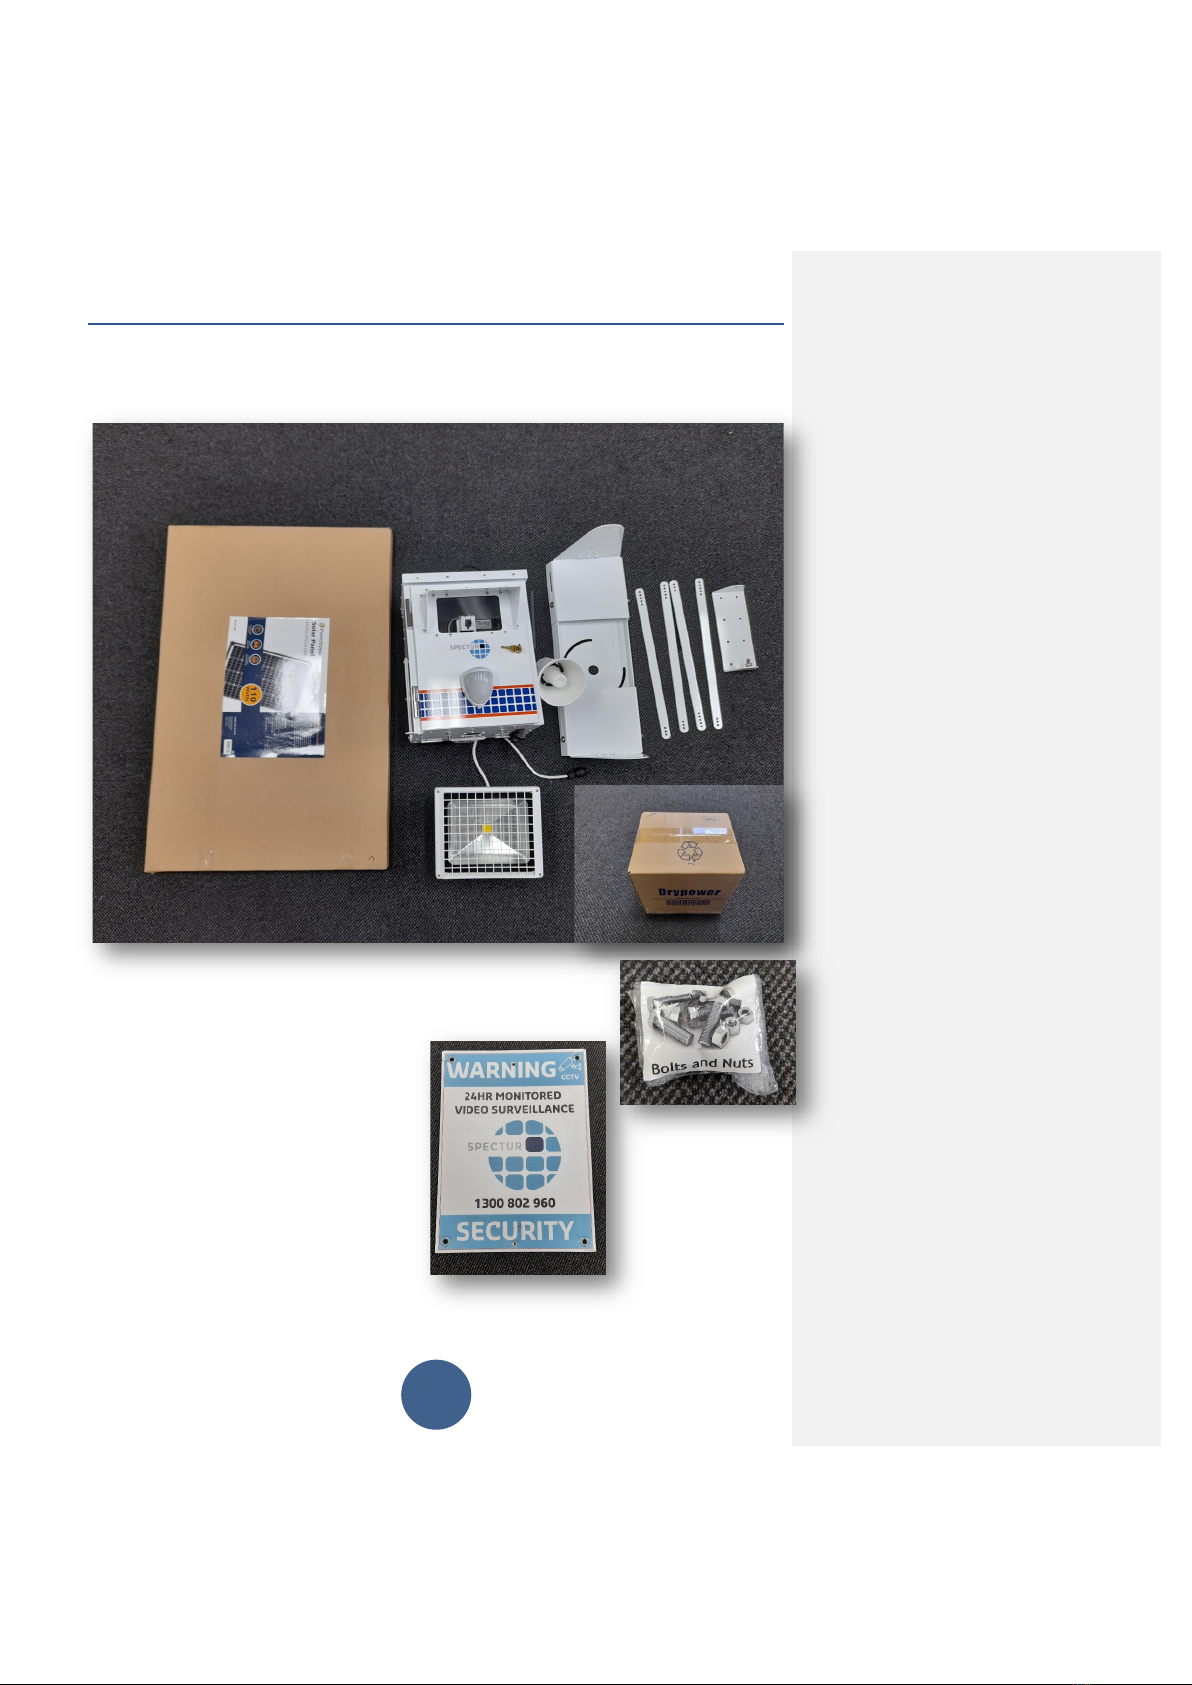
Camera box setup ........................................................................................................................... 5
What you need .............................................................................................................................. 5
Attach the Floodlight ...................................................................................................................... 6
Step 1: ............................................................................................................................................. 6
Step 2: ............................................................................................................................................. 6
Installing the Antennas ................................................................................................................... 7
Step 1: ............................................................................................................................................. 7
Step 2: ............................................................................................................................................. 7
Installing a SIM card in the Spectur Modem ............................................................................. 8
Step 1: ............................................................................................................................................. 8
Step 2: ............................................................................................................................................. 9
Assembling the solar panel ........................................................................................................... 9
What you need .............................................................................................................................. 9
Step 1: ............................................................................................................................................. 9
Step 2: ........................................................................................................................................... 10
Step 3: ........................................................................................................................................... 10
Step 4: ........................................................................................................................................... 11
Pole installation .............................................................................................................................. 11
Picking a spot: ............................................................................................................................. 11
In-ground ..................................................................................................................................... 12
What you Need: ...................................................................................................................... 12
Step 1: ....................................................................................................................................... 12
Step 2: ...................................................................................................................................... 13
Step 3: ...................................................................................................................................... 13
Step 4: ...................................................................................................................................... 14
Completing the Installation ...................................................................................................... 14
Step 1: ....................................................................................................................................... 14
Step 2: ...................................................................................................................................... 15
Step 3: ...................................................................................................................................... 15
Step 4: ...................................................................................................................................... 15

Spectur Guide for HD5 Installation
1300 802 960 | www.spectur.com.au
3
Step 5: ...................................................................................................................................... 16
Step 6: ...................................................................................................................................... 16
Step 7: ....................................................................................................................................... 17
Step 8: ...................................................................................................................................... 17
Step 9: ...................................................................................................................................... 17
Step 10: ..................................................................................................................................... 18
Step 11: ..................................................................................................................................... 18
Step 12: ..................................................................................................................................... 19
Step 13: .................................................................................................................................... 19
Step 14: .................................................................................................................................... 19
Other Base Options ....................................................................................................................... 20
Mobile Base installation ............................................................................................................ 20
What you need: ...................................................................................................................... 20
Step 1: ....................................................................................................................................... 20
Step 2: ...................................................................................................................................... 21
Step 3: ...................................................................................................................................... 21
Step 4: ...................................................................................................................................... 22
Step 5: ...................................................................................................................................... 22
Trailer installation ....................................................................................................................... 23
Step 1: ....................................................................................................................................... 23
Non-standard installation ......................................................................................................... 24
Setup and checking system .................................................................................................... 24
Step 1: ....................................................................................................................................... 24
Step 2: ...................................................................................................................................... 24
Leaving sites orderly ................................................................................................................. 25
Step 1: ....................................................................................................................................... 25
Step 2: ...................................................................................................................................... 25
Step 3: ...................................................................................................................................... 25
How to ensure customers know how to use services and get assistance .................. 26
Step 1: ....................................................................................................................................... 26
Step 2: ...................................................................................................................................... 26
Notes: ............................................................................................................................................... 26
Number of bags of concrete to use: ................................................................................. 26

Spectur Guide for HD5 Installation
1300 802 960 | www.spectur.com.au
4
A Message From the CEO: Gerard Dyson
Hi, I am Gerard Dyson, the CEO of Specur Ltd. Congratulations on your purchase of one of our Spectur
Systems. Please read the installation manual fully prior to conducting an installation. We strongly
recommend the use of PPE throughout the installation and a site-specific job hazard assessment.
Good luck and be safe
Gerard Dyson
CEO
Spectur Guide for HD5 Installation
1300 802 960 | www.spectur.com.au
5
Camera box setup
What you need
○ Solar panel
○ Main camera box
○ Pole mounting bracket
○ 50 W flood light
○ Screws
○ Sign
○ Battery
○ Adjustable or 6mm set spanner.
○ Sim pin

Spectur Guide for HD5 Installation
1300 802 960 | www.spectur.com.au
6
Attach the Floodlight
Step 1:
Unscrew the nuts at the bottom of the Main camera box. Remove the two M6 washers
and M6 spring washers. Place the floodlight bracket over the bolt, ensuring that the
white cable is at the bottom of the flood light. Put on a washer followed by a spring
washer, then the nut over each bolt. Tighten until bracket is securely set.
Step 2:
Connect the white cable to the middle plug at the base of the box. Once plugged in,
tighten by twisting the top of the barrel connector.

Spectur Guide for HD5 Installation
1300 802 960 | www.spectur.com.au
7
Installing the
Antennas
Step 1:
Open the Main camera box
using the provided key and
remove the two antennas
from the box.
Step 2:
Screw the two antennas to the two SMA plugs above the speaker being careful not to
overtighten. Note that the SMA plugs may be covered in a red removable plastic
cover. Position the antennas so that they are parallel to the camera box, vertical and
evenly spaced.

Spectur Guide for HD5 Installation
1300 802 960 | www.spectur.com.au
8
Installing a SIM card in the Spectur Modem
Below are instructions for installing your
own
SIM card. Note that if you have purchased a
Spectur SIM plan, the SIM card will be pre-installed, and you can skip this section.
Step 1:
Using a SIM pin open the SIM card tray in the
Spectur Modem. Remove the SIM card tray.
Spectur Guide for HD5 Installation
1300 802 960 | www.spectur.com.au
9
Step 2:
Place the SIM card in the SIM card tray aligning the corner notch as shown. Reinsert
the tray, taking care that the SIM is facing down, or else the modem will not be able
to read the SIM.
Assembling the solar panel
What you need
○ Nuts and bolts
○ Solar bracket and solar arms
○ Adjustable or M6 spanner and
socket
Step 1:
Unpack the nuts and bolts and locate 4
M6x20 bolts
and 4 M6
washers.

Spectur Guide for HD5 Installation
1300 802 960 | www.spectur.com.au
10
Step 2:
The solar panel will have three sets of bolts
on each side. Do not remove the bubble wrap
from the panel just yet.
Step 3:
Note the marked holes on the panel arm, we will be using these holes to connect the
panel and solar bracket.

Spectur Guide for HD5 Installation
1300 802 960 | www.spectur.com.au
11
Step 4:
Using the M6x20 bolts and washers provided, connect the arms to the solar bracket.
Do not tighten the bolts, this will be done later. Note how the washers and spring
washers are used. The spring washer is in between the flat washer and the nut. Once
you have put in all the screws, use an M6 ratchet and spanner (not supplied) to
tighten the nuts. Make sure everything is tight as failure to do so can result in serious
injury and damage to equipment.
Pole installation
There are many ways a pole can be installed. Namely, in ground, mobile base, or non-
standard.
Picking a spot:
The system should be installed at a location:
• With direct access to full sunlight. If there is even 10% shade over the panel it
will lose 90% of its energy generation.
• Away from other assets such as Power lines and utility pipes (electrical, gas,
water)
• Not pointed at areas that may lead to privacy breaches.

Spectur Guide for HD5 Installation
1300 802 960 | www.spectur.com.au
12
In-ground
What you Need:
Step 1:
Using a post-hole digger, dig a 700
mm deep hole and insert the
Bottom pole. The bottom pole is the
longer of the two poles.
○ Post-hole digger
○ 2 or 3 x 20 kg kwikset concrete
○ At least 7L of water
○ Bottom Pole
○ Top Pole
○ Spirit level
○ Measuring tape
○ Spade
○ Ability to measure 2.2 L
increments.

Spectur Guide for HD5 Installation
1300 802 960 | www.spectur.com.au
13
Step 2:
Check that the front of the pole is facing
in the direction of the area you wish to
monitor. To ensure this, align the pole
such that the two top bolt holes (these
will be used for the winch, shown in red)
on the side are at 90° to the area you
wish to view. This is done so that the
winch faces the right way. Using a spirit
level on 2
sides check
that the pole
is vertical.
Step 3:
Once the pole is vertical pour 2 or 3 bags of
KwikSet concrete into the hole. Pour
roughly 4.4L or 6.6L (2.2L per 20kg) of water into the
hole, then stir the concrete using a spade or pick until

Spectur Guide for HD5 Installation
1300 802 960 | www.spectur.com.au
14
concrete is consistently wet. Shovel dirt on top of the concrete to flatten out the area
and to cover the concrete.
Step 4:
Wait 10 – 15 minutes for the concrete to set before proceeding to the Winch Vertical
Pole section.
Completing the Installation
○ 2 x M6x30 bolts
○ 2 x M6 Spring washers
○ 2 x M6 Washers
○ 2 x M8x20 bolts
○ 2 x M8 washers
○ 1 x M30 Nut
○ 1 x M30 Washer
○ 4 x M15x235 Bolts
○ 8 x M15 washers
○ 4 x M15 Nuts
○ 2 x M10 nuts
○ 8 x 12-14x35 Tek screws
○ 1 x Battery cable
○ 2 x Antennas
○ 2 x Spectur Signs
○ Mounting bracket
○ Mounting pole
○ Adjustable or M6, M8, M10, M15,
M30 spanners
○ Phone
○ Cordless drill with bits for the
above.
Step 1:
Attach the winch to the base pole as shown to the right
using 2 M15x235 bolts.

Spectur Guide for HD5 Installation
1300 802 960 | www.spectur.com.au
15
Step 2:
Slide the mounting pole between the winch and the base pole. Secure the mounting
pole with the winch cable by hooking it underneath the pole as shown.
Step 3:
Attach the mounting bracket to the mounting pole by
securing it with 8 tec screws as shown ensuring that
it is vertical.
Step 4:
The back of the camera box has two parallel semi
circles plates attached – one with a bolt and one with
a hole. Align the plate bolt & hole with the
corresponding mounting bracket hole& bolt as shown.
Once clipped in place, put an M10 nut over each bolt,
but do not fully tighten.

Spectur Guide for HD5 Installation
1300 802 960 | www.spectur.com.au
16
Step 5:
Rotate the cameras box to the correct view, and then lock in place by using two M6x30 bolts
in the bottom bracket.
Each M6 bolt should be inserted from the top and have an M6 spring washer, followed by an
M6 washer. Tighten the M6 bolts and the M10 nuts from the previous step.
Step 6:
Open the camera box and place the battery inside.
Connect the battery to the system via the matching
cables. Once attached, close the camera box.

Spectur Guide for HD5 Installation
1300 802 960 | www.spectur.com.au
17
Step 7:
Remove the M30 washer and M30 nut from the top of the camera
box and feed the cables through the hole in the bottom of the solar
panel bracket then the washer, followed by the nut. Proceed to
tighten the M30 nut.
Step 8:
Next feed the cables back through the M30 washer
and nut, then tighten to secure the solar panel
bracket in place.
Connect the cable to the solar panel cable.
Orient the solar panel so that it faces north. Once
correctly aligned use the two M8 bolts and M8
washers to bolt the bracket onto the top of the
camera box.
Step 9:
Open the system and check the view of the camera by
using the Spectur admin web interface. To change the
view of the camera gently adjust the cameras position.
When done checking and configuring the camera view
close the camera box and lock it with the provided key.
Commented [GP1]: Remove washer first?

Spectur Guide for HD5 Installation
1300 802 960 | www.spectur.com.au
18
Step 10:
Confirm the PIR has been configured properly and is
able to detect motion in front of it. To check this,
activate the system and walk past the system. The
flood light should turn on. To configure the PIR, remove
the cover by unscrewing the Philips screw at the
bottom and lifting the cover off. Once open, gently
shift it so that it points in the desired direction.
Step 11:
When the configuration of the cameras is finalized, wind the
winch up. Wind until the two holes in each pole line up with
each other. Check the camera view again to make sure the
camera is viewing the desired area, if not bring it down and
refer to the Setup and checking system section. If the setup
is correct, insert an M15x235 bolt through each hole in the
pole as shown. Each of the bolts should have an M15
washer in contact with both sides of the pole. Secure the
bolt with an M15 nut.

Spectur Guide for HD5 Installation
1300 802 960 | www.spectur.com.au
19
Step 12:
Remove the winch by loosening the cable, detaching the hook, and
then removing the bolts fastening it to the pole.
Step 13:
Using 2 tec screws attach the Spectur sign to the pole, such that it
faces in the same direction as the camera.
Step 14:
Attach the post sign wrap by removing the rectangular cut outs
from the sign. This will provide the holes to connect the sides
of the sign together. With the completion of this step the
Spectur HD5 system is ready to protect the premises.

Spectur Guide for HD5 Installation
1300 802 960 | www.spectur.com.au
20
Other Base Options
Mobile Base installation
What you need:
Step 1:
Place pole in the middle of the base as shown below. Then using the 3 M15x140 bolts
provided, secure the pole with a washer on each side of the frame, followed by a nut.
○ 2 x sheet metal covers.
○ 4 x Triangular metal sheets
○ 2 x Pole supports
○ 4 x base supports
○ 2 x M15x25 bolts
○ 2 x M15x15 nuts
○ 20 x 12-14x35 Tek screws
○ Socket set
○ 20 x Tec screws
○ Socket set for the above bolts
○ 3 x M15x140 bolts
○ 10 x M15 washers
○ 2 x M15x25 bolts
○ 4 x M15x30 bolts
○ 4 x Base support plates
○ 2 x M15x12 nuts
○ 20 x 20kg sandbags
○ Mounting pole drilled for
mobile base.
○ Drill + Philips head
Commented [GP2]: Put these sections below winch section.
That is, finish one compete install and then talk about other
base options
Commented [GP3]: How is base assembled before this step
Commented [MD4R3]: This is the condition the base comes
in, but I will do a full assembly of the base when available
Commented [MD5R3]:
Other manuals for HD5
2
Table of contents
Other Spectur Industrial Equipment manuals


