Speedsignal B-3540006 User manual
speedsignal GmbH Phone: +49 8061 49518 – 0 E-Mail: info@speedsignal.de
Carl-von-Ossietzky-Straße 3 Fax: +49 8061 49518 – 10 Homepage: www.speedsignal.de
D- 83043 Bad Aibling facebook: facebook.com/speedsignal
EINBAUANLEITUNG
Installation Guide
DVI Displayanbindung VW MQB Display
DVI Display-connection VW MQB Display
(Seat, Skoda, VW)
Für Fahrzeuge mit 8" Display
For vehicles with 8” display
Seat Media System „Plus”
Skoda Amundsen (ab 2017)
Bolero (ab 2017)
Columbus (2015-2019)
VW Composition Media (ab 2017)
Discover Media (ab 2017)
Discover Pro (ab 2015-2019)
Nur für den Gebrauch in Behördenfahrzeugen mit Einzelabnahme vorgesehen.
Only intended for use in official vehicles with individual approval.
Art.Nr. B-3540006
10R-058209 (Interface)

B-3540006_R0 03.12.2020 Seite 2von 10
Sicherheitshinweise - safety instructions
Der Einbau dieses Artikels darf nur von geschultem Fachpersonal vorgenommen werden und nur nach der in dieser
Anleitung beschriebenen Vorgehensweise.
Die speedsignal GmbH übernimmt keinerlei Haftung für Personen- oder Sachschäden, die mit dem Missbrauch unserer
Produkte im Zusammenhang stehen.
Vor der Montage bitte die Batterie abklemmen. Beim Einbau müssen alle zusätzlichen Versorgungsleitungen ent-
sprechend ihres Querschnittes und ihrer Kabellänge abgesichert werden. (DIN VDE 0298-4)
The installation of this product should only be carried out by trained specialist personnel and in accordance with this manual.
speedsignal GmbH cannot accept any liability for injury to persons or damage to property from errors or mistakes in this operating
manual.
Please disconnect the battery before you start with the installation. During montage, all additional supply lines must be secured
pursuant to their cross section and cable length. (DIN VDE 0298-4)
Beschreibung – description
Dieses Interface bietet eine elektronische Einspeisung zusätzlicher HDMI/DVI Bildquellen auf ein originales Fahrzeug-
Display. Die Bedienung erfolgt über Touch und/oder Hardkey-Funktionen.
This interface offers an electronic feed of additional HDMI/DVI image sources to an original vehicle display. It is operated via touch
and/or hardkey functions.
Lieferumfang – scope of delivery
USB Anbindung Video-Adapter Anschluss-Kabel USB-Kabel Antennenleitung
USB connection video adapter video switch cable USB cable antenna cable
3540002 3676306 C-3544757 C-3540001 C-3674757
Benötigtes Werkzeug – required tools
Ausbauwerkzeug
Removal tool

B-3540006_R0 03.12.2020 Seite 3von 10
Übersicht der kompatiblen Displays – overview of compatible displays
Seat
Media System „Plus”
Skoda
Amundsen (ab 2017) Bolero (ab 2017)
Columbus (2015-2019)

B-3540006_R0 03.12.2020 Seite 4von 10
VW
Composition Media (ab 2017) Discover Media (ab 2017)
Discover Pro (ab 2015-2019)
Anschlussstecker an der Rückseite des Displays – connection plug at the rear of the display
B-3540006_R0 03.12.2020 Seite 5von 10
Abgriffpunkt – tap point
Das Interface wird direkt mit einer Plug & Play Lösung an die bestehende Radiodisplay-Rückseite angeschlossen.
The interface is connected directly to the existing radio display rear panel using a plug & play solution
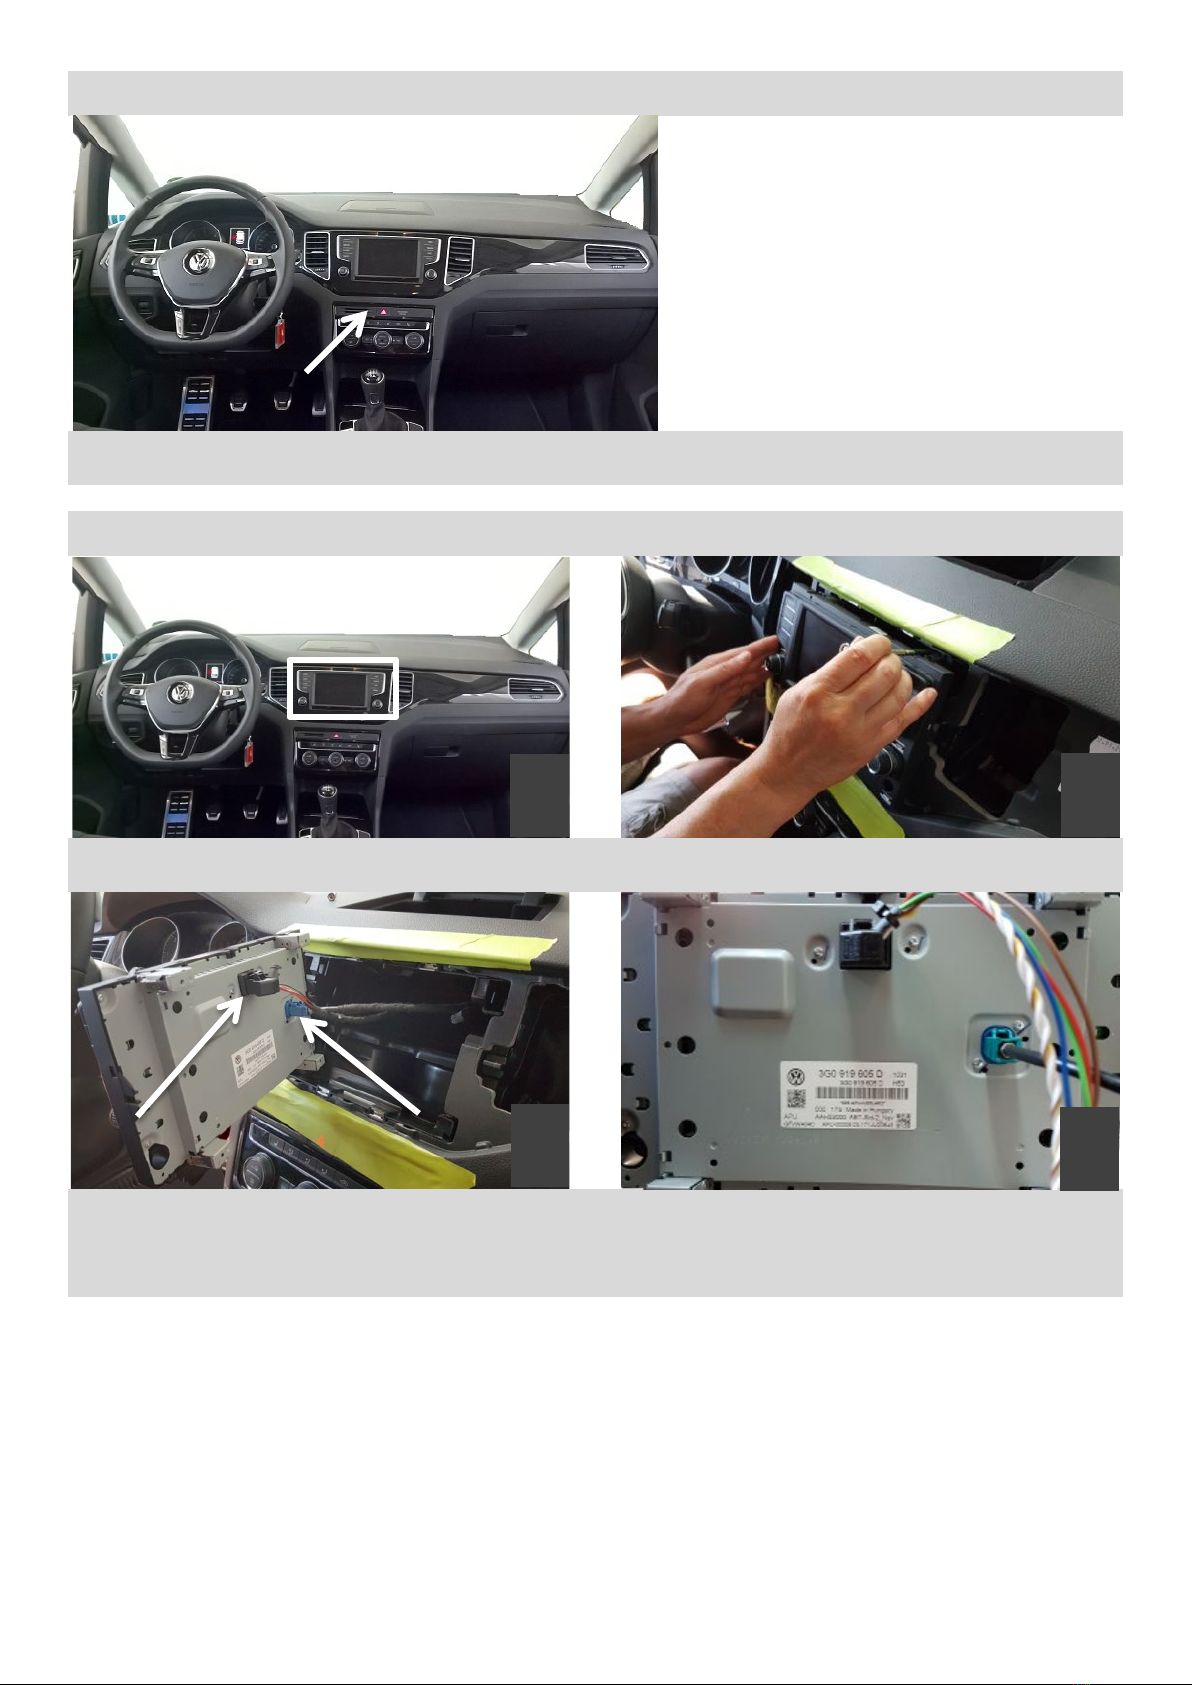
Einbau – installation
1
2
Abdeckung um das Display entfernen
Remove the cover around the display
Display des Radios entfernen
Remove the radio display
Beide Anschlusskabel abziehen
Disconnect both connection cables
Anschlusskabel zwischen Werksverkabelung und Dis-
play anschließen
Connect connecting cable between factory wiring
and
display
3
Radio
Video
4

B-3540006_R0 03.12.2020 Seite 6von 10
Multimediale Wiedergabe – Multimedia Playback
Wollen Sie mehrere Geräte auf ihrem Display spiegeln, so müssen Sie ein weiteres Interface und einen weiteren Ka-
belsatz hintereinander schalten.
If you want to mirror several devices on your display, you have to connect another interface and another cable set in
series.
5
6
7
8
Videointerface anschließen
Connect the video interface
CAN Bus Interface mit Anschlusskabel verbinden
Connect CAN bus interface with connection cable
Der Anschluss an das Endgerät (Laptop, Tablet) erfolgt über den DVI (HDMI) Anschluss am Videointerface und den
USB Anschluss am Interface.
The connection to the device (laptop, tablet) is made via the DVI (HDMI) connector on the video interface and the
USB connector on the interface.

B-3540006_R0 03.12.2020 Seite 7von 10
Pin Belegung Kabelsatz Stecker – Pin assignment cable harness connector
Anschlussbelegung 10-poliger Microfit-Stecker
Pin assignment 10-pin Microfit connector
Ein-/Ausgang
Input/output
Bezeichnung
designation
Kabelfarbe
cable colour
Bemerkung
remark
1
Eingang input
Masse ground
braun brown
---
2 Ausgang output
Schaltsignal für Video Interface
Switch signal for video interface
lila purple
0V wenn aktiv
0V if active
3
nicht belegt not assigned
---
---
---
4
nicht belegt not assigned
---
---
---
5 Eingang input CAN Low
weiß-braun
white-brown
---
6 Eingang input
Stromversorgung +12 V
Power supply +12 V
rot red
an Klemme 30
at clamp 30
7
nicht belegt not assigned
---
---
---
8
nicht belegt not assigned
---
---
---
9 Ausgang output
Stromversorgung Display Inter-
face
Power supply Display Interface
red
+12V wenn Display AN
0V wenn Display aus
+12V when display is ON
0V when display is OFF
10 Eingang input CAN High
weiß-gelb
white-yellow
---
Anschlussbelegung 6-poliger Microfit-Stecker
Pin assignment 6-pin Microfit connector
Ein-/Ausgang
Input/output
Bezeichnung
designation
Kabelfarbe
cable colour
Bemerkung
remark
1 Eingang input CAN Low
weiß-braun
white-brown
---
2
nicht belegt not assigned
---
---
---
3 nicht belegt not assigned --- --- ---
4 Eingang input CAN High
weiß-gelb
white-yellow
---
5
nicht belegt not assigned
---
---
---
6
nicht belegt not assigned
---
---
---
Anschlussbelegung 4-poliger Microfit-Stecker
Pin assignment 4-pin Microfit connector
Ein-/Ausgang
Input/output
Bezeichnung
designation
Kabelfarbe
cable colour
Bemerkung
remark
1
Eingang input
Masse ground
braun brown
---
2 Eingang input
Schaltsignal für Video Interface
Switch signal for video interface
lila purple
0V wenn aktiv
0V if active
3 Eingang input
Stromversorgung +12 V
Power supply +12 V
rot red
an Klemme 30
at clamp 30
4
nicht belegt not assigned
---
---
---

B-3540006_R0 03.12.2020 Seite 8von 10
Bedienung – operation
Durch längeres Drücken der MEDIA Taste (ca. 3 Sekunden) schalten Sie das Videodisplay ein.
Press and hold the MEDIA button (approx. 3 seconds) to switch on the video display.
Die Auflösung des Displays ist auf 800x480 begrenzt. Deshalb ist dieses Format auf dem Endgerät (Laptop, Tablet)
einzustellen.
The resolution of the display is limited to 800x480. Therefore this format must be set on the end device (laptop, tab-
let).

B-3540006_R0 03.12.2020 Seite 9von 10
Die linke Bedienfeldseite behält die Funktionen.
The left side of the control panel retains the functions.

B-3540006_R0 03.12.2020 Seite 10 von 10
Garantiebestimmungen - Warranty Conditions
Die speedsignal GmbH gewährleistet innerhalb der gesetzlichen Frist von 2 Jahren ab Datum des Erstkaufes, dass dieses
Produkt frei von Materialfehlern und Verarbeitungsfehlern ist, sofern dieses Produkt unseren Vorgaben entsprechend
verbaut wurde.
Sollten Reparaturen durch Verarbeitungsfehler oder Fehlfunktionen des Produktes innerhalb der Gewährleistungsfrist
nötig sein, wird die speedsignal GmbH das Produkt reparieren oder durch ein fehlerfreies Produkt ersetzen. Um die
Gewährleistung beanspruchen zu können, benötigen Sie einen Kaufbeleg.
Der Garantieanspruch erlischt durch:
unbefugte Änderungen am Gerät oder Zubehör
selbst ausgeführte Reparaturen am Gerät
unsachgemäße Nutzung bzw. Betrieb
Gewalteinwirkung auf das Gerät (Herabfallen, mutwillige Zerstörung, Unfall, etc.)
Beachten Sie beim Einbau alle sicherheitsrelevanten und gesetzmäßigen Bestimmungen.
Bitte beachten Sie generell beim Einbau von elektronischen Baugruppen in Fahrzeugen die Einbaurichtlinien und Ga-
rantiebestimmungen des Fahrzeugherstellers.
Sie müssen auf jeden Fall den Auftraggeber (Fahrzeughalter) auf den Einbau eines Interfaces aufmerksam machen und
über die Risiken aufklären.
Es empfiehlt sich, mit dem Fahrzeughersteller oder einer seiner Vertragswerkstätten Kontakt aufzunehmen, um Risi-
ken auszuschließen.
speedsignal GmbH guarantees within the legal deadline of 2 years from the original date of purchase that this product is free from
defects in material and workmanship as long as this product was installed similar to our installation guide.
If repairs of processing errors or malfunctions of this product are necessary within the warranty period, speedsignal will repair the
product or replace it with a flawless product. To be able to assert the benefit of these provisions, you need the proof of purchase.
Warranty claim and operating license lapses:
unauthorised changes on the device or accessory
self-initiated repairs at the device
improper use or operation
violent impacts to the device (fall down, wanton destruction, accident, etc.)
For installation, please notice all safety and legal regulations.
When installing electronic assemblies into vehicles please note the installation guidelines and warranty conditions of the vehicle
manufacturer.
In any case, you have to inform the principal (vehicle owner) about the installation of this interface and about all risks.
It is therefore recommended to get in contact with the vehicle manufacturer or with an authorized workshop to exclude any risks.
speedsignal GmbH Phone: +49 8061 49518 – 0 E-Mail: info@speedsignal.de
Carl-von-Ossietzky-Straße 3 Fax: +49 8061 49518 – 10 Homepage: www.speedsignal.de
D- 83043 Bad Aibling facebook: facebook.com/speedsignal
Table of contents
Other Speedsignal Car Video System manuals


