Spike Solo User manual

Spike Solo System
Bottom Drain User Guide

SPIKE SOLO BOTTOM DRAIN USER GUIDE1
Congrats on
securing your
new Spike Solo
System!
We know you’re anxious to get brewing, so we made these
assembly instructions and Brew Day Guide easy for you to
follow and threw in a few pro tips along the way.
Grab a beer, and let’s get started.
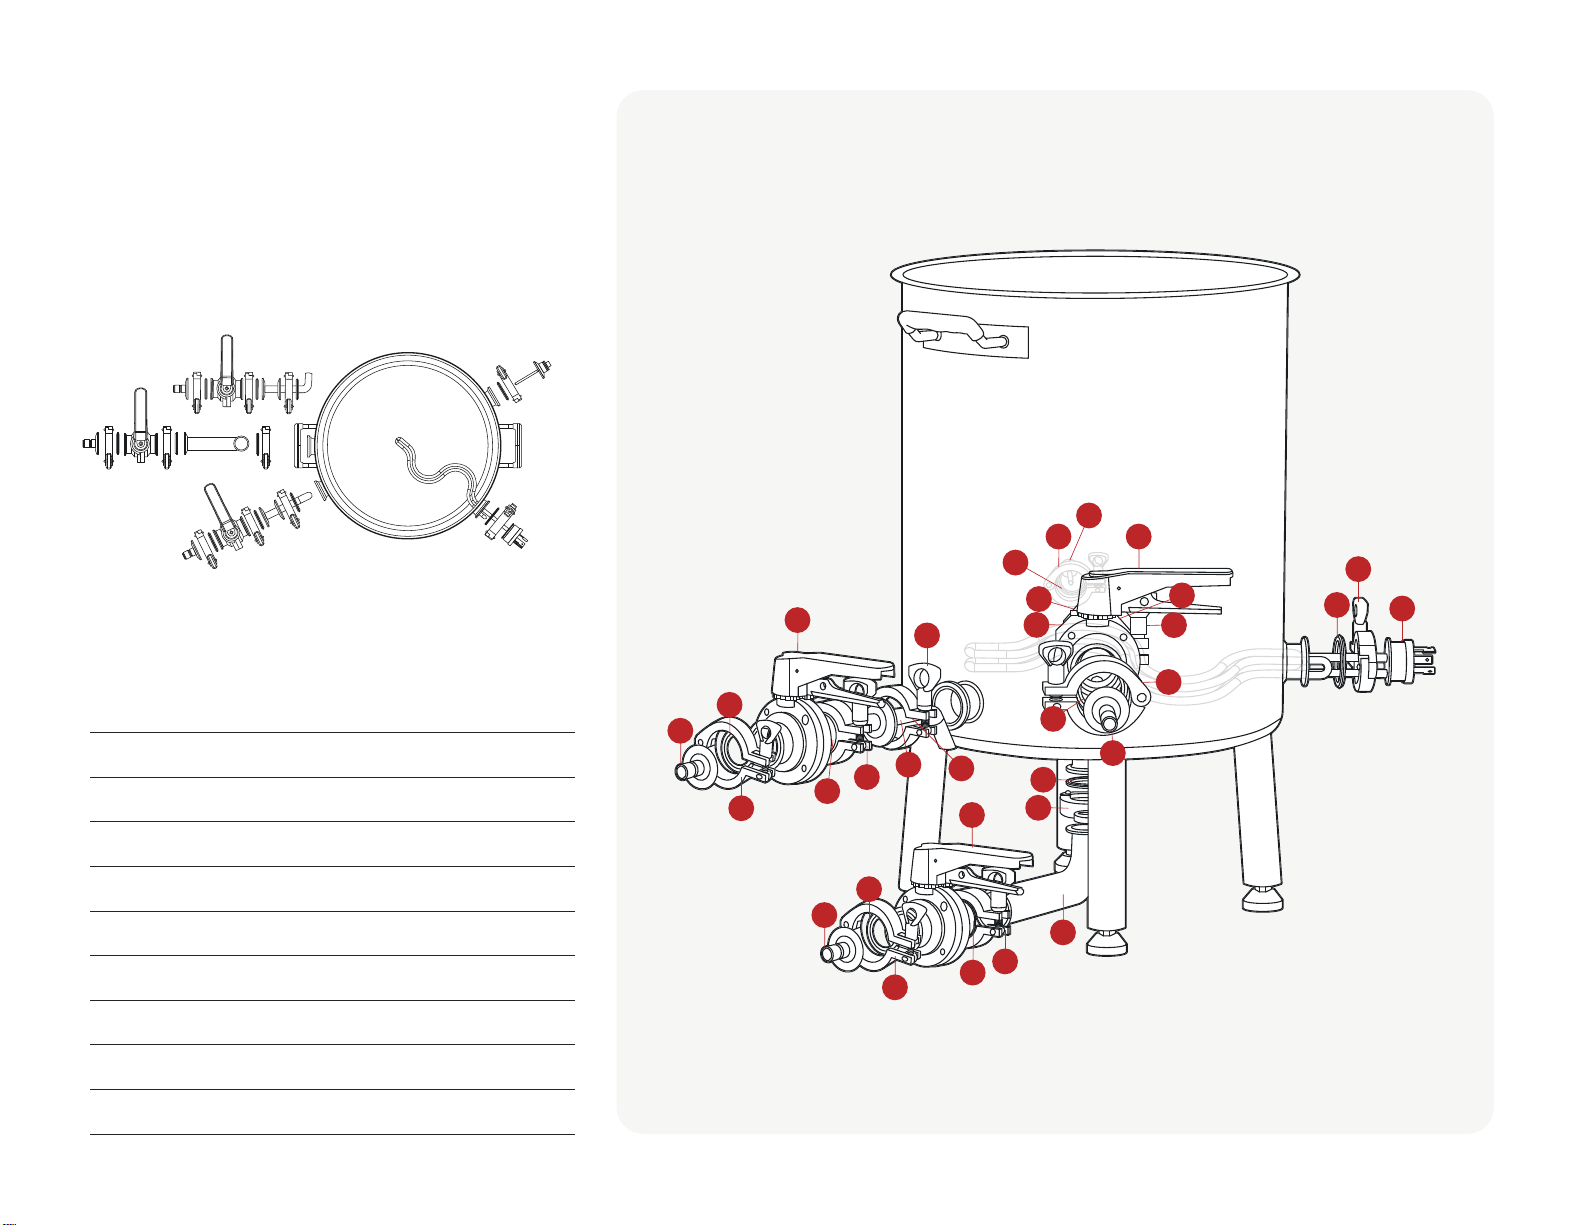
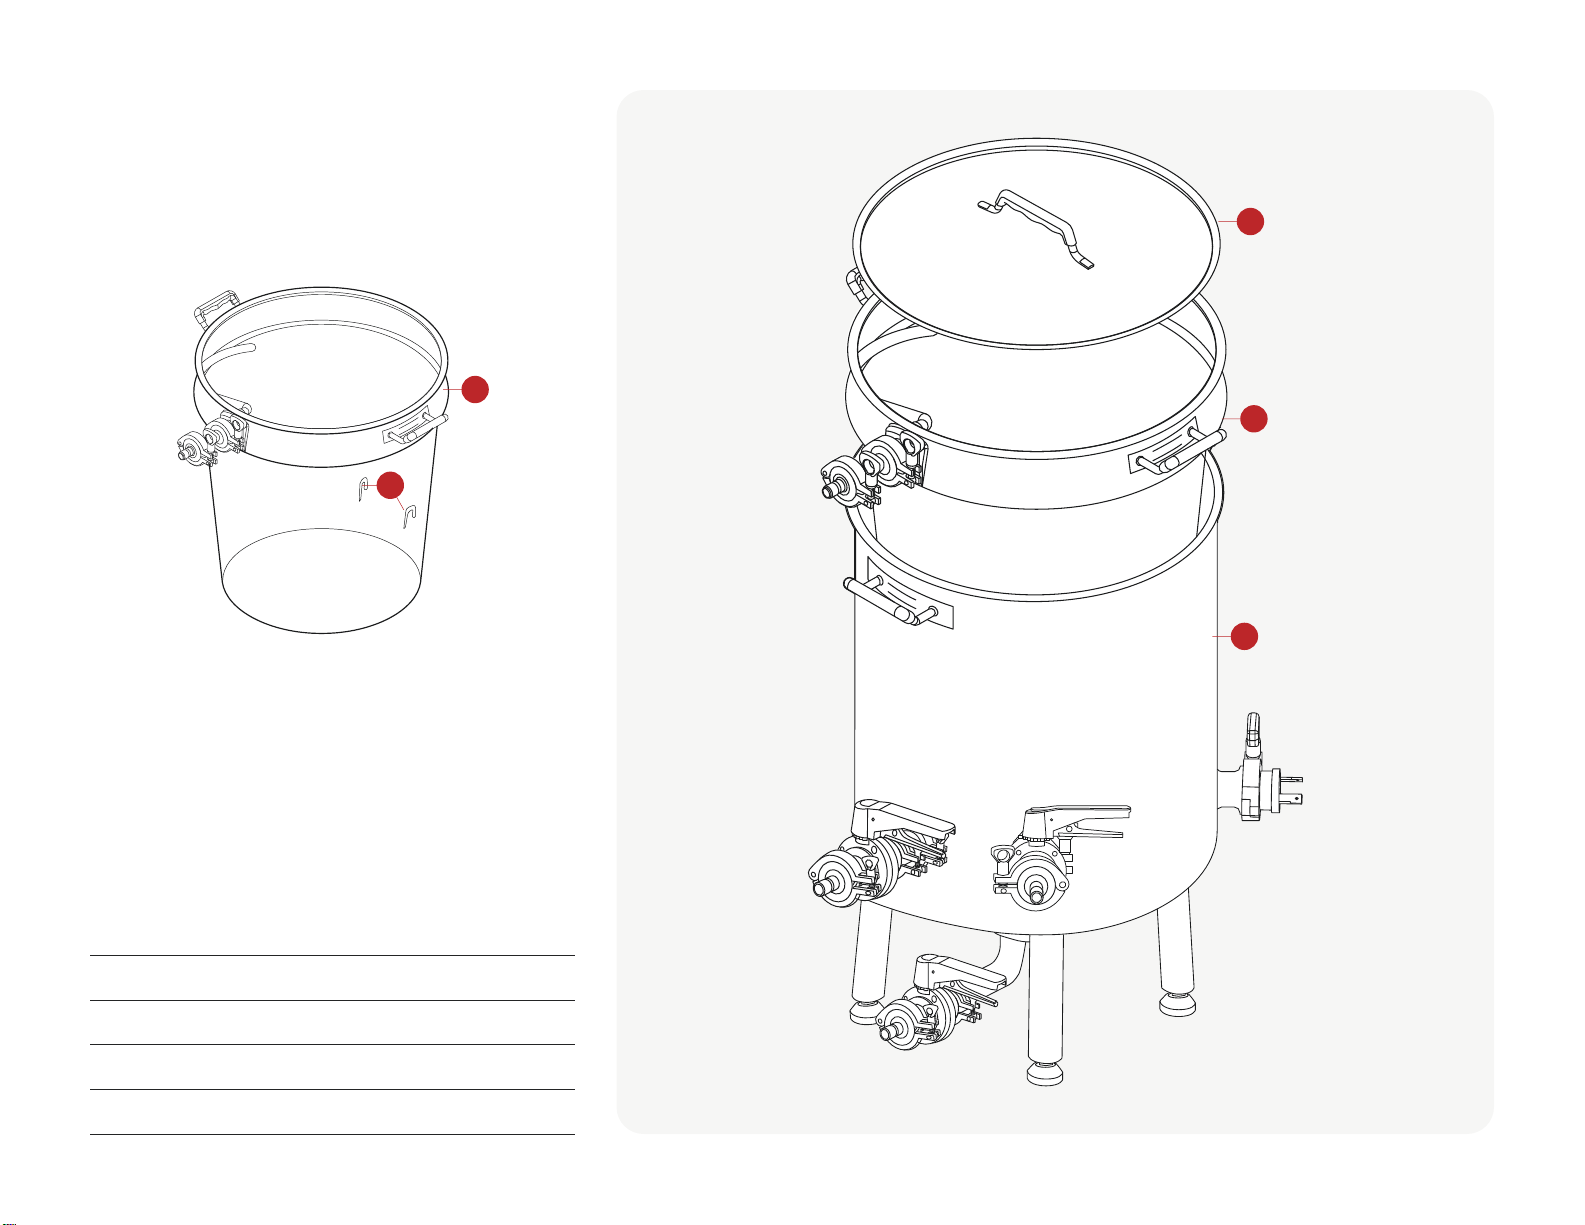
Kettle.................................... 4.
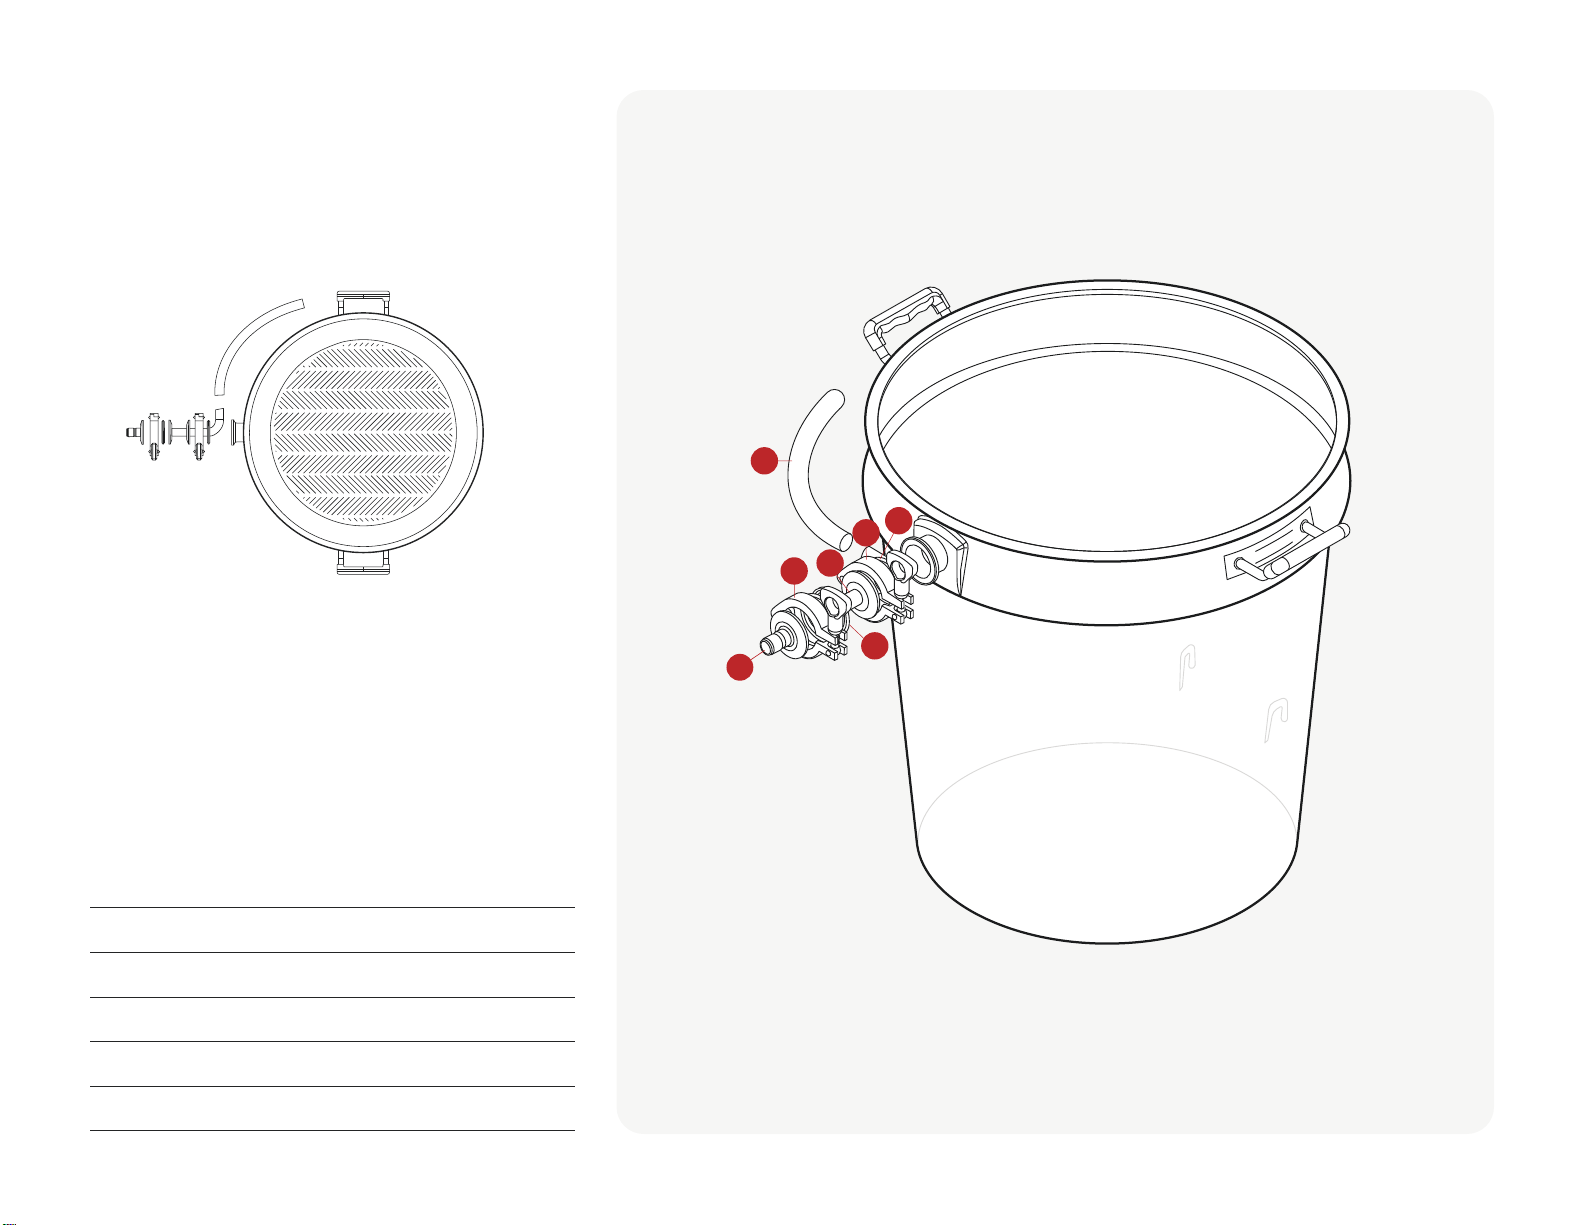
Basket................................... 6.
Kettle & Basket ....................... 8.
Wort Chiller............................ 10.
Pump.................................... 12.
Hoses ................................... 14.
01. Assembly................................ 2.
Control Panel ......................... 16.
Heat Strike Water .................... 17.
Mashing ................................ 18.
Drain (Lauter) ......................... 19.
Boiling................................... 20.
Whirlpool............................... 21.
Chill (Knockout)....................... 22.
Cleaning................................ 23.
02. Brew Day Guide ..................... 15.
.

SPIKE SOLO BOTTOM DRAIN USER GUIDE2
Assembly
01.
Ready to get your Solo up and running? This guide will show you how to assemble
each piece of equipment with step-by-step instructions and key visuals.
Kettle
Basket
Assembled
Wort Chiller
Pump
Hoses

SPIKE SOLO BOTTOM DRAIN USER GUIDE3
Assembly –
Before
you begin
Make sure the elements are plugged in, and the power cords are fully twisted
into position. We also recommend strain relieving the power cords so the full
weight is not pulling down on the element connection. Taking these actions will
certainly extend the life of your power cords.
Before installing parts into quick-connect (QC) ttings, be sure to lubricate
them with water. This will allow them to slide into the QC tting easily and
prevent tearing the o-ring.

SPIKE SOLO BOTTOM DRAIN USER GUIDE4
Assembly –
Kettle

SPIKE SOLO BOTTOM DRAIN USER GUIDE5
Assembly –
Kettle
ITEM DESCRIPTION QTY
A1.5” TC X QC 3
B1.5” TC Clamp 11
C1.5” TC Gasket 11
D1.5” TC Buttery Valve 3
ESpike+ Pickup Tube - Side 1
F1.5” TC Element 1
G1.5” TC Temp Sensor 1
HBottom Drain Piping 1
IBoil Kettle Racking Arm 1
A
B
B
B
B
C
H
I
AC
D
D
D
C
C
C
C
C
C
C
B
C
B
B
B
C
B
B
B
G
F
A

SPIKE SOLO BOTTOM DRAIN USER GUIDE6
Assembly –
Basket
Use 2 feet of your silicone tubing to create a sparge arm
from the top recirc port. The tubing will oat on top of
the grain bed allowing for an even recirculation.

SPIKE SOLO BOTTOM DRAIN USER GUIDE7
Assembly –
Basket
ITEM DESCRIPTION QTY
A1.5” TC X QC 1
BTC Clamp 2
CTC Gasket 2
DSpike+ Pickup Tube - Side 1
EMash Recirculation Hose 1
E
B
B
D
C
C
A

SPIKE SOLO BOTTOM DRAIN USER GUIDE8
Assembly –
Kettle & Basket

SPIKE SOLO BOTTOM DRAIN USER GUIDE9
ITEM DESCRIPTION QTY
ALid 1
BBasket 1
CKettle 1
DBasket hangers 2
C
B
B
A
D
Assembly –
Kettle & Basket

SPIKE SOLO BOTTOM DRAIN USER GUIDE10
Assembly –
Wort Chiller
Our counterow chiller is made from super-conductive
copper, which provides fast chilling speeds. The chiller
comes with QC ttings, so you can quickly connect to
the rest of your system. It also includes a tee tting and
additional temp sensor so you can monitor the inline
chilling temps going into your fermenter.
To get started, attach the temp sensor cable from your
kettle to the tee on the chiller. You’ll be able to see the
chiller exit temp on the control panel and adjust the ow
rate to achieve your perfect yeast pitch temp.
If you have high groundwater temps, we recommend
submerging your chiller in an ice water bath for the last
leg of chilling.
The hot water exiting the counterow chiller can be
saved and reused for cleaning!

SPIKE SOLO BOTTOM DRAIN USER GUIDE11
Assembly –
Wort Chiller
A
C
C
D
C
C
F
B
B
B
B
E
G
A
ITEM DESCRIPTION QTY
A1.5” TC x QC 2
BTC Clamp 4
CTC Gasket 4
DTemp Sensor 1
E1” TC Tee 1
F1/2” Hose Barb 1
GCounterow Chiller 1

SPIKE SOLO BOTTOM DRAIN USER GUIDE12
Assembly –
Pump

SPIKE SOLO BOTTOM DRAIN USER GUIDE13
Assembly –
Pump
ITEM DESCRIPTION QTY
ASpike Flow Pump 1
B90 degree elbow 1
C1.5” TC Clamp 4
D1.5” TC Gasket 4
E1.5” TC X QC 2
FTC 3pc Valve 1
A
C
E
E
C
C
B
B
F
D
C

SPIKE SOLO BOTTOM DRAIN USER GUIDE14
Assembly –
Hoses
ITEM DESCRIPTION QTY
AFQC x Barb 4
BHose - 4’ 2
CMash Tun Recirculation Hose - 2’ 1
We use oversized barbs, which creates a secure
attachment without the need for sharp hose
clamps. The quick connect ttings also use a
full port design which doesn’t restrict the ow
through the tting resulting in a quicker brew day.
A
B
C

SPIKE SOLO BOTTOM DRAIN USER GUIDE15
02.
Brew Day
Guide
Now that your Solo is fully assembled, it’s time to get brewing.
Follow the steps in this user guide for a simple and easy Brew Day experience.
Auotune the Control Panel
Heat Strike Water
Mashing
Drain (Lauter)
Boil
Whirl Pool
Chill (Knockout)
Cleaning

0033
PASS FØØ
FØ2
yes
At
auto
AM.RS
man
AM.RS
070.0%
150°F
SPIKE SOLO BOTTOM DRAIN USER GUIDE16
Using
Your Solo
Control Panel
Autotune the Control Panel
Before you get started, make sure to auto-tune
your PID controller. This ensures proper system
calculations and helps the heating element run as
efficiently as possible.
NOTE: you only need to auto-tune your PID
before your rst brew
1. Fill your kettle 75% full with water.
2. On the PID, press the up arrow until you hit 150
degrees Fahrenheit.
3. Press set to lock in the temperature at 150F.
4. Once the PID is close to 150F turn on the pump
to recirculate into the basket
5. Once water reaches 150F, press set and < at
the same time.
6. Press ^three times, then <once, then ^ three
times to show 0033. Press set.
7. This will bring up FØØ.
8. Press ^two times to get FØ2, and hit set.
9. The screen will read AT (Auto Tune) on top with
“no” in green at the bottom of the screen.
10. Press ^to change from “no” to “yes”.
Controlling Your Boil
Ready to boil? The PID has 2 temperature control
options, Auto and Manual. Auto allows you to set a
specic temperature, and the heating element will
hold the liquid at that temperature. Manual mode
will allow us to control heating output by percentage
instead of actual temperature. This works similar to
dialing your gas burner up or down, but on a numeric
scale of 0-100.
We recommend moving your PID to Manual
mode while boiling, and keeping it in that mode
at all times. To move from Auto to Manual,
follow the steps below.
1. Start on the temperature readout screen,
and press set until you see AMRS.
2. Press up to change from Auto to Manual,
and press set again.
3. Click set twice to bring you to the Manual
temp screen, and set your temperature.
To begin your boil, make sure your elements are
completely covered in liquid. We recommend
setting the temperature to 100% output until
you are at boil, then dial down to 70-80% for the
duration of your boil.
11. Press set and <at the same time.
12. “ATU” will blink on the bottom left of the screen.
13. Auto Tuning will take about an hour as the PID
makes adjustments. Auto Tuning is complete
when “ATU” stops blinking!

SPIKE SOLO BOTTOM DRAIN USER GUIDE17
PRO TIP: When priming your pump make
sure the pump outlet valve and kettle valves
are open so liquid can ow through the pump
which will push any air out of pump head. If
the pump head has air inside it will not work
properly.
Brew Day –
Heat Strike
Water
During this step you’ll heat all the water
needed (called strike water) to add your
crushed grain which will make your mash.
Since this is a single vessel, no sparge system
you’ll add your entire volume of strike water
to your kettle during this step.
1. Fill your kettle with the entire volume of strike
water as prescribed by your recipe. Use the
etched volume markers inside the kettle.
2. After lling the kettle with the correct amount of
strike water place the basket into the top of the
kettle.
3. Connect one hose from the bottom drain valve to
the inlet on the pump.
4. Connect the other hose from the pump outlet to
the inlet port on the basket. (see Figure 1)
PRO TIP: Set your controller roughly 3-5
degrees higher than your desired mash temps.
Since the grain is colder than
mash temps it will lower the temperature inside
the kettle/basket once the grain is poured in.
Figure 1
5. Open the kettle drain valve and the pump valve.
6. Set your controller to the desired mash
temperature and turn the element on.
7. Turn the pump on and let the kettle heat up
until it reaches the desired temp. Put the lid on
to help retain heat and speed up heat up times.
The constant recirculation from the pump will
make sure the temps are consistent throughout
the entire kettle and basket.

SPIKE SOLO BOTTOM DRAIN USER GUIDE18
Brew Day –
Mashing
During this step the crushed grain will be
added to the hot water creating a mash.
This hot water converts the starches in the
grain into sugars. Eventually these sugars
will be ‘eaten’ by the yeast and alcohol will
be created.
1. Ensure your hoses are properly set up (see Figure 2).
2. Turn the pump off, element off and remove the lid.
The lid can conveniently hang on the back kettle
handle.
3. Slowly start pouring your crushed grain into the
basket. Either have a brew partner stir while you
pour the grain in or pour a little at a time and stir in
between pours. This stirring will make sure all the
grain gets into contact with the strike water and no
dough balls are created.
PRO TIP: Always use the ball valve on the pump
to restrict the ow. This valve will control the ow
most accurately. Never restrict the ow to the
pump as it will starve the pump of liquid and can
cause premature wear.
PRO TIP: We recommend a constant
recirculation during the entire mash as it helps
maintain the most consistent temperatures, as
well as helps raise brewing efficiency.
PRO TIP: We recommend letting the grain rest
for 5-10 minutes to fully hydrate before turning
the pump and element on. This will reduce grain
pass through and reduce the change of a stuck
mash.
PRO TIP: The volume in the basket should
stay at roughly the same height throughout the
mash. If the volume starts to increase, there is
most likely a stuck mash meaning the lter at the
bottom of the basket is clogged with grain. If the
liquid level increases, simply turn off the pump,
stir the mash for a minute and then turn the
pump back on. This should unclog the lter!
PRO TIP: Turn the pump off the last 5 mins to
let all liquid start draining out of the basket.
Figure 2
4. Set your controller to your desired mash temps and
turn the element on.
5. Turn your pump on and slowly open the ball valve on
your pump. Restrict the ow to about ¼ of full ow.

SPIKE SOLO BOTTOM DRAIN USER GUIDE19
Brew Day –
Drain (Lauter)
Now it’s time to separate the grain from
the sugar water that was created (wort).
The spent grain can be used for baking,
dog treats, fertilizer, etc while the wort will
be boiled.
PRO TIP: With the basket raised out of the
wort and hanging from the basket hooks the
pump can be turned back on at about ¼ ow.
This is called a ‘vorlauf’ and will help with wort
clarity. The grain acts as a lter and recirculating
the wort in the kettle back through the grain
will allow the clear liquid to ow through while
the solids are trapped in the grain bed. We
recommend doing a vorlauf for 10 minutes.
Figure 3
3. Let the basket hang on the kettle until it stops
dripping wort. This should take 5-10 minutes.
However while the basket is draining you can
proceed to Step 4 and turn on the element..
1. Turn the element and pump off.
2. Lift the basket out of the kettle and carefully rest the
basket on top of your kettle with both hooks secured
over the top lip of the kettle. (see Figure 3)
CAUTION: We recommend having two people lift the
basket and placing on the kettle for safety reasons.
Other manuals for Solo
1
Table of contents
Other Spike Brewing System manuals