Spinning BIO User manual

OWNER’S MANUAL
BIO™
COMPUTER
BIO HR™
COMPUTER
BIO™ and BIO HR™
• Computer Monitor/Display
• (2) Triple AAA Batteries for Display
• Cadence Sensor–Includes CR2032 Battery
• (2) Zip ties for Cadence Sensor
• Round Handlebar Mount for Monitor
• Oval Handlebar Mount for Monitor
• Rubber Insert for Oval Mount
• Handlebar Mount Screw/Nut
For BIO HR™ only
• Heart Rate Strap–Includes CR2032 Battery
PARTS LIST
INSTALLING BATTERIES IN COMPUTER DISPLAY
INSTALLING MOUTING BRACKET ON BICYCLE HANDLEBARS
© SPIN®, Spinning®, Spinner® and the Spinning logo are registered trademarks of Mad Dogg Athletics, Inc.
• Open the battery cover by exing the tab at the top as shown.
• Insert 2 Triple AAA batteries as shown. Make sure each
battery is installed with correct +/- polarity.
• Snap battery cover back into place.
If the display is only partially visible, please reset the device by
removing the batteries for at least 15 seconds and then reinstall
them. Note that previous exercise data will be lost when
batteries are removed.
• Mounting adapters for all Spinner® bikes are included with the computer.
• Select the proper mount for your bike from the list below.
• Stretch mount over handle bar in desired location and secure with
provided screw and nut. The screw and nut work with either mount.
Round adapter
For Sport, FIT, Pace, Ascent, and
Sprint Spinner® Bikes
Oval Adapter
For Edge, Aero, and Pro
Spinner Bikes
Rubber Insert
For NXT, NXT SR, and Blade
Spinner Bikes
MAD DOGG ATHLETICS, INC.
2111 Narcissus Court • Venice, CA 90291 •USA
TEL 1 800 847 SPIN (7746) •TEL 1 310 823 7008 •FAX 1 310 823 7408
MAD DOGG ATHLETICS EUROPE, BV
Industrieweg 20A • 3144 CH Maassluis • The Netherlands
TEL +31 (0) 10 590 4508 • FAX +31 (0) 10 590 0054
MAD DOGG ATHLETICS SRL
Via G. Ferraris 12 • 56121 - Pisa • Italy
TEL +39 (0) 50 314 0198 • FAX +39 (0) 50 316 3819
WWW.SPINNING.COM
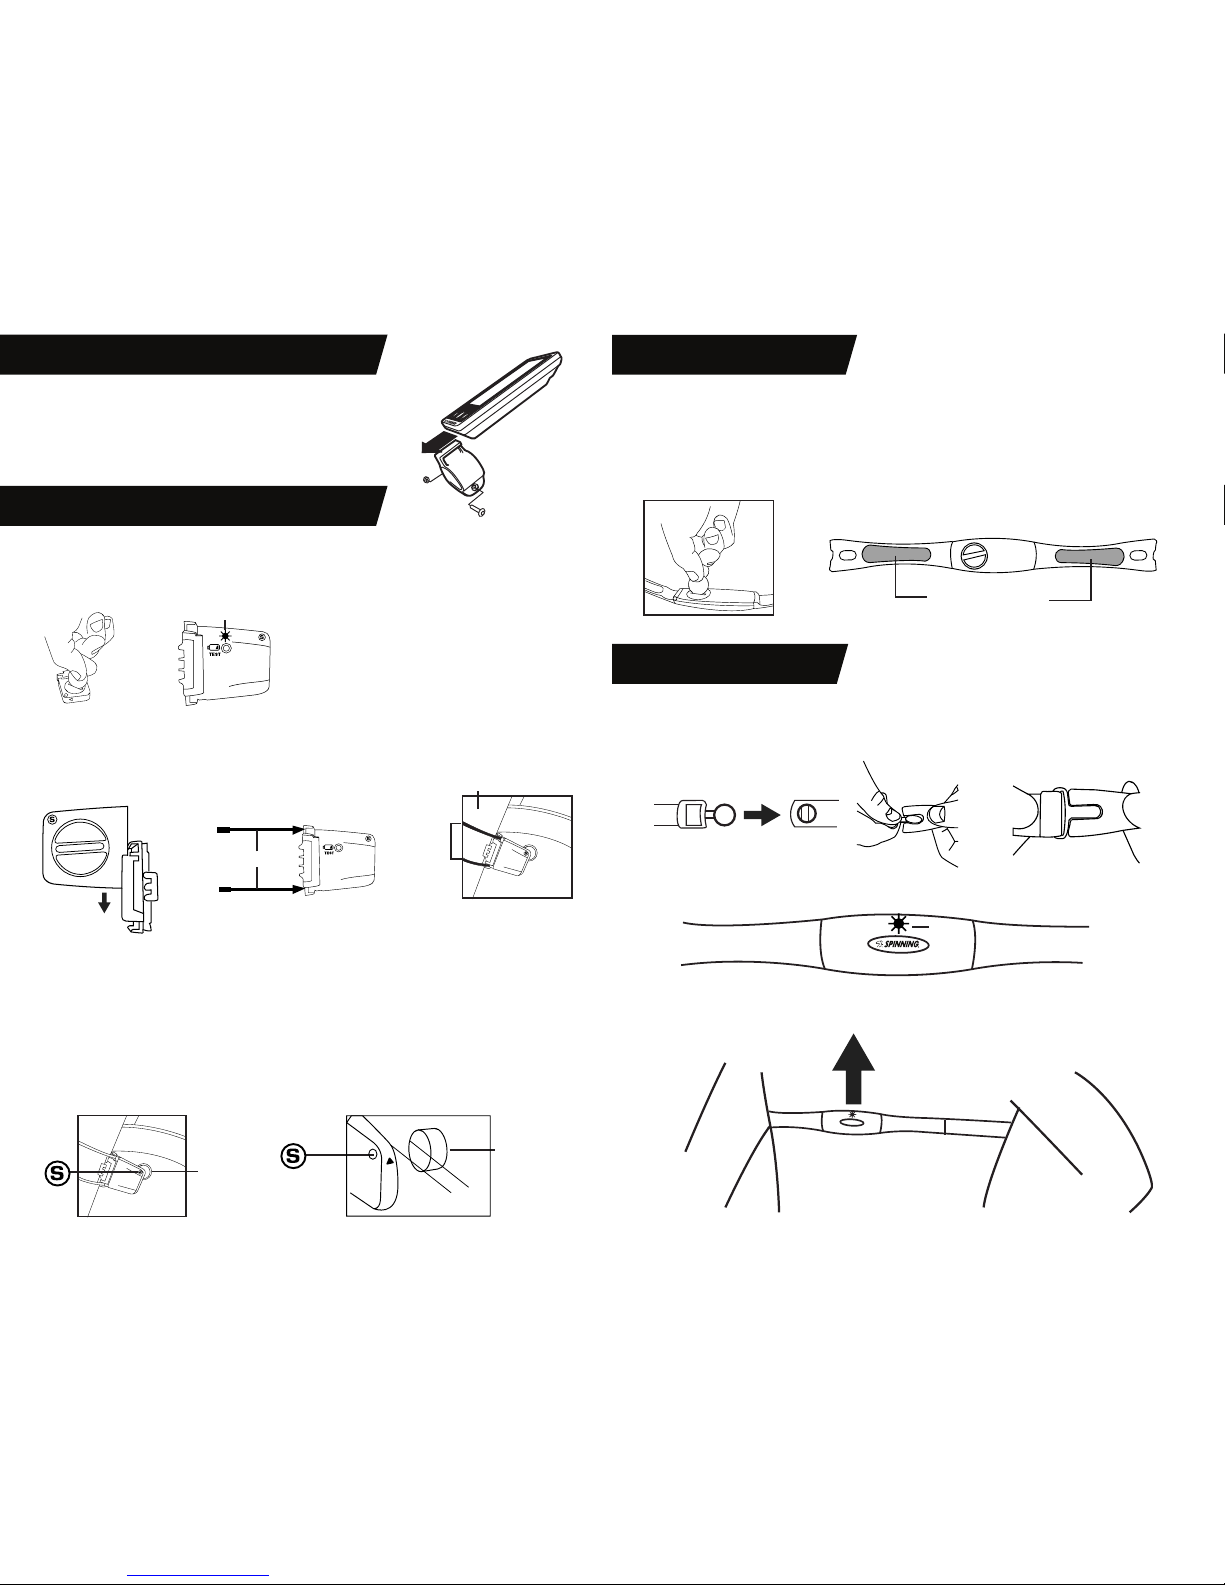
Battery Installation
Install CR2032 Coin Cell Battery into sensor body. Note: Positive side with writing must face out. Insert
cover and rotate closed using a coin or similar tool. To verify proper battery installation or check for a
charged battery, push the test button. If a green LED is seen then the sensor is ready for use.
Mounting to Bike
Find a suitable location on the rear of the left fork blade. Install zip ties as shown below through the
cadence sensor, wrapping around the fork blade and securing back to sensor. Tighten zip ties so that
cadence sensor is securely mounted, trimming o excess.
Magnet Installation
• Sport, FIT, and Pace bikes come with a magnet pre-installed on the ywheel.
• All other bikes: install provided magnet to left face of ywheel by peeling o adhesive backing and
adhering to ywheel. Make sure that ywheel surface is clean and free of grease and dirt
before installing. Magnet must be installed so that it passes by the S symbol on the cadence sensor.
Sensor Adjustment
• Magnet must pass by the S symbol on the cadence sensor and be 5 mm (.2 in.) or less from the
sensor. If required, raise/lower/or rotate cadence sensor so that magnet passes S indication on
sensor each ywheel revolution.
CADENCE SENSOR SETUP AND INSTALLATION
HEART RATE STRAP SETUP
s
Magnet
5mm (.2in)
or less
Magnet
LED
LED
LED
ZIP TIES
• Slide the provided CR2032 coin cell battery into the compartment on the heart rate strap.
• The positive side must face toward the outside of the compartment (writing on battery should be
visible).
• Install battery cover and rubber o-ring and rotate closed using a coin or other similar tool.
• Battery cover must be securely closed and should be oriented as shown in the picture to prevent
sweat and moisture from entering the strap.
HEART RATE STRAP USE
• Before use, moisten electrodes in the location shown above to improve transmission.
• Position the heart rate strap as shown and adjust elastic strap for a secure and comfortable t.
• If the heart rate strap is installed and functioning properly the red LED indicator will ash.
NOTE: For Sport, FIT and Pace bicycles the small plastic clip on the
left fork blade must be removed before attaching cadence sensor.
INSTALLING DISPLAY ON MOUNTING BRACKET
Moisten before use
FORK
ZIP TIES
Align slot on the bottom of the computer display with mounting
bracket and slide into place.
NOTE: Display installs from the front of the bike towards the rear.

OPERATING INSTRUCTIONS
Auto Start/Stop
Monitor automatically starts when exercise begins and automatically turns o 4 minutes after
exercise stops at which time all exercise data willl be erased.
Countdown Timer
• If desired, the exercise interval can be set using time or distance.
• If no exercise interval is set then ride time and distance will count up from zero.
Setting Countdown Functions
Time
• Select Mode “M” key once (time will be ashing).
• Use ▲ or ▼ arrows to set time, ▲ arrow will add time in 5-minute increments and ▼ arrow
will subtract time in 5-minute increments to set time.
• Once desired time is achieved, select Mode “M” key again.
• Once exercise begins, time will count down from selected time to zero.
Distance
• Select Mode “M” key twice (distance will be ashing).
• ▲ arrow will add 1 mile to distance and ▼ arrow will subtract 1 mile from distance.
• Once desired distance is achieved, select Mode “M” key again.
• Once exercise begins, distance will count down from selected distance to zero.
Alternating Display Between Speed and Distance
During exercise pushing the ▼ button will alternate the third line of the display between speed
and distance.
Max/Avg/Current RPM and Speed
During exercise the ▲ arrow can be used to toggle the RPM and speed displays to show
maximum, average and current as desired.
Auto Start/Stop
Monitor automatically starts when exercise begins and automatically turns o 4 minutes after
exercise stops at which time all exercise data willl be erased.
Countdown Timer
• If desired, the exercise interval can be set using time or distance.
• If no exercise interval is set then ride time and distance will count up from zero.
Setting Countdown Functions
Time
• Select Mode “M” key once (time will be ashing).
• Use ▲ or ▼ arrows to set time, ▲ arrow will add time in 5-minute increments and ▼ arrow
will subtract time in 5-minute increments to set time.
• Once desired time is achieved, select Mode “M” key again.
• Once exercise begins, time will count down from selected time to zero.
Distance
• Select Mode “M” key twice (distance will be ashing).
• ▲ arrow will add 1 mile to distance and ▼ arrow will subtract 1 mile from distance.
• Once desired distance is achieved, select Mode “M” key again.
• Once exercise begins, distance will count down from selected distance to zero.
Alternating Display Between Cal/Pulse and Speed/Distance
During exercise pushing the ▼ arrow will toggle the rst and third lines of the display between
1-Cal/3-Speed and 1-Pulse/3-Distance respectively.
MAX/Avg/Current RPM, Speed and Pulse
• If Cal and Speed are displayed on the rst and third line respectively then the ▲ arrow can be
used to toggle RPM and Speed displays between Max/Avg/Current respectively.
• If Pulse and Distance are displayed on the rst and third line respectively then the ▲ arrow
can be used to toggle the Pulse and RPM display between MAX/AVG/Current respectively.
CALORIES (KCAL)
CALORIES (KCAL)
PULSE (HR)
CURRENT → MAX → AVG
RPM (CADENCE)
CURRENT → MAX → AVG
RPM (CADENCE)
CURRENT → MAX → AVG
SPEED
CURRENT → MAX → AVG
DISTANCE
CURRENT → COUNTDOWN
TIME
TIME OF RIDE → COUNTDOWN TIME
TIME OF RIDE → COUNTDOWN
BIO™BIO HR™
SPEED
CURRENT → MAX → AVG
DISTANCE
CURRENT → COUNTDOWN
PULSE (HR)
CURRENT

Mad Dogg Athletics, Inc. Limited Warranty
BIO™ and BIO HR™
Mad Dogg Athletics, Inc. warrants to the original purchaser that the BIO and BIO HR Spinning®
Computers will be free from defects in workmanship and materials. All other BIO and BIO HR parts
are covered for one (1) year from the date of purchase (see limitations and exclusions below ). This
warranty does not cover labor charges associated with replacing covered part(s). Parts replaced
under the terms of this warranty will be warranted for the remainder of the original warranty period
only. This warranty becomes eective upon the invoice date of the original purchase.
To order replacement part(s), the original purchaser may contact Mad Dogg Athletics, Inc. Product
Support at 800-847-SPIN (7746) or 310-823-7008. Proof of purchase or warranty registration may be
needed in order for Mad Dogg Athletics, Inc. to verify warranty coverage and issue a Return Materials
Authorization (RMA) number. Parts being returned to Mad Dogg Athletics, Inc. for warranty credit must
be shipped prepaid, accompanied by a packing list or tag bearing the RMA number, and customer
name. No credit will be issued for parts returned without prior authorization from Mad Dogg Athletics,
Inc.
Mad Dogg Athletics, Inc. reserves the right to review defective part(s). All costs of shipping defective
part(s) to and from Mad Dogg Athletics, Inc. for inspection shall be borne solely by the original
purchaser. If Mad Dogg Athletics, Inc. determines, in its sole discretion, that it is impractical to ship
defective part(s) to Mad Dogg Athletics, Inc., Mad Dogg Athletics, Inc. may designate, in its sole
discretion, a repair facility to inspect and estimate the cost to repair such defective part(s). The cost, if
any, of shipping defective part(s) to and from such repair facility and of such estimate shall be borne
solely by the original purchaser. Defective part(s) must remain available for inspection until the claim
is nalized. Whenever claims are settled, Mad Dogg Athletics, Inc. reserves the right to be subrogated
under any existing insurance policies the claimant may have.
Limitations and Exclusions
This limited warranty does not apply to cosmetic damage or imperfections that are within design
specication(s) or that do not materially alter functionality, or damage due to acts of God, accident,
abuse, misuse, negligence, lack of normal maintenance, abnormal service or handling that diers from
that specied for this model of computer, improper installation or operation. In addition, alternation
or modication of the product, or repair by anyone other than a Mad Dogg Athletics, Inc. technical
representative or authorized service provider will void this warranty. This warranty is valid only in the
continental United States.
Disclaimer of Warranties; Limitation of Liability
This warranty is in lieu of all other warranties, express or implied, including without limitation the
implied warranties of merchantability and tness for a particular purpose.
Repair or replacement as provided above shall be the sole and exclusive remedy available to the
purchaser. Correction of defects, in the manner and for the period of time described above, shall
constitute complete fulllment of all liabilities and responsibilities of Mad Dogg Athletics, Inc. to the
purchaser with respect to contract, negligence, strict liability or otherwise. Mad Dogg Athletics, Inc.
shall not be liable or in any way responsible for any incidental or consequential damages based upon
breach of any express or implied warranty on this product or otherwise. Some states do not allow the
exclusion or limitation of implied warranties or incidental or consequential damages, so the above
exclusions and limitations may not apply to you. This warranty gives you specic legal rights, and you
may also have other rights which may vary from state to state. This product is warranted for home use
only.
The Spinning® BIO™ and Spinning® BIO HR™ computers are not for use in commercial settings and are
warranted for home use only.
WARRANTY INFORMATION FCC REGULATORY STATEMENTS
1. This device complies with Part 15 of the FCC Rules. Operation is subject to following two conditions:
(1) this device may not cause harmful interference, and (2) this device must accept any interference
received, including interference that may cause undesired operation.
2. Changes or modications not expressly approved by Mad Dogg Athletics, Inc. could void the user’s
authority to operate the equipment.
This manual suits for next models
1
Other Spinning Bicycle Accessories manuals


Popular Bicycle Accessories manuals by other brands


Specialized
Specialized Elite CylcoComputer user manual

Sigma
Sigma BC 16.16 manual

Playcore
Playcore Dero Setbacks installation instructions

VDO Cyclecomputing
VDO Cyclecomputing x3dw instruction manual

Cateye
Cateye RAPID X2 manual

buratti meccanica
buratti meccanica Clorofilla Trail Use and maintenance manual


