Spinning SPINPower Studio Crank User manual

OWNER’S MANUAL
STUDIO CRANK
SpinningPower-Studio-CrankUsers-Manual_2_5_19.indd 1 2/5/19 5:38 PM

CONTENTS
The SPINPower® Studio Crank
What’s Inside
SPINPower® Studio Crank Features
Checking or Replacing the Batteries
Pairing the SPINPower® Studio Crank
Removing your Existing Crank and Pedal
Installing the SPINPower® Studio Crank
Care and Maintenence
Frequently Asked Questions
Certification and Limitations
Warranty Information and Customer Support
4
5
6
7
8
9
13
14
15
16
17
SpinningPower-Studio-CrankUsers-Manual_2_5_19.indd 3 2/5/19 5:38 PM

Thank you for purchasing the SPINPower®
Studio Crank. Power measurement is a key
component of the SPINPower® program that
was developed by the leader of the indoor
cycling world: Spinning®. This crank will measure a
rider’s eort and is designed to be compatible with
Bluetooth and ANT+ devices to provide a rider with
real (and not estimated) power measurement. The
crank is also compatible with many popular cycling
apps and most leaderboard systems.
This owner’s manual will explain all of the key features
of this crank as well as take you through each step
of installing the crank onto your commercial Spinner®
bike. Be sure to log on to spinning.com for all of the
latest updates and information about SPINPower® and
the Spinning® program.
©2019 Mad Dogg Athletics, Inc. All rights reserved.
Spin®, Spinner®, Spinning®, Spin Fitness® and the Spinning logo
are registered trademarks that are owned by Mad Dogg Athletics, Inc.
4
THE SPINPOWER®
STUDIO CRANK
SpinningPower-Studio-CrankUsers-Manual_2_5_19.indd 4 2/5/19 5:38 PM
www.spinning.com 800.847.SPIN (7746)
SPINPOWER® STUDIO CRANK OWNER’S MANUAL
Tools Needed to Install the SPINPower® Crank
1. Spinning® or Park CWP-7 crank removal tool (not included).
2. Corresponding wrenches to fit the crank removal tool.
3. 8mm Allen torque wrench for the crank and pedal bolt.
4. 3mm Allen wrench for the battery door (included).
5. White lithium grease or light oil.
1 2
3
4
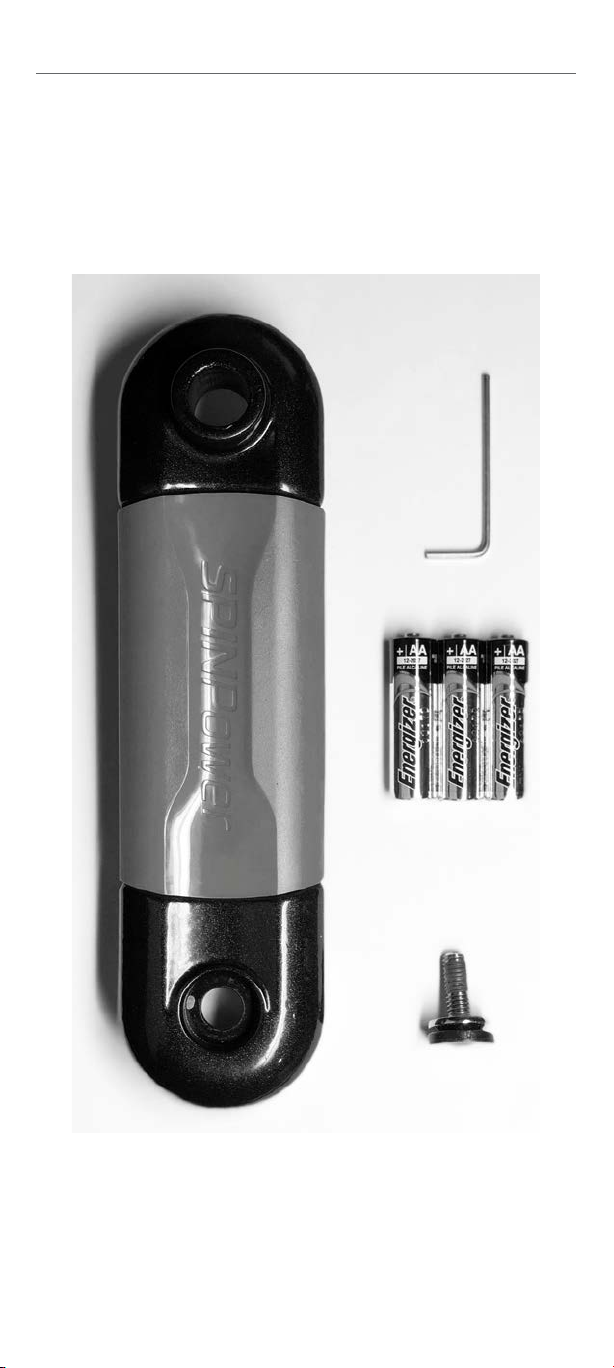
WHAT’S INSIDE
1. SPINPower® Studio Crank
2. 3mm allen wrench (for the battery compartment)
3. 3 AA batteries
4. 8mm crank bolt (NOT for the pedal)
SpinningPower-Studio-CrankUsers-Manual_2_5_19.indd 5 2/5/19 5:38 PM

General
Proprietary oversized steel crank design with Morse
Taper threadless connections for both the pedal
and crank.
Proprietary battery configuration with 3 AA batteries
and energy-saving firmware for longer time between
battery changes (battery life depends upon usage).
Single sliding battery door access for ease of use
and security.
Dual mode design allows for compatibility with both
ANT+ and Bluetooth devices.
Powder coated finish for durability.
Specifications
Compatible only with Spinning® branded bikes.
More specifically, compatible with all commercial
Spinner® bikes manufactured by Precor. Also
compatible with some previous versions of Spinner®
bikes that featrure a Morse Taper connection to the
crank and pedals.
Powered by 3 AA batteries.
Compatible with ANT+ (Studio SpinPower Comput-
er) and Bluetooth Smart devices (smart phones,
tablets, smart TVs).
D powermeter technology (patent pending)
measures tri-axial strain on your crank arm for
accurate, consistent data.
Crank calibration and maintenance is supported
by the SPINPower® Crank Connect App which is
available in the iOS and Android stores.
Data accuracy: +/- 1% error margin
6
FEATURES
SpinningPower-Studio-CrankUsers-Manual_2_5_19.indd 6 2/5/19 5:38 PM

www.spinning.com 800.847.SPIN (7746)
SPINPOWER® STUDIO CRANK OWNER’S MANUAL
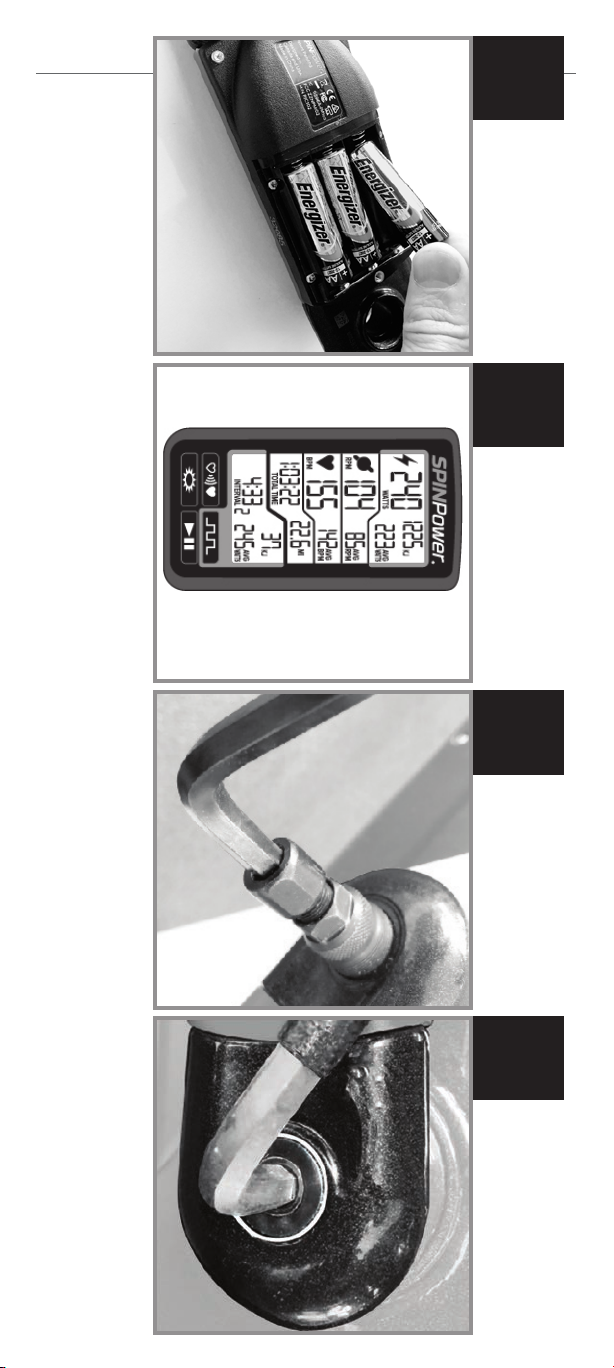
INSTALLING THE BATTERIES
1. Use the 3mm allen wrench to remove the single
allen bolt on the battery door (as shown).
2. Slide the cover forward (towards the pedal side) as
shown to reveal the battery compartment. Note the
orientation of the 3 AA batteries.
3. Place the batteries as shown with all three positive
ends pointing towards the pedal end of the crank.
4. Slide the cover back onto the crank and secure it
with the screw that was previously removed. The screw
should be snug. DO NOT OVER TIGHTEN THE SCREW.
7
SpinningPower-Studio-CrankUsers-Manual_2_5_19.indd 7 2/5/19 5:38 PM
PAIRING THE CRANK
Your crank is designed to pair with a wide variety
of devices that receive signals in either ANT+ or
Bluetooth formats. The crank is equipped with a
motion sensor that will turn it on while the crank is
rotating making an on/o switch unnecessary. Once
the crank is rotated it will take a few seconds for the
signal to activate your display device.
If you are pairing this for the first time to the Studio
SPINPower® computer, we suggest you pair the
crank before installing it on your Spinner® bike.
The instructions for this pairing can be found in the
SPINPower® Studio Computer box and also online at
Spinning.com.
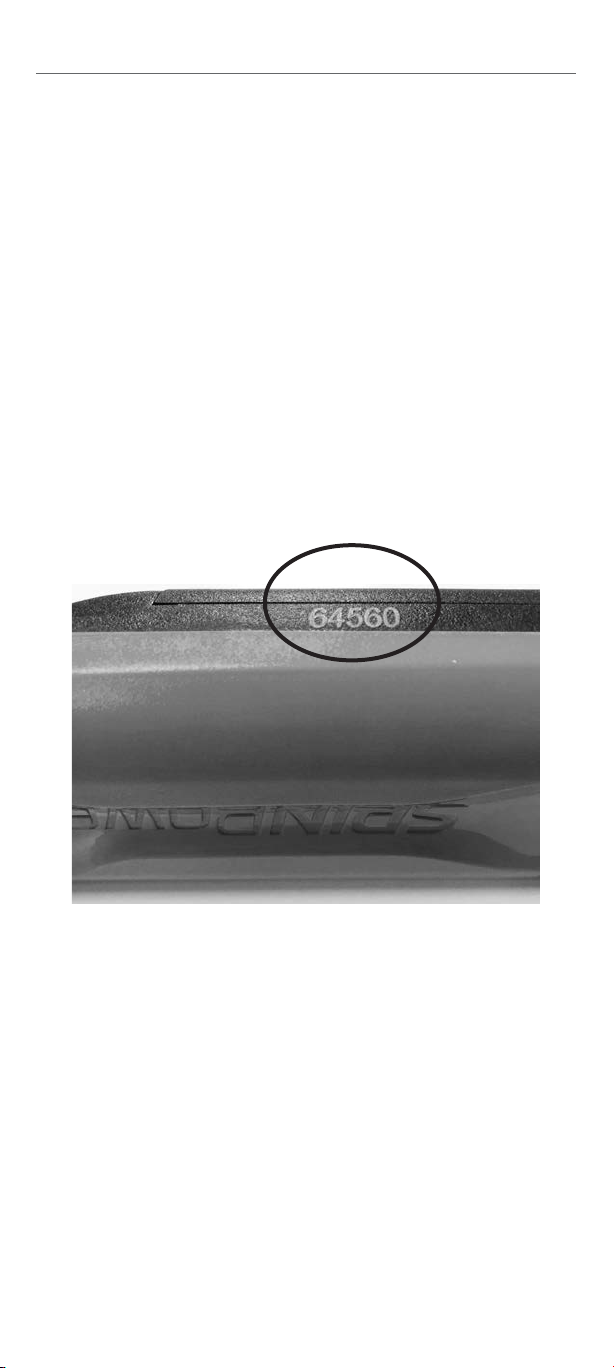
ANT+ ID
Each crank has a unique 5-digit ANT+ identification
code so that many cranks can be used in the same
room at the same time. It can also be used as a
unique identifier when pairing to a display device.
Some display devices will show that number when
initial pairing occurs. For reference, the 5-digit
number is located on the bottom edge of the black
plastic housing as shown. In the photo above, the
ANT+ ID is 64560. Your number will most likely be
dierent from that. Also take note of the serial number
of your crank that has been etched on the back side
of the crank underneath the pedal connection.
8
SpinningPower-Studio-CrankUsers-Manual_2_5_19.indd 8 2/5/19 5:38 PM

www.spinning.com 800.847.SPIN (7746)
SPINPOWER® STUDIO CRANK OWNER’S MANUAL
REMOVING YOUR
EXISTING CRANK
You may need to remove your existing crank before
installing your new SPINPower® crank. To do so, you
need an 8mm allen wrench as well as a heavy duty
crank removal tool. (SPINTech® tool by Spinning®, Park
CWP-7 tool or equivalent – available on Spinning.com).
Keep the crank from rotating during installation.
Before starting, place the crank in an easily
accessible location for both crank and pedal bolts
(crank pointed towards the back works well). Then
turn the resistance knob clockwise until the flywheel
and crank are locked.
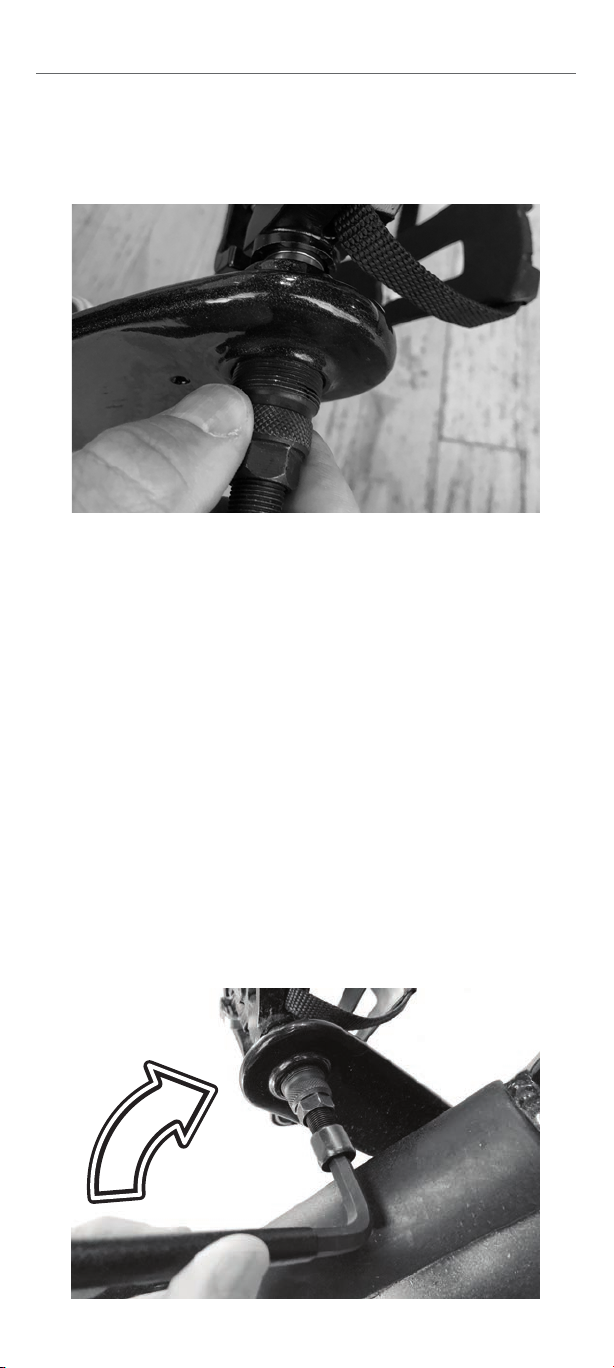
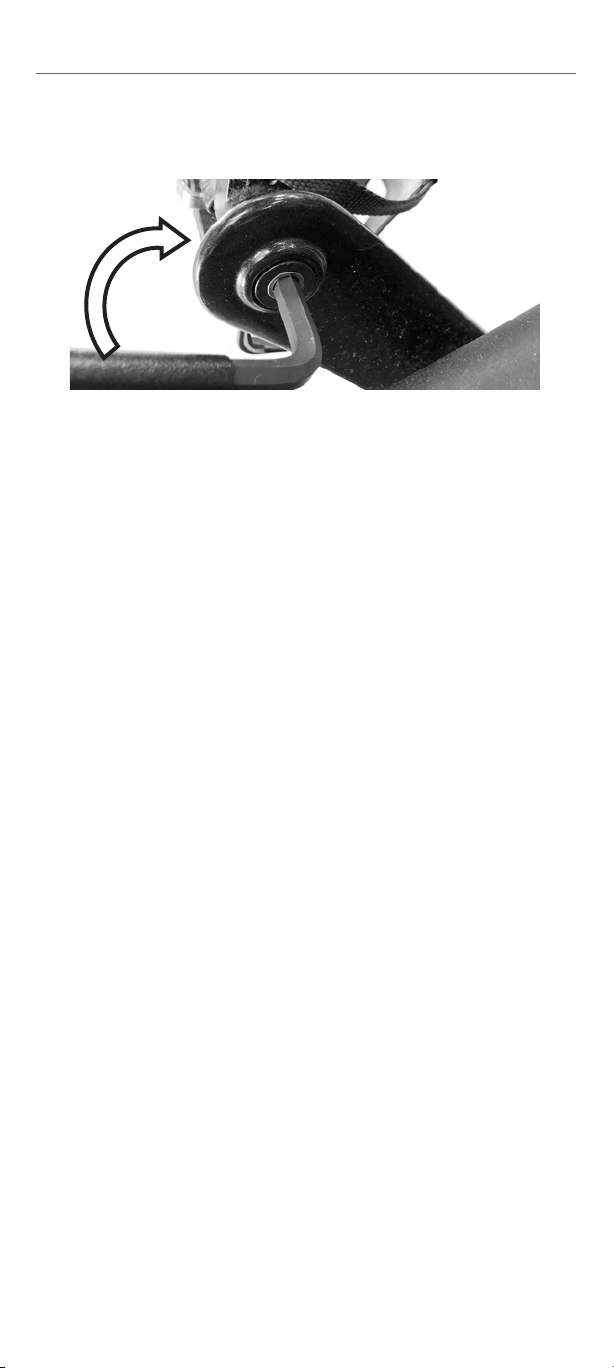
Remove the pedal first.
1. Locate the pedal bolt (on the back side of the
crank). Insert the 8mm allen wrench and turn it count-
er-clockwise for removal.
2. Before threading in the crank removal tool (for both
the pedal and crank), unthread the center bolt (on the
tool) so that the tip is pulled back inside the body (as
shown). Your tool may dier, but unscrew that main
bolt until it clears the body as shown.
9
SpinningPower-Studio-CrankUsers-Manual_2_5_19.indd 9 2/5/19 5:38 PM
REMOVING YOUR
EXISTING CRANK (continued)
(Removing the pedal, continued)
3. Once the tool is ready, thread the body of the crank
removal tool into the fine threads of the crank. It is
VERY IMPORTANT that this tool is threaded into the
crank in a straight manner. Do not cross-thread this
tool and make sure to turn the tool into the crank by
hand for the first few threads. Once confirmed that the
tool is in straight, proceed to use a wrench to tighten
the tool so that it is completely threaded into the crank.
4. Once the tool is fully threaded into the crank, use
a wrench to turn the removal bolt clockwise into the
crank. It might take a few turns that might require
heavy force. The center of that tool will “push” the
pedal out.
10
SpinningPower-Studio-CrankUsers-Manual_2_5_19.indd 10 2/5/19 5:38 PM

www.spinning.com 800.847.SPIN (7746)
SPINPOWER® STUDIO CRANK OWNER’S MANUAL
Now it’s time to remove the crank.
1. Use the 8mm allen wrench to remove the center
crank bolt by turning it counter-clockwise.
REMOVING YOUR
EXISTING CRANK (continued)
11
2. The process for removing the crank is exactly
like removing the pedal (prevously outlined). Before
threading in the crank removal tool, unthread the
center bolt (on the tool) so that the tip is recessed
(see diagram on page 9). Once set, thread the body
of the crank removal tool into the fine threads of
the crank. It is VERY IMPORTANT that this tool is
threaded into the crank in a straight manner. Do not
cross-thread this tool.
SpinningPower-Studio-CrankUsers-Manual_2_5_19.indd 11 2/5/19 5:38 PM

3. Once started by hand, use a wrench and turn it
clockwise to thread the tool completely into the crank.
4. Once the tool is fully threaded into the crank, use a
wrench to turn the removal bolt clockwise into the crank.
It might take a few turns that might require heavy force.
The center of that tool will engage with the bottom
bracket axle and will allow the tool and crank to ”pull”
away from the bottom bracket axle. Note that it is easiest
to unthread the tool from the crank (with a wrench)
before completely removing the crank.
REMOVING YOUR
EXISTING CRANK (continued)
12
SpinningPower-Studio-CrankUsers-Manual_2_5_19.indd 12 2/5/19 5:38 PM
www.spinning.com 800.847.SPIN (7746)
SPINPOWER® STUDIO CRANK OWNER’S MANUAL
INSTALLING THE SPINPOWER®
STUDIO CRANK
At this point in the process, the “stock” crank has
been removed.
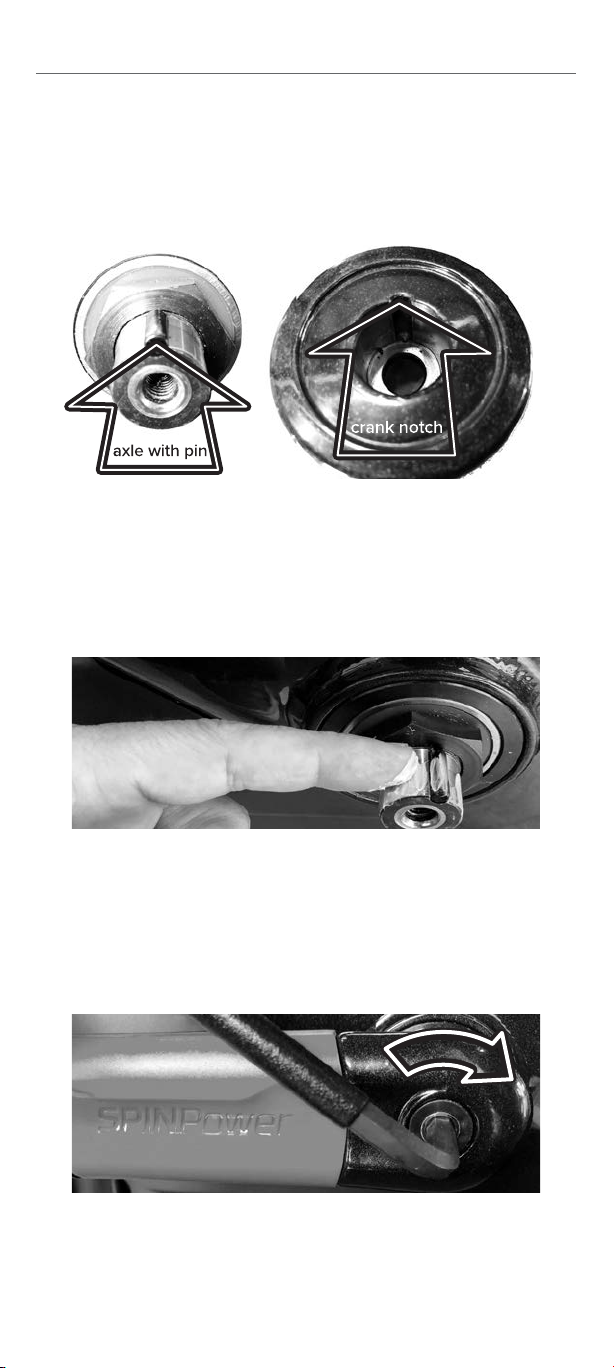
Prepare the bottom bracket axle.
Note that the exposed bottom bracket axle has a keyway
with a “floating” pin installed on the axle. That pin may
have come out with the crank and if so, place it back
in the slot on the bottom bracket axle (as shown).
Install the crank.
1. Locate the notch on the crank hole and line it up
to the pin on the bottom backet. For best results,
add a small amount of lithium grease to the bottom
bracket axle. Push the crank onto the axle in the
aligned position.
2. Once the crank is on, hand-thread the 8mm bolt
clockwise onto the axle. Now use an 8mm torque
wrench to tighten the bolt to 35-40 ft-lbs (47-57 Nm).
Do not overtighten the bolt.
13
SpinningPower-Studio-CrankUsers-Manual_2_5_19.indd 13 2/5/19 5:38 PM
INSTALLING THE SPINPOWER®
STUDIO CRANK (continued)
3. Once the crank has been tighened it is time to
install the pedal. Locate the 8mm pedal bolt and hand
thread it into the pocket on the back of the crank.
Now use an 8mm torque wrench and tigthen the bolt
to 35-40 ft-lbs (47-57 Nm). Do not overtighten the bolt.
CALIBRATING THE
SPINPOWER® CRANK
After installation of the crank it must be calibrated
using the SPINPower® Crank Connect App (available
for Android and Apple iOS) to ensure accurate power
measurement. The app also contains tools to name
the crank, check battery life and install updated
firmware (as needed). Download for your specific
mobile device and follow the on-screen instructions.
CARE AND MAINTENANCE
Your SPINPower® Studio crank is designed for
accuracy and durability in the commmercial
environment. If needed, the crank can be cleaned
with a soft cloth. Use a mild diluted solution of Simple
Green® or equivalent applied to the cloth. Do not
spray any cleaners directly on the crank (or the bike).
Batteries (3- AA) can be easily replaced when needed
and the instructions for replacement are at the begin-
ning of this manual. Always use high quality alkaline
batteries such as Duracel®, Energizer® or equivalent
for optimal performance.
Periodically check the crank, pedal bolts and
calibration as part of your regular maintenance for
your Spinner® bikes.
14
SpinningPower-Studio-CrankUsers-Manual_2_5_19.indd 14 2/5/19 5:38 PM

www.spinning.com 800.847.SPIN (7746)
SPINPOWER® STUDIO CRANK OWNER’S MANUAL
FREQUENTLY ASKED
QUESTIONS
The power reading on the crank seems to jump around a bit.
The crank is designed to be very accurate in measuring power
output. Depending upon the device that is reading the power
signal, the power number can appear to jump with variable
changes of rider input. Smooth power delivery at a constant
level should yield very small fluctuations of power readings.
It is normal to see larger fluctuations during “non-smooth”
delivery of power (during sprints, standing hills, etc.).
I want to ensure that the power reading is accurate.
The best way to ensure accuracy is to “zero calibrate” the crank
through the SpinPower® Crank Connect App. When calibrating,
make sure to have the cranks in the vertical position with feet out of
the pedals.
If I replace the batteries, will I need to pair the computer again?
No. The computer has a memory function for pairing.
Can I pair the crank with both Bluetooth® and ANT+ devices?
Yes. The crank has “dual mode” functionality.
My crank will not pair with the SPINPower® computer.
Make sure that both the computer and crank havefresh high
grade batteries. Review the pairing steps provided in the
computer manual for pairing.
The watts reading seems too high or low:
Use the SpinPower Crank Connect app calibrate the crank.
The crank removal tool is dicult to thread into the crank.
Make sure that you have a removal tool that is compatible with
the SPINPower® crank. The same tool is used for pedals and it
should thread into both. There may be a need to clean those
fine threads before threading the tool in. Use caution and do not
damage the treads. DO NOT CROSS THREAD THE TOOL INTO
THE CRANK.
The crank removal tool is correctly threaded into the crank
and it is dicult to remove the crank.
Removing the old crank may take some “elbow grease” as they
are pressed on at the factory. Take your time and make sure to
use leverage points to turn the wrench. It is normal for the crank
to be securely fastenend to the bottom bracket.
Can I pair my crank to Zwift® or other apps with power?
Absolutely. As long as your device is capable of reading a
Bluetooth® or ANT+ signal.
Can I pair my crank to a leaderboard system?
Yes. Most leaderboards work with ANT+ signals
through a WASP or other translation device. Consult your
leaderboard instructions for details.
15
SpinningPower-Studio-CrankUsers-Manual_2_5_19.indd 15 2/5/19 5:38 PM

CERTIFICATION
16
Federal Communication Commission
Interference Statement
This device complies with Part 15 of the FCC Rules.
Operation is subject to the following two conditions:
( 1 ) this device may not cause harmful interference,
and
( 2 ) this device must accept any interference
received, including interference that may cause
undesired operation.
Changes or modifications not expressly approved by
Spinning® could void the user’s authority to operate the
equipment.
IC: 9896A-PM102
FCC: ZZNPM102
M/N: PIC102
EU Declaration of Conformity
This device complies with the essential requirements
of the R&TTE Directive 1999/5/EC.
ANT+
This crank is ANT+ certified
LIMITATIONS
Your crank should only be used indoors and on a
commercial Spinner® bike. Specific Spinner® bike
compatibility is listed on page 6 of this manual. Please
note that the SPINPower® Studio Crank is designed
specifically for commercial Spinner® bikes and should
NEVER be used on other brands of indoor cycles or
outdoor bicycles of any kind.
SpinningPower-Studio-CrankUsers-Manual_2_5_19.indd 16 2/5/19 5:38 PM

www.spinning.com 800.847.SPIN (7746)
SPINPOWER® STUDIO CRANK OWNER’S MANUAL
WARRANTY INFORMATION
AND CUSTOMER SUPPORT
Warranty:
The SPINPower® Studio Crank has a one-year warranty. This
warranty excludes batteries, battery replacement and any
crank/pedal installation or removal costs. See the next page
for specific details.
Customer Support:
If you are a facility operator and you have any questions
about the commercial use of this computer, please contact
Spinning® Technical Support by phone at 1-800-847-7746.
For all other inquiries, please contact the Mad Dogg Athletics
customer service departments, which are listed below:
©2019 Mad Dogg Athletics, Inc. All rights reserved. Spin®, Spinner®,
Spinning®, Spin Fitness®, SPINPower® and the Spinning logo ® are
registered trademarks that are owned by Mad Dogg Athletics, Inc.
17
For customers in North America,
South America and Asia Pacific,
please contact:
MAD DOGG ATHLETICS, INC.
2111 Narcissus Court
Venice, CA 90291 U.S.A.
Toll-free: 1.800.847.7746
Dialing outside U.S.:
1.310.823.7008
Hours: 6:00 AM–5:00 PM PST
For customers in Europe,
the Middle East and Africa,
please contact:
MAD DOGG ATHLETICS, EUROPE B.V.
Scheldeweg 3, 3144 ES Maassluis
The Netherlands
Phone: +31 6814 77697
Hours: 9:00 AM–5:30 PM CET
SpinningPower-Studio-CrankUsers-Manual_2_5_19.indd 17 2/5/19 5:38 PM

MAD DOGG ATHLETICS, INC.
LIMITED WARRANTY
SpinPower® Studio Crank
MAD DOGG ATHLETICS, INC. WARRANTS TO THE ORIGINAL PURCHASER THAT
SPINPOWER® STUDIO CRANKS WILL BE FREE FROM DEFECTS IN WORKMANSHIP AND
MATERIALS (SEE LIMITATIONS AND EXCLUSIONS BELOW). THIS WARRANTY DOES NOT
COVER LABOR CHARGES ASSOCIATED WITH REPLACING COVERED COMPONENTS OR
INSTALLATION. PART(S) REPLACED UNDER THE TERMS OF THIS WARRANTY WILL BE
WARRANTIED FOR THE REMAINDER OF THE ORIGINAL WARRANTY PERIOD ONLY. THIS
WARRANTY BECOMES EFFECTIVE UPON THE INVOICE DATE OF THE ORIGINAL
PURCHASE FROM AN AUTHORIZED SPINNING® DEALER ONLY. THE SPINPOWER®
STUDIO CRANK IS FOR COMMERCIAL AND HOME USE. TO FILE A WARRANTY CLAIM,
THE ORIGINAL PURCHASER MAY CONTACT MAD DOGG ATHLETICS, INC. PRODUCT
SUPPORT AT (800) 847.SPIN. PROOF OF PURCHASE OR WARRANTY REGISTRATION
MAY BE NEEDED IN ORDER FOR MAD DOGG ATHLETICS, INC. TO VERIFY WARRANTY
COVERAGE AND ISSUE A RETURN MATERIALS AUTHORIZATION (RMA) NUMBER. PARTS
BEING RETURNED TO MAD DOGG ATHLETICS, INC. FOR WARRANTY CREDIT MUST BE
SHIPPED PREPAID, ACCOMPANIED BY A PACKING LIST OR TAG BEARING THE RMA
NUMBER AND THE CUSTOMER NAME. NO CREDIT WILL BE ISSUED FOR PARTS
RETURNED WITHOUT PRIOR AUTHORIZATION FROM MAD DOGG ATHLETICS, INC. TO
NOTIFY MAD DOGG ATHLETICS, INC. OF DAMAGES THAT OCCURRED DURING
SHIPPING YOU MUST DO SO WITHIN 48 HOURS OF RECEIPT OF GOODS. MAD DOGG
ATHLETICS, INC. RESERVES THE RIGHT TO REVIEW DEFECTIVE PART(S). ALL COSTS OF
SHIPPING DEFECTIVE PART(S) TO AND FROM MAD DOGG ATHLETICS, INC. FOR INSPEC-
TION SHALL BE BORNE SOLEY BY THE ORIGINAL PURCHASER. ANY REPAIR OR
MODIFICATION OF DEFECTIVE PART(S) BY ANYONE OTHER THAN A MAD DOGG
ATHLETICS, INC. TECHICAL REPRESENTATIVE OR AUTHORIZED SERVICE PROVIDER
WILL VOID THIS WARRANTY. IF MAD DOGG ATHLETICS, INC. DETERMINES, IN ITS SOLE
DESCRETION, THAT IT IS IMPRACTICAL TO SHIP DEFECTIVE PARTS BACK TO MAD
DOGG ATHLETICS, INC., MAD DOGG ATHLETICS, INC. MAY DESIGNATE, IN ITS SOLE
DISCRETION, A REPAIR FACILITY TO INSPECT AND ESTIMATE THE COST TO REPAIR
SUCH DEFECTIVE PART(S). THE COST, IF ANY, OF SHIPPING DEFECTIVE PART(S) TO AND
FROM SUCH REPAIR FACILITY AND OF SUCH ESTIMATE SHALL BE BORNE SOLY BY THE
ORIGINAL PURCHASER. DEFECTIVE PART(S) MUST REMAIN AVAILABLE FOR
INSPECTION UNTIL THE CLAIM IS FINALIZED. WHENEVER CLAIMS ARE SETTLED, MAD
DOGG ATHLETICS, INC. RESERVES THE RIGHT TO BE SUBROGATED UNDER ANY
EXISTING INSURANCE POLICES THE CLAIMANT MAY HAVE.
LIMITATIONS AND EXCLUSIONS
THIS LIMITED WARRANTY DOES NOT APPLY TO COSMETIC DAMAGE, IMPERFECTIONS
THAT ARE WITHIN DESIGN SPECIFICATIONS OR THAT DO NOT MATERIALLY ALTER
FUNCIONALITY, OR DAMAGE DUE TO ACTS OF GOD, ACCIDENT, ABUSE, MISUSE,
NEGLIGENCE, LACK OF NORMAL MAINTENANCE, EXCESSIVE MOISTURE, ABNORMAL
SERVICE OR HANDLING THAT DIFFERS FROM THAT SPECIFIED FOR THE CONSUMER
SPINPOWER CRANK, IMPROPER INSTALLATION OR IMPROPER OPERATION AND IN
ADDITION, ALTERATION OR MODIFICATION OF THE PRODUCT.
DISCLAIMER OF WARRANTIES.
LIMITATION OF LIABILITY.
THIS WARRANTY IS IN LIEU OF ALL OTHER WARRANTIES, EXPRESSED OR IMPLIED,
INCLUDING WITHOUT LIMITATION,THE IMPLIED WARRANTIES OF MERCHANTABILITY
AND FITNESS FOR A PARTICULAR PURPOSE. REPAIR OR REPLACEMENT AS PROVIDED
ABOVE SHALL BE THE SOLE AND EXCLUSIVE REMEDY AVAILABLE TO THE
PURCHASER. CORRECTION OF DEFECTS, IN THE MANNER AND FOR THE PERIOD OF
TIME DESCRIBED ABOVE, SHALL CONSTITUTE COMPLETE FULFILLMENT OF ALL LIABIL-
ITIES AND RESPONSIBILITIES OF MAD DOGG ATHLETICS, INC. TO THE PURCHASER
WITH RESPECT TO CONTRACT, NEGLIGENCE, ANY INCIDENTAL OR CONSEQUENTIAL
DAMAGES BASED UPON BREACH OF ANY EXPRESS OR IMPLIED WARRANTY ON THIS
PRODUCT OR OTHERWISE. SOME STATES DO NOT ALLOW THE EXCLUSION OR
LIMITATION OF IMPLIED WARRANTIES OR INCIDENTAL OR CONSEQUENTIAL DAMAGES,
SO THE ABOVE EXCLUSIONS AND LIMITATIONS MAY NOT APPLY TO YOU. THIS
WARRANTY GIVES YOU SPECIFIC LEGAL RIGHTS, AND YOU MAY ALSO HAVE OTHER
RIGHTS WHICH MAY VARY FROM STATE TO STATE.
The SpinPower® Studio Crank is not for outdoor use and carries a warranty that is valid for
home and commercial use.
US and International Patents Pending.
2019.01.14-10-010. Copyright 2019 Mad Dogg Athletics, Inc. All rights reserved. SPIN®,
Spinner®, Spinning® SpinPower® and the Spinning® logo are registered trademarks that
are owned by Mad Dogg Athletics, Inc.
SpinningPower-Studio-CrankUsers-Manual_2_5_19.indd 18 2/5/19 5:38 PM

MAD DOGG ATHLETICS, INC.
2111 Narcissus Court
Venice, CA 90291
Toll-free: 1.800.847.7746
Dialing outside U.S.: 1.310.823.7008
Fax: 1.310.823.7408
www.spinning.com
MAD DOGG ATHLETICS EUROPE B.V.
Scheldeweg 3, 3144 ES Maassluis
The Netherlands
Phone: +31 1059 04508
Fax: +31 (0) 1059 00054
SpinningPower-Studio-CrankUsers-Manual_2_5_19.indd 19 2/5/19 5:38 PM
1 2 4
INSTALL THE
BATTERIES
PAIR YOUR (OPTIONAL)
SPINPOWER®
COMPUTER 3REMOVE THE
EXISTING CRANK
INSTALL THE
SPINPOWER® CRANK
Congratulations on the purchase of your new SPINPower® Studio Crank.
Video instructions are also available at youtube.com/user/SpinningHQ
SpinningPower-Studio-CrankUsers-Manual_2_5_19.indd 20 2/5/19 5:38 PM
Other manuals for SPINPower Studio Crank
1
Table of contents
Other Spinning Bicycle Accessories manuals


Popular Bicycle Accessories manuals by other brands


Specialized
Specialized Elite CylcoComputer user manual

Sigma
Sigma BC 16.16 manual

Playcore
Playcore Dero Setbacks installation instructions

VDO Cyclecomputing
VDO Cyclecomputing x3dw instruction manual

Cateye
Cateye RAPID X2 manual

buratti meccanica
buratti meccanica Clorofilla Trail Use and maintenance manual


