manuals.online logo
Brands
  1. Home
  2. •
  3. Brands
  4. •
  5. Spirit
  6. •
  7. Toy
  8. •
  9. Spirit BLACK & RED JUMPING SPIDER User manual

Spirit BLACK & RED JUMPING SPIDER User manual

BLACK & RED JUMPING SPIDER™
Installation and Operating Instructions
Keep all plastic and wire parts away from children.
WARNING: DO NOT TURN ON THE PROP UNTIL FULLY ASSEMBLED. STAY CLEAR OF THE PROP WHILE OPERATING.
1 2
3

Back of Module
4
6
ON
OFF
FOOTPAD
ON
OFF
FOOTPAD
8
FOOT
BOTTOM
MODULE
FOOT
5
PARTS:
A: MODULE WITH SPIDER
B: FRONT FOOT
C: BACK FOOT
D: SIDE FEET
E: FOOT REMOVAL “KEY”
Assembly:
1. Insert FRONT FOOT into bottom of MODULE WITH
SPIDER until it locks into place. (Match A to A)
NOTE: Press to make sure each FOOT is ush with
rectangular base.
2. To remove FOOT, insert plastic “KEY” (included) into
holes on bottom. To release locks, twist and pull.
3. Insert BACK FOOT into bottom of MODULE WITH
SPIDER until it locks into place. (Match B to B)
4. If needed place weight on FOOT to increase stability.
5. Insert SIDE FEET into bottom of MODULE WITH
SPIDER until they lock into place. (Match C to C)
6. IMPORTANT: Lift SPIDER wrapped in fabric until poles
are vertical. Attach the 2 metal springs by pulling each
spring backward and securing them to the posts located on
either side of the pole on MODULE WITH SPIDER.
Pull black fabric bag up and over the springs.
7. Insert 4 AA alkaline batteries (not included) into the
battery compartment located on the top of the MODULE
or connect the DC Adapter (sold separately).
NOTE: Make sure there are no obstructions to hinder the
SPIDER’S movement.
8. Remove spring instruction label located on the corner of
the MODULE and turn switch on top of MODULE to ON
to operate in sound and motion activation mode. Make a
loud sound (clap) or move in front of the item to activate.
Leave switch in OFF position when not in use.
9. Release fabric around SPIDER and attach hook and loop
fasteners under fabric to the opposite hook and loop
fasteners located on all four FEET. Spread out fabric and
pose legs as desired.
A B C D E
BOTTOM
MODULE
FOOT
Patent
RE46,087
7
9
TROUBLESHOOTING STEPS
If you hear a constant clicking sound and the item does not function properly, it means there is an obstruction preventing the item from
operating (rock, bush, incline, etc.). Remove the obstruction and the item should function normally.
Make sure the springs are attached. (See illustration 6) If item is stuck in up or down position: 1. Turn the item OFF. 2. Detach the
springs from the module. 3. Turn the item ON and activate for 1 full cycle. 4. Turn the item OFF, reattach the springs and turn the item
back ON.
Motion Sensor – make sure that the motion sensor on SPIDER’S head is facing forward and there are no obstructions blocking sensor
tube. To test the motion sensor, shine a ashlight into the tube.
ON
OFF
FOOTPAD
ON
OFF
FOOTPAD
FOOTPAD
2
BATTERY INSTALLATION
Battery installation should be performed by an adult.
• Use only batteries recommended in the instructions.
• Do not mix old and new batteries.
• Do not mix alkaline, rechargeable, standard,
or different types of batteries.
• Be mindful to insert batteries with correct polarity as indicated.
• Remove all exhausted batteries.
• Rechargeable batteries are only to be charged
under adult supervision.
• Rechargeable batteries are to be removed from item
before being charged.
• Non-rechargeable batteries are not to be recharged.
• The supply terminals are not to be short-circuited.
WARNINGS:
• This product is designed for indoor or covered porch use
only, and should not be placed outdoors subject to the
weather.
• This item is not a toy. For decoration only.
• Choking hazard due to small parts.
• Keep all plastic and wire parts away from children.
• This product is intended for use by persons 15 years of age
and older. Not intended for use by children ages 14 and
under.
• Do not turn item on until you have completed assembly.
• Stay clear of item while operating.
• Do not place weight on item while in operation.
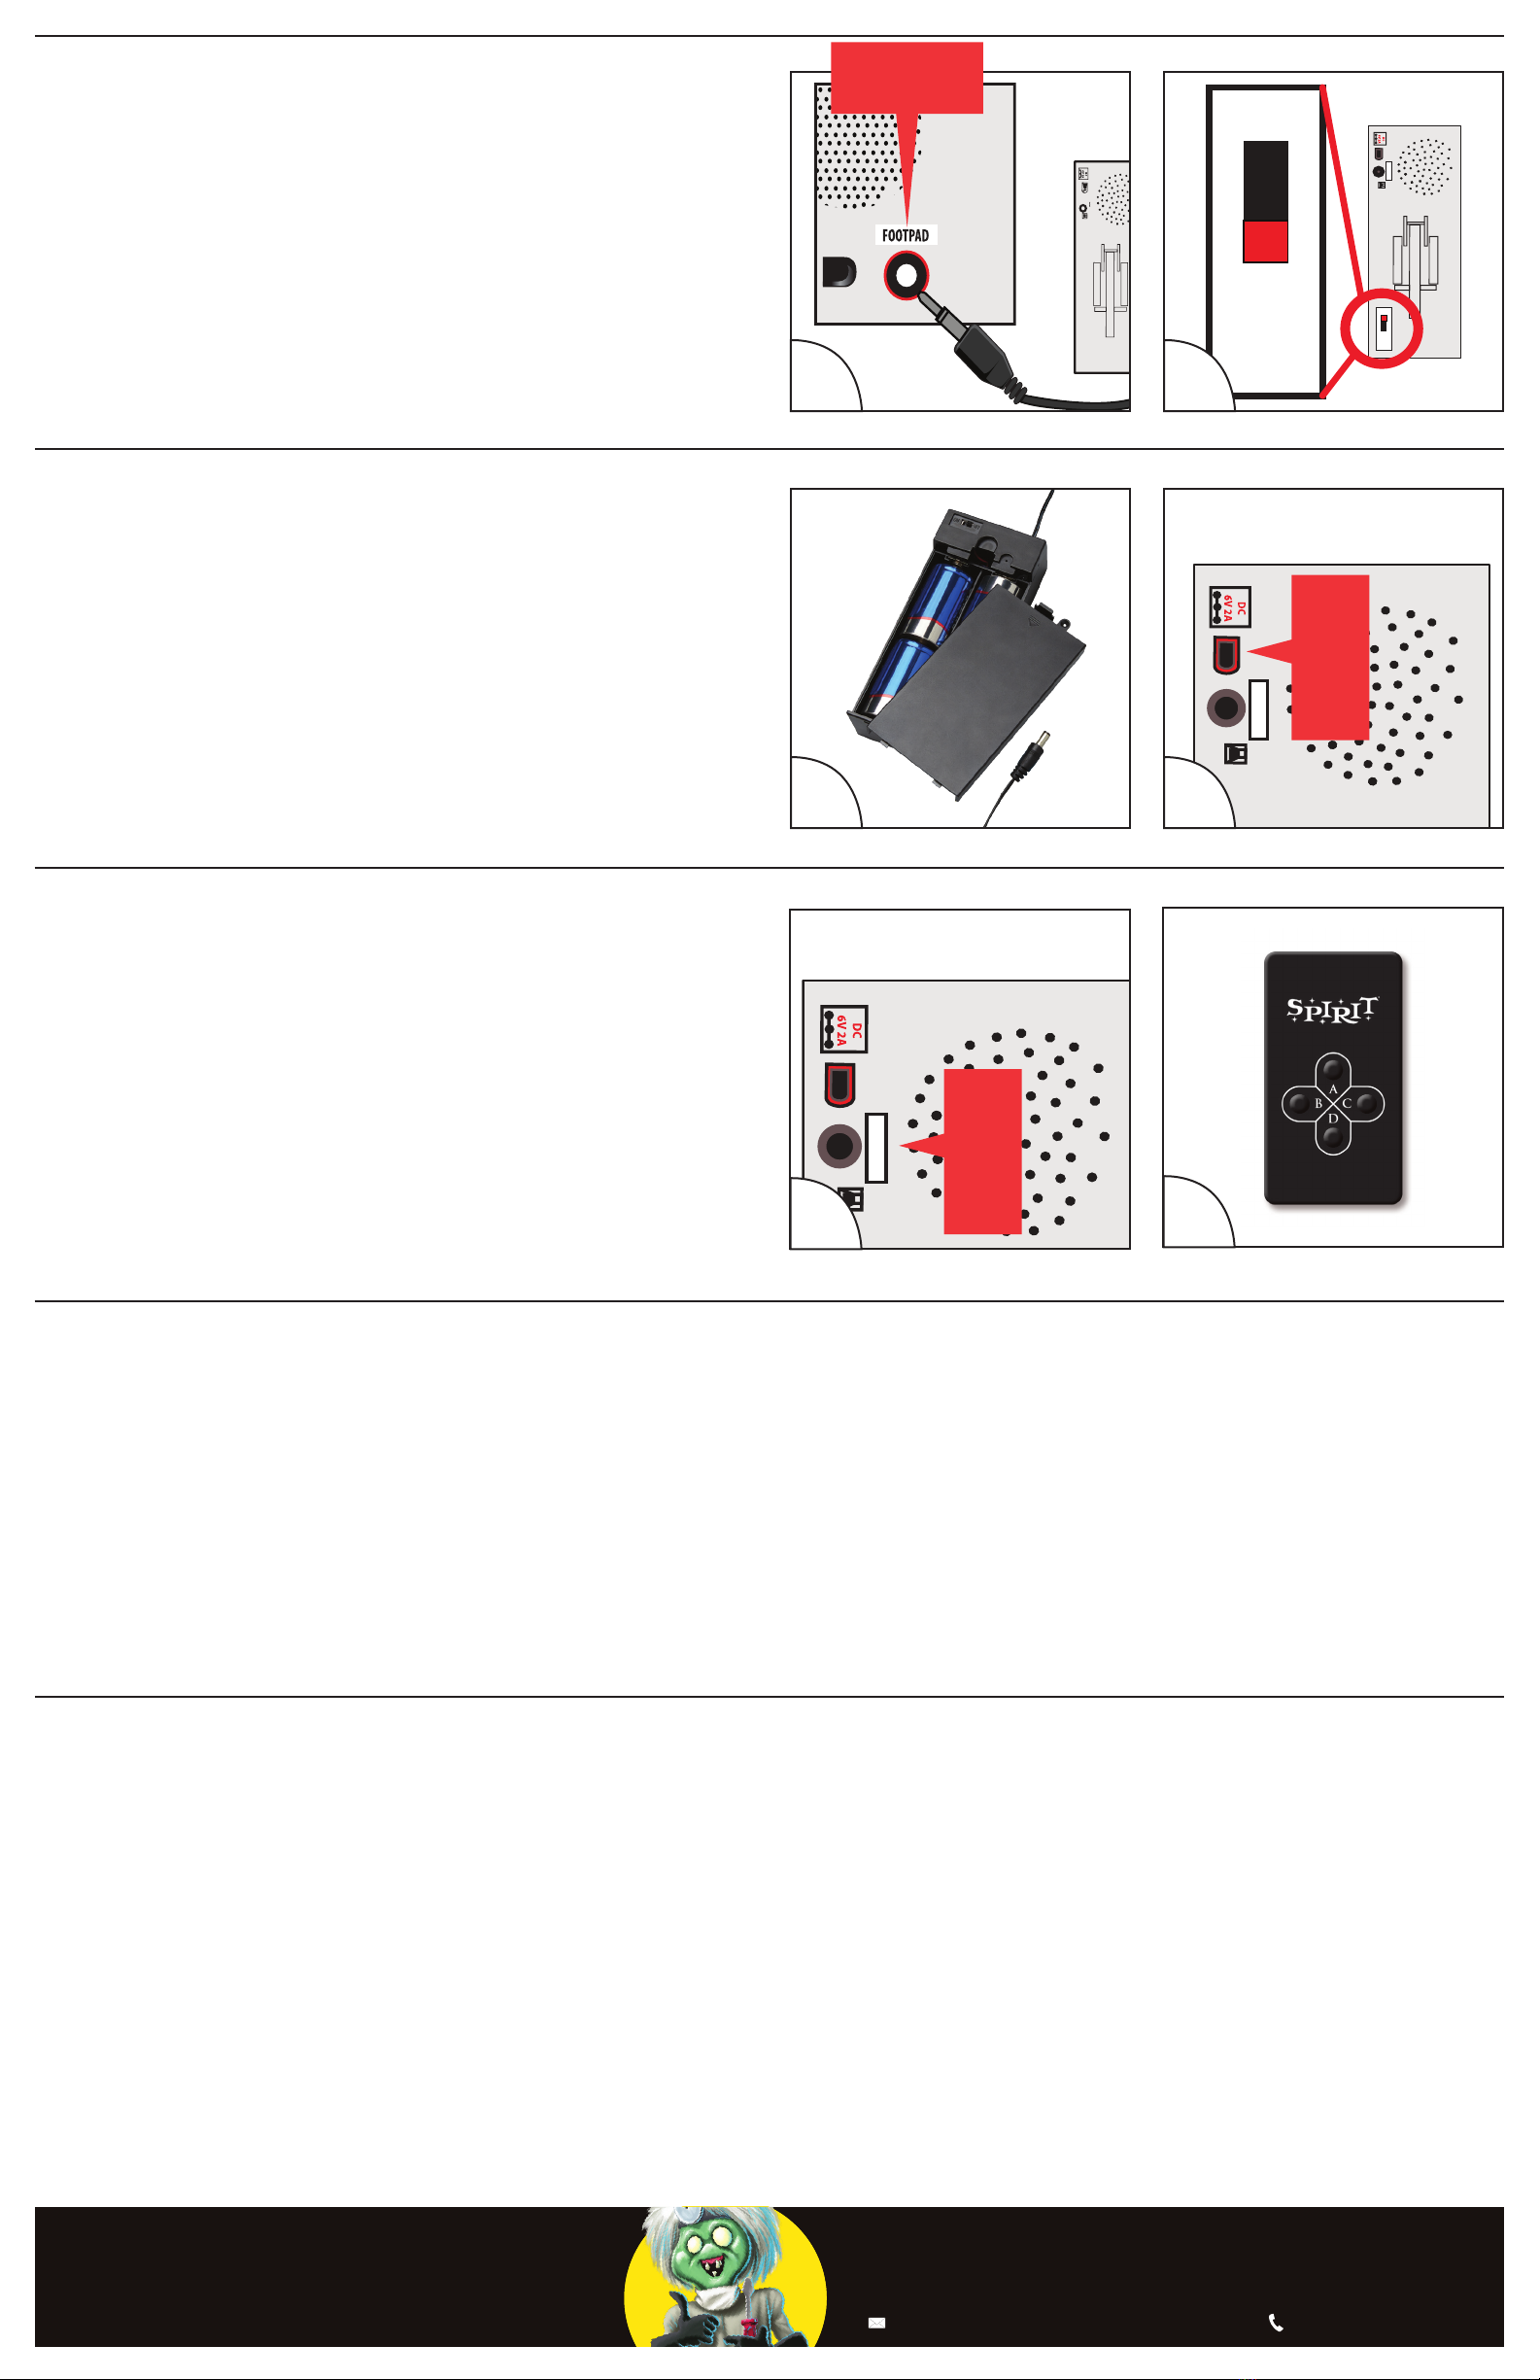
OPTIONAL FOOTPAD SETUP
1. Connect the cable from the optional FOOTPAD to the jack
labeled FOOTPAD located on the MODULE. (See Fig. 1)
2. Turn switch on top of MODULE to the ‘FOOTPAD’ position
to enable FOOTPAD activation. (See Fig. 2)
3. Step on FOOTPAD to activate the prop.
Step Pad (SKU #01181288) is sold separately and can be
purchased in-store and online at www.SpiritHalloween.com
1.
1
FOOTPAD
2.
ADAPTER
INPUT
A
SK
D
R
. Z
OMBIE
!A
SK
D
R
. Z
OMBIE
!A
SK
D
R
. Z
OMBIE
!A
SK
D
R
. Z
OMBIE
!A
SK
D
R
. Z
OMBIE
!A
SK
D
R
. Z
OMBIE
!A
SK
D
R
. Z
OMBIE
!A
SK
D
R
. Z
OMBIE
!A
SK
D
R
. Z
OMBIE
!A
SK
D
R
. Z
OMBIE
!
He’s dying to bring your prop to life!
DrZombie@SpiritHalloween.com 1.866.586.0155
Questions about setup? Prop not working?
There’s no need to go back to the store, just…
FOOTPAD
INPUT
OPTIONAL MULTI-PROP REMOTE SETUP
Connect one of the transponders to the prop by inserting the
wire of the transponder into the Footpad jack as labeled on the
MODULE. (See Fig. 1)
1. Flip the switch on the transponder to the ON position.
2. Click the button on the Multi-Prop Remote that matches
the letter on the transponder to activate the prop.
(See Fig. 2) 2
FOOTPAD
1
FOOTPAD
INPUT
OPTIONAL BATTERY ADAPTER SETUP
1. Install 4 D Batteries into Spirit Battery Adapter.
(See Fig. 1)
2. Connect wire from Spirit Battery Adapter to the DC adapter
port on the MODULE. (See Fig. 2)
3. Turn switch on Battery Adapter to the ON position
to power the prop.

Other Spirit Toy manuals

Spirit Victorian Railways QR bogie 3 door wagon User manual

Spirit

Spirit Victorian Railways QR bogie 3 door wagon User manual

Spirit Wacky Mole Clown Parts list manual

Spirit

Spirit Wacky Mole Clown Parts list manual

Popular Toy manuals by other brands

REVELL Wheel Loader user manual

REVELL

REVELL Wheel Loader user manual

3DAeroventures Super Chipmunk Build guide

3DAeroventures

3DAeroventures Super Chipmunk Build guide

Fly Eagle Jet F-35A Instruction manuals

Fly Eagle Jet

Fly Eagle Jet F-35A Instruction manuals

Mega MEGA BLOCKS HALO UNSC ALL-TERRAIN MONGOOSE... manual

Mega

Mega MEGA BLOCKS HALO UNSC ALL-TERRAIN MONGOOSE... manual

PDK 42 Series instructions

PDK

PDK 42 Series instructions

Hasbro NERF N-STRIKE ELITE SHELLSTRIKE DS-6 quick start guide

Hasbro

Hasbro NERF N-STRIKE ELITE SHELLSTRIKE DS-6 quick start guide

LEGO City 60098 Building instructions

LEGO

LEGO City 60098 Building instructions

Associated Electrics RC12L3 4015 instruction manual

Associated Electrics

Associated Electrics RC12L3 4015 instruction manual

WARCRADLE STUDIOS Dystopian Wars BORODINO BATTLEFLEET Aassembly Instructions

WARCRADLE STUDIOS

WARCRADLE STUDIOS Dystopian Wars BORODINO BATTLEFLEET Aassembly Instructions

Badger Basket 12021 Assembly and use instructions

Badger Basket

Badger Basket 12021 Assembly and use instructions

Eduard RA-5C Vigilante quick start guide

Eduard

Eduard RA-5C Vigilante quick start guide

Opitec Hobbyfix Cube instructions

Opitec

Opitec Hobbyfix Cube instructions

BigPlanes ME-109F manual

BigPlanes

BigPlanes ME-109F manual

Faller 120490 manual

Faller

Faller 120490 manual

Jenx Monkey Assembly instructions

Jenx

Jenx Monkey Assembly instructions

Eduard F-15C MSIP II interior quick start guide

Eduard

Eduard F-15C MSIP II interior quick start guide

Seagull Models SWIFT40 Assembly manual

Seagull Models

Seagull Models SWIFT40 Assembly manual

Oregon Scientific Accelerator Junior Laptop instruction manual

Oregon Scientific

Oregon Scientific Accelerator Junior Laptop instruction manual

manuals.online logo
manuals.online logoBrands
  • About & Mission
  • Contact us
  • Privacy Policy
  • Terms and Conditions

Copyright 2025 Manuals.Online. All Rights Reserved.