manuals.online logo
Brands
  1. Home
  2. •
  3. Brands
  4. •
  5. SPL
  6. •
  7. Drum
  8. •
  9. SPL Baja BTB1413L User manual

SPL Baja BTB1413L User manual

Other SPL Drum manuals

SPL D4420 User manual

SPL

SPL D4420 User manual

SPL Kicker Pro D2518 User manual

SPL

SPL Kicker Pro D2518 User manual

SPL UNITY KIT D4522 User manual

SPL

SPL UNITY KIT D4522 User manual

SPL StreetBop S5418SMG User manual

SPL

SPL StreetBop S5418SMG User manual

SPL Lil'kicker D1316 User manual

SPL

SPL Lil'kicker D1316 User manual

Popular Drum manuals by other brands

Audiothingies DoubleDrummer user manual

Audiothingies

Audiothingies DoubleDrummer user manual

Yamaha RX-21 owner's manual

Yamaha

Yamaha RX-21 owner's manual

Roland TD-9K Setup guide

Roland

Roland TD-9K Setup guide

Sudoku LEXUS owner's manual

Sudoku

Sudoku LEXUS owner's manual

Cherub WRW-206 owner's manual

Cherub

Cherub WRW-206 owner's manual

Roland CR-80 owner's manual

Roland

Roland CR-80 owner's manual

V-Drums V-Tour TD-9KX2 Setup guide

V-Drums

V-Drums V-Tour TD-9KX2 Setup guide

Yamaha DTXPLORER manual

Yamaha

Yamaha DTXPLORER manual

Yamaha DD65 YDD-60 null

Yamaha

Yamaha DD65 YDD-60 null

Roland CR-80 owner's manual

Roland

Roland CR-80 owner's manual

Roland TR-808 Operation manual

Roland

Roland TR-808 Operation manual

Koma Elektronik RH 301 user manual

Koma Elektronik

Koma Elektronik RH 301 user manual

Roland TR-8 Operation guide

Roland

Roland TR-8 Operation guide

Casio RZ-1 manual

Casio

Casio RZ-1 manual

Yamaha DD-7 owner's guide

Yamaha

Yamaha DD-7 owner's guide

Pintech E-Gig Care and instruction guide

Pintech

Pintech E-Gig Care and instruction guide

Krüger & Matz Warrior KM0764 quick start guide

Krüger & Matz

Krüger & Matz Warrior KM0764 quick start guide

Alesis DM10 MKII Pro Assembly guide

Alesis

Alesis DM10 MKII Pro Assembly guide

manuals.online logo
manuals.online logoBrands
  • About & Mission
  • Contact us
  • Privacy Policy
  • Terms and Conditions

Copyright 2025 Manuals.Online. All Rights Reserved.

by
®
STEEL
TIMBALE SET
ASSEMBLY MANUAL
BTB1413L
2 Steel Timbale Set • BTB1413L Assembly Manual
by
®
ASSEMBLY STEPS
STAND ASSEMBLY
1. Loosen wing nut and pull out legs to full extension
2. Insert top of stand into bottom assembly.
3. Loosen wing nut and extend tilter to be straight up
PLACING DRUMS ON STAND
Our stabilization system will allow you to pick the drums
up by the shells. If you’re moving the drums, grasp by
the stand for additional stability. When transporting the
timbales it is always best to disassemble the drums from
the stand.
4. Place 13” Timbale on center post by slipping the
mounting bracket over the post. The 13” timbale
traditionally faces to your right.
5. Place 14” Timbale on center post facing to your left.
6. Place top collar over the center post.
1 2
3
Center Post
Center Post
Center PostTop Collar
Mounting Bracket
Mounting Brackets
RIGHT SIDE
LEFT SIDE
TIMBALE SET PARTS
13” Timbale
14” Timbale
Timbale Stand
Cowbell
Accessory arm
Top Collar
2 Stabilizer Bars
Drum Key
Timbale Sticks
Washer
Wing Nut
SoundPercussionLabs.com 3
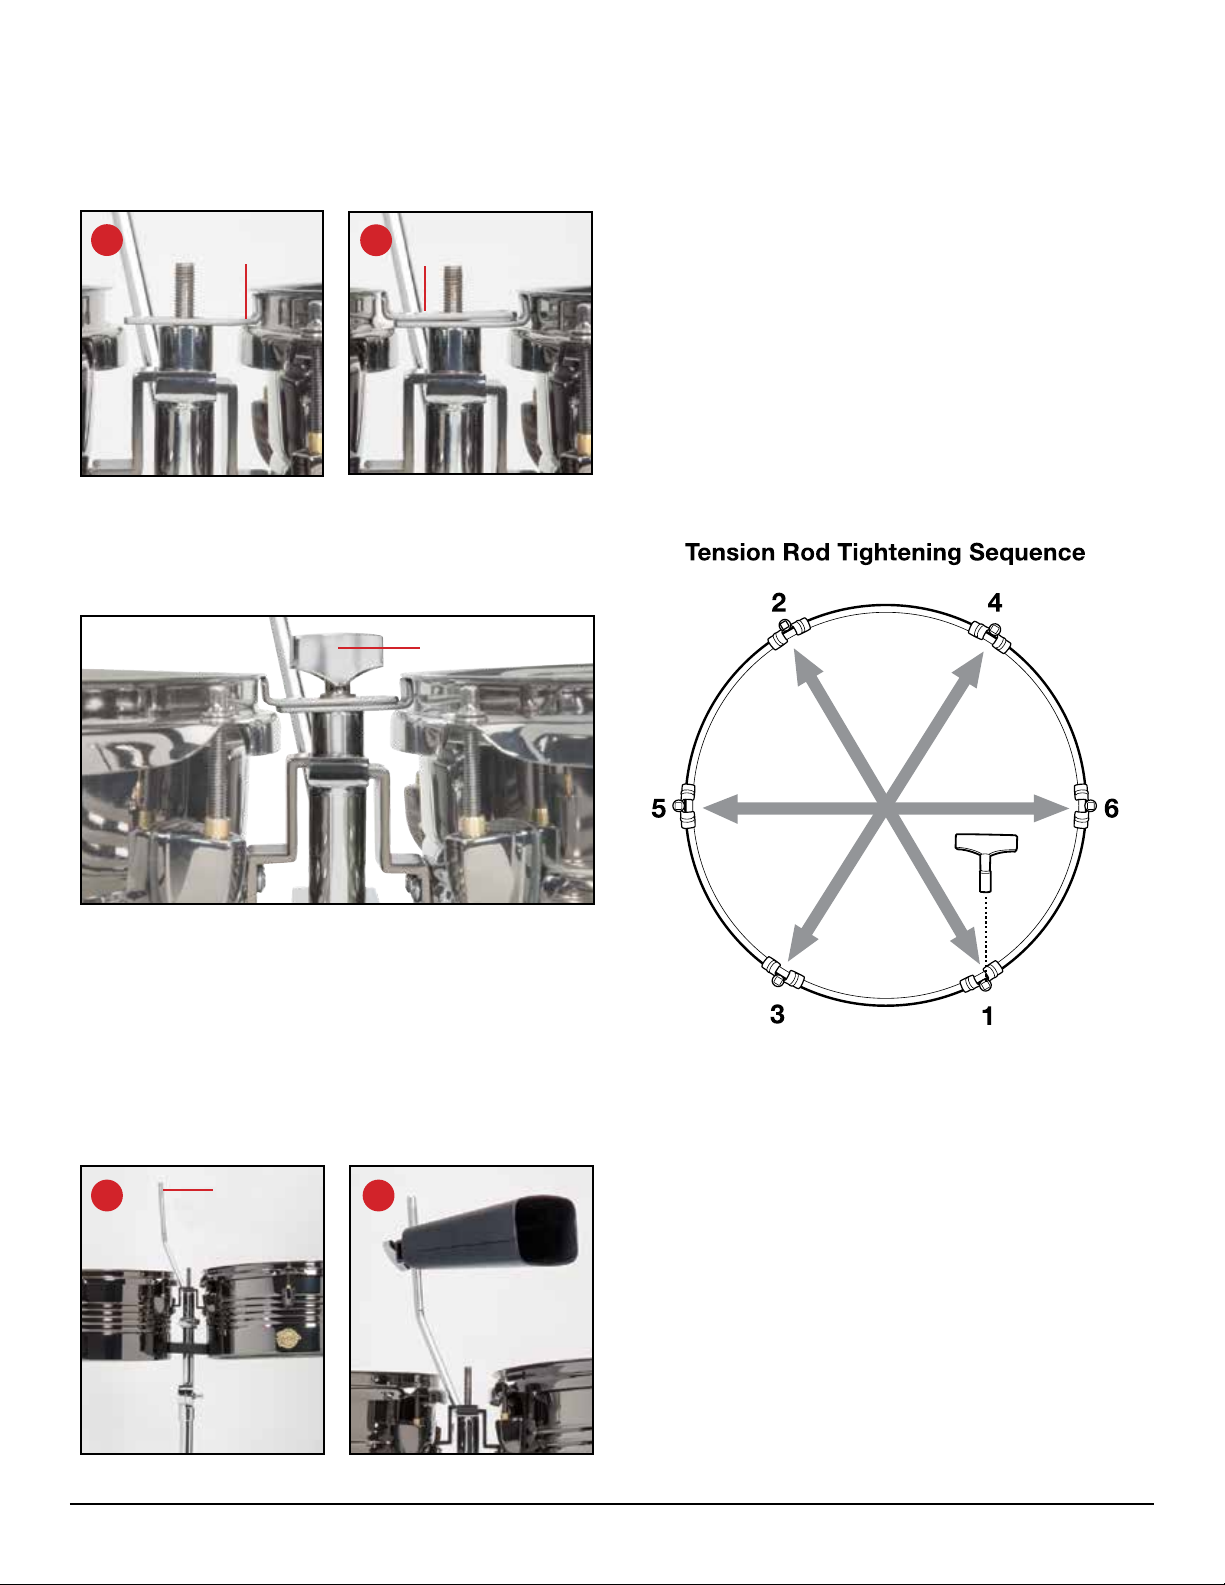
7. Position first stabilizer bar and slip the lip of the bar
under the curve of the 13” timbale rim on your right.
8. Place second stabilizer on top of the first one and
repeat steps with the 14” timbale on your left.
9. Place washer and wing nut onto center post and
tighten. Once tightened the drums will lock into place
and provide a stable frame.
ASSEMBLING AUXILLARY ACCESSORY
ARM AND MOUNTING COWBELL
10. On the stand you will find the accessory arm.
11. Slip cowbell on the accessory arm. Tighten attached
cowbell wing nut for a secure fit. The cowbell opening
should be facing your right side.
ADJUSTING HEIGHT AND ANGLE
1. The usual height for the drums should be about waist
high of the player.
2. Most Timbales are played relatively flat with no angle.
But you do have the ability to change the angle by
positioning the tilter at the upper section of the stand.
This is especially handy if placing within a drum set or
when playing multiple percussion instruments.
TUNING
1. Loosen each tension rod of both timbales with drum
key, then finger tighten.
2. Now, take the drum tuning key and tighten each tension
rod a quarter turn in a crisscross pattern using the
sequence indicated in the diagram below.
3. While tensioning use your finger and tap the timbale
head at each lug point about 2” in from the rim.
The goal here is to listen to the overtones produced and
bring each point in tune with the others. A clear tone
at desired pitch is what you want to get to. Apply small
quarter turns of the drum key and use listening to get a
natural even tone. Again use the crisscross pattern to
maintain equal tensioning. Take your time.
7
10 11
8
First
Stabilizer Bar
Second
Stabilizer Bar
Wing Nut
Accessory
Arm
4 Steel Timbale Set • BTB1413L Assembly Manual
by
®
SUGGESTED RHYTHM FOR TIMBALEMOVING THE TIMBALES
AFTER ASSEMBLY
When moving the Timbales, use the center
stand for better stability.
MUSICAL NOTATION