Split-fire Sales Fast Freddy Series User manual


Thank You for Purchasing a Fast Freddy
Winder!
We appreciate having you as our customer and wish
you many years of safe and satisfactory operation
with your machine.
SPLIT-FIRE SALES INC.
285633 Airport Road
Norwich, ON N0J 1P0
Canada
1-877-548-3473 / 519-468-3647
Please share a google review about your
Split-Fire experience

Table of Contents
1. Introduction 4
1.1 How to use your Owner’s Manual 4
1.2 Product Identification 6
2. Safety 8
2.1 Safety Labels 8
2.2 Operator Training 9
2.3 Operation & Work Site Safety 10
3. Operating 12
4. Assembly 18
4.1 Fast Freddy 4 & 6 18
4.2 Fast Freddy 2 24
5. Storage 31
5.1 Storage 31
5.2 Storage Accessories 31
6. Warranty 32
7. Parts Breakdown 34
7.1 Model Fast Freddy 2 34
7.2 Model Fast Freddy 4 36
7.3 Model Fast Freddy 6 38

Fast Freddy Hose Winder
Introduction Owners Manual
4
1.1 How to use your Owner’s Manual
By reading the operator’s manual you will help avoid
unnecessary personal injury and/or damage to the winder. The
information recorded in this manual will help you use this
winder safely and effectively. Once you know how to operate
the winder correctly and safely, you can train others to operate
the winder as well.
The Fast Freddy Winder that is used in this manual for
illustration may differ slightly from your model. It will be similar
enough to help you understand our instructions.
Throughout this manual the terms “Back” and “Front” will be
used. The “Front” of the winder is where the crank handle is
located on the side that contains the wound, hose, cable or
rope. The “Back” is the side that houses the bearings. Also, the
terms “Left Hand” and “Right Hand” will be used. These sides
are determined when standing in front of the winder.
Your machine has been tested and inspected to ensure good
performance prior to leaving the factory.

Fast Freddy Hose Winder
Owners Manual Introduction
5
Please carefully read and understand the warnings about safety
concerns relating to machine damage and important servicing
information. Please read all these messages to avoid personal
injury and machine damage. The three main messages will
start with:
WARNING!!!: which suggests, a strong chance of
personal injury to the operator or bystanders if procedures are
ignored.
IMPORTANT: which suggests, a strong chance of
potential damage to the machine may occur if procedures are
ignored.
NOTE: suggests to the operator, general information given to
help the operator to operate or service the machine.

Fast Freddy Hose Winder
Introduction Owners Manual
6
1.2 Product Identification
If you ever need to contact your dealer or the manufacturer for
parts or questions regarding the operation or servicing of the
machine, it is important to have the model number as well as all
the necessary identification numbers. Using the sample picture
below you can find the necessary number to complete the
spaces below.
Date of Purchase: ______________________
Dealer Name: __________________________________________
Dealer Phone Number: ______________________
Frame Serial Number: ( XX XX XX ) ______________________
Made in Canada
Frame Serial Number

Fast Freddy Hose Winder
Owners Manual Introduction
7
The Fast Freddy Winder is manufactured by Split-Fire Sales
Inc., an Original Equipment Manufacturer (OEM) based in
Canada.
Split-Fire products have been designed and engineered to be
safe, productive, long lasting machines using design principals
not found in other comparable products. A combination of smart
engineering and quality manufacturing by highly skilled
technicians results in a quality made-in-Canada product.
SPLIT-FIRE™ is a registered Trademark of
Split-Fire Sales Inc.
Fast Freddy Hose Winder
Safety Owners Manual
8
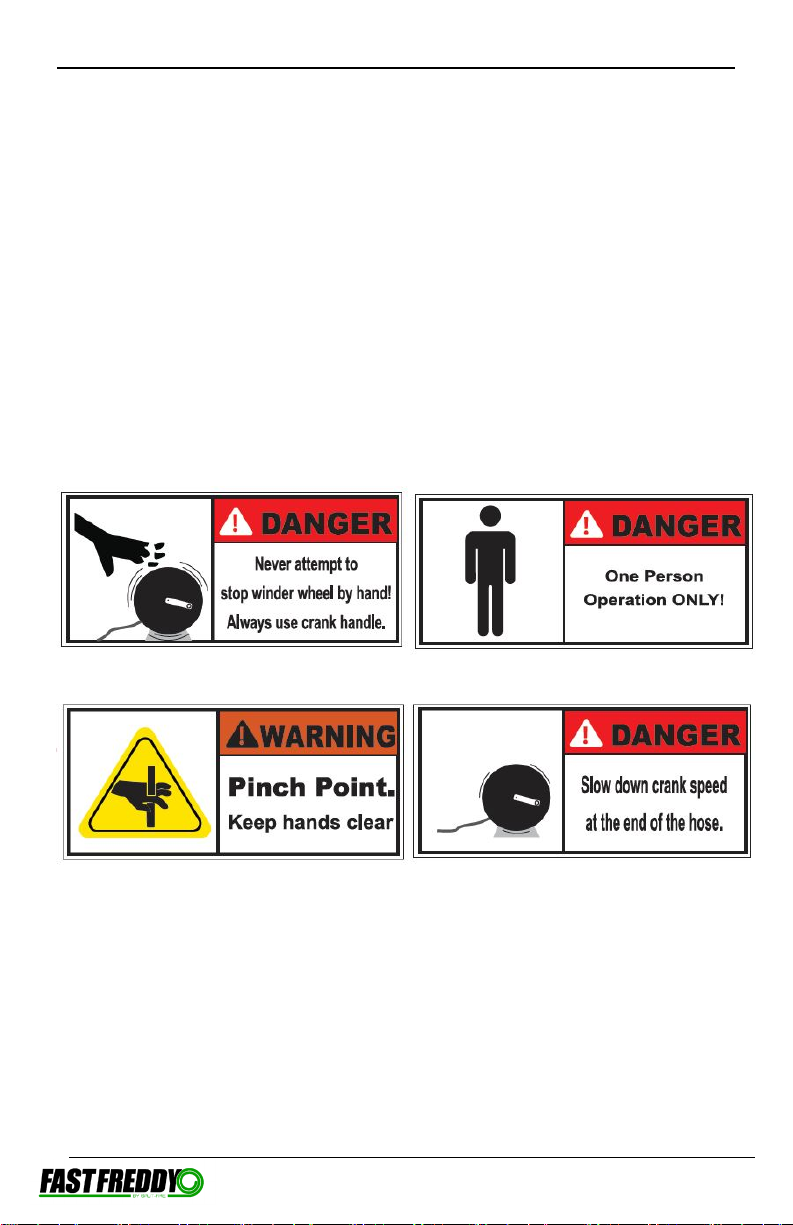
2.1 Safety Labels
The product safety labels shown in the section below are very
important. They are placed in areas on the winder that draw
the attention of the operator to potential safety hazards
associated with the winder. If at any time the stickers are
removed, or come off, contact your dealer or the manufacturer
immediately for replacement decals.
Special attention should be given to these recommendations.
They are outlined for your safety.
Safety Stickers

Fast Freddy Hose Winder
Owners Manual Safety
9
2.2 Operator Training
WARNING!!!
Carefully read and understand all the instructions in the
operator’s manual before operating or servicing your hose
winder. If any doubt or question arises about the safe and/or
correct method of performing anything in this manual, contact
your local dealer or the manufacturer.
Avoid accidents by being alert and recognizing potential
hazards. Not all possible circumstances can be anticipated in
this manual. Keep your winder and work area safe for yourself
and others. Proper care and safety is your responsibility.
Only adults over the age of 18 should operate this manual
hose winder.
The Fast Freddy Winder is designed and intended for use
by one operator only.
All operators must have the necessary training and skills to
operate the winder properly and safely. Read and understand
the owner’s manual and follow the safety warnings and
recommendations. Never allow untrained persons to operate or
service the equipment.
The owner is responsible for accidents and injuries to
themselves and/or other persons operating their winder. If
others are permitted to use this winder it is the responsibility of
the owner to train users.

Fast Freddy Hose Winder
Safety Owners Manual
10
2.3 Operation & Work Site Safety
Inspect your machine each time before use. Special
attention should be taken that all damaged or missing parts are
replaced, and that all the safety decals highlighted in the safety
labels section are in place, clear and visible on the machine.
Only allow responsible adults, over the age of 18, who have
read and fully understand the full instructions to operate the
machine. Only one person may operate the machine at any
time.
Only use the crank handle to turn the winder wheel.
Each time you operate your winder, ensure that the crank
handle and the winder wheel turns freely.
Keep hands and body parts clear of the wheel when
spinning and keep hands away from pinch points (between the
adjustable guide arm and frame) when adjusting the guide arm.
Your machine is designed to reel in and wind up hoses,
cables and ropes. Any other material may cause damage to the
machine and increase the chance of personal injury.
Keep the working area and ground around the winder
organized, lit and free of equipment, tools, unwound hose,
cable, rope and debris. Not doing so could result in injury.
Before operating the winder make sure to disengage the
safety wheel lock and that the winder is firmly sitting on level
ground. Operate the winder on level surface only.

Fast Freddy Hose Winder
Owners Manual Safety
11
Always slow down crank speed when nearing the unwound
end of the hose, cable or rope to prevent whiplashing action.
Take frequent breaks and be alert when using the winder.
Do not operate your winder in enclosed areas or around
other pieces of moving machinery. You will need ample room
to work with your unwound hose, cable or rope.
Never attempt to stop the winder wheel by hand or force.
Always use crank handle provided or wait for momentum of the
wheel to slow down and stop if crank handle control is lost.
Never wear loose clothing and keep long hair tied back when
operating the winder either can get caught and cause injury.
Never operate the winder if anybody is standing nearby.
Nobody other than the operator should be within 25 feet of the
winder. Keep other distractions like electronic devices away.
Never operate winder if under alcohol or drug influence.
Do not over-spin the winder to increase the speed beyond
the operator’s comfort level.
Do not alter; add accessories, or attachments to your winder
without the approval of the manufacturer. If manufacturer
approved attachments have been added, be sure to keep
safety labels visible.
Doing any of the above without the manufacturer’s approval
WILL VOID THE WARRANTY.
Fast Freddy Hose Winder
Operating Owners Manual
12
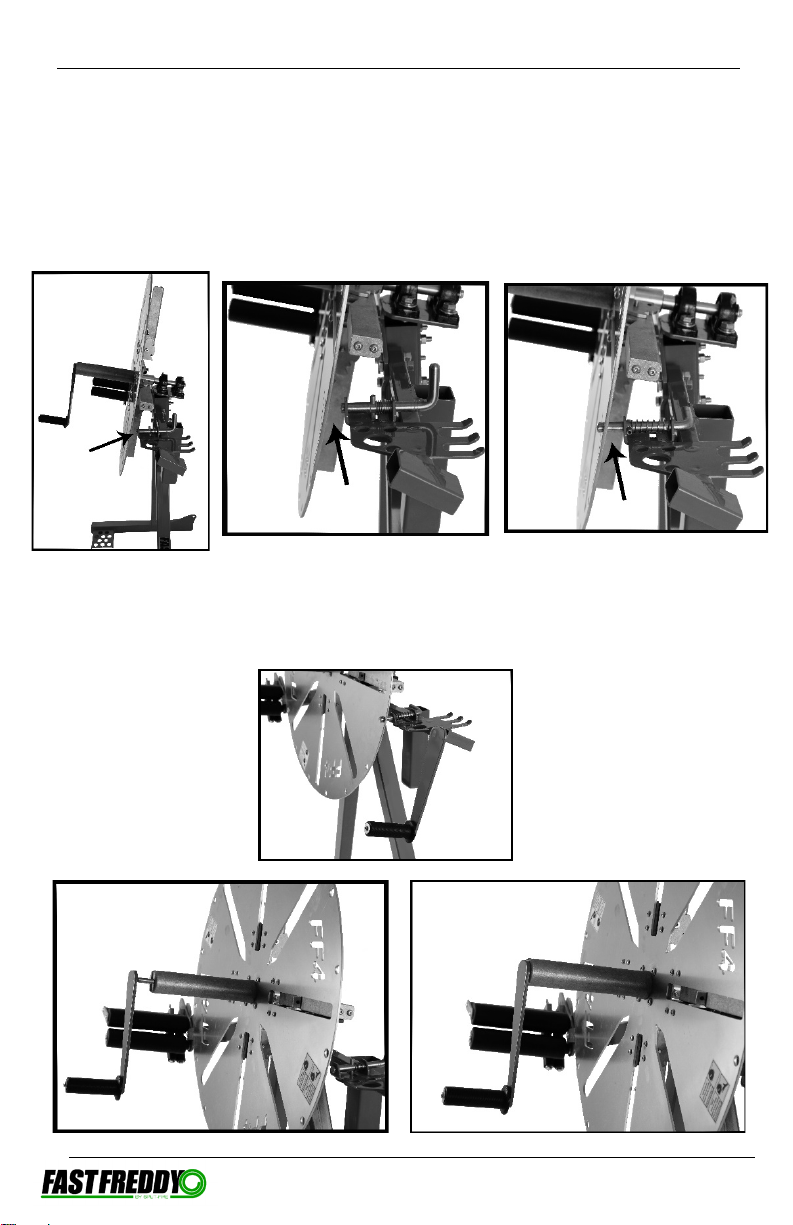
3. Operation
Make sure that you have read and understand all safety
recommendations before operating the winder.
Disengage the wheel lock on the right side of the machine.
Remove the crank handle from its holder and insert it into the
reel plate stem for turning the wheel.
Fast Freddy Hose Winder
Owners Manual Operating
13
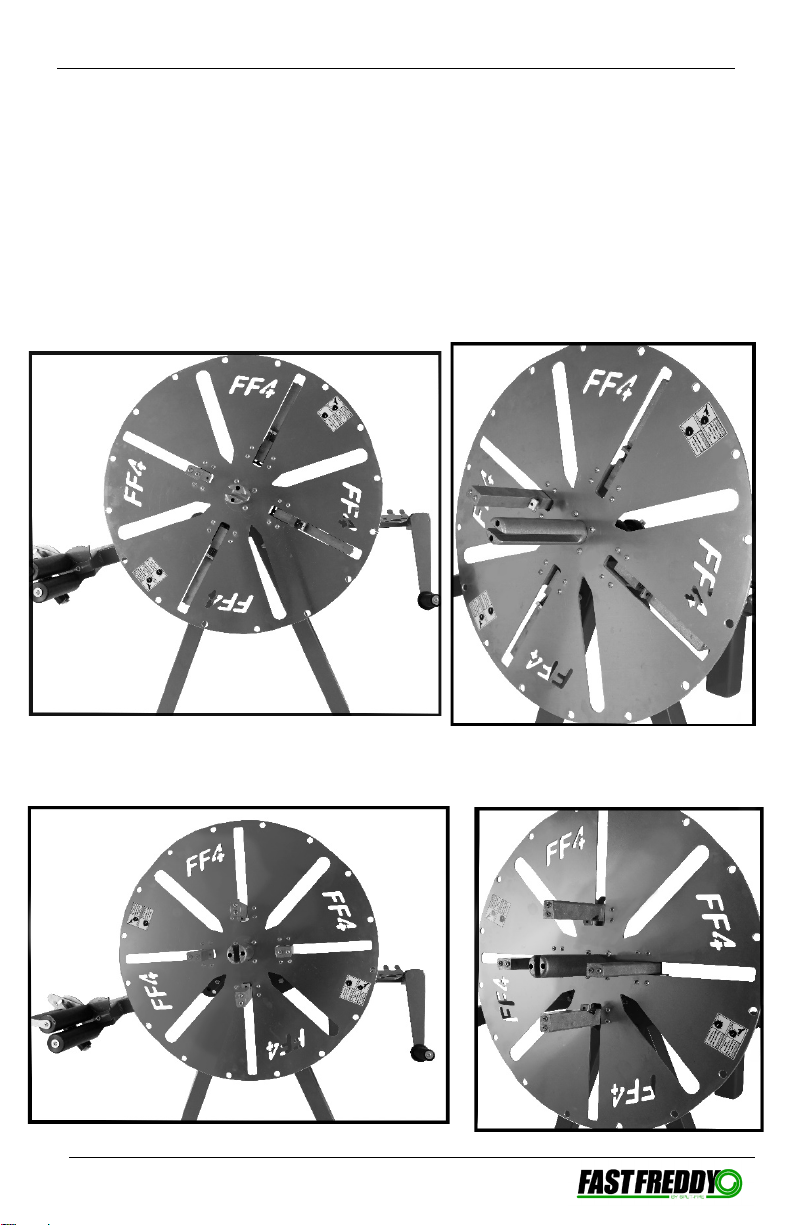
Determine the size of the inner diameter opening you desire
and release one or more of the spring actuated detent arms
and make sure it is locked in place. Using one detent arm only
will give you the smallest opening. Using all four detent arms
will give you the largest opening.
For some applications the detent arms do not need to be used.
One Detent Arm
Four Detent Arms

Fast Freddy Hose Winder
OperatingOwners Manual
14
When winding small diameter cables use the detent shoulders
provided with the winder to prevent the cable from sliding off
the detent arm.
Take the lead end of the hose, cable or rope that is to be
wound and secure it through the reel plate stem.
If the diameter of the hose or cable exceeds ½” place it over the
stem.
Insert the crank handle into the reel plate stem.

Fast Freddy Hose Winder
Owners Manual Operating
15
Secure the hose, cable or rope through the Fair Lead, threading
it flush through the Vertical Rollers and then down through the
Horizontal Rollers.
Use the ratchet action & thumbscrews to adjust the position of
the guide rollers. Ratchet the horizontal rollers down to tighten.
The vertical rollers should be at a 90 degree angle to the hose,
rope or cord being wound and make sure it remains in the
middle of the Fair Lead when winding. If the hose, cord or rope
slips out of the Fair Lead stop turning the crank handle to
prevent kinks and reset the material properly through the guide
rollers.

Fast Freddy Hose Winder
Operating Owners Manual
16
The Guide Arm can swing completely down and out of the way
for manual guiding of the hose by the operator. Turn the guide
arm lock clockwise or counter clockwise to loosen or tighten the
arm. Position the arm to the desired spot and then tighten the
lock to secure it in place.
With the crank handle firmly in place in the reel plate stem,
place one hand on the plastic palm grip on the crank handle
and turn the crank handle clockwise to wind the hose, cable or
rope. The operator should turn the wheel at a comfortable
speed keeping it under control at all times. Slow down the turn
speed when nearing the end of the hose, cord or rope being
wound.

Fast Freddy Hose Winder
Owners Manual Operating
17
Remove wound end from the Fair Lead and tie off the wound
hose, cable or rope with twine or tie straps. The wheel has four
open tie slots cut into the face of the wheel to conveniently
access the wound up hose from two sides when tying it down.
Disengage one or more of the detent arms to slacken the
wound hose enough to pull it off the wheel. Your wound hose,
cable or cord is now ready for stacking or storage.

Fast Freddy Hose Winder
Assembly Owners Manual
18
4.1 Assembly – Fast Freddy 4 & 6
Please follow the assembly instructions provided.
Tools required for assembly include:
9/16” Wrench
9/16” Ratchet / Socket
3/16” Allen Key
1/2” Wrench
Large Flat Bar or Wrench (Any Size).
Your Fast Freddy Winder is shipped in a box.
All of the components required to assemble your Fast Freddy
will be packed inside as shown by the illustration. (Packaging
may differ slightly with wall or hitch mount models.)

Fast Freddy Hose Winder
Owners Manual Assembly
19
1. Find the Main Bearing Mount. Note: the 4 bolts, (3 bolts
for Wall and Hitch Mount Models) are assembled in the
bearing mount before shipping. Remove these bolts for
the next step.
2. Assemble the 2 legs to the Bearing Mount. Reinsert the
4 bolts back into the Bearing Mount and tighten. Note:
The nuts must be placed on the back of the Bearing
Mount. There are 4 bolts for leg mount, and 3 bolts for
Wall and Hitch mount. (Note: the Wall and Hitch mounts
have different bolt patterns.)

Fast Freddy Hose Winder
Assembly Owners Manual
20
3. Find the Guide Arm, and remove the hinge bolt and
retract the lock pin. Assemble the Guide Arm to the
Bearing Mount and insert the hinge pin. (Do not tighten
bolt. Bolt must only be snug). Then, add the nut to the
bolt and lock the bolt. This keeps it from loosening while
not over tightening the Guide Arm.
This manual suits for next models
3
Table of contents
Popular Farm Equipment manuals by other brands

Schaffert
Schaffert Rebounder Mounting instructions

Stocks AG
Stocks AG Fan Jet Pro Plus 65 Original Operating Manual and parts list

Cumberland
Cumberland Integra Feed-Link Installation and operation manual

BROWN
BROWN BDHP-1250 Owner's/operator's manual

Molon
Molon BCS operating instructions

Vaderstad
Vaderstad Rapid Series instructions


