Sportmag SM1223 User manual

User manual
SM1223 Magnetic exercise bike Xbike
Sportmann
www.sport-mag.ro
EN

1
Catalogue
1. Safety Instruction…………………………………………....…….......2
2. Finished Structure……………………………………………………...3
3. Assembly Instruction…………………………………………….......5-7
4. Operation Instruction……………………………………………..........8
5. Computer Operation Instruction………………………………..……..8
6. Small Explosion Diagram……………………………………..….…....9
7. Big Explosion Diagram………………………………………………..10
8. Explosion Diagram Parts Name……………….............………....….11
9. Important Notes…………………………………………………...……12
10.Personal Training Program……………………………………………13
11.Warm-up Exercise…………………………………………….........14-16

2
Safety Instruction
A great deal of emphasis was placed on safety in the design and manufacture
of this fitness device. Still, it is very important that you strictly adhere to the
following safety instructions. We cannot be held liable for accidents that were
caused due to disregard.
1) Consult your body status before starting to exercise on this device.Should
you want to exercise regularly ,the approval of your body status would be
advisable.It’s good for your health.
2) In order to avoid danger, we recommend that children, patients,
handicapped people should only use the device when a qualified career is
present.
3) When using the fitness device, wear comfortable clothing. Avoid wearing
loose clothing which could get caught in the moving parts of the device.
4) Stop exercising immediately when you feel unwell, and lie down to rest.
5) Ensure that only one person can use the fitness device at a time.
6) After the sports device has been set up according to operating instructions,
make sure all screws, bolts and nuts are correctly fitted and tightened.
7) We should take the product for maintenance after using it for a period of
time. Damaged equipment is strictly prohibited to use.
8) Equipment should be placed in the ground. which is smooth, clean, and
waterless.
9) Use only attachments recommended by the manufacturer. Strictly prohibit
private replacing.
10)User weight shall not exceed the carrying capacity of the product
calibration.
11) Check each component carefully before Using.
12) It is the indoor equipment; do not use it in the sun, moist environments.

3
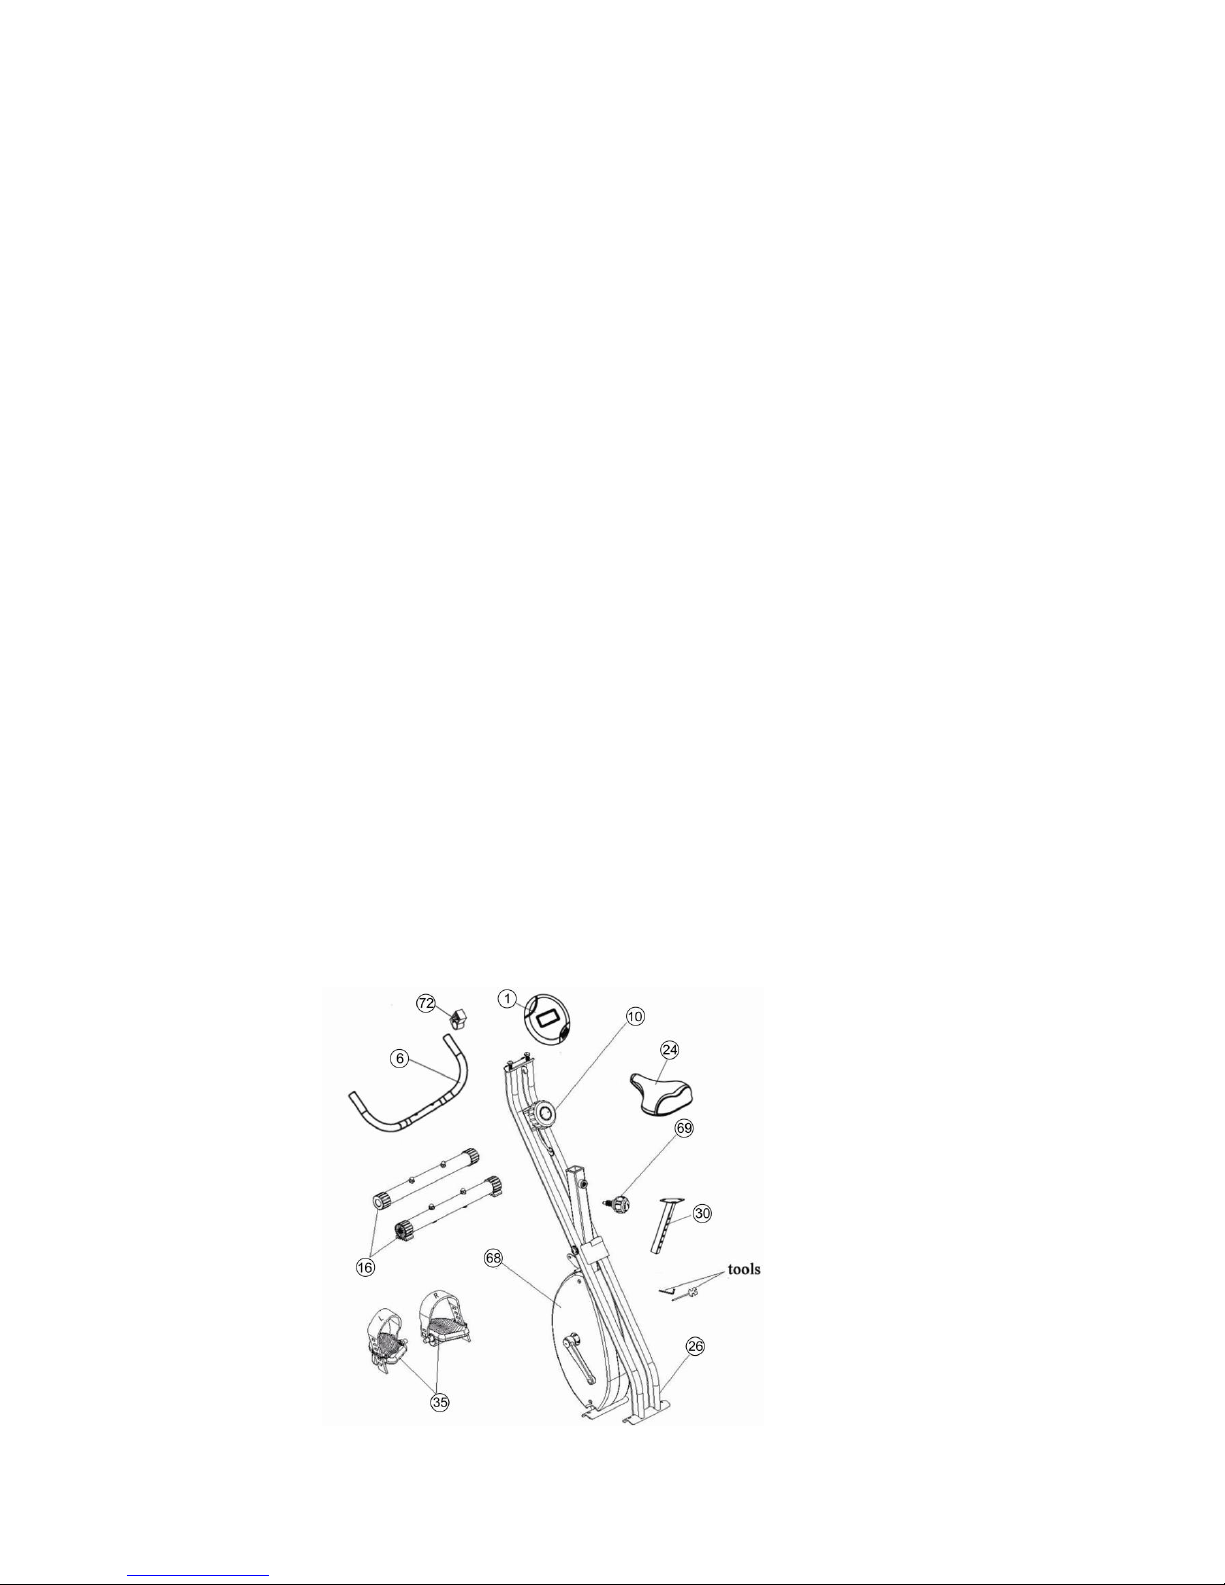
Finished Structure

4
Main Structure
Hardware Bag

5
Assembly Instruction
Step1: Adjust bolt holes to make the product standing
●Take off the item from the box,then make it stand on the ground; push out
the positioning pin(34) as shown in Figure 1 to make the main frame stable;
Rotate the main frame (68) in a clockwise direction as shown by the arrow
2, then insert the positioning pin (34) to another hole,as shown in Figure 2.
Step2: Install the front and rear stabilizers to the main frame.
●Attach the two stabilizers (16) to the main frame(26) and (68) respectively
using four pieces of M8*50 the carriage screws(38), four pieces of M8
caping nuts (36) and four pieces of cambered washers(3).
●Then tighten the screws and nuts with the wrench of tool box.

6
Step3: Install left an d right pedal assemblies.
●Install the pedals (35L/R) to the appropriate crank arms of the main frame
(68).
●Match the foot buckle fasteners with the corresponding pedals according to
the note as shown in figure 1.Firstly, button the foot buckle fasteners as
shown in the arrow 1 into the pedal convex plate , tighten in the direction as
shown in arrow 2. Then, as shown in figure 2, penetrate the other end of
the foot buckle fasteners into the hole of the pedal in the direction of arrow
3. You can select the appropriate hole position based on individual settings,
tighten as the direction of arrow 4 as shown in figure 3.
●The direction of the product is determined by the user. When using it, left
hand is laft, right hand is right;There are mark L and knurling on the central
spindle of left pedal(35L), and buckle fasteners also has mark L.The
opposite side has mark R as the left.,but the central spindle dosen’t has
knurling.

7
Step 4: Install handrail Components
●Fasten the handrails(6) into the main frame (26) with 2 pieces of M8*30
Countersunk head screw.
Step5: Installate the seat post
●Pull out the round broaching from the main frame(68), and insert the seat
tube(30) into the main frame.Then tighten the seat tube with the locknut,
and fasten the seat post (24) to the seat tube(30) with the wrench of tool
box.
Step 6: Install the computer
●Fasten the computer base(72) into the handrail tube and main frame with
the cross tapping screw(5), and adjust the good point of view, insert the
computer into the computer base(72), connect the wires of the computer
and handrail tubes, as shown in the big picture.

8
Operation Instruction
●After the location is confirmed, adjust the balance by rotating the padels.
●Loosen the round broaching,and pull out a little, then adjust the seat to a
comfortable height and tighten the seat post with the round broaching.
●Adjust the torque
Rotate the knob to adjust the resistance of the magnetic wheel.
Computer Operation Instruction
1) display description:
●Time-----------------------------------------------------------00.00~99.59 MIN:SEC
●Speed---------------------------------------------------------0.0~999.9KM/H OR ML/H
●Distance------------------------------------------------------0.00~99.99 KM OR ML
●Calories-------------------------------------------------------0.0~999.9 KCAL
●Odometer-----------------------------------------------------0.0~99.99 KM OR ML
●Pulse ----------------------------------------------------------40~200 BEATS/MTN
2) Key-press funtion:
●Mode/Reset: A short press can choose different funtions, but a long press of
4 seconds can delete all the data except ODO.
9
●Set: set up the input value (if it has this button).
●Reset: set up the data reset (if it has this button).
3)Operating process:
If the signal is not used within 4 minutes or it dosen’t has any button operation,
the display will automatically shut down, and enter the power-saving state. If
you start to use or it has the operation of keypad, the display will open into the
working-state automatically.
4) fuctions:
●Scan: When this feature-headed arrow appears, the system will
automatically switch in the other funtions of "Show introduction" every five
seconds , as following order:SCAN+TIME,SCAN+SPEED,SCAN+DIST,
SCAN+CAL,SCAN+ODO,
SCAN+PULSE,cycles like this. If it is the ODO, PULSE function does not exist,
it will automatically skip.
●Time: Exercise to remember time Automatically.
●Speed: Display the current speed.
●Distance: Cumulate distance when exercising
●Calories: Memorize the consumption of calories automatically wnhen
exercising.
●Odometer: Display the total distance,and it cumulate based on the original
value when inputting the signal. Mileage display will not be zero when you
press the reset button, except you replace or remove the battery.
●Pulse: When you hold the heartrate, it will show the number of heartbeats
per minute (if you have this feature).
●Scan:It scans each function of 1~ 6 automatically.
5) Battery: If it’s not correct, please replace the battery,or change to “AA”
“AAA”or 1.5V button battery, replace all of the batteries one time.
Small Explosion Diagram

10
Big Explosion Diagram

11
Explosion Diagram Parts Name
NO.
Name
Size
Qty
NO.
Name
Size
Qty
1
meter
1set
37
Tube cushion
For Ø38 tube
2
2
Countersunk head
screw
M8*30
2
38
Carriage
Screw
M8*50
4
3
curved washer
Ø8.4* Ø16*1.5T
4
39
Washer
2
4
pipe stopple
for Ø22*1.5tube
2
40
Bent chain
2
5
Cross screw
M4*25
1
41
Wheel
Ø35*16
1set
6
handlebar
Ø 22*1.5
1set
42
Flat washer
Ø5.3* Ø10*1
1
7
handlebar cover
Ø20*5T*280L hdr
2
43
Cross screw
M5*8
1
8
flat washer
1
44
Chain
1set
9
cross screw
M5*16
1
45
Spring
OD Ø10.5*55L* Ø1.5
1
10
speed control
1100L
1set
46
wheel
Ø150 J3
1
11
middle wire
1000
1
47
axletree
608
2
12
cross screw
ST4*16
7
48
Spindle
Ø 11*94 M8
1
13
plastic cover
1set
49
Nylon nut
M6
2
14
Front cover
1
50
Flat washer
Ø8.4* Ø 16*1.5T
6
15
Front tube cover
For Ø38 tube
2
51
Nylon nut
M8
2
16
Earth tube
Ø38*390*1.5T
2
52
Axletree steel
Ø77*3T
2
17
Cross screw
M6*8
1
53
R.L pole
5”
1set
18
Press spring
45L* Ø0.8
1
54
Cover
2
19
Magnetic stand
118*20*3
1set
55
Screw
M8*P1.0*20
2
20
Magnetic
R95*20*13
3
56
Flat washer
Ø8.4* Ø20*1.5T
2
21
Lock spring
For Ø10 spindle
1
57
Screw
M6*12
10
22
Cross screw
ST4*12
2
58
Flat washer
Ø6.4* Ø12*1.0
10
23
Sensor
100
1
59
Axletree
6003
2
24
seat
1
60
Lock spring
For Ø17 spindle
6
25
Wire stopple
Ø12
1
61
Plastic sheet
2
26
Main frame
1
62
Wave washer
For Ø17 spindle
2
27
Wire-stopple
22*26 Ø12
2
63
Magnetic wheel
Ø160
1
28
anti-shock cushion
1
64
Nut
M6
4
29
Spindle cover
Inside Ø16.05
6
65
Magnetic
1
30
Seat post
1set
66
Main wheel
Ø155 J3
1
31
Screw
M8*16
2
67
Spindle
Ø17*149.5
1set
32
Flat washer
Ø8.4* Ø22*1.5T
2
68
Inside frame
1set
33
Round spindle
Ø16*93 M8
1
69
Pull-bolt
M16*P1.5*20
1set
34
Lock bolt
Ø8*108
1
70
Seat post cover
For 38*1.5 & Ø 30
1
35
Pedal
1/2”-20
1set
71
Belt
230J3
2
36
Capping Nut
M8
4
72
Computer
base
1

12
Important Notes
The device cooresponds to currenr safety standards.The device is only
suitable for home use. Any other use is impermissible and possibly even cause
danger.We can not be responsible for improper use.
●Please consult your body status before starting your exercise session to
clarify whether you are in suitable physical health for exercising with this
device.
●You have pain,shortness of brealth ,feel unwell or have other physical
complaints,do break off the exercise immediately.
●This fitness device is not suitable for professional or medical use .
●The max load weight of this fitness device is below 120 kg.
Usual System Training
Start your exercise program slowly, i.e. one exercise unit every 2 days.
Increase your exercise session week by week. Begin with short periods per
exercise and then increase these continually. Start slowly with the exercise
sessions and don't set yourself impossible targets. In addition to these
exercises, do other forms of exercise such as jogging, swimming,
dancing .cycling.
Always warm up thoroughly before exercising. To do so, carry out at least five
minutes of stretching or gymnastic exercises to avoid muscle strains and
injuries.
Make sure you breathe regularly and heartbeat when exercising
Take care to drink enough while exercising. This ensures that the liquid
requirement of your body is satisfied. Consider that the recommended drinking
amount of 2-3 liter per day is strongly increased through physical strain. The
fluid you drink should be at room temperature.
When exercising on the device always wear light and comfortable clothing as
well as sports clothing. Do not wear any loose clothing that could tear or
become caught in the device whilst exercising.

13
Personal Training Program:
How high or low should your heart rate be during exercises?
Is your physical fitness enough?
age
Heart rate (bpm)
Limit (bpm)
20
100—150
200
25
98—146
195
30
95—142
190
35
93—138
185
40
90—135
180
45
88—131
175
50
85—127
170
55
83—123
165
60
80—120
160
65
78—116
155
70
75—113
150
COPYRIGHT(c) 1997 AMERICAN HEART ASSOCIATI0N

14
Warm-up Exercise
A successful exercise session begins with warming up exercises and ends
with exercises for cooling down and relaxing. These warming up exercises
prepare your body for the subsequent demands made upon it. The cooling
down/relaxation period after the exercise session ensures that you do not
experience any muscular problems.In the following you will find strentching
exercise instructions for warming up and cooling down.Please pay attention to
the following points:
NECK EXERCISE
Tilt your head to the right and feel the tension in your neck. Slowly drop your
head down to your chest in a semi-cirle and then turn your head to the left. You
will feel a comfortable tension in your neck again.
You can repeat this exercise alternately several times.
EXERCISE FOR THE SHOULDERS AREA
Lift the left and right shoulders aiternately, or lift both shoulders
simultaneously.
ARM STRETCHING EXERCISES
Stretch the left and right arms alternately towards the ceiling. Feel the tension
in your left and right side. Repeat this exercise several times.

15
EXERCISES FOR THE UPPER THIGH
Support yourself by placing your hand on the wall, then reach down behind you
and lift up your right or left foot as close to your buttocks as possible. Feel a
comfortable tension in your front upper thigh. Maintain this position for 30
seconds if possible and repeat this exercise 2 times for each leg.
INSIDE UPPER THIGH
Sit on the floor and place your feet in such a way that your knees are facing
outwards. Pull your feet as close as possible to your groin. Now press your
knees carefully downwards. Maintain this position for 30-40 seconds if
possible.
TOUCH TOES
Bend your trunk slowly towards and try to touch your feet with your hands.
Reach down as for as possible to your toes. Maintain this position for 20-30
seconds if possible.

16
EXERCISES FOR THE KNEES
Sit on the floor and stretch out your right leg. Bend your left leg and place your
foot on your right upper thigh. Now try to reach your right foot with your right
arm. Maintain this position for 30-40 seconds if possible.
EXERCISES FOR THE CALVES/ACHILLES TENDON
Place both hands on the wall and support your full body weight. Then move
your left leg backwards and alternate it with your right leg. This stretches the
back of the leg. Maintain this position for 30-40 seconds for possible.

17
Manual de utilizare
SM1223 Bicicleta fitness magnetica Xbike
Sportmann
www.sport-mag.ro
RO

18
Cuprins
1. Instructiuni de siguranta .…………………………………....……....19
2. Schema.........................………………………………………………20
3. Instructiuni de asamblare………………………………………....22-24
4. Instructiuni de utilizare……………………………………………......25
5. Calculator....................................………………………………..…...25
6. Diagrama.........................……………………………………..….…...26
7. Diagrama detaliata...………………………………………………......27
8. Lista componente.....................……………….............………....…..28
9. Note importante..………………………………………………...….....29
10.Program de antrenament personal………………………………….30
11.Exercitii de incalzire……………………………………….............15-17

19
Instructiuni de siguranta
Produsul a fost fabricat in concordanta cu cele mai inalte standarde de
siguranta. Va recomandam sa respectati toate instructiunile de siguranta din
acest manual pentru a evita accidentarile.
1) Este important sa fiti constient de starea dvs. de sanatate inainte de a
incepe un program de exercitii regulat.
2) In cazul in care copiii sau persoanele cu dizabilitati vor folosi produsul, este
rcomandat ca acestia sa fie supravegheati in permanenta.
3) Cand va antrenati, purtati imbracaminte confortabila. Evitati hainele prea
largi care s-ar putea agata in componentele mobile ale bicicletei.
4) Opriti-va imediat daca va simtiti rau si intindeti-va pentru a va odihni.
5) Este interzis ca mai multe persoane sa foloseasca bicicleta in acelasi timp.
6) Dupa finalizarea asamblarii produsului, verificati toate suruburile si piulitele
sa fie stranse ferm.
7) Nu folositi niciodata un produs deteriorat.
8) Asezati bicicleta pe o suprafata stabila, curata, unde nu este risc de a
ajunge apa la produs.
9) Folositi doar piese si accesorii recomandate de producator.
10 Greutatea maxima a utilizatorului nu trebuie sa depaseasca 120 kg.
11) Verificati fiecare componenta cu atentie inainte de a folosi bicicleta.
12) Bicicleta este conceputa pentru utilizare in interior. Nu expuneti produsul la
umiditate sau soare.
This manual suits for next models
1
Table of contents
Languages:
Other Sportmag Exercise Bike manuals


