SPORTS ART 5007 User manual

SPORTSARTSEMI-RECUMBENTCYCLE#5007
TABLEOFCONTENTS
A.SAFETYGUIDELINES..........................................................................................
B.INTRODUCTION......................................................................................................
C.ASSEMBLINGYOURCYCLE
Listofparts...........................................................................................................
Stepbystepinstructions......................................................................................
Floorleveladjustment..........................................................................................
Seatadjustment...................................................................................................
D.EXERCISINGONYOURCYCLE
Understandingtheelectronicspackage...............................................................
Manual.................................................................................................................
Interval..................................................................................................................
Program................................................................................................................
E.KEYFUNCTIONS...............................................................................................
F.MAINTAININGYOURCYCLE
Cleaningthebike.................................................................................................
Guidelinesforexercise........................................................................................
G.TROUBLESHOOTING.......................................................................................
Replacefuse........................................................................................................
Replacebattery....................................................................................................
1
2
3
4
8
9
10
10
11
12
14
15
15
16
16
17
PDFcreated withpdfFactorytrialversion www.pdffactory.com

SAFETYGUIDELINES:
Pleasereadandfollowthesafetyguidelinesasbelow.
Readthisowner'smanualandfollowtheinstructions.
Keepthisowner'smanualforfutureuseandreference.
Alwaysunplugthecyclefromtheelectricaloutletbeforecleaning.
Assembleandoperatethecycleonasolid,levelsurface.
Neverallowchildrenonornearthecycle.
Checkthecyclebeforeeveryuse.Makesureallsparepartsareassembled,andall
washersandboltsaretightened.Donotusethecycleiftheunitisdisassembledin
anyway.
Keepyourhandsawayfrommovingparts.
Wearproperworkoutclothing:doNOTwearlooseclothing.Donotwearshoeswith
leathersolesorhighheels.Tiealllonghairback.
Don'trocktheunitfromsidetoside,andusecarewhenmountinganddismounting
theunit.
Don'tstandontheunit.
Donotuseanyaccessoriesthataren'tspecificallyrecommendedbythe
manufacturerasthesemightcauseinjuriesorcausetheunittofail.
Allowsufficientspaceonbothsidesofthebikeforuserstomountanddismountthe
machine.
Remembertoallowspacetoplugintheunit.
Workwithinyourrecommendedexerciselevel,doNOTworktoexhaustion.
Thepowercordcanonlybereplacedbyaqualifiedtechnician.
Ifyoufeelanypainorabnormalsensations,STOPYOURWORKOUTandconsult
yourphysicianimmediately.
Ifanypartsfailoraredefective,pleasestopyourworkoutimmediatelyandcontact
yourauthorizeddealerforrepairs.
Beforebeginninganyexerciseprogram,youshouldconsultwithyourdoctor.
Itisrecommendedthatyouundergoacompletephysicalexamination.
.
.
.
.
.
.
.
.
.
.
.
.
.
.
.
.
.
Caution:
PDFcreated withpdfFactorytrialversion www.pdffactory.com

INTRODUCTION
Congratulationsonpurchasingoneofthefinestpiecesofgradeexerciseequipment
onthemarkettoday.Constructedofhighqualitymaterialsanddesignedforyearsof
troublefreeusage,theSportsArt5007willbeanintegralpartofyourfitness
regimen.
Beforeusingyourcycle,werecommendthatyoufamiliarizeyourselfwiththis
Owner'sManual.Whetheryouareafirsttimeuserofanexercisecycleora
seasoned"pro,"understandingthecorrectuseoftheequipmentwillenhanceyour
abilitytoachieveyourexercisegoalssafelyandsuccessfully.
PDFcreated withpdfFactorytrialversion www.pdffactory.com

ASSEMBLINGYOURCYCLE
Listofparts:
.
.
.
.
.
.
.
.
.
.
.
.
.
.
.
.
.
.
Six5/16"x3/4"boltsUprightpost
Four5/16"wavewashersUprightpost
Two5/16"flatwashersUprightpost
FourphilipscrewsUprightpostcover
Four1/4"x1/2boltsHandlebar
Four5/16"x3/4"boltsHandlebarmountingplate
Four5/16"flatwashersHandlebarmountingplate
Four5/16"springwashers-Handlebarmountingplate
Three5/16"x3/4"boltsSeatpost
Three5/16"flatwashersSeatpost
Four5/16"x3/4"boltsSeatbase
Four5/16"flatwashersSeatbase
Onepairoffootpedals
Oneopen-endedwrench
Onefuse:1AMP
Two-wayscrewdriver
Onehexallenwrench
Onehexsocket
PDFcreated withpdfFactorytrialversion www.pdffactory.com

StepByStepInstructions:
Beforeassemblingyourcycle,makesurethatyouhaveallthelistedontheprevious
pageparts.Thefollowingstepsexplainhowtoassembleyour5007.Pleaseread
everystepthoroughly,andfollowthedirectionscompletelytoensurecorrect
assembly.
1.Takeoutthecycleframeandmakesureallpackingmaterialsareremovedfrom
theunit.
2.Placethecycleonalevel,flatsurface.
3.Placetheuprightpostcoverintotheuprightpost.Locatethe16pincable
connectorinsidetheuprightpostandinsertitsecurelyintothesocket.
Tightentheconnectorbyturningbothscrewpinsclockwisetosecure.Insertthe
uprightposttothecycleframe(seeFig.1).
4.Use6pcs5/16"bolts,andwasherstosecuretheuprightpost(seeFig.2).
Fig.1
Fig.2
PDFcreated withpdfFactorytrialversion www.pdffactory.com
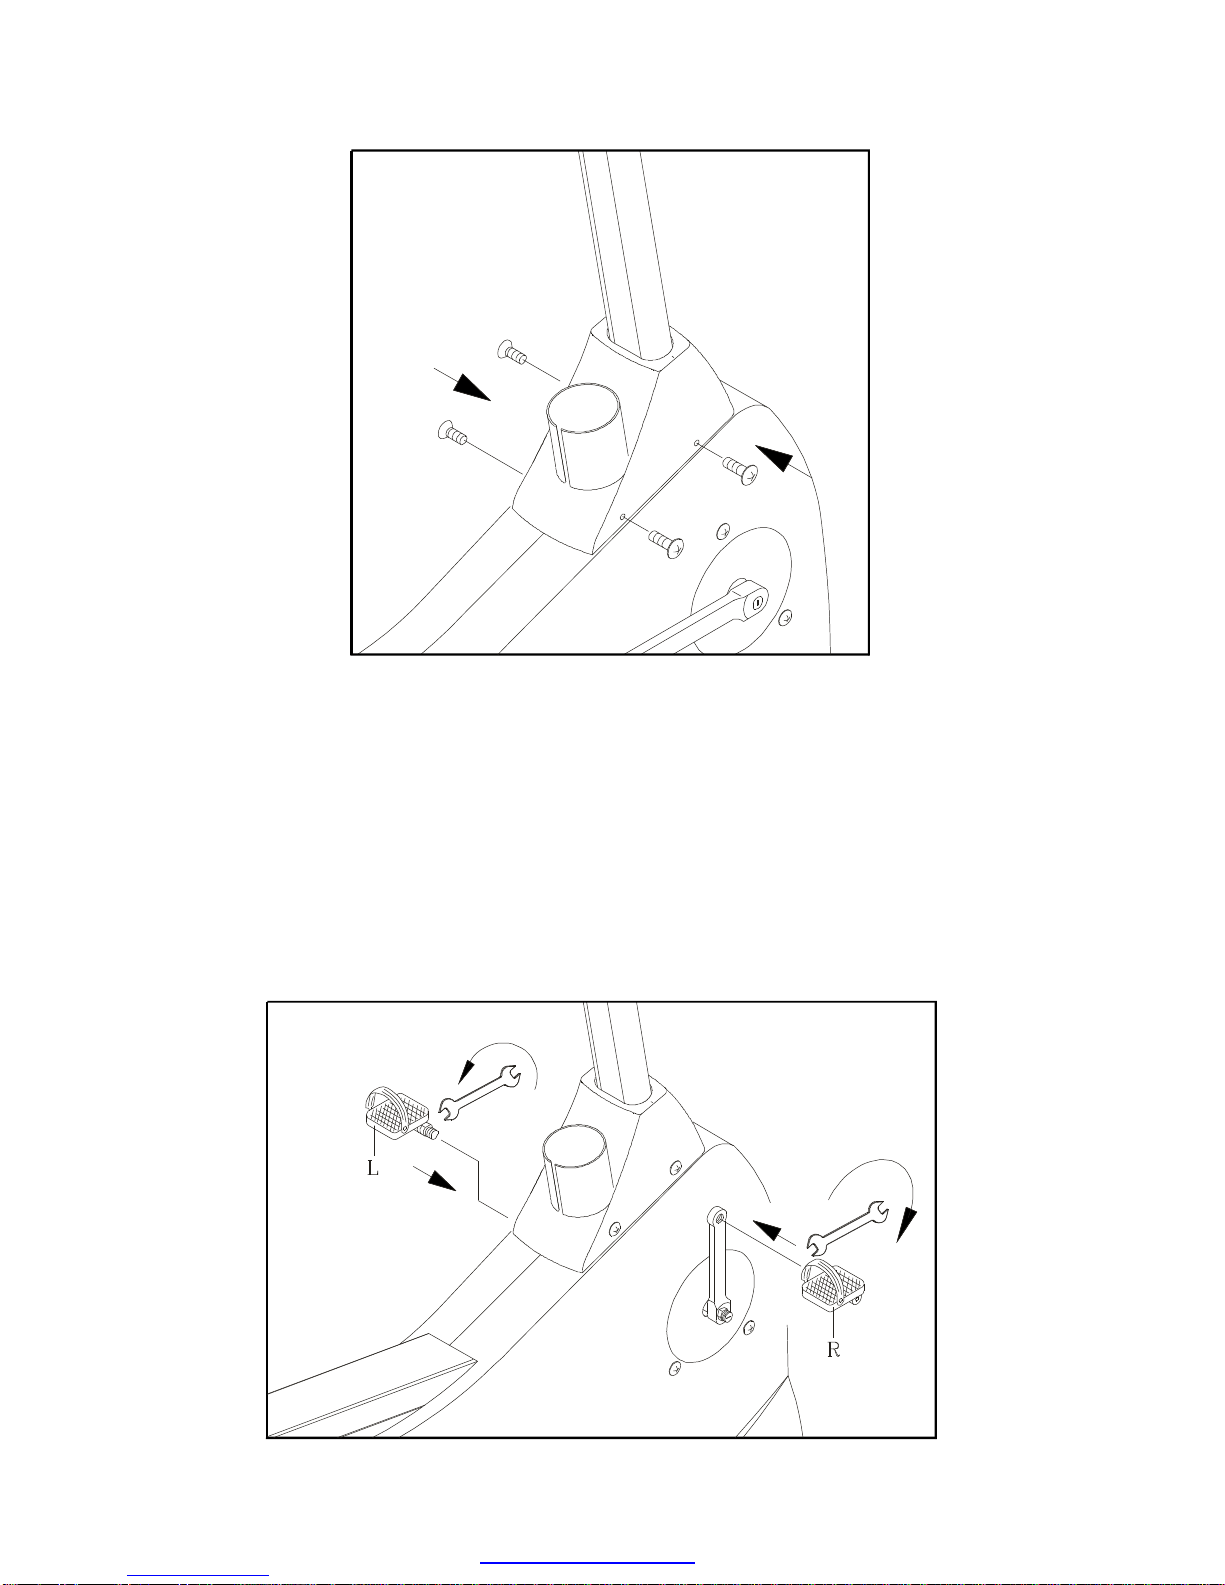
5.Usefourscrewstosecuretheuprightpostcover(seeFig.3).
6.Attachthefootpedalstobothsidesofthecrankarmsbyusingthewrench
provided.
Becarefultoinstallthepedalsonthecorrectcrankarm.A"R"or"L"onthe
footpedalindicatesthecorrectside.
Installthepedalmarked"R"ontherighthandcrankarm(asyoustandatthe
rearofthecyclefacingfront).Whenyouinstallthepedalonthelefthandcrank
arm,rotatethepedalcounterclockwisetotightensincethepedalhaslefthanded
screwthreads(seeFig.4).Tightenthepedalssecurely.
Fig.3
Fig.4
PDFcreated withpdfFactorytrialversion www.pdffactory.com

7.Usethe1/4"boltstofixthehandlebartotheuprightpost.Makesuretheangle
betweenthehandlebarandtheuprightpostismorethan90(seeFig.5).
8.Attachthehandlebarmountingplatetothecycleframe,usingtheboltsand
washersprovided.(SeeFig.6)
Note:Theremotecontrolshownhereisoptional,itisnotincludedinsome
markets.
Fig.6
Fig.5
PDFcreated withpdfFactorytrialversion www.pdffactory.com

9.Inserttheseatbackintotheseatpost,usingthe5/16"boltsandwashersto
secureit(seeFig.7).
10.
Fig.7
Fig.8
PDFcreated withpdfFactorytrialversion www.pdffactory.com
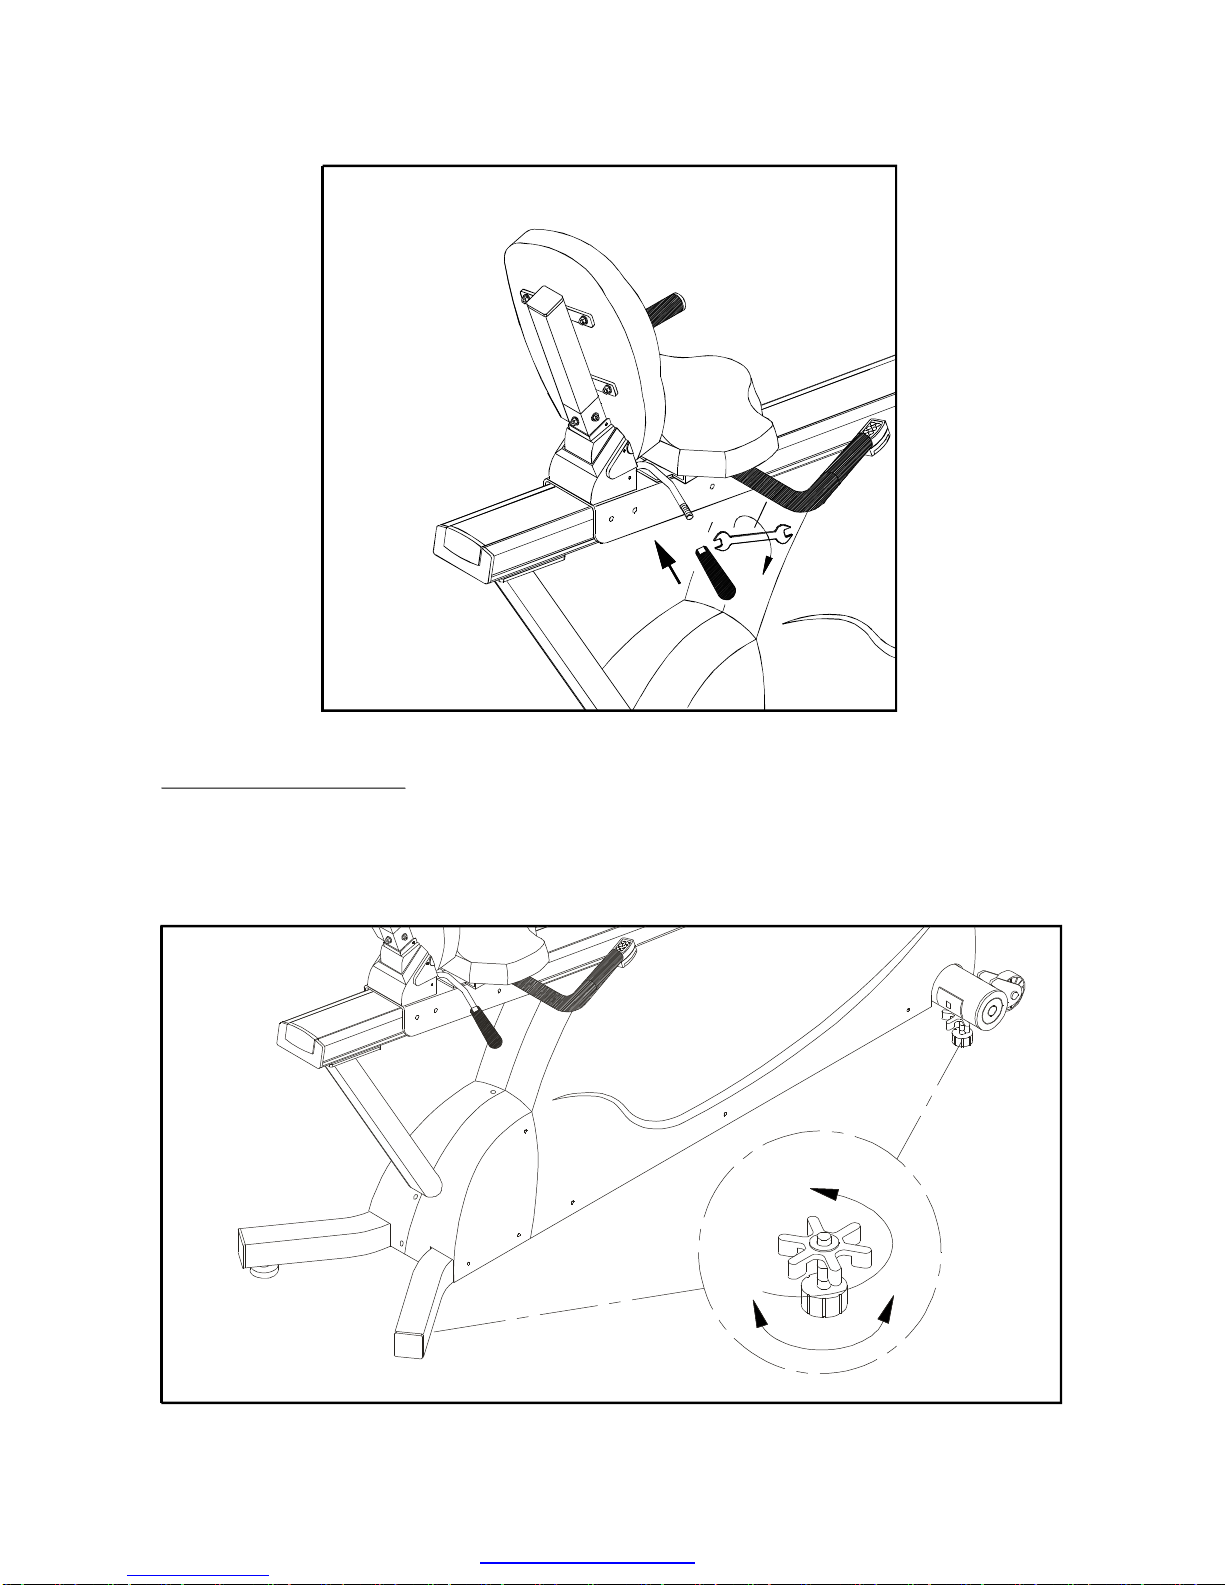
11.Attachtheseatbackadjustmenthandgriptotheseatbackadjustmentlever,
usingthewrenchprovided.(seeFig.9).
Ifthecycleisunsteadyonyourfloor,turnthefloorleveladjustmenteitheronthe
frontorrearfeetorcycle.Raiseorlowerthefloorleveladjustmenttosteadyyour
cycle.Tightenthefloorleveladjustmentbyturningitcounterclockwise.(seeFig.10)
FloorLevelAdjustment
Fig.9
Fig.10
PDFcreated withpdfFactorytrialversion www.pdffactory.com

SeatAdjustment
The5007isequippedwithatwo-pieceseat,allowingyoutoadjusttheseatback's
angleofincline.Pullontheseatbackadjustmentleverandmovetheseatupand
backtofindthemostcomfortablepositionforyou,thenreleasethelever(seeFig.11).
Beforeyourworkout,youmightneedtoadjusttheseattotheappropriatepositionfor
you.Sitonthecyclewithbothfeetinthepedalsandonelegextendedasfaras
possible.Pullupontheseatadjustmentlever,andmovetheseatforwardor
backwarduntilthepedaldistanceiscomfortable.Youmayrefertothescaleplate.
Releasetheseatadjustmentlever.(SeeFig.12~Fig.12-1).
Your5007Semi-RecumbentCycleisassembledandreadytouse.
Fig.11
Fig.12 Fig.12-1
PDFcreated withpdfFactorytrialversion www.pdffactory.com

EXERCISINGONYOURBIKE
UnderstandingtheElectronicsPackage
Manual:
SET:
PlugthePOWERCORDintoanelectricaloutlet,thenturnonthepowerswitch
locatedonthefrontofthebike.Themainwindowofelectronicpackagewill
automaticallyappear"MAN'L".IfthisistheModeyouwishtostart,youmaysimply
pedalthebiketobegin.Youmayalsopressotherfunctionkeysandfollowthe
scrolledmessagestostartyourworkout.
Ifyoudonotpedalwithin3secondsoryoustopinthemiddleofyourworkout,you
willbepromptedtoPEDALTOSTARTWITHLOADINLEVEL(WATTS).
1.Assoonasyouturnonthemachine,youwillgostraightintotheMANUALMODE,
"MAN'L"willappearinthecentralwindow.
2.YoucanpressLOADbuttonstoadjustyourdesiredload.
YoucanpressTIMEbuttonstosetyourworkouttime.
YoucanpressDISTANCEbuttonstosetthedesireddistance.
3.Afteryoufinishyoursetting,ifyoudonotpedalwithin3secondsoryoustopinthe
middleofyourworkout,thecentralwindowwilldisplay"PEDALTOSTARTWITH
LOADINLEVEL(WATTS)"topromptyoutopedalthebike.Allinputinformation
(LOAD,TIMEorDISTANCEetc.)willberetained.
4.WhenyourdesiredTIMEorDISTANCEisreached,abeeptonewillsoundfor10
secondstoalerttheuser.
PresstheMANUAL/SETkey,and"MAN'L"willshowinthedisplay.Pressthekey
onceagain,and"SET"willappearinthedisplay.ThenpressENTER.
1.YoucanchoosebetweenMILE/KILO,MALE/FEMALEandWEIGHTwhileinthe
SETMODE.
2.Thereadoutwilldisplay"PRESSTOSELECTMILE/KILO".Presskeys
toselecteitherMILEorKILO,thenpressENTERtosaveyourselection.
(Note:choosingMILEwillautomaticallyselectpoundsintheweightcalculation,
andchoosingKILOwillautomaticallyselectkilogramsintheweightcalculation.)
3.Youwillbepromptedtochoosebetween"MALE/FEMALE".Usetheto
selectyourchoice,thewindowdisplaywillbe-"M"or-"F",pressENTERto
recordyourchoice.
▲▼
▲▼
▲▼
▲▼▲▼
▲▼
♂♀
PDFcreated withpdfFactorytrialversion www.pdffactory.com

4.Next,"ENTERWEIGHT"willscrollacrossthescreen.Thenthelastweightsetting
willshowonthedisplay.Usethebuttontochangeyourdesiredweight.
Onceyouhavesetyourdesiredweight,press"ENTER"torecordthem.Thiswill
allowtheunittocalculateyourcalorieexpenditure.
1.PresstheINTERVALkeyandyouwillbein"INTV.1".PressENTER,andthe
windowwilldisplaythemessage:"INPUTRESTLOAD&TIME,THENPRESS
ENTER"Followthebelowsteps:
a.RESTwillappearinthecentraldisplay.
b.Adjustthedesiredloadusingthebuttons.
c.SelectthedesiredRESTTIME(inseconds)usingthebuttons,
d.ThenpressENTERtoconfirmyourinputdata.
2.OncetheRESTloadandtimehasbeenset,thewindowwilldisplaythemessage
"INPUTWORKLOAD&TIME,THENPRESSENTER",andthen"WORK"will
appearinthemainwindow.
AdjustyourdesiredLOADandTIMEbyusingthebuttons,thenpress
ENTERtocompletethesetting.
3.Youwillbepromptedto"PEDALTOSTART",andthebikewillautomaticallyadjust
theloadaccordingtoyourenteredpreferences.
4.Whenpedaling,thewindowwilldisplaythecourseprofileandcountdowntozero
foreachsegment.
5.WhentheRESTintervalisover,thedisplaywillshow"INPUTWORKLOAD&
TIME,THENPRESSENTER",andthemachinewilladjusttothesettingsyou
chosefortheworkinterval.WhentheWORKtimeisover,thedisplaywillshow
"GOINGTORESTLOAD",andreturntothesettingsyouchosefortherest
interval.
6.Youcanchangetheloadatanytimeduringyourworkout.
7.PleasekeepinmindthattheTIMErangeis:60~250seconds
Interval2allowsyoutodesignyourownpersonalworkoutprogram.
ThereareEIGHTsegmentsinInterval2.PresstheINTERVALbuttonuntilyousee
INTV.2inthewindow,thenpressENTER.
▲▼
▲▼
▲▼
▲▼
UsingtheINTERVALMode:
A.Interval1:
B.Interval2
PDFcreated withpdfFactorytrialversion www.pdffactory.com

Youwillbepromptedto"INPUTLOADLEVEL(orWATTS)&TIMEOFSEGMENT1".
The"SEG1"willappearonthedisplay.Usethekeystoselectthedesired
LOADandTIME,thenpressENTER.
AfteryouhavesetyourdesiredSEG.1setting,"SEG.2"willappearinthewindow.
ForSegments2-8settings,pleaserefertotheinstructionsasabove.Onceall
segmentsareset,yourownpersonalprogram,underINTV.2willberecorded.
Ifyouonlywanttosetfoursegments,forexample,leavetheTIMEofsegment5with
avalueofzero,andthe5007willperformonlyyourdesiredfoursegments.
Whenpedaling,thewindowwilldisplaythecourseprofilesandtheywillflashfrom
SEG1.
Attheendofeachsegment,thedisplaywillread"GOINGTOSEGMENTX"Youcan
changethetensionlevelduringyourworkout.
Ifyoustopinthemiddleofyourworkout,youwillbepromptedto"PEDALTOSTART
WITHLOADINLEVEL(WATTS)".Allinputinformation(TIME,DIST.,CAL.,etc.)will
beretained.
The5007featuresatotalofsix(6)professionallydesignedworkoutprograms.The
programscontroltheloadofyourworkout.
1.PressthePROGRAMbuttonstoscrollbetweenthe6Programs.Whenyouhave
chosentheprogramyouwant,press"ENTER".
2.Youwillbepromptedto"PRESSTOSETTIME/DIST".Youcanonlyset
TIMEorDISTANCE(butnotboth).UsebuttonstosetyourdesiredTIMEor
DISTANCE,thenpressENTER.Ifyoudon'tpressENTER,thedisplaywillprompt
youto"PRESSENTER"
3.Theprogramprofilewillbedisplayedinthemainwindow,andwillbeginwhenyou
starttheunitbypedaling.Ifyoudonotbeginpedalingimmediately,youwillbe
promptedto"PEDALTOSTARTWITHLOADINLEVEL(WATTS)".
4.Duringtheseprograms,theunitwillautomaticallyswitchbetweenloads,giving
youthefeelingofridingonhillsorlevelground.
5.WhenyourdesiredDIST.orTIMEisreached,abeepwillsoundfor10seconds,
andafterthatthemachinewillbegintocountup.
6.Eventhoughtheprogramsfeaturepreprogrammedloads,youcanchangethe
loadanytimeduringyourworkout.
7.Ifyoustopinthemiddleofyourworkout,youwillbepromptedto"PEDALTO
START".Allinputdatawillberetained.
▲▼
▲▼
▲▼
PROGRAM:
PDFcreated withpdfFactorytrialversion www.pdffactory.com

ThecourseprofilesforeachPROGRAMareasfollows:
1
11
1
1
155
11
3
3 3
3
3
33
33
33
33
3
3333
3
7
7
7
7
77 7
7
11
11 13 13
11
7
7
5
5
5 5
5
55
5
5
99
5
5
333―Level
―Level
―Level
―Level
―Level
―Level
PDFcreated withpdfFactorytrialversion www.pdffactory.com

RESET
Whateachofthesecategoriesmeans:
TochangeanyofyourdatainMAN'L,SET,INTERVALandPROGRAM,simplyhold
theENTERbuttontoRESET,theexistingdatawillbecleared,andthedisplaywill
returntotheoriginaloperationmodeforyourresetting.
LOAD(LEVEL):Thereare14levelsavailable,withLevel1beingthelightest,and
LEVEL14beingtheheaviest.Usethebuttonstochoosethe
desiredlevel.Pressingthekeyoncechangestheloadonelevel.
Holdingthekeydownwillchangetheloadonelevelevery0.5
second.
TIME:Usethekeystosetthedesiredtime.Pressingthekeyoncechangesthe
timeby1minute.Holdingthekeydownwillchangethetime5minutesevery
0.5second.Theelectronicspackagewillbeepfor10secondswhenyour
desiredtimeisreached,thenwillstarttocountupifyourworkoutcontinues.
DIST.:Usethekeystosetthedesireddistance.Eachpressofthekeychanges
thedistanceby0.1miles(0.1km).Ifyouholddownthekey,thenumberswill
increaseordecreaseby0.1miles(or1km)every0.5second.Theelectronics
packagewillbeepfor10secondswhenyourdesireddistanceisreached,
thenwillstarttocountupifyourworkoutcontinues.
RPM:Asensorcountsthenumberofrevolutionstheflywheelmakesperminute,and
thisisdisplayedonthescreen.
PULSE:(ifyourbikeisequippedwithheartratefunction)
Thisreadoutgivesyoutheheartrateperminute.
CAL:Thisreadoutgivesyoutheamountofcaloriesburned,basedontheweight
enteredandspeed/distancecycledduringyourworkout.
▲▼
▲▼
▲▼
(WATTS)
PDFcreated withpdfFactorytrialversion www.pdffactory.com

MAINTAININGYOURSEMI-RECUMBENTBIKE
GUIDELINESFOREXERCISE
Thisbikerequireslittlemaintenance.Thebike'slowfrictionoperationisdependent
onkeepingtheunitascleanaspossible.
CAUTION:Turnoffunitanddisconnectpowercordbeforecleaning.
Regularcleaningisrecommendedtokeepyourbikeatpeakperformance.
Beforeyourworkout,useadryclothtocleanthesurfaceoftheelectronicspackage.
Note:NEVERPOURLIQUIDSONTHEELECTRONICSPACKAGE.
Tocleantheplasticparts,useamilddetergentandmakesuretheunitiscompletely
drybeforeoperating.
Itisrecommendedthatyoukeepallliquidsawayfromtheunitduringoperation.
Spillageofliquidsontoorintothemachinewillvoidthewarranty.
Thedurationofyourexercisesessionisdependentonyourfitnesslevel.Ingeneral,
itisrecommendedthatyoumaintainyourheartrateinthetrainingzoneforatleast
10minutestorealizeanaerobicbenefit.Asyourfitnesslevelincreases,youwillbe
abletomaintainyourheartrateinthetrainingzoneforlongerperiods:usually
between20and30minutes.
Whenstartingyourworkout,usethefirstseveralminutestowarmup,thenslowly
increaseyourworkloadtobringyourheartrateinthetrainingzone.Attheendof
yourworkout,graduallydecreaseyourworkload,thenexerciselightlyasa"cool
down".
Aerobicexercises,toachievethegreatestbenefits,shouldbeperformed3-5timesa
week.Itisimportanttoallowsufficienttime,atleast24hours,foryourbodyto
recoverafterexercise.
CleaningtheBike
HowlongshouldIexercise?
HowoftenshouldIexercise?
PDFcreated withpdfFactorytrialversion www.pdffactory.com
TROUBLESHOOTING:
A.Nopower
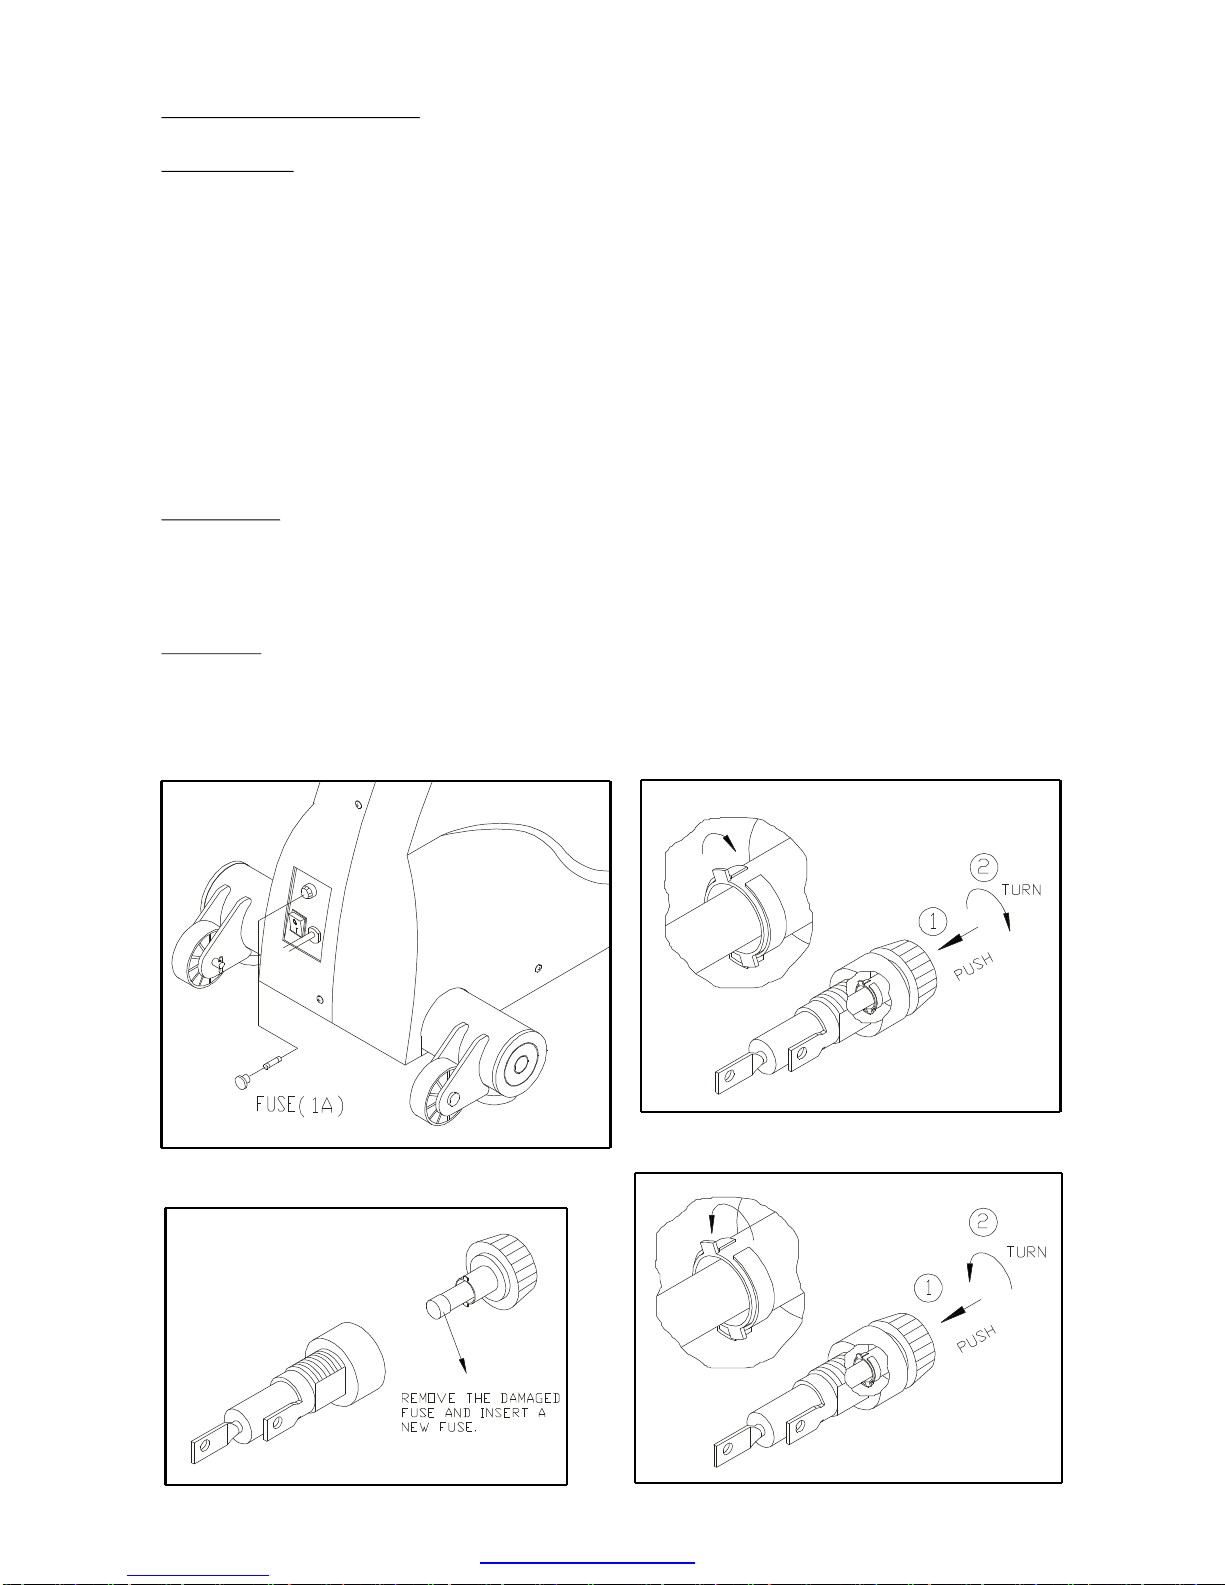
Toremove:
Toinstall:
1.IfyouturnonthePOWERSWITCHandtheswitchisnotlit:
a.Checkifthepowercordispluggedsecurelyintothewallsocket.
b.Aftertheabovestepisperformed,ifthepowerswitchisstillnotlit,please
replacethefuse.
CAUTION:Makesuretounplugthepowercordfromthewallsocketbefore
replacingthefuse.Also,makesuretocheckyourstandardvoltageand
usetheproperfusespecificationpriortofusereplacement.
Findthe1Afuseholderonthefrontofthemachine,pushonthefuseholderandturn
thefuseholdercounterclockwisetoremovethedamagedfuse(seeFig.13-1~13-2).
Insertanewfuseintotheholder.Pushthefuseandholderin,thenturnclockwiseto
securethefuseholder(seeFig.13-3~13-4).
Fig.13-1 Fig.13-2
Fig.13-4
Fig.13-3
PDFcreated withpdfFactorytrialversion www.pdffactory.com

c.Plugthepowercordintothewallsocketandturnonthemachineagain.Ifthe
powerswitchisstillnotlit,pleasecontactyourauthorizedSportsArtdealerfor
moreinformation.
2.Ifyouturnonthepowerswitchandtheswitchislit,butthereisnodisplay,please
contactyourauthorizedSportsArtdealerformoreinformation.
ToreplacethetwoAAA1.5V(UM-4)batteries,removebatterycover,removethe
spentbatteries,theninserttwoneworrechargedbatteries,andreplacethecover.
(seeFig.14-15)
Disposeofthespentbatteriesresponsibly.
Ifyourbikehasotherproblems,suchasnotension,no"RPM",orotherreadings
whilepedaling,pleasecontactyourauthorizedSportsArtdealerformoredetails.
B.BatteryRemovalandInstallationProcedure:
C.Other
Fig.14
Fig.15
PDFcreated withpdfFactorytrialversion www.pdffactory.com

WiringSchematic:
YourAuthorizedSPORTSARTDistributor
PDFcreated withpdfFactorytrialversion www.pdffactory.com
Table of contents
Other SPORTS ART Exercise Bike manuals

SPORTS ART
SPORTS ART C521u User manual

SPORTS ART
SPORTS ART 506P User manual

SPORTS ART
SPORTS ART C51U User manual

SPORTS ART
SPORTS ART C545U User manual

SPORTS ART
SPORTS ART SENZA Elite C574U-13 User manual

SPORTS ART
SPORTS ART C51R Operating instructions

SPORTS ART
SPORTS ART C5200 User manual

SPORTS ART
SPORTS ART 5002B User manual
Popular Exercise Bike manuals by other brands


Sunny Health & Fitness
Sunny Health & Fitness SF-B121021 user manual

Monark
Monark 827E instruction manual

Stamina
Stamina 1310 owner's manual

American Fitness
American Fitness SPR-BK1072A owner's manual
 Service manual")
Cateye
Cateye CS-1000 (CYCLO SIMULATOR) Service manual

BH FITNESS
BH FITNESS H9158H Instructions for assembly and use