Spruce PS-SPRZ16-0 User manual

FCC Compliance Statement
This device complies with Part 15 of the FCC Rules. Operation is subject to
the following two conditions: (1) this device may not cause harmful
interference, and (2) this device must accept any interference received, including
interference that may cause undesired operation.
Note: This equipment has been tested and found to comply with the limits for a
Class B digital device, pursuant to part 15 of the FCC Rules. These limits are designed
to provide reasonable protection against harmful interference in a residential
installation. This equipment generates, uses, and can radiate radio frequency energy
and, if not installed and used in accordance with the instructions, may cause harmful
interference to radio communications. However, there is no guarantee that
interference will not occur in a particular installation. If this equipment does cause
harmful interference to radio or television reception, which can be determined by
turning the equipment off and on, the user is encouraged to try to correct the
www.spruceirrigation.com/terms
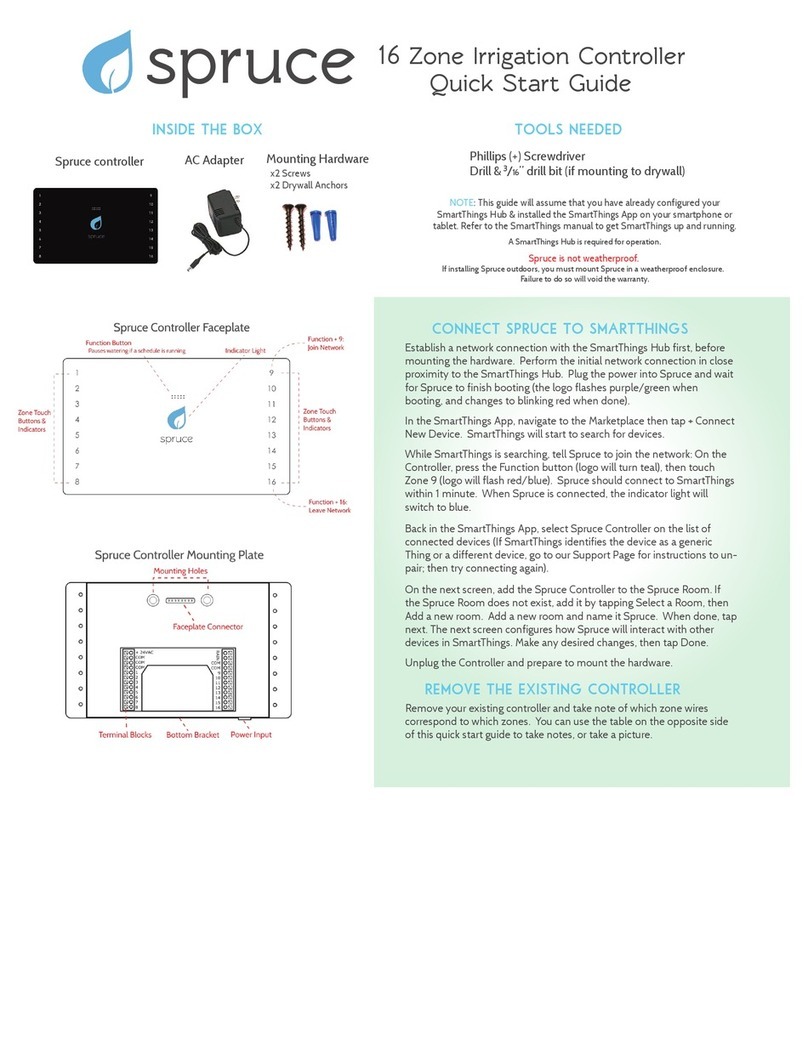
Spruce
controller
AC Adapter
Mounting Hardware
x2 Screws
x2 Drywall Anchors
installing the spruce smartapp
Establish a network connection with the SmartThings Hub
first, before mounting the hardware. Perform the initial
network connection in close proximity to the SmartThings
Hub. Plug the power into Spruce and wait for Spruce to
finish booting (the logo flashes purple/green when
booting, and changes to blinking red when done).
In the SmartThings App, navigate to the Marketplace
then tap + Connect New Device. SmartThings will start to
search for devices.
While SmartThings is searching, tell Spruce to join the
network: On the Controller, press the Function button
(logo will turn teal), then touch Zone 9 (logo will flash
red/blue). Spruce should connect to SmartThings within 1
minute. When Spruce is connected, the indicator light will
switch to solid blue.
The SmartThings App should have also identified your
new device as the Spruce Controller - select it now (If
SmartThings identifies the device as a generic Thing or a
different device, visit our Support Page for instructions to
un-pair; then try connecting again).
On the next screen, add the Spruce Controller to the
Spruce Room. If the Spruce Room does not exist, add it by
tapping Select a Room, then Add a new room. Add the
room and name it Spruce. When done, tap next. The next
screen configures how Spruce will interact with other
devices in SmartThings. Make any desired changes, then
tap Done.
Unplug the Controller and prep to mount the hardware.
inside the box
1
2
3
4
5
6
7
8
9
10
11
12
13
14
15
16
zone notes
© 2016 Plaid Systems
Spruce and the Spruce Logo are trademarks of Plaid
Systems. App guidance is for instructional purposes
only and may differ from actual product, and are
subject to change without notice.
indicator light codes
Flashing Purple/Green
Booting up
Flashing Red
Not connected to network
Blue
Connected to network
Flashing Blue/Green
Scheduled watering
Flashing Red/Blue
Searching for network Teal
Function button active
spruce
16
Zone Irrigation Controller
Quick Start Guide
remove the existing controller
Remove your existing controller and take note of which
zone wires correspond to which zones. It will be helpful
to take a picture. You can also use the table below to
take notes.
mount the mounting plate
If necessary, install drywall anchors. Use a drill to drill
two holes in alignment with the mounting holes, and
insert the provided drywall anchors. Remove the
faceplate from the Controller. Using the 2 screws
provided, screw the Spruce Controller Mounting Plate
into the drywall anchors, or directly into bare wood.
install the zone wires
Feed the zone wire bundle under the bottom bracket
and insert the zone wires into the screwless connectors.
It may be helpful to push down on the terminal block
with a small screwdriver when inserting or releasing
wires. Make sure all the connections are tight.
The common, 16 zones, and rain sensor ports are
labelled on the board. It does not matter which
common ports are used. The Master/Pump wire (if
applicable) can be installed into any open zone and
then configured as such in the Zone Summary and
Setup section of the SmartApp. The 24VAC ports are
optional and not necessary if using the supplied AC
adaptor & power input port at the bottom of the unit.
Re-install the faceplate. Take care to align the pins.
Plug the AC adaptor into Spruce and into a wall plug
(Note: the faceplate must be re-attached before
plugging in the power). The Spruce indicator will
change to solid blue when connected. Remove the
protective plastic from the faceplate when ready.
manual zone operation
This would be a good opportunity to test that the wiring
was installed correctly by toggling your zones manually.
Zones can be toggled on or off manually on the Spruce
Controller by simply touching
the zone of interest to toggle
the zone ON or OFF.
For manual control via the
SmartThings App, navigate to
My Home -> Spruce Room and select your Spruce
Controller. Tap on any of the zones to toggle the zones
on or off.
NOTE: You may see an alarm state on the controller after rebooting. This
will clear itself after the next schedule begins.
interference by one or more of the following measures:
- Reorient or relocate the receiving antenna.
- Increase the separation between the equipment and receiver.
- Connect the equipment to an outlet on a circuit different from that to which the
receiver is connected.
- Consult an experienced radio/TV technician for help.
Changes or modifications to this product not authorized by Plaid Systems could
void the electromagnetic compatibility and wireless compliance and negate your
authority to operate the product.
Canada Statement
This Class B digital apparatus complies with Canadian ICES-003. This device
complies with Industry Canada license-exempt RSS standard(s). Operation is
subject to the following two conditions: (1) this device may not cause interference,
and (2) this device must accept any interference, including interference that may
cause undesired operation of the device.
Spruce™Wireless Smart Irrigation Controller, 16 zone
Model Number: PS-SPRZ16-01
Contains FCC ID: XFF-Z357PA20

Phillips (+) Screwdriver
Drill &3/16” drill bit (if mounting to drywall)
tools needed NOTE: This guide will assume that you have already configured your
SmartThings Hub & installed the SmartThings App on your smartphone or
tablet. Refer to the SmartThings manual to get SmartThings up and running.
A SmartThings Hub is required for operation.
Spruce is not weatherproof.
If installing Spruce outdoors, you must mount Spruce in a weatherproof enclosure.
Failure to do so will void the warranty.
v4
the spruce controller device page
Your Spruce Controller device page will look similar to the screenshot on the right. The
first two circles are indicator icons and tell you if Spruce is running and the status of your
rain sensor (if you have one attached). The third icon will manually start a schedule (only
if a schedule is configured).
At the bottom, the Refresh icon will retrieve the current status from the controller, update
the icon status for each of your zones, and report the result in the Recently tab. Note that
when you toggle a zone in the SmartThings App, it will send the command and update
the icon status regardless of whether Spruce actually receives the command. Tapping the
refresh button is a good way to ensure that your screen shows the true current status. If
your Recently tab does not refresh with the full list of zone states within a few seconds,
you may have a range issue.
Finally, the Configure button will push any settings changes (accessible by tapping the
gear icon in the upper right corner) made to the device. If you wish to configure options
for scheduling and watering, do so in the Spruce Scheduler SmartApp.
install the spruce scheduler smartapp
Navigate to the Marketplace then SmartApps, then Energy Management. Find the
Spruce Scheduler, and tap Done to install.
setting up a watering schedule
Here you can set all settings for the Spruce SmartApp. A full explanation of settings can
be found in the Spruce Support Page in the Spruce Scheduler category.
Spruce Schedule Settings: General settings for the app and global schedule settings
such as watering start time and watering day restrictions.
Weather Settings: Configure some simple weather settings here.
Zone Summary and Setup: The majority of your configuration will take place here.
Valve and Contact Delays: This section contains settings for pump or master valve delays, contact delays (for example,
to configure a door sensor to pause watering if opened), and selection of a master controller (note: for users with multiple
controllers only).
Need more help? Visit
support.spruceirrigation.com
The Zone Configuration section contains a few settings
which will affect all of your zones, including an option to
globally adjust all watering times up or down. Of particular
note is the moisture sensor Learn Mode. When disabled,
Spruce will use its sensors in a “go/no-go” or “delay
watering” mode. In this mode, the sensors will affect the
watering days, and not the watering duration. When Learn
Mode is on, Spruce will compare the current moisture value
for that zone vs. the moisture sensor target value. In this
mode, Spruce adjust watering times, not days.
In each Zone of interest, you will need to choose your
Sprinkler & Landscape types so that Spruce can calculate a
suggested watering time for your zones. You would also
assign your sensors here. The
“Guideline value” setting will
affect how many days per
week your system will water;
refer to our support page for
further details and examples.
got sensors?
Connect them to
SmartThings and
assign them to a zone
in the Zone Summary
and Setup section of
the SmartApp.
Other Spruce Controllers manuals
