SPT SH-1508 User manual

Instruction Manual
Tower Ceramic Heater
It is important that you read these instructions before using your new purchase and we strongly
recommend that you keep them in a safe place for future reference.
Press main power switch on the bottom of unit after it is
plug into an outlet.
Model : SH-1508
Service Questions: Contact Sunpentown at (800)-330-0388
Sales Inquiries: Contact Sylvane at (800) 934-9194 or visit sylvane.com

SPECIFICATIONS………………………………………………………………………………..1
GENERAL SAFETY INFORMATION…………………………………………………………..1
PARTS NAME….…………………………………………………………………………………2
ASSEMBLY AND USAGE……………………………………………………………………….2
LCD Display…………………………………………………...…………………………………..3
REMOTE CONTROL…………………………………………………...………………………...4
SAFETY FEATURES……………………………………………………………………………..4
MAINTENANCE……………………………………….…………………………………………..5
YOUR GUARANTEE………………………………………………………………………………6
Table of Contents

Model Number
SH-1508
Dimension
8.7" x 8.7" x 23.8"
Heating Element
Ceramic
Safety
Power Indicator Light, Tip-Over Protection Shut-Off, Current
Fuse, Thermostat, Thermal Cutoff
Rated Power
1,500W / 12.5A
Ion Function
Yes
Air Filter
Yes
LCD Display
Blue
Timer
7.5 hours
Color
Silver
Remote Control
64 0F - 900F
Approval
ETL
General Safety Information
Read carefully attempting to assemble, install, operate or maintain the product described.
Protect yourself and others by observing all safety information. Failure to comply with
instructions could result in personal injury and/or property damage!
1. Read all instructions carefully before using the heater.
2. Use this heater only as described in this manual. Any other use not recommended by the
manufacturer may cause fire, electrical shock, or injury to persons.
3. Remove the packaging and ensure that the heater is undamaged. In case of doubt, do not
use heater and contact your supplier.
4. Do not allow children play with unit or packaging.
5. Before using the heater, check if the voltage marked on the rating label corresponds to the
outlets in your home.
6. Extreme caution is necessary when the heater is used near children or individual and
whenever the heater is left operating unattended.
7. Avoid using extension cords as the extension cord may overheat and cause a risk of fire.
Specifications
1

8. Do not pull the power cord to disconnect from power source. Always grasp the plug to pull
out.
9. Do not insert any objects into the heater as it may cause an electric shock, fire, or damage to
the heater. Do not block or tamper with the heater in any manner while it is in operation. To
prevent a possible fire, do not block air inlet or outlet in any manner. Do not place on soft
surface, like bed, where opening may become blocked.
10. Always unplug heater when not in use.
WARNING: The main power switch and the on/off switch should not be used as the sole
means of disconnecting power. Always unplug the power cord before servicing or
moving the unit.
11. This heater is hot when in use. To avoid burn, do not let bare skin touch hot surface. Always
use handle when moving this heater. Keep combustible materials, such as furniture, pillows,
bedding, papers, clothes and curtains at least 3 feet (0.9m) from the front of the heater and
keep them at least 1 foot (0.3m) from the sides and rear.
12. The heater has hot and arcing or sparking parts inside. It must NOT be used in potentially
dangerous location such as flammable explosive, chemical-laden or wet atmospheres. This
heater is intended for general use only.
13. This heater is not intended for use in wet or damp locations. Never located a heater where it
may fall into a bathtub or other water container.
14. Do not use heater outdoors.
15. This heater includes an audible alarm to warn that parts of the heater are getting excessively
hot. If the alarm sounds, immediately turn the heater off in inspect for any objects on or
adjacent to the heater that may cause high temperatures.
DO NOT OPERATE THE HEATER WITH THE ALARM SOUNDING
WARNING: To avoid danger of electric shock, unplug from outlet when not in use and before
cleaning. If the supply cord is damaged, it must be replaced by a special cord or
assembly available from the manufacture or it’s service agent.
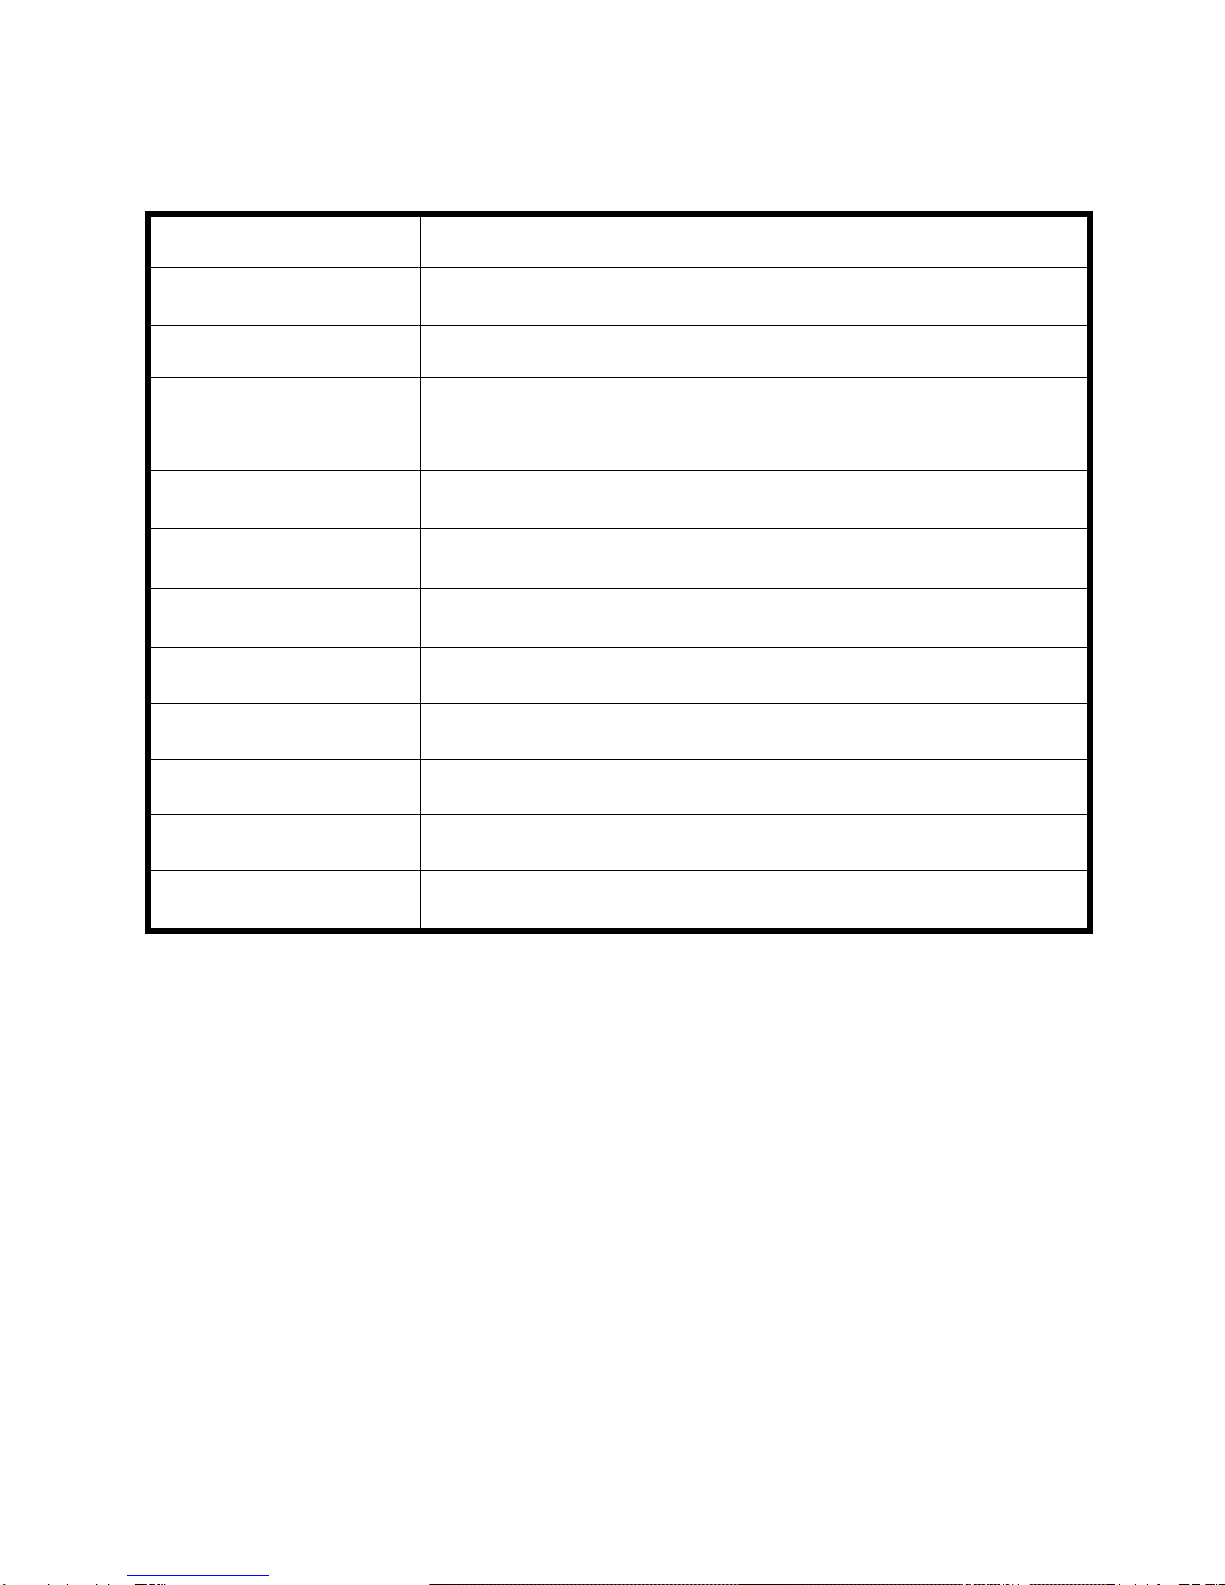
PARTS NAME
2

ASSEMBLY AND USAGE
The heater may be operated by the manual controls located on the heater (as shown in FIGURE
2) or by your remote control (shown in FIGURE 8).
1. Carefully remove the heater from the plastic bag and the carton.
2. Assemble the two detached half pans and fasten the screws on the bottom of the pan (as
shown in FIGURE 1). Place the heater on a stable flat surface.
3. Plug the power cord into a power socket. Turn on the Main Power Foot Switch on, a “Beep”
will sound and the red indicator light will appear above the LCD Display. The heater is ready
to use. The red light will remain lit until the POWER switch is turned OFF and the heater is
unplugged from the electrical outlet.
4.Power: Connect plug to power source and LCD backlight will illuminate. Push
POWER button to turn unit ON and begin fan operation. LCD backlight will fade
15 seconds after setting. Push POWER button again to turn unit OFF.
5.MODE: Pressing the ‘mode’ button will set the heater into a different MODE: COOL FAN,
LOW HEAT, HIGH HEAT and AUTO. (As shown in FIGURE 2)
6.UP and DOWN: When the unit is in AUTO MODE only, the LCD will displaying a ‘SET
TEMP’ indicator, (As SHOWN IN FIGURE 3)
1) To adjust “SET TEMP”, press the ‘UP’ button to increase the desired temperature and the
‘DOWN’ button to decrease the desired temperature. The LCD will display the current ROOM
temperature about 10 seconds after setting is complete.
2) When the air temperature reaches 1 degree above the SET TEMP, the heater will cut off.
3

3) When the air temperature drops 1 degree below the SET TEMP, the unit will come back on.
4) Note: it is normal for the heater to cycle ON and OFF as it maintains the SET TEMP.
7.OSC: Pressing the ‘OSC’ button will allow the heater to oscillate. To stop the oscillation,
press the ‘OSC’ button once more. (Besides the 70 degree, Auto oscillation, There is a 60
degree Manual oscillation)(As shown in FIGURE 5)
8.TIMER: The timer function allows you to set the length of operation from 0.5 hour to 7.5
hours. Pressing the ‘TIME’ button will increase the length of operation by 0.5 hour each time.
(As shown in FIGURE 6)
9. To turn the heater off, press the ‘POWER’ button, and the unit will work in the COOL FAN
MODE for 30 second then turn off by itself.
REMOTE CONTROL
1. Install two “AAA” batteries as shown in FIGURE 7.
2. The Remote Control Power button is labeled as such. All the functions performed with the
Remote Control work identically to the Manual Controls.
SAFETY FEATURES
1. A thermal overload protector is built in to prevent overheating.
4

2. When an overheat temperature is reached, the heater will be automatically shut off. It can
only resume operation when the user resets the unit. (See reset instruction below)
3. If the unit is tilted, a safety system will automatically cut off the power, put the unit in a
vertical position and it will operate again.
To Reset Heater:
1. Unplug the heater and wait 5-10 minutes for the unit to cool down.
2. Then, turn on the unit again and operate normally.
MAINTENANCE
WARNING: ALWAYAS UNPLUG THE CORD BEFORE MOVING OR SERVICING, DO NOT
IMMERSE HEATER IN WATER.
CLEANING: IMPORTANT! DO NOT IMMERSE HEATER IN WATER!
Take the Air Inlet and the Air Filter off, clean the Air Inlet with the vacuum brush
attachment on your Vacuum cleaner, and wash the Air Filter in warm water and
dry it. DO NOT DRY AIR FILTER IN DIRECT SUNLIGHT. Clean the body of the
Heater with a soft cloth.
CAUTION: Do not use gasoline, benzene, thinner, harsh cleaners, etc. as they will damage
the heater. NEVER use ALCOHOL or SOLVENTS.
STORAGE: Store the heater with these instructions in the original in a cool, dry place.
DEFECTIVE NOTICE
If this product is defective or not working properly
Please DO NOT return to your retail store
Please contact us directly with any Service or TechnicalAssistance
Contact us toll free at:
SUNPENTOWN INTERNATIONAL INC.
1(800) 330-0388
21415 Baker Parkway, City of Industry, CA 91789
5

Your Guarantee
If this product is found to be faulty as a result of faulty materials or workmanship within one year
from date of purchase, it will be repaired free of charge.
This guarantee is subject to the following terms:
Sunpentown must be notified of the fault.
Proof of purchase must be presented to Sunpentown’s nominated representative.
The warranty will be void if the product if modified, misused or repaired by an unauthorized
person.
The warranty after repair will not be extended beyond the original one-year period.
All replacement parts will be new or reconditioned.
Parts , which are replaced, become the property of Sunpentown.
The warranty applies for the use of the product in the USA only.
What is NOT COVERED:
Warranty does not include freight charges.
Incidental or consequential damage caused by possible defects with this product.
Damage to product caused by improper power supply voltage, accident, fire, floods or acts of
nature.
Failure of product resulting from unauthorized modifications to the product.
Improper installation or failure to perform the necessary maintenance.
This GUARANTEE is in addition to your Statutory Rights
SUNPENTOWN INTERNATIONAL INC.
21415 Baker Parkway, City of Industry, CA 91789-5236
909-468-5288 Fax: 909-468-5279
service@sunpentown.com
www.sunpentown.com
6
Service Questions: Contact Sunpentown at (800)-330-0388
Sales Inquiries: Contact Sylvane at (800) 934-9194 or visit sylvane.com
Table of contents
Other SPT Heater manuals
Popular Heater manuals by other brands

Anslut
Anslut KEROSENE HEATER operating instructions

Bluegrass Living
Bluegrass Living B10TNIR-B OWNER'S OPERATION AND INSTALLATION MANUAL

Hortus
Hortus ZHQ1288-HD-65 instructions

Dimplex
Dimplex FX 20VL Installation and operating instructions

Dimplex
Dimplex 3082S Installation and operating instructions

EUROM
EUROM TS 1501 manual