SPX EF-7700 User manual

MANUAL ENGLISH
Rev 1 date 26-04-11 RS 1-8
PRODUCT DESCRIPTION
IMPORTANT!
In order to get the best out of your system it is important you take
the time to read through the manual before you start to
install/program your equipment.
The system (EF-7700) consists out of two parts: the transmitter
(EF-7602) and the receiver including wiring (EF-7701).
The transmitter and receiver are preset and factory coded. This
means that the system is ready for use. Every transmitter has a
fixed, unique serial coding which has been programmed into the
receiver, so that another transmitter cannot control the receiver.
APPLICATIONS
The receivers and transmitters of the System EF-7700 are pre-
programmed. They are meant to control fixed or mobile equipment
with a limited amount of functions.
SAFETY
Ensure that:
Appropriate personnel receive a review of the systems’
functions before it is used.
Only appropriate personnel have access to the
transmitter.
The transmitter is not left unsupervised.
The operator always has a complete view of the
equipment when it is radio controlled.
Be sure that your hydraulic lift application is shut off
during transit.
CAUTION: tampering with the product, changing the settings
or using the product in a fashion other than as set forth
herein can lead to product malfunctions which in turn can
lead to serious injuries or death. Any tampering,
unauthorized change in the product, misuse or abuse will
invalidate SPX's warranty on the product.
MANUAL ENGLISH
Rev 1 date 26-04-11 RS 2-8
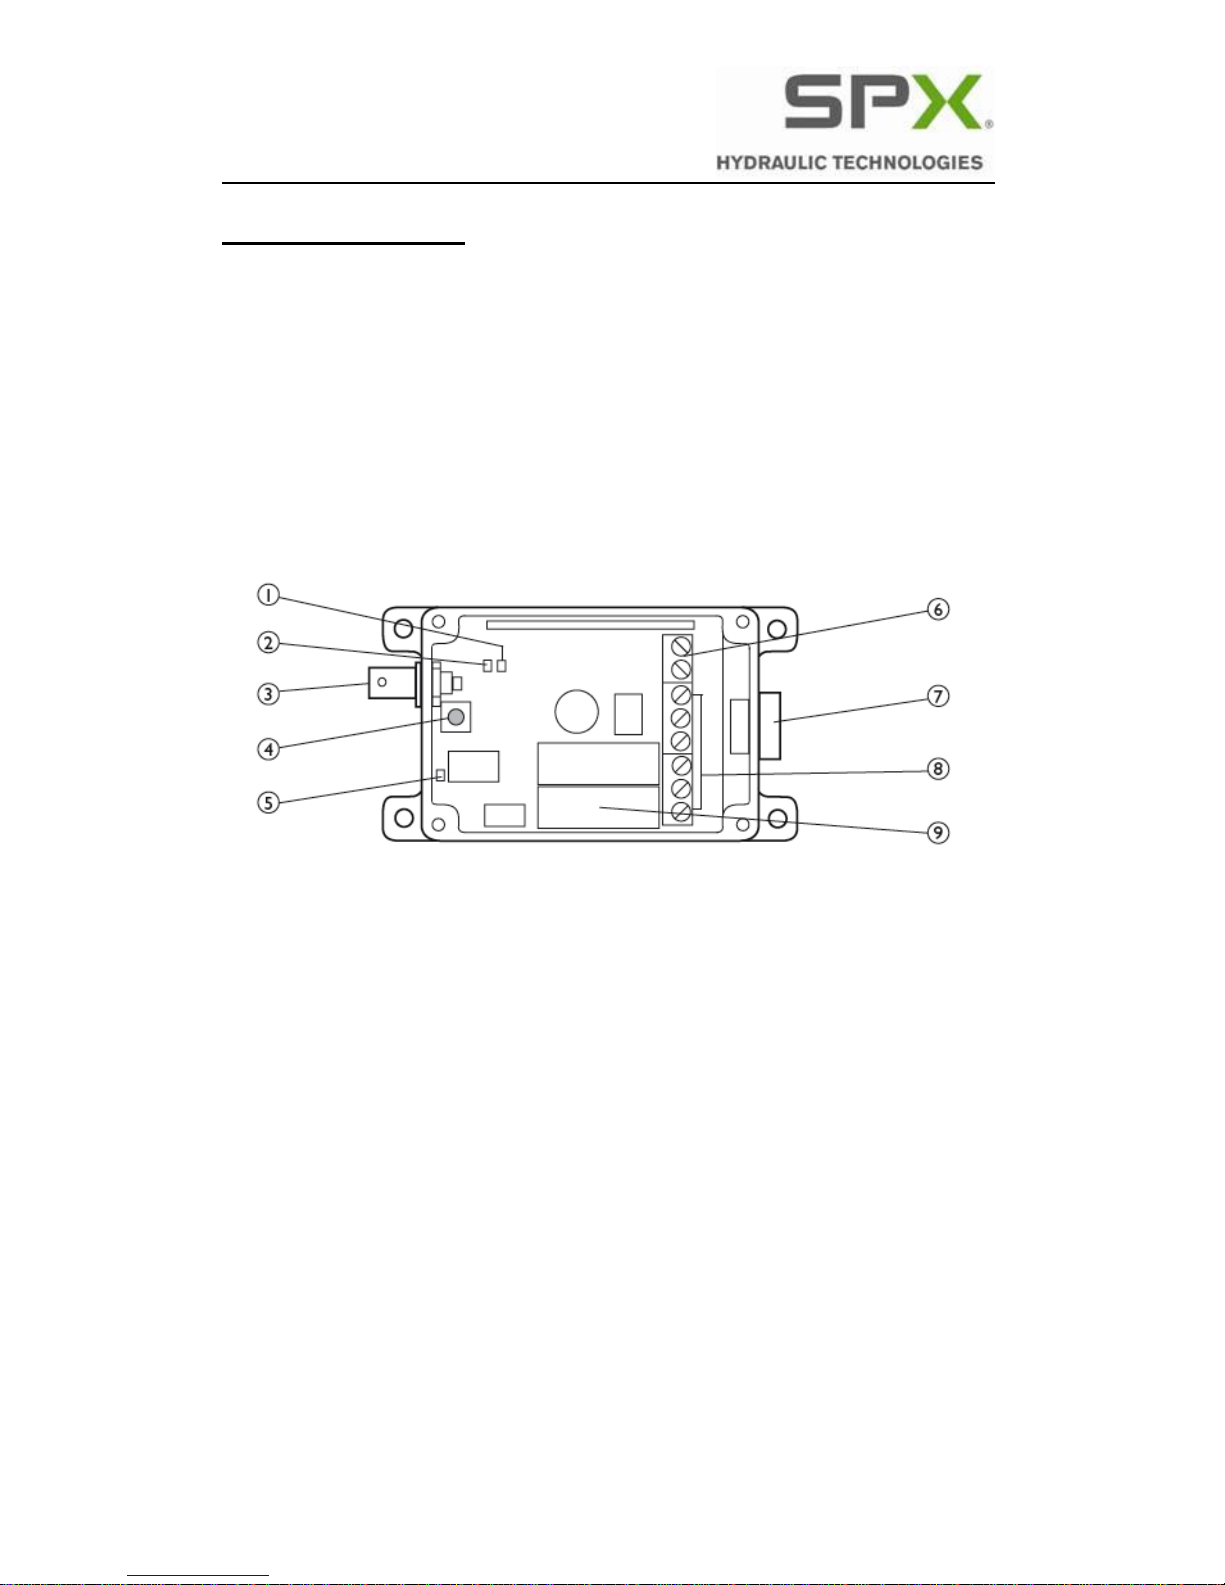
RECEIVER EF-7701
Operating voltage: 12-30 V AC/DC
Power consumption: 30-80 mA
Dimensions: 54 x 96 x 37 mm
Protection: IP 65
Climatic conditions: -30°C to +70°C
Humidity: 10%-90%
Compatible transmitter: EF-7702
1. Yellow LED Lights up when the receiver has the correct
operating voltage.
2. Green LED Lights up when the receiver receives a
radio signal.
3. BNC BNC-connector for the antenna.
4. Pushbutton Program receiver / erase receiver.
5. Red LED Lights up during programming.
6. Connection terminal Connection terminal for voltage.
7. Cable with plug Cable connection to motor relays.
8. Connection terminal Connection terminal for relays.
9. Relays Two separate relays. Max. Over load relay
is 8 A for resistive load.

MANUAL ENGLISH
Rev 1 date 26-04-11 RS 3-8
TRANSMITTER EF-7702
FUNCTION
The transmitter must be activated by pushing the ON/OFF button
for 3 seconds. After that the UP or DOWN button can be used for
operating the system.
The transmitter is active when the LED glows steadily.
Note: if the transmitter is not used within 60 seconds, it turns off
automatically. Pushing the ON/OFF button for 3 seconds activates
the transmitter again.
Battery replacement
3 batteries, AAA 1,5 V.
MANUAL ENGLISH
Rev 1 date 26-04-11 RS 4-8
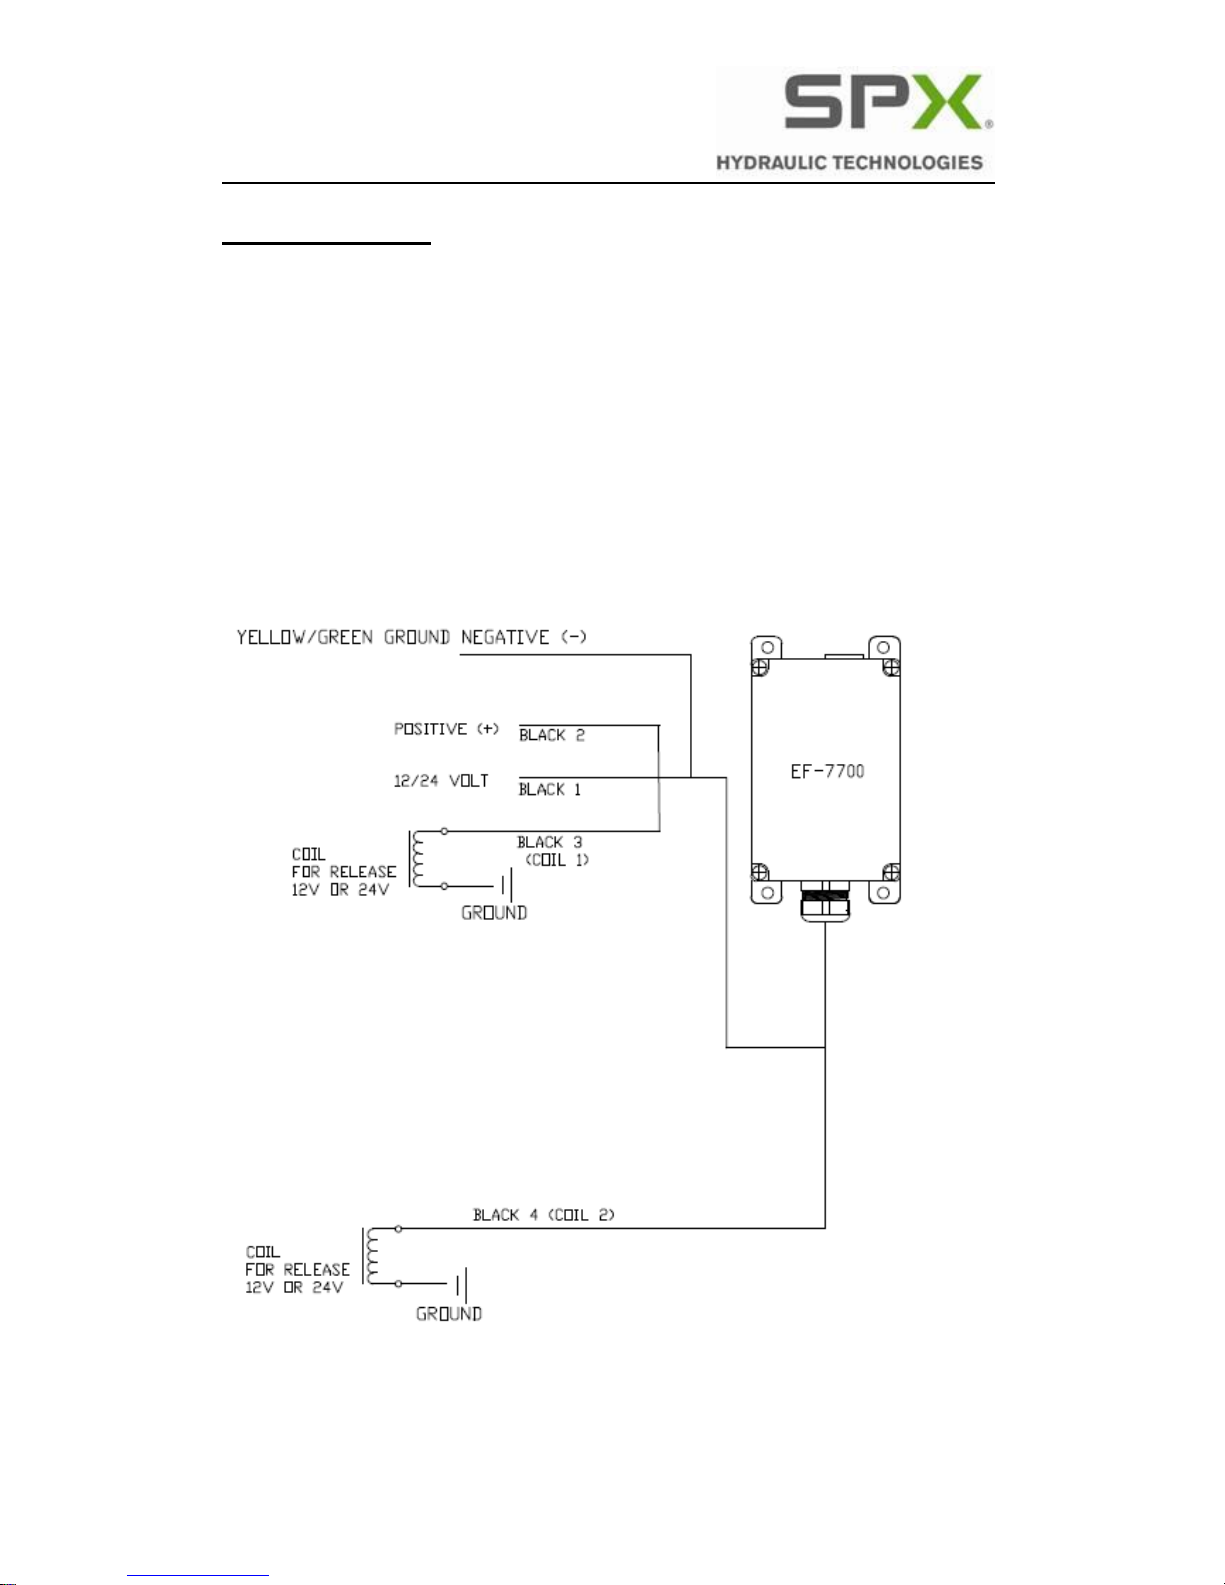
PREPARATIONS
ASSEMBLY AND INSTALLATION
1. Select a suitable location for assembly of the receiver.
2. Connect the Positive (+). (BLACK 2)
3. Connect the ground cable of the receiver (YELL/GR)
4. Connect the first coil (BLACK 3)
4. The black cable (4) is to connect a second coil when using a
3P/4W valve. If not used please protect or cut off.
5. Place a fuse between the receiver and the battery to prevent
damage from short circuits to the receiver.
MANUAL ENGLISH
Rev 1 date 26-04-11 RS 5-8
PLACEMENT OF THE RECEIVER
- Select a location, if possible, that is protected from the wind
and weather. Place it with cable-glands facing downward.
Avoid locations where the receiver may be exposed to
abnormal moisture conditions, e.g. during high pressure
washing.
Avoid locations close to metal objects, electrical cables and
antennas. Provide the receiver with a separate power supply.
NOTE! Upon delivery the receiver will be pre-wired.
! The following instructions should only be used in case of
reconnecting the wiring.
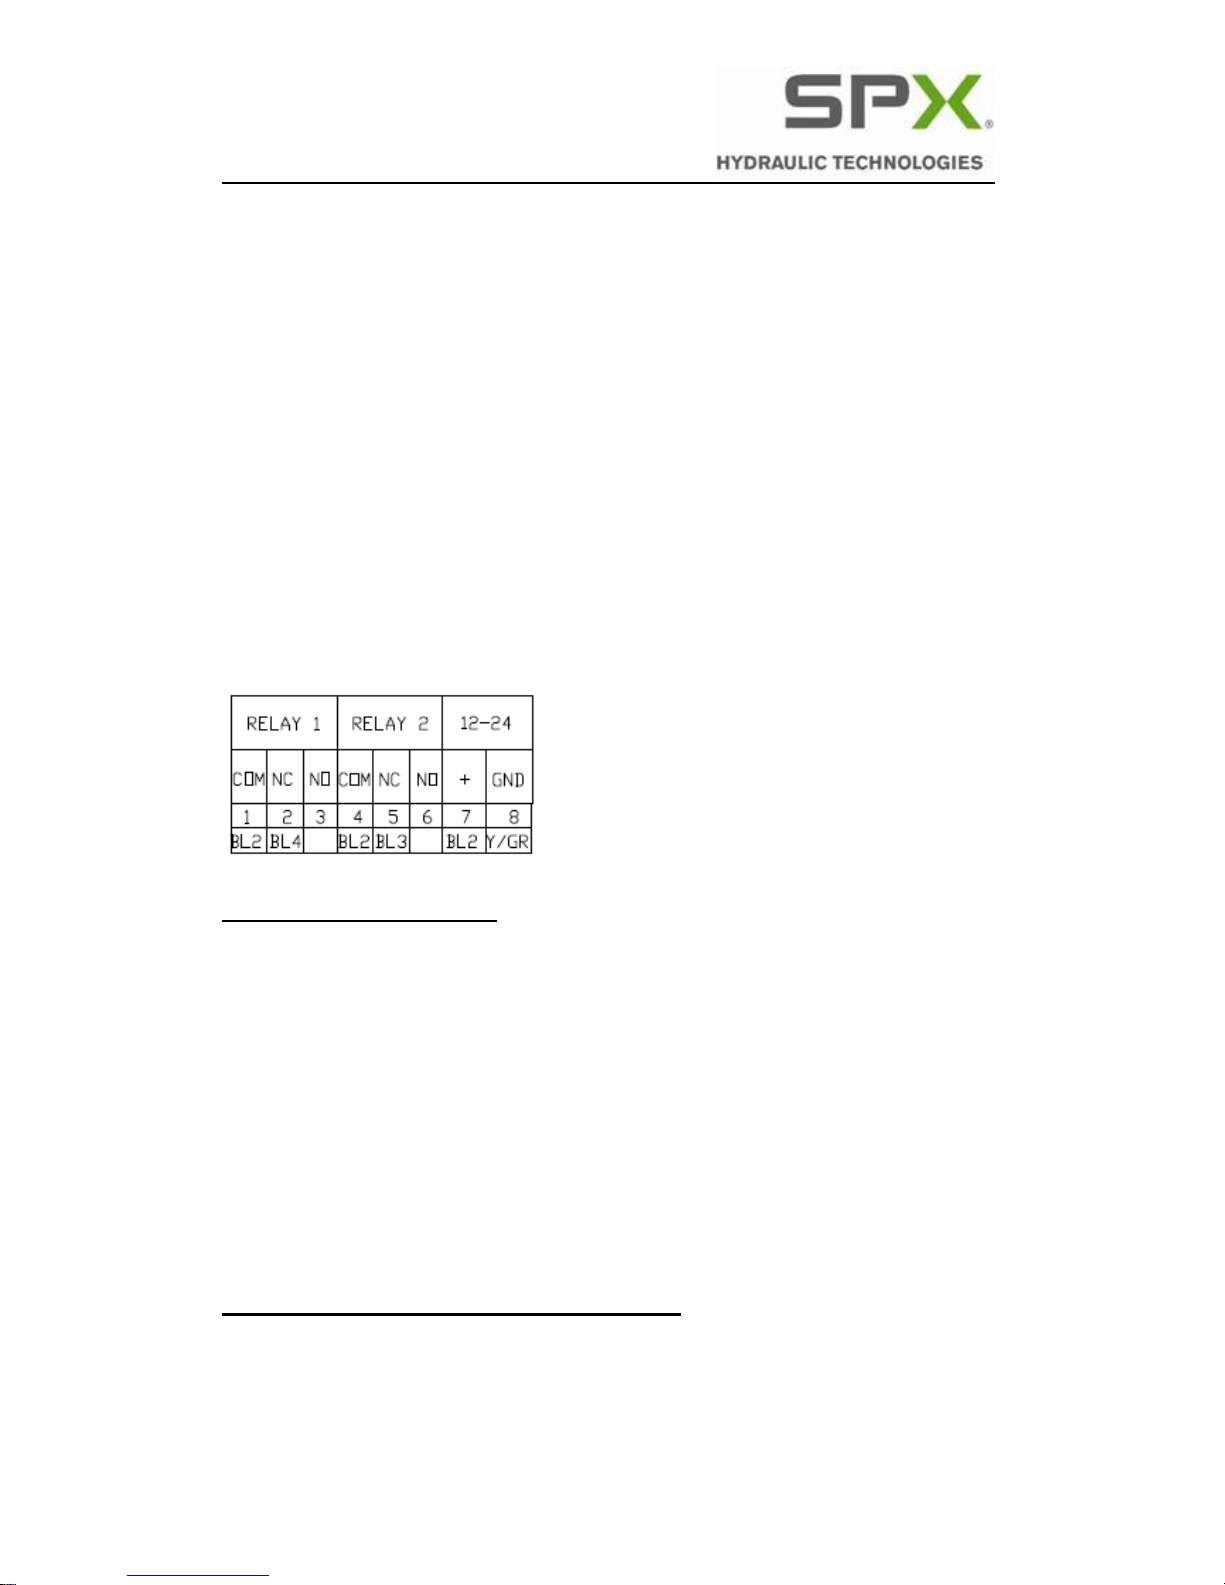
Rewiring the receiver:
Connect the right wiring to the terminals
- Black 2 (+) and the yellow/green cable according to the
above drawing.
Connect the signal cabling to the terminals for the relays:
- Black 3 and 4 cables according to the above drawing
- Black 2 on the relays is pre-wired on the circuit boards.
STORING THE TRANSMITTER CODE:
How to program the id-code of the transmitter?
1. Unscrew the 4 screws to open the receiver.

MANUAL ENGLISH
Rev 1 date 26-04-11 RS 6-8
2. Push the teach-in button on the receiver until the red LED
lights up.
3. Release the button when the red LED light up.
4. Turn transmitter ON.
5. Push on any button of the transmitter that is to be used with
the receiver. The ID-code will be programmed into the
receiver, and the red LED will blink three times.
6. Check if the functions are correctly working by pushing the
buttons of the transmitter and checking if the relays are being
activated. The green LED will light up if the receiver receives
the signal from the transmitter. When the transmitter is
programmed into the receiver, the red LED in the receiver
will blink continuously two times.
STOP INSTRUCTION
The teaching-in procedure can be stopped by pushing the button
in the receiver for 6 seconds.
ERASING THE PROGRAMMED TRANSMITTER
You can erase the programmed ID-code of the transmitter by
pushing the button on the receiver for more than 8 seconds.
TROUBLE SHOOTING:
If the equipment does not work like it should, please check the
points here under.
2.

MANUAL ENGLISH
Rev 1 date 26-04-11 RS 7-8
PROBLEM
POSSIBLE CAUSE
SOLUTION
The YELLOW LED
of the receiver does
not light up.
The receiver is not
well connected to
the power supply.
Incorrect power
voltage supply.
Check the
connection of the
power supply.
Check the power
voltage supply.
The GREEN LED on
the receiver lights
up, but the relays do
not react.
The transmitter code
has not been stored
in the receiver.
Program/teach-in the
transmitter code in
the receiver.
The GREEN LED in
the receiver does not
light up, while the
transmitter is
transmitting.
The battery in the
transmitter is empty.
The transmitter is
broken.
Replace the battery.
Contact your
supplier.
The GREEN LED in
the receiver lights
up, although the
transmitter is not
transmitting.
In the surrounding of
the receiver, another
transmitter is being
used on the same
frequency.
Contact your
supplier.
The LED of the
transmitter does not
light up when you
transmit.
The battery of the
transmitter is empty.
The transmitter is
broken.
Replace the battery.
Contact your
supplier.
The range of the
system is too small.
The battery in the
transmitter is almost
empty.
Replace the battery.
Please contact your supplier if you have tried out all solutions, but
your system still does not work properly.
MANUAL ENGLISH
Rev 1 date 26-04-11 RS 8-8
RECYCLING, SCRAPPING
EF-7700-systems and any accessories and spare parts no longer
in use should be scrapped and recycled according to local
environmental regulations.
This manual suits for next models
2
Table of contents
Other SPX Transmitter manuals

Popular Transmitter manuals by other brands


Vaisala
Vaisala Spectracap OMT355 user guide

Defender
Defender RT-Feet Operation manual

MYE
MYE MWCS-AT9-CXA Installation

Grohe
Grohe 39 142 manual

Critical Environment Technologies
Critical Environment Technologies LPT Operation manual

Endress+Hauser
Endress+Hauser Proline 500 HART Brief operating instructions