SQ Professional K-MOJO DIGIEXTRACT User manual

USERGUIDE
PLEASE READ THESE INSTRUCTIONS CAREFULLY BEFORE USE
KMIM 10062 08-12-2021 V1 | © 2022 SQ Professional Ltd

2
Due to sharp parts and
potential hazards, this appliance
should not be used by children
under 16 years old unless supervised
by an adult.
Please keep the appliance and mains
cable out of the reach of children.
This is not a toy!
If used by persons with reduced physical, sensory
or mental capabilities, instruction and supervision
must be given to understand the use of the
appliance and the hazards involved.
Always disconnect the appliance from the power
socket if it is left unattended and before
assembling, disassembling or cleaning.
If the mains cable is damaged, it must
be replaced by qualified persons
in order to avoid any hazards.
3
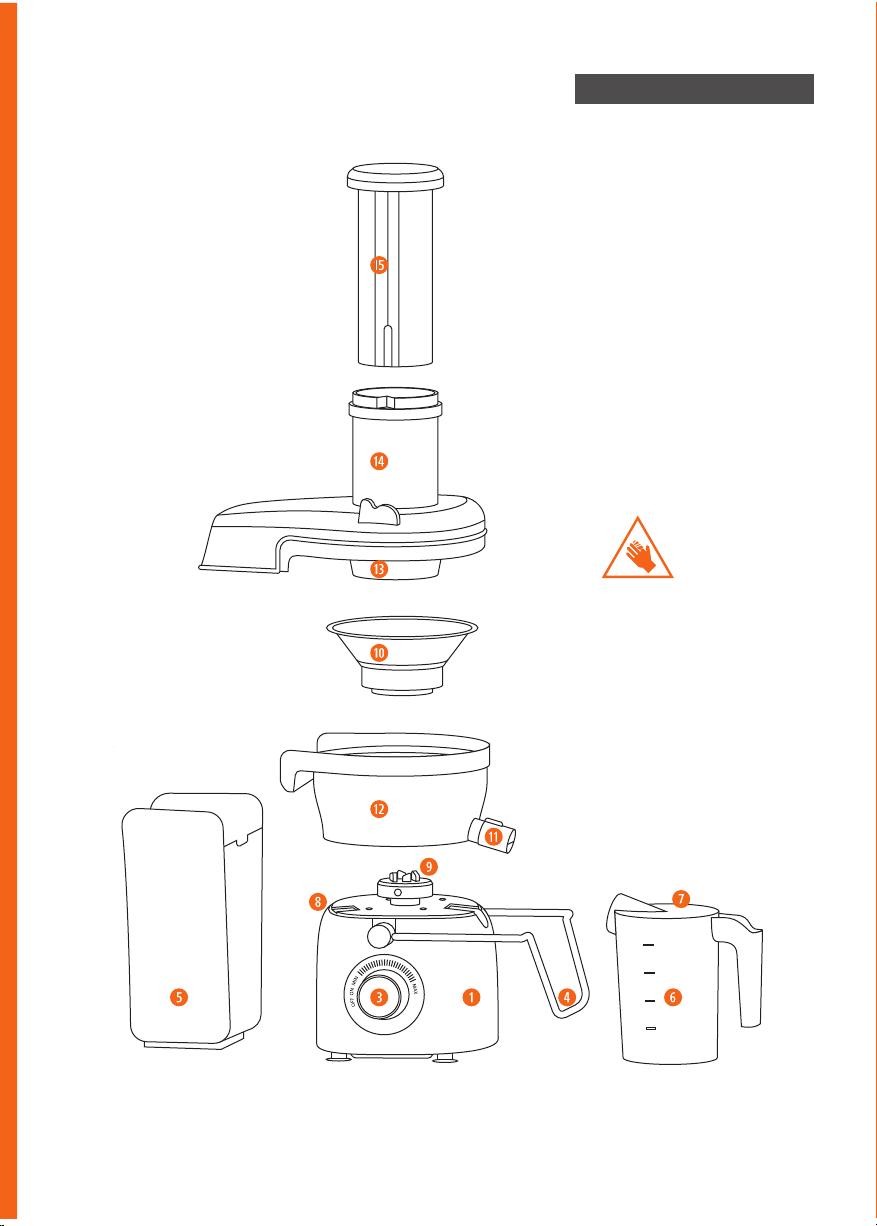
FEATURES
Motor unit
wSpeed indicator
eRotary switch with digital display
rInterlocking safety arm
tPulp container
yJuice jug
uJuice jug cover
iSafety switch
oDrive head
aStainless steel micro-mesh filter
sJuice spout
dJuicing bowl
fJuicer cover
gFeed chute
hFood pusher
SHARP OBJECTS

4
IMPORTANT SAFEGUARDS
Do not use the appliance in a bathroom, near
water, or outdoors. Do not operate the appliance
with wet hands or bare feet.
Do not immerse any of the parts (appliance,
mains cable, plug) in water or other liquids
during use to protect from fire, electric shock and
personal injury.
Do not use the appliance if it is damaged or
malfunctioning.
Do not leave the appliance unattended whilst in
use. Use and store it out of reach of children.
Keep hands and utensils away from the moving
parts while juicing to reduce the risk of severe
injury to persons or damage to the juicer.
•This appliance is intended for household
use only.
•Ensure that the appliance is always placed
on a firm and flat surface, away from
any edges of the worktop. Do not place
the appliance onto a metal tray or metal
surface whilst in use. Do not place the
appliance on, or near, a hot gas or electric
burner or in a heated oven.
•Keep the appliance and mains cable away
from the edges of worktops and out of
reach of children. Route the mains cable
so it does not overhang, and cannot be
tripped over or caught.
•Do not let the mains cable run across an
open space, such as between a low power
socket and a table, or across any hot area,
such as a cooker. Heat may damage the
mains cable.
•The connections on both sides of the mains
cable (the appliance and the power socket)
should never be strained. If the mains
cable is damaged it must be replaced by
a qualified person or service to avoid any
hazards.
•This appliance must not be operated by an
external timer or a remote control system.
•The drive head oand the micro-mesh
filter should always be kept dry.
•Before washing and drying, disconnect
the power supply; ensure that the drive
head o and the micro-mesh filter are
completely dry before assembling and
before you reconnect the appliance to
power supply.
•Before operating the appliance ensure
that the juicing bowl is in position and
the drive head ohas the micro-mesh filter
securely fitted onto the motor unit .
•Only switch the appliance on when the
pulp container tand the juice jug yare
in place and the juicer cover is securely
locked with the interlocking safety arm r.
•Do not move the appliance when it is
switched on.
•Always clean and cut the ingredients in pieces
small enough to fit into the feed chute .
•Do not open the juicer cover or attempt to
remove the micro-mesh filter while the
appliance is running.
•Always use the food pusher to push the
food down the feed chute .
•Switch off the juicer and unplug from
the power socket before attaching or
approaching parts that move while in use.
Unplug the juicer when not in use.
•Ensure that the juicer has come to a
complete stop before disassembling,
cleaning and storing away.
•The juicer will switch off automatically if
the interlocking safety arm ris released
during use.
•Keep the attachments, motor unit , mains
cable, and plug away from sources of heat.
Store in a dry place.
•Use only the parts supplied with the motor
unit (and vice versa) and do not tamper
with the drive head oin any way.
•Do not use the juicer for any other purpose
than its intended use.
•Read all operating instructions before
using the appliance.
SAVE THESE INSTRUCTIONS FOR FUTURE REFERENCE .
5
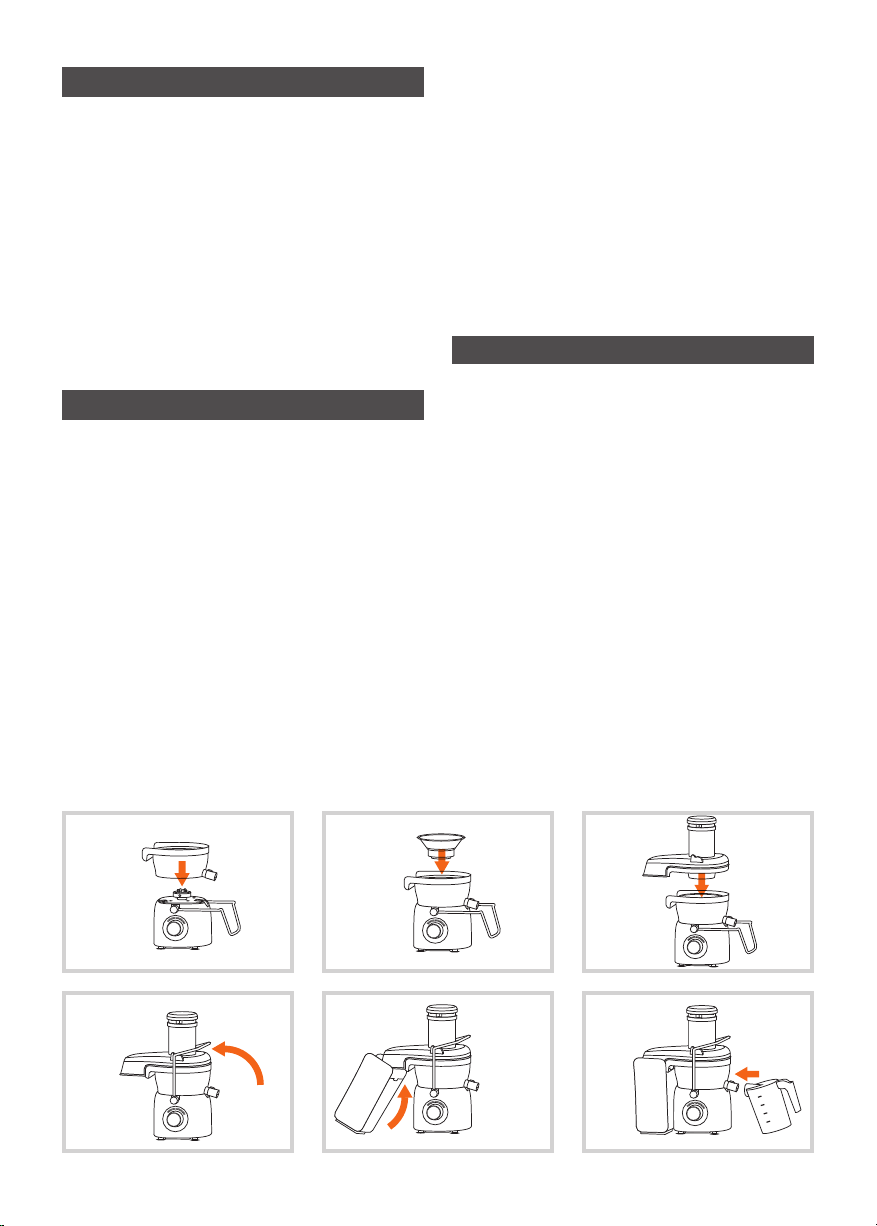
•Raise the interlocking safety arm rup and
lock it into the grooves on either side of the
juicer cover . image 4
•Tilt the pulp container tslightly forward
and push it upwards under the pulp spout.
image 5
•Slide the food pusher into the feed
chute .
•Position the juice jug ynext to the motor
unit and align the spout of the juice jug
ywith the juice spout s. image 6
DISASSEMBLY
•Turn the rotary switch eto OFF and
unplug the mains cable from the power
socket. Ensure that the appliance has come
to a complete stop.
•Remove the pulp container tby holding it
with both hands and pivoting its lower end
away from the motor unit .
•Place both hands on either side of the
interlocking safety arm r, pull back and lift
over the grooves on either side of the juicer
cover , then lower it.
•Hold the juicing bowl with both hands
and lift it off the motor unit with the
micro-mesh filter still in place.
•Place the juicing bowl into the sink,
remove the juice spout sthen turn the
juicing bowl upside down to remove the
micro-mesh filter .
BEFORE FIRST USE
All parts of the juicer are to be thoroughly
cleaned before being used for the first time.
Carefully wash and dry all parts which come
into contact with food – juicer cover , food
pusher , micro-mesh filter , juicing bowl
, pulp container tand juice jug y.
Wipe the motor unit with a damp cloth and
dry immediately with a soft, lint-free cloth.
Assemble the appliance, take out the required
length of the mains cable and plug it into the
power socket.
ASSEMBLY
Exercise extreme care when inserting or
removing the micro-mesh filter . It contains
small, very sharp teeth and a cutter on its base.
•Place the motor unit on a flat, stable
surface and push the interlocking safety
arm rdown. Place the juicing bowl
on the motor unit and attach the juice
spout s. image 1
•Place the micro-mesh filter onto the
drive head oand press down firmly on the
edges until it clicks into place. image 2
•Place the juicer cover on the juicing
bowl with the feed chute positioned
centrally above the micro-mesh filter .
image 3
123
6
45

6
USING THE DIGIEXTRACT
Do not use your fingers or other utensils to push
the ingredients down the feed chute .
If the rotary switch eis not in the OFF position
when power is supplied to the appliance, it will
not function. Return the rotary switch eto the
off position before selecting a speed again.
•Wash the ingredients and remove any hard
or inedible parts such as stones, pits, hard
skin, rind, pith, etc.
•Ensure that the appliance is correctly
assembled, the juice jug yis placed under
the juice spout s, and pulp container tis in
position before juicing.
•Plug the mains cable into the power socket
(switch the power socket on if applicable).
•Place the ingredients into the feed chute
and turn the rotary switch eto the ‘ON’
position. The digital display will illuminate
to indicate it is ready to use.
•Turn the rotary switch eto the desired
speed to begin juicing. The digital
display will show the length of time
which has elapsed.
miN Low speed for juicing softer fruit and
vegetables such as apricots, berries,
cucumber, grapes, kiwis, mangoes,
oranges, watermelons, tomatoes, etc.
maX High speed for juicing harder fruit
and vegetables such as apples, pears,
carrots, brussels sprout, cabbage,
fennel, plums, beetroot, celery, etc.
•Use the food pusher to gently guide the
food down the feed chute and extract
the maximum amount of juice. The juice
will flow into the juice jug yand the pulp
will separate and accumulate in the pulp
container t.
•Do not allow the pulp container tto
overfill as this may prevent correct
operation or cause damage to the
appliance. To empty the pulp container
t during juicing, turn the rotary switch
eto OFF and remove it as described
in disassembling instructions. Replace
the empty pulp container tbefore
continuing to juice.
•After juicing, always turn the rotary switch
e to OFF and unplug the mains cable.
JUICING TIPS
•Always use fresh fruit and vegetables and
wash them well before use and storage.
•Add a little lemon juice to apples, pears
and similar fruits to prevent browning.
•When juicing herbs, sprouts or leafy
vegetables, form them together into a
bundle or mix them with softer ingredients
and juice on low speed for best extraction.
•Any pulp remaining after juicing should be
used promptly to avoid oxidation and loss
of nutrients.
•Consider lining the pulp container twith a
bio-degradable or food-safe bag for easier
disposal or consumption of the pulp.
CLEANING
Never immerse the motor unit in any liquids.
•Always ensure that the appliance is
disconnected from the mains supply before
disassembling, cleaning and storing.
•Wipe the motor unit with a damp cloth and
immediately dry with a soft, lint-free cloth.
•Thoroughly clean all the surfaces that
come into contact with food during use.
•Immediately after each use, rinse all the
removable parts under running water and
allow to air dry.
•Soak the micro-mesh filter for about 10
minutes in warm soapy water, then hold
it under the running water and use the
supplied brush to ensure that all the pulp is
removed from the mesh and any openings.

7
•In the case of dried pulp, soak the micro-
mesh filter in warm soapy water then
use the brush again. Never soak the micro-
mesh in bleach and always treat it with care
as it can be easily damaged.
•After disassembling the appliance,
thoroughly hand wash all the removable
parts with warm soapy water or on the top
rack of a dishwasher.
SPECIFICATIONS
Rated Voltage: AC 220-240V
Frequency: 50/60Hz
Rated Power: 1000W
Juice jug capacity: 1.0L
Pulp container capacity: 1.4L
ELECTRICAL
The product must not be used without the fuse
cover fitted.
Should the power cable or the power
plug become damaged, arrange for these
to be replaced by Customer Service or a
qualified person before continuing to use the
appliance. The appliance is fitted with a 13A
fuse (BS1362) in a 13A plug (BS1363).
ENVIRONMENTAL
To reduce environmental
and health problems due
to hazardous substances in
electrical and electronic goods,
appliances marked with the
symbol below must not be
disposed of with unsorted
municipal waste. Please repair,
reuse or recycle appropriately.
SERVICE
The product is not user-serviceable. If it is not
working, read the instructions, check the plug
fuse and main fuse/circuit breaker. If it is still
not working, consult your retailer.
If that does not solve the problem ring
Customer Service – they may be able to offer
technical advice. Please have the Model
Number to hand, as they will not be able to
help you without it.
If you are advised to return the product to
us, pack it carefully, include a note with your
name, address, day phone number, and
description of the problem.
If under a guarantee, say where and when it
was purchased and include a valid VAT receipt.
Send it to SQ Professional Ltd.
GUARANTEE
The guarantee for this product is covered
by SQ Professional Limited. Any faults with
this product arising through a manufacturer
defect will be covered for 1 year from the date
of purchase, subject to a valid VAT receipt
being presented. This does not include faults
or damage caused by misuse of general wear
and tear. SQ Professional Ltd will not be held
liable for general wear and tear, or eventual
damages to persons, animals or objects
caused by incorrect installation or deriving
from improper, erroneous or unreasonable
use.
Please contact customer services on
01992 716 070 or send an e-mail to
info@sqprofessional.com,
Monday to Friday from 09:30 - 17:30.
This does not affect your statutory rights.
All images are for illustration purposes only. Actual products may vary.

Voltage Business Centre, Units 1 - 3
6 Mollison Avenue, Eneld, EN3 7XQ
T: 01992 716 070 E: [email protected]
www.sqprofessional.com
Table of contents
Other SQ Professional Blender manuals

SQ Professional
SQ Professional MEGA Series User manual

SQ Professional
SQ Professional BLITZ 4157 User manual

SQ Professional
SQ Professional MEGABLEND User manual

SQ Professional
SQ Professional dainty SQIM 7280 User manual

SQ Professional
SQ Professional Gems Luminate User manual

SQ Professional
SQ Professional gems LUMINATE User manual

SQ Professional
SQ Professional K-MOJO BLUESTEEL User manual

SQ Professional
SQ Professional EPOQUE User manual

SQ Professional
SQ Professional BLITZ User manual

SQ Professional
SQ Professional Twist N Blitz User manual


