Squareled VIGOR User manual

SquareLED - VIGOR Outdoor battery pack

Manual | VIGOR outdoor battery pack
1. Mechanical Specication

Manual | VIGOR outdoor battery pack
2. Introduction
Unpacking
Thank you for purchasing theVIGOR OUTDOOR BATTERY PACK.
Every VIGOR OUTDOOR BATTERY PACK has been tested and shipped in perfect operating condition. Carefully
check the shipping carton for damage that may have
occurred during shipping. If the carton appears to be damaged, carefully inspect your xture for any damage and
be sure all accessories necessary to operate the unit has arrived intact.
Introduction
TheVIGOR OUTDOOR BATTERY PACK is the newest revolutionary battery powered and main supply wireless
controlled colour changer with 12 powerful RGBW full color LEDs.This light can be used in a stand alone mode or
connected in a Master/Slave conguration.
Our rechargeable battery pack xture, is particularly suitable for events where set - up time is problematic, and
the passage of cables is hard. Setup and conguration of the xture by touch control panel. Warning! To prevent
or reduce the risk of electrical shock or re, do not expose this unit to rain or moisture.
Caution!
There are no user serviceable parts inside this unit. Do not attempt any repairs yourself, doing so will void your
manufactures warranty. In the unlikely event your unit may require service please contact us.
The battery life is one year.
PLEASE recycle the carton when ever possible.

Manual | VIGOR outdoor battery pack
3. Safety Information
• Installation:
Make sure all parts for xing the projector are in a good state of repair. Make sure the point of anchorage
is stable before positioning the projector.The safety chain must be properly hooked onto the tting and
secured to the framework, so that,if the primary support system fails, the tting falls as little as possible.
If the safety chain gets used,it needs to be replaced with a genuine spare.
• Minimum distance of illuminated objects:
The projector needs to be positioned so that the objects hit by the beam of light are at least 0.2 metres
(8”) from the lens of the projector.
• Minimum distance from ammable materials:
The projector must be positioned so that any ammable materials are at least 0.20 metres (8“) from every
point on the surface of the tting.
• Mounting surfaces:
It is permissible to mount the tting on normally ammable surfaces.
• Maximum ambient temperature:
Do not use the project if ambient temperature (Ta) exceeds 40°C.
• IP65 protection rating:
The equipment is fully protected against dust (rst digit 6) and against jets of water (second digit 5).
• Protection against electrical shock:
Connection must be made to a power supply system tted with ecient earthing (Class I appliance accor-
ding to standard EN 60598-1). It is, moreover, recommended to protect the supply lines of the projectors
from indirect contact and/or shorting to earth by using appropriately sized residual current devices.
• Connection to the power mains:
A qualied electrician must perform connection to the power mains. Check that the mains frequency and
voltage correspond to the frequency and voltage for which the projector was designed and indicated on
the electrical data label. This label also gives the input power.Refer to the latter to evaluate the maximum
number of devices to be connected to the mains to avoid overloads.
• Maintenance:
Before starting any maintenance work or cleaning the projector, cut o power from the supplymains. After
switching o, do not remove any parts of the tting for at least 10 minutes. The lensesmust be mounted
and, if visibly damaged, they have to be replaced with genuine spares.
• Battery:
This product contains a lithium iron tetraphosphate rechargeable battery. To protect the environment,
please discard the battery at the end of its life cycle according to current 40°Claw.
• The products referred to in this manual conform to the European Community Directives to which
they are subject: Low Voltage Directive 2006/95/EC - Electromagnetic Compatibility Directive 2004/108/EC

Manual | VIGOR outdoor battery pack
4. Product Overview

Manual | VIGOR outdoor battery pack
5. Technic Data
• Source: 12x 8W LED RGBW 4 in 1
• Led power: 96W
• Optics: 30mm lenses standard beam 25
• Head adjustment: 0-120°
• Cooling: Natural cooling by body
• Control:
Wireless DMX,Master, Slave and sound,auto mode
Wirless module: WDMX from sweden
• User interface:
LED display with touch button
Nice battery indicator from 25-100
Wirless indicator for connection
• External power:
full range 100-240V 50-60Hz, WEIPU connector,
for both battery charge and normal operations
• Body:
Die cast aluminium
1 bracket
• Protection rating: IP65
• Battery:
8 hours for full on
Color change and dimming with 16 hours
Quality lithum battery
• Working position:
Outdoor use
• Dimension:
289 X 238.6 X 377.9 mm
• N.W: 9.6 KG
• G.W: 11.6KG
• G.W: 610. Flight case charge battery

Manual | VIGOR outdoor battery pack
6. Operating Instructions

Manual | VIGOR outdoor battery pack
7. DMX control mode
1 DMX Channel
Channel Value Function
1
0 Light o
1-4 Color 1
5-9 Color 2
10-14 Color 3
…. ….
240-244 Color 48
245-249 Color 49
250-254 Color 50
255 Color 51
4 DMX Channel
Channel Value Function
10-255 Red
20-255 Green
30-255 Blue
40-255 White
8 DMX Channel
Channel Value Function
10-255 Dimmer
20-255 Red
30-255 Green
40-255 Blue
50-255 White
60-255 Strobe
7
0 Light o
1 - 24 Auto 0
25-49 Auto 1
50-74 Auto 2
75-99 Auto 3
100-124 Auto 4
125-149 Auto 5
150-174 Auto 6
175-199 Auto 7
200-224 Auto 8
225-255 Auto 9
80-255 Speed (slow-fast)

Manual | VIGOR outdoor battery pack
8. Connection
8.1 DMX connection
Connect all lights with controller,set all chanels are same.
8.2 Master slave connection
Connect all lights with controller,set one light on or , other all lights set it
8.3 Wireless connection
If use diferenct DMX sender,should cancel the DMX signal record rst. Choose
press ENTER button about 10 second,until the red dot without ashing, like this that means cleaning is
successful.
Connect the power cable of controller and put the DMX cable connect with DMX out button of wireless receiver.
The display panel of if the menu on Show a little
ashing, like this then the connection is successful.

Manual | VIGOR outdoor battery pack
Stat- This menu will let you select your desired static color mode and strobe mode
1. Tap the MENU button until“Stat”is displayed, press ENTER.
2. There will be ve options. Press ENTER can select the option and press UP or DOWN button can select the
value you desire as below.
1) R000~R255
2) G000~G255
3) B000~B255
4) U000~U255
5) St00~St30
Colo – Build-in color mix
1. Tap the MENU button and UP button or DOWN button until“CoLo”is displayed, press ENTER.
2.“CoLX”will now be displayed,,“X”representing a number between 0-51 will be displayed. Press the UP or
DOWN buttons to select either a static color mode.
Auto - This menu will let you select your desired auto mode
1. Tap the MENU button and UP button or DOWN button until“Auto”is displayed, press ENTER.
2.“Autx”will now be displayed, You can conrm ten modes by UP or DOWN for auto mode.
Chnd - This menu will let you select your desired DMX Channel mode.
1. Tap the MENU button and UP button or DOWN button until“Chnd”is displayed, press ENTER.
2.“X Ch”will now be displayed,“X”represents the displayed DMX channel mode. Press the UP or DOWN but-
tons to nd your desired Channel mode.
Addr - DMX Address Setting via control board
1. Tap the MENU button and UP button or DOWN button until“Addr”is displayed, press ENTER.
2.“Axxx”will now be displayed,“x”represents the displayed address. Press the UP or DOWN buttons to nd
your desired address.
SLav- This menu will let you select your desired Master/slave mode
1. Tap the MENU button until“SLav”is displayed, press ENTER.
2.“Sla ”will now be displayed,Slave mode is conrmed. It will be slaved by auto mode sound mode and chase
mode.

Manual | VIGOR outdoor battery pack
Info - This will display the software version and working time
1. Tap the MENU button until“Info”is displayed. Press the ENTER button and the software vesion will be
displayed.
2. Press the MENU button to leave this function.
PASd – Password function switch
1. When you want to lock the light, administrator can control it only.As shown as following picture:
or
2. When the light which on the board is o,if you want to access again,must enter password.
As shown as following picture:
3. Finger touch the button from left to right side,screen will be shown same like:
if screen will be shown Similar:
or
Build – in Wireless DMX System made in Sweden.
ThisWireless DMX System is the ideal solution for DJ’s, nightclubs, bars or for any event where you don’t want
data cables to be seen and when it is not easy to run data cables to your xture(s) location.The most important is
that the control distance is up to 500 wireless meter (open line of sight)
8.4 Release wireless DMX signal
Relaese signal of wireless DMX. Because there is memory function in the light the signal of sender or receiver are
dierent,so should be cleaned old signal if use a new sender or receiver.
If use diferenct DMX sender,should cancel the DMX signal record rst. Choose
press ENTER button about 10 second,until the red dot without ashing,
like this that means cleaning is successful.

Manual | VIGOR outdoor battery pack
9. Installation
Because there is lithum battery inside - the light must be upwards,can‘t be downwards.
10. Flight case charge battery
Open ight case,connect the inside power cable of ight case with light and then connect the outside power
cable of ight case with socket.
Manual | VIGOR outdoor battery pack
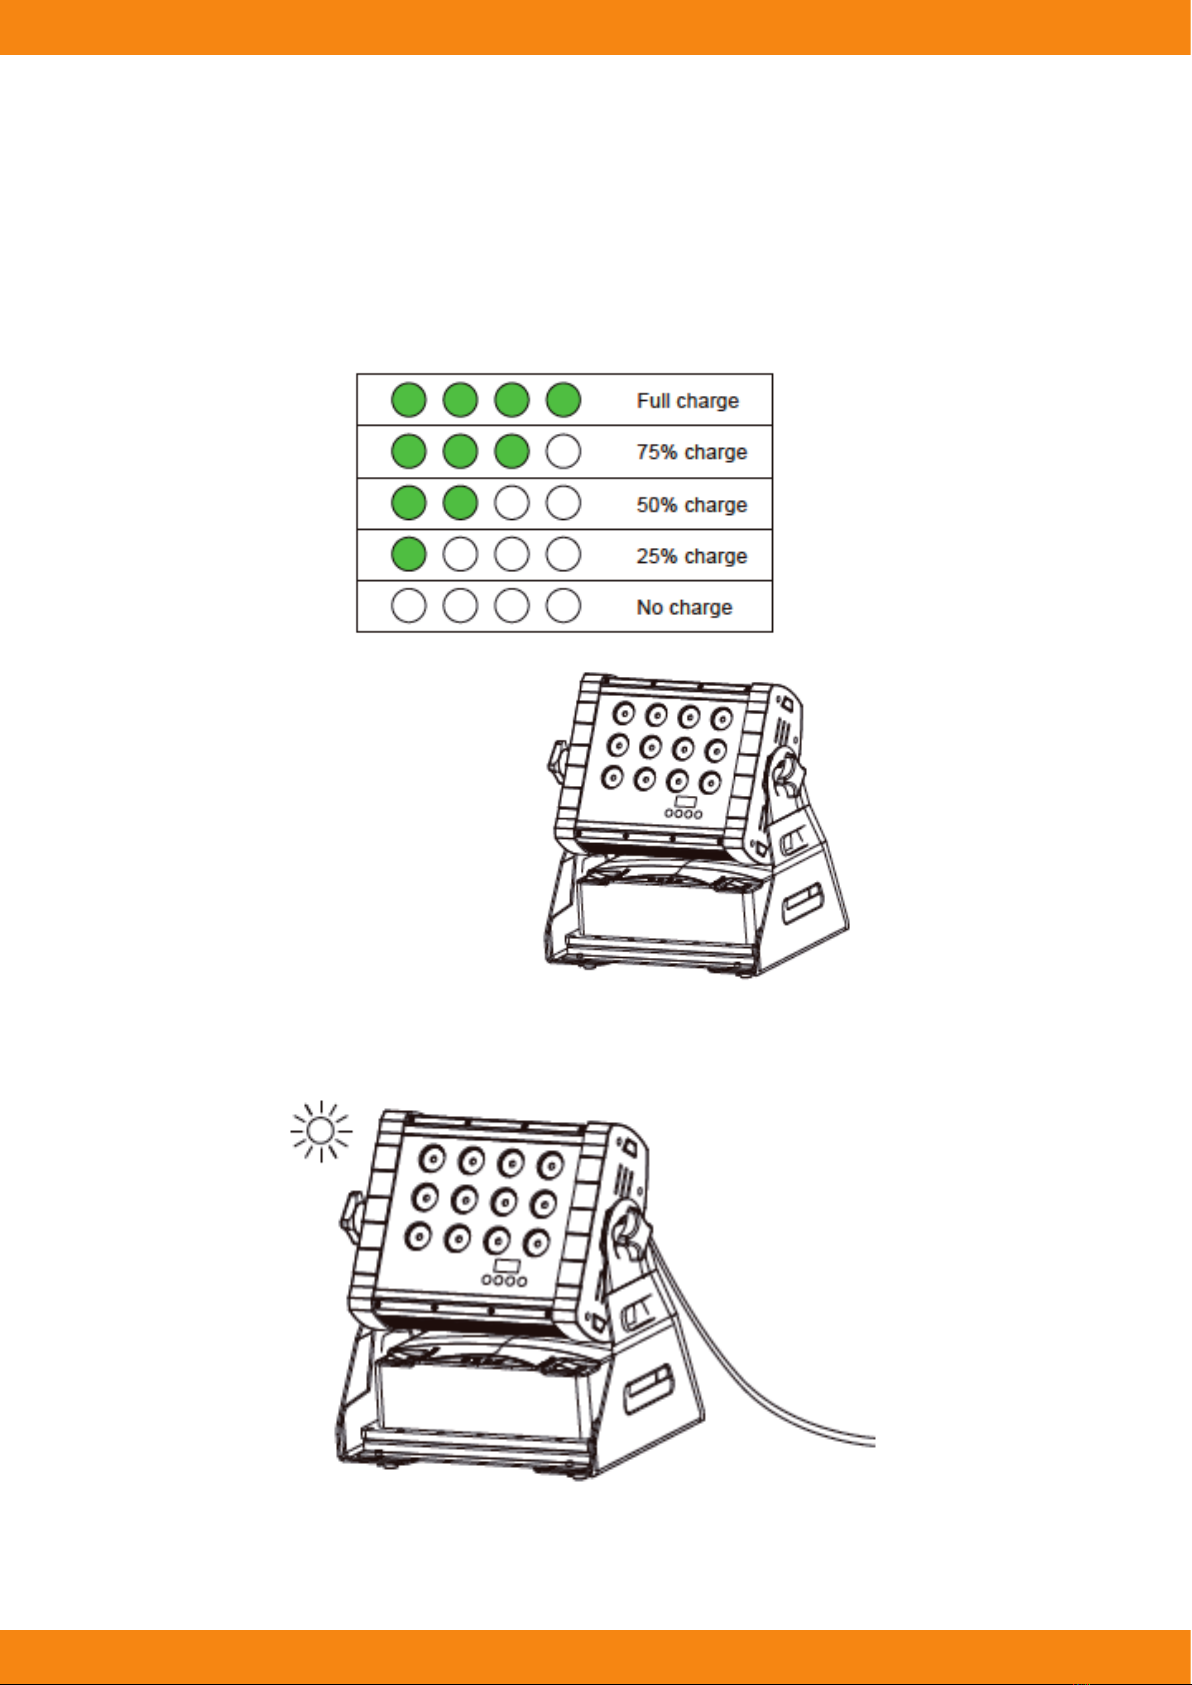
11. How to charge the battery
1. The battery life indicator located on the product displays the remaining amount of internal bat-
tery life. Use the chart below to nd out how much battery life remains per charge cycle.The light to the far
right ashes during charging.
2. Light can be charged when using.
Manual | VIGOR outdoor battery pack
12. Service
12.1 Battery Manual
1. The energy of battery must be nished 100% when charge battery.
2. Should be charge one time each 3 month if do not use light.Must keep a few energy in
battery,otherwise the volume of battery will be cut down 20%.
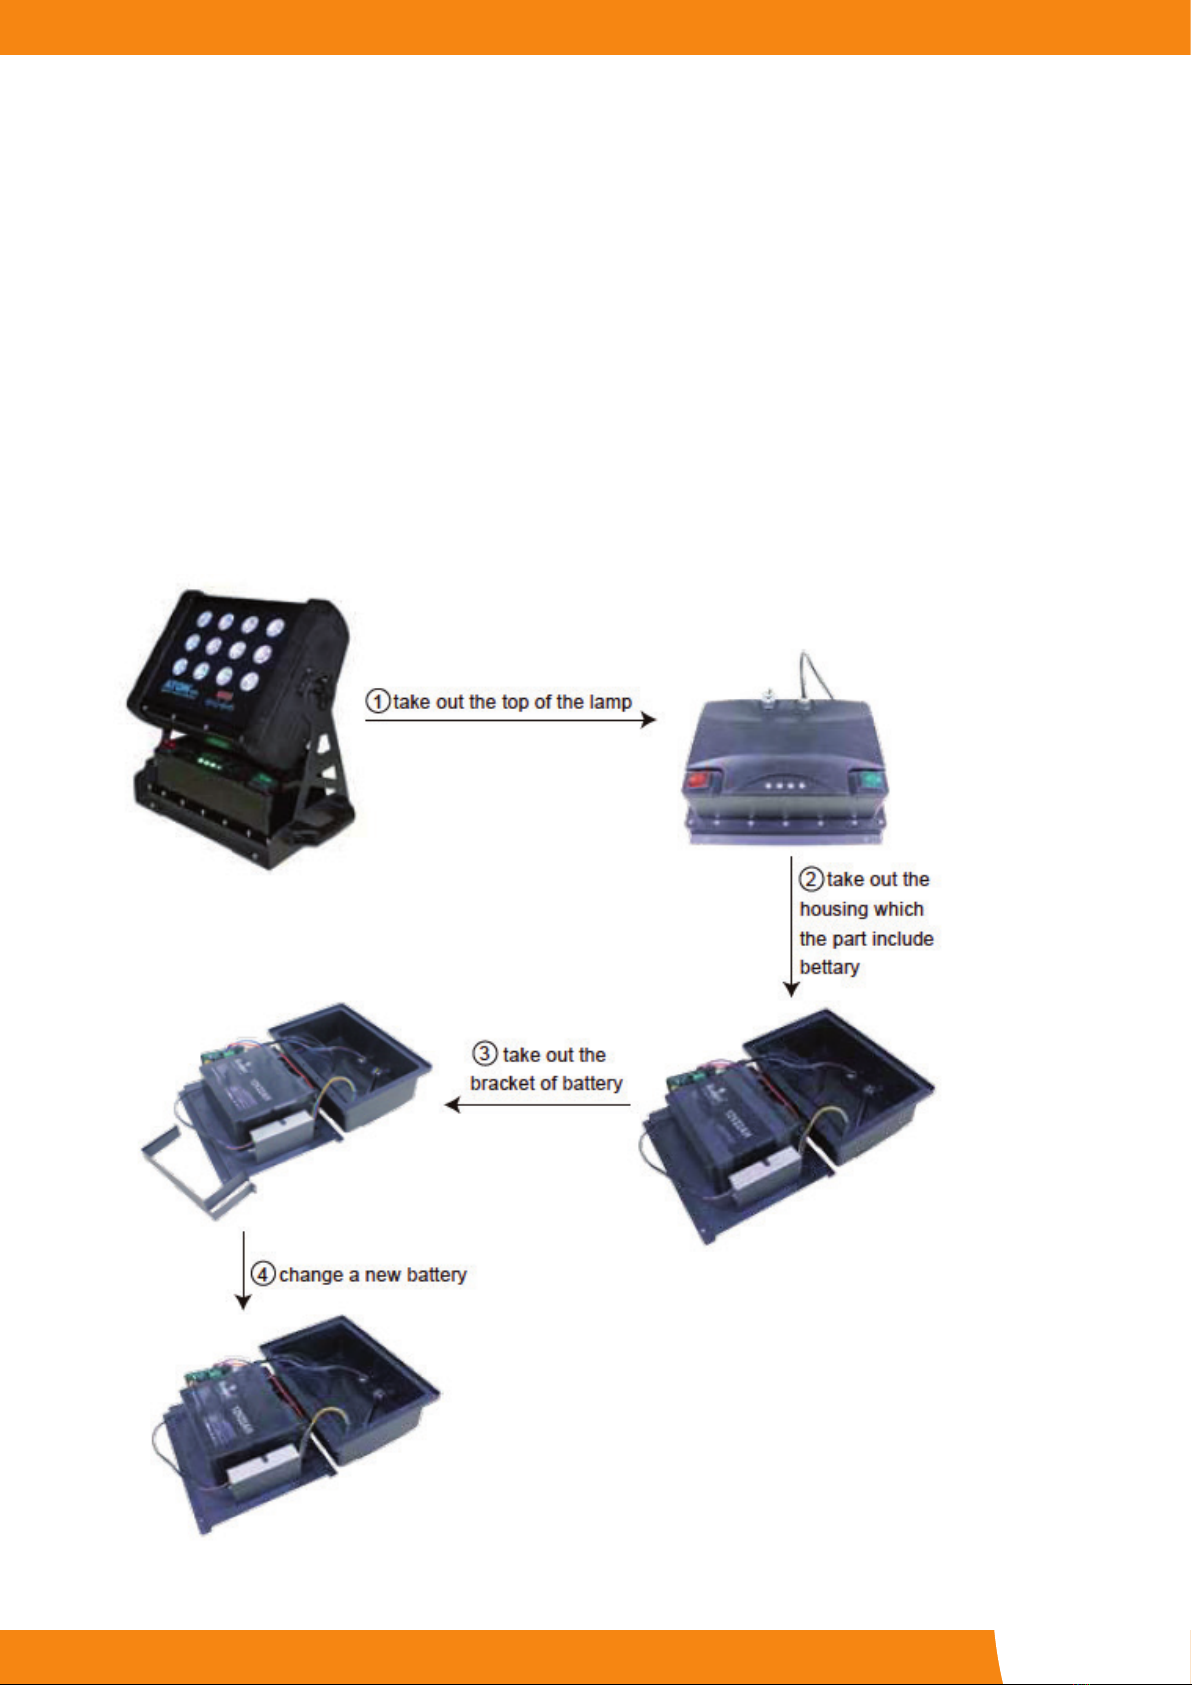
12.2. How to replace the battery

Manual | VIGOR outdoor battery pack
Das Lichttechnikhaus Vertriebs GmbH
Rudolf-Diesel-Str. 3, D-89312 Günzburg
Telefon +49 (0) 82 21 207 98-0
Fax +49 (0) 82 21 207 98-69
Web www.lth-gmbh.de
Table of contents
Popular Batteries Pack manuals by other brands


W-Tec
W-Tec IN 20908 user manual

CertaUPS
CertaUPS C300R installation manual

TOOLCRAFT
TOOLCRAFT 2520085 operating instructions

Jamara
Jamara Ride-On Strong Bull 6V Instruction

True blue power
True blue power TB40 Series Installation manual and operating instructions

XD COLLECTION
XD COLLECTION XD P322.16 Series manual


