SRS Lighting DMX SHUTTER-3 User manual

( 1 / 8)
Instruction Manual
Models:
version 1.0 since 3 February 2020
ATTENTION!
This instruction manual contains important information about the installation and the use of
the equipment. Please read and follow these instructions carefully.
Always ensure that the power to the equipment is disconnected before opening the
equipment or commencing any maintenance wor .
DMX_SHUTT_en_manual_M267
MX PROJECTOR
SHUTTER
MX SHUTTER-3
MX SHUTTER-5

( 2 / 8)
General information
IMPORTANT INSTRUCTIONS
All safety and operating instructions should be read before the equipment is installed or
operated.
IMPORTANT SAFETY INFORMATION
The following general safety precautions have to be observed during all phases of
operation, service, and the repair of this equipment. Failure to comply with these
precautions or with specific warnings in this manual violates safety standards of
design, manufacture, and the intended use of this equipment.
Do not operate in an explosive atmosphere!
Do not operate this equipment in the presence of flammable gases or fumes. Operation
of any electrical instrument in such an environment constitutes a definite safety
hazard.
ater, moisture, heat and humidity
Do not operate this equipment near water or in areas with wet floors, or in high
humidity atmosphere, where condensation forms on the equipment. It should never be
placed near or over a heat register or other source of heated air. It should not be
installed or operated without proper ventilation.
( 3 / 8)
The DMX Projector SHUTTER /dowser is a small device that is used to ma e a true blac out
in the projection area. It can be used with all types of projectors.
This device is controlled via the DMX signal, USB port of a computer or using a manual
switch with 3- or 5-pin DMX cable. The DMX is optically isolated and protected by transils.
The device comes with mounting straps, M10 thread for C-clamp and mounting points for
line securing. This product requires flaps. They are made from high-quality aluminium and
there are three sizes available.
Power supply
DC 12-15V, 100mA – 500mA
Operating temperature
-20 °C to +60 °C
Housing
Steel; with powder coating
imensions & Weight
110 x 44 x 145mm, 0.8 g
Warranty
2 years

( 4 / 8)
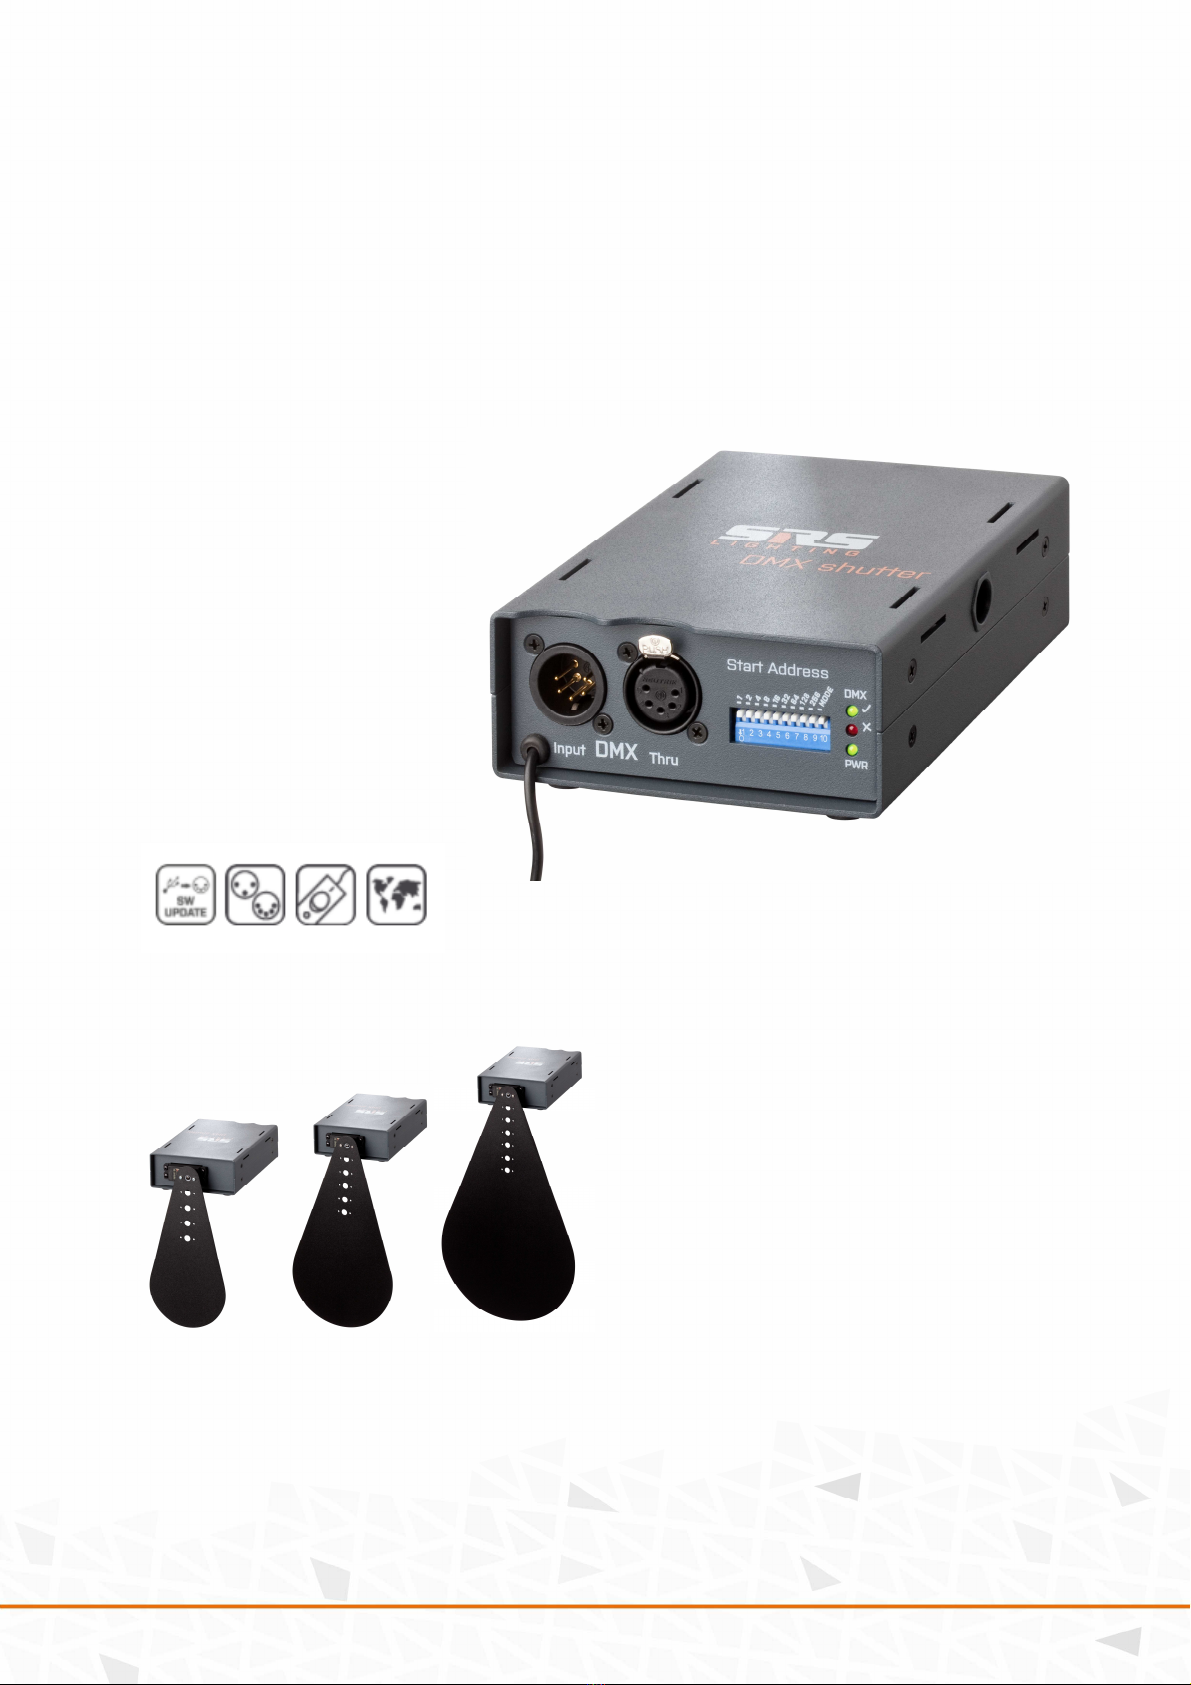
Front panel description:
Rear panel description:
MX 512
−
USITT DMX 512 (1990)
−
protected by transil diodes
XLR 5-pin connector (Neutrik®):
Pin 1 GND
Pin 2 Data -
Pin 3 Data +
Pin 4, 5 Not connected
evice functions
DMX address selection: The DMX address is set using nine DMX DIP switches. The green
OK LED is on when correct DMX signal is connected. Red LED is on when the DMX signal is
connected with inverted polarity. The DMX signal is applied using a standard XLR-plug.
Mounting t e blackout flap: The flap must be mounted on the servo motor axle. When the
desired angle has been found, the flap can be tightened with a small blac screw. When
aligning the flap, ma e sure the device is turned off – the servo motor can be damaged
when the movement line is obstructed by other devices.
1. DMX input
2. DMX output
3. DMX start address switch (UP = ON)
Switch #10 is a MIRROR switch that
inverts the zero position of flap:
DMX512 = zero position, DMX0 = 90 deg.
4.
LED indication of DMX and power
1. Hi-Grade Servo motor
2. Mounted flap s etch

( 5 / 8)
DMX signal controlled projector s utter:
When power adaptor and the DMX line have been connected, the projector shutter is ready
for use. By changing the percentage of the chosen DMX address, the motor axle can be
turned forward and bac ward according to the DMX percentage. The motor axle can turn
from 0 to 90 degrees, 0% meaning 0 degrees and 100% being 90 degrees. The mirror
movement of the flap can be achieved by setting of the switch #10 near the DMX address
selector mar ed as TEST.
Switc controlled projector s utter:
The shutter with the DMX interface has an optional switch button. Projector shutter can be
controlled by a short circuit of the DMX lines 1 and 3 on the DMX cable. In this case, the
DMX OK and DMX ERR LEDs are on. This signalizes that shutter’s flap is closed – it is in 90-
degree position. The movement can be inverted by the TEST switch #10.
USB controlled projector s utter: DMX 1-512 projector shutter can also be controlled by
the DMX. To control it, the DMX SW-UPG cable and software is needed. As us for the USB
support.

( 6 / 8)
Address field:
x- single digit software sends command only to X DMX start address
x,x multiple digits software sends command to all DMX addresses separated by
comma a sign
Value field:
Specifies the DMX value sent to desired channels: 0-255
.

( 7 / 8)
Firmware update:
Select the firmware file and clic OPEN
Warranty:
The product design should be varied to eep the product continuously updated. The
product price should be subject to possible variations for eventual rises of production costs
or duties. Claims for possible damages during the freight must be notified to the carrier. All
claims must be notified to the distributor or manufacturer within 8 days from the receipt of
goods. Buyer is responsible for the right installation and the use of the apparatus.
The apparatus is covered by a TWO-YEAR warranty from the date of purchase against
defects of manufacture and components. Defects and brea ages caused by wrong
use/connection are not subject to warranty. For any dispute is competent the Tribunal of
Bratislava, Slova Republic.

( 8 / 8)
DECLARATION OF CONFORMITY
According to guide lines 89/336 EEC and 92/31 EEC:
Name of producer: SRS Group s.r.o.
Address of producer: Rybnicna 36/D, SK- 83106 Bratislava, Slova Republic
Declares that the product
Name of product: DMX Shutter
Type: DMX SHUTTER-3, DMX SHUTTER-5
Corresponds to the following product specifications:
Safety: EN60065, resp. EN 60950
EMC: EN55103-1, resp. EN55103-2
Bratislava, 10 May 2009 Robert Sloboda
Copyright 2017 SRS Group, s.r.o. | Specifications subject to change without notice.
Document: DMX_SHUTT_en_manual_M267 | Version 1.0 | Actual as of: 3 February 2020
SRS Group s.r.o.
Rybnicna 38/B | 831 07 Bratislava | Slova ia
Phone: +421 2 32 661 800
Email: sales@srs-group.com | www.srs-group.com
This manual suits for next models
1
Table of contents
Other SRS Lighting Dj Equipment manuals


