SSR Motorsports SX50 User manual

OWNERS MANUAL
Two Stroke Dirt Bike
Distributed by SSR Motorsports
Address: 12825 Alondra Blvd, Norwalk CA 90650
www.ssrmotorsports.com
Please note that this is a general manual. The model of the vehicle
you have may differ from the picture shown in this manual.

1
Instructions
Please read this owner’s manual carefully before using this product! This is very important!
It’s required for driver’s safety and vehicle’s maintenance!
If the rider is without safety awareness or driving experiences, please drive under the
adult’s supervision! This is most important! It’s very important for your safety.
This product is recommended for riders of 12 years old or over.
Do not lend the vehicle to others who don’t know how to operate.
Please observe all local law and regulations.
Content
P2 Safety warning
P2 Assembling
P3 Emergency kill switch and speed limiter
P4 Tire pressure gauges
P4 Operating
Inspection before riding
P4 Idling (
inspection)
P4 Front, rear suspension (
inspection)
P4 Front brake system (
inspection)
P4 Rear brake system (
inspection)
P5 Tool bag (
inspection)
P5 Self-Protection (
inspection)
P5 Starting
P5 Training
P5 Riding
P6 Parking
P6 Cleaning
P6 Storage
P6 Transport
P6 Delivery
P6 Maintenance & accessories
P7 Maintenance list, age warning and warning labels.
P8-9 Accessory description, spec data, circuit diagram,

2
Safety warning
1.This vehicle is not a toy.
2. Children must be trained before operating this vehicle.
3. Be sure of children's ability to avoid injury. This is very important.
4. Children must understand the manual and the importance of warnings in the manual.
5. User must read the owner’s manual carefully and understand the content of the manual.
6. Incorrect operation of this off road two-wheel vehicle will result in serious injury or even death.
7. Age limit warning.(See label on the vehicle)
8. This product is not intended for ON-ROAD use.
9. Never ride with more than one person.
10. Never attempt to operate this vehicle while under the influence of alcohol or drugs, avoid injury or death.
11. Please control the speed, do not drive at excessive speeds.
12. Do not allow the vehicle to be used while being serviced.
13. Inspect the vehicle’s condition before operating.
14. Do not modify the vehicle or change the parts. This is can be unsafe.
15. Before riding, please wear proper safety gear at all times.
16 It is necessary to receive training from your retailer to learn the operation of the vehicle.
17. Know your local laws and regulations of off road two-wheel vehicles prior to riding. This may be
obtained from your retailer.
18. After using the vehicle for long periods of time the muffler will become very hot and will burn you if
not careful.
19. Although the vehicle is designed with safety measures, Injury can still arise.
Please read the warning labels on the vehicle carefully, and understand them fully.
1. Warning/caution label includes important safety information.
2. User must understand the content of labels completely.
3. Make sure all labels are put on the vehicles at time of assembly.
4. When the labels are not clear or fall off, please ask your retailer for replacements to ensure the integrity
of all the labels.
Assembling guide:
1. Place the packing box on the flat ground, then open it.(with the scissors or cutter)
2. Use 10# open-end wrench and 6# Allen wrench to take apart the packing metal.(for non- iron cage
packed models, this step is not applicable)

3
1
st
step
: Please install the rear shock absorber, and tighten nuts on both sides with 25N.m force.
2
nd
step
: Please install the front tire (make sure the tread pattern and cycle valve outside), and tighten the
nuts with force between 35N.m ~ 45N.m.
3
rd
step
: Please install the handlebar (adjust to proper angles), and tighten the nuts with force between
15N.m ~ 25N.m.
If you fail tounderstandthe instructions, please contact your local retailer and get proper guidance.
Adjust the Chain
: Use your index finger. Press lightly in the middle position between power output
sprocket and rear sprocket. The ideal adjustment should be 15mm to 20mm when pressed. If it is not in
this range, please adjust the chain adjuster. (Please note: The chain adjuster should be adjusted at the
same time to ensure the balance of both side).Loosen the fasten nuts of chain adjuster first, and then
unscrew or screw nuts to be best position. Finally, tighten the nuts of chain adjuster.
Emergency kill switch
The switch is located on the left side of the handlebar. Pull or press down on the switch and the engine will
be stopped.
The emergency rope can be fastened to the rider in case there is an emergency. The vehicle will stop
automatically when the rider pulls the rope.
The speed limiter is located on the right side of the handlebar, the speed will be limited to Two-thirds of the
normal speed.
Kill Switch
Speed Limiter

4
Tire gauge
The proper tire pressure can provide the maximum stability and performance.
Check and adjust the tire pressure regularly, to make sure the pressure is correct.
To find the tire size and standard pressure, please check parameter list and warning label on
the vehicle. To find the “Load-bearing” and “speed grade”, please check the tire surface.
1. Check tire pressure and condition before riding. Please replace the tire if there are any of the
following conditions: broken, stabbing, or rim is out of shape. (Please seek assistance from qualified
technician or local retailer for replacement.)
2. Improper tire pressure will result in hazards. Over the standard pressure can cause a flat tire.
Lower than the standard pressure can cause tire relaxation or even dropping, and resulting in loss of
control of the vehicle.
3. When the tire-tread wear is over 2mm, please replace with a new tire. (Please seek assistance
from qualified technician or local retailer for replacement.
Operating
Inspection before riding
Idling inspection
1. Stabilize the vehicle
,
and make sure it moves normally and without interference.
2. Check whether the rear shock absorber is deformed or leaking.
3. Hold the vehicle when checking.
4. Repair and replace parts when worn or broken.
5. Contact your local retailer if you are unable to resolve any issues.
Front brake inspection
Check whether the front brakes are firm, the braking effect is valid.
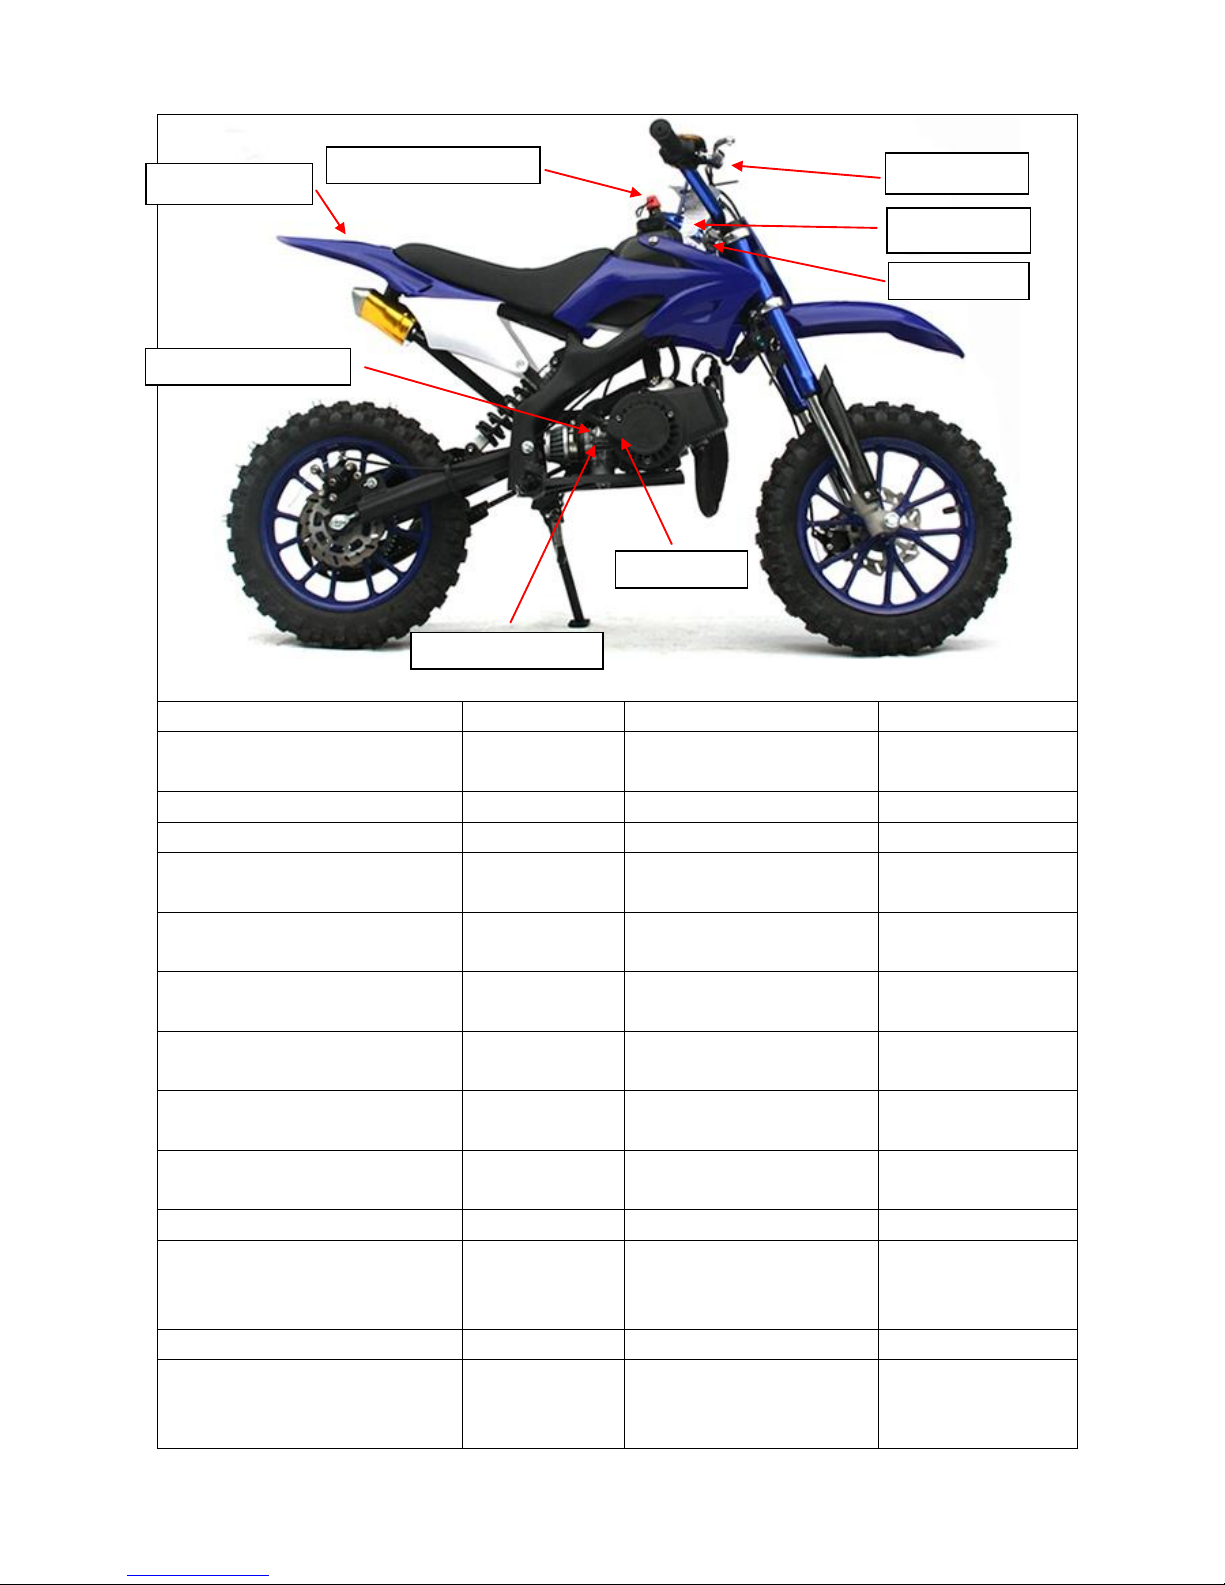
1. Front brake handle is mounted on the right side of the handlebars.
2. Check if the tire rotation is good after releasing the brake lever
3. Contact the retailer if brake maintenance is needed.
4. The front brake lever has a parking feature as well. Use it when parking.
Rear brake inspection
Check whether the rear brakes are firm, the braking effect is valid.
1. The rear brake is mounted on the left side of the handlebars, or on the right foot.
2. Release the brake lever or foot brake lever quickly and check if the tire rotation is good when the
pressure is released.
3. Contact the retailer if brake maintenance is needed.
4. Inspect the brake shoe regularly, and replace if brake pads are worn.
5. The rear brake lever has a parking feature as well. Use it when parking.

5
Tool bag inspection
Check whether tool bag is taken every time before riding.
The tool bag is equipped with some professional tools. You can use them when needed.
Self-protection inspection
Self-protection inspection is to help ensure a safe and fun riding experience. Please wear the proper
protective
clothing to ensure your safety.
Protective clothing consists of these parts below:
Every check and inspection step above is necessary. Danger exists when riding. Please conform to the
above process before riding and operating this vehicle. The warning label on the surface of the vehicle
includes important safety information. User must fully understand. This vehicle may cause extreme
injury and could even lead to death if the above mentioned procedure is not followed.
Starting
Following the steps below to start the engine:
1. Park the vehicle on the flat surface.
2. If the engine doesn’t start, please open the choke valve first. Try again. Close the choke valve, when
the engine runs steady.
3. At the beginning, turn the throttle slowly.
Training
If you don’t understand the information, please contact your local retailer to learn from a local
professional institution or the retailer.
How you operate the vehicle in the first 2 weeks may affect the vehicle future performance.
During this period, do not run the vehicle at full throttle.
After training period, maintain the vehicle according to maintenance. Keep the vehicle in good
condition.
Training is necessary. Improper operation will result in damage to the vehicle and can result in serious
injuries and death.
If the rider has no safety awareness or riding experience, please operate the vehicle under the
supervision of an adult.
Riding
Before operating, please review the safety operating information.
1. Pay attention to the brakes working condition at all times.
2. Riding with only one hand is dangerous and forbidden.
3. Turn the throttle slowly. Never turn it suddenly.
4. Release the throttle and use the brake, to make it slow down.
5. Make sure both the front brake and the rear brake work at the same time when braking.

6
6. Do not make dangerous movements while riding to ensure safety.
Parking
1.Turn back the throttle and brake at the same time.
2.Parking function is recommended to avoid sliding.
Cleaning
After every ride, the rider should clean the vehicle. Always place the vehicle on flat surface to clean, and then
check.
1.High pressure air or water will harm the vehicle.
2.Chain should be always lube with chain lubricate.
Storage
The performance will be reduced if you do not use vehicle for a long time and properly prepare the vehicle.
Before storage, vehicle must be checked to ensure it is in a good condition.
1.Clean the vehicle, and then wax its surface.
2.Clean the chain, and then lubricate it.
3.Lubricate all the cable parts.
4.Drain fuel from carburetor.
5.Place the vehicle well-packed in a cool ventilated place to avoid damp and sun exposure.
Transport
Transporting the vehicle
1. Ensure the vehicle is well protected.
2. Ensure the vehicle is secured properly.
3. Handle with care.
Delivery
Delivery of the vehicle
1.Ensure the vehicle is placed properly. Do not turn it upside down or lay it on its side.
2.Ensure the vehicle is secured properly.
3.Handling with care.
Maintenance
If you do not understand the information please contact local retailer.
Necessary maintenance is the important to keep the vehicle in good condition. Please maintain the vehicle
according to list.

7
Engine maintenance: After every riding, please close the switch of carburetor and fuel.
Release the fuel. This is very important.
If you don’t do it accordingly, the vehicle will not be
easy to start after it has been placed for a long time, or carburetor will leak.
Maintenance list (Please operate according to maintenance list)
I: Inspection, Maintenance or lubricant replacement C: Cleaning L: Add lubricant
After every ride
30days after driving
Each year
Fuel System
I
I&C
Throttle
I
I
Air filter
I&C
After every ride
After every ride
spark plug
I
I
carburetor
I
I&C
chain
I&L
I&L
Brake pads
I
brake system
I
I
I
Nuts and bolts
I
I
Tire
I
I
I
Steering system
I
I
suspension system
I
I
I
Battery (if available)
I

8
PRODUCT NAME
DIRT BIKE
PRODUCT MODEL
SX50
LENGTH X WIDTH X HEIGHT
(mm)
1200×600×810
ENGINE MODEL
1E44F-6
AXLE BASE (mm)
820
BORE×STROKES
44.015
×
33±0.06
WHEEL BASE (mm)
/
DISPLACEMENT (ml)
50.53
MIN GROUNDCLEARANCE
(mm)
190
COMPRESSION RATE
8:1
TURNING CIRCLE DIAMETER
(mm)
2900
UNLOADING AND
ROTATE SPEED(r/min)
2800±150
DRY WEIGHT (kg)
21
RATED POWER Kw
(r/min)
1.4/7000
THE WEIGHT OF FULL
FURNISHMENT (Kg)
22
MAXIMUMTORQUE
N.m (r/min)
2.2/5500
RATED LOAD QUALITY (kg)
25
CARBURETOR TYPE
H117A FLOAT
(PLUNGER)
MAXIMUM SPEED (Km/h)
40
CLUTH TYPE
AUTOMATIC
CENTRIFUGAL
OILTANKCAPACITY (L)
1.7
SPARK PLUG TYPE
BM6A
FRONT/REAR SHOCK
ABSORBER TYPE
SPRING
MUFFLER TYPE
IMPEDANCE
COMPOUND
MUFFLER
FRONT/REAR BRAKE TYPE
DISC BRAKE
STARTING MODE
PULL START
FRONT/REAR BRAKE
OPERATION MODE
BY HAND
IGNITION MODE
NONE-TOUCH
MAGNETIC
CONTROL
Pull Starter
Rear Brake
Key switch
Safety KILL switch
Warning labels
plate
Front brake
Carburetor choke
Fuel shut off valve

9
FRONT/REARTIRE
SPECIFICATION
2.50—10
DRIVE MODE
CHAIN DRIVE
RONT/REARTIRE
PRESSURE
248
LUBRICATION MODE
PETROL MIXED
LUBRICATE
FRONT/REAR RIM TYPE
ALLOY RIM
COOLING MODE
AIR-COOLED
HEADLIGHT SPECIFICATION
/
FUEL GRADE
91#
PRIMARY REDUCTION RATIO
3.20
MIXTURE RATIO OF
FUEL &LUBRICANT OIL
1:25
FINAL REDUCTION RATIO
4.91
LWA dB(A)
78
DRIVE RATIO
15.71
VIBRATION(m/s
2
)
1.0
CIRCUIT DIAGRAM
Table of contents
Other SSR Motorsports Bicycle manuals
Popular Bicycle manuals by other brands

Jorvik
Jorvik Jet-E1 user manual

Schuchmann
Schuchmann MOMO Instructions for use

Specialized
Specialized S-WORKS SL2 Instruction guide

Worksman
Worksman PORTOTRIKE PT, PORTOTRIKE PT2F, PORTOTRIKE PTCB, PORTOTRIKE PT2CB, PORTOTRIKE... owner's manual

Giant
Giant REVEL 0 W datasheet

Rollplay
Rollplay Planado Assembly instructions