Staaker 820101 User manual

Staaker 1
User manual
Draft20170721

Using this manual
Read the Staaker 1 user manual before flying the drone for the first time. Before flight, learn
how to operate the drone and be aware of any local laws regarding flight of drones in your area.
Document revision: 1.0 (12.07.2017)
This document is subject to change. Download the latest digital version of the document at
www.staaker.com.
Legend
••Warning
Explains something that, if not obeyed, could cause serious injury to people or damage
to equipment.
⚠Important
Describes extra important information that you should take note of when using the
product.
Hints and Tips
Information that can improve user experience and improved video footage.
2

Introduction
We have tailored this autonomous follow drone to capture all your activities, moments and
beautiful places in the best possible way.
It consist of a tracker that is placed on your wrist and a quadcopter with a camera (camera not
included). With the touch of a button, it follows and films you automatically.
The Staaker drone follows whomever or whatever is wearing the tracker by itself. Using the
tracker, Staaker follows you and takes care of the filming automatically, even if you are alone.
Choose from 4 different tracking modes as well as Scenery mode. By using the tracker you can
always adjust the angle, height and distance of your Staaker relative to you.
3

Terminology
Emergency Landing: When the drone automatically lands due to low battery, sensor failure or
an abnormal system error.
Barometer: A sensor device that measures air pressure. Can be used for determining altitude
above average sea level. Both the Staaker drone and Tracker are equipped with this sensor.
GPS: Abbreviation for Global Positioning System. Both the Tracker and Staaker drone use GPS
for navigation and positioning. The system uses in reality multiple GNSS systems , but in this
1
document this is referred to as just GPS for simplicity.
Gimbal: Camera stabilization module for improved video footage and framing.
LED: Abbreviation for light-emitting-diode, a lamp located on the bottom of the Staaker drone.
Locate Staaker: A menu option on the Tracker for locating the Staaker drone. Requires GPS
on the Tracker.
Return to Home: A procedure where the drone flies back to a designated location and lands.
RTH: Abbreviation for Return to Home. (See Return to Home)
Smart Battery: The Staaker is equipped with an intelligent battery that measures voltage,
current and temperature on all 4 cells.
Staaker Drone: Auto-follow drone equipped with 3-axis gimbal and camera.
Takeoff Mode: One of three ways to make the drone takeoff and begin flight: Quick Staak
(normal use), Water Staak (use in watersports) and Pro Staak (for expert users).
Tracking Mode: Autonomous follow modes, Follow, Compass, Hover, Circle and Scenery
Tracker: Handheld wrist device which is used to remotely control the Staaker drone.
1Staaker utilizes American GPS, Russian GLONASS, Chinese BeiDou-2 and SBAS such as
EGNOS and WAAS
4

Table of Contents
Using this manual 3
Legend 3
Introduction 4
Terminology 5
Table of Contents 6
Safety and disclaimer 10
Staaker Drone 11
Status LED 12
Unfolding the drone 13
Gimbal 14
Camera protection 14
Camera installation guide 14
Battery insertion and removal 17
Warning 18
Tracker 19
Emergency kill switch 20
Tracker Radio Signals 20
User Interface 21
Navigating the Main Menu 22
Quick Staak 22
Water Staak 22
Pro Staak 23
Calibrate Altitude 23
Locate Staaker 23
Pairing 24
About 24
Pro Staak Settings 25
Return to Home (RTH) 25
Track Altitude 26
Responsivity 26
Fuse GPS Alt 26
Faster Altitude 27
Takeoff 27
Tracking 29
Landing 31
Land now 31
Return To Home (RTH) 32
Pause/ Unpause 33
Mounting the Tracker 33
Attaching the strap 34
Charging the Tracker 34
How to use the Staaker 35
Before use 35
5

Check list 35
Things to be aware of while flying 35
Flying above water 36
What is a safe Takeoff location? 36
Takeoff 37
Flight 37
Tracking modes 38
Compass 38
Follow 38
Circle 39
Scenery 39
Hover 40
Drone Smart Battery 41
To turn the power on 41
To turn the power off 41
To check the capacity 41
Charging 42
Battery failure 43
Storage 43
Battery Warnings 43
Maintenance and repairs 44
After flight 44
Warranty warning 44
Replacing arms 44
Replacing Gimbal 44
Replacing landing gear 45
Motors 45
Propellers 46
Staaker tips 47
Camera tips 47
Drone Tips 47
Troubleshooting 48
Error Messages 48
Before or during takeoff 48
Under Flight 50
Land reasons 51
Return to home (RTH) reasons 52
Tracker cannot connect to the drone 53
Staaker Assist problems 53
System cannot get GPS reception 53
Tracker looses connection to the drone often 55
The drone landed or crashed and I cannot find it 55
The drone changes altitude too much 55
The drone does not always respond to my button presses 55
The drone crashed for unexpected reasons 55
Staaker Assist 56
Flight logs 56
Firmware update 57
6

Terms & Warranties 58
Assumption of risks 58
Product warranty and return 59
Limited One-Year Warranty 59
Warranty Exclusions 59
Return of products 60
Indemnity 60
Limitations of Liability 60
Software License 61
Dispute Resolution 61
General Terms 64
Technical Specifications 65
PRODUCT FEATURES 65
Staaker Drone 66
Tracker 67
Smart Battery 67
Smart Battery Charger 67
CE, FCC and IC compliance 68
CE 68
FCC Compliance Statement 68
FCC Modification Statement 68
FCC Interference Statement 68
Industry Canada Notes 69
About Staaker 70
Customer Support 70
7

Safety and disclaimer
1. Read the complete manual before using the product.
2. The user holding the tracker controlling the drone is legally the pilot of the drone. The
pilot is responsible for safe usage and consequences of unsafe usage of the drone. The
Staaker Company is not responsible for any injury, damage of property or harm caused
by usage of the drone.
3. Always check and follow all local regulations and laws for flying unmanned aerial vehicle
when using the Staaker.
4. Do not use the drone within designated No-Fly zones like areas close to airports and
heliports.
5. Do not use the drone close to obstacles.
6. Do not use close to man-made structures (e.g vehicles, buildings, power lines) and
areas with high level of interference (e.g radio transmission towers).
7. Do not use the drone over people, animals, urban areas or trafficked roads.
8. Do not breach the bounds of privacy. Ask for permission before flying on private
property.
9. Keep the drone in line of sight at all times.
10. Do not use the drone in weather or lighting conditions that result in reduced visibility.
11. Do not use the drone in wind conditions exceeding 10 m/s, or in other severe weather
conditions.
12. Do not use the drone while under the influence of drugs or alcohol.
13. Make sure that the drone is in good condition when using it.
14. Only use genuine certified Staaker replacement parts.
15. The appliance is not intended for use by persons (including children) with reduced
physical, sensory or mental capabilities, or lack of experience and knowledge, unless
they have been given supervision or instruction concerning the use of the appliance by a
person responsible for their safety.
8

Staaker Drone
The Staaker drone is a quadcopter powered by a Smart Battery and carries a 3-axis
stabilization gimbal equipped with a camera (camera not included). The drone is foldable and
compact, designed to be durable and lightweight. The drone is equipped with an intelligent
autopilot to aid you in flying the drone and keeping you always in the video frame.
The Staaker drone is pre-calibrated and tuned. This means no extra technical setup is required
and the drone is ready to fly out of the box!
⚠Caution! The ESC cooling plate may be hot after flight.
9

Status LED
The multi-coloured status LED is located on the bottom of the Staaker drone. The LED indicates
if the drone is ready to fly or not. The led is only on when the drone is powered.
Status light
Description
Blinking yellow light
Drone is powered on and searching for GPS
Blinking green light
Drone has sufficient GPS and ready for
takeoff
Blinking red light
Drone has an error, check tracker for
message
Status light during flight
Description
Steady yellow light
Drone has lost GPS and is landing
Steady green light
Everything ok
Blinking red light
Drone has a problem or is running low on
battery, check message on tracker
10
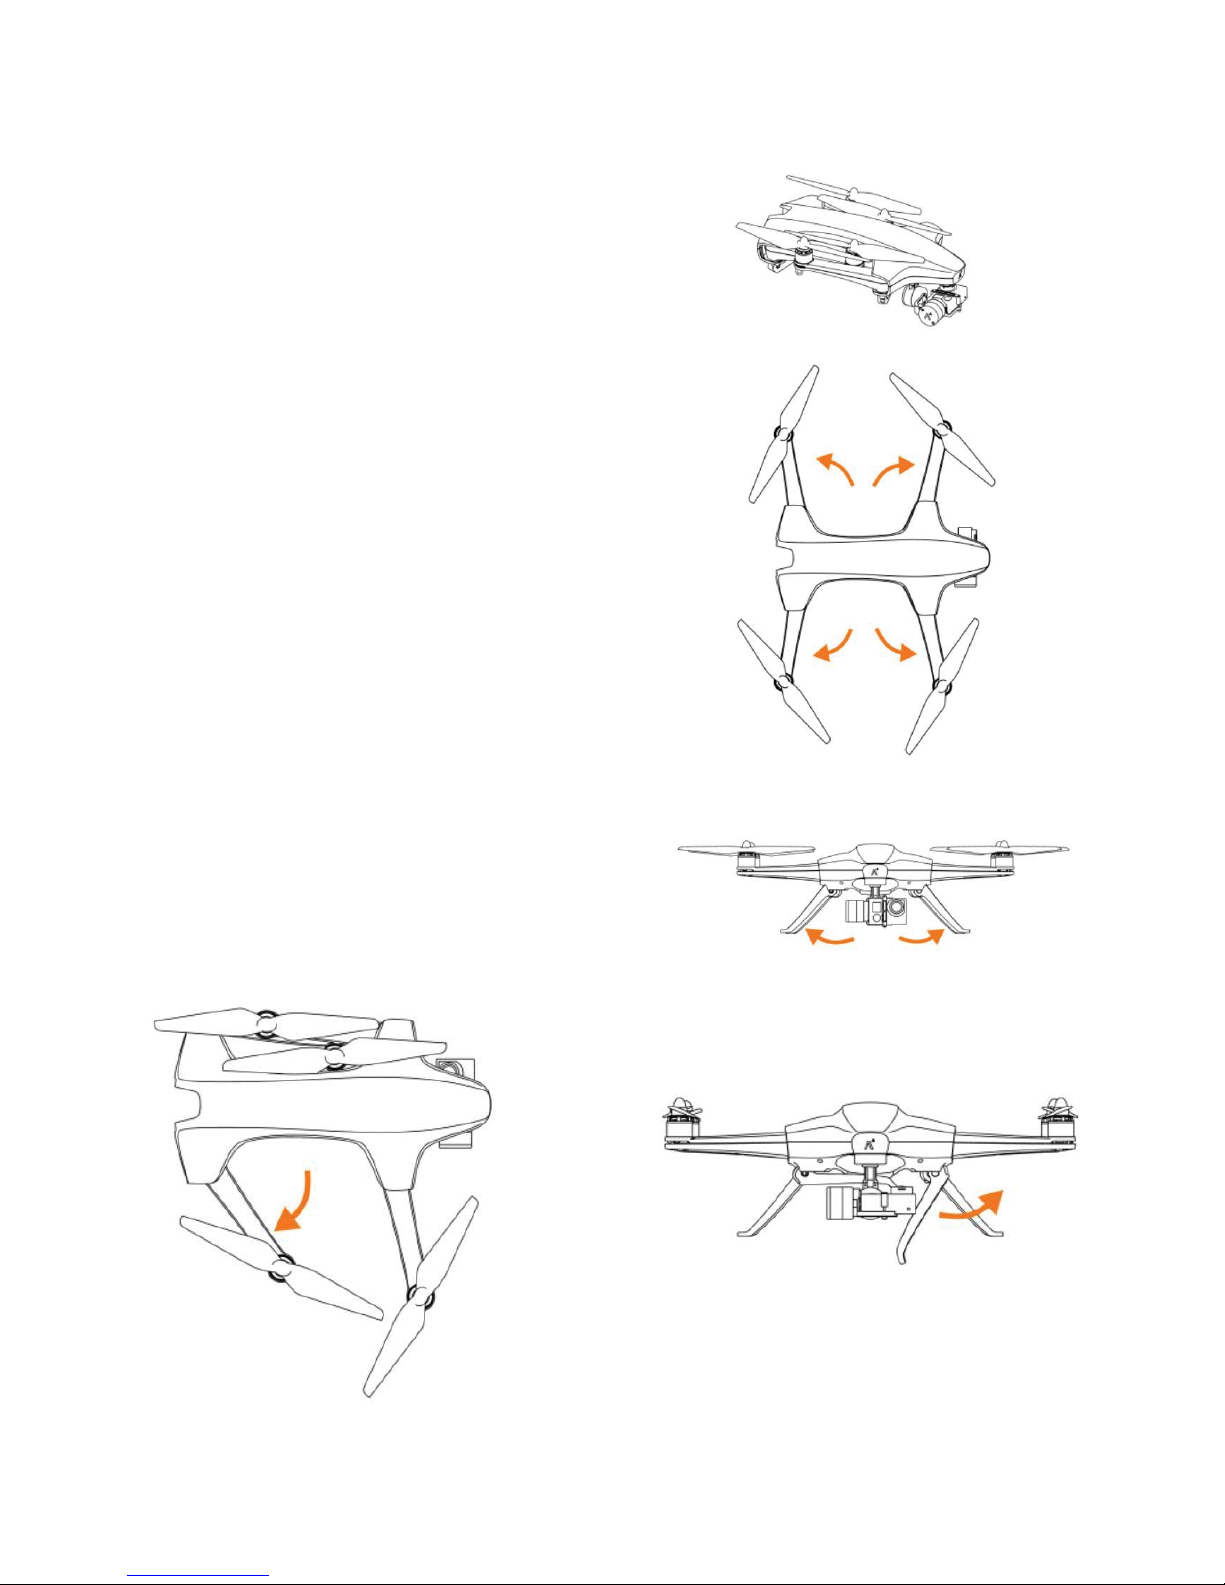
Unfolding the drone
Unfold all arms first and then secure them by
pulling out the landing gear. It is important that all
arms are unfolded completely (reaching endpoint)
before the landing gear is pulled out. This will
ensure the arms are completely locked and
prevent vibrations which degrade flight
performance and video quality. Check that all
arms are tightly locked in extended position before
fight.
11
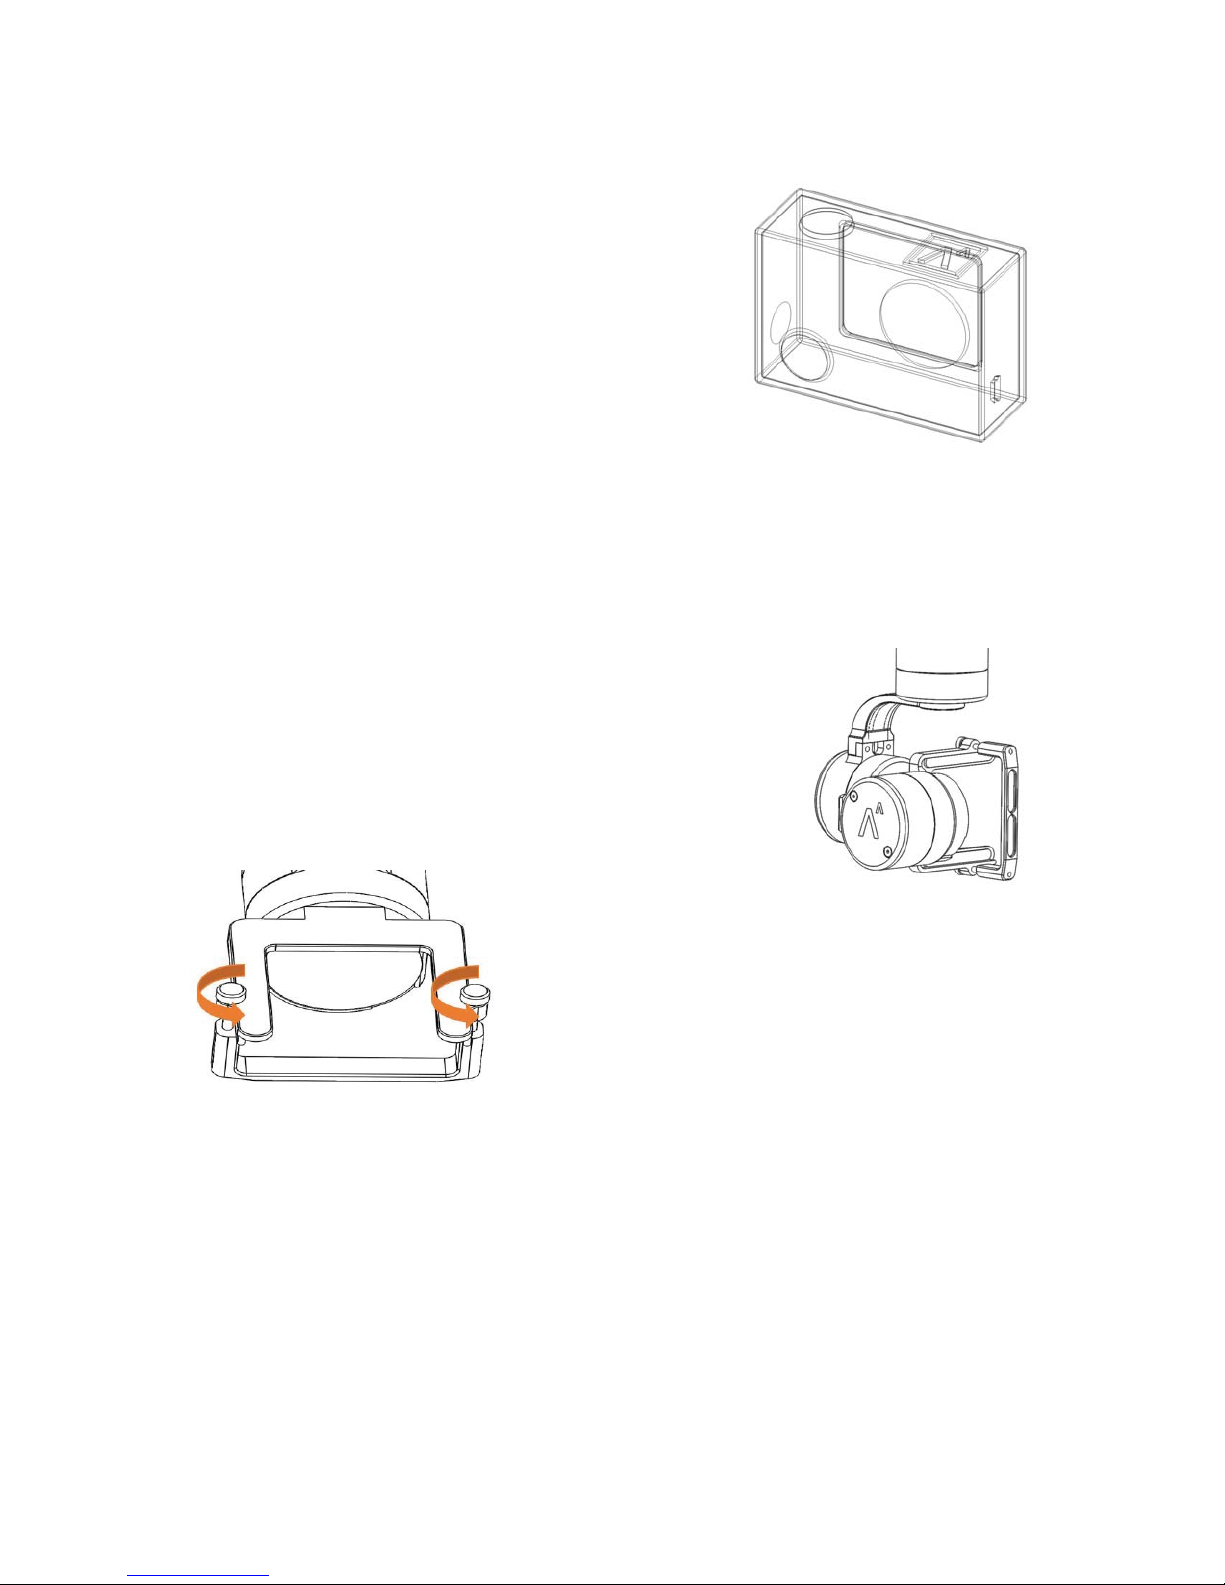
Camera protection
We always recommend to use the protective Staaker
camera cover on Gopro 3 and 4 to make the camera
water and dust resistant.
Gimbal
The gimbal eliminates vibrations and makes a steady
video footage. The Staaker 3-axis gimbal supports the
following cameras:
- GoPro Hero 3 (all versions).
- GoPro Hero 4 (all versions).
- GoPro Hero 5 black.
- Garmin VIRB ultra 30
Camera installation guide
1. Make sure the drone is powered off
2. Place the gimbal in the right orientation, logo on the
gimbal should be on the drone’s right side.
3. Loosen the two screws on the camera holder so the
camera fits in the holder.
4. Insert the camera in the middle of the holder.
12

⚠NB! Be sure it’s inserted all the way in and is aligned with the edge where it stops.
5. Tighten the two screws on the camera holder and check if the camera is not loose.
6. Insert the power cable to the Gimbal and the camera(only for GoPro 3 and 4).
13

Tip: Lead the charging cable between the
camera and the screw before inserting the
camera to better secure the cable.
14
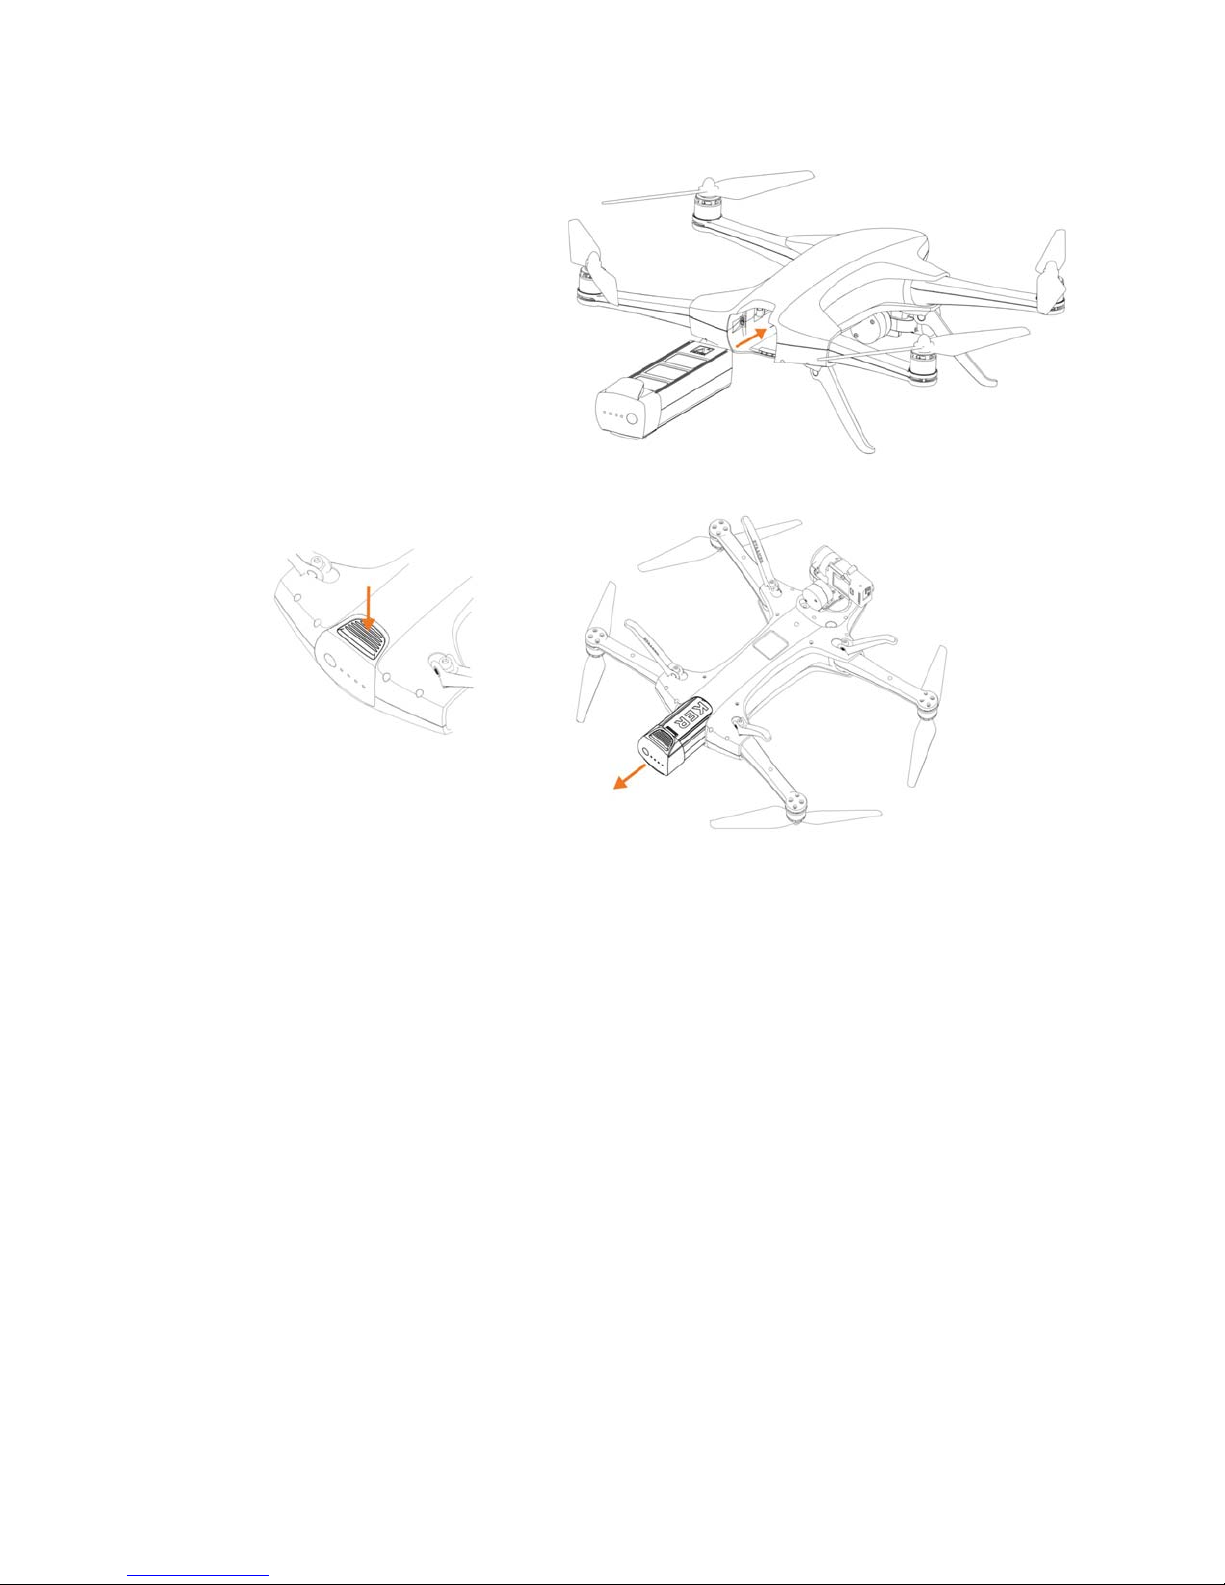
Battery insertion and
removal
The battery is inserted in the back of
the drone. Push the battery all the way
in so it is secured by the battery lock.
To take it out, pull the battery while
pressing the battery lock button.
••If the battery is not properly secured, there’s a risk that it may fall out during flight.
This can happen if the battery is not fully inserted or damaged. Always be sure it is
locked as this affects your and others' safety.
15

Warning
••If drone is unfolded incorrectly, battery not inserted properly or the camera is not
secured it may cause unsafe flights, damages, bad video quality and uncontrolled crash
landings.
⚠Do not power on the drone without a camera mounted in the gimbal. The gimbal
will spin erratically without the counter-weight from the camera and can damage your
equipment.
••Do not modify or tamper with the drone or attempt to use non-authorized Staaker
replacement parts. Attempting such modifications can interfere with on board sensors
and severely degrade flight stability. Do not attach other modules on the drone, such as
additional cameras, magnetic materials or radio-emitting telemetry.
16

Tracker
The Tracker is the technology that replaces an ordinary remote-control. It has multiple buttons
for navigating the menus and controlling the Staaker in flight. The screen displays the current
state of the drone and tracker.
ڹ
ڹۃUp/Down: Used to navigate menus or increase/decrease altitude of the drone.
ΛV Further away/Closer: Two buttons located on the left side of the tracker. Used for placing
the drone closer or further away from the tracker.
< > Left/Right: Two buttons located on the face pointing against you. Used for orbiting the
drone left or right around the tracker.
Mode: Used for navigating menus (same as up/down) and changing tracking modes. It Is also
used for going back to the previous menu.
On/Off: A single button located on the right side of the tracker. Pressing this button will
instantly the power on or off.
•
••Select/Pause/Continue: This button confirms a selection. A single press during flight will
pause the drone instantly and resume movement when pressed again. Holding this button down
under flight will display the land menu.
17
Emergency kill switch
There is a “Kill switch” functionality that instantly cuts the power from the drone motors, for use
in dangerous situations as a last resort.To execute the “Emergency kill switch” press and hold
ڹ
ڹ(up) and ۃ(down) at the same time for 3 seconds. This will make the drone cut all power
from the engines.
⚠By activating the Kill Switch, the motors will instantly power off and the drone will
fall to the ground if it is in the air.
If the drone detects that it has crashed, it will
automatically turn off the motors to reduce damage.
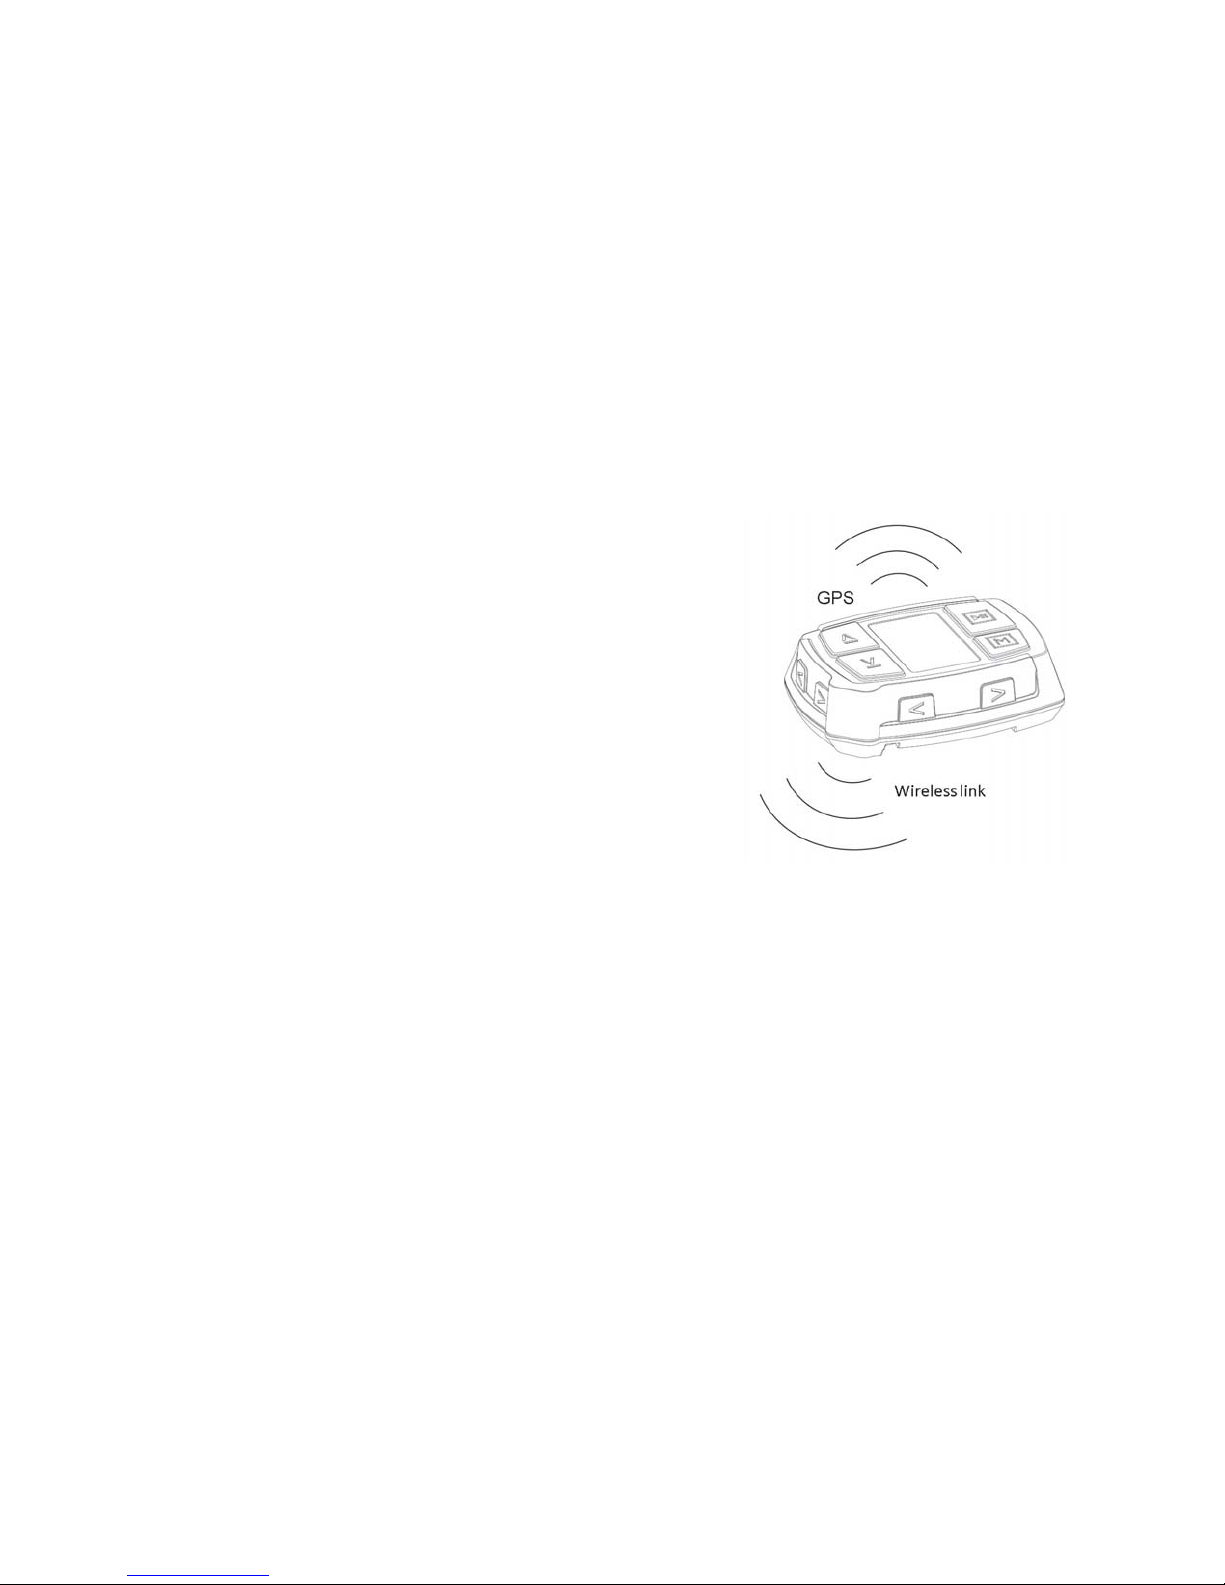
Tracker Radio Signals
The tracker has multiple sensors inside to read your
movements, the GPS is the most important one. Illustration
shows where on the tracker that the wireless signals to the
Staaker is being sent from and the GPS location. These
locations should be unobstructed while flying the drone.
⚠Loss of radio link will make the drone hold its
current position until radio link is recovered. If the
battery level on the drone is too low, the drone will land on its current position. If the
drone is in Water Staak mode or Pro Staak mode with Return to Home enabled it will
Return to Home instead. If you fly the drone out of range in Scenery mode, the drone will
engage Return to Home.
⚠If the tracker loses GPS signal the drone will stop following you and the drone will
enter Scenery mode under your control.
For optimal radio link range between drone and tracker, the wireless link on the
tracker should have clear line of sight to the drone.
18

User Interface
This section describes how to use the user interface on the tracker and explains how to
navigate through the different screens that are available. When you power on the tracker, the
following screen should appear:
If the Tracker has no connection with the drone (as shown by the radio signal
strength indicator on the bottom left on the screen), the tracker does not know the
current battery status of the drone. Note the status bar on the bottom of the screen:
19
Navigating the Main Menu
The main menu is the initial screen state on the tracker. You can navigate through the menu by
either pressing the ڹ
ڹor ۃbuttons or the button. Pressing • •will open the current selection.
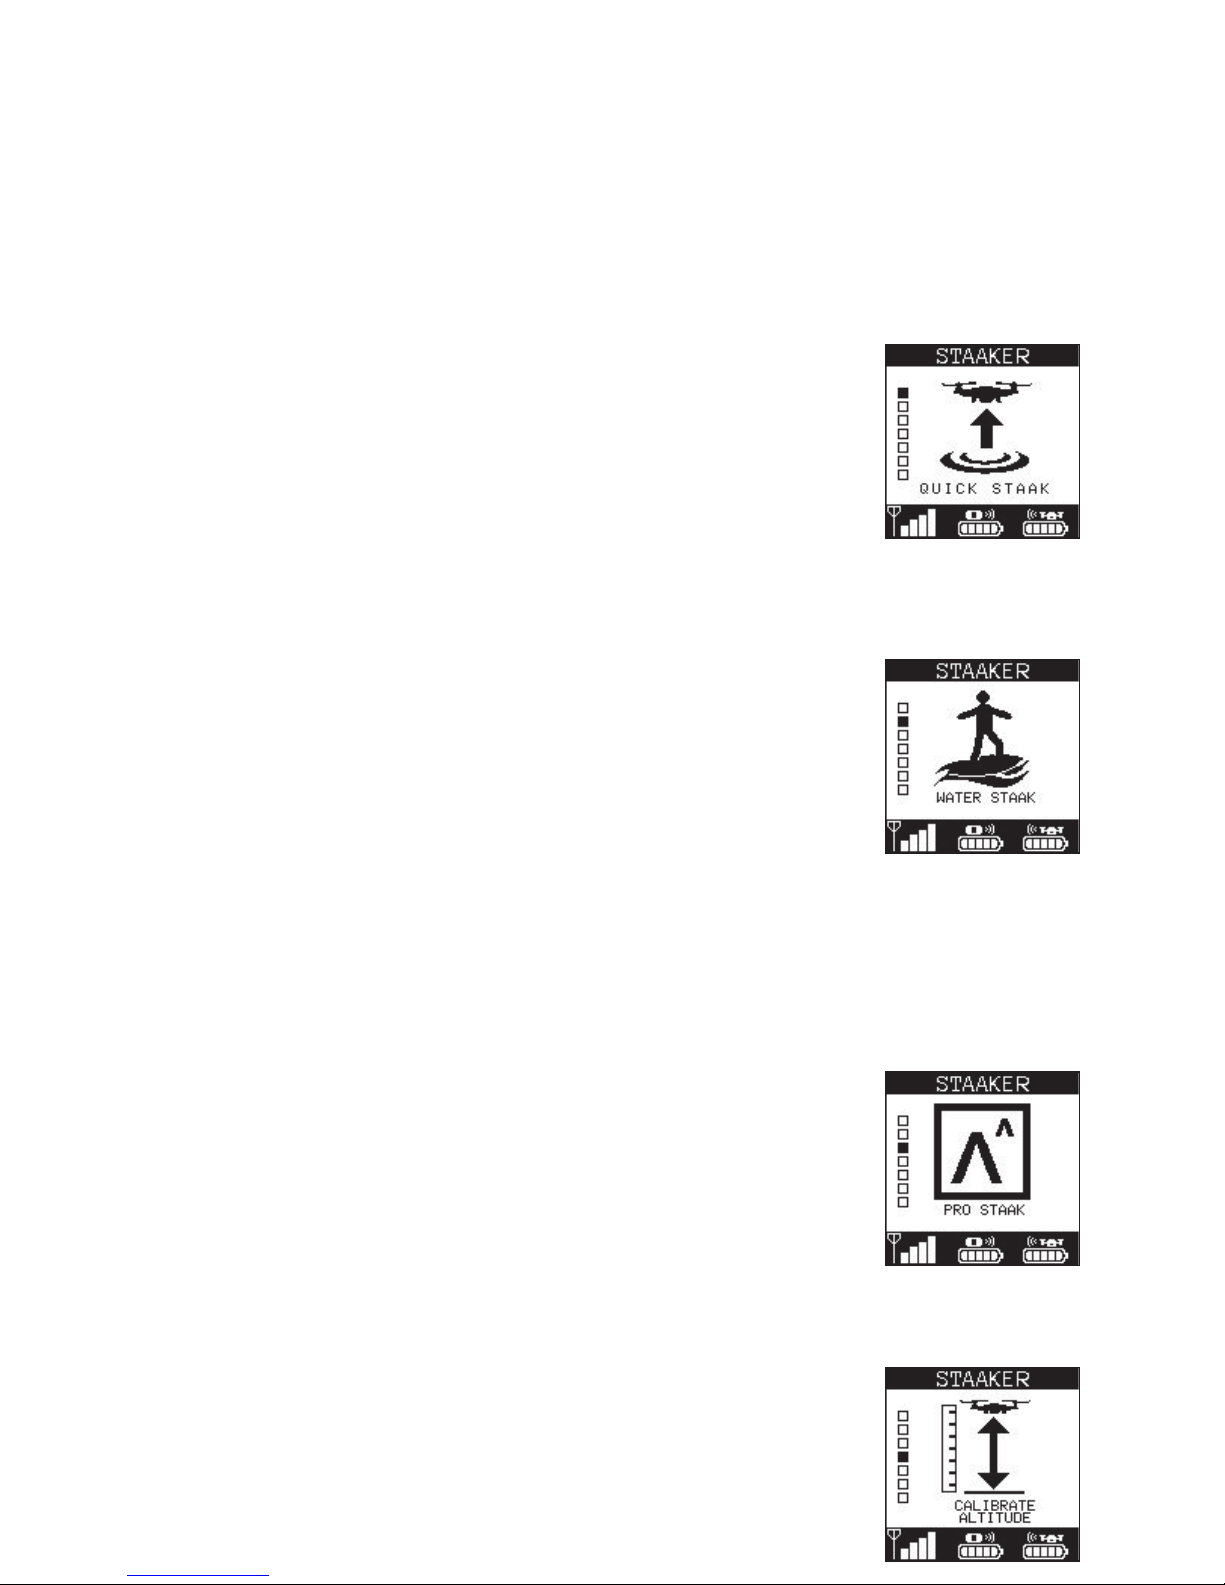
Quick Staak
Quick Staak is a default and easy preset that fits most use scenarios on
land. It is the fastest way to get your camera tool up in the air ready to film
your adventure. If this is you first time using Staaker we recommend to
use Quick staak on land the first times to get use to the drone and using
the tracker. Do not use this mode when the tracker is used for water
sports.
Water Staak
Water Staak is made for flying over water or other places where you do
not need the drone to follow your vertical movements. In this mode the
drone will not change altitude when the tracker changes altitude. The
drone will automatically Return to Home (RTH) when battery is low. The
drone will also Return to Home if it loses connection with the tracker. This
mode should be used when doing watersports.
⚠NB! In Water Staak the drone automatically engages Return to
Home at 40% battery level. This means that if you discharge 60% of the battery by
moving directly away from the takeoff location, the drone might not have enough battery
to fly completely back to home and will land on its current location when battery reaches
0%. You can abort any Return to Home at any time as long as the tracker has radio
connection with the drone.
Pro Staak
Pro Staak is an expert mode where you can tailor advanced settings to fit
your specific needs. The default settings in Quick Staak and Water Staak
are our recommended settings for stable flight performance and good
video output. See the Pro Staak Settings for more information about Pro
Staak and the various expert user settings.
Calibrate Altitude
The drone uses barometers to track vertical movements. The sensor
operates differently based on temperature and local weather variations.
20
Table of contents
Other Staaker Drone manuals


