Stahlwerk SW500 User manual

Read me first
Congratulations with the purchase of your Stahlwerk SW
-
500 floor
sweeper. We at Stahlwerk Germany always offer you the very best quality
available to assure safe and successful use. However we urge you to read
this manual with great care before use.
FLOOR SWEEPER
SW500

1
INSTRUCTION ....................................................................................................................2
PRESERVATION OF MANUAL....................................................................................2
CONFIRMATION INFORMATION................................................................................2
ATTENTION..................................................................................................................2
OTHER REFERENCE MANUAL..................................................................................2
SPARE PARTS AND MAINTENANCE .........................................................................3
AMENDMENT AND IMPROVEMENT..........................................................................3
SAFTY..................................................................................................................................3
CONTENT AND PURPOSE .........................................................................................3
SYMBOLS ....................................................................................................................3
SAFETY REQUIREMENTS FOR BATTERIES............................................................5
GENERAL SAFETY REGULATIONS...........................................................................6
MACHINE DESCRIPTION...................................................................................................6
OUTER PACKING OF MACHINE ................................................................................6
PERFORMANCE..........................................................................................................7
CONTROL PANEL........................................................................................................7
OPERATION.................................................................................................................8
MACHINE OPERATION PRECAUTIONS....................................................................9
MACHINE PRESERVATION AND MAINTENANCE ..................................................10
MAIN BRUSH HEIGHT INSPECTION AND ADJUSTMENT .....................................10
MAIN BRUSH REPLACEMENT............................................................................... 111
SIDE BRUSH HEIGHT ADJUSTMENT......................................................................12
SIDE BRUSH REPLACEMENT .................................................................................12
VIBRATION.................................................................................................................13
FILTER CLEANING AND INSPECTION ....................................................................13
BATTERY CHARGING...............................................................................................14
EMPTY THE DUSTBIN ..............................................................................................14
WATER INJECTION...................................................................................................15
SQUEEGEE INSPECTION AND ADJUSTMENT ...................................................... 15
MAINTENANCE.................................................................................................................16
USE CONDITIONS.....................................................................................................16
MAINTENANCE SCHEDULE.....................................................................................16
TOUBLESHOOTING ..................................................................................................17
SPECIFICATIONS......................................................................................................18

2
INSTRUCTION
The manual will provide necessary information for customers to use machines
safely, conveniently and correctly, including technical characteristics, operation
methods, machine storage, maintenance, spare parts and safety conditions.
Before using the machine, users and professional maintenance technicians
must read the manual carefully and use the machine strictly according to the
instructions in the manual. If you have any questions or get more details, please
consult the seller. The manual is specially provided for users and professional
maintenance/maintenance technicians. Operators must undergo professional
technical training, otherwise the manufacturer will not be responsible for the
loss.
PRESERVATION OF MANUAL
The manual must be placed in a safe and accessible area near the machine,
away from easily damaged areas such as liquids.
CONFIRMATION INFORMATION
The machine model and the year of manufacture are displayed on the
nameplate behind the machine.
Machine Model: SW500
Machine Number:
ATTENTION
This machine is suitable for industrial and commercial purposes, specially used
for cleaning hard floor in the room, and can not be used for other purposes.
Please use all recommended cleaning mats and brushes, as well as floor
cleaners for sale.
OTHER REFERENCE MANUAL
List of spare parts

3
SPARE PARTS AND MAINTENANCE
All necessary operations, maintenance and repair procedures must be
completed by trained operators or after-sales service centers. When
purchasing spare parts or requiring repairs with sellers, please inform the
machine model and fuselage number in detail.
AMENDMENT AND IMPROVEMENT
Our company often improves our products and keeps room for expansion, but
we are not obliged to make new improvements to the products already sold. If
there is any change in the content, please contact our after-sales service
department.
SAFTY
CONTENT AND PURPOSE
The following symbols indicate potential dangers. Read these instructions
carefully and take necessary precautions. The essence of the machine
operation manual is to prevent injury. Accident-free safety precautions are
necessary. Most accidents occur at work without paying attention to basic
safety rules. A careful and cautious user is the best guarantee against accidents,
even better than some other preventive measures. When using the machine,
we must pay attention to the people around you, especially the children.
SYMBOLS
DANGER!
This sign refers to a situation that is dangerous to the operator.
WARNING!
This sign refers to potential harm to people.
CAREFUL!
This sign refers to careful or important related notes or useful functions.

4
NOTE!
Please pay special attention to the above signs in the paragraph!
DANGER!
Detailed warnings and messages on the prevention of personnel and
machine damage hazards are as follows:
Please keep loose clothing, hair, fingers and other parts of the body away
from the air vent and any moving parts of the machine.
When the machine stops, remember to turn off the power.
Do not use the machine where the slope exceeds the rated value of the
machine.
Please read the maintenance and repair instructions carefully before
performing any maintenance and repair operations.
Please dont smoke while the battery is charging.
Do not use the machine in a very dirty area. If the road waste is thick, please
repeat the sweeping twice or more.
When using the machine, be careful not to cause injury to people, especially
children.
Do not place liquid containers on the machine.
The machine should be stored between - 10 and 40 degrees.
When using the machine, the temperature should be between - 10 ° C and
40 ° C.
Humidity should be between 30% and 95%.
Do not use the machine as a means of transport.
When the machine is not moving forward, do not let the brush continue to
rotate to avoid damage to the ground.
In case of fire, please remember to use powder fire extinguisher instead of
water.
Dont hit the shelves where there is a danger of falling objects.

5
Adjust the travel speed of the machine according to the adhesion of the
ground.
Do not change the safety guards of the machine; follow the maintenance
instructions procedure.
Do not move or change the Stahlwerk nameplate on the machine.
When the machine operation fails, make sure that the failure is not caused by
the lack of scheduled maintenance, and turn to Stahlwerk for help.
If some parts need to be replaced, you can purchase spare parts from the
original manufacturer or authorized dealer.
To ensure the proper operation and safety conditions of the machine,
professionals or service centers must follow the maintenance section of this
manual work.
Even if the machine is to be disassembled and scrapped, people should pay
attention to it as some harmful substances (such as batteries, waste oil, etc.)
shall be sent to a specific Center for treatment.
Machines equipped with lead (wet) batteries shall not be tilted more than 30 °
above the horizontal ground, so that the battery is highly corrosive acid will
leak. The machine must be tilted during maintenance. Please remove the
battery.
SAFETY REQUIREMENTS FOR BATTERIES
It is necessary to avoid the battery in low voltage state and charge it as soon
as possible.
The battery is 12V lead-acid maintenance-free battery.
To avoid leakage, keep the battery dry and clean, especially remove
pollutants such as metal dust.
It is forbidden to place metal parts (such as tools) on batteries in order to
prevent short circuit burnout of batteries.
When reclaiming batteries, please comply with local regulations.
It is forbidden to use open fire when handling and handling batteries.

6
The charging room should be well ventilated.
When the key switch is in the ON position, it is forbidden to connect or
disassemble batteries.
Before disassembling and assembling batteries, first disconnect the negative
(-) battery wire, and then disconnect the positive (+) battery wire. When re-
wiring, we must pay attention to the polarity of batteries, wrong wiring will
damage electrical components;
Avoid direct contact between positive and negative electrodes, because it will
cause high current short circuit, high heat and even the possibility of fire.
When the battery is charged, it generates explosive hydrogen, charges the
battery in a ventilated place, and keeps the lid open and away from the open
fire.
GENERAL SAFETY REGULATIONS
In addition to the provisions made in this specification, the required general
safety regulations and accident prevention guidelines must also be complied
with. Even if you have used a similar car before, please read the instructions
carefully. Reading the instructions in advance will save you a lot of time in the
future. Before you start using it, its vital for you to be familiar with all the
accessories and controls and their functions. Read the manual thoroughly so
that you dont get in a h urry when you turn it on.
MACHINE DESCRIPTION
OUTER PACKING OF MACHINE
When the machine arrives, please carefully check whether the machine itself
is damaged or not. If the damage is obvious, please keep the outer packing
carton so as to make the damage declaration to the freight company
immediately.
Please check whether the machine contains the following items:
Handbook for the Use of Sweeper
7
List of spare parts for floor sweeper
Floor sweeper spare parts
Start-up key
PERFORMANCE
The sweeper must be operated by qualified operator on flat concrete or
asphalt floor to sweep dust or light garbage.
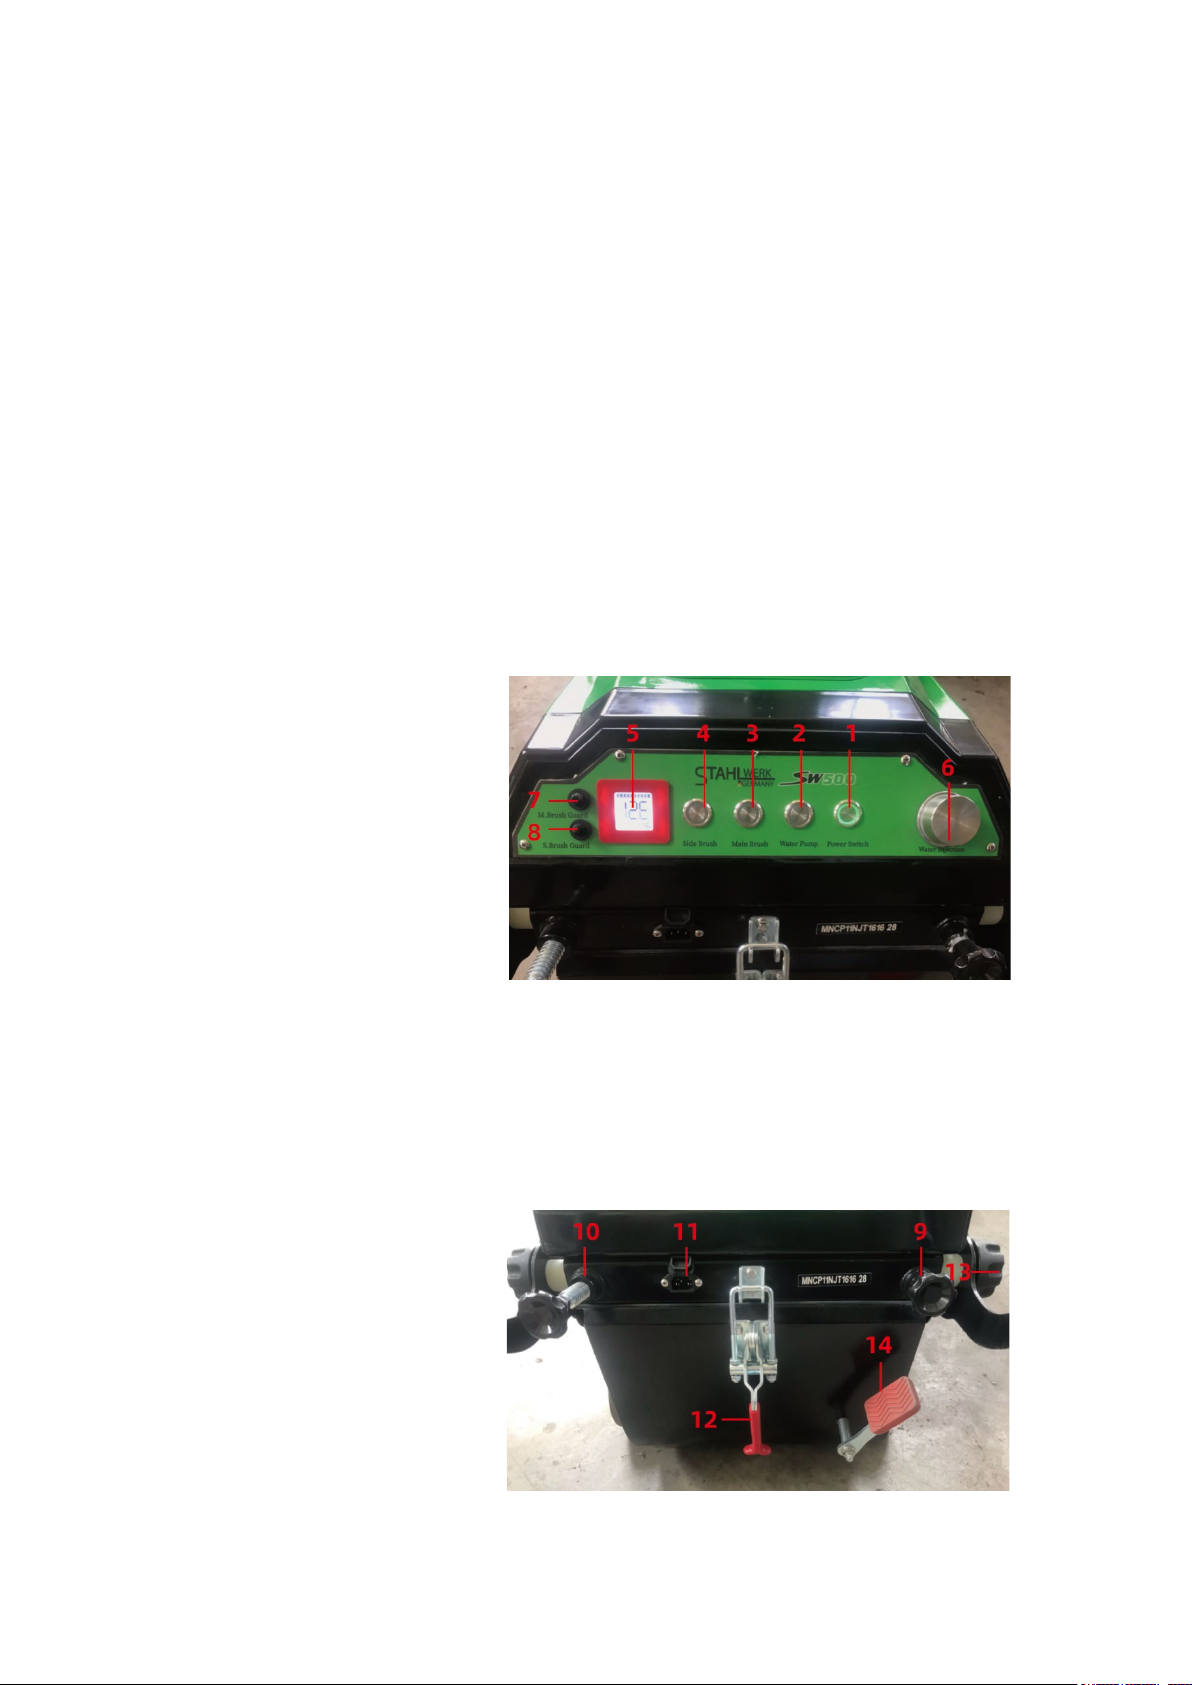
CONTROL PANEL(Figure 1 and 2)
1. Key switch
2. Water pump
3. Main brush button
4. Side brush button
5. Electric and voltage display
6. Water injection figure 1
7. Main brush protection
8. Side Brush protection
9. Main brush height adjuster
10. Side Brush height adjuster
11. Charging port
12. Dustbin handle
13. Armrest adjuster
14. Vibrating pedal figure 2

8
OPERATION
EVERY START
Insert the start key in the operation panel; turn the key switch to the "on"
position.
Three seconds later, the meter displays the battery power value. If it is fully
charged, it will display 100%; if it is under charged, it will display 20%, please
charge; otherwise, it will display the battery memorized during the last
shutdown.
CAREFUL!
Make sure that the dust bin is closed properly when the machine is in
normal operation.
If the machine is transported, check that all parts are moved during
transportation.
MACHINE START
Turn the start key to the "on" position.
Move the machine to the working area by pushing the push rod forward,
backward and turning.
Press the main brush function button and side brush function button to I to start
sweeping.
If the working environment is poor, stop sweeping after a certain time interval
(pull the vibrating handle).
Check the amount of garbage in the dustbin and empty it in time.
Check the water quantity and add water in time.
MACHINE STOP
Press the main brush and side brush function buttons to O.
Turn the start key to the "off" position.

9
MACHINE OPERATION PRECAUTIONS
NOTE!
In the process of work, determine whether to start the vibration device
temporarily according to the amount of garbage on the cleaned ground.
When the filter is blocked or the bin is full, the machine cant collect
the garbage. After each work, the dustbin must be emptied. (if the
dustbin is full in the work, please empty it immediately.) if the
temperature is lower than 0 ℃, please pay attention to drain the water
in the dustbin to prevent freezing!
WARNING!
Avoid stopping the machine at the same place for a long time and
rolling the brush; this will leave traces on the ground
When collecting large garbage, please remember to lift the front wheel
slightly and move forward. Note that it is only lifted for a short time.
In order to make the machine have a good cleaning, be sure to clean
the filter. Step the vibration on the side of the bin for about ten times
to shake off the dust on the filter.
CAREFUL!
Decide whether to clean the filter according to the dirt of the cleaned
area.
The dustbin must be emptied every time after working. When the main
brush and the side brush are worn, the screw at the rear of the
machine can be adjusted to lower the main brush and the side brush,
and the adjustment cannot be too low. Clean them to avoid burning
the fuse. (during the first cleaning, there is no need to adjust, and the
companys staff has adjusted it)
1
MACHINE PRESERVATION AND MAINTENANCE
If the machine will not be used within 30 days, follow the procedure below:
Store the machine in a clean and dry place.
Disconnect the battery connector.
First use
After the first use (the first 8 hours), it is necessary to check the following
operations:
Check the connection and fastening parts for looseness.
Check whether the visible parts are intact.
Check the main side brush for excessive wear.
WARNING!
To perform maintenance operations, the battery must be removed
when the machine is stopped (the start switch key is removed) and if
necessary. Therefore, please read the safety section of the manual
carefully.
MAIN BRUSH HEIGHT INSPECTION AND ADJUSTMENT
The height of main brush has been adjusted before leaving the factory. After
using for some time, the main brush will be worn and it is necessary to adjust
the brush. Turn the rotary handle at right hand anticlockwise to lower about
2mm, so that the main brush is 3-5mm in contact with the ground. (Figure 4)

1
Figure 3 figure 4
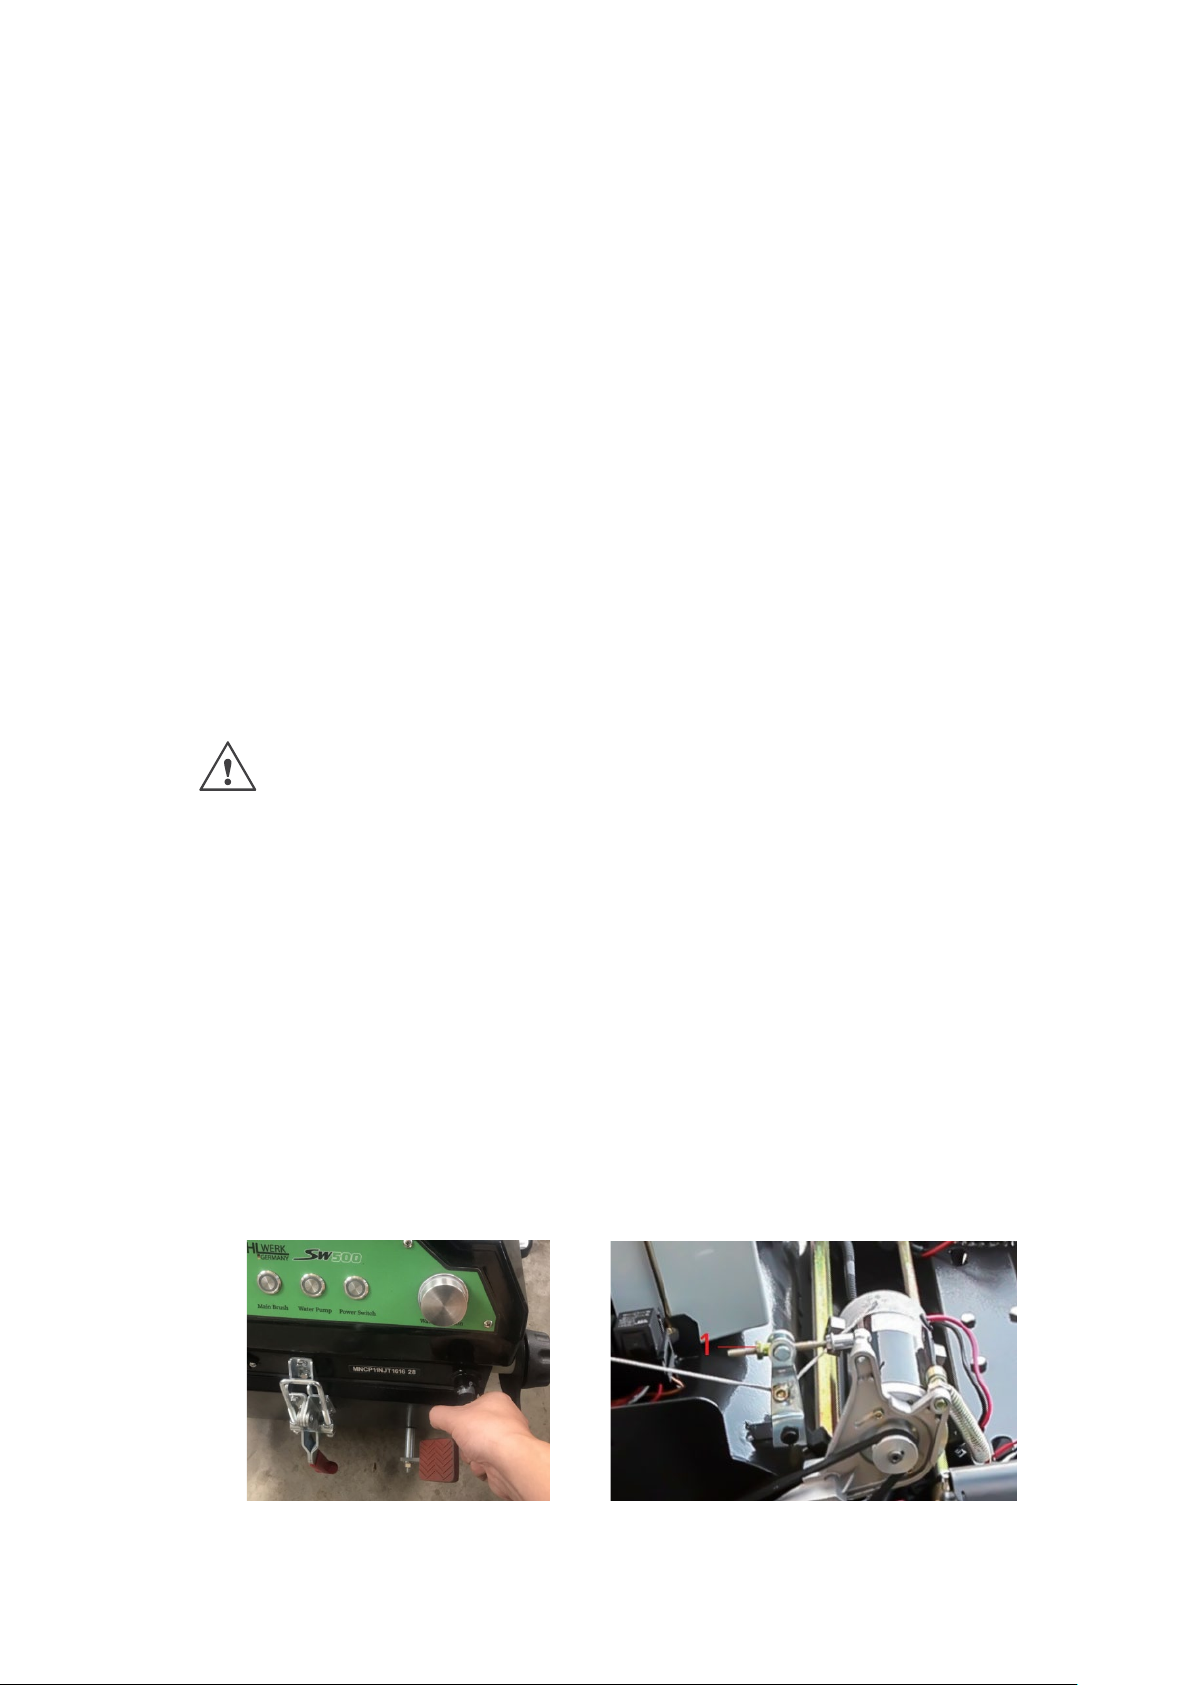
When the main brush is seriously worn and the rotating handle has turned to
the last stage, please open the front cover and adjust it as follows:
Adjust the right rotating handle to the initial position (Figure 3) turn the nut 1
clockwise (Figure 4) to make the main brush brush hair touch the ground for 3-
5mm
Cover the front cover properly
Repeat the last process (main brush height inspection and adjustment ).
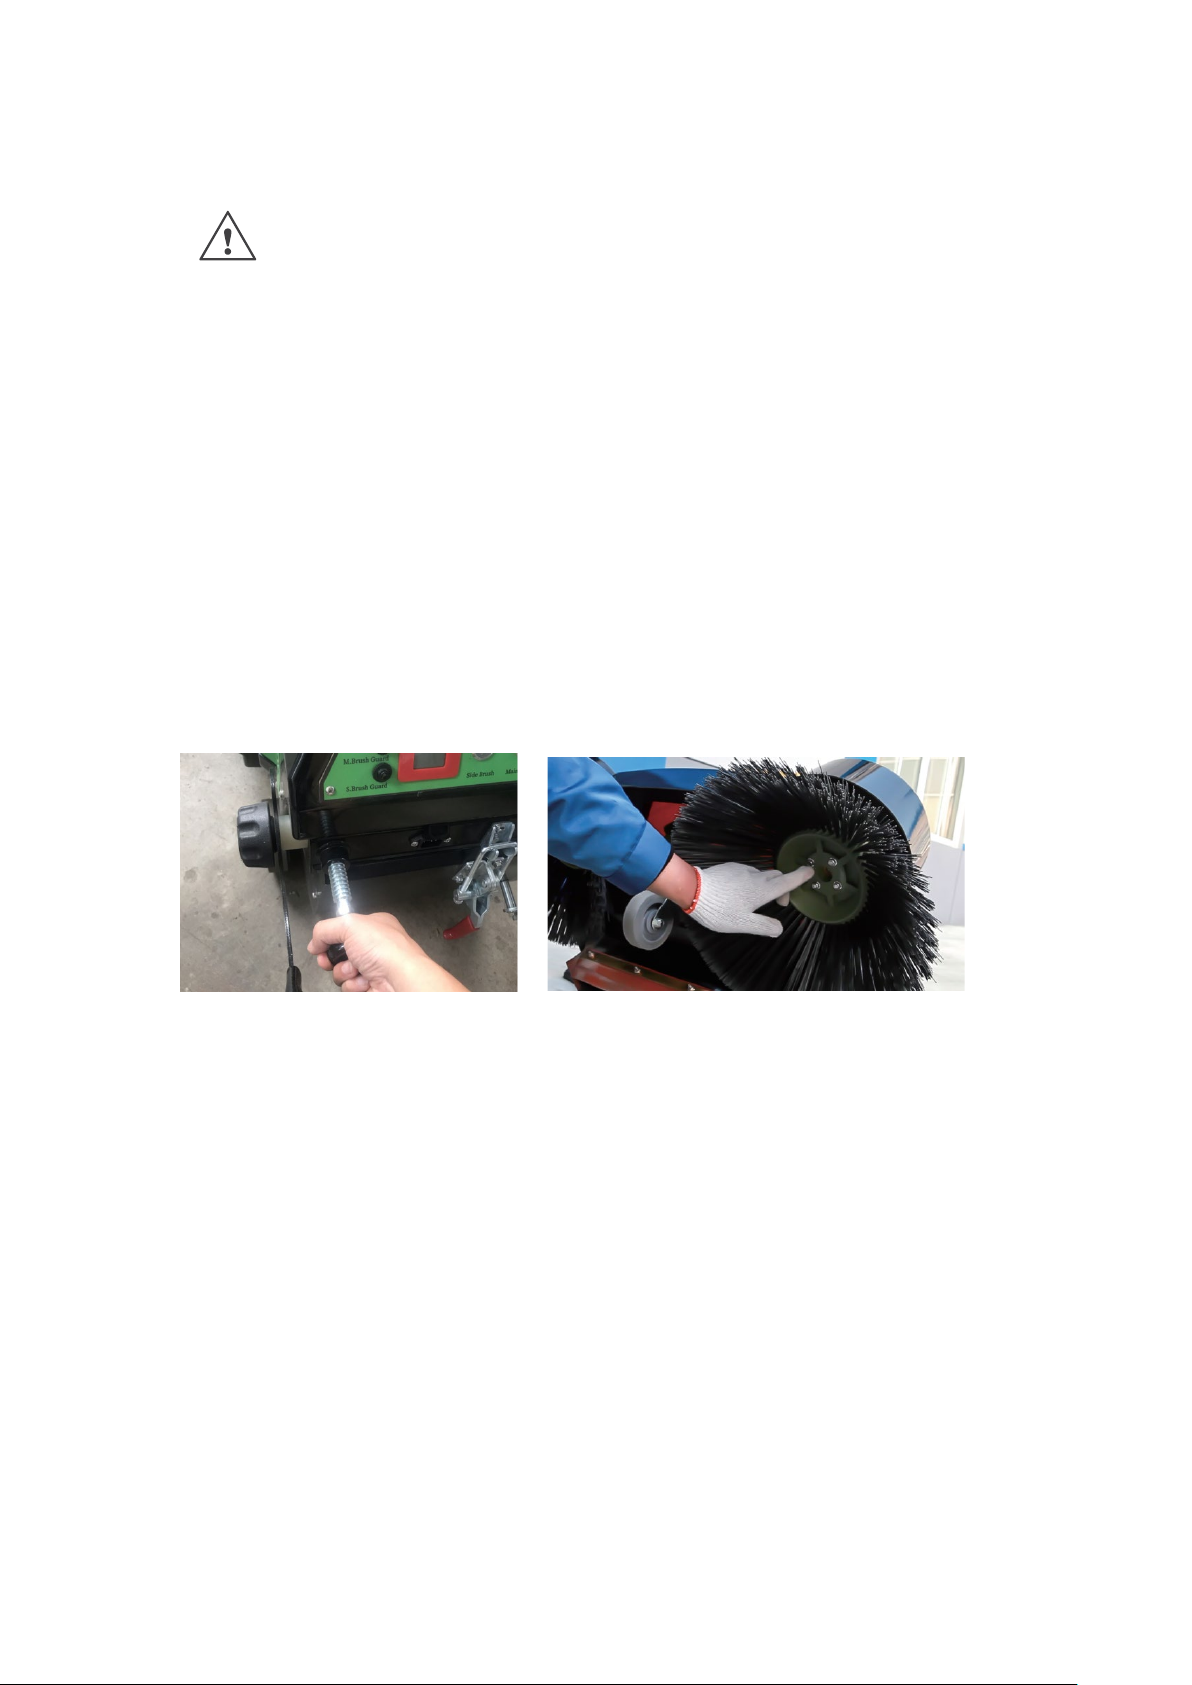
MAIN BRUSH REPLACEMENT
1. Remove the cover screws (Figure 5)
2. Loosen the left and right rocker arms of the main brush (Figure 6)
3. Disassemble the rocker arm.
4. Lift up the machine and take out the main brush (Figure 7)
5. Take out the left and right heads of the main brush.
6. Install the left and right head on the main brush, and pay attention to the
installation direction.
7. Install the main brush on the sweeper and tighten the bolts (Figure 8)
8. Adjust the adjusting screw of the main brush to the position where it is used
for the first time, so that the main brush hairs touch the ground for 3-5mm
9. Install the cover.
Figure 5 Figure 6
1
Figure 7 Figure 8
CAREFUL!
The hard brush or soft brush can be selected according to the ground
conditions; when replacing the main brush, it is better to wear gloves,
because it may be cut by the brush; the operation direction of the main
brush is shown in Figure 5, and the main brush shall be installed
correctly as shown in the figure, and the pressure between the main
brush and the ground shall be checked as described in the relevant
chapters.
SIDE BRUSH HEIGHT ADJUSTMENT
When the sweeper leaves the factory, the height of the edge brush has been
adjusted to be qualified. When it is used for a period of time, the side brush
cannot clean effectively, and it is necessary to adjust the side brush. Turn the
left rotary handle clockwise for 1 stage (Fig. 9), and clean it.
Figure 9 Figure 10
SIDE BRUSH REPLACEMENT
The main function of the side brush is to collect the garbage on both sides into
the middle by using its own rotation, and then the main brush will collect it into
the garbage bin. The advantage of the side brush is that it can sweep out the
garbage at the corners and dead corners and increase the cleaning area.
Use the machine on the level ground, turn the starting key of the machine to
"off" position.
Lift up the machine and loosen the four bolts at the bottom of the brush disc
(Figure 11)
1
Replace with a new side brush.
Adjust the height of the side brush according to the instruction.
VIBRATION
After continuous operation of the sweeper for a period of time, the capillary
hole of the filter is might be blocked. Please use the dust vibrating function
regularly:
Turn off the machine power supply.
Step the dust vibrating pedal for ten times to shake off the dust on the
filter(Figure 11).
Figure 11 Figure 12
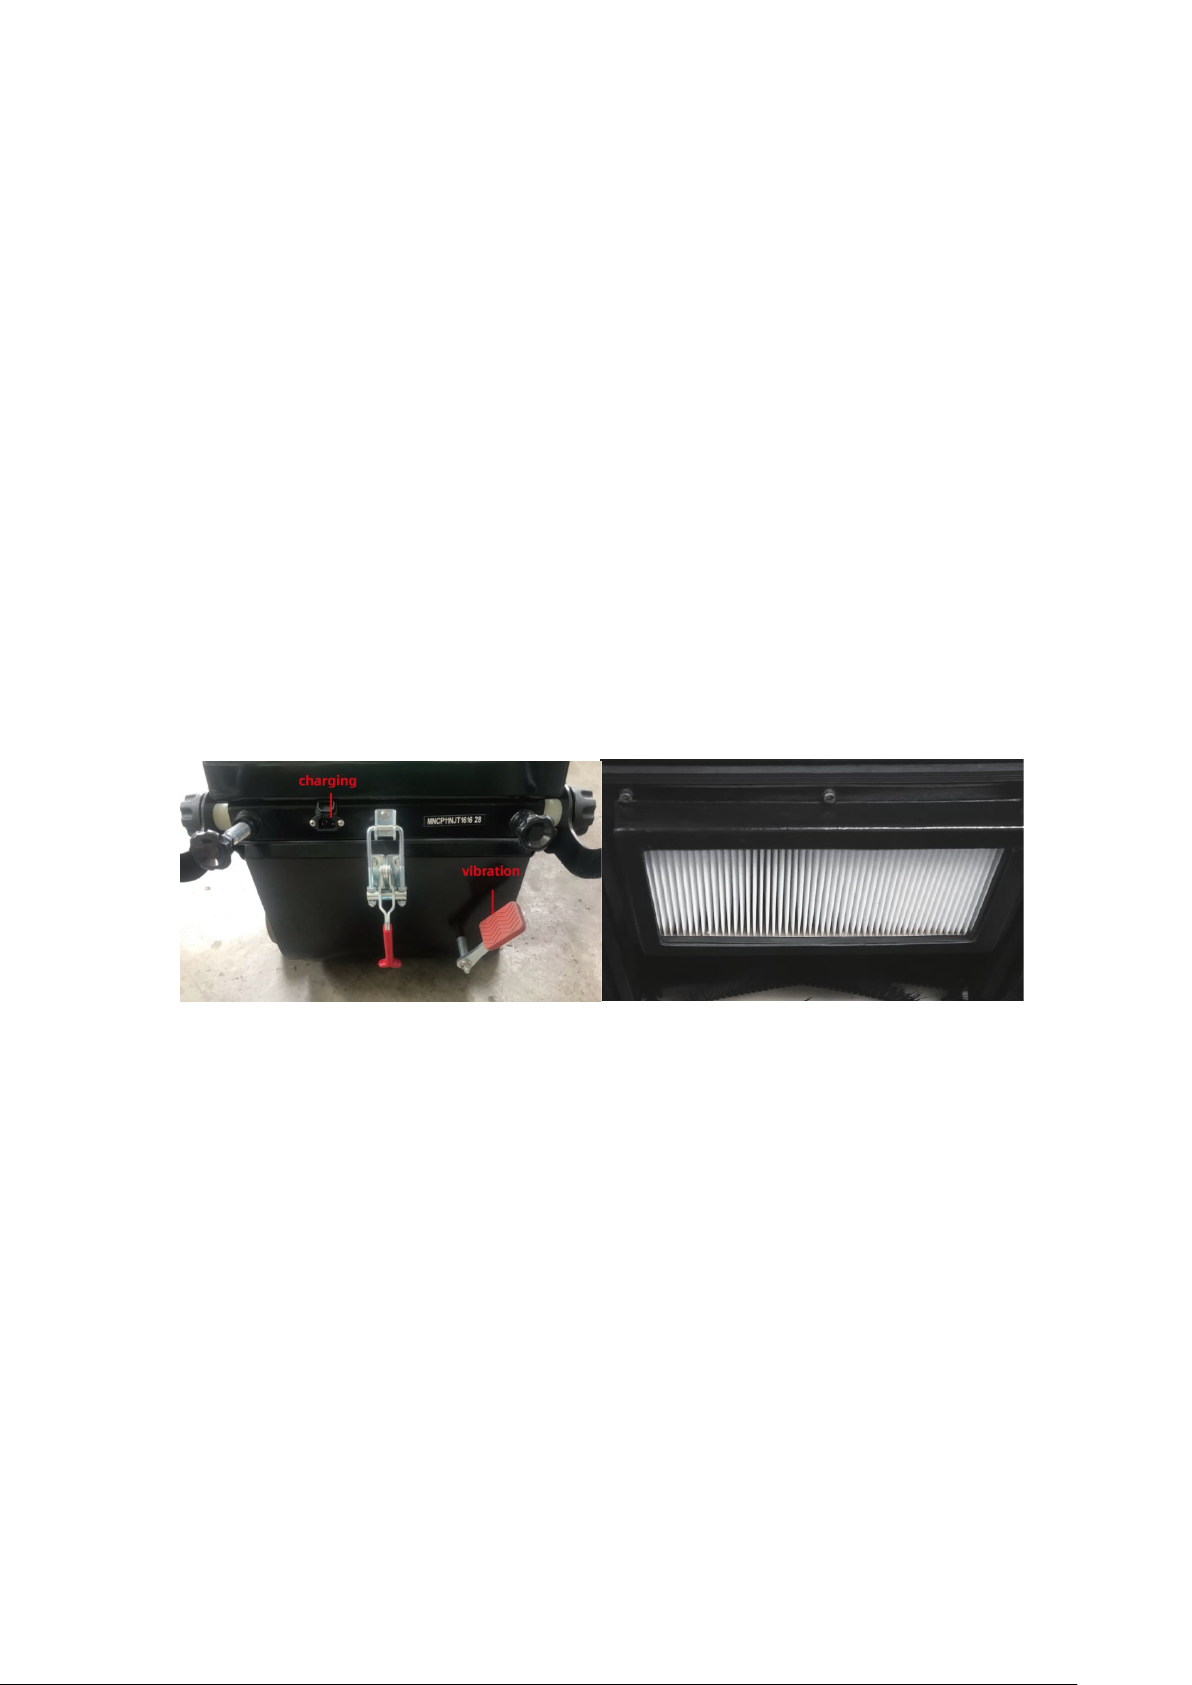
FILTER CLEANING AND INSPECTION
Use the machine on flat ground, turn the machine start key to "off" position
and remove the dustbin. Lightly scrape the bottom of the filter with a burr free
bar.
Please note the following: do not use water or detergent to clean it, the filter
will be damaged. Replace the filter when there is crack on it.

1
BATTERY CHARGING
After each use, when the warning light is on, charging the battery will prolong
the battery life.
If you want to stop charging, disconnect the AC socket switch before
disconnecting the DC socket, and then take the DC plug after the charger is
disconnected(Figure 12).
DANGER!
Do not touch the battery terminals and DC plugs.
EMPTY THE DUSTBIN
Push the sweeper to the garbage dumping area. Release the buckle and take
out the dustbin (Figure 13).After cleaning the garbage, put the dustbin inside
and then lock the buckle.
Figure 13 Figure 14
NOTE!
When the machine stops working, the brush must be lifted to prevent
deformation of the brush.

1
WATER INJECTION
Turn the water filling cover anticlockwise to add water(figure 14).
NOTE!
When the temperature is lower than zero, please empty the water
tank!
SQUEEGEE INSPECTION AND ADJUSTMENT
1. Place the machine on a flat ground suitable for checking the height of the
squeegee.
2. Turn the starting key of the door to the "off" position.
3. Check the integrity of the side squeegee.
4. Check whether the height between the squeegee and the ground is within 0-
3mm.
5. Raise the front wheels of the sweeper
6. Check the integrity of the front and rear squeegee
7. The front squeegee slightly touches the ground but not separated from the
ground
8. The height between the back squeegee and ground is within 0-3mm

1
MAINTENANCE
The service life and operation safety of the machine must be ensured by the
correct routine maintenance of the machine. Make a list of the routine
maintenance requirements below. Under suitable working conditions, the
maintenance interval can be changed, which must be determined by the
professional responsible for the maintenance.
WARNING!
Stop the machine (remove the start switch key) to carry out
maintenance operations, remove the battery if necessary. Therefore,
please read the safety section of the manual carefully.
USE CONDITIONS
1. Temperature: - 10 ~40;
2. Relative humidity of air: 5%-70%;
3. No conductive dust, no explosion danger environment;
4. An environment free of corrosive metal gases or vapors;
5. Used indoors, ventilated, non-vibration environment, front and rear space at
least 300 mm.
MAINTENANCE SCHEDULE
Maintenance operation
First use
Every
10 hours
Every
50 hours
Every
100 hours
Every
200 hours
Every
500 hours
Main brush and side brush height
adjustment
Main brush and side brush wired or
twisted
Filter inspection

1
TOUBLESHOOTING
Trouble
Cause
Troubleshooting
No display on instrument
board
Fuse broken
Replace the fuse
Battery output
Charge or replace the battery
Brushes not working
Brush motor broken
Replace the brush motor
Main brush belt broken Replace the main brush belt
Main brush button broken Replace the main brush button
Fuse broken Replace the belt
Relay broken Replace the relay
Not cleaning effectively Brushes are worn Replace the brushes
Squeegee is worn
Replace the squeegee
Filter is plugged
Vibration
Working speed is too high
Lower the speed
Brushes are worn quickly
Brushes are pressed too
tightly or the floor is too
harsh
Lighten the pressure of brush
Main brush makes too
much noise when
working
Rope or wire twining in
brush
Move the entanglement
Seal of dustbin is broken
Replace the seal
Waste container leakage
Waster container is too full
Empty the dustbin
Battery can’t be charged Battery damaged Replace the battery
Charger
Check the charger’s input
current
Battery connection loosen
Check and tighten the
connection
Excessive battery
Charging time insufficient Prolong the charging time
Squeegee height
inspection
Refueling
Main brush drive belt inspection
Screw nut tightening inspection
Check the wear of main brush and
side brush
Replacement of drive belt

1
discharge Battery damaged Replace the battery
SPECIFICATIONS
www.stahlwerkgermany.com
Friedrich-Ebertstrasse 75-77
42719 Solingen Germany
NO
Item Name
Unit
Specification
1
Sweeping width
mm
>1000
2
Cleaning efficiency
m²/h
>4000
3
Main brush length
mm
400
4
Side brush diameter
mm
400
5
Power supply
v
12( >100AH)
6
Working time
h
>4
8
Dustbin capacity
L
>22
9
Working power(motor)
main brush + fan + side
brush
w120+30+35×2
10
Filtering area
m²
1.5
11
Net weight
kg
95
12
Water tank capacity
L
12
Table of contents
Popular Blower manuals by other brands


Becker
Becker SV 1100 operating instructions

DeWalt
DeWalt DCMBA572X1 Original instructions

STEWART-AMOS
STEWART-AMOS Starfire S-5s Operation manual

Heart & Home Collectables
Heart & Home Collectables GFK-210 Installation and operating instructions

Powr-Flite
Powr-Flite PIRANHA PS 400 manual

Core
Core ROVER R4300 Original instructions


