Standard Horizon PC-35 User manual

OPERATORS MANUAL
Standard Horizon PC-45 Cutter
Read this manual, and thoroughly
familiarize yourself with its
contents before operating or
servicing this equipment.
PC45/OM


I
UM204005-08
040308/PC45/08E/DV
Important Information
- This manual is designed to help you to install, operate and maintain Paper Cutter, PC-45.
Read, understand and keep this manual in a safe and convenient place.
- Do not operate PC-45 until you read and understand the instructions in this manual.
- Horizon International Inc. shall not be liable for incidental consequential damages result-
ing from : improper or inadequate maintenance by customer; unauthorized modification or
misuse; operation outside of the environmental specifications for the product.
- Horizon International Inc. pursues a policy of continuing improvement in design and
performance of the product. Therefore, the product design and specifications are subject to
change without prior notice and without our legal obligation.
- All rights are reserved. No part of the manual may be photocopied, reproduced or trans-
lated to another language without the prior written consent of Horizon International Inc.
PC-45
PAPER CUTTER

II
Safety Precautions
- The signal word WARNING indicates a potentially hazardous situation which, if not
avoided, could result in death or serious injury.
- The signal word CAUTION indicates a potentially hazardous situation which, if not
avoided, may result in damage on machines. It may also be used to alert against unsafe
practices.
- Read and understand all safety instructions with signal word such as WARNING and
CAUTION. If safety instructions are ignored, personal injury may result.
- Horizon International Inc. cannot anticipate every possible situation that might involve
a potential hazard. The instructions in this manual and warning labels on the machine are
therefore not all inclusive.
- All equipment shall be locked out or tagged out to protect against accidental or inad-
vertent operation when such operation could cause injury to personnel. Do not attempt to
operate any switch, valve, or other energy isolating device where it is locked or tagged out.
- Do not operate the machines when any covers are removed.
- Some of the drawings in this manual show the machine uncovered for explaining the
detail or inside of machine.

III
CONTENTS
Important Information ............................................................................................I
Safety Precautions....................................................................................................II
1. Before You Begin
1-1 Purpose of PC-45 ...............................................................................................2
1-2 Specifications......................................................................................................2
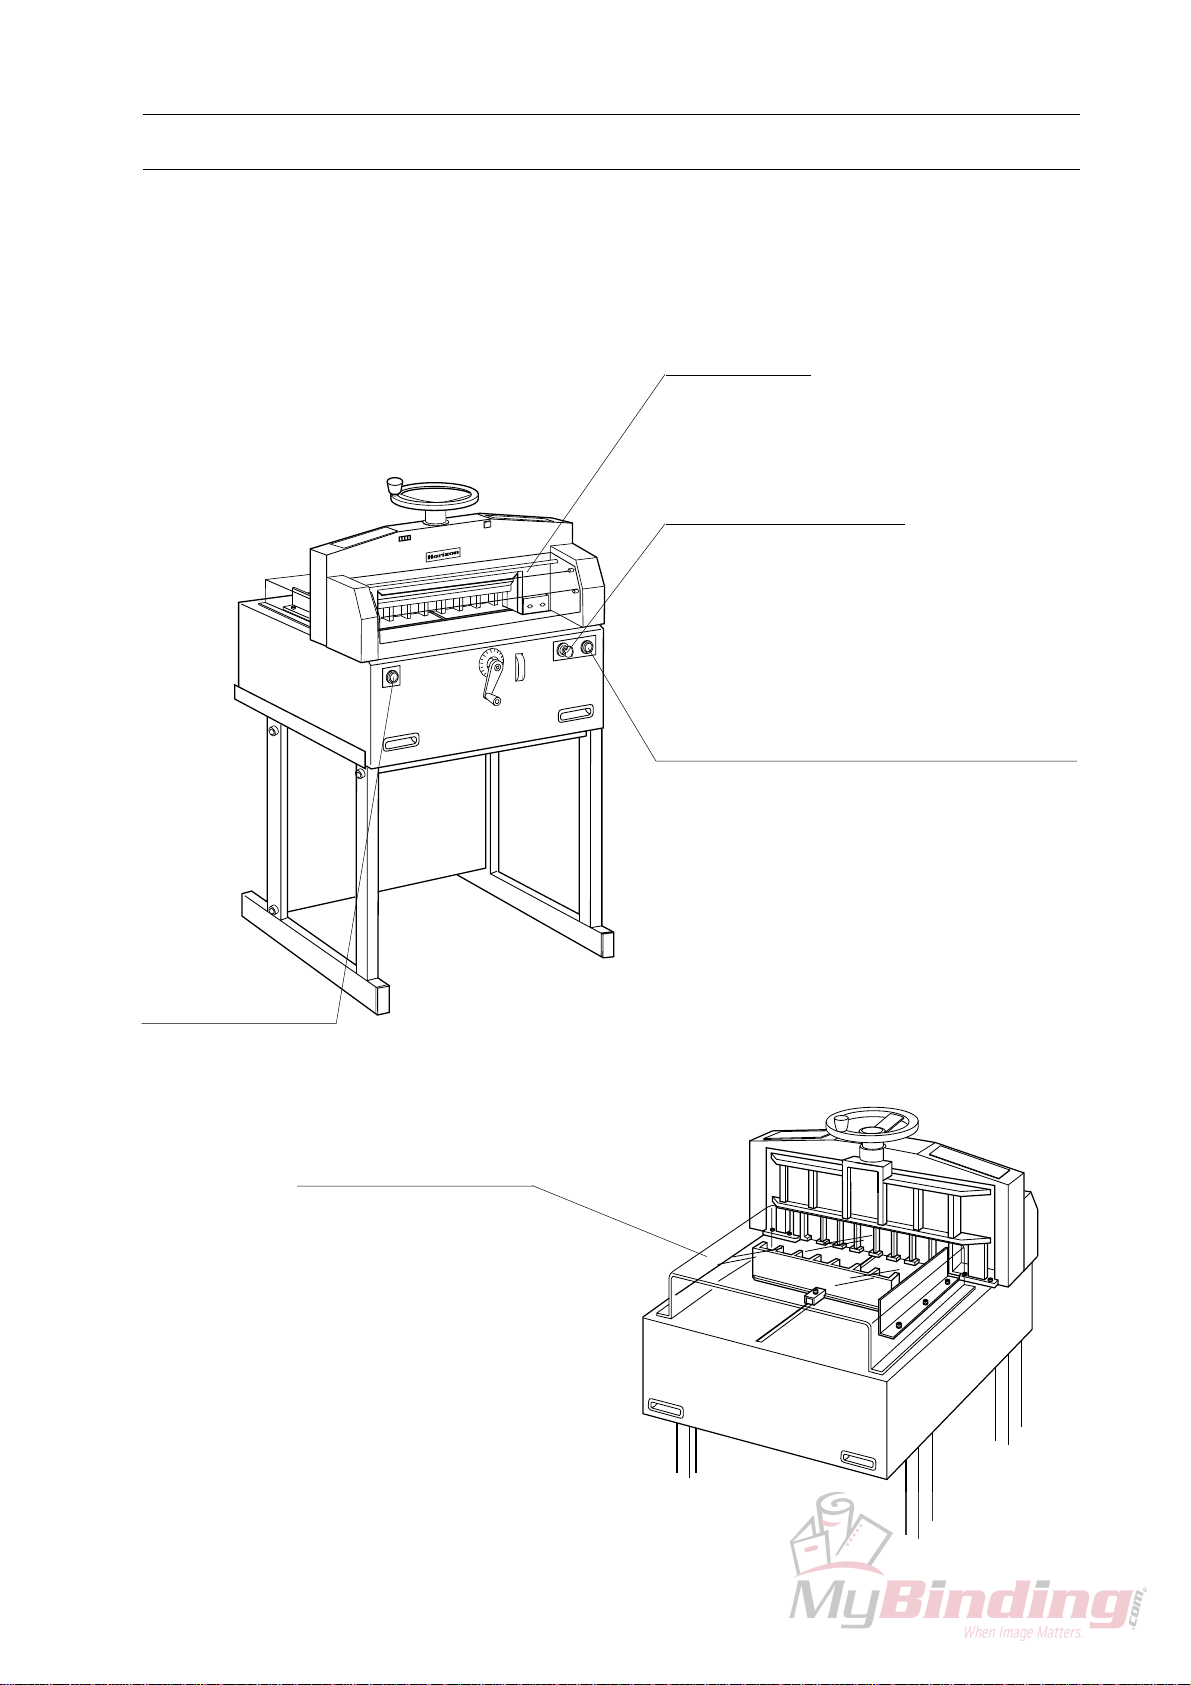
1-3 Machine Descriptions ........................................................................................3
1-3-1 Safety Functions.............................................................................................3
1-3-2 Main Parts Descriptions .................................................................................4
1-4 Accessories..........................................................................................................5
1-5 Consumables ......................................................................................................6
2. Safety Function Check
2-1 Check on Table ..................................................................................................8
2-2 Check on Power .................................................................................................8
2-3 Check on Safe Functions ...................................................................................9
2-3-1 Check on Front Cover ....................................................................................9
2-3-2 Check on Automatic Return of Knife.............................................................9
2-3-3 Check on One Cycle.......................................................................................9
2-3-4 Check on Unworkable Knife with One Hand ................................................10
2-3-5 Check on Stop during Working......................................................................10
3. Operation Procedure
3-1 Operation Procedure .........................................................................................12
4. After Cutting
4-1 Original Condition.............................................................................................16
4-2 Power off.............................................................................................................16
4-3 Cleaning Table ...................................................................................................17

IV
5. Troubleshooting
5-1 Cut Sheets Are Not Square ...............................................................................20
5-2 Cut Surface Has Diagonal Lines ......................................................................21
5-3 Sheets Are Not Cut Equally ..............................................................................21
6. Maintenance
6-1 Cutting Stick Replacement ...............................................................................24
6-2 Knife Replacement.............................................................................................26
6-2-1 Knife Removal ...............................................................................................26
6-2-2 Knife Installation............................................................................................29
6-3 Knife Height Adjustment ..................................................................................32
6-3-1 Cutting Depth Adjustment..............................................................................32
6-4 Cutting Depth Balance Adjustment .................................................................33
6-5 Test Cutting........................................................................................................34
6-6 Lubrication (Monthly).......................................................................................35
7. Installation
7-1 Installation..........................................................................................................38

1
1. Before You Begin
1-1 Purpose of PC-45 ..................................................................................... 2
1-2 Specifications ........................................................................................... 2
1-3 Machine Descriptions.............................................................................. 3
1-4 Accessories ............................................................................................... 5
1-5 Consumables ............................................................................................ 6

2
1. Before You Begin
1-1 Purpose of PC-45
Horizon PC-45 is a machine for cutting printed sheets, wrapping paper, writing paper, or
booklets.
1-2 Specifications
Model PC-45
Maximum Cutting Width 450 mm (17.7")
Maximum Lift Height (Clamp Opening) 70 mm (2.7")
Maximum Cutting Depth 450 mm (17.7")
Minimum Cutting Depth 20 mm (0.8")
Cutting Speed 2.5 sec./cut
Power 120 V 60 Hz 13 A,
220 V 50/60 Hz 4.0 A,
240 V 50 Hz 2.3 A
Power Consumption 1.1 kW
Machine Dimensions (L) x (W) x (H) 790 x 805 x 1,170 mm (31.1" x 31.7" x 46")
Height from the floor level to table top 880 mm (34.6")
Machine Weight 158 kg (348 lb)
The machine design and specifications are subject to change without any notice.

3
1. Before You Begin
1-3 Machine Descriptions
1-3-1 Safety Functions
0
1
9
8
7
Key Switch
Cut Button B
Knife works when cut buttons A and B
are pressed at the same time. Knife stops
immediately when either cut button A or
B is released.
Cut Button A
Back Gauge Cover
Front Cover

4
1. Before You Begin
1-3 Machine Descriptions
1-3-2 Main Parts Descriptions
0
1
9
8
7
Side Gauge and Back Gauge Scale
This gauge is used to square-up both sides
of sheets.
Back Gauge
This gauge is used to position cutting
width.
Clamper
This clamper presses sheets not to move
during cutting.
Back Gauge Dial
This dial is used to measure cutting width.
Knife
Clamper Hand Wheel
This wheel is used to raise/lower clamper.
Back Gauge Handle
This handle is used to move back gauge
either forward or backward.
Back gauge is moved by 5 mm when this
handle makes one turn.
Scales are used to adjust cutting position.
Scales are marked in 0.5 mm intervals.
When this handle is pulled, it is free to
move.
Counter

5
1. Before You Begin
Spare Knife and Knife Case 1 pc
Ground Wire 1 pc
Allen Wrench 6 mm 1 pc
Allen Wrench 4 mm 1 pc
Box Wrench 1 pc
Adjust Bar 1 pc
Tool Box 1 pc
Knife Holder 2 pcs
Spanner 30 mm 1 pc
1-4 Accessories
Handle 1 pc

6
1. Before You Begin
1-5 Consumables
Spare Knife C-45
Cutting Stick (M007407-02)

7
2. Safety Function Check
2-1 Check on Table ........................................................................................ 8
2-2 Check on Power ....................................................................................... 8
2-3 Check on Safe Functions......................................................................... 9

8
2. Safety Function Check
2-1 Check on Table
4
5
6
3
2
1
2-2 Check on Power
POWER CUTTER B
OFF ON
Key Switch
4
5
6
3
2
1
Table
Table must be clean.
1. Check that trimmings, adhesive, or grease
is not on table.
NOTE
- Clean table referring to "4-3 Cleaning
table" if table is dirt.
Check that power turns on.
1. Insert key into power switch and turn key
clockwise to switch on power.
- Power pilot lamp will illuminate.
Power Pilot Lamp

9
2. Safety Function Check
2-3 Check on Safe Functions
4
5
6
3
2
1
Clamper Hand Wheel
Front Cover
Cut Button A Cut Button B
WARNING
- Do not put your hands under knife
while power is on.
- Assign only "ONE" operator to oper-
ate PC-45.
If your PC-45 do not work as shown in this
book, ask your local dealer to fix the PC-45.
2-3-2 Check on Automatic Return of Knife
Check that knife at bottom position returns to
home position automatically and then stops.
1. Press cut buttons A and B at the same
time.
2. Release your hands from cut buttons when
knife is on the way to home position.
- Check that knife returns to home position
without stopping and then stops at home
position.
2-3-3 Check on One Cycle
Check that knife remains stationary if cut
buttons are continued to press after knife
returns to home position.
1. Continue pressing to cut buttons about 5
seconds after knife returns to home posi-
tion. Check that knife does not work
again.
2-3-1 Check on Front Cover
Check that knife do not work while front
cover is open.
1. Lower clamper to the bottom with clamper
hand wheel.
2. Open front cover.
3. Check that knife does not work in spite of
pressing cut buttons A and B at the same
time.
4. Close front cover.
4
5
6
3
2
1
Knife
Cut Button B
Cut Button A
Next, check that knife remains stationary
unless both hands are released from cut
buttons.
2. Release your hand from cut button B with
cut button A pressed.
3. Press cut button B again. Check that knife
does not work.

10
2. Safety Function Check
2-3 Check on Safe Functions
2-3-4 Check on Unworkable Knife with One Hand
4
5
6
3
2
1
Knife
Cut Button A Cut Button B
Check that knife work only when both cut
buttons A and B are pressed at the same time.
1. Check that knife does not work by press-
ing only cut button A.
2. Check that knife does not work by press-
ing cut button B with cut button A pressed.
NOTE
- Knife works only when both cut buttons A
and B are pressed at the same time (within 5
seconds).
3. Release your hands from cut buttons.
4. Check that knife does not work by repeat-
ing procedure 1 to 3, exchanging A with B.
2-3-5 Check on Stop during Working
WARNING
- Do not raise clamper when knife is
stopped during cutting. Otherwise
knife gets bare and, as a result, your
fingers might be cut with knife.
Check that knife is stopped when you release
your hand from even one cut button during
lowering knife.
1. Check that knife is stopped immediately
when you release your hand from cut
button A while knife is lowering after you
press cut button A and B at the same time.
2. Release your hands from cut buttons.
3. Press cut button A and B separately with
the interval of 0.5 seconds or more to
return the knife to the home position.
NOTE
- Knife can return to home position by press-
ing cut button A and B separately with the
interval of 0.5 seconds or more when knife is
stopped on the way to bottom.
4. Repeat procedure 1, exchanging A with B.
4
5
6
3
2
1
Knife
Cut Button B
Cut Button A

11
3. Operation Procedure
3-1 Operation Procedure............................................................................... 12

12
3. Operation Procedure
4
5
6
3
2
1
3-1 Operation Procedure
0
1
2
9
8
7
Clamper Hand Wheel
Clamper
Scale
Back Gauge Handle Back Gauge Dial
Key Switch
This section shows how to operate PC-45.
WARNING
- Do not put your hands under knife
while power is on.
- Assign only "ONE" operator to oper-
ate PC-45.
- It is dangerous to remain knife on
half position for fear of cutting hands
or fingers. Make sure to return knife to
home position.
CAUTION
- Cut only paper sheets. Otherwise PC-
45 may be broken.
1. Turn on power with key switch.
2. Turn clamper hand wheel counterclock-
wise to raise clamper.
3. Adjust back gauge according to cutting
with back gauge handle.
NOTE
- Move back gauge from rear side to front
side. Otherwise, it errs in cutting width.
- Cutting line helps to see cutting position.
Cutting line is the beam that is reflected on
sheets.

13
3. Operation Procedure
4
5
6
3
2
1
3-1 Operation Procedure
Clamper
4
5
6
3
2
1
Knife
4. Open front cover and pile sheets on table.
5. Square-up sheets with back gauge and side
gauge.
6. Turn clamper hand wheel, and clamper
will press sheets to fix them.
NOTE
- Be careful not to shift sheets when fixing
sheets.
7. Close front cover.
8. Continue to press cut button A and B at
the same time, and knife lowers and cuts
sheets. You may release cut buttons when
knife begins to rise because knife returns to
home position automatically.
NOTE
- If you fail to press both cut buttons at the
same time, release your hands from buttons
and try it again 2 seconds later.
- If you release your hand(s) from cut
button(s) while knife is lowering and cutting
operation is stopped, press cut button A and
B separately with the interval of 0.5 seconds
or more, and knife returns to home position.
Sheets
Side Gauge
Back Gauge
Clamper Hand Wheel
Front Cover
Cut Button B
Cut Button A
Table of contents