STAR INDUSTRIES 660 Series User manual
4101 Garland Dr., Fort Worth, TX 76117
Phone 817.485.6073 Fax 817.428.6008
www.starindustries.com
Installation, Use & Safety Precautions
Manual for Models
660, 660-01 & 660-02
If you need clarication or any additional
information call your Star dealer or call
Star Industries @ 1-800-541-1797
during normal business hours.
BEFORE USE, READ AND UNDERSTAND
THE COMPLETE OPERATOR’S MANUAL.
LIMITATION OF DAMAGES: Star’s obligation
under this warranty shall not include costs of
installation, duty, taxes or any other charges
whatsoever or any liability for direct, indirect,
incidental or consequential damages or delay.
Star’s liability for any and all losses and damage
to purchaser resulting from any cause whatso-
ever, including negligence or breach of form of
warranty, express or implied. by Star, alleged
damage for defective goods, irrespective of
whether such defects are discoverable or latent,
shall in no event exceed the purchase price of
the particular goods. Products repaired or
replaced under
this warranty are warranted only for the
remainder of the original warranty. Any
improper use including operation after discov-
ery of defective or worn parts not approved by
Star or any alteration or repair by others in such
manner as in Star’s judgment aects the prod-
uct materially and adversely shall void this
warranty.
THE FOREGOING WARRANTIES ARE EXCLUSIVE
AND ARE IN LIEU OF ALL OTHER WARRANTIES
(WHETHER WRITTEN, ORAL OR IMPLIED)
INCLUDING WARRANTIES OF ERCHANTABILITY
AND WARRANTY OF FITNESS FOR A PARTICU-
LAR PURPOSE.
Customers Who Bought this product also bought
Safety Work Platforms
Turn your forklift into an aerial
Work Platform
Lift Hooks
Lift uo to 22,000 lbs.
safely and securely
Visit www,starindustries.com or call us at 800-541-1797 for more information
on these and other great products
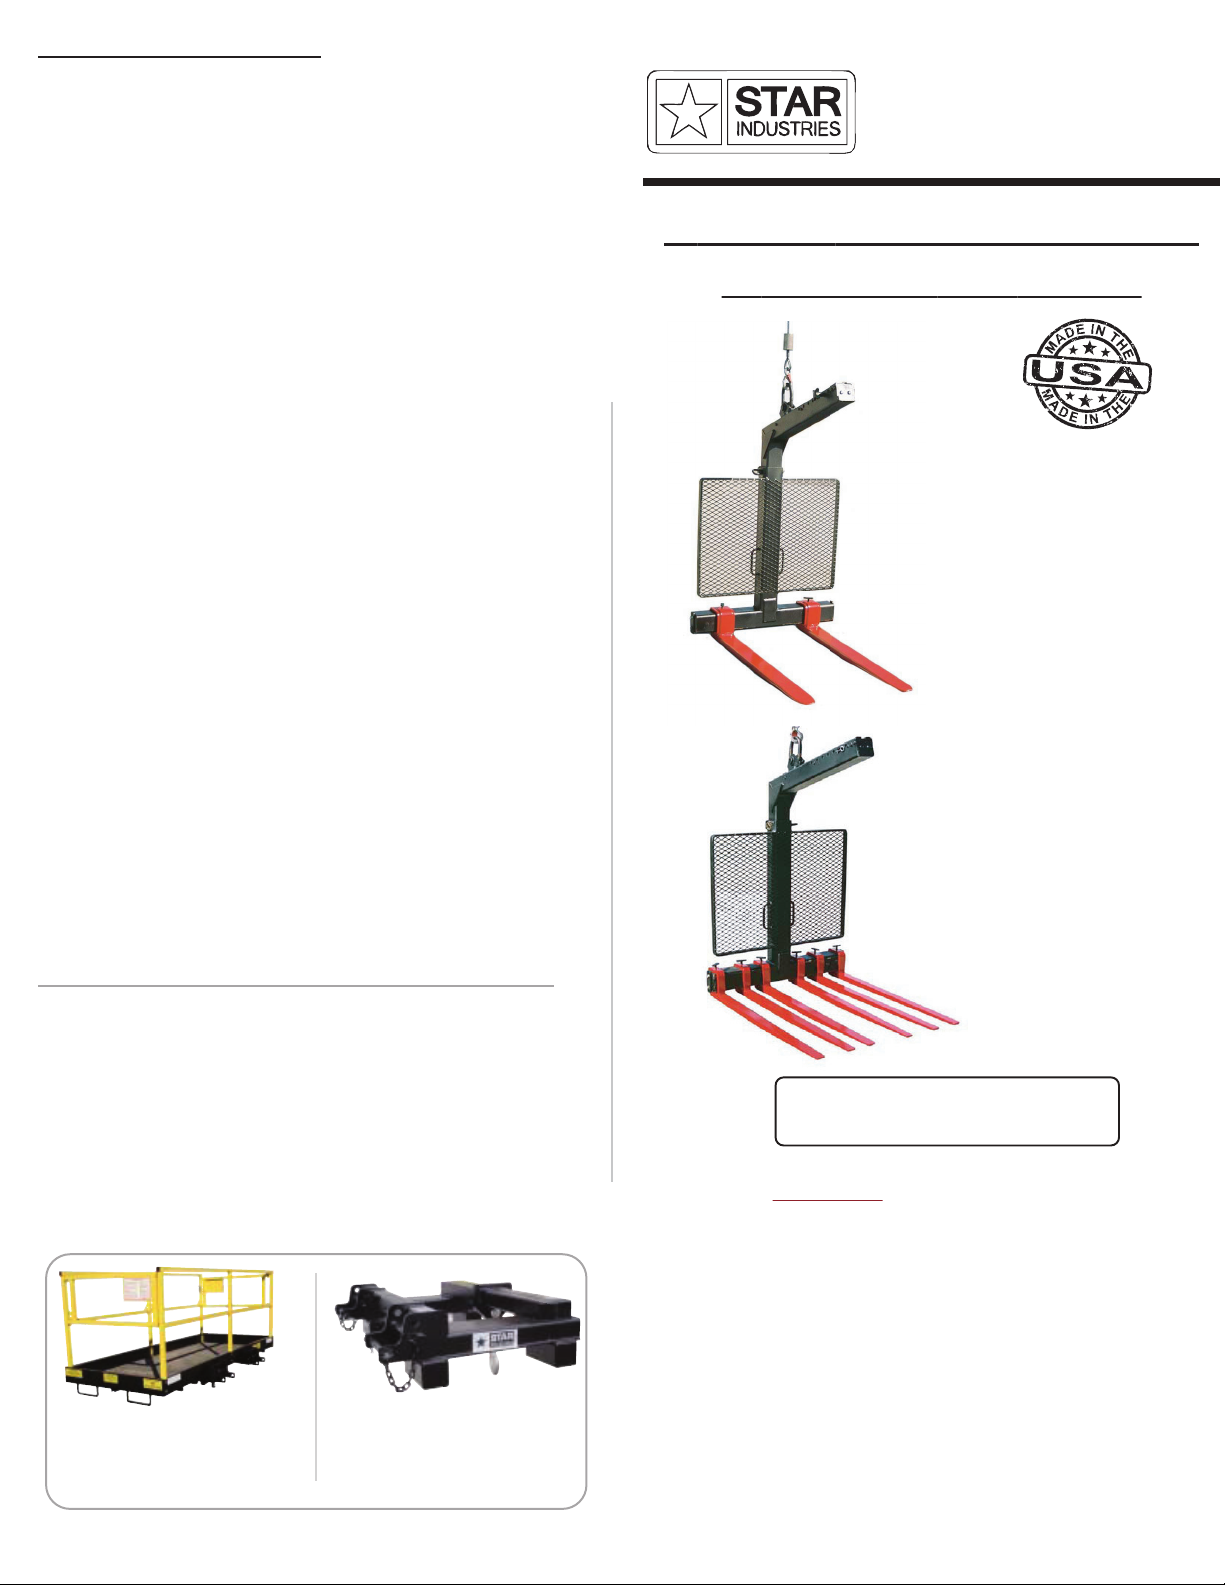
CRANE FORKS ATTACHMENT
OPERATOR’SMANUAL
MODEL 660
WITH 660-02 BLOCK FORKS
MODEL 660
WITH 660-01 GENERAL PURPOSE FORKS
(660-03 BRICK FORKS SIMILAR)

General Safety Precautions
Under no circumstances should personnel be
elevated with Crane Forks.
Users should review the Operator’s Manual &
Safety Information and understand all operations
of the crane forks before using it.
Materials to be elevated with the crane fork must
be adequately secured to prevent material from
falling from pallets or packages.
Never allow personnel to stand under the load.
Use the handles on the king post to guide the
crane fork into the pallet/package to prevent
injury to ngers or other parts of the hand.
Make sure the lifting equipment is capable of
handling the weight of the loaded crane fork.
Certication
Star Crane forks have been engineered and tested in
accordance with A.N.S.I. Standards and the model 660
is rated at 6000 lbs capacity at a 23.6" load center
with an equally balanced load, however with the
smaller 660-03 Brick Tines the capacity is reduced to
4500 lbs.
WARRANTY PROCEDURE: Upon notication, Star
Industries will determine if the product will need to
be returned to Star Industries for inspection or
repair or if the Star dealer or other entity can be
authorized to make the repair at his location or if
circumstances dictate other solutions. Dealer or
other entity repairs must have prior written autho-
rization. Reimbursement will be at the current“Star
Warranty Labor Rate” and will not include reim-
bursement for osite travel. A Warranty Claim Form
must be submitted within 45 days of warranty
repair authorization to receive credit for repair.
A return authorization number must be obtained
from Star Industries before a product can be
returned for inspection and/or warranty and that
number must appear on the return shipping label.
Upon inspection, Star Industries will determine if
the product is defective and if so, whether it will be
repaired or replaced. Repair or replacement is at
the discretion of Star Industries. Transportation
charges to Star Industries are not covered under
the warranty and must be prepaid by dealer or
customer unless it is within the rst two years of
warranty. In which case, if evidence acceptable to
Star Industries, is provided
that the product is defective and the return is from
within the continental United States or Canada,
Star will arrange for return shipment at Star Indus-
tries’expense. Products found to be defective
within the initial two year period and returned to
Star Industries for repair or replacement will be
returned to the dealer or customer freight prepaid
providing it is within the continental United States
or Canada. Warranted products to be shipped
outside the United States or Canada and those
warranted after the initial 2 years will be shipped
freight collect. Unwarrantable products will be
returned freight collect at the
request of the dealer or customer, otherwise they
will be destroyed.
2 11
Dimension
A B C D E F G
48” to 68 62” to 80” 68” to 86” 7” 39” 6.5” 23.6”

Assembly and Adjustment
The King post can be adjusted for greater load height
from 48" to 68" by removing the locking pin and
raising the upper arm section for load heights - Make
sure personnel raising the post have sucient
strength to handle the weight.
Tines are installed on the bottom square horizontal
tube and are secured with the end plates and locked
into position with the TBolts. Adjust the tines to allow
for even load distribution.
Fitting to crane
The crane fork should be connected to the crane by
means of a universal joint type suspending element
via the crane hook or rotator.
< < < Star Industries Limited Warranty > > >
Star Products are warranted to the original pur-
chaser against defective workmanship and/or
materials (when properly installed, used, and main-
tained) for a period as specied below from date of
delivery to the customer by an authorized Star
Dealer or direct from Star Industries. This warranty
does not cover misuse, abuse, normal wear and
tear, or accidental damage.
5 year Warranty: All Star products except as
noted below (Includes HD
Auger Drives and most non-
hydraulic products)
2 year Warranty: Medium Duty Auger Drives
1 year Warranty: Auger Bits and Auger Accesso
ries (excludes auger drives),
Crane Forks, Grapples, 4 in 1
Buckets, Angle Broom,
Mad Beaver Brush Cutters, Self
Dumping Hoppers, Replace
ment Forks, and Over the
Bucket Forks.
6 months Warranty: Concrete Mixers
WARRANTY CLAIM NOTIFICATION: Product defects
should be reported to the Star dealer from whom
the product was purchased or to Star Industries in
writing promptly after discovery. Preferably photo-
graphs showing the defect should also be provided
along with a written report of circumstances
involved. Warranty claims not made within 30 days
after discovery of the defect shall be null and void.
WARRANTY DETERMINATION: If a warranty claim is
found worthy and made within the warranty
period we reserve the right at our discretion to
repair existing defects or to replace it with the
same or current model free of charge or to issue a
credit for the reasonable cost of repair or take
possession of the equipment and issue reimburse-
ment for the calculated value.
10 3

4 9
How it works
The crane fork is equipped with a spring loaded
trolley that keeps the forks level with or without a
load. The trolley is designed so that when tension is
relieved on the hoist line, the spring returns the
trolley to the empty fork position. When the load is
lifted and tension is applied, the trolley travels out
to a predetermined stop set at the load center of the
loaded crane fork. A trolley end stop pin is provided
to adjust the travel of the trolley for various
pallet/package sizes.
Operation
When picking a new load check to see that the load
is being carried with the forks level or slightly tipped
up. If not, immediately lower the load to the ground
and relieve the tension on the hoist line. Then
reposition the Trolley End Stop Pin in the top arm to
adjust the travel of the trolley so that it stops at the
crane fork’s loaded vertical load center. You may
have to move the pin several times to nd the
position where the forks hang level or slightly
tipped up with the load.
For proper operation of the trolley, the load must be
greater than 1,100 lbs otherwise the trolley will not
travel properly. When lifting the load, the hoist line
should lead the load slightly to ensure that the
trolley moves out to the loaded stop position. The
maximum load capacity of the Crane Fork must not
be exceeded. The maximum load capacities are
based on a 23.6" load center on the forks. Use
handles to guide the crane fork into the
pallet/package. Keep hands o other parts of the
crane fork during use to prevent getting ngers
mashed between the crane fork and the load.
Never stand under the load.
Parts List
Item
No. Qty Description Part Number
1 1 Lower Section Assy. 660-B
1 Set of 2 Pallet tines 1.5"x4"x46" 660-01
2 1 Set of 6 block tines 1.5"x2"x47" 660-02
1 Set of 2 brick tines 1.5"x3"x39" 660-03
3 2/6 Tine T-Bolt 660-33
4 2 End Plate 660-34
4.1 4 End plate screw 660-341
5 1 King post pin w/ locking ring 660-35
5.1 1 King post pin only 660-351
5.2 1 locking ring only 660-352
Parts Manual
Crane Fork Lower Section

8 5
Transporting the pallet fork
When in transit, the pallet fork must be properly
secured and if it is carried on a boom truck make sure
the boom and crane fork cannot swing out in an
uncontrolled manner. In addition make sure the
boom does not exert any extreme compression force
on the crane fork.
Maintenance and Repair
General notes
Thorough regular maintenance of the crane fork is
essential to prevent downtime and prolong its life.
Strict cleanliness must be observed in all mainte-
nance operations.
Grease
Chevron Delo #2 or
Any multi-purpose high-melting-point lithium-based
grease of consistency
category 2
Maintenance every 50 hours of operation
(Depending on conditions more frequent mainte-
nance may be required)
Check screw connections, tighten if necessary
Apply grease thru Zerk ttings on top of top arm
Remove any rust or corrosion and Lubricate tine
adjustment T-bolts
Annual Maintenance
Check for cracks, wear, corrosion and functional
safety (to be carried out by qualied specialist).
Parts List
Crane Fork – Upper Section
Item
No. Qty Description Part Number
1 1 upper section complete 660-A
2 1 trolley slide 660-12
3 2 trolley slide wear pads 660-13
4 2 Grease Zerks 660-14
5 1 trolley pin assy. 660-15
5.1 1 Trolley pin 660-151
5.2 2 Cotter pins 660-152
5.3 2 trolley pin washers 660-153
6 1 Trolley pick ring 660-16
7 1 Spring guide tube 660-17
8 2 Compression springs 660-18
9 1 Upper arm cover plate 660-19
10 4 Hex head screw – m10x25 660-20
11 2 Hex head screw – m10x35 660-21
12 1 Left slide rail 660-22
13 1 right slide rail 660-23
14 6 Locking screw – m8x16 660-24
15 1 Trolley stop pin 660-25
15.1 1 Hairpin for trolley stop pin 660-251

6 7
Upper part - Changing springs, spring guide, slide, cover plate and sliding rails
Remove four hexagon screws (1) and pin (2).
Pull complete spring guide (4) forwards out of upper part (3).
Slacken o the two hexagon screws (6) on the cover plate (5).
Squeeze together the rst spring (7) on the cover plate (5) (maintain preload)
Remove corresponding hexagon screw (6).
Swing cover plate (5) to one side. Relieve pressure on spring.
Remove second spring (8) in the same way.
WARNING !!
Always relieve pressure on springs slowly and one ata time to avoide risk of injury !!
Remove sliding rails (9 and 10)
Install in the reverse order.
For load capacities above 2000 kg / 4400 lbs, a second person is needed to relieve the load on the
spring slowly.
This manual suits for next models
3
Table of contents
Popular Lifting System manuals by other brands

Upright
Upright AB-46 Bi-Energy Operator's manual

WOOD'S POWR-GRIP
WOOD'S POWR-GRIP P110L02DC3 operating instructions

Challenger Lifts
Challenger Lifts 44060 Installation, operation & maintenance manual

AUTOLIFT
AUTOLIFT I-Swim2 instruction manual

SCANCLIMBER
SCANCLIMBER SC4000 instruction manual

Fenton
Fenton Shift N Step Operator's manual

Ergoswiss
Ergoswiss SL 14 Compact Series Operating instruction

Genie
Genie Lift Guard GR-12 Service manual

Terex
Terex Genie GR -12 Service manual

WM System
WM System WM LIGHT Installation, use and maintenance manual

Stockmaster
Stockmaster Mezzalift Assembly instructions

Scaleo medical
Scaleo medical Poweo 140 Quick Up user manual


