Star Progetti 206S-1 User manual
ISTRUZIONI DI MONTAGGIO
-------------------------------------------------
ASSEMBLY INSTRUCTIONS
-------------------------------------------------
INSTRUCTIONS POUR LE MONTAGE
-------------------------------------------------
MONTAGEANLEITUNG
-------------------------------------------------
INSTRUCCIONES DE MONTAJE
COD. 206S/1
COD. 206F/1
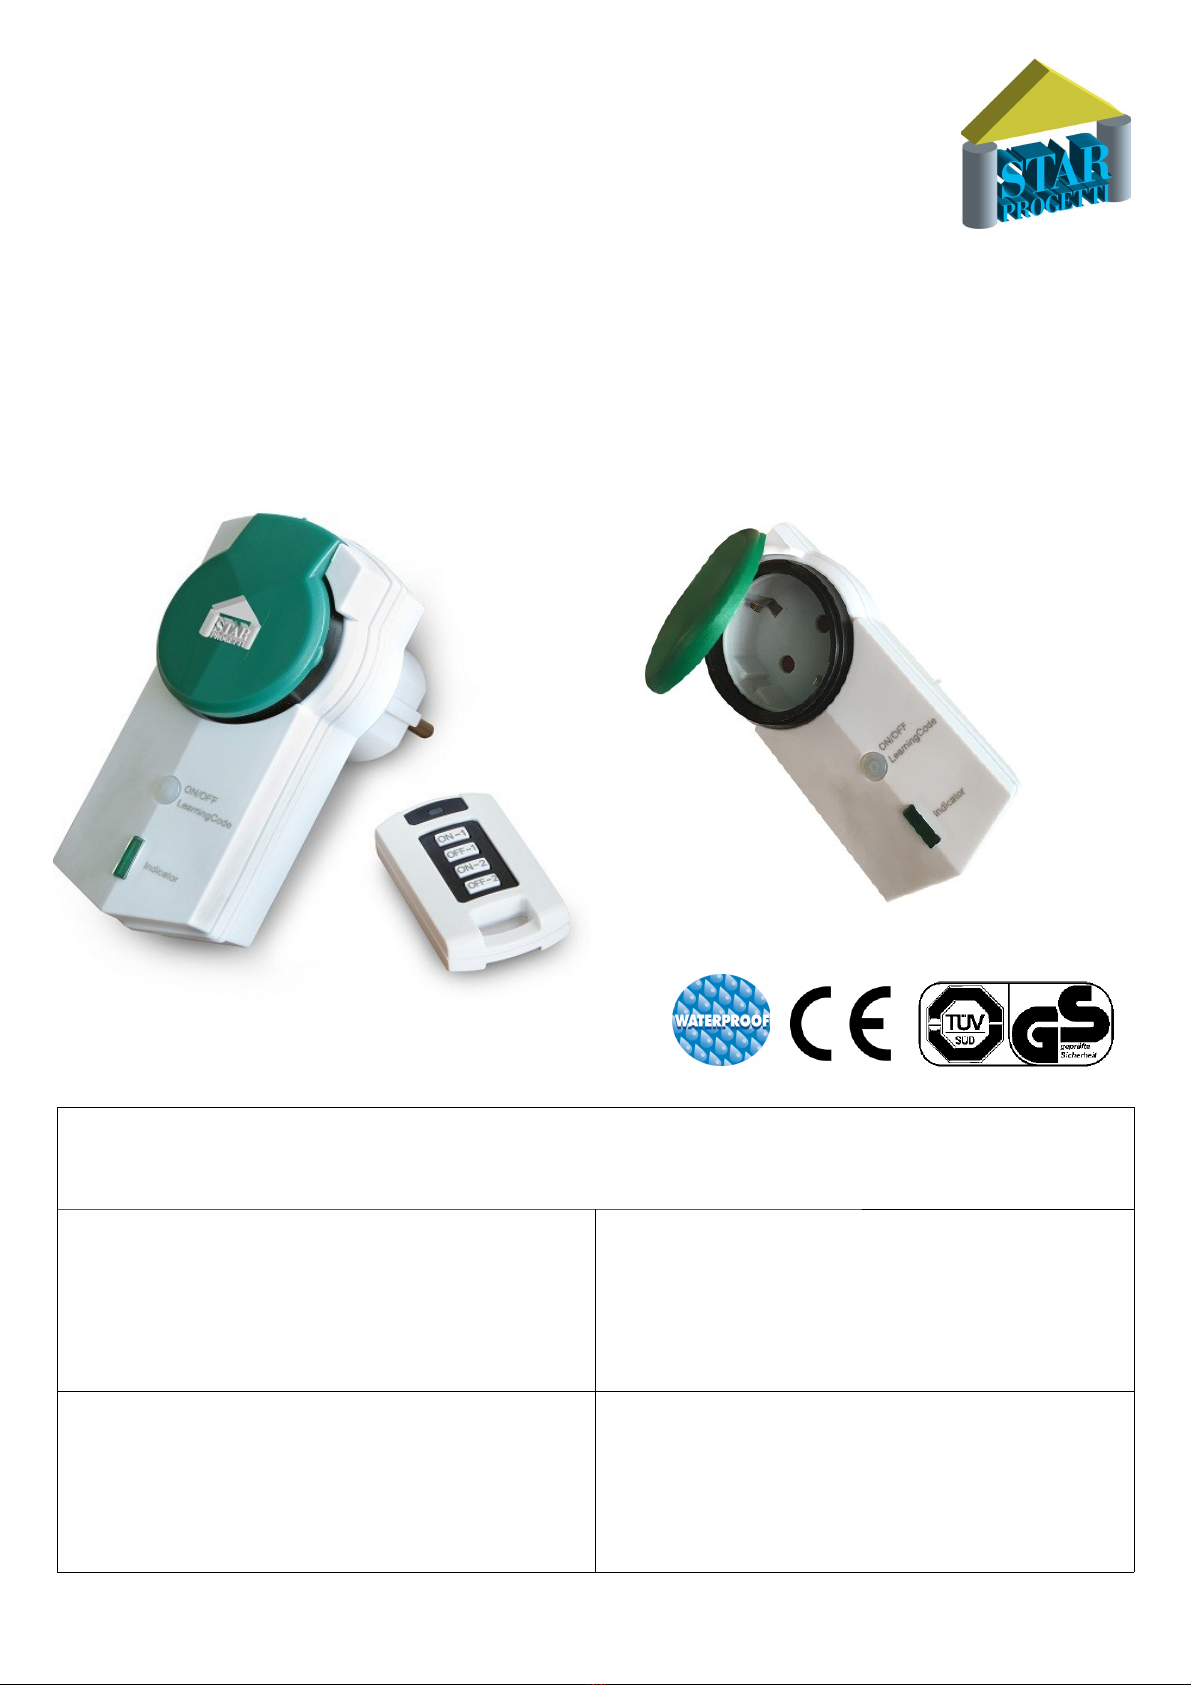
INTERRUTTORE REMOTO WIRELESS PER ESTERNI – IP44
Per accendere e spegnere con immediatezza 1 riscaldatore fino a 3680 Watt
•Specifico per riscaldatori elettrici a raggi infrarossi IRK di Star Progetti
WIRELESS REMOTE CONTROL SWITC FOR
OUTDOORS – IP44
To quic ly switch-on/off 1 heater until 3680 Watts
•Especially for Star Progetti electric infrared
heaters IRK
TELEINTERRUPTEUR WIRELESS POUR
EXTERIEURS -IP44
Pour allumer et éteindre rapidement 1 chauffage
jusqu'à 3680 Watts
•Spécifiques pour chauffages électriques a
infrarouges IRK de Star Progetti
INTERRUPTOR REMOTO SIN CABLES PARA
EXTERIORES – IP44
Para encender y apagar rápidamente 1 calefactor
de 3680 Watt
•Especifico para calentadores infrarrojos
electricos IRK Star Progetti
FUNKFERNSC ALTER WIRELESS WATERPROOF
– IP44
Zum schnellen Ein/Ausschalten 1 Heizstrahler bis
3680 Watt
•Speziell für ele trische Infrarot-Heizstrahler
IRK STAR PROGETTI

Informazione importante per lo smaltimento ambientalmente compatibile. IN ALCUNI PAESI DELL'UNIONE EUROPEA QUES O PRODO O NON
RICADE NEL CAMPO DI APPLICAZIONE DELLA LEGGE NAZIONALE DI RECEPIMEN O DELLA DIRE IVA RAEE E QUINDI NON È IN ESSI VIGEN E
ALCUN OBBLIGO DI RACCOL A DIFFERENZIA A A FINE VI A.
Questo prodotto è conforme alla Direttiva EU2002/96/EC. Il simbolo del bidone barrato riportato sull apparecchio indica che il prodotto, alla fine della propria vita
utile, dovendo essere trattato separatamente dai rifiuti domestici, deve essere conferito in un centro di raccolta differenziata per apparecchiature elettriche ed
elettroniche oppure riconsegnato al rivenditore al momento dell acquisto di una nuova apparecchiatura equivalente. L utente è responsabile del conferimento
dell apparecchio a fine vita alle appropriate strutture di raccolta, pena le sanzioni previste dalla vigente legislazione sui rifiuti. L adeguata raccolta differenziata per
l avvio successivo dell apparecchio dismesso al riciclaggio, al trattamento e allo smaltimento ambientalmente compatibile contribuisce ad evitare possibili effetti
negativi sull ambiente e sulla salute e favorisce il riciclo dei materiali di cui è composto il prodotto. Per informazioni più dettagliate inerenti i sistemi di raccolta
disponibili, rivolgersi al servizio locale di smaltimento rifiuti o al negozio in cui è stato effettuato l acquisto. I produttori e gli importatori ottemperano alla loro
responsabilità per il riciclaggio, il trattamento e lo smaltimento ambientalmente compatibile sia direttamente sia partecipando ad un sistema collettivo.
Important information for environmentally friendly disposal. IN SOME EU COUN RIES HIS PRODUC DOES NO FALL IN O HE SCOPE OF
APPLICA ION OF HE I ALIAN DOMES IC LAW ACKNOWLEDGING HE RAEE DIREC IVE AND HEREFORE HERE IS NO OBLIGA ION IN FORCE O
SEPARA E MA ERIALS A HE END OF HEIR USEFUL LIFE.
This product complies with Directive ED2002/96/EC.The symbol of a dustbin with a cross, which is shown on the appliance, indicates that the product, because it must
be treated separately from household waste, must be taken, at the end of its useful life, to a collection centre for electrical and electronic equipment or redelivered to
the retailer on purchase of a new equivalent appliance.The user is responsible for delivering the appliance to the appropriate collection structure at the end of its life,
on penalty of the measures provided for by current legislation on waste. The proper separate collection for subsequent transfer of the appliance for recycling,
treatment and environmentally friendly disposal contributes to avoiding any possible harmful effects on the environment and health and promotes recycling of the
materials that make up the product. For more detailed information on the available collection systems, contact the local refuse disposal service or the shop where the
purchase was made. The producers and importers meet their responsibilities for recycling, treatment and environmentally friendly disposal either directly or through
participating in a collective system.
Information importante pour une élimination compatible avec l’environnement.DANS CER AINS PAYS DE L’UNION EUROPEENNE, CE PRODUI NE
OMBE PAS SOUS LE COUP DE L’APPLICA ION DE LA LOI NA IONALE D’ACCEP A ION DE LA DIREC IVE RAEE E N’ES DONC SOUMIS A AUCUNE
OBLIGA ION DE RI SELEC IF EN FIN DE VIE.
Ce produit est conforme à la Directive EU2002/96/EC.Le symbole de la poubelle barrée reporté sur l appareil indique que le produit, arrivé en fin de vie, doit faire
l objet d un traitement spécial et doit donc être confié à un centre de tri pour appareillages électriques et électroniques, ou bien ramené au vendeur à l achat d un
nouvel appareil équivalent. L utilisateur est responsable du transfert de l appareil en fin de vie aux structures de tri appropriées, sous peine des sanctions prévues par
la législation en vigueur sur les déchets. Le tri prévu pour l envoi de l appareil démantelé à la phase de recyclage, de traitement et d élimination compatible avec
l environnement contribue à éviter d éventuels effets négatifs sur l environnement et sur la santé et favorise le recyclage des matériaux dont le produit se compose.
Pour des informations plus détaillées concernant les systèmes de collecte disponibles, s adresser au service local d élimination des déchets ou au magasin où l achat a
été effectué. Les producteurs et les importateurs assument leurs responsabilités quant au recyclage, au traitement et à l élimination compatible avec l environnement
soit directement, soit en participant à un système collectif.
Wichtige Informatinen zur umweltverträglichen Entsorgung. IN EINIGEN LÄNDERN DER EUROPÄISCHEN UNION FÄLL DIESES PRODUK NICH
UN ER DIE A IONALEN GESE ZLICHEN REGELUNGEN FÜR ELEK RO ECHNIK UND NICH UN ER DIE BES IMMUNGEN DER ERORDNUNG RAEE.
DAS GERÄ UN ERLIEG DESHALB KEINERLEI VERPFLICH UNGEN ZUR ESONDER EN SAMMLUNG DER EILE. Dieses Produkt ist konform mit der
EU-Richtlinie 2002/96/EC.Das Symbol des "Abfalls-Containers" auf dem Heizgerät bedeutet, dass das Produkt am Ende der Lebensdauer nicht im normalen
Hausmüll entsorgt werden darf, sondern muss zu einer Sammelstelle für elektrische und elektronische Geräte gebracht werden, oder es wird beim Kauf eines neuen,
gleichartigen Gerätes dem Verkäufer übergeben. Der Verbraucher ist verantwortlich für die Übergabe des Gerätes am Ende seiner Lebensdauer an die
entsprechenden Sammelstellen. Er unterliegt den Sanktionen der gesetzlichen Bestimmungen für Abfallentsorgung. Die ordnungsgemäße Getrennt-Sammlung und
die nachfolgende Weiterleitung des Gerätes zur Wiederverwertung oder zur umweltfreundlichen Entsorgung trägt dazu bei, mögliche negative Folgen auf die Umwelt
und auf die Gesundheit zu verhindern und fördert die Wiederverwertung der Geräte-Materialien. Für weitergehende Informationen über die vorhandenen
Sammelstellen wenden Sie sich an die örtlichen Abfallentsorgungs-Behörden oder an das Geschäft, in dem Sie das Gerät gekauft haben. Die Hersteller und die
Importeure erfüllen ihre Verantwortung für Wiederverwertung und umweltverträgliche Entsorgung, - sowohl direkt wie auch durch Teilnahme an einem kollektiven
System.
Información importante para el desecho ambiental compatible. EN ALGUNOS PAÍSES DE LA UNIÓN EUROPEA, ES PRODUC O NO EN RA EN EL
CAMPO DE APLICACIÓN DE LA LEY NACIONAL DE ACEP ACIÓN DE LA DIREC IVA RAEE Y, POR LO AN O, EN DICHOS PAÍSES NO HAY VIGEN E
NINGUNA OBLIGACIÓN DE RECOGIDA SELEC IVA DE RESIDUOS DE APARA OS CUANDO ERMINA SU VIDA Ú IL. Este producto guarda conformidad
con la Directiva EU2002/96/EC.El símbolo del recipiente con una cruz que se encuentra sobre el aparato indica que, a los fines de su propia vida útil, el producto se
debe tratar en forma separada de los residuos domésticos y, por lo tanto, se debe entregar a un centro de recogida selectiva de aparatos eléctricos y electrónicos, o
bien entregar al distribuidor en el momento de la adquisición de un nuevo aparato equivalente.El usuario es responsable de entregar el aparato cuando termina su
vida útil a las estructuras de recogida apropiadas, bajo pena de aplicación de las sanciones previstas por las legislaciones vigentes sobre residuos. La adecuada
recogida selectiva para la entrega sucesiva del aparato desechado para reciclado, tratamiento y eliminación ambientalmente compatible contribuye a evitar posibles
efectos negativos en el ambiente y la salud, y favorece el reciclado de los materiales con los cuales está compuesto el producto. Para obtener información más
detallada inherente a los sistemas de recogida disponibles, dirigirse al servicio local de eliminación de desechos o al negocio donde se ha realizado la compra. Los
fabricantes y los importadores se ajustarán a su responsabilidad en cuanto al reciclado, el tratamiento y la eliminación ambientalmente compatible ya sea en forma
directa o participando en un sistema colectivo.
2

INTERRUTTORE REMOTO WIRELESS (COD.206S/1 – 206F/1)
PER RISCALDATORI ELETTRICI IRK STAR PROGETTI
ISTRUZIONI D'USO
Ci complimentiamo con Lei per l'acquisto del nostro INTERRUTTORE REMOTO WIRELESS. Il prodotto da
Lei acquistato è stato appositamente progettato e costruito per gli apparecchi elettrici Star Progetti.
AVVERTENZE
•Prima di usare il prodotto leggere attentamente le istruzioni contenute nel presente libretto. Star
Progetti non potrà essere ritenuta responsabile per eventuali danni a persone o cose causati dal
mancato rispetto delle indicazioni di seguito elencate, la cui osservanza assicurerà invece la durata
e l’affidabilità, elettrica e meccanica, dell’apparecchio. Conservare sempre questo libretto di
istruzioni.
•Questo apparecchio non è da intendersi adatto all'uso da parte di persone (incluso bambini) con
ridotte capacità fisiche, sensoriali o mentali, o prive di esperienza e conoscenza a meno che siano
state supervisionate o istruite riguardo all'uso dell'apparecchio da una persona responsabile della
loro sicurezza. I bambini devono essere supervisionati per assicurarsi che non giochino con
l'apparecchio.
•Si raccomanda di non utilizzare l'interruttore remoto collegato a prolunghe.
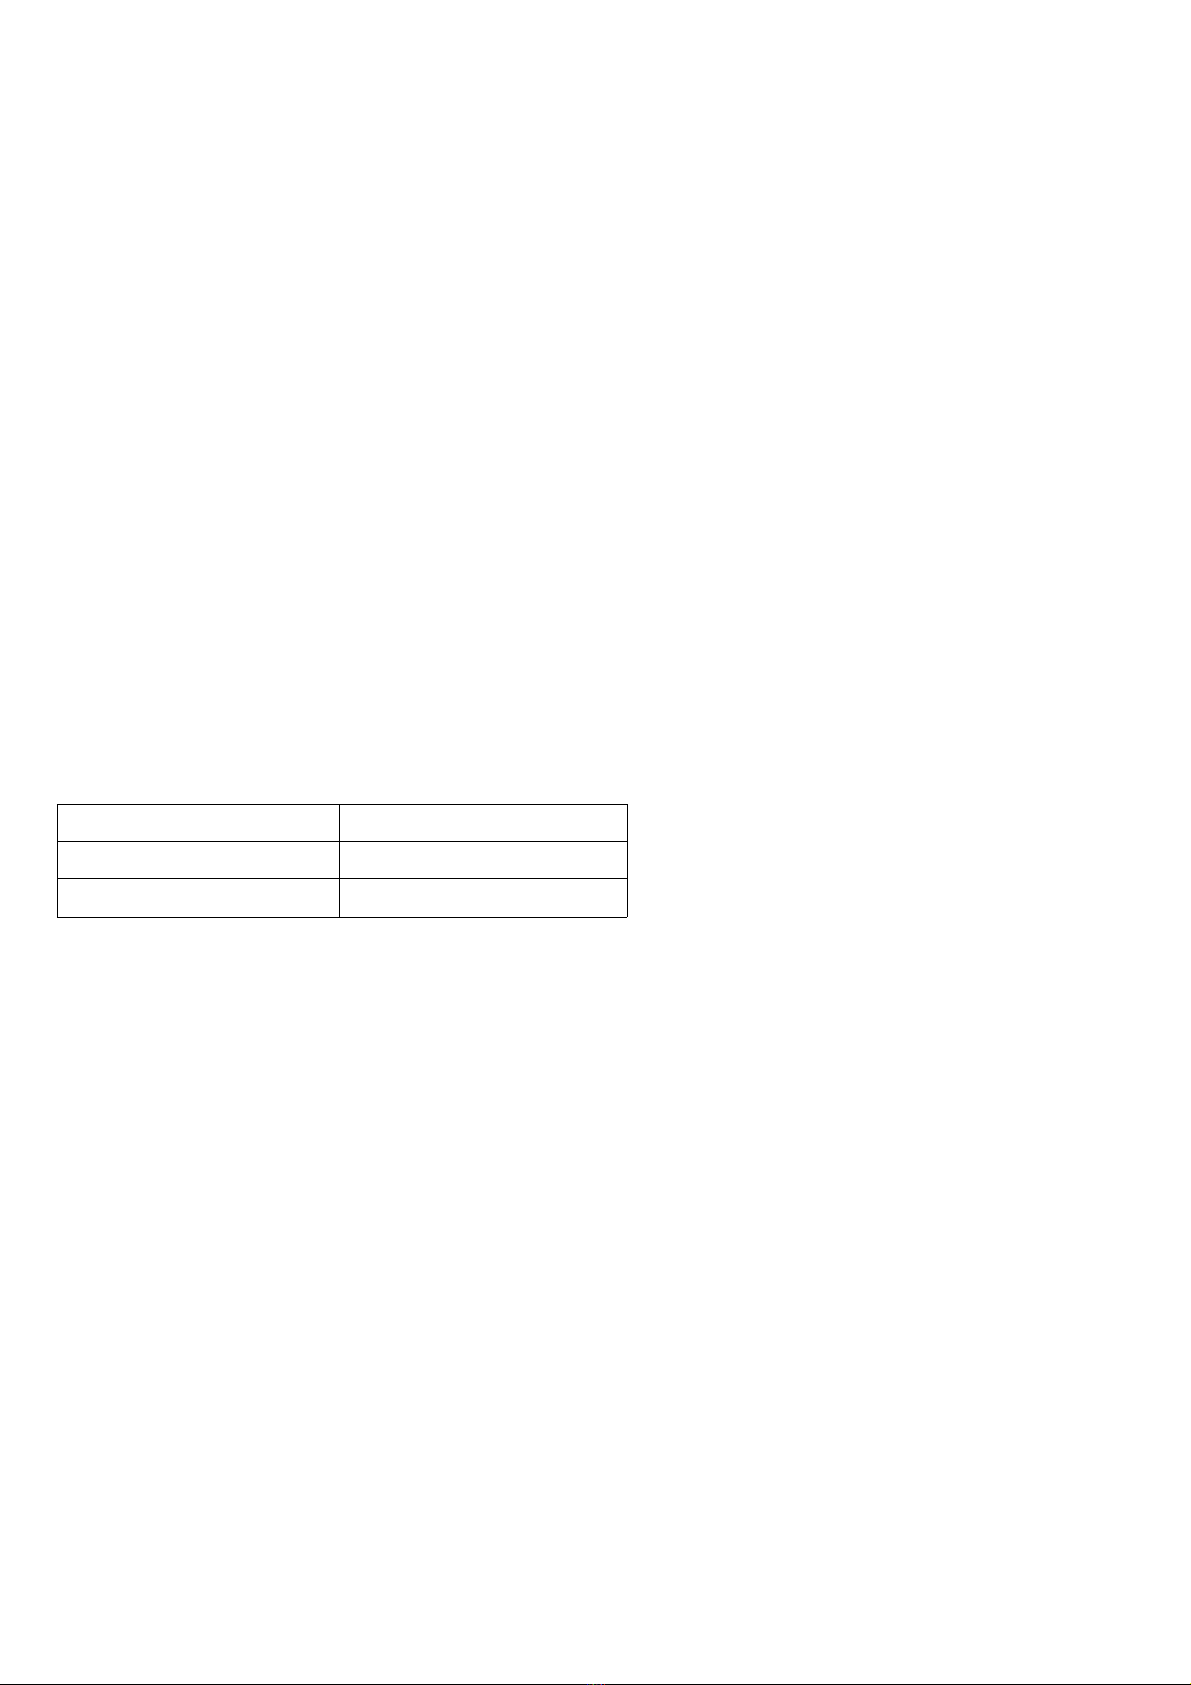
•L'interruttore remoto è stato progettato anche per utilizzi esterni.
1. CARATTERISTIC E
L'interruttore remoto mod.206 è stato progettato adottando la trasmissione radio con l'utilizzo di un
telecomando per l’accensione e lo spegnimento. L'interruttore 206 viene fornito completo di telecomando
e batteria 12V. La presa dell'interruttore è stata progettata per la sicurezza e protezione dei bambini.
Qualsiasi apparecchio elettrico collegato all'interruttore 206 può essere acceso o spento tramite il
telecomando o manualmente sull'interruttore. La spia verde (LED) sull'interruttore mostra lo stato di
funzionamento: acceso ON – spento OFF.
2. PROGRAMMAZIONE – FUNZIONAMENTO CON TELECOMANDO
A) COME COLLEGARE UN CODICE
Per iniziare a programmare il telecomando con l’interruttore remoto:
1. Inserire l'interruttore remoto nella presa elettrica a parete. Ricordate di rispettare l'indicazione
sulla etichetta "↑ TOP"
2. Portare il telecomando vicino all’interruttore remoto, Premere i tasto LEARNING CODE
sull’interruttore remoto per circa 3 secondi.
3. Il LED dell’interruttore remoto lampeggia lentamente, premere il tasto ON selezionato sul
telecomando.
4. L’interruttore remoto collegato commuta per due volte on-off, il codice è confermato e il LED
smette di lampeggiare. Bene, collegato!
B) PER MODIFICARE O ELIMINARE UN CANALE.
1. Premere i tasto LEARNING CODE per circa 3 secondi, il LED lampeggerà lentamente,
2. Premere il tasto OFF selezionato sul telecomando, la memoria programmata viene cancellata.
3. l’interruttore remoto collegato commuta per due volte on-off per conferma.
C) TELECOMANDO – INSERIMENTO BATTERIA
1. Rimuovere le quattro viti dalla parte inferiore della custodia del telecomando.
2. Collegare la batteria 12V tipo di A27 e fare attenzione ad allineare la polarità della batteria, come
indicato sulla custodia.
3. Chiudere la custodia inferiore del telecomando con le quattro viti.
3
L'interruttore remoto dispone di 5 impostazioni di memoria in Auto programmazione.
Può essere programmato per attivazioni singole o programmato per diverse combinazioni di attivazioni
allo stesso tempo. Questo significa che un interruttore remoto può essere programmato fino a 5
telecomandi.
3. FUNZIONAMENTO MANUALE - ACCENSIONE E SPEGNIMENTO DELL'INTERRUTORE REMOTO
1. Inserire l'interruttore remoto nella presa elettrica a parete.
2. Premere il tasto “ON/OFF” posto sull'interruttore remoto. L'interruttore remoto è acceso e la spia
luminosa verde (LED) è accesa.
3. Premere nuovamente il tasto “ON/OFF”. L'interruttore remoto e la spia luminosa sono entrambi
spenti.
4. RICERCA GUASTI
NESSUNA ATTIVAZIONE:
•Controlla rimuovere l'isolante della batteria.
•Controllare la polarità della batteria o corto circuito della batteria del telecomando.
•Controllare la programmazione del telecomando con l’interruttore remoto.
5. DATI TECNICI
•Telecomando opera su due zone e con due canali preimpostati
•Corrente di standby telecomando: <5μA
•Temperatura di funzionamento 0°C – 35°C
•Distanza di funzionamento: 30 mt senza ostacoli (funzionamento anche attraverso i muri)
•Con spina schu o direttamente nella presa a muro.
•Per uso interno ed esterno, IP44
RADIO FREQUENZA 433.92 MHz
VOLTAGGIO 230–240V 50/60HZ
POTENZA 3680 Watt (max per presa)
6. CONSIGLI DI UTILIZZO
Per comodità è possibile utilizzare 1 solo telecomando per due o più interruttori remoti cod. 206.
4

WIRELESS REMOTE CONTROL SWITC (COD.206S/1 – 206F/1)
FOR STAR PROGETTI ELECTRIC EATERS IRK
TEC NICAL INSTRUCTIONS
Congratulations for purchasing our wireless REMOTE CONTROL SWITCH (Receiver). The product you
have purchased was designed and constructed especially for Star Progetti electric appliances.
WARNING
•Before using the product read the instructions in this boo let carefully. Star Progetti cannot be
held liable for any damage to persons or things caused by non-observance of the instructions
listed below, observance on the other hand will ensure that the appliance is longlasting and
reliable, both electrically and mechanically. Always eep this instruction boo let.
•If using this appliance where there are children, supervision by an adult is necessary; this
appliance must not be used, without assistance, by children or persons whose physical, sensory or
mental capacities prevent them from applying the necessary safety precautions.
•Never use an extension cable with this appliance.
•Remote switch is designed also for outdoor use
1. DESCRIPTION
The mod. 206 remote control switch was designed for use by radio wave transmission with remote on-off
control deviceThe 206 switch is provided with REMOTE CONTROL device (Transmitter). The switch
electrical outlet design is child-proof. All electric appliances connected to the 206 switch can be turned
on and off by remote control or by manually switching. The green LED indicator light on the switch
indicates function status (if the indicator light is on, the switch is ON; if the indicator light is off, the
switch is OFF).
2. SETTINGS AND REMOTE CONTROL FUNCTION
A) HOW TO LINK A CODE
To start program your transmitter with the receiver:
1. Receiver plugged on power. Remember to respect the indication on the mar ing “↑ TOP ”
2. Bring the transmitter near the receiver, push the self program button LEARNING CODE on receiver
about 3 second.
3. Receiver LED will blin slowly, press transmitter selected ON button
4. Receiver connected lamp will on-off twice, code is confirmed and LED stops blin ing. Learning
done!
B) TO CHANGE OR DELETE THE CHANNEL
1. Push the learning code about 3 second, LED will blin slowly.
2. Press selected OFF button on transmitter, programmed memory is deleted.
3. Receiver connected lamp will on-off twice for confirmation.
C) REMOTE CONTROL DEVICE – INSERTING THE BATTERY
1. Remove the four screws from the case bottom.
2. Connect the battery 12V battery type A27 and be careful to align the battery polarity as shown on
the case housing.
3. Attach the upper case with four screws.
Receiver has 5 memory settings.
Self program function receiver has 5 memory settings.
It can be programmed to switch on at one time individually or programmed with different combinations
switching at same time. This means One receiver can be programmed into max. 5 different combination
to the transmitter button.
5

3. MANUAL - TURNING T E REMOTE CONTROL SWITC ON AND OFF
1. Plug in the remote control switch.
2. Press the ‘ON/OFF’ button on the remote control switch. The remote control switch is on and the
green (LED) indicator light is on.
3. Press the ‘ON/OFF’ button again. The remote control switch and indicator light are both off.
4. FAULT FINDING
NO ACTIVATION:
•Chec remove the battery insulator
•Chec battery polarity or running out of battery of the remote control
•Chec code program successful
5. TEC NICAL DATA
•Remote control with 2 Preset channels, it operate on 2 areas
•Remote control standby current: <5μA
•Wor ing temperature range: 0°C – 35°C
•Range: 30 m without obstacles (also wor s where spaces are separated by walls)
•Just plug-in receiver into wall outlet.
•For indoor and outdoor use, IP44
RADIO FREQUENCY 433.92 MHz
VOLTAGE 230–240V 50/60HZ
POWER 3680 Watt (max per outlet)
6.USER TIPS
For your convenience you can use only one remote control for two or more remote switches code 206.
6

TELEINTERRUPTEUR WIRELESS (COD.206S/1 - 206F/1)
POUR C AUFFAGES ELECTRIQUES IRC de STAR PROGETTI
INSTRUCTIONS TEC NIQUES
Nos compliments pour l’achat de notre télé-interrupteur wireless. Le produit que vous avez acheté a été
spécialement conçu et construit pour les appareils électriques STAR PROGETTI.
ATTENTION
•Avant d’utiliser le produit, lire attentivement les instructions contenues dans le présent manuel.
Star Progetti ne pourra être tenue responsable des éventuels dommages aux personnes ou aux
biens causés par le non respect des indications listées ci-dessous, dont l’application assurera au
contraire la durée et la fiabilité électrique et mécanique de l’appareil. Conserver ce livret
d’instructions.
•Cet appareil n’est pas adapté pour être utilisé par des personnes (y compris des enfants) ayant des
capacités physiques, sensorielles ou mentales réduites, ou bien sans expérience ni connaissance
du fonctionnement, à moins qu’elles aient été instruites ou formées pour l’utilisation de l’appareil
par une personne responsable de leur sécurité. Les enfants devraient être surveillés pour
s’assurer qu’ils ne jouent pas avec l’appareil.
•Nous vous recommandons de ne pas utiliser l'interrupteur déporté s'il est raccordé à des
rallonges.
•L'interrupteur déporté a été conçu aussi pour une utilisation en extérieur.
1. CARACTERISTIQUES
Le télé-interrupteur mod. 206 a été projeté en adoptant la transmission radio avec l’emploi d’une
télécommande pour l’allumage et pour éteindre. Le télé-interrupteur 206 est livré avec télécommande.
La prise de l’interrupteur a été projetée pour la sécurité et la protection des enfants. Chaque appareil
électrique relié au télé-interrupteur 206 peut être allumé ou éteint avec la télécommande ou
manuellement sur l’interrupteur. Le voyant lumineux vert (LED) sur l'interrupteur montre L’état de
fonctionnement: allumé ON – éteint OFF.
2. PROGRAMMATION – FONCTIONNEMENT AVEC TELECOMMANDE
A) COMMENT PROGRAMMER
Pour commencer à programmer la télécommande avec l'interrupteur à distance:
1. Brancher l'interrupteur à distance dans la prise électrique murale. Rappelez-vous de respecter
l'indication sur l'étiquette "↑ TOP"
2. Positionner la télécommande près de l'interrupteur à distance, appuyer sur le bouton LEARNING
CODE de l'interrupteur pendant 3 secondes environ.
3. Le voyant LED de l’interrupteur clignote lentement, appuyer sur le bouton ON de la
télécommande.
4. L’interrupteur connecté commute par deux fois on-off, le code est confirmé et le voyant LED arrête
de clignoter. Tout est bon, c'est connecté!
B) POUR MODIFIER OU ELIMINER UN CANAL
1. Appuyer sur le bouton LEARNING CODE pendant environ 3 secondes, le voyant LED clignotera
lentement,
2. Appuyer sur le bouton OFF de la télécommande, la mémoire programmée est effacée.
3. L’interrupteur connecté commute par deux fois on-off pour confirmation.
C) TELECOMMANDE – INSTALLATION DE LA PILE
1. Enlever les quatre vis de la partie inférieure de l'étui de la télécommande.
2. Brancher la pile 12V de type A27 et faire attention à l'alignement de la polarité de la batterie,
comme indiqué sur l'étui.
3. Refermer l'étui inférieur de la télécommande avec les quatre vis.
7
L'interrupteur à distance dispose de 5 configurations de mémoire.
L'interrupteur à distance dispose de 5 configurations de mémoire en Auto programmation.
Il peut être programmé pour des activations singulières ou pour diverses combinaisons d'activation en
même temps. Cela signifie qu'un interrupteur à distance peut être programmé pour un maximum de 5
combinaisons de code différentes.
3. FONCTIONNEMENT MANUEL - ALLUMER ET ETEINDRE LE TELEINTERRUPTEUR
1. Insérer le télé-interrupteur dans la prise électrique.
2. Appuyer la touche “ON/OFF” qui se trouve sur le télé-interrupteur. Le télé-interrupteur est allumé
et le voyant lumineux vert (LED) est allumé.
3. Appuyer à nouveau sur la touche “ON/OFF”. Le télé-interrupteur et le voyant lumineux sont
éteints.
4. REC ERC E DE PANNES
Aucune activation:
•Contrôler d'avoir enlever l'isolant de la batterie.
•Contrôler la polarité de la batterie ou un court-circuit de la batterie de la télécommande.
•Contrôler la programmation de la télécommande avec l'interrupteur à distance.
5. DONNEES TECNIQUES
•Telecommande fonctionne sur deux zones et deux canaux pré-configurés
•Courant de stand-by de la télécommande:<5μA
•Température de fonctionnement :0°C – 35°C
•Distance de fonctionnement:30 sans obstacles (fonctionne même à travers les murs)
•Avec fiche directement dans la prise murale.
•Pour une utilisation intérieure et extérieure, IP44
FREQUENCE RADIO 433.92 MHz
VOLTAGE 230–240V 50/60HZ
PUISSANCE 3680 Watt (max per prise)
6. MODE D’EMPLOI
Pour plus de commodité, il est possible d'utiliser une seule télécommande pour deux ou plusieurs
interrupteurs à distance cod. 206.
8

FUNKFERNSC ALTER (COD. 206S/1 – 206F/1)
FÜR ELEKTRO EIZGERÄTE IRK von STAR PROGETTI
TEC NISC E BEDIENUNGSANLEITUNG
Wir begluc wunschen Sie zum Erwerb unseres Fun fernschalters. Das von Ihnen erworbene Produ t ist
eigens fur die Ele trogerate Star Progetti entworfen und hergestellt worden.
WARNUNG
•Lesen Sie bitte vor dem Einsatz des Produ tes aufmer sam die Hinweise in diesem Heft. Star
Progetti ann fur eventuelle Personen- oder Sachschaden einerlei Haftung ubernehmen, die
aufgrund von Nichtbeachtung der vorliegenden Hinweise erfolgen. Die Beachtung dieser Hinweise
sichert auserdem die Lebensdauer wie auch die Gebrauchssicherheit der ele trischen und
mechanischen Teile des Gerates. Heben Sie das Anweisungsheft gut auf.
•Dieses Gerat ist nicht geeignet fur die Benutzung durch Personen (einschl. Kindern) mit
verringerter orperlicher, sinnlicher oder mentaler Leistungsfahig eit oder ohne Erfahrung und
Kenntnis, es sei denn, sie werden beaufsichtigt oder uber die Nutzung des Gerates durch eine fur
ihre Sicherheit verantwortliche Person instruiert. Kinder mussen beaufsichtigt werden, um
sicherzustellen, dass diese nicht mit dem Gerat spielen.
•Der Fernschalter sollte nicht in Verbindung mit Verlangerungs abeln benutzt werden.
•Der Fernschalter ist auch fur den Gebrauch im Ausenbereich geeignet.
1. EIGENSC AFTEN
Der Fernschalter Mod. 206 fun tioniert per Fun ubertragung mit einer Fernbedienung fur die Ein- und
Ausschaltung. Der Fernschalter 206 wird mit Fernbedienung und 12V-Batterie geliefert. Der Anschluss
des Schalters ist so beschaffen, dass er die Sicherheit und den Schutz von Kindern gewahrleistet. Jegliches
an den Fernschalter 206 angeschlossene Ele trogerat ann mittels Fernbedienung oder manuell am
Schalter ein- oder ausgeschaltet werden. Die grune Leuchtanzeige (LED) am Schalter zeigt den
Betriebszustand an: eingeschaltet ON – ausgeschaltet OFF.
2. PROGRAMMIERUNG – BETRIEB MIT FERNBEDIENUNG
A) KOPPLUNG ÜBER CODE
Fur die Programmierung der Fernbedienung mit dem Fernschalter:
1. Den Fernschalter in die Wandstec dose einstec en. Dabei die Angabe auf dem Eti ett "↑ TOP"
beachten.
2. Die Fernbedienung in die Nahe des Fernschalters bringen und die Taste LEARNING CODE auf dem
Fernschalter ca. 3 Se unden druc en.
3. Die LED des Fernschalters blin t langsam. Die ON-Taste auf der Fernbedienung druc en.
4. Der ge oppelte Fernschalter wird zwei Mal ein- und ausgeschaltet, der Code ist bestatigt und die
LED hort zu Blin en auf. Die Verbindung wurde hergestellt!
B) KANAL ÄNDERN ODER LÖSCHEN
1. Die Taste LEARNING CODE ca. 3 Se unden druc en, die LED blin t langsam.
2. Die OFF-Taste auf der Fernbedienung druc en, der programmierte Speicher wird geloscht.
3. Der ge oppelte Fernschalter wird zur Bestatigung zwei Mal ein- und ausgeschaltet.
C) FERNBEDIENUNG – BATTERIE EINLEGEN
1. Die vier Schrauben an der Unterseite des Gehauses der Fernbedienung losen.
2. Die 12V-Batterie vom Typ A27 einlegen und darauf achten, die Pole der Batterie wie auf dem
Gehause gezeigt auszurichten.
3. Das Gehause der Fernbedienung an der Unterseite mit den vier Schrauben verschliesen.
9
Der Fernschalter verfügt über 5 Speichereinstellungen.
Der Fernschalter verfugt uber 5 Speichereinstellungen fur die automatische Programmierung. Er ann
fur einzelne A tivierungen oder fur verschiedene A tivierungs ombinationen gleichzeitig programmiert
werden. Dies bedeutet, dass ein Fernschalter maximal fur 5 verschiedene Kombinationen von
Fernbedienungscodes programmiert werden ann.
3. MANUELLER BETRIEB - EIN- UND AUSSC ALTUNG DES FERNSC ALTERS
1. Den Fernschalter an die Stec dose anschliesen.
2. Die Taste “ON/OFF” auf dem Fernschalter druc en. Der Fernschalter ist eingeschaltet und die
grune Leuchtanzeige (LED) leuchtet.
3. Erneut die Taste “ON/OFF” druc en. Der Fernschalter und die Leuchtanzeige sind beide
ausgeschaltet.
4. STORUNGSSUC E
KEINE AKTIVIERUNG:
•Sicherstellen, dass das Isolierband an der Batterie entfernt wurde.
•Die Polung der Batterie oder einen Kurzschluss der Batterie der Fernbedienung uberprufen.
•Die Programmierung der Fernbedienung mit dem Fernschalter uberprufen.
5. TEC NISC E DATEN
•Zwei Ubertragungs anale, dec t zwei Bereiche ab
•Stand-by-Strom der Fernbedienung: <5μA
•Betriebstemperatur 0°C – 35°C
•Fun tionsweite: 30 m ohne Hindernisse (fun tioniert auch durch Wande hindurch)
•Stec er dire t in der Wandstec dose.
•Zum Gebrauch im Innen- und Ausenbereich, IP44
RADIOFREQUENZ 433.92 MHz
SPANNUNG 230–240V 50/60HZ
LEISTUNG 3680 Watt (maximal pro Anschluss)
6. BENUTZUNGS INWEISE
Aus Bequemlich eitsgründen ist es möglich, eine einzige Fernbedienung für zwei oder mehr Fernschalter
Code 206 zu verwenden. .
10

INTERRUPTOR REMOTO SIN CABLES (CÓD. 206S/1 – 206F/1)
PARA CALEFACTORES ELÉCTRICOS IRK de STAR PROGETTI
INSTRUCCIONES TÉCNICAS
Lo felicitamos por haber adquirido nuestro interruptor remoto sin cables. El producto que Ud. ha
comprado ha sido expresamente proyectado y construido para los equipos electricos Star Progetti.
ATENCIÓN
•Antes de usar el producto, leer atentamente las instrucciones que contiene el presente folleto. Star
Progetti no sera responsable por eventuales danos a personas o cosas causados por la falta de
cumplimiento de las indicaciones que se detallan mas abajo. Este cumplimiento asegurara la
duracion y la confiabilidad del aparato, tanto electrica como mecanica. Conservar siempre este
folleto de instrucciones.
•Si este producto se utiliza en presencia de ninos, debe estar presente un adulto. Este aparato no
puede ser utilizado, sin supervision, por ninos ni personas con discapacidades sensoriales o
mentales que impidan la aplicacion de las medidas de seguridad necesarias.
•Se recomienda no utilizar el interruptor remoto conectado a cables de extension.
•El interruptor remoto ha sido disenado tambien para uso externo.
1. CARACTERÍSTICAS
El interruptor remoto mod. 206 ha sido proyectado adoptando la trasmision radio con el uso de un
control remoto para el encendido y el apagado. El interruptor remoto 206 esta acompanado por un
control remoto y bateria de 12V. La toma del interruptor ha sido proyectada para la seguridad y
proteccion de los ninos. Cualquier equipo electrico conectado con el interruptor remoto 206 puede ser
encendido o apagado mediante el control remoto o manualmente en el interruptor. El indicador luminoso
verde (LED) sobre el interruptor muestra el estado de funcionamiento: encendido ON – apagado OFF.
2. PROGRAMACIÓN – FUNCIONAMIENTO CON CONTROL REMOTO
A) CÓMO CONECTAR UN CÓDIGO
Para comenzar a programar el control remoto con el interruptor remoto:
1. Colocar el interruptor remoto en el toma electrico de pared. Recordar respetar las indicaciones de
la etiqueta "↑ TOP"
2. Acercar el control remoto al interruptor remoto. Apretar el boton LEARNING CODE en el
interruptor remoto durante unos 3 segundos.
3. El LED del interruptor remoto destella lentamente, apretar el boton ON seleccionado en el control
remoto.
4. El interruptor remoto conectado conmuta dos veces on-off, el codigo esta confirmado y el LED
deja de destellar. !Bien conectado!
B) PARA MODIFICAR O ELIMINAR UN CANAL.
1. Apretar el boton LEARNING CODE durante unos 3 segundos, el LED destellara lentamente.
2. Apretar el boton OFF seleccionado en el control remoto, se cancela la memoria programada.
3. El interruptor remoto conectado conmuta dos veces on-off para confirmar.
C) CONTROL REMOTO – COLOCACIÓN DE BATERÍA
1. Quitar los cuatro tornillos de la parte inferior de la carcasa del control remoto.
2. Conectar la bateria de 12V tipo A27 prestando atencion a alinear las polaridades de la bateria,
segun se indica en la carcasa.
3. Cerrar la carcasa inferior del control remoto con los cuatro tornillos.
11
El interruptor remoto cuenta con 5 programaciones de memoria.
El interruptor remoto cuenta con 5 programaciones de memoria en Auto programacion.
Puede programarse para activaciones individuales o para diferentes combinaciones de activaciones al
mismo tiempo. Esto significa que un interruptor remoto puede ser programado al max. para 5 diferentes
combinaciones de codigo de control remoto.
3. FUNCIONAMIENTO MANUAL - ENCENDIDO Y APAGADO DEL INTERRUPTOR REMOTO
1. Colocar el interruptor remoto en el toma electrico.
2. Oprimir el boton “ON/OFF” colocado sobre el interruptor remoto. El interruptor remoto esta
encendido y el indicador luminoso verde (LED) esta encendido.
3. Oprimir nuevamente el boton “ON/OFF”. El interruptor remoto y el indicador luminoso estan
apagados.
4. BUSQUEDA DE DESPERFECTOS
Ninguna activacion:
•Controlar haber quitado el aislante de la bateria.
•Controlar la polaridad de la bateria o del corto circuito de la bateria del control remoto.
•Controlar la programacion del control remoto con el interruptor remoto.
5. DATOS TÉCNICOS
•Predisposicion para dos canales, trabaja sobre dos areas
•Corriente de stand-by del control remoto: <5μA
•Temperatura de funcionamiento 0 °C – 35 °C
•Distancia de funcionamiento: 30 m sin obstaculos (funciona miento tambien a traves de las
paredes)
•Con toma directamente en el enchufe de pared.
•Para uso interno y externo, IP44
FRECUENCIA RADIO 433.92 MHz
VOLTAJE 230–240V 50/60HZ
POTENCIA 3680 Watt (máx. por toma)
6. RECOMENDACIONES PARA EL USO
Para su comodidad es posible utilizar 1 único control remoto para dos o más interruptores remotos cód.
206.
12

CERTIFICATO DI GARANZIA
Ci complimentiamo con Lei per l’acquisto dell'INTERRUTTORE REMOTO WIRELESS mod. 206. La durata della garanzia è di 1
anno, decorre dalla data di acquisto del prodotto e cessa dopo il periodo prescritto. La ricevuta fiscale o altro documento
valido fiscalmente comprova la decorrenza della garanzia. Si garantiscono tutte le sostituzioni o riparazioni che si rendessero
necessarie a causa di difetti di materiale o di costruzione. E’ esclusa quindi la sostituzione o la riparazione delle parti soggette
a normale consumo. La garanzia non viene riconosciuta qualora l’apparecchio venga manomesso o qualora sia danneggiato a
causa d incuria, durante il trasporto, manutenzione operata da personale non autorizzato, mancata osservanza delle istruzioni
d’uso, errata installazione o non conforme alle norme vigenti nel paese di utilizzo. La garanzia non prevede in nessun caso la
sostituzione dell’apparecchiatura. Le riparazioni eventuali riconosciute in garanzia saranno effettuate gratuitamente per
merce resa Franco Star Progetti o presso il distributore autorizzato. Sono quindi a carico dell’utilizzatore le sole spese di
trasporto.
CERTIFICATE OF GUARANTEE
We congratulate you on the purchase of WIRELESS REMOTE CONTROL mod.206. Validity 1 year from date of purchase of the
appliance: the guarantee expires after this period. The invoice, receipt or hire purchase agreement shall prove the duration of
the guarantee period. Replacements and repairs caused by faulty materials or manufacture are guaranteed. Replacements and
repairs to those parts of the appliance subject to normal wear are excluded form this guarantee. The guarantee shall
immediately cease and become void should the appliance be dismantled or repaired by unauthorized people, or in case of
negligence, or accidental damage during transport or elsewhere, or in case of misuse, failure to comply with the instructions
for use, maintenance carried out by unauthorized people, faulty installation not in conformity with the laws in force.
Replacement of the appliance is excluded from this guarantee. The eventual repairs recognized in guarantee will be carried out
free of charge for those appliances returned free STAR PROGETTI’s factory or to one of the authorized distributor. All transport
costs are to be paid by the customer.
CERTIFICAT DE GARANTIE
Nos compliments pour l’achat de l' INTERRUPTEUR WIRELESS mod.206. La durée de la garantie est de 12 mois à partir de la
date d’achat de l’appareil et elle cesse après la période prescrite. Le tic et d’achat ou autre document, obligatoire fiscalement
prouve la date de début de la garantie. On garantie toutes les substitutions ou les réparations qui sont nécessaires à cause de
défauts des matériaux ou de la construction. La substitution ou la réparation des parties assujetties à un usage normal sont
par conséquent exclues. La garantie n’est pas reconnue au cas ou l’appareil ait été malmené ou quand il a été abîmé à cause de
la négligence de l’utilisateur, maintient fait par personnel pas autorisé, à cause du transport, lorsque les instructions
d’utilisation n’ont pas été respectées ou encore lorsqu’il a été mal installé sans tenir compte des normes en vigueur. La
garantie ne prévoit absolument pas la substitution de l’appareil. Les réparations prises en considération par la garantie sont
effectuées gratuitement pour les marchandises rendues franco atelier Star Progetti ou auprès d’un de nos distributeurs. Par
conséquent seulement les frais de transport sont à la charge du client.
GARANTIESC EIN
Wir beglüc wünschen Sie zu Ihren Ein auf der FUNKFERNSCHALTER WIRELESS cod.206. Die Dauer der Garantie beträgt 12
Monate, sie beginnt mit dem Kaufdatum des Gerätes und endet nach der vorgeschriebenen Zeit, auch wenn das Gerät nicht
benutzt worden ist. Der Steuerbeleg oder gesetzlich steuerrechtliche Do umente bestätigen den Beginn der Garantie. Es
werden alle Ersetzungen und Reparaturen garantiert, welche sich auf Grund von Material- oder Konstru tionsfehlern als
notwendig erweisen. Ausgeschlossen sind daher Reparaturen und Ersetzungen von Teilen bei normalen Verbrauch. Die
Garantie wird nicht aner annt, falls das Gerät durch falsche Betätigung beschädigt wird oder auf Grund Nachlässig eit, beim
Transport, durch fehlende Aufmer sam eit der Gebrauchsanweisungen oder bei falscher Installation, welche nicht den
geltenden Normen entsprechen. Die Garantie schließt die Gerätsersetzung aus. Eventuelle Garantie-Reparaturen werden für
Geräte, die frei Haus Star Progetti oder bei dem genehmigten Wiederver äufer geliefert werden, ostenlos durchgeführt. Nur
Transport osten sind daher zur Lasten des Endverbrauchers.
CERTIFICADO DE GARANTIA
Nos complimentamos con Usted por la compra de INTERRUPTOR REMOTO mod.206. La duración de la garantía es 1 años, a
partír de la fecha de la compra del aparejo y se acaba despues del periodo prescrito. El recibo u otro documento que tenga
validez fiscal comprueba el transcurso de la garantía.Se garantizan todas las substituciones o reparaciones che sean necesarias
a causa de defectos del material o de construcción. Queda excluida, entonces, la substitución o la reparación de las partes
sujetas a normal consumo.La garantía no viene econocida si el aparejo viene manumiso o si viene dañado a causa de incuria,
durante el transporte, manutención hecha por personal no autorizado, falta en la observancia de las instrucciones de
utilización, errata installación o no conforme con las normas en vigor en el pais de utilización.La garantía no prevée en ningun
caso la substitución del aparejo. Las reparaciones eventuales reconocidas en garantía serán realizadas gratuitamente por
ercancia entregada Franco de transporte Star Progetti o a la oficina del distribuidor autorizado. Son, entonces, a cargo del
utilizador los gastos de transporte.
13

CERTIFICATO DI GARANZIA - CERTIFICATE OF GUARANTEE
CERTIFICAT DE GARANTIE - GARANTIESC EIN
CERTIFICADO DE GARANTIA
•Per rendere operante la garanzia, l'utilizzatore all'atto dell'acquisto deve compilare il certificato in
tutte le sue parti.
•The user must fill in the certificate for the guarantee to be effective.
•Pour que la garantie soit valable, l'utilisateur, au moment de l'achat de l'appareil, doit remplir
toutes les parties du certificat de garantie.
•Der Endverbraucher soll den Garantieschein beim Ein auf ganz ausfüllen, damit die Garantie
aner annt wird.
•Para que la garantía tenga validez, el utilizador, al momento de la compra, tiene que rellenar el
certificado en todas sus partes.
N. SERIE - APPLIANCE No. – N° D’IMMATRICOLATION - SERIENNUMMER- NUMERO DE SERIE
__________________________________________________________________________
DATA ACQUISTO - DATE OF PURCHASE – DATE D’ACHAT - EINKAUFSDATUM - FECHA DE COMPRA
__________________________________________________________________________
FATTURA N. - INVOICE NO. – FACTURE NO. – RECHNUNGSNUMMER - FACTURA NUMERO
__________________________________________________________________________
RIVENDITORE - DEALER – REVENDEUR – WIEDERVERKAEUFER – REVENDEDOR
__________________________________________________________________________
This manual suits for next models
1
Table of contents
Languages:


/BGEF Installation and owner's manual")