Riello R290 User manual

R290
EN Wall-mounted user interface User Manual
(Original document)
IT Interfaccia utente a parete Manuale utente
(Traduzione del documento originale)
HU )DOUDV]HUHOKHWęIHOKDV]QiOyLLQWHUIpV] +DV]QiODWLXWDVtWiV
$]HUHGHWLGRNXPHQWXPIRUGtWiVD
RO ,QWHUIDġĄFXXWLOL]DWRUXOPRQWDWĄSHSHUHWH Manual de utilizare
(Traducerea documentului original)
PL 1DğFLHQQ\SDQHOVWHURZDQLD 3RGUċF]QLNXī\WNRZQLND
(7âXPDF]HQLHRU\JLQDOQHMLQVWUXNFML
NL %HGLHQLQJVSDQHHOYRRUZDQGPRQWDJH Gebruikershandleiding
(Vertaling van het originele document)

2
QUICK START.......................................................................................................................................................................................................................3
Important ..........................................................................................................................................................................................................3
Key features ...................................................................................................................................................................................................... 3
WUI DISPLAY OVERVIEW ................................................................................................................................................................................................ 4
OVERVIEW OF ICONS.......................................................................................................................................................................................................5
PROGRAMMING THE CONTROL...................................................................................................................................................................................6
Clock/Day: Setting the time and day.......................................................................................................................................................6
Heating / Cooling / DHW only / O: Changing the operating mode .........................................................................................7
Home / Sleep / Away: Changing the comfort range.......................................................................................................................... 8
Current setpoint control: Changing the temperature.......................................................................................................................10
Additional data display: General status of the unit............................................................................................................................ 11
Scheduling: Assigning schedules to heating and cooling modes................................................................................................12
ADVANCED PROGRAMMING OPTIONS....................................................................................................................................................................15
Advanced settings: Programming the Control....................................................................................................................................15
Domestic Hot Water mode..........................................................................................................................................................................16
Master / Slave control....................................................................................................................................................................................17
ALARMS AND ERRORS.....................................................................................................................................................................................................18
Alarms.................................................................................................................................................................................................................18
Errors ...................................................................................................................................................................................................................19
Contents
User interface

3
Quick Start
Your system is controlled by a Wall-Mounted User interface
(WUI) that can be installed inside your home.
This manual provides guidelines on how to use this
interface eectively.
If you have any questions regarding the display and its
configuration, please contact your installer for more
information.
ŶHeating / Cooling: Depending on the unit, the system
may operate in Heating or Cooling.
ŶOccupancy control allows you to easily set the system to
operate in the following modes:
Home
Sleep
Away
ŶEasy temperature control: Depending on system
conguration, room temperature or water temperature
will be constantly displayed on the screen.
Room temperature icon indicates
that system control is based on room
temperature.
Water temperature icon means that the
system is controlled according to water
temperature.
ŶThe setpoint which is the temperature to be achieved is
displayed in the upper-right corner of the screen.
ŶSchedule control allows you to set the unit to operate
with a set of pre-dened parameters (heating/cooling,
occupancy, setpoint) in a specic period of time. You can
always modify the schedule if necessary.
ŶAdditional data display: In addition to the standard
display, you may easily check other parameters, which
provide information on the general status of the unit.
ŶAlarms are used to warn of potentially dangerous
situations that may result in the failure of the unit.
TIP To congure the advanced parameters of the unit, please
contact professional technicians.
Occupancy
Mode Down
Schedule Up
Important
Key features

4
WUI Display Overview
ᬕᬔ
ᬓ
ᬅ
ᬒ
ᬆ
ᬑ
ᬇ
ᬐ
ᬈ
ᬏ
ᬉ
ᬊᬋ ᬌᬍᬎ
Legend:
ᬅDays of week ᬋCooling mode ᬑOccupancy lock
ᬆClock ᬌPump running (Not applicable on R290) ᬒOccupancy status
ᬇRoom temperature ᬍDomestic Hot Water mode (DHW) ᬓSetpoint
ᬈWater temperature ᬎMaster / Slave control ᬔElectric heater stage
ᬉAdvanced settings ᬏAlarm ᬕBoiler
ᬊHeating mode ᬐTemp. display / Alarm code / Message
Home Screen
Please note that the home screen display may vary depending
on unit conguration and screen settings:
ŶHeating / Cooling / DHW mode
ŶAdditional heating: Boiler or electric heating
ŶOccupancy mode control: Home/Sleep/Away
ŶAir temperature control (room temp.)
ŶWater temperature control
ŶTime display: 12-hour clock or 24-hour clock

5
Overview of Icons
Days of week: Temperature display:
Monday – Sunday Room temperature
Clock:
Water temperature
12-hour or 24-hour clock display
Room temperature: Occupancy lock:
System control is based on room
temperature
Occupancy is set manually by the
user (schedule control is disabled)
Water temperature: Occupancy:
System control is based on water
temperature
HOME mode is active
Advanced settings: Occupancy:
The icon is blinking when a
password is required
SLEEP mode is active
Heating mode: Occupancy:
HEATING mode is active AWAY mode is active
Cooling mode: Setpoint:
COOLING mode is active Temperature to be achieved
(room or water temperature)
Pump status: Electric heater stage active:
Pump is running Usedinthecaseofheatpumpfailure
or low outdoor air temperature
Domestic Hot Water mode (DHW): Boiler active:
DHW mode is active Used in the case of heat pump
failure or low outdoor air
temperature
Master / Slave: Alarm:
Steady icon: This interface is
connected to the master unit and
it is used to control all units in the
same master/slave group
Steady icon: Alarm condition
detected; the unit is stopped
Fast ashing icon: This interface is
connected to the slave unit and it is
controlled by commands sent from
the Master
Flashing icon: Alarm condition
detected; the unit is running
Slowly ashing icon: Master/Slave
communication failure
NOTE :KHQWKHXVHULQWHUIDFHEDFNOLJKWLVVZLWFKHGR௺SUHVVDQ\NH\WRWXUQRQWKHGLVSOD\

6
Before using any programming features of the WUI, it is
necessary to set the time and day of the control.
To congure time and day display
1. To access the time conguration menu, press and hold
the Schedule key for 2 seconds.
Day of week setting
2. The current day starts ashing.
3. If necessary, press the Down key or the Up key to change
the day of the week.
4. Press the Schedule key to conrm your selection and go
to the next parameter.
Time format setting
5. Once the day of the week has been conrmed, set the
time format.
6. Press the Down key or the Up key to change the time
format.
7. Press the Schedule key to conrm the time display.
You may customise the clock to display time in a 12-hour
or 24-hour format.
Example: 12-hour clock display
Example: 24-hour clock display
Time setting
8. Once the time format has been conrmed, set the time.
9. Press the Down key or the Up key to set the time.
For 24-hour format: Set the hour and press the Schedule
key to conrm. Then, set minutes and press the Schedule
key to conrm.
10.
To conrm all changes, press and hold the Schedule key
for 2 seconds.
Programming the Control
Clock/Day: Setting the time and day
12-hour format 24-hour format

7
Theoperatingmodedisplaydependsontheunitconguration
as well as user settings.
Heating: the heat pump heats the water loop
to the selected temperature setpoint.
Cooling: the heat pump or chiller cools
the water loop to the selected temperature
setpoint.
Domestic Hot Water only: the heat pump is
used to provide domestic hot water. Cooling
or Heating is disabled.
Boost Heating: the heat pump heats the
water loop to the selected temperature
setpointregardlessofitsmaximumpowerlimit
[fast ashing icon].
Boost Cooling: the heat pump cools the
water loop to the selected temperature
setpointregardlessofitsmaximumpowerlimit
[fast ashing icon].
Drying: the heat pump slowly heats the water
loop (progressive warm-up) for proper screed
oor drying [slowly ashing icon].
Purge: the water pump is requested to run
in order to vent the hydraulic circuit [fast
ashing icon].
To set the operating mode
1. Press the Mode key successively to select the required
operating mode.
2. The icon corresponding to the selected mode will be
displayed.
Example:
Mode Cooling
Occupancy Home
Temp. control Air temp. control
Room temp. 28°C
Setpoint 26°C
Example:
Mode Heating
Occupancy Home
Temp. control Water temp. control
Water temp. 34°C
Setpoint 35°C
Heating / Cooling / DHW only / O: Changing the operating mode

8
Threemethodsusedtodenethecomfortrange(occupancy
mode) are as follows (A/B/C):
A. Scheduling
The user can set up to 8 steps where each step is dened by
the following parameters:
ŶStarting time
ŶOccupancy mode
ŶDay(s) of week when it is activated
For more information about occupancy control based on
scheduling, please see “Scheduling: Assigning schedules to
heating and cooling modes”on page 12.
B. Manual setting
The user can change occupancy directly on the screen.
This setting will be eective until the next scheduling step
becomes active.
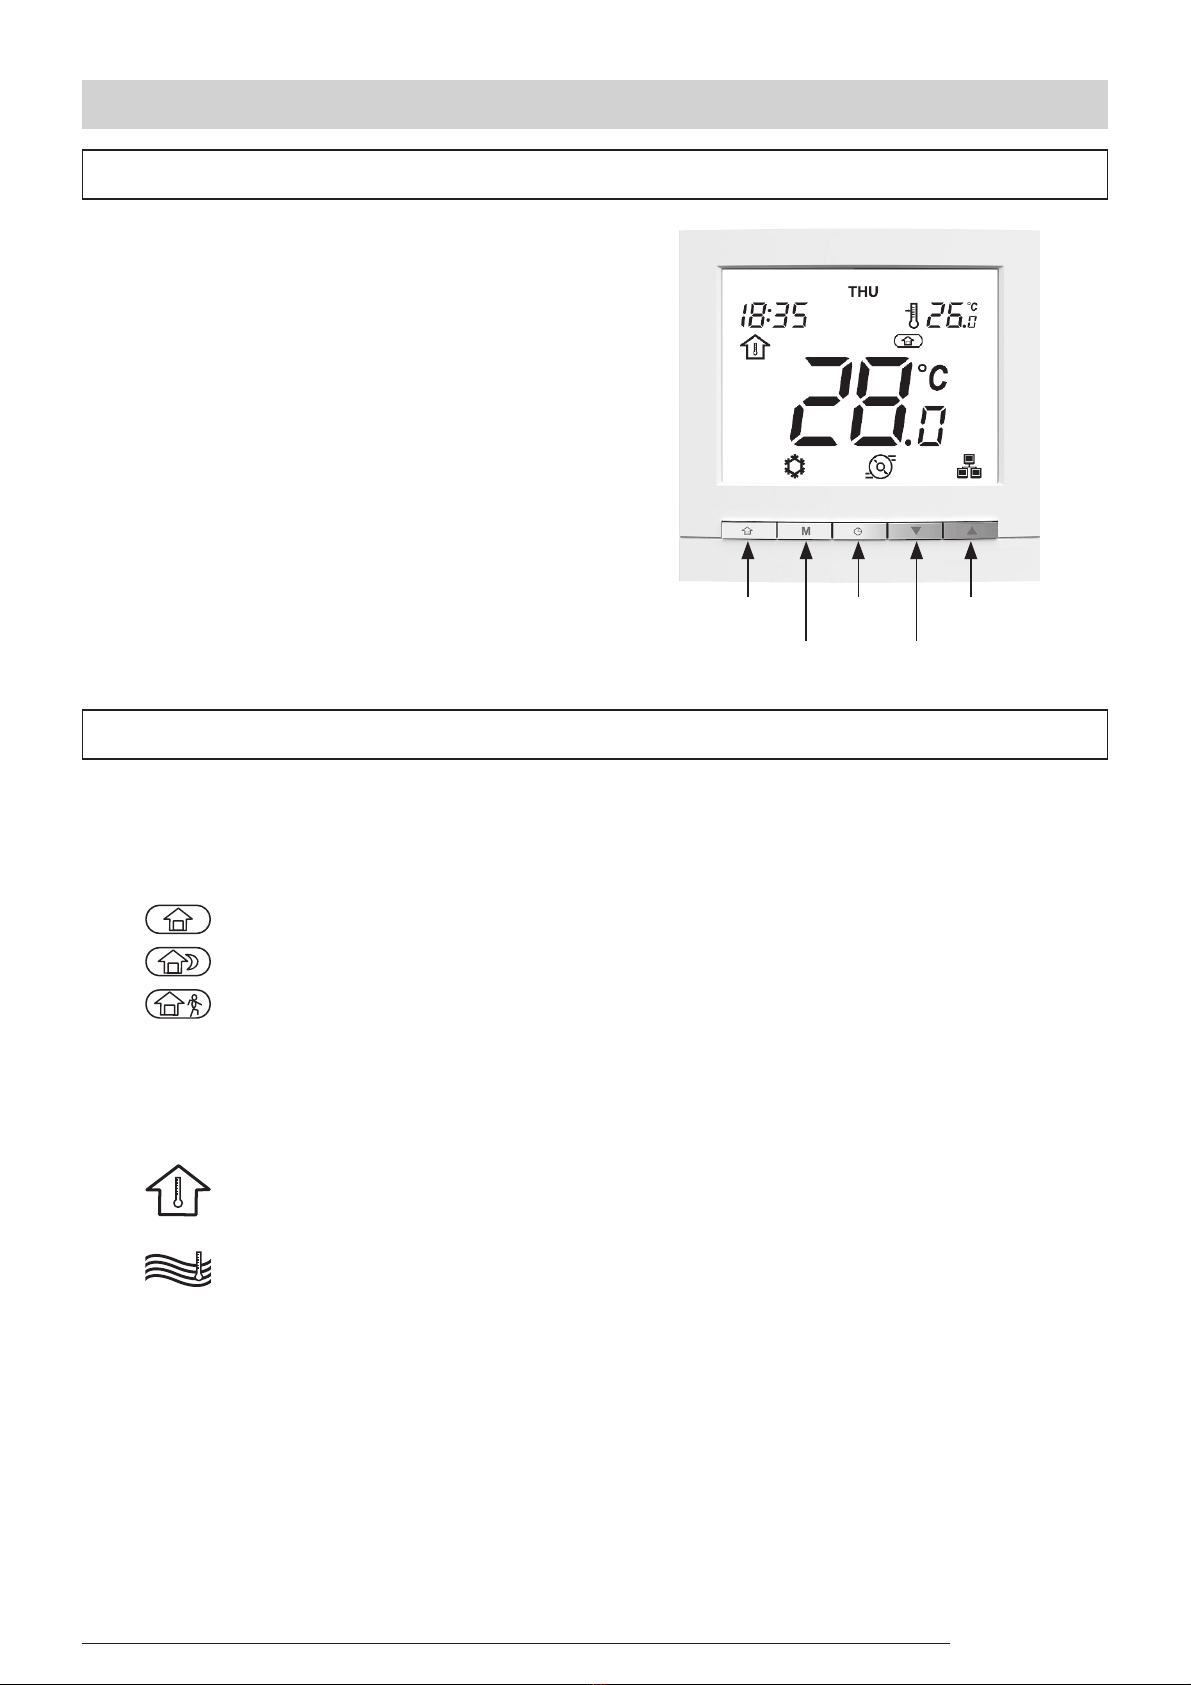
To set occupancy manually
1. Press the Occupancy key successively to select the
required occupancy mode.
2. The icon corresponding to the selected mode will be
displayed.
Home Sleep Away
The heat pump or chiller is running in the Home mode
and the Home setpoint is used.
The heat pump or chiller is running in the Sleep mode
and the Sleep setpoint is used.
The heat pump or chiller is running in the Away mode
and the Away setpoint is used.
Note To configure the setpoints of different occupancy
modes, refer to “ Current setpoint control: Changing
the temperature
To optimise energy eciency of the building while preserving
its occupants’ comfort, the controller is normally scheduled
according to occupancy hours.
If necessary, you can select the occupancy mode manually. Each
occupancy mode is associated with a pre-dened temperature
range.
Home / Sleep / Away: Changing the comfort range
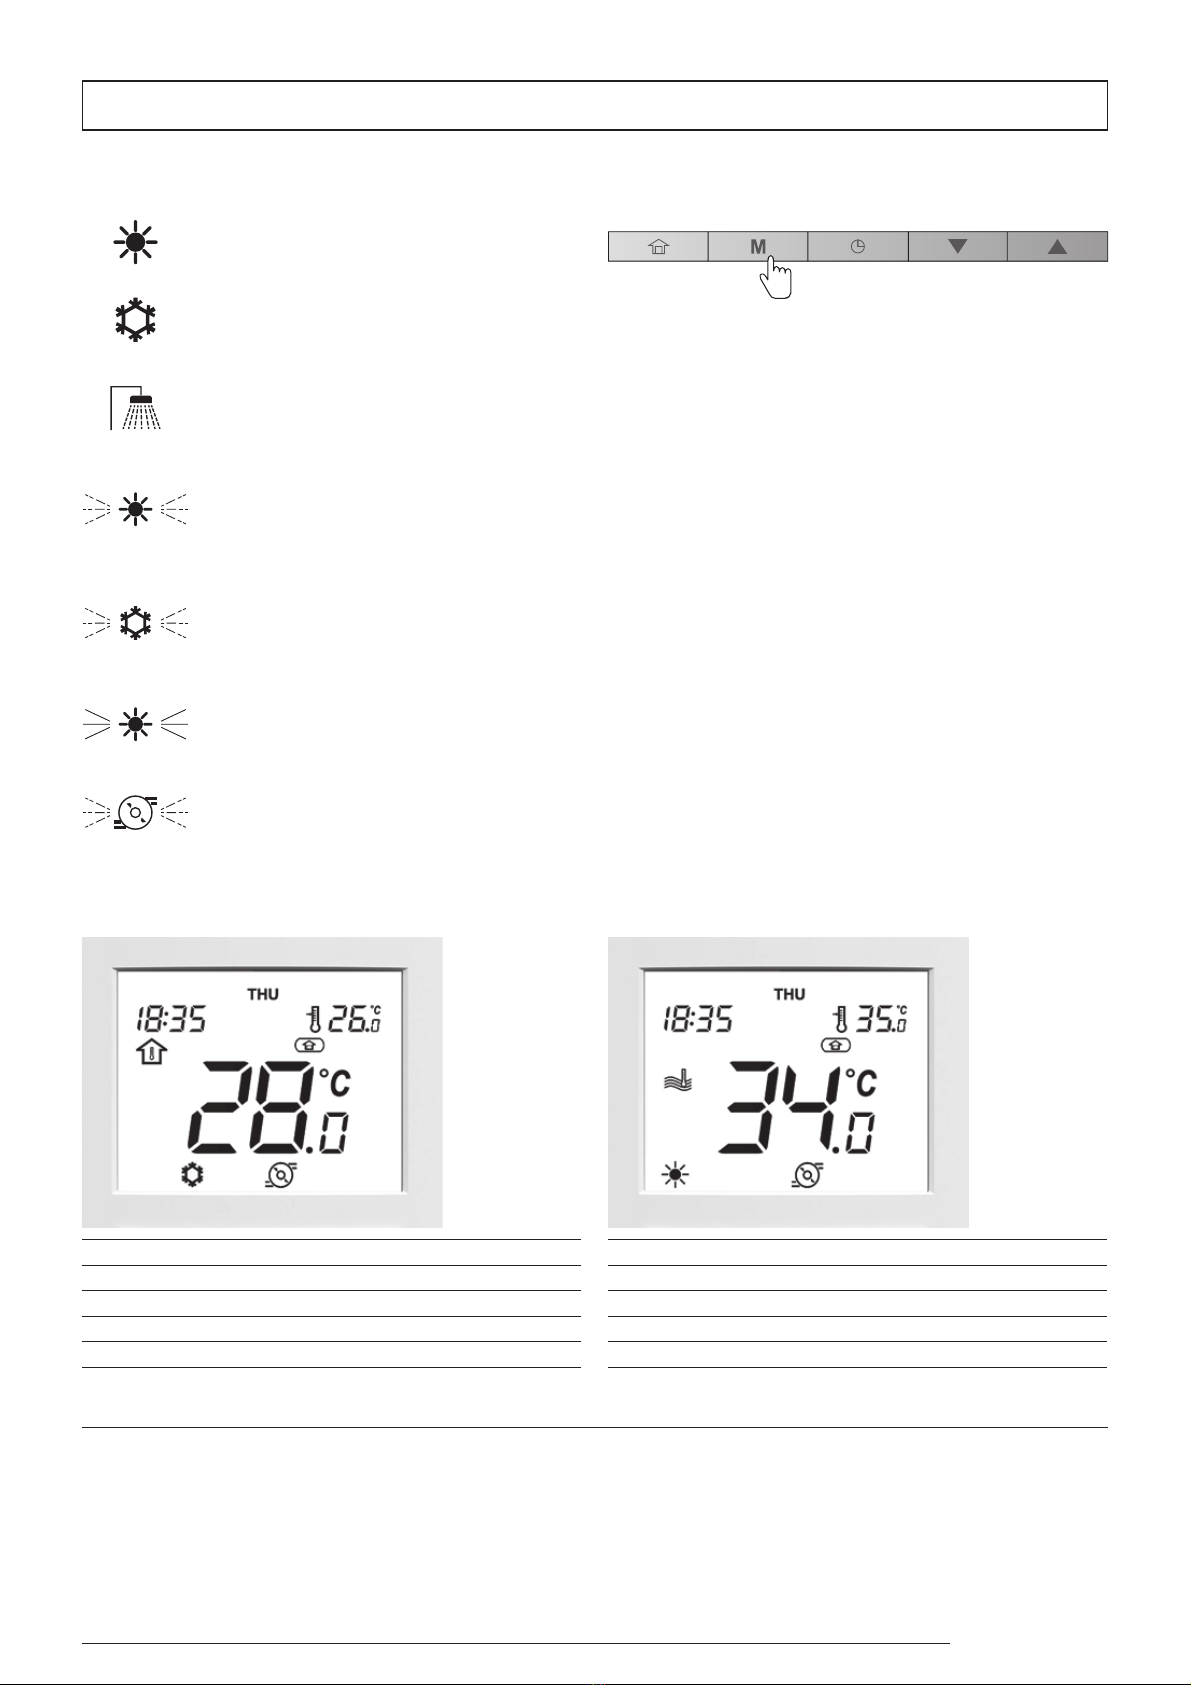
To turn on the system
1. Press the Mode key to go from the OFF Mode to any
other mode.
To turn o the system
1. Press and hold the Mode key for 2 seconds.
2. The unit will be turned o, but the current time and day
will be still displayed on the screen.
WhentheunitisOFF,alloperating modesdescribedabove
(cooling / heating / DHW only / boost heating / boost
cooling) are disabled.
Never turn the power o to your system in order to ensure
that the home anti-freeze protection and the water
anti-freeze protection are always available.
Example:
Mode O

9
C. Occupancy lock
The current occupancy can be locked during a period
specied by the user (“occupancy lock”). During this time,
the scheduling will be ignored. Once this period has elapsed,
occupancy returns to the scheduling setting.
To set the time for the selected occupancy
1. Press and hold the Occupancy key for 2 seconds.
2. The length of Home / Sleep / Away period can be set in
hours or days. Press the Down key or the Up key to set
the required number of hours/days.
Example: Occupancy period (2 hours / 2 days)
Note Upon“23Hr”,the display switches todays (“1 d”).When
set in days, the dened occupancy will end at exactly
the same time it started. Afterwards, the mode dened
by the schedule will be in force.
3. To conrm the selected occupancy, press and hold the
Occupancy key for 2 seconds.
4. The lock icon will be displayed .
Example: Occupancy lock (Home)
To cancel the occupancy lock
1. Press and hold the Occupancy key for 2 seconds.
2. The display will show you the time remaining till the end
of the selected occupancy. Press the Down key to set the
counter to“0”.
3. To conrm your action, press and hold the Occupancy
key for 2 seconds.
4. The lock icon will disappear and the schedule will
be active again.

10
Current setpoint control: Changing the temperature
Two dierent congurations could be available:
ŶIf Parameter 510 “Control on Air” is set to NO, then the
setpoint control is based on the water temperature
ŶIf Parameter 510 “Control On Air” is set to YES, then the
setpoint control is based on the room (air) temperature.
Control type Current setpoint
Control on water Water setpoint
Control on air Air setpoint
To achieve better comfort, it is possible to adjust the current
setpoint according to your needs.
To adjust the setpoint
1. Press the Down key to decrease the temperature.
2. Press the Up key to increase the temperature.
Pleaserememberthatthesetpointcanbeadjustedonlywithin
a range dened for each occupancy mode.
Note 1 After a pre-defined period of inactivity (no key is
pressed), the setpoint information (air or water temp.
tobe achieved)is dimmed.By default, the timeout is 10
minutes.
Note 2 With the method described in this section, it is
also possible to congure the setpoint for dierent
occupancy modes, except when setpoint control is
congured on leaving water setpoint and with the
climatic curves (depending on installer conguration).
In this case, the setpoints cannot be changed by user.
If necessary, please contact a professional technician
to change the conguration.
WATER TEMPERATURE CONTROL
Example (water temp. and water setpoint):
Current setpoint 35°C
ROOM TEMPERATURE CONTROL
Example (room temp. and air setpoint):
Current setpoint 19°C

11
Additional data display: General status of the unit
Normally when the user interface is installed indoors, you
havethecurrent indoor airtemperatureandthe airsetpoint
displayed on the screen.
For units installed outdoors, the display normally shows the
current water temperature and the water setpoint.
In addition to these temperatures, WUI gives you the option
to check other parameters allowing you to monitor the status
of the unit (see the table given below). Please note that these
parameters (1-16) are in read-only access.
No. Description Parameter number R290
1 Outdoor Air Temp P001 x
2 Entering Water Temp P003 x
3 Leaving Water Temp P004 x
4 Water Control Temp P052 x
5 Saturated Suction Temp P008 x
6 Suction Temperature P009 x
7 Superheat Temperature P015 x
8 Superheat Target Temp P016 x
9 Discharge Temperature P010 x
10 Refrigerant Temperature P005 x
11 Requested Compressor Frequency P022 x
12 Actual Compressor Frequency P023 x
13 Water Control Point P051 x
14 Flow Switch Status P106 x
15 Safety Switch Status P105 x
16 DHW Tank Temperature P206 o
x = Value is displayed for this unit
o= Value is displayed only if DHW option is congured
To display the required temperature
1. Press and hold the Occupancy key and the Mode key
simultaneously for 2 seconds.
2. The rst parameter will be displayed.
3. Press the Down key or the Up key to switch between all
parameters listed in the table above.
4. To exit the current screen, press and hold the
Occupancy key until the home screen is displayed or
wait for 30 seconds (screen timeout).
Example: Outdoor Air Temp (Parameter: P001)

12
Scheduling: Assigning schedules to heating and cooling modes
The scheduling functionality makes it possible to set the unit to operate in a specic mode during a pre-dened period of time.
The system allows you to modify eight steps, where each step is dened by the day(s) of the week, start time, and occupancy.
Example of scheduling parameters
Step
Number
Day of week Start time Occupancy
MON TUE WED THU FRI SAT SUN Home Sleep Away
1xxxxxxx06:00 x
2xxxxx 08:00 x
3 x 12:00 x
4 x x x x 17:00 x
5xxxxx 22:00 x
6 x x 23:00 x
7 00:00
8 00:00
Hour (Start time)
Hour
Day 06:00 08:00 12:00 17:00 22:00 23:00
MON ŏŏŏŏ
TUE ŏŏŏŏ
WED ŏŏŏŏ
THU ŏŏŏŏ
FRI ŏŏŏŏ
SAT ŏŏ
SUN ŏŏ
Occupancy mode
Home
Away
ŏSleep
Complete the schedule according to daily routine and use it as you follow the instructions below.
Step
Number
Day of week Start time Occupancy
MON TUE WED THU FRI SAT SUN Home Sleep Away
1
2
3
4
5
6
7
8

13
To modify the schedule (schedule steps)
1. Press the Schedule key to edit the schedule.
2. Upon entering the schedule menu, you will be able to
edit the rst schedule step.
Day(s) of the week
3. The rst day of the week (“MON”) will start ashing. Press
the Down key or the Up key to set ”Yes” (step active on
this day) or“no” (step inactive on this day).
Example: Monday (step inactive)
Example: Monday (step active)
4. Press the Schedule key to conrm your choice.
5. The following day (“TUE”) will start flashing.
Press the Down key or the Up key to set“Yes”(step active
on this day) or“no” (step inactive on this day).
6. Press the Schedule key to conrm your choice and
continue with the remaining days of the week.
Start time
7. Once the last day of the week (“SUN”) has been set, the
clock starts ashing.
8. Press the Down key or the Up key to set the start time.
9. Press the Schedule key to conrm the start time.
OCCUPANCY
10. Once the start time has been set, the occupancy icon
starts ashing.
11. Press the Down key or the Up key to set the occupancy
for a given period.
12. Press the Schedule key to conrm the selected
occupancy.
13. The rst day“MON”will start ashing. You can edit your
schedule settings again if necessary.
14. To validate the current schedule, press and hold the
Schedule key for 2 seconds.
15. The next schedule step will be displayed (Schedule 2).

14
Saving the schedule
At any time in the schedule menu, you can save the current
schedule step settings and go to the next schedule step.
To save the current schedule and go to the next one
1.
Press and hold the Schedule key for 2 seconds
(repeatedly)untiltherequired schedule number appears.
2. Perform all required steps as presented earlier in this
section.
Editing schedules
If necessary, you may easily modify any of 8 schedule steps
that are available.
To modify only one schedule, e.g. schedule“2”
1. Press the Schedule key to enter the schedule menu.
2. Press and hold the Schedule key for 2 seconds to validate
schedule“1” without making any modications.
3. Schedule “2” will be displayed.
4. Perform all required steps as presented earlier in this
section.
Example:
Start time 9:00
Days of week WED, SAT, SUN
Occupancy HOME
Schedule step 8
To exit the schedule menu
1. To exit the schedule menu at any time, press and hold the
Occupancy key for 2 seconds.
2. The home screen will be displayed and changes made to
the currently modied schedule will NOT be saved.
For example:
After having set and validated schedule “1”, you may want to
edit schedule“2”.
ŶWhen exiting schedule “2” without prior validation,
schedule “2” will NOT be saved (schedule “1” will be
saved).
ŶTo validate a schedule, press and hold the Schedule key
for 2 seconds.
Deleting a schedule step
There are 8 schedule steps available; however, not all of them
have to be used.
To delete a schedule
1. Press the Schedule key to go to the Schedule menu.
2. Once you have navigated to the schedule step to be
deleted, you have to deselect all days of the week in a
given schedule.
3.
Press the Down key or the Up key to set ”no” (step
inactive on this day).
4. Press the Schedule key to conrm your choice.
5. Follow steps given above (step 3 and 4) to deselect all
days of the week.
6. To conrm deleting the schedule step, press and hold
the Schedule key for 2 seconds.

15
Advanced Programming Options
Advanced settings: Programming the Control
The settings menu is used by technicians to congure some
advanced settings of the unit.
To access the settings menu
1. Press and hold the Occupancy key and the Schedule key
simultaneously for 2 seconds.
2. The password screen is displayed.
3. Provide the password.
For the user access, provide the following password: 0000.
4. Tovalidatethepasswordandaccesssettingsconguration,
press and hold the Mode key for 2 seconds.
5. Press the Down key or the Up key to navigate across the
screens.
To exit the password screen
1. Press and hold the Occupancy key until the home screen
is displayed.
Password screen
For more information about advanced settings
conguration, please refer to the IOM Manual.

16
Domestic Hot Water mode
Please remember that the Domestic Hot Water (DHW) mode
enablinghotwaterproductionisapplicableonlytoheatpumps
that come with a domestic water tank.
Normally the Domestic HotWater mode is triggered whenever
necessary and no further action from the user is required.
To set DHW mode only (manually)
1. Press the Mode key successively to select DHW mode
only.
2. The icon corresponding to the DHW mode will be
displayed.
The Domestic Hot Water schedule and the DHW setpoint
are set by the installer. For more information about DHW
schedule conguration, please refer to the IOM Manual.
The DHW mode only can be activated when there is currently
no need for cooling or heating.
To adjust dierent DHW setpoints
1. Press the Occupancy key successively to select the
required occupancy mode.
WUI Occupancy Water setpoint
DHW Setpoint
DHW Anti-Legionella Stp
DHW Eco Setpoint
2. Dene DHW setpoint for each Occupancy mode:
- Press the Down key to decrease the temperature.
- Press the Up key to increase the temperature.
NOTE 1 When the system is in DHW mode, then the current
water temperature (“Water Control Temp”) becomes
the DHW tank temperature. See also “Additional data
display: General status of the unit” on page 11.
NOTE 2 To change the DHW setpoint, refer to “Current setpoint
control: Changing the temperature” on page 10.

17
Master / Slave control
Buildinginstallationsmayrequireafewunitstobeinterfaced
together in order to provide cooling / heating on the same
network.
The unit that is the decision point for the OPERATING MODE
and the CONTROL POINT is dened as the Master, all other
units belonging to the same group on the same network are
referred to as Slaves.
When the user interface is connected to the Master unit, the
Master / Slave icon is displayed on the screen.
If you change the operating mode or
dene a new setpoint on your “master”
user interface, this command will be sent
to all slaves on the network. The slaves
will act according to the command sent
from the Master.
When the user interface is connected to the Slave unit, the
Master / Slave icon is ashing rapidly.
If you change the operating mode or
dene a new setpoint on your “slave”user
interface, this command will be ignored.
The operating mode and setpoint dened
by the Master will be active.
When the Master / Slave communication failure occurs, the
Master / Slave icon is ashing slowly.
Inthecaseofmaster/slavecommunication
failure,theMasterwillruninthestandalone
mode or it will continue to operate
with other Slave units that are still
communicating. The aected Slave unit
will stop all of its operations.
Please contact a professional technician in order to set the Master/Slave assembly control.
Example: Master / Slave mode

18
Alarms are used to inform you of the failure of one of the
parts of the heat pump or chiller system.
In the case of an alarm, the alarm icon is displayed:
Steadyicon:Alarm conditiondetected;the
unit is stopped
Flashing icon: Alarm condition detected;
the unit is running
To see the alarms
1. Press and hold the Mode key and the Schedule key
simultaneously for 2 seconds.
2. The alarms menu will be displayed.
3. Press the Down key or the Up key to display the alarms
(1 to 5).
Two types of alarms are displayed:
Current alarms (C-X) / Past alarms (P-X).
Example:
Current alarm C1
Alarm code 16
Example:
Past alarm P1
Alarm code 15
To reset alarms
1. In the alarm menu, press and hold the Mode key and the
Schedule key simultaneously for 2 seconds.
2. The reset alarm menu will be displayed.
3. Press the Down key or the Up key to set the alarms reset
to “YES”.
4. To conrm the alarms reset, press and hold the Mode key
and the Schedule key simultaneosly for 2 seconds.
To exit the alarm screen
1. Press and hold the Occupancy key until the home screen
is displayed.
For more information about alarms, please refer to the
IOM Manual.
Alarms and errors
Alarms
Alarm reset: NO Alarm reset: YES

19
Errors
Some components failure may cause the user interface to
malfunction. In such cases, the error will be displayed on
the screen.
Example: E1, error 1
In case of error, please verify that all WUI local parameters
are correct, i.e. check the value of parameters given in the
table below.
To access local parameters
1. Press and hold the Occupancy key and the Mode key
simultaneously for 2 seconds.
2. The rst parameter will be displayed.
3. Press the Down key or the Up key to switch between all
parameters listed in the table.
4. To exit the current screen, press and hold the Occupancy
keyuntilthehomescreenisdisplayedorwaitfor30seconds
(screen timeout).
ID Description
1 Communication failure
2 Wrong conguration (Unit not congured to use WUI)
3 Prole table wrong size
4 Parameter not found but mandatory
5 Room sensor failure
For more information about errors, please refer to the
IOM Manual. Local parameters
No. Description Parameter number Range Default value
1 Hour of Day P901 0 to 23 0
2 Minute of Hour P902 0 to 59 0
3 Day of Week & Holiday 1 P903 0 to 255 0
4 Day of Month P904 1 to 31 0
5 Month P905 1 to 12 0
6 Year P906 0 to 99 0
7 DAYLIGHT SAVING SELECT (DST) P920 No/Yes No
8 Entering DST : Hour P921 0 to 22 2
9 Leaving DST : Hour P922 1 to 23 3
10 Entering DST : Month P923 1 to 12 3
11 Entering DST : Day of week P924 1 to 7 17
12 Entering DST : Week nb of month P925 1 to 5 25
13 Leaving DST : Month P926 1 to 12 10
14 Leaving DST : Day of week P927 1 to 7 17
15 Leaving DST : Week nb of month P928 1 to 5 25
16 CCN address of chiller P951 1
17 LCD display timeout1 P952 5 to 60 min 10 min
18 AM/PM Time format P953 No/Yes No
19 CCN Element Address P991 1 to 239 116
20 CCN Element Bus P992 0 to 239 0
21 Baud Rate P993 9600/19200/38400 38400
22 PIC Application SW Version Number P999 - -
1. Daylight Saving Time (DST) usually starts/ends on Sunday morning (7). The clock goes one hour forward when entering DST (usually at 2:00 a.m.)
and one hour backward when leaving DST (usually at 3 a.m.).
2. This parameter denes the week number when the time change occurs:
#1: If “Day of Week” is set to 7 (Sunday), the time change will occur on the rst Sunday of the month.
#5: If “Day of Week” is set to 7 (Sunday), the time change will occur on the last Sunday of the month (it can be either 4th or 5th Sunday of the month).

20
AVVIO RAPIDO....................................................................................................................................................................................................................21
Importante........................................................................................................................................................................................................ 21
Caratteristiche principali..............................................................................................................................................................................21
PANORAMICA DISPLAY WUI.......................................................................................................................................................................................... 22
PANORAMICA DELLE ICONE .........................................................................................................................................................................................23
PROGRAMMAZIONE DEL CONTROLLO....................................................................................................................................................................24
Orologio/Giorno: Impostazione dell'ora e del giorno....................................................................................................................... 24
Riscaldamento/ Rareddamento / solo ACS / O: Cambiare la modalità di funzionamento ............................................25
Home/ Sleep / Away: Cambiare le impostazioni di comfort...........................................................................................................26
Controllo setpoint corrente: Cambiare la temperatura ....................................................................................................................28
Display informazioni aggiuntive: Stato generale dell'unità ............................................................................................................29
Programmazione: Assegnare programmazioni alle modalità di rareddamento e di riscaldamento ............................ 30
OPZIONI DI PROGRAMMAZIONE AVANZATE.........................................................................................................................................................33
Impostazioni avanzate: Programmazione del Controllo..................................................................................................................33
Modalità Acqua Calda Sanitaria.................................................................................................................................................................34
Controllo Unità principale / Unità secondaria......................................................................................................................................35
ALLARMI ED ERRORI......................................................................................................................................................................................................... 36
Allarmi.................................................................................................................................................................................................................36
Errori....................................................................................................................................................................................................................37
Sommario
Interfaccia utente
Table of contents
Languages:
Other Riello Remote Control manuals