STARBUCKS Verismo User manual

Operating Manual
Manuel d’utilisation
EN
FR
600

2
Contents
EN Introduction ............................................................................................................................................................... 2
Important safeguards ................................................................................................................................................. 4
Verismo® System 600 overview ................................................................................................................................. 6
Setting up your Verismo® System 600 ...................................................................................................................... 7
Preparing beverages .................................................................................................................................................. 8
Programming pouring capacities .............................................................................................................................. 9
Daily maintenance .................................................................................................................................................... 10
System cleaning ....................................................................................................................................................... 11
System descaling ..................................................................................................................................................... 12
Frequently asked questions ..................................................................................................................................... 13
Disposal instructions ................................................................................................................................................ 13
Specifications ........................................................................................................................................................... 14
Emptying the machine ............................................................................................................................................. 14
Notes ........................................................................................................................................................................ 15
Verismo® System 600 Operating Manual — Introduction
WARNING
Read ALL instructions before use to avoid injury.
Pay attention to warnings in this Operating Manual.
Keep this Operating Manual in a safe place for future reference.
For use by adults only.
Be diligent about emptying, cleaning and descaling as described in this Operating Manual.
Designed for beverage pods that bear the Verismo® System logo. Also compatible with other K-fee® System pods.

3
Manuel d’utilisation du système Verismo® 600 — Introduction
AVERTISSEMENT
Lisez TOUTES les instructions avant l’utilisation pour éviter les blessures.
Portez attention aux avertissements contenus dans ce manuel d’utilisation.
Conservez ce manuel d’utilisation dans un endroit sûr pour vous y référer ultérieurement.
Pour une utilisation par des adultes seulement.
Ne tardez pas à procéder à la vidange, au nettoyage et au détartrage comme décrit dans ce manuel d’utilisation.
Conçu pour les capsules de boissons qui portent le logo du système Verismo®. Également compatible avec les
autres capsules du système K-fee®.
Table des matières FR
Introduction ............................................................................................................................................................... 3
Consignes de sécurité importantes ......................................................................................................................... 16
Aperçu du système Verismo® 600 ........................................................................................................................... 18
Réglage de votre système Verismo® 600 ................................................................................................................ 19
Préparation des boissons .........................................................................................................................................20
Programmation du format ....................................................................................................................................... 21
Entretien quotidien ..................................................................................................................................................22
Nettoyage du système .............................................................................................................................................23
Détartrage du système .............................................................................................................................................24
Foire aux questions .................................................................................................................................................. 25
Instructions pour la mise au rebut ........................................................................................................................... 25
Caractéristiques techniques .................................................................................................................................... 26
Vider l’appareil .........................................................................................................................................................26
Remarques ............................................................................................................................................................... 27

4
EN
IMPORTANT
SAFEGUARDS
WARNING
When using electrical appliances, basic safety
precautions must always be followed, including
the following:
1. Read all instructions and use only in accordance
with these instructions.
2. The appliance is designed and manufactured for
household use. Do not use the appliance for
other than intended use.
3. Never place your fingers under the spout
while the appliance is operating —this may
result in scalding. Never insert your fingers
in the pod opening—this may result in injury.
4. Never open the handle on the appliance
during the brewing, rinsing, cleaning or
descaling processes. Always keep the handle
in the closed/down position while machine is
operating.
5. Do not touch hot surfaces. Use handles or knobs
when available.
6. Never use a damaged or deformed pod. Only use
beverage pods suitable for this appliance.
7. Never lift the appliance by its handle.
8. Never open or close the handle with excess force.
9. Never open the appliance or insert objects into the
appliance openings.
10. Never operate the appliance without its drip tray
or drip grating.
11. Do not overfill the water tank with water.
12. Use only fresh and cold drinking water in this
appliance! Do not put any other liquids or foods in
the water tank except as directed in the cleaning
and descaling instructions in this manual.
13. The use of accessory attachments not
recommended by the appliance manufacturer
may result in fire, electric shock or injury to
persons.
14. Do not place on or near a hot gas or electric burner,
or in a heated oven.
15. Do not place near water, e.g., kitchen sink.
16. Do not use outdoors.
17. To protect against fire, electric shock and injury,
do not immerse appliance, cord or plug in water
or any other liquid.
18. This appliance is equipped with a power cord
having a grounding wire with a grounding plug.
Only plug the appliance into a grounded 3-pin
wall outlet. In the event of an electrical short
circuit, grounding reduces the risk of electrical
shock. Check that power supply ratings match
the electrical ratings specified on the product’s
nameplate. The warranty becomes null and void
if the appliance is plugged into an incorrect power
supply.
19. Do not, under any circumstances, cut or remove
the third (ground) prong from the power cord or
use an adapter that converts a 3-prong plug to
a 2-prong plug. Consult a qualified electrician if
the grounding instructions are not completely
understood, or if doubt exists as to whether the
appliance is properly grounded.
20. Turn off and unplug from outlet when not in use
and before cleaning. Allow to cool before putting
on or taking off parts, and before cleaning the
appliance.
21. Do not operate appliance with a damaged cord or
plug or after the appliance malfunctions in any
manner.ContactStarbucks customer service (1-800-
334-5553) to report any malfunction or damage to
the appliance and receive instructions for any return
for examination, repair, or adjustment.
22. Do not let cord hang over the edge of the table or
the counter, or touch hot surfaces.
23. To disconnect, always turn any control to “off” first,
then remove plug from wall outlet.
24. Close supervision is necessary when this
appliance is used by or near children. Store the
appliance and all its accessories outside the reach
of children.
25. Refer to the instructions for use of all cleaning
and descaling agents before use and comply with
the safety regulations. Do not turn off appliance
during rinsing or descaling process.
26. Apart from normal use—cleaning, descaling and
external cleaning— all other work such as repairs
or replacing the power cord should only be carried
out by an authorized Customer Service company
in order to avoid hazards.
27. In case of long periods of absence, vacation, etc.,
the appliance must be emptied, cleaned and the
plug must be removed from the outlet.
28. If appliance has been exposed to temperatures
below freezing, allow at least three hours for
the appliance to reach room temperature before
startup. A frozen or extremely cold appliance may
not operate properly.
SAVE THESE
INSTRUCTIONS
WARNING TO USERS AND PARENTS
DO NOT permit children to use the appliance
unless there is adult supervision.

5
EN
SPECIAL SAFETY INSTRUCTIONS
Warning symbols and words
The warning triangle appears in these instructions
where failure to comply with the safety instructions
may result in risks to the user or the appliance.
WARNING: Extremely hot water
Don’ts: Do not reach inside
WARNING:
Electric shock
WARNING
Avoid risk of electric shock
splashing water.
a water jet.
Do not, under any circumstances, cut or remove the
third (ground) prong from the power cord or use an
adapter that converts a 3-prong plug to a 2-prong plug.
WARNING
WARNING: Make sure the handle is closed
completely during use. Extremely hot water runs
through the appliance when operating (brewing,
descaling, cleaning, rinsing). To avoid the risk of
scalding or other injury, always keep the handle
in the closed / down position while machine is
operating. Do not reach under the spout or remove
the drip tray while appliance is operating.
Take care when emptying the drip tray. The water
can be very hot.
residual water (the steam temperature can be as
high as 248°F/120°C).
CAUTION
Hygiene and cleaning
expired.
rinse the appliance five
times before first use to prime machine and
once after your last beverage of the day to
rinse the system. Read the instructions under
“Daily Maintenance“ on page 10.
with the operating manual to prevent hygiene risks.
suitable for the appliance.
Carefully read the user instructions about the
cleaning and descaling agents and comply with the
safety instructions.
Short cord instructions
A short power-supply cord is provided to reduce risks
of entanglement or tripping over a longer cord. Longer
detachable power-supply cords or extensions may be
used if care is exercised in their use. If a longer power-
supply or extension cord is used, 1) The marked electrical
rating of the detachable power-supply cord or extension
cord should be at least as great as the electrical rating of
the appliance, 2) If the appliance is a grounded type, the
extension cord should be a grounded type 3-wire cord,
and 3) the longer cord should be arranged so it will not
drape over the counter top or table top where it can be
pulled on by children or tripped over.
Information on Energy–Saving mode and Power Off
The appliance returns to Energy–Saving mode if it is
unused for more than 15 minutes (factory setting). After
30 minutes, the machine automatically powers off. The
appliance uses considerably less energy in this mode. For
example, it uses less than 0.5W/h (the standardoperating
amount of energy used).
CAUTION
CAUTION:Thereare four sharp needles that puncture
the Verismo™System pods inside the pod opening.
To avoid risk of injury, do not put your fingers in the
pod opening.
WARNING:
PARTS ARE INSIDE. REPAIR SHOULD BE DONE
WARNING
DO NOT OPEN
6
CAUTION
CAUTION: There are four sharp needles that
the pod opening. To avoid risk of injury, do
not put your fingers in the pod opening.
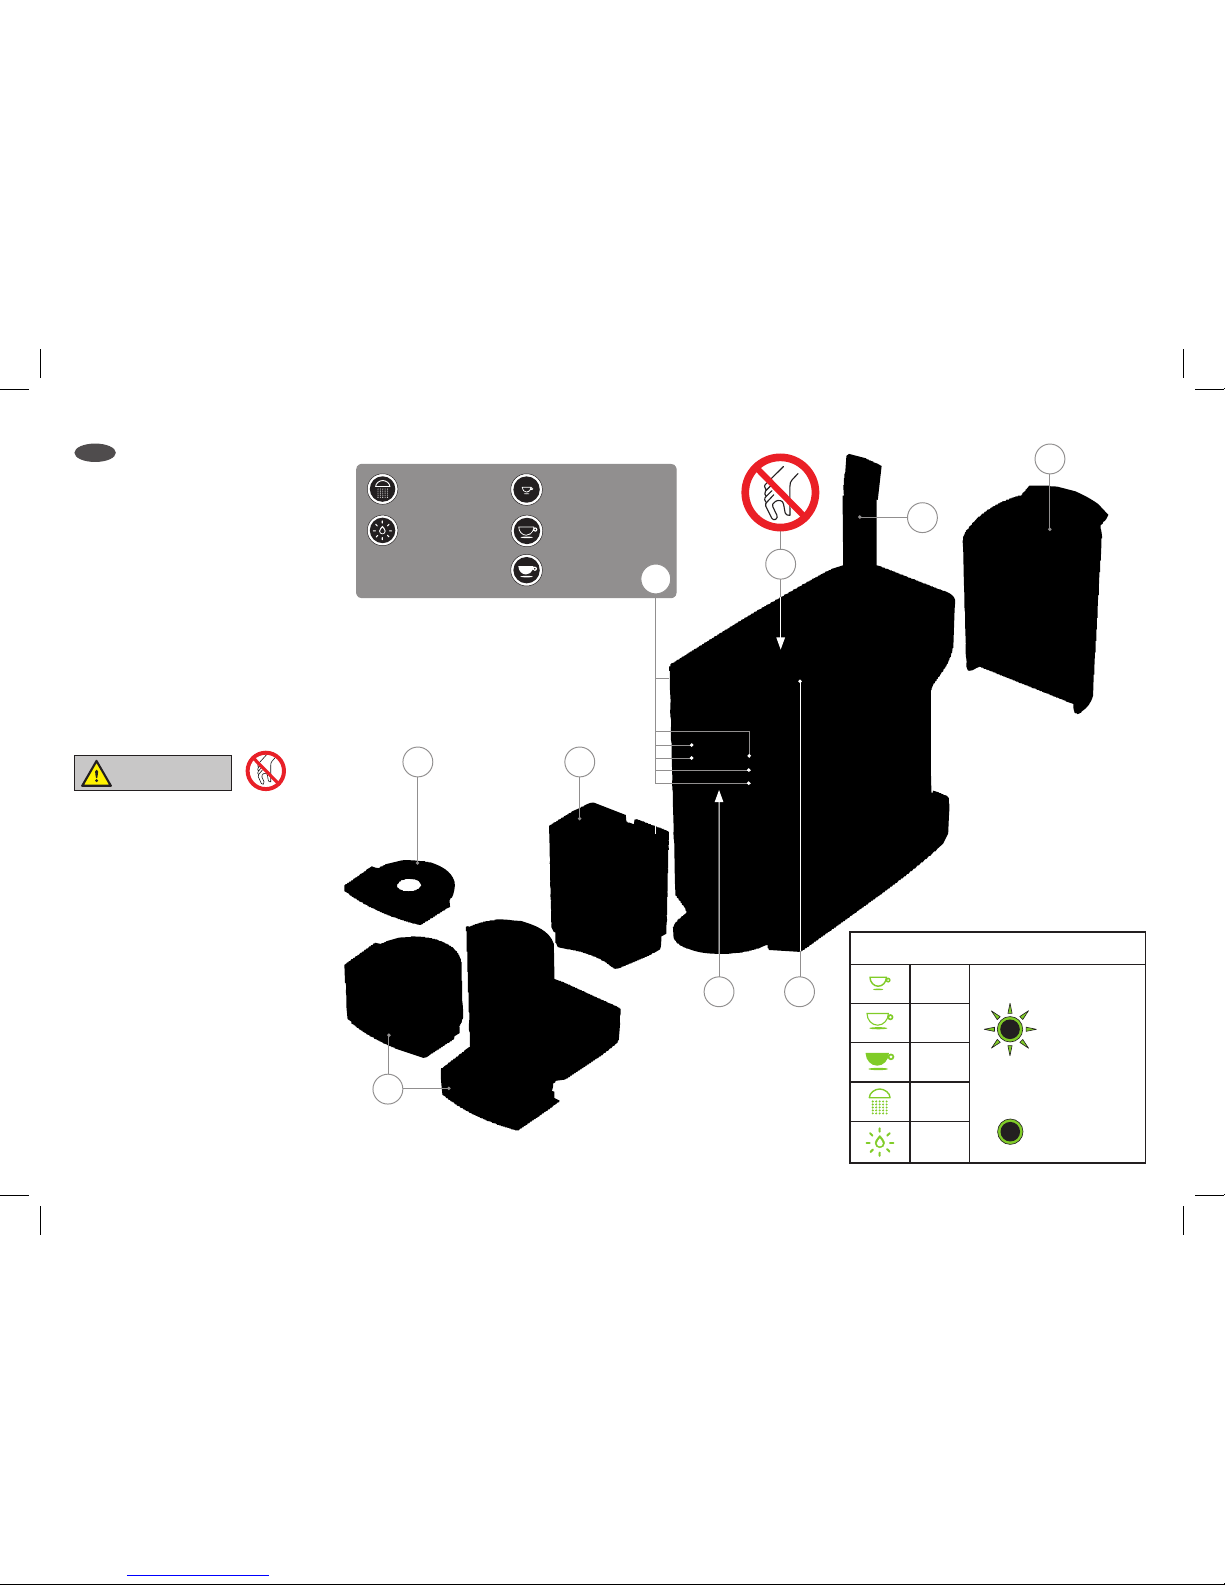
Verismo® System
600 overview
1 Drip tray grate
2 Used pod container
3 Controls
4 Pod opening
5 Handle
6 Water tank
7 Spout
8 Height-adjustable drip tray
9 Power button
EN
IMPORTANT: Remove white
protective film from drip tray
grate.
Presettings for buttons:
Espresso..............................1.0 fl oz/30 mL
Brewed.............................. 7.1 fl oz/210 mL
Milk .................................4.56 fl oz /135 mL
(with reduced temperature)
Rinse..........................................1.5 fl oz/45 mL
Hotwater.................................5.1 fl oz/ 150 mL
Overview of LED Symbols
Espresso LIGHTS BLINK WHEN:
MACHINE
HEATS UP
MACHINE
IS POURING
SOLID LIGHTS WHEN:
MACHINE
IS READY
Brewed
Milk
Rinse
Hot Water
5
7 9
8
6
1 2
4
3
Espresso button
Brewed button
Milk button
Rinse button
Hot Water
7
1x
max
1
5
4
910 11 12
678
2 3
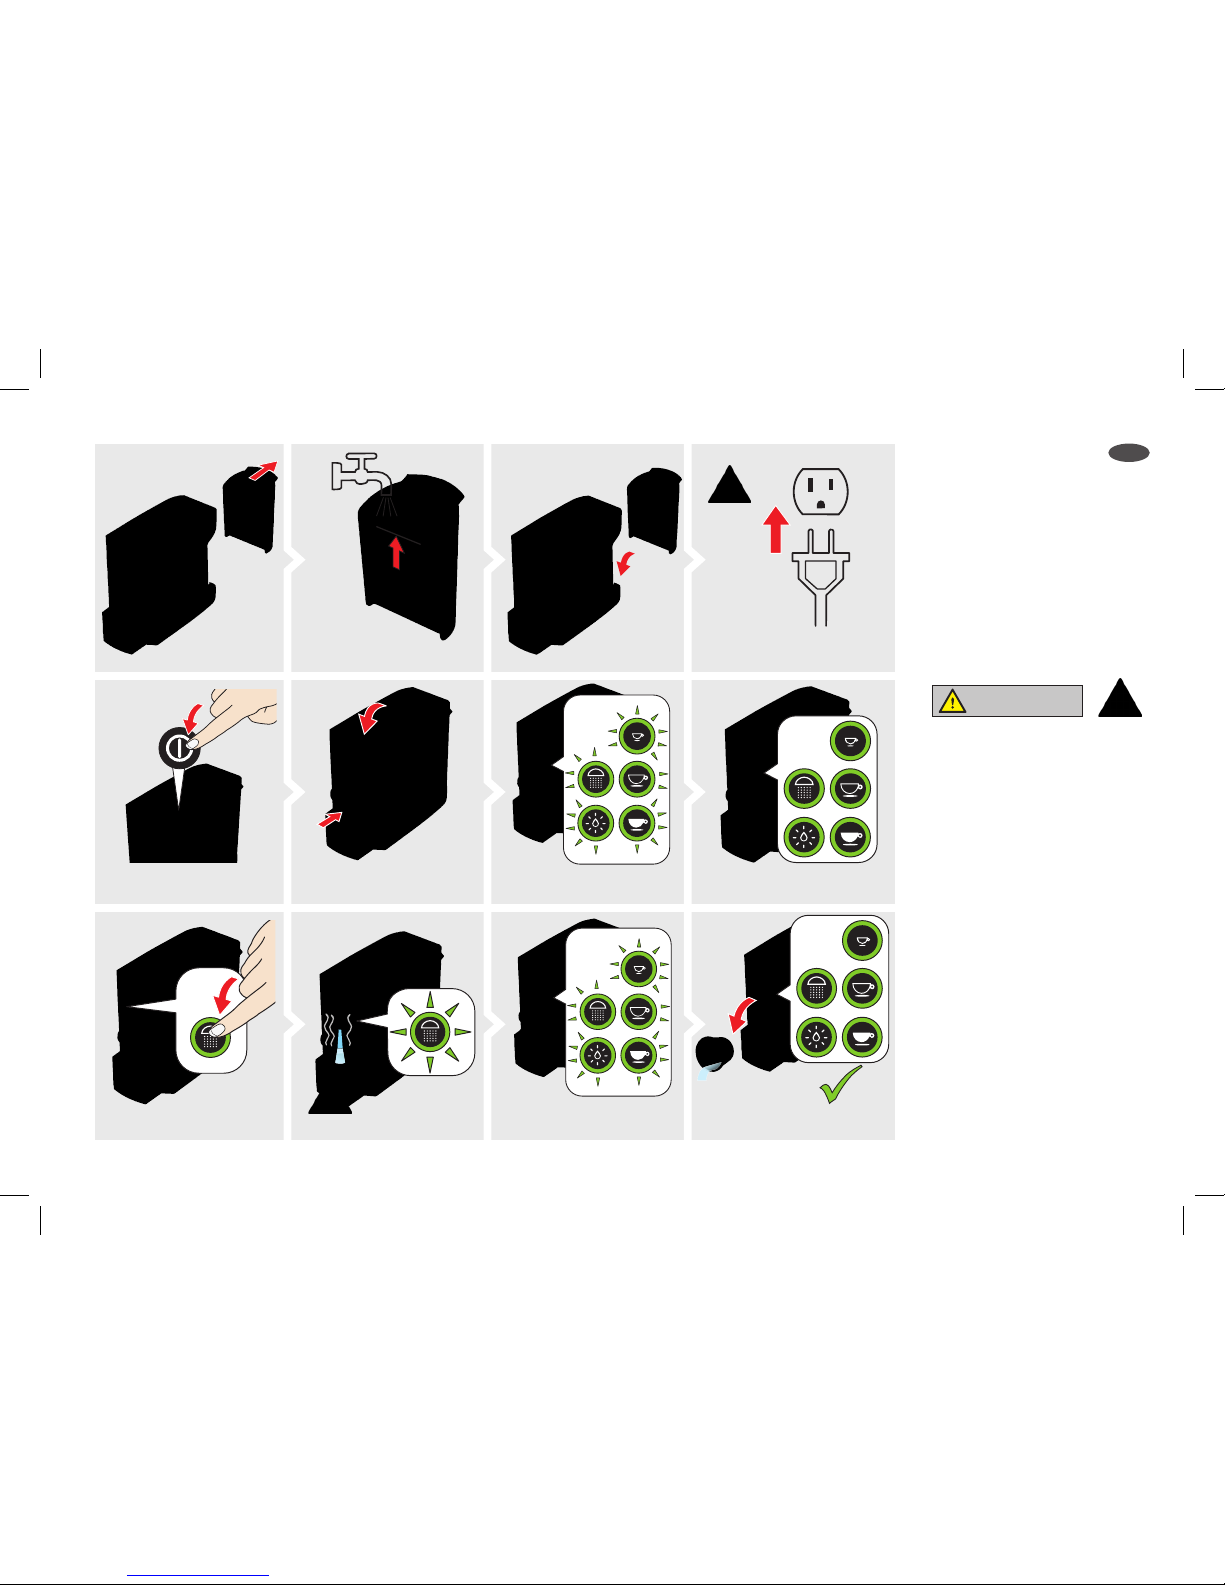
IMPORTANT:Repeat steps
9—12 four more times to prepare
machine for first use.
IMPORTANT:
must be primed before first use and any time
the unit is run dry or runs out of water.
Setting up your
Verismo® System
600 (Priming the machine)
EN
Remove
water tank.
Push button to rinse.
Solid green lights indicate
machine is ready.
Discard liquid when finished.
Repeat steps 9–12 four more times.
Machine is preparing for next
rinse cycle.
Blinking lights indicate machine
is warming up.
Please read important
safeguards first on page 4.
WARNING: Extremely hot water.
WARNING
WARNING: Make sure the handle is closed
completely during use. Extremely hot water
runs through the appliance when operating
(brewing, descaling, cleaning, rinsing). To
avoid the risk of scalding or other injury,
always keep the handle in the closed/down
position while machine is operating. Do not
reach under the spout and do not remove the
drip tray while appliance is operating.
Fill water tank with
fresh and cold drinking water.
heat-safe cup under spout.
Press On / Off button briefly
(1second).
Insert water tank.
On

8
WARNING
WARNING: Make sure the handle is closed
completely during use. Extremely hot water
runs through the appliance when operating
(brewing, descaling, cleaning, rinsing). To
avoid the risk of scalding or other injury,
always keep the handle in the closed/down
position while machine is operating. Do not
reach under the spout and do not remove the
drip tray while appliance is operating.
max
3.54 in /
90 mm
max
5.9 in /
150 mm
Do not remove the top foil lid or puncture
the pod.
Rinse the machine before making each
beverage by placing an empty cup on the
drip tray and pushing the Rinse button once,
then discarding hot water.
Preparing beverages
EN 1
2
6 7 8
345
1A 1B 1C
Use proper heat-safe cup size.
Machine is ready
when lights are solid.
Beverage is ready.
Lift handle. Insert espresso pod.
Lift and close handle to eject pod. Beverage is ready.
Press Espresso (top) button. Beverage is pouring.
WARNING: Extremely hot water.
For larger beverages, remove drip tray. Replace tray.
9
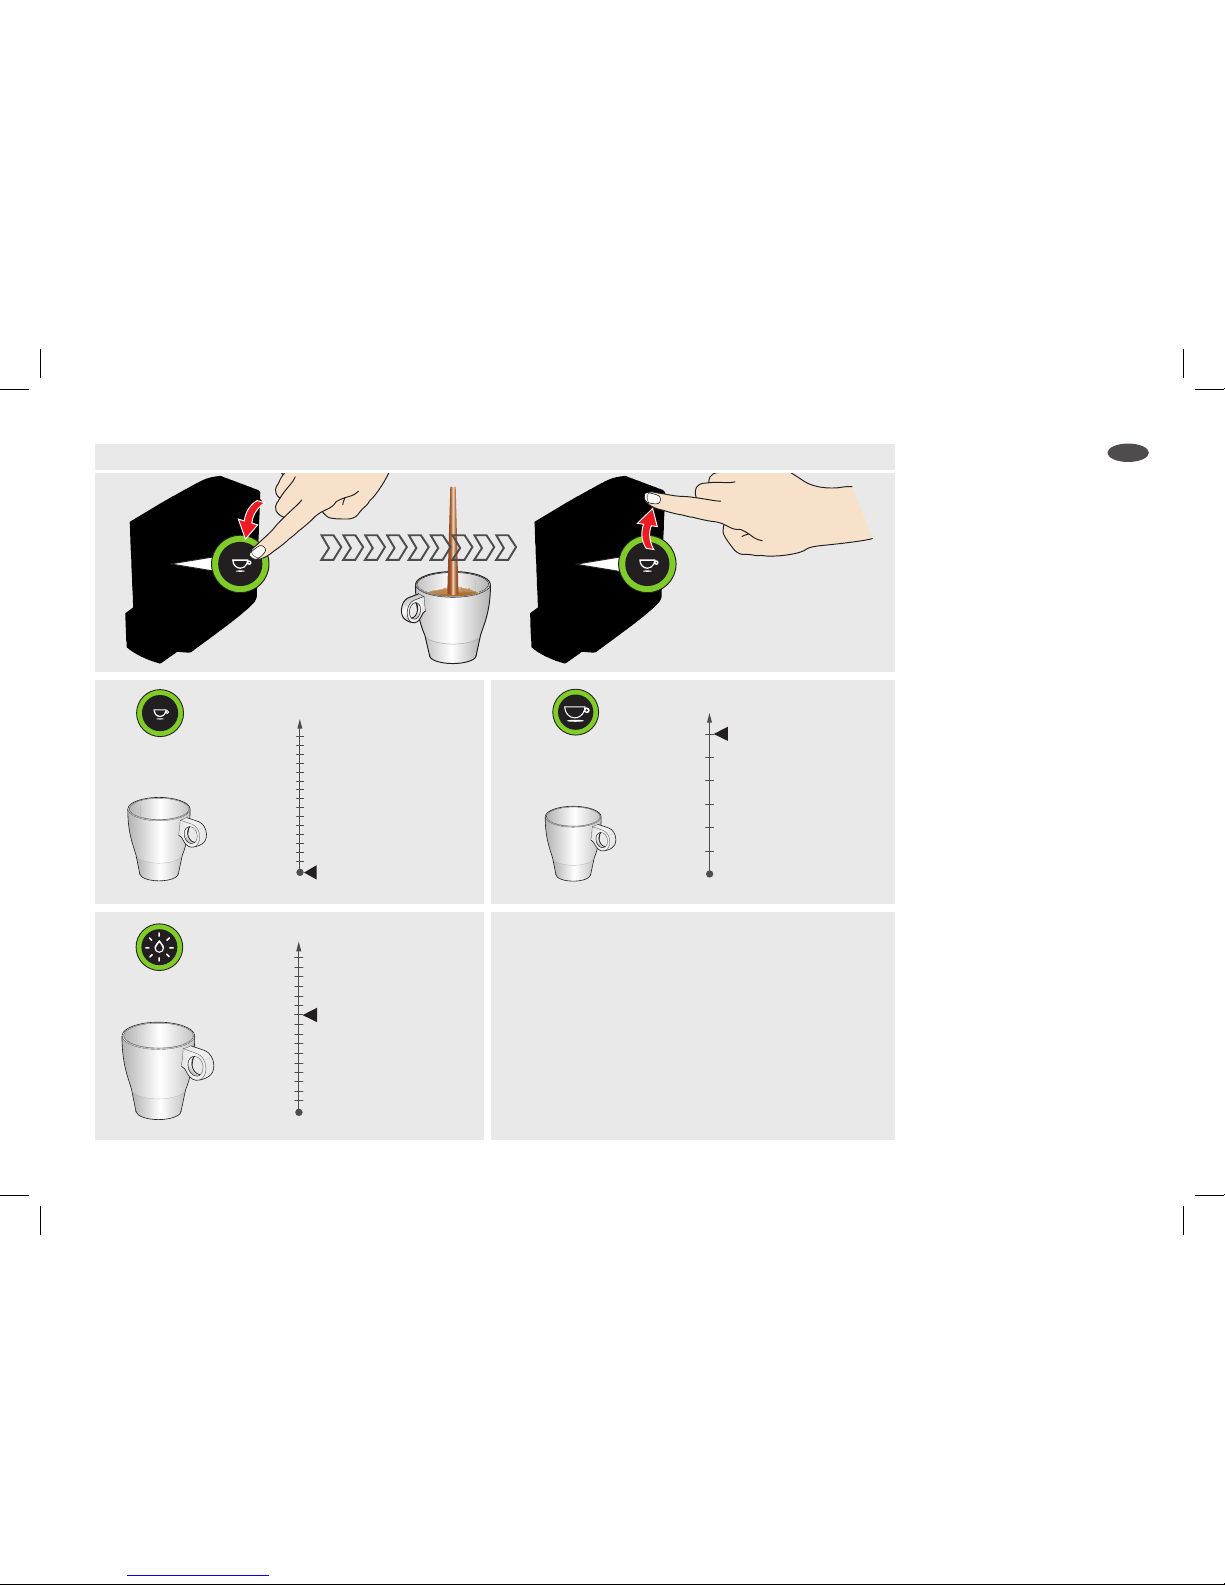
Programming
pouring capacities
EN
The machine is delivered with preset pouring
capacities (approximate values) that can be
programmed to your cup size.
Programmed volumes remain saved (even if
power is interrupted).
To reset the pouring capacities back to the
recommended settings, switchoff themachine
(see FAQ on page 13). Press the Brewed and
Rinse buttons together. Then press the Power
button. All user-programmable functions
return to factory settings. The buttons flash
one time for confirmation.
Press and hold desired
beverage button (Espresso,
Brewed, Hot Water) for at least
3seconds to start programming.
Continue to hold down the button until
the liquid reaches the level desired in
the cup. Then release button.
45 mL
Programmable volumes
Recommended
setting
30 mL
Espresso
1.5 fl oz
1.0 fl oz 150 mL
Programmable volumes
210 mL
Recommended
setting
Brewed Coffee
5.1 fl oz
7.1 fl oz
210 mL
Programmable volumes
150 mL
Recommended
setting
Hot Water
50 mL
1.7 fl oz
5.1 fl oz
7.1 fl oz
3 seconds minimum
EXAMPLE WITH ESPRESSO BUTTON
10
WARNING
WARNING: Make sure the handle is closed
completely during use. Extremely hot water
runs through the appliance when operating
(brewing, descaling, cleaning, rinsing). To
avoid the risk of scalding or other injury,
always keep the handle in the closed/down
position while machine is operating. Do not
reach under the spout and do not remove the
drip tray while appliance is operating.
Take care when emptying the drip trays
and pod container. Residual water can be
very hot.
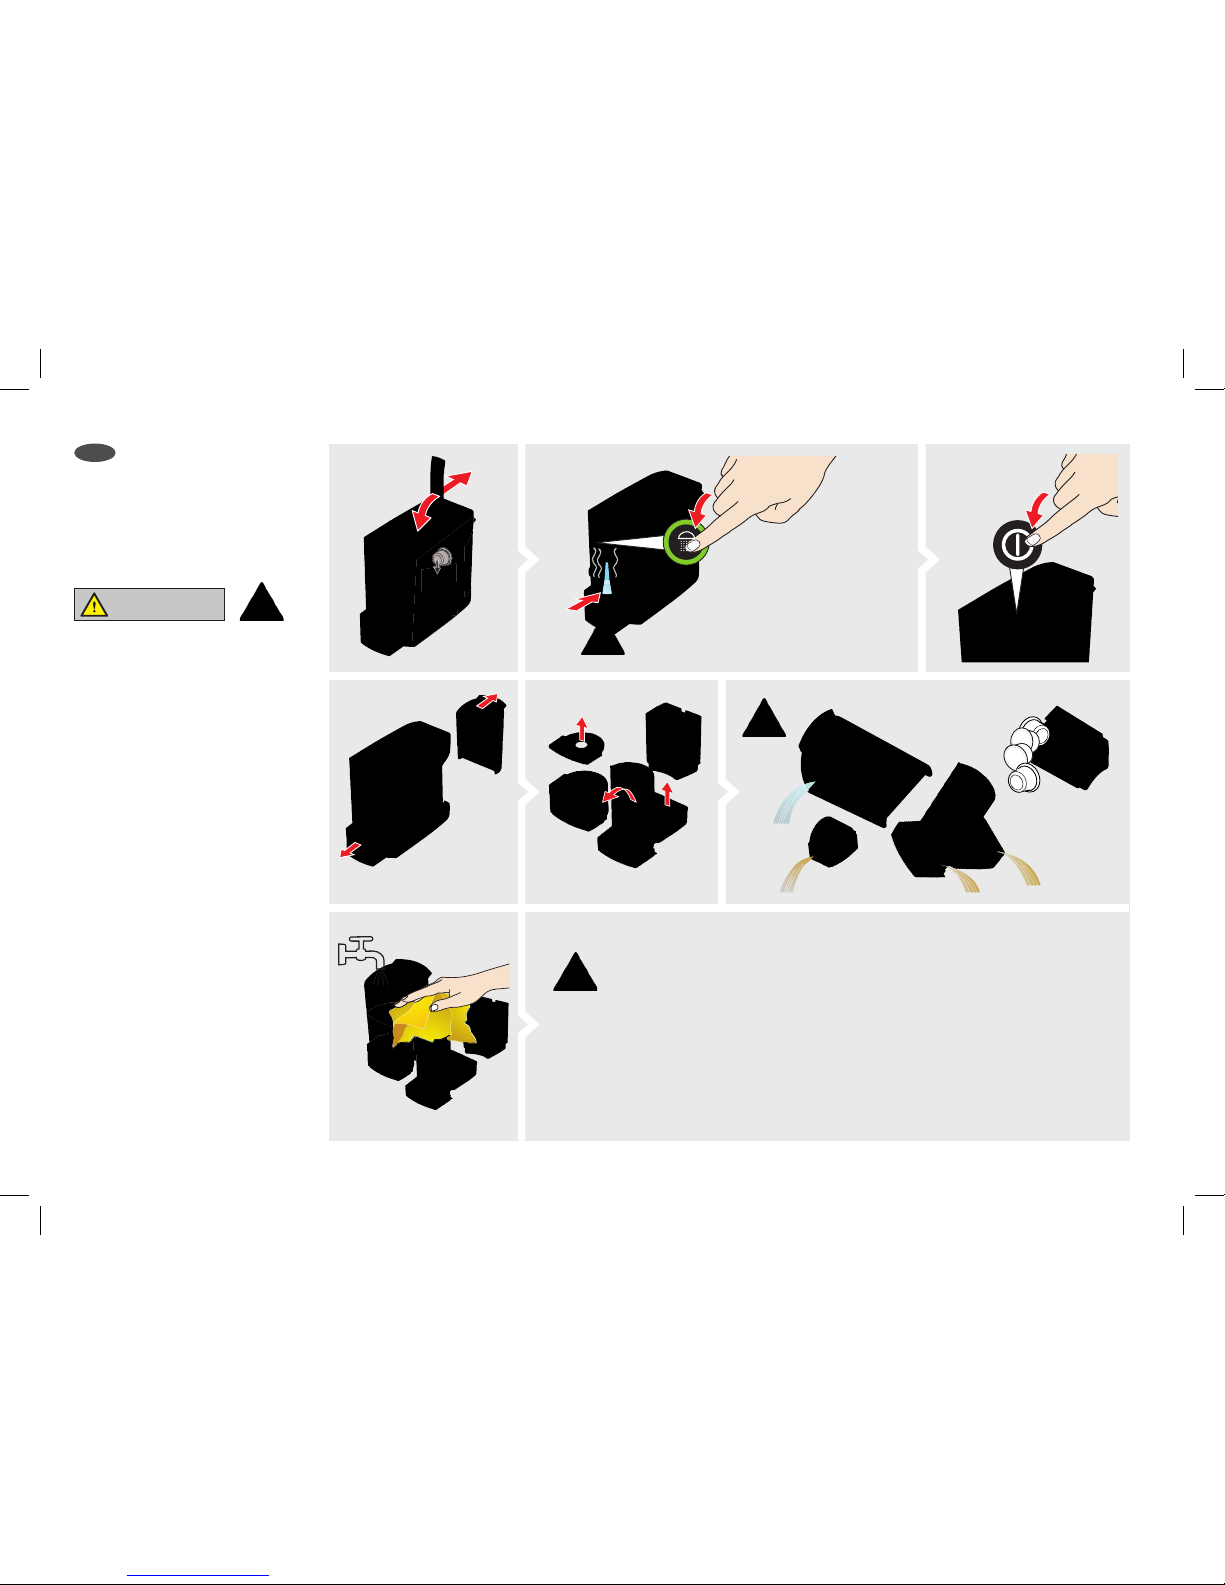
Daily maintenance
(after the last time
youuse it)
Place a heat-safe cup under spout.
Press button to rinse the machine
once, then discard liquid.
Empty all the containers.
Only use a moist cloth and if necessary a mild detergent (never use abrasive or aggressive
detergents).
Risk of damage
1
4
7
5
2 3
Lift and
close handle.
Remove drip tray and water tank. Take drip trap apart.
Clean and reassemble all parts.
WARNING: Extremely hot water
6
Off
EN To turn off machine,
press button for at
least 5 seconds.

11
EN
WARNING
WARNING: Make sure the handle is closed
completely during use. Extremely hot water
runs through the appliance when operating
(brewing, descaling, cleaning, rinsing). To
avoid the risk of scalding or other injury,
always keep the handle in the closed/down
position while machine is operating. Do not
reach under the spout and do not remove the
drip tray while appliance is operating.
*Water filter optional. Sold separately. See
verismo.com for more information.
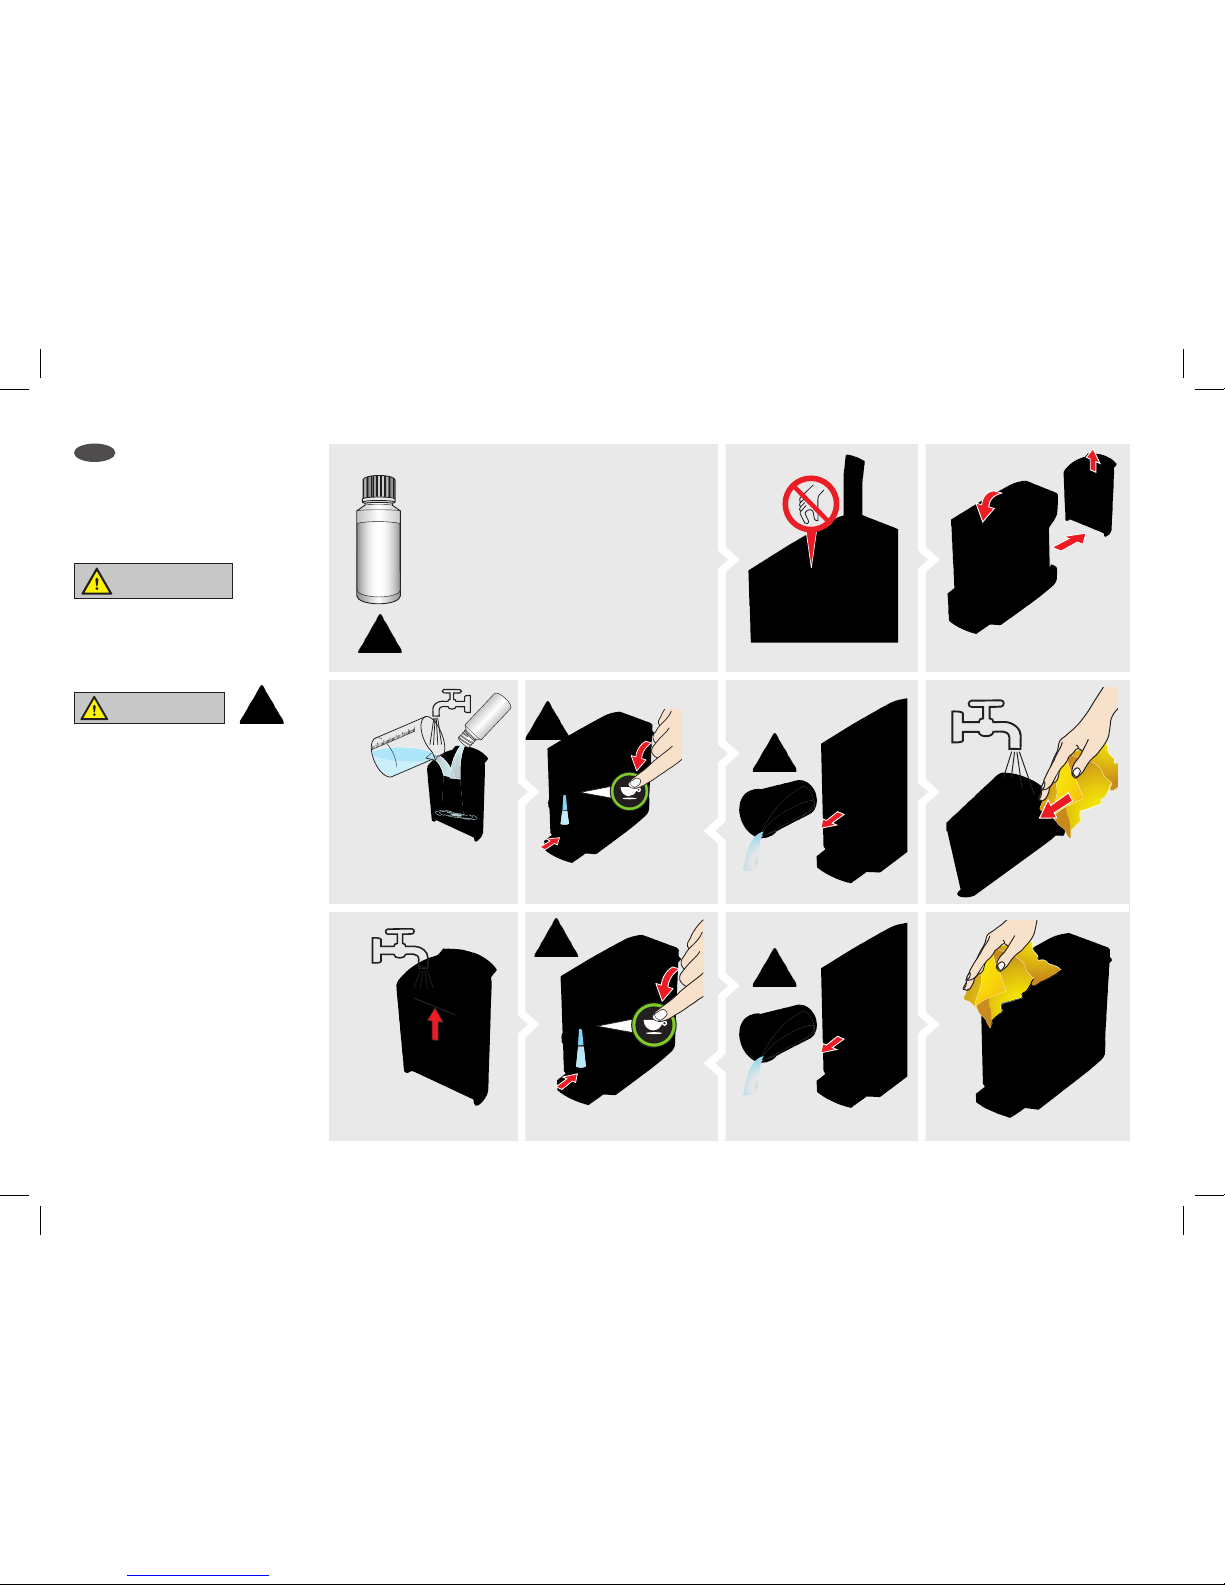
System cleaning
Only use liquid cleaners that are suitable for the
information.
For health reasons it is recommended to clean the
machine every month with a cleaning agent.
Carefully read the instructions for using the cleaning
agent and comply with all safety instructions.
1
4
8 9 10 11
7
2 3
Close handle and
remove water tank.
If using a water filter*, it must
be removed before cleaning.
Clean water tank.
Lift handle.
max
Fill water tank with water only.
Press Rinse button and
rinse until water tank is empty.
WARNING: Extremely hot water 65
Fill water tank
with cleaner
and water according to the
cleaning agent manufacturers
directions. Insert water tank.
Place a heat-safe cup under spout.
CAUTION
CAUTION: If using a water filter*, it must be
removed before cleaning the system.
Rinse until water tank is empty.
Empty cup.
Empty cup.
Wash cup before using again. Wipe down machine surface.
12
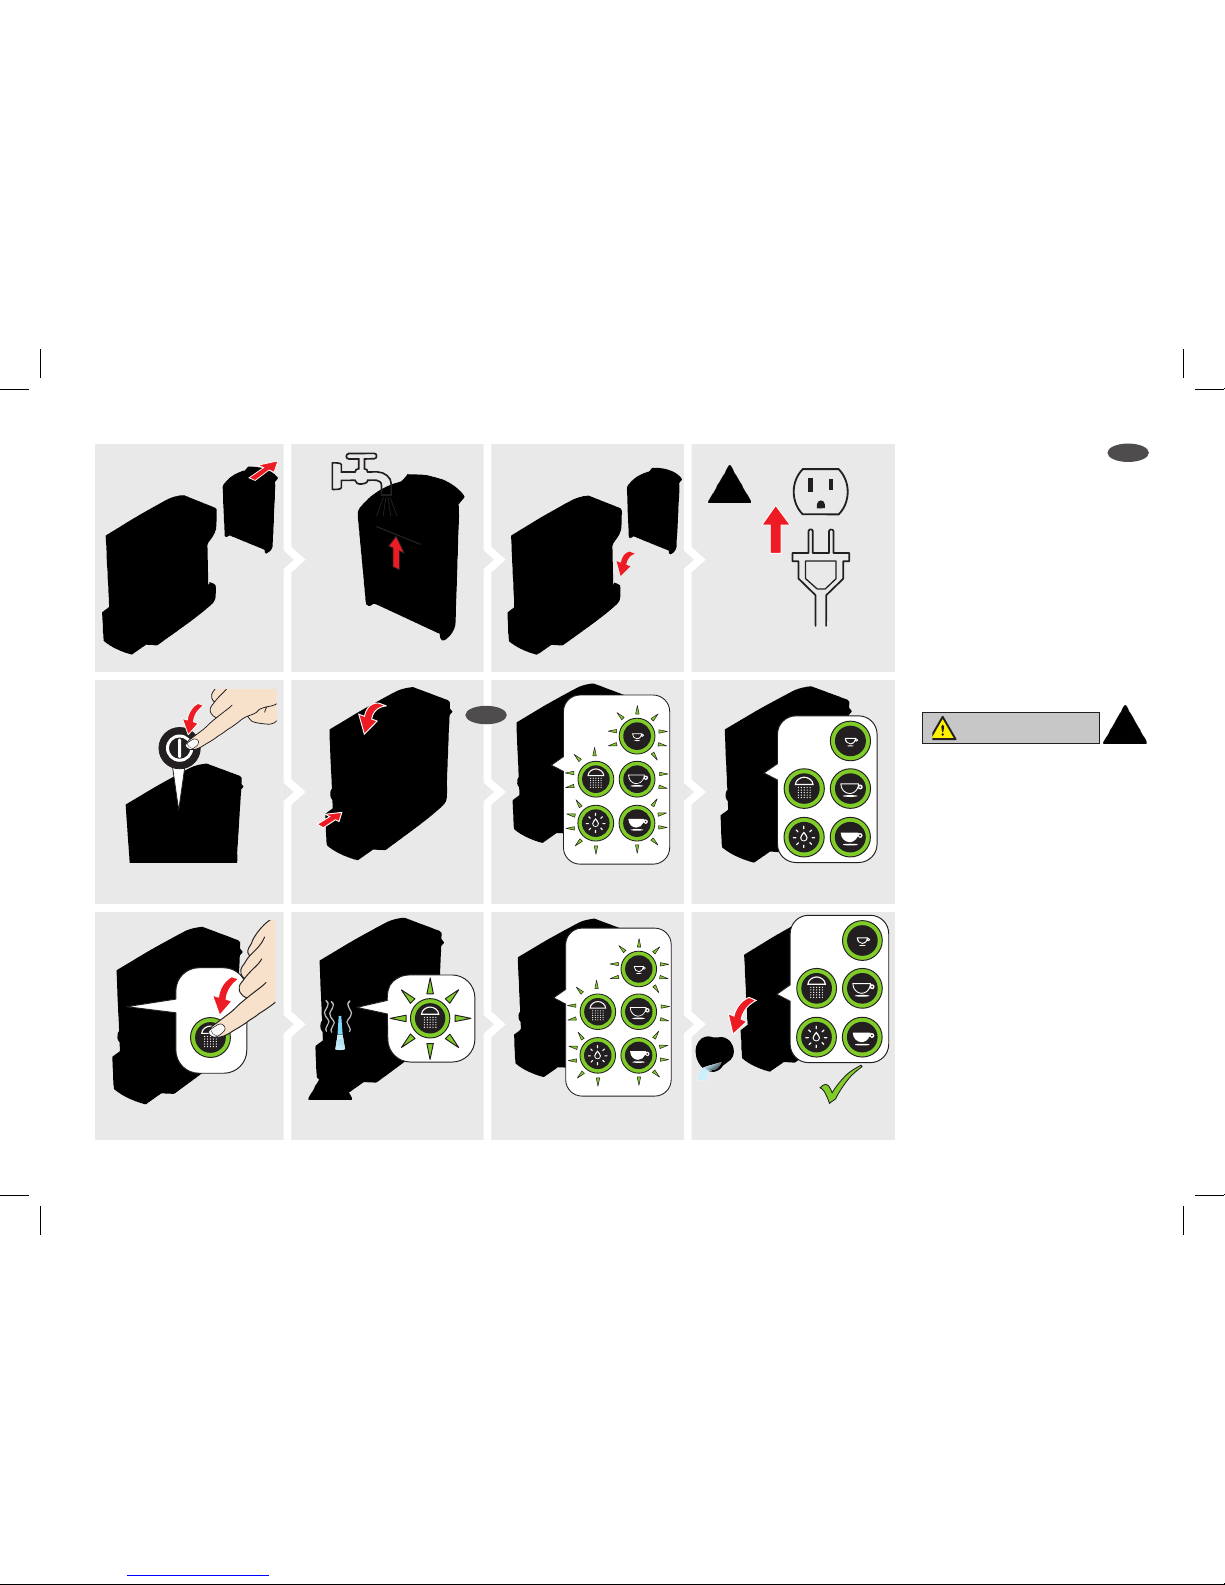
Press Milk button and rinse until
water tank is empty.
Rinse until water tank is empty.
Only use descaling agents that are suitable for
information.
System descaling
Carefully read the instructions for using the descaling
agent and comply with all safety instructions.
1
4
8 9 10 11
567
2 3
WARNING
WARNING: Make sure the handle is closed
completely during use. Extremely hot water
runs through the appliance when operating
(brewing, descaling, cleaning, rinsing). To
avoid the risk of scalding or other injury,
always keep the handle in the closed/down
position while machine is operating. Do not
reach under the spout and do not remove the
drip tray while appliance is operating.
Close handle and
remove water tank.
If using a water filter*, it must
be removed before descaling.
Clean water tank.
Lift handle.
max
Fill water tank with water only.
WARNING: Extremely hot water
Fill water tank
with descaler
and water according to the
descaling agent manufacturers
directions. Insert water tank.
Place a heat-safe cup under spout.
CAUTION
CAUTION: If using a water filter*, it must be
removed before descaling the system.
Empty cup.
Wipe down machine surface.
Empty cup.
Wash cup before using again.
EN
*Water filter optional. Sold separately. See
verismo.com for more information.
13
Why is there a delay before the drink is dispensed?
The machine is adjusting to the right temperature to make your beverage.
How do I remove the pod container if it is jammed or overfilled?
Gently move the pod container back and forth while removing the container.
Why isn’t the beverage hot enough?
The machine may need to be descaled (refer to section “System descaling”).
Why is the Rinse button flashing at a fast rate for a prolonged period of time?
Try switching off the machine and unplugging the cord from the wall outlet. If this problem persists, please visit verismo.com.
Why isn’t the drink dispensing properly?
Ensure the handle is pressed down completely. If necessary, descale the machine (refer to section “System descaling”).
Why does the machine switch itself off suddenly when it is used a lot?
The machine switches itself off as protection against overheating. If it occurs, the Rinse button will blink in red while the Hot Water button will
blink simultaneously in green for about 60 seconds. The appliance will switch automatically back into ready mode (all buttons are green).
How do I reset the machine to factory settings?
Switch off the machine. Press Brewed and Rinse buttons at the same time, hold them and press the Power button for at least three seconds.
All user-programmable functions return to factory settings and the buttons flash one time for confirmation.
Why does the machine switch off automatically after not being in use for more than 30 minutes?
The machine has an automatic switch-off function to save energy.
Frequently asked
questions
EN
Disposal
instructions
EN
The packaging is recyclable. Follow your local
guidelines when recycling.
Designed for beverage pods that bear the
If any problems persist, contact verismo.com
Overview of water hardness
Hardness range Water hardness in mmol
1 (soft) < 1.3
2 (medium-hard) 1.3–2.5
3 (hard) 2.5–3.8
4 (very hard) > 3.8
14
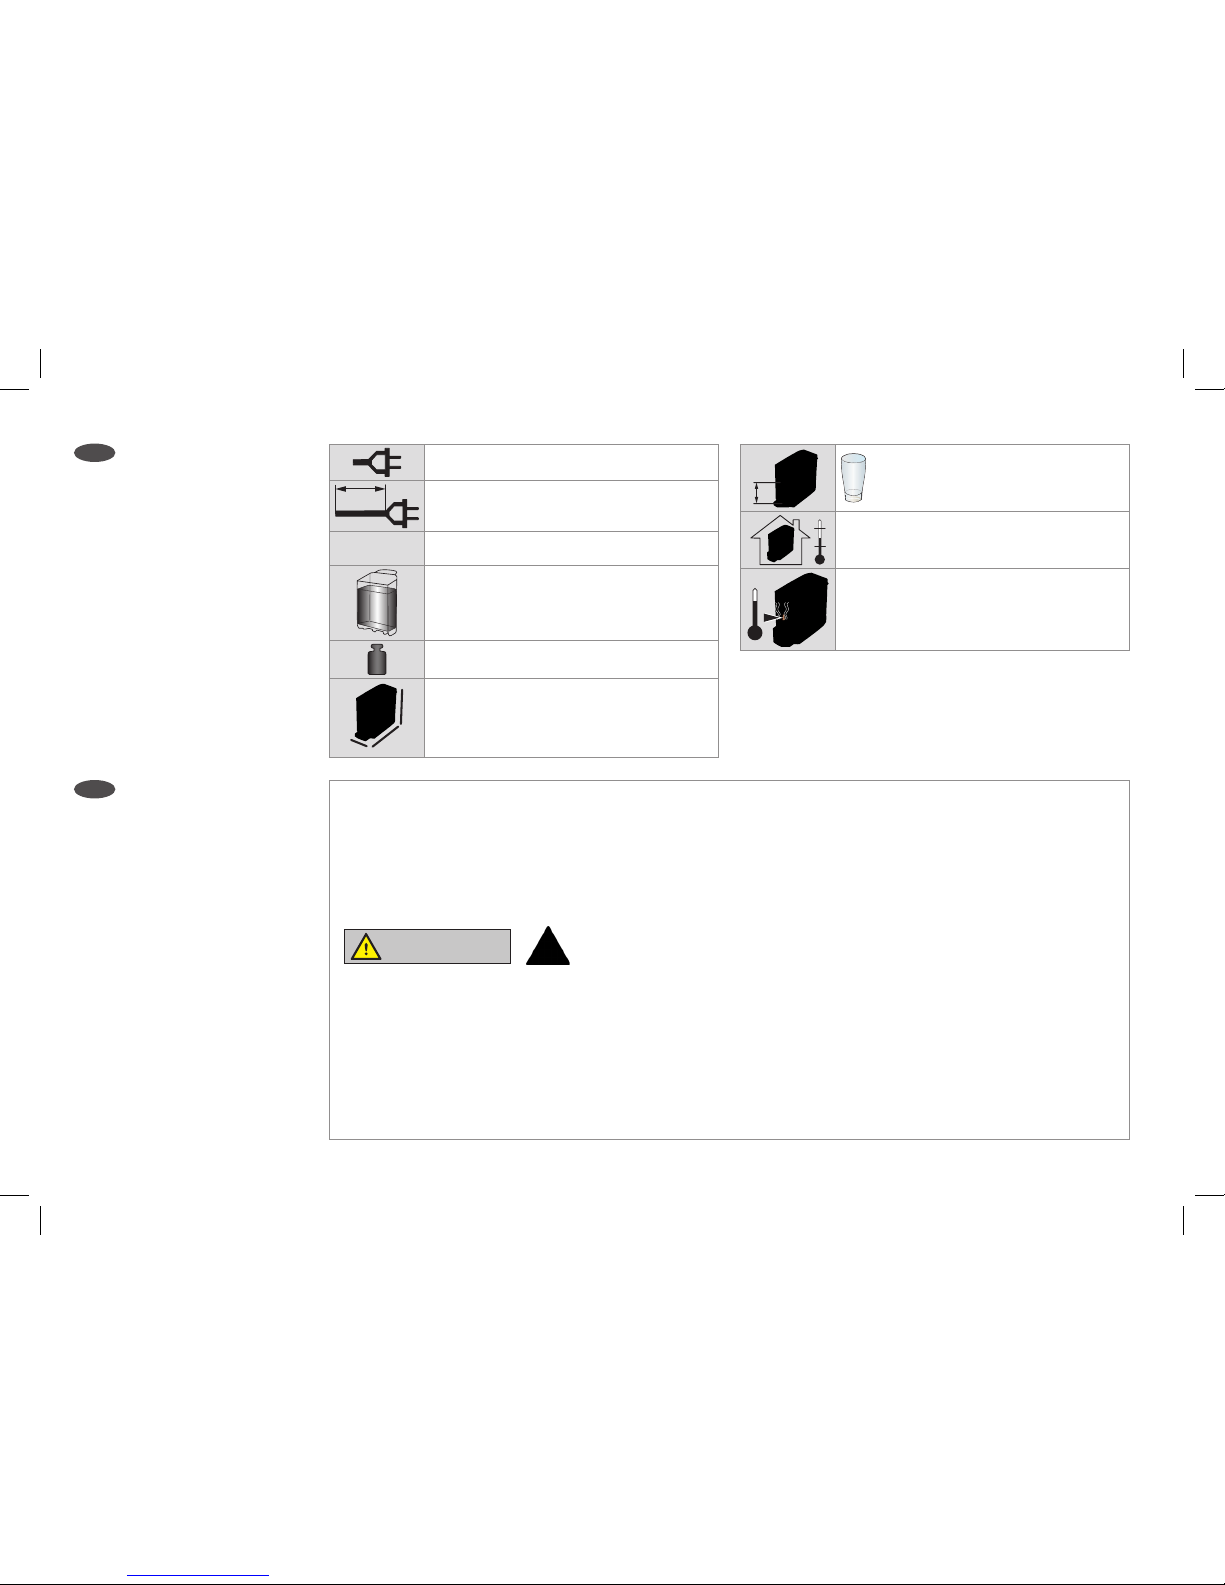
39.4 in/1 m
Pressure maximum 275 psi / 19–bar
33.8 fl oz/1 L
8.38 lb/3.8 kg
A
B
C
A = 5.9 in/150 mm
B = 14.88 in / 378 mm
C = 11.69 in /297 mm
Empty the residual water if the appliance should be transported or stored during frosty conditions (temperatures below 32°F / 0°C). This
prevents residual water from freezing inside the appliance.
Let appliance warm up to room temperature if necessary. Make sure that the appliance is switched off. Open handle and close it again.
Remove and empty the water tank. Press the Espresso and Milk buttons at the same time, hold them and press the Power button for at least
three seconds. Evaporation will start. Wait until evaporation is finished. Reinsert emtpy water tank. Wipe and dry the front of the appliance
with a cloth.
WARNING
WARNING: Extremely hot water
The steam temperature can be as high as 248°F/120°C. Do not reach under the spout and keep at a distance from spout.
WARNING: Extreme temperatures
Do not operate the appliance below 50°F/10°C to avoid risks to the appliance (temperature range for operation is 50–115°F/10–45°C).
maximum 5.9 in/150 mm
50°F–113°F/10°C–45°C
approximately 199°F/93°C
EN
EN
Specifications
Emptying the
machine

15
Notes EN

16
CONSIGNES DE SÉCURITÉ
IMPORTANTES
AVERTISSEMENT
Respectez toujours les mesures de sécurité de base lors
de l’utilisation d’appareils électriques, notamment les
suivantes:
1. Lisez toutes les instructions et utilisez uniquement
l’appareil conformément à ces instructions.
2. L’appareil est conçu et fabriqué pour un usage
domestique seulement. N’utilisez pas l’appareil
à des fins autres que celles pour lesquelles il a été
conçu.
3. Ne placez jamais vos doigts sous le bec verseur
lorsque l’appareil est en marche – vous pourriez
vous ébouillanter. Ne mettez jamais vos doigts
dans le compartiment à capsule – vous pourriez
vous blesser.
4. Ne soulevez jamais le levier de l’appareil
pendant l’infusion, le rinçage, le nettoyage ou
le détartrage. Maintenez toujours le levier en
position fermée (vers le bas) lorsque l’appareil
fonctionne.
5. Ne touchez pas les surfaces chaudes. Utilisez les
poignées lorsqu’elles sont disponibles.
6. N’utilisez jamais une capsule endommagée ou
déformée. N'utilisez que des capsules de boissons
qui conviennent à cet appareil.
7. Ne soulevez jamais l’appareil par son levier.
8. Ne relevez ni n'abaissez jamais le levier de force.
9. Ne démontez jamais l’appareil et n’insérez jamais
d’objet dans les ouvertures de l’appareil.
10. Ne faites jamais fonctionner l’appareil sans son bac
ou sa grille d’égouttement.
11. Ne remplissez pas trop le réservoir avec de l’eau.
12. N’utilisez que de l’eau potable douce et froide
dans cet appareil! Ne mettez pas d’autres liquides ou
aliments dans le réservoir d’eau, sauf tel qu’indiqué
dans les instructions de nettoyage et de détartrage
contenues dans ce manuel.
13. L’utilisation d’un accessoire non recommandé par le
fabricant de l’appareil peut entraîner un incendie,
une électrocution ou des blessures corporelles.
14. Ne placez pas l'appareil sur le dessus ni près d'un
brûleur à gaz ou électrique, ni dans un four chaud.
15. Ne placez pas l’appareil à proximité d’une source
d’eau, par exemple un évier de cuisine.
16. N’utilisez pas ce produit à l’extérieur.
17. N’immergez pas l’appareil, le cordon d'alimentation
ni la fiche dans l'eau ou tout autre liquide pour éviter
les incendies, les électrocutions et les blessures.
18. Cet appareil est équipé d’un cordon d’alimentation
comportant un fil de mise à la terre avec une prise
équipée d’une mise à la terre. Ne branchez l’appareil
que dans une prise murale à trois broches. La mise
à la terre réduit le risque d’électrocution dans le cas
d’alimentation en courant correspond bien aux
caractéristiques techniques inscrites sur la plaque
signalétique. La garantie devient nulle et non avenue
si l’appareil est branché sur une prise secteur dont
l’alimentation en courant est incorrecte.
ou enlever la troisième broche (mise à la terre) du
cordon d’alimentation ni utiliser un adaptateur
à deux broches. Consultez un électricien qualifié
si les instructions de mise à la terre ne sont pas
complètement comprises ou si un doute existe quant
à savoir si l’appareil est correctement mis à la terre.
20. Mettez hors tension et retirez la fiche de la prise
lorsque vous n’utilisez pas l’appareil ou avant de
procéder à un nettoyage. Laissez refroidir l’appareil
avant de mettre ou d’enlever des pièces et avant de
le nettoyer.
21. N’utilisez pas un appareil qui ne fonctionne pas
convenablement ou dont le cordon ou la fiche est
en mauvais état. Contactez le service à la clientèle
de Starbucks (1-800-334-5553) pour signaler tout
mauvais fonctionnement ou dommage à l’appareil
ou pour obtenir des directives pour un retour aux fins
d’inspection, de réparation ou d’ajustement.
22. Ne laissez pas le cordon d’alimentation pendre du
rebord d’une table ou d’un comptoir ni toucher à des
surfaces chaudes.
23. Pour débrancher l'appareil, mettez-le toujours hors
tension («off »)avantde retirerla fichede laprise murale.
24. Une supervision étroite est requise si cet appareil est
utilisé par un enfant ou est à proximité d’un enfant.
Rangez l’appareil et tous ses accessoires hors de
portée des enfants.
25. Reportez-vous aux instructions d’utilisation de tous
les agents de nettoyage et de détartrage avant de
les utiliser et conformez-vous aux règles de sécurité.
N’éteignez pas l’appareil pendant le processus de
rinçage ou de détartrage.
26. Hormis l’utilisation normale – ce qui comprend le
nettoyage, le détartrage et le nettoyage externe – tous
les travaux tels que la réparation ou le remplacement
du cordon d’alimentation ne devraient être effectués
que par une entreprise de service à la clientèle
autorisée afin d’éviter les dangers.
27. L’appareil doit être vidé et nettoyé et la fiche doit
être retirée de la prise en cas de longues périodes
d’absence, de vacances, etc.
28. Si l’appareil a été exposé à des températures
inférieures au point de congélation, attendez au
moins troisheures avant le démarrage afin de
permettre à l’appareil d’atteindre la température
ambiante. Un appareil congelé ou très froid peut ne
pas fonctionner adéquatement.
CONSERVEZ CES
INSTRUCTIONS
AVERTISSEMENT POUR LES
UTILISATEURS ET LES PARENTS
NE PERMETTEZ PAS aux enfants d’utiliser l’appareil à
moins qu’ils ne le fassent sous la surveillance d’un adulte.
FR

17
INSTRUCTIONS DE SÉCURITÉ
PARTICULIÈRES
Symboles et mots d’avertissement
Le triangle d’avertissement apparaît dans ces instructions
lorsque le défaut de se conformer aux consignes de
sécurité peut entraîner des risques pour l’utilisateur ou
l’appareil.
Ce qu’il ne faut pas faire: Ne pas mettre la main
à l’intérieur
Électrocution
AVERTISSEMENT
Éviter les risques d’électrocution
éclaboussures.
un jet d’eau.
d’alimentation.
l’intérieur.
ou enlever la troisième broche (mise à la terre) du
cordon d’alimentation ni utiliser un adaptateur à
deux broches.
AVERTISSEMENT
AVERTISSEMENT: Assurez-vous que le levier est
complètement abaissé pendant l’utilisation. De l’eau
extrêmement chaude traverse l’appareil lorsqu’il
fonctionne (infusion, détartrage, nettoyage, rinçage).
Pour éviter les risques de brûlures ou d’autres
blessures, gardez toujoursle levierabaissé (en position
fermée) lorsque l’appareil est en marche. Ne mettez
pas la main sous le bec verseur et ne retirez pas le bac
d’égouttement lorsque l’appareil est en marche.
Faites attention lors de la vidange du bac
d’égouttement. L’eau peut être très chaude.
l’eau résiduelle (la température de la vapeur peut
être aussi élevée que 120°C [248°F]).
MISE EN GARDE
Hygiène et nettoyage
rincer l’appareil cinq fois
avant la première utilisation et une fois à la fin de
son utilisation quotidienne. Lisez les instructions de
la section «Entretien quotidien» à la page 22.
consignes du manuel d’utilisation pour prévenir les
risques liés à l’hygiène.
détartrage appropriés pour l’appareil.
Lisez attentivement les instructions d’utilisation des
agents de nettoyage et de détartrage et conformez-
vous aux consignes de sécurité.
Instructions concernant le cordon d’alimentation court
Un cordon d’alimentation court est fourni pour réduire
les risques d’enchevêtrement ou de trébuchement que
causerait un cordon d’alimentation plus long. Un cordon
d’alimentation détachable plus long ou une rallonge
peuvent être utilisés avec prudence. En cas d’utilisation d'un
cordon d’alimentation plus long ou d’une rallonge : 1) la
puissance électrique marquée sur ceux-ci doit être au moins
égale à celle de l’appareil; 2) si l’appareil est un modèle avec
prise de terre, le cordon de la rallonge doit être à trois fils
avec mise à la terre; et 3) le cordon d’alimentation doit être
disposé de manière à ne pas reposer sur le comptoir ou sur
la table lorsqu’il peut être tiré par un enfant.
Informations sur le mode économie d’énergie et
l’arrêt automatique
L’appareil se met en mode économie d’énergie s’il n’est
pasutilisé pendant plusde15minutes (réglage del’usine).
L’appareil semetautomatiquement hors tensionaprès 30
minutes. L’appareil consomme considérablement moins
d’énergie lorsqu’il est dans ce mode. Il consomme en fait
moins de 0,5 W/h (la quantité d’énergie utilisée pour un
fonctionnement normal).
MISE EN GARDE
MISE EN GARDE: Quatre aiguilles pointues servent à
percer les capsules du système Verismo® à l’intérieur
du compartiment à capsule. Ne mettez pas vos
doigts dans le compartiment à capsule pour éviter
tout risque de blessure.
AVERTISSEMENT: AFIN DE RÉDUIRE LES RISQUES
D’INCENDIE OU D’ÉLECTROCUTION, NE RETIREZ PAS
RÉPARABLE PAR L’UTILISATEUR À L’INTÉRIEUR. LES
PERSONNEL AGRÉÉ SEULEMENT.
AVERTISSEMENT
RISQUE D’INCENDIE OU
D’ÉLECTROCUTION
NE PAS OUVRIR

18
Survol des symboles DEL
Espresso LES VOYANTS LUMINEUX
CLIGNOTENT LORSQUE :
L’APPAREIL SE
RÉCHAUFFE.
L’APPAREIL PRÉPARE
UNE BOISSON.
LES VOYANTS LUMINEUX
S’ALLUMENT LORSQUE :
Infusion
Lait
Rinçage
Eau
chaude
5
7 9
8
6
1 2
4
3
Bouton à espresso
Bouton d’infusion
Bouton à lait
Bouton de rinçage
Eau chaude
MISE EN GARDE
MISE EN GARDE: Quatre aiguilles pointues servent à
du compartiment à capsule. Ne mettez pas vos doigts
dans le compartiment à capsule pour éviter tout
risque de blessure.
Aperçu du système
Verismo® 600
1 Grille du bac d’égouttement
2 Réceptacle à capsules utilisées
3 Boutons de commande
4 Compartiment à capsule
5 Levier
6 Réservoir d’eau
7 Bec verseur
8 Bac d’égouttement à hauteur réglable
9 Bouton de mise sous tension
FR
Préréglages pour les boutons:
Espresso................................30mL (1,0oz)
Infusion............................... 210mL (7,1oz)
Lait.....................................135mL (4,56oz)
(avec une température réduite)
Rinçage .......................................45mL (1,5oz)
Eau chaude ...........................150mL (5,1oz)
IMPORTANT: Retirez la
pellicule de protection blanche
de la grille du bac d’égouttement.
19
1x
max
1
5
4
910 11 12
678
2 3
Retirez le
réservoir d’eau.
Appuyez sur le bouton pour rincer.
Un voyant vert s’allume lorsque
l’appareil est prêt.
Jetez le liquide lorsque
vous avez terminé. Répétez les étapes
9 à 12 quatre fois de plus.
L’appareil se prépare pour rincer
de nouveau.
Les voyants
lumineux qui clignotent indiquent
que l’appareil se réchauffe.
importantes à la page16.
chaude.
Remplissez le réservoir d’eau
potable douce et froide.
Maintenez le levier en position
abaissée. Placez une tasse résistant à
la chaleur sous le bec verseur.
Appuyez brièvement (1seconde)
sur le bouton «On/Off».
Insérez le réservoir d’eau.
On(Mise
sous tension)
IMPORTANT:Répétez les
étapes 9 à 12 quatrefois de plus
afin de préparer l’appareil à sa
première utilisation.
IMPORTANT:
doit être préparé avant la première
utilisation et chaque fois que l’appareil
sèche ou manque d’eau.
Réglage de votre
système Verismo®
600 (Préparation à la
première utilisation)
AVERTISSEMENT
levier est complètement abaissé pendant
l’utilisation. De l’eau extrêmement chaude
traverse l’appareil lorsqu’il fonctionne
(infusion, détartrage, nettoyage, rinçage).
Pour éviter les risques de brûlures ou d’autres
blessures, gardez toujours le levier abaissé
(en position fermée) lorsque l’appareil est en
marche. Ne mettez pas les mains sous le bec
verseur et ne retirez pas le bac d’égouttement
lorsque l’appareil est en marche.
FR
FR

max
90 mm
(3,54 po)
max
150 mm /
5.9 in
1
2
6 7 8
345
1A 1B 1C
Utilisez une tasse résistant à la
chaleur de format approprié.
L’appareil est prêt lorsque les
voyants lumineux s’allument.
La boisson est prête.
Soulevez le levier. Insérez une
capsule à espresso.
Soulevez et abaissez le levier pour
éjecter la capsule. La boisson est prête.
Appuyez sur le bouton à espresso
(le bouton du haut).
La boisson s’écoule.
extrêmement chaude.
Pourles
boissons
de grandformat,
retirezlebacd’égouttement. Replacez le bac d’égouttement.
AVERTISSEMENT
levier est complètement abaissé pendant
l’utilisation. De l’eau extrêmement chaude
traverse l’appareil lorsqu’il fonctionne
(infusion, détartrage, nettoyage, rinçage).
Pour éviter les risques de brûlures ou d’autres
blessures, gardez toujours le levier abaissé
(en position fermée) lorsque l’appareil est en
marche. Ne mettez pas les mains sous le bec
verseur et ne retirez pas le bac d’égouttement
lorsque l’appareil est en marche.
N’enlevez pas l’opercule et ne percez pas la
capsule.
Rincez l’appareil avant de préparer chaque
boisson en plaçant une tasse vide sur le bac
d’égouttement et en appuyant une fois sur
le bouton, puis jetez l’eau chaude.
Préparation des
boissons
FR
20
Other manuals for Verismo
2
Table of contents
Languages:
Other STARBUCKS Coffee Maker manuals

STARBUCKS
STARBUCKS Verismo Instruction Manual

STARBUCKS
STARBUCKS BARISTA AROMA SOLO User manual

STARBUCKS
STARBUCKS Verisimo V User manual

STARBUCKS
STARBUCKS SIN 006 User manual

STARBUCKS
STARBUCKS Kontakt User manual

STARBUCKS
STARBUCKS Sirena User manual

STARBUCKS
STARBUCKS SUP021 YDR User manual

STARBUCKS
STARBUCKS SUP021 YDR User manual
Popular Coffee Maker manuals by other brands


MPM
MPM MKW-02 user manual

Melitta
Melitta CI E970-003 operating instructions

cecotec
cecotec Cumbia POWER INSTANT-CCINO 20 TOUCH WHITE instruction manual

Jura
Jura Impressa Xs9 OT Classic Operating & cleaning instructions

HLF Italian Design
HLF Italian Design AROMA 4000 instruction manual

Electrolux
Electrolux CMPRO user manual