Starcomms LSP-300 User manual

CDMA Fixed Wireless Telephone
User Guide
Model: LSP-300

LGE CDMA Fixed Wireless Telephone
LSP-300
3
REVISED HISTORY
DATE ISSUE CONTENTS OF CHANGES REMARK
2001/02/19
ISSUE1 Initial Release

LGE CDMA Fixed Wireless Telephone
LSP-300
4
Blank Page

LGE CDMA Fixed Wireless Telephone
LSP-300
5
CONTENTS
Highlights......................................................................................................................................7
1. Important Information.......................................................................................................8
1.1 Safety Information...........................................................................................................8
1.2 Optimal Phone Performance.........................................................................................8
1.3 Care and Service............................................................................................................9
2. Introduction.......................................................................................................................10
2.1 Front View of the Telephone.........................................................................................10
2.2 LCD Display.................................................................................................................11
2.3 Installation.....................................................................................................................12
2.4 Installation Steps ..........................................................................................................14
3. Basic Operation................................................................................................................15
3.1 Making a Call................................................................................................................15
3.2 Redialing Last Outgoing Number.................................................................................15
3.3 Receiving a Call............................................................................................................16
3.4 Signal Strength.............................................................................................................16
3.5 Missed Call Message...................................................................................................16
4. List of Menu State............................................................................................................17
4.1 Volume / Ring..................................................................................................................17
4.1.1 Ring Volume.........................................................................................................17
4.1.2 Key Volume..........................................................................................................18
4.1.3 Ear Volume ..........................................................................................................18
4.1.4Ring Type
4.2 Additional Feature.........................................................................................................24
4.2.1 Wake-up time.....................................................................................................19
4.2.2Minute alert ..........................................................................................................20
4.2.3Set Rx call mode..................................................................................................20
4.2.4SIO baud rate.......................................................................................................20
4.2.5Own Number ..........................................................................................................2
4.3Dialing features ..................................................................................................................19
4.4.1 Hot line...............................................................................................................19
4.4.2 Hot line time.......................................................................................................20
4.4.3 Auto time-out........................................................................................................20
4.4.4 Speed dialing........................................................................................................20
4.4.5 Keytone length.....................................................................................................20

LGE CDMA Fixed Wireless Telephone
LSP-300
6
4.5Security Features............................................................................................................22
4.5.1 Set Lock mode.......................................................................................................23
4.5.2 Clear calls..............................................................................................................23
4.5.3 Clear memory.........................................................................................................23
4.5.4 Emergency call ......................................................................................................23
4.5.5 Restrict call............................................................................................................23
4.5.5.1 Restriction set .....................................................................................................23
4.5.5.2 Permit Memory..................................................................................................23
4.5.5.3 Deny Memory....................................................................................................23
4.5.6 New Code
5. Features while in a Call..................................................................................................25
5.1 Ear Volume...................................................................................................................25
5.2 MIC Volume..................................................................................................................25
5.3 Mute..............................................................................................................................26
5.4 Memo............................................................................................................................26
5.5 Transmitting your own number....................................................................................26
6. Searching, Editing & Dialing.........................................................................................27
6.1 Retrieving Last Call History..........................................................................................27
6.2 Retrieving Phone Number by Name............................................................................28
6.3 Retrieving Phone Number by Address........................................................................29
6.4Retrieving Phone Number by Number.........................................................................29
7. SMS(Short Message Service).......................................................................................30
7.1 Check & Deleting Received Message..........................................................................30
7.1.1 Text Message........................................................................................................30
7.1.2 VoiceMessage..................................................................................................31
7.1.3 Erasing all Received Message..........................................................................31
7.2MSG Notification tone select........................................................................................32
7.3Erasing Message..........................................................................................................31
7.4Message sending.........................................................................................................32
7.3.1 Sending a New Message....................................................................................32
7.3.2 Sending the sent message or message after editing the sent message...........33
7.3.3 Erasing a sent message.....................................................................................34
8. Beside Functions.............................................................................................................35
8.1 Redial...........................................................................................................................35
8.2Viewing last call-history................................................................................................35
8.3Flash.............................................................................................................................35
9. Storing Phone Number..................................................................................................36
9.1 Storing / Editing Phone Numbers................................................................................36
9.1.1 Storing Phone Numbers.........................................................................................36
9.1.2 Erasing Stored Phone Numbers..............................................................................37
9.2Finding Stored Phone Numbers...................................................................................38
10. Speaker phone..................................................................................................................39
11. General information.........................................................................................................39

LGE CDMA Fixed Wireless Telephone
LSP-300
7
Highlights
Congratulations on your purchase of the LSP-300 Fixed Wireless Telephone. This
telephone has been designed to operate on the latest digital mobile communications
technology. This technology has greatly enhanced voice clarity and can provide various
advanced features.
The telephone provides:
l3-line LCD Display with status indicator
lA choice of 10 ring sounds
lA menu driven interface with prompts for easy operation
lLast Number Redial
lSpeed Dialing with a 99-number memory
lDial tone
lROH (Receiver Off-Hook) tone
lAdjustable Ring Volume
lInternal Back-up Battery Pack
lAC Power Supply
lDipole Antenna
lDB9 Data Port for service and repair
lBacklingt
lSpeaker phone

LGE CDMA Fixed Wireless Telephone
LSP-300
8
1. Important Information
1.1 Safety Information
Warning
To reduce the risk of fire or electric shock, do not expose this product to rain or moisture.
Do not use this product near swimming pools or other bodies of water.
IMPORTANT
Before installing or operating this product read this information.
1.2 Optimal Phone Performance
lDo not operate your product when holding the antenna, or when someone is within four
inches (ten centimeters) of the antenna. Holding the antenna affects call quality and may
cause the telephone to operate at a higher power level than needed.
lFor the best call quality, keep the antenna free from obstructions and point the antenna
straight up.
lDo not use the unit with a damaged antenna. Have your antenna replaced by a qualified
technician immediately. Use only a manufacturer-approved antenna. Non-approved
antennas, modifications, or attachments could impair call quality, damage the phone.
lRF energy may affect improperly installed or inadequately shielded personal medical
devices such as pace markers, hospital monitor. Consult the manufacturer of any
personal medical devices to determine if they are adequately shielded from external RF
energy. Turn your terminal OFF in health care facilities when any regulations posted in the
areas instruct you to do so. Hospitals or health care facilities may be using equipment that
could be sensitive to external RF energy.
lIf this equipment does cause harmful interference to radio or television reception, which
can be determined by turning the equipment off and on, the user is encouraged to try to
correct the interference by one or more of the following measures:
-Reorient or relocate the receiving antenna
-Increase the distancebetween the radio or television and the telephone.
-Connect the equipment into an outlet on a circuit
different from that to which the
terminal is connected.
-Consult you Authorized LGIC Dealer of an experienced radio/TV technician for help.
lUse only the battery, antenna and AC power supply provided by LGIC. Using any other
type will invalidate the warranty.
lOnly authorized personnel should service the phone and its accessories. Faulty
installation or service any be dangerous and may invalidate the warranty.
lDo not use the unit in designated “no cellular phone use” area.
lAvoid exposure to high temperature or humidity.
lAvoid wetting the unit with any liquids. If the unit gets wet, turn the power off immediately
and remove the backup battery and AC power supply. If the unit is inoperable, then return
to the service agent for service.
lAvoid shock or impact.

LGE CDMA Fixed Wireless Telephone
LSP-300
9
lWe recommend you to charge the backup battery before initial use. Backup battery may
be discharged during delivery.
1.3 Care and Service
lUnplug the telephone from the wall outlet and remove antenna (or disconnect antenna
cable) before cleaning. Do not use liquid or aerosol cleaners. Use a damp cloth for
cleaning.
lIf the unit fails for any reason, do not attempt to disassemble; contact the telephone
service provider for assistance.
lIf any of the following conditions exist; unplug the unit at the wall plug, remove battery, and
call the service provider.
-The power supply cord is damaged or frayed.
-Liquid has been spilled into the unit.
-The unit has been exposed to rain or water.
-The unit has been dropped or damaged.
-The unit does not work normally by following the operating instructions.
LGE CDMA Fixed Wireless Telephone
LSP-300
10
2. Introduction
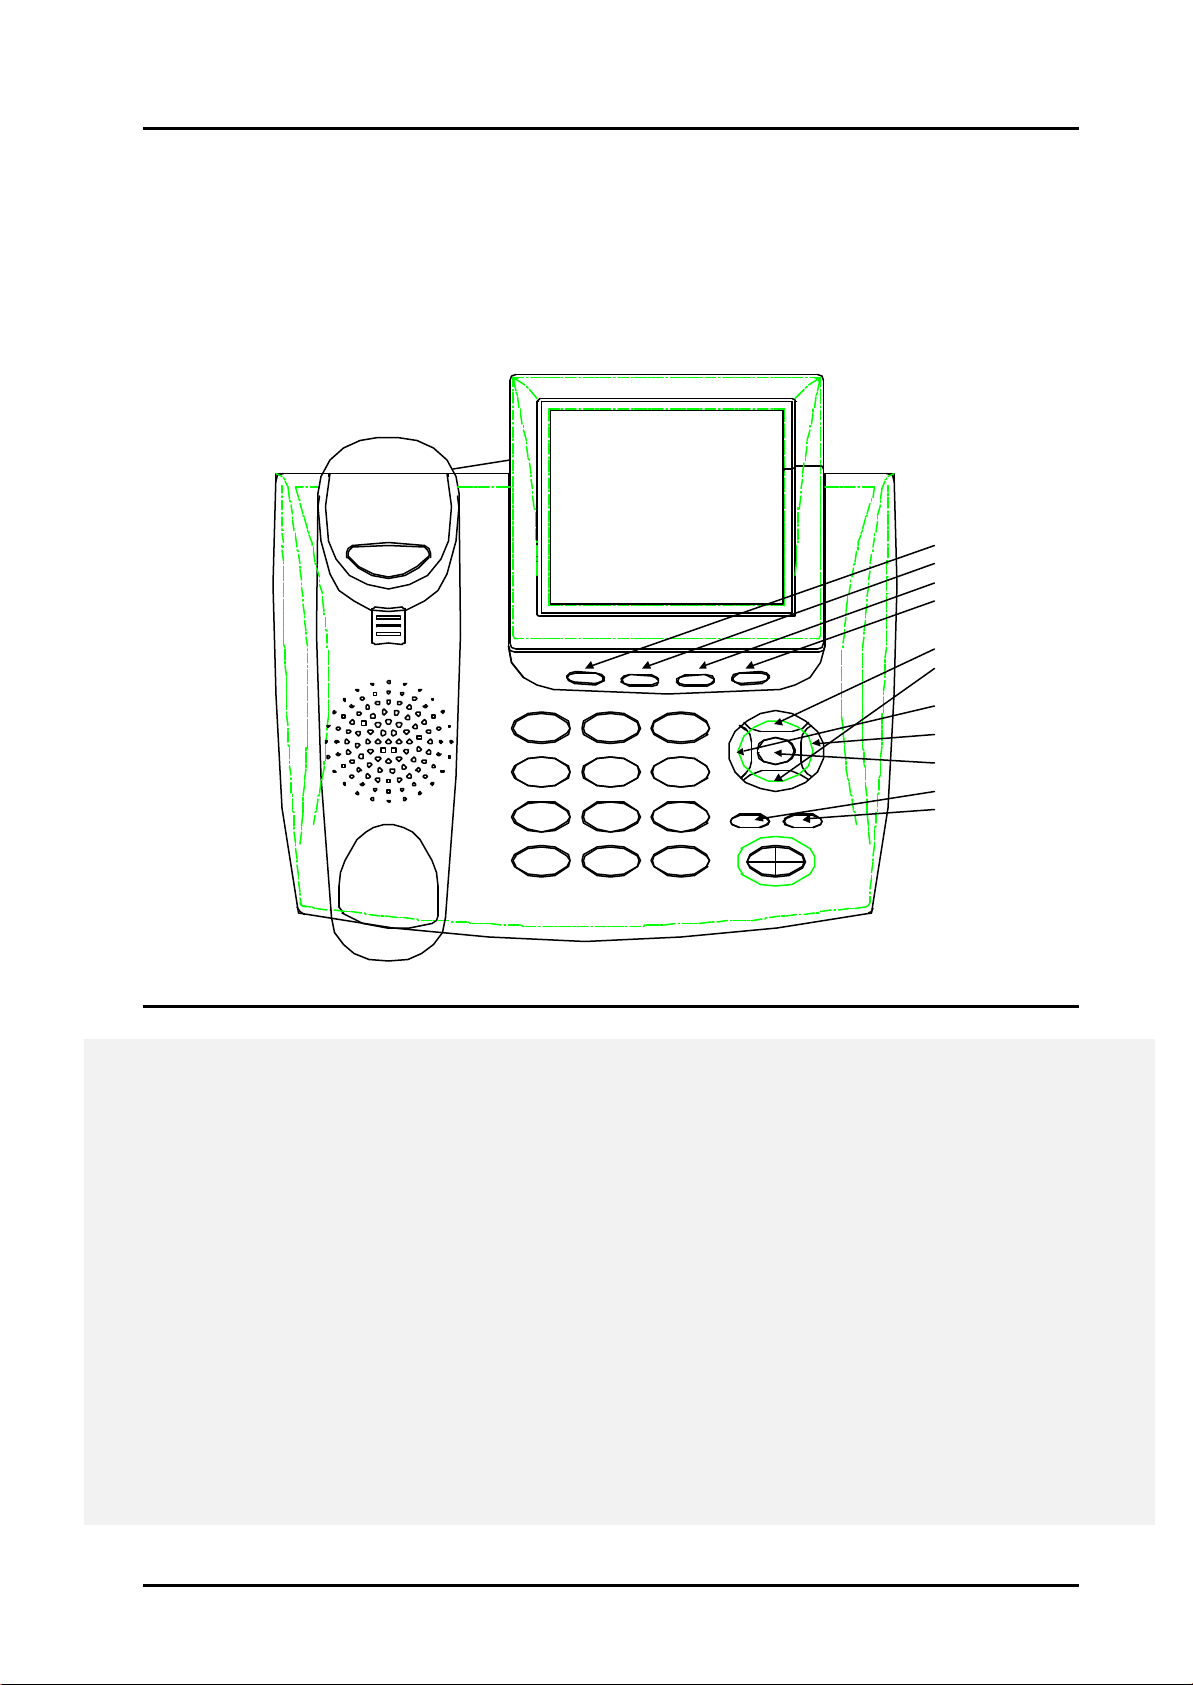
2.1 Front View of the Telephone
Menu / Softkey 1 :Activate MENU state (also MENU state in the call state)
Message :Activate SMS state
End :Deactivate a STATE –No store a value (also activate MUTE state )
Recall / Softkey 2 :Activate RECALL state / Choose NEXT state
Navigation Up (é): Shift to a upper state in the MENU state (also Function as a cursor in the EDIT state)
Navigation Down(ê): Shift to a lower state in the MENU state(also Function as a cursor th the EDIT state)
Navigation Left (ç):Volume(also Function as a cursor th the EDIT state)
Navigation Right (è):Volume(also Function as a cursor th the EDIT state)
Clear(Cancel) :Delete the last digit/dial number(also Exit without storing in the MENU state)

LGE CDMA Fixed Wireless Telephone
LSP-300
11
Flash :flash function in the call state Redial : Redial function
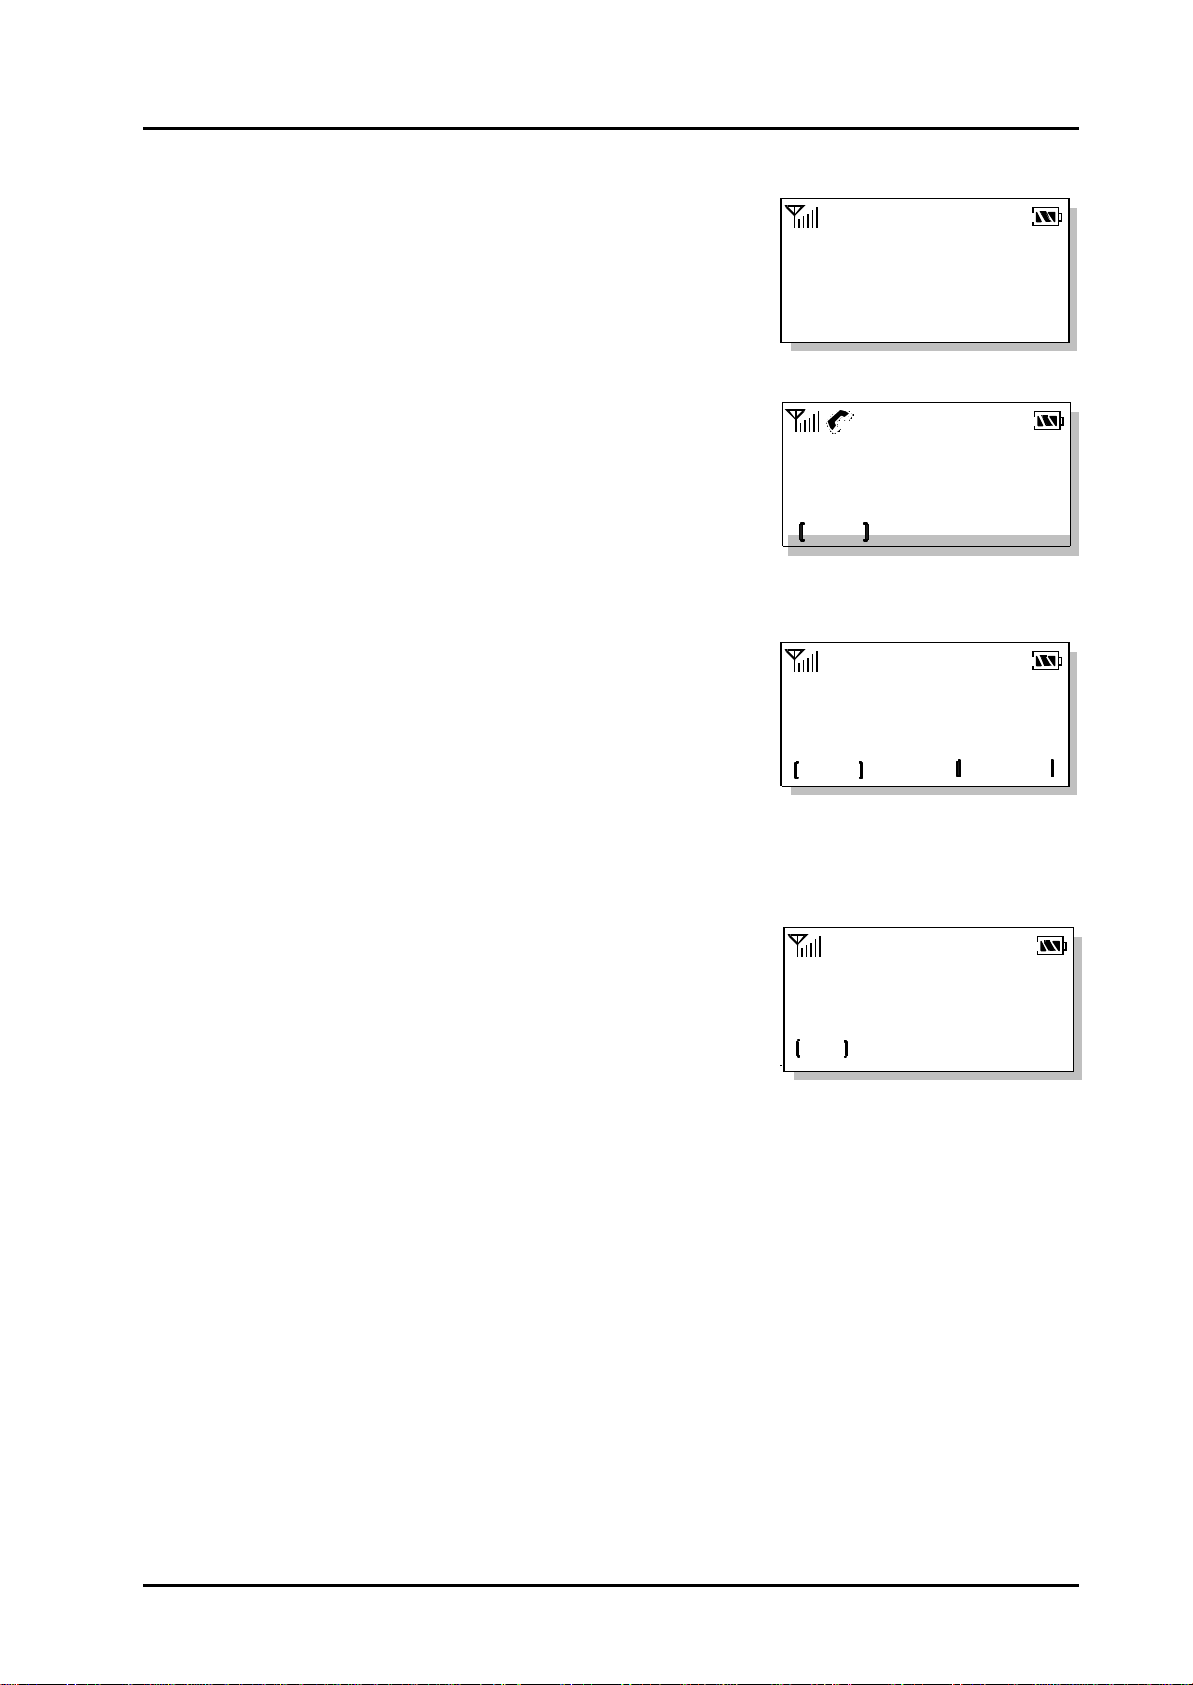
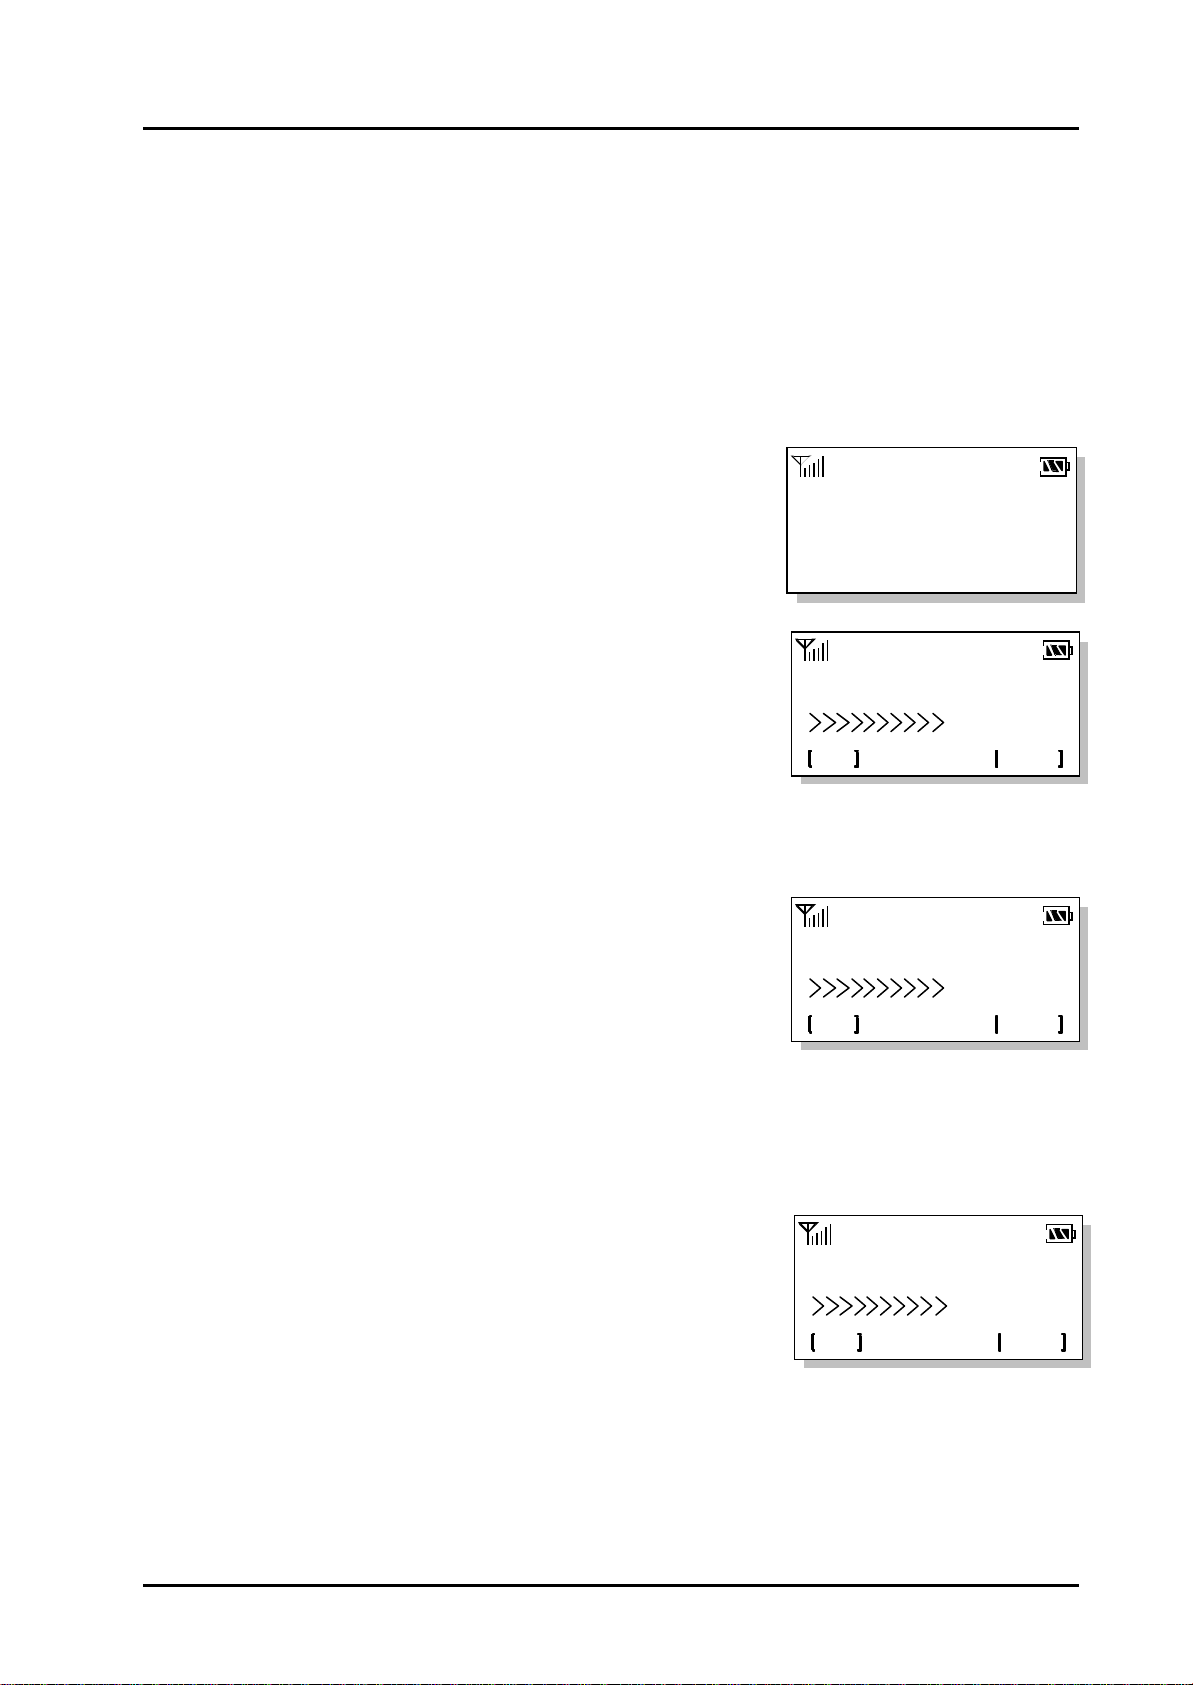
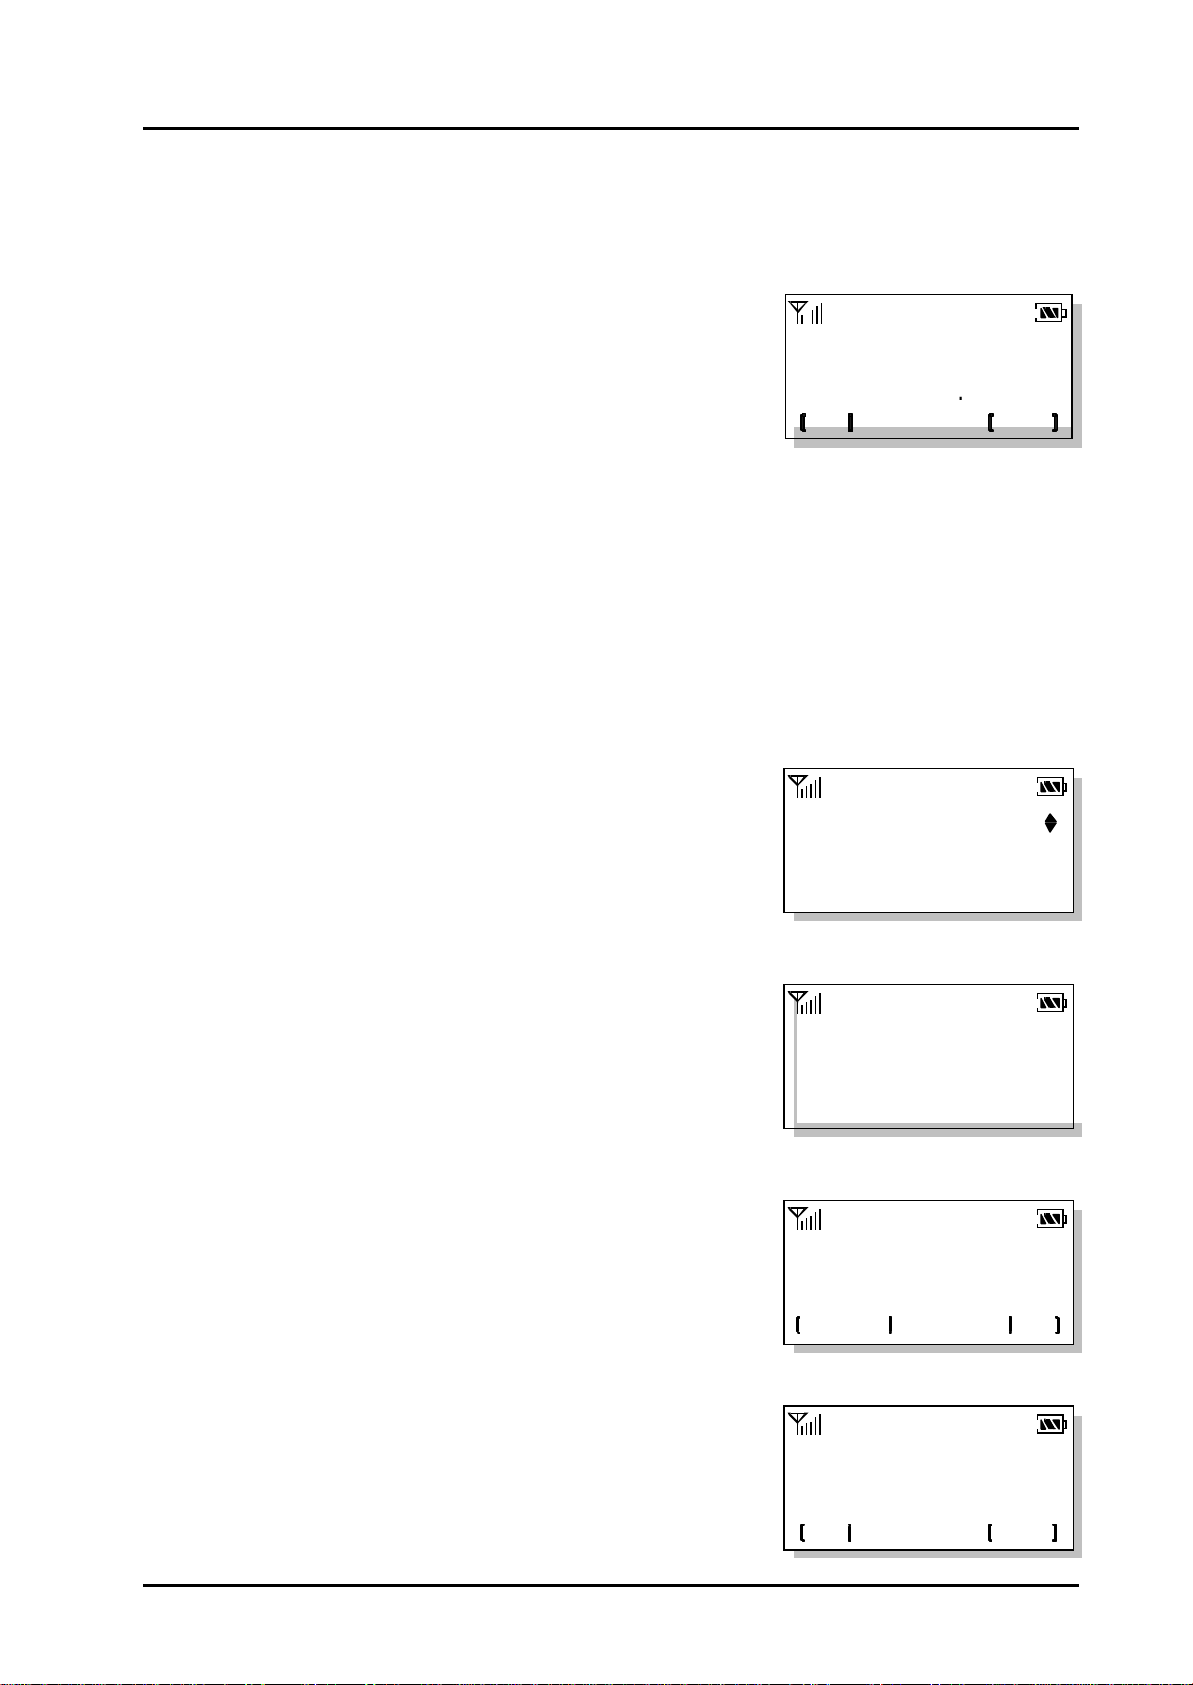
2.2 LCD Display
The LCD shows icons on the top of the LCD screen.
Different indicator appears based on the phone's operating mode.
1) RSSI indicator : Indicates the signal strength in the service area.
2) No service : The phone is not receiving system signal.
3) In use : Displayed when call is in progress or the phone is in off-hook and dial tone
heard.
: No service : In use
4) Text message : Displayed when a text message is received.
5) Voice message : Displayed when a voice message is received.
6) Alarm : Displayed when wake up alarm time was setting.
7) Caller ID : Displayed when caller ID is received.
8) OUT : Going out.
9) Battery charge level : Indicates charged battery level.

LGE CDMA Fixed Wireless Telephone
LSP-300
12

LGE CDMA Fixed Wireless Telephone
LSP-300
13
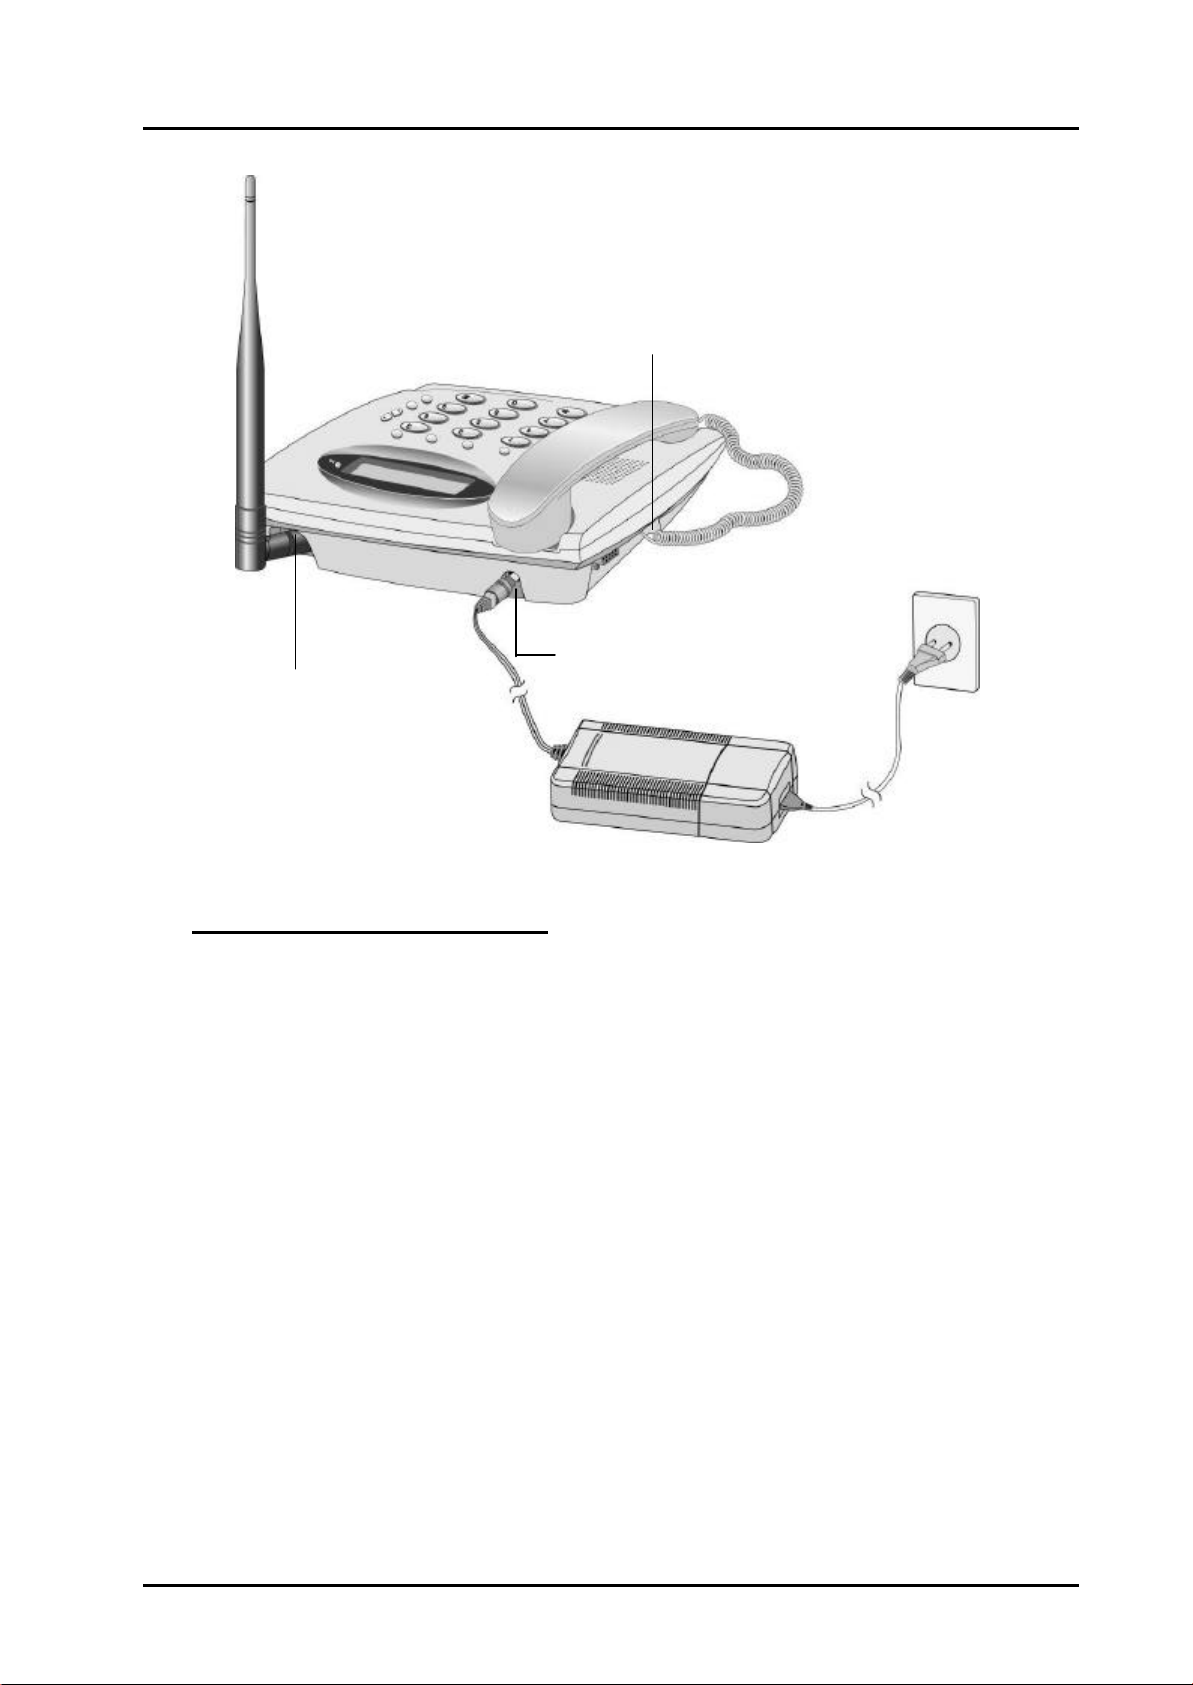
2.3 Installation
You should follow each step carefully as shown below in order to guarantee proper
operation of CDMA Fixed Wireless Telephone.
STEP I. Check Components
lFixed Wireless Terminal is supplied with the following standard unit and accessories;
1. LSP-300 Main Unit with Handset -1EA-
2. Dipole Antenna -1EA-
3. Backup Battery -1EA-
4. User Guide .-1EA-
5. AC/DC Power Adapter -1EA-
6. Power Cord(Only SMPS Adapter) -1EA-
lPlease make sure that these components are present before you begin the unit
installation. And then compare the following figures and components. If components
are missing or damage is found, contact the store where you purchased the unit
immediately.
STEP II. Place the Terminal
lPlace the terminal on the stable flat secure surface area (desk, table, etc.). Serious
damage may result if the unit falls. Do not place the unit on, or within 1 meter of
heaters or radiators. This unit is designed for desktop usage. Avoid direct exposure to
the sun lights and damp area.
lRead the SAFETY INFORMATION located at the first part of this document before you
place the terminal
STEP III. Connect Components (See the figures in “Installation Steps”.)
lConnect the antenna to the TNC antenna connector located at the top side of the
terminal. If you placed the terminal on the flat surface, bend the antenna up right.
lConnect curl cord of handset assembly to the RJ-11C port located at the left side of the
terminal.
lOpen the battery case, securely connect the battery cord, place the backup battery
pack and close the case.
lConnect the AC/DC Adapter cable to the DC input port located at the topside of the
terminal.
-. If it is good, beep tone is heard.
-. If it is not good(Booting is fail or beep tone is not heard), you have to connect the
adapter or backup battery, again.
lPlease follow the below to get better voice quality;
1. Keep away from electrical appliances such as TV, computer, radio and so on.
2. Keep terminal in a high and central location with no obstructions, such as metal
walls.
3. Raise the integral antenna of terminal to get maximum strength of receive signal
as shown figure at the next page.
LGE CDMA Fixed Wireless Telephone
LSP-300
14
STEP IV. Check the LCD Display
lAfter you follow the installation instruction step Ito step III, please check the LCD for
normal operation.
lIf you may not see status of service, please repeat the 5th instruction of step III. And
conform Fixed Wireless Telephone to get the proper signal strength from service
operator system.
The adapter type(with power cord) may be different by country adaptation.
Antenna TNC
Connector
AC Power Supply
Connector
Handset Connector

LGE CDMA Fixed Wireless Telephone
LSP-300
15
2.4 Installation Steps
Please follow the below procedure to install the unit properly.
Connect Base-
handset to the
handset connector.
Connect the
antenna to the
TNC connector
(Turn right).
Bend the antenna
up right.
Open the
battery cover
at the bottom
of the unit.
Insert back-up
battery in the
bottom of the unit.
(give care to
polarity)
Connect the AC
power supply.
1
11
1
22
1
33
1
55
1
44
1
66

LGE CDMA Fixed Wireless Telephone
LSP-300
16
1234567
1234567
Calling...
Basic Operation
3.1 Making a Call
1. Pick up the handset or press button.
2. Listen for dial tone
3. Enter the phone number with area code if needed.
4. Wait for the Auto Time-out.
5. The call is connected and you can start conversation.
6. To disconnectthe call, replace the handset or press button.
3.2 Redialing Last Outgoing Number
1. Pick up the handset or press button.
2. Listen for dial tone.
3. Press Redial button. The last number that you called will be re-dialed.
lCorrecting dialing mistakes
1. Press Clear button shortly to erase the most recent digit.
2. Press and hold Clearbutton for at least one second.
lIf the phone is locked, enter the Lock Code
lIf the call did not go through, press the hook switch and dial again.
lFlashing / Hook Switch
1.
While in the middle of a call, pressing the hook switch for less than 1 second will be
treated as a flash. After 1 second, the call will be terminated.
2. Very briefly pressing the hook switch will be ignored.
lBattery icon is displayed only when the terminal is operating by battery without AC power.
LGE CDMA Fixed Wireless Telephone
LSP-300
17
10:51 AM
Missed 1 call
OK
Incoming Call!
10:23 AM
08 May, Sat
MENU RECALL
3.3 Receiving a Call
1. When bell rings, pick up the handset.
2. Start conversation.
3. To disconnectthe call, replace the handset.
3.4 Signal Strength
The quality of calls depends on the signal strength in your
area. The stronger the signal, the better the call quality.
The signal strength icon indicates the current strength as a
number of bars. You can see the antenna and bars
according to the strength of received signal in the upper-
left part.
3.5 Missed Call Message
If a call is received and not answered for user’s absence,
You are informed that you have missed a call. The latest
missed call time and number of missed call is displayed.
Press [OK] to erase “Missed call” message.
Time: 0:23
MENU [MUTE]
LGE CDMA Fixed Wireless Telephone
LSP-300
18
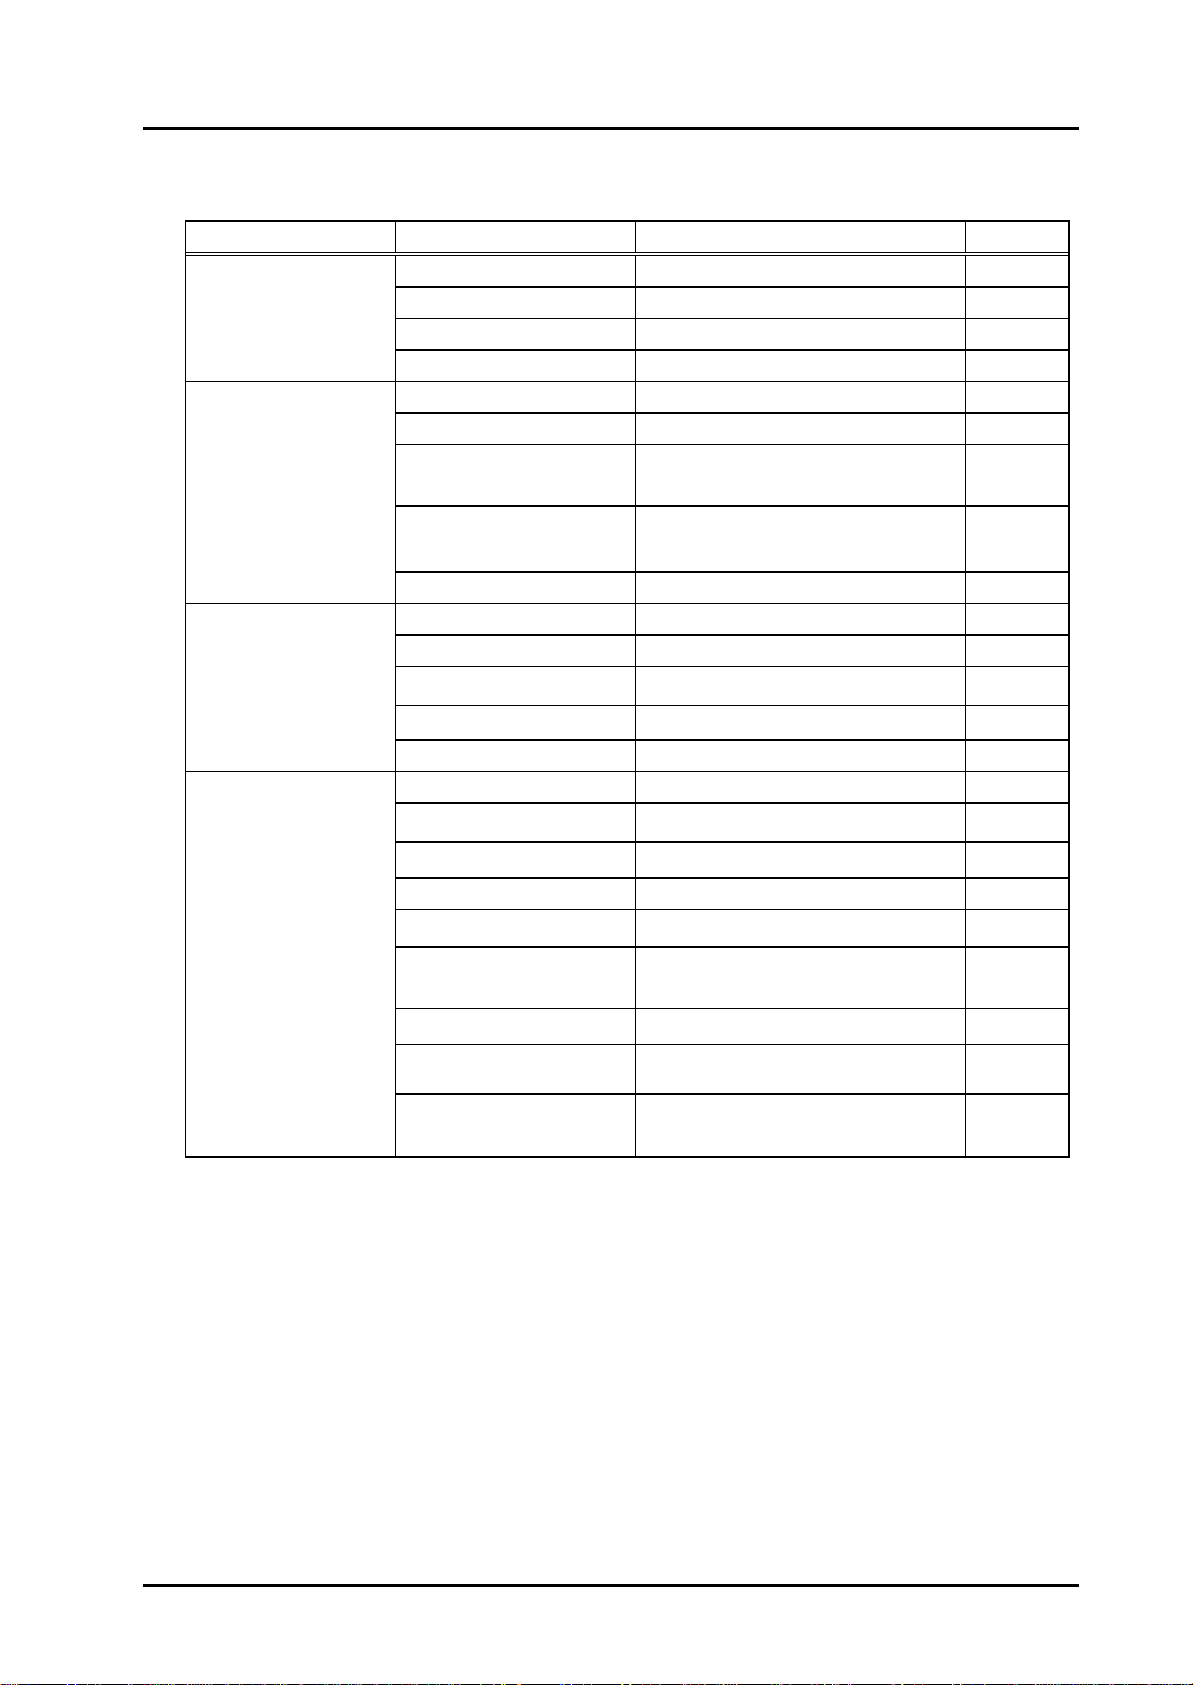
List of Menu State
Main Menu Sub-Menu Setting Value Default
1. Ring Volume 4 steps
2. Key Volume 4 steps +silent
3. Ear Volume 4 steps
1. Select Volume
4. Ring Select-10 types
1. Wake-up time Off/Once/Always
2 .Minute alert Enable/Disable
3.Rx call mode Voice / Fax for next / Always Fax /
Modem for next / Always modem
4.SIO baud rate 19200/38400/57600/115200
/230400
2. Additional
5.Own Number Display own number
1. Hot Line Off/On
2. Hot Line Time 2-9 Sec.
3. Auto time-out 2-9 Sec.
4. Speed Dialing Enable/Disable
3. Dialing features
5. Key tone length normal/Long
1. Set Lock mode Never/on power up/Always
2. Clear calls Enable/Disable
3. Clear memory No/Yes
4. Emergency call Local(3.ea)
5. Restrict call
5.1 restrict set No restriction/restriction
/emergency only
5.2 permit memory Local(10.ea)
5.3 Deny memory Local(10.ea)
6. new code Create new lock code
4. Security
LGE CDMA Fixed Wireless Telephone
LSP-300
19
MAIN MENU
2:Additional
1:Volume / Ring
RING VOLUME
OK NEXT
KEY VOLUME
NEXTOK
U
EAR VOLUME
NEXTOK
4.1 Select Volume
This menu allows you to adjust the various different volumes.
4.1.1 Ring Volume
The received tone when you receive a call can be adjusted.
lFrom the MENU
1. Press [MENU] + 1(Volume/Ring)+ 1(Ring Volume) in on-hook state.
2. Press Volume button or [NEXT] to adjust ring volume.
3. Press [OK]
lBy the Volume button
1. Press Volume button to adjust ring volume in on-hook
state
4.1.2 Key Volume
The tone when you press a key can be adjusted.
1. Press [MENU] + 1(Volume/Ring) + 2(Key Volume) in
on-hook state.
2. Press Volume button or [NEXT] to adjust key volume.
3. Press [OK]
4.1.3 Ear Volume
The voice of the other party can be adjusted in on-hook state.
1. Press [MENU] + 1(Volume/Ring) + 3(Ear Volume) in
on-hook state.
2. Press Volume button or [NEXT] to adjust ear piece
volume
3. Press [OK]
üPress Volume button to adjust volume during conversation
LGE CDMA Fixed Wireless Telephone
LSP-300
20
MAIN MENU
Alarm Time
Always
[OK] [NEXT]
Wake-up Time
_1:23 AM
OKAM/PM
MINUTE ALERT
NEXTOK
On
4.1.4 Ring Select
You can select the various ring types
1. Press [MENU] + 1(Volume/Ring) + 4(Ring Type)
in on-hook state.
2. Select a desired ring type with Volume button or
[NEXT].
üThere are 10 different ring types.
üThose are Standard,Option 1,Option 2, Option 3, Option 4, Habanera, Deutsch
song, La Primavera, Oh! susanna, Beethoven
3. Press [OK] to save and exit.
4.2 Additional feature
4.2.1 Wake-up Time
This function allows you to adjust Wake-up Time.
1.Press [MENU] + 2(ADDITIONAL) + 1(Wake-up Time)
In on –hook State
2.Select Off, Once or Always by [NEXT] and press [OK].
3.Press [EDIT] and set the time.
4.Select A.M. or P.M. by [AM/PM].
5.If you want to modify the wrong time, press Clear button
and set again.
6.Press [OK] to save and exit
4.2.2 Minute Alert
Alerts you every minute during a call.
1. Press [MENU] + 2(ADDITIONAL) + 2(Minute Alert)
In on –hook State
RINGER TYPE
NEXTOK
Standar
d
1:VOLUME/RING
2.ADDITIONAL

LGE CDMA Fixed Wireless Telephone
LSP-300
21
DATA BAUDRATE
NEXTOK
19200
OWN NUMBER
OK
000-000-0000
DIAL FEATURES
2:Hot Line Time
1:Hot Line
Hot Line
NEXT
OK On
RX CALL MODE
NEXTOK
voice
2. Select On or Off by [NEXT] or Volume button.
3. Press [OK] to save and exit
4.2.3 Rx call mode
.
1. Press [MENU] + 2(ADDITIONAL) + 3(RX Call Mode)
in on –hook State.
2. Select Voice, Fax for next, Always Fax, Modem for
next by Volume or [NEXT] button.
3. Press [OK] to save and exit.
4.2.4 SIO baud rate
1. Press [MENU] + 2(ADDITIONALl) + 4(SIO Baud Rate)
in on –hook State.
2. Select 19200, 38400, 57600, 115200, 230400 by
Volume or [NEXT] button
3. Press [OK] to save and exit
4.2.5 own number
1. Press [MENU] + 2(ADDITIONAL) + 5(Own Number)
in on –hook Sate.
2. Press [OK] to exit
4.3 Dial features
4.3.1 Hot Line
1. Press [MENU] + 3(DIAL FEATURES) + 1(Hot Line)
In on –hook State.
2. Select Onor Off by [NEXT] or Volume button and
press [OK] to select.
Table of contents
Other Starcomms Telephone manuals


 quick start guide")


